Huawei Storage and Veeam Backup and Replication v12
| Interoperability Test Report |
Axians Global
All Rights Reserved
1 Executive Summary
Axians Global (“Axians”) assessed the interoperability of Veeam backup and replication version 12 software with Huawei storage solutions including OceanStor Dorado V6, OceanStor Pacific and OceanProtect. The goal of the assessment is to validate that Veeam v12 is interoperable with Huawei storage.
In the assessment, Axians has determined that Veeam 12 backup and restore jobs will function with Huawei storage for the following scenarios :
| Test Scenario | System Involved | Result |
| OceanStor Dorado All-Flash Storage | Backup Source – SAN (VMware) | Passed |
| OceanProtect Backup Storage | Backup Target – NAS | Passed |
| OceanStor Pacific Series | Backup Target – NAS | Passed |
| OceanStor Pacific Series | Backup Target – S3 Object Store | Passed |
In this document, you will find details on the above test cases and the captured output. The procedures conducted in the tests are referenced from standard online documentation from Veeam and Huawei.
Some new features introduced in Veeam 12 will be highlighted in this report, including:
- Direct backup to S3 target
- Move backup between repositories of different type of storage
We also confirmed that the performance of OceanStor Pacific S3 storage is comparable with NAS targets served from the same storage system.
2 Environment Configuration
2.1 Networking diagram
Figure 1.1 Huawei OceanStor Function Compatibility Test Networking
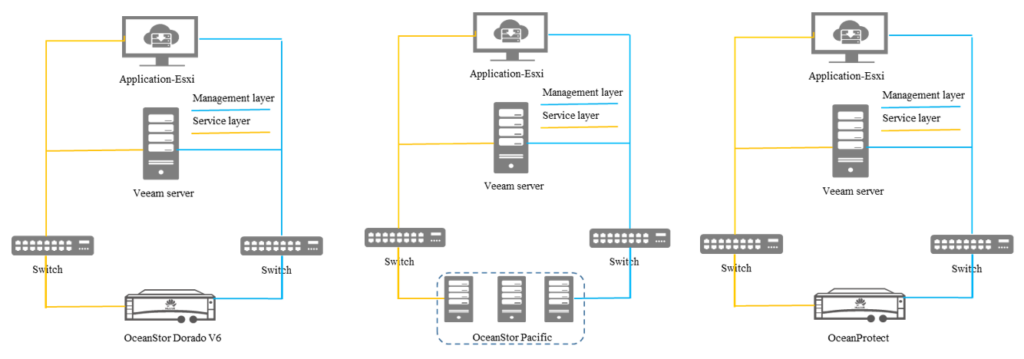
Note: This networking diagram is for reference only. For details about the connections between OceanStor Dorado V6 controller enclosures and application servers, between controller enclosures and disk enclosures, and between controller enclosures, see the OceanStor Dorado V6 product documentation.
Networking description:
- Deployment at the production end:
1) Deploy one ESXi physical host, install the VMware VM software, create a VM, and preconfigured production data as the production end for VM backup.
(2) The management network and service network are connected to the Veeam backup software and OceanStor Dorado V6 storage through switches.
- Deploy the Veeam backup software: Use one Windows server VM as the Veeam server and proxy.
- All storage devices connect to the Veeam backup server via 10g ethernet.
2.2 Hardware and software configuration
2.2.1 Storage Configuration
Table 1-1 Huawei storage configuration table
| Name | Model & software version | Quantity |
| OceanStor Dorado All-Flash Storage | Dorado 8000 V6, version 6.1.5 | 1 |
| OceanStor Pacific Series | Pacific 9950, version 8.1.2 | 1 |
| OceanProtect Backup Storage | OceanProtect X8000/X9000, version 1.1.0 | 1 |
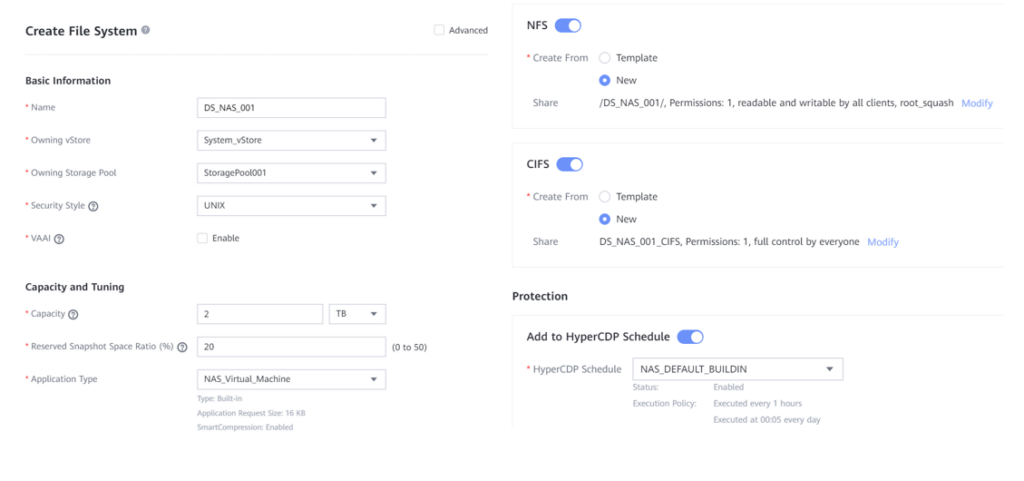
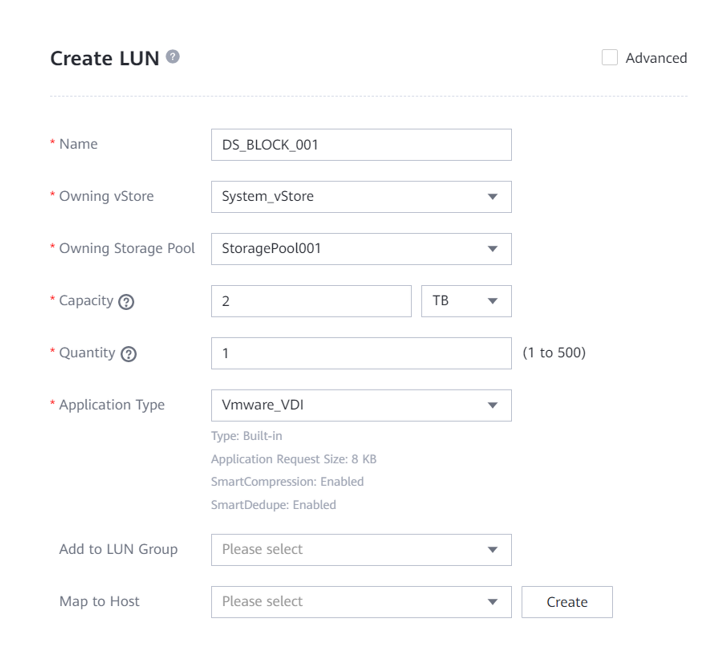
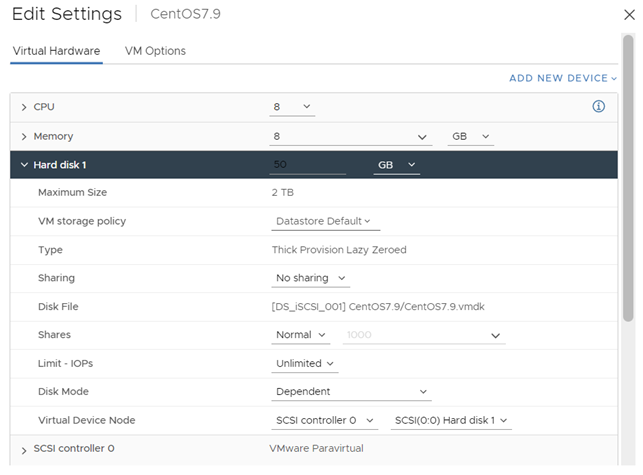
iSCSI volumes and NAS volumes were configured on OceanStor devices to serve as datastore for vSphere cluster used in the test. Test VMs below were using a mix of both to demonstrate that OceanStor backed VMs works well with Veeam software.
Volumes are protected with automatic hourly or daily snapshot:
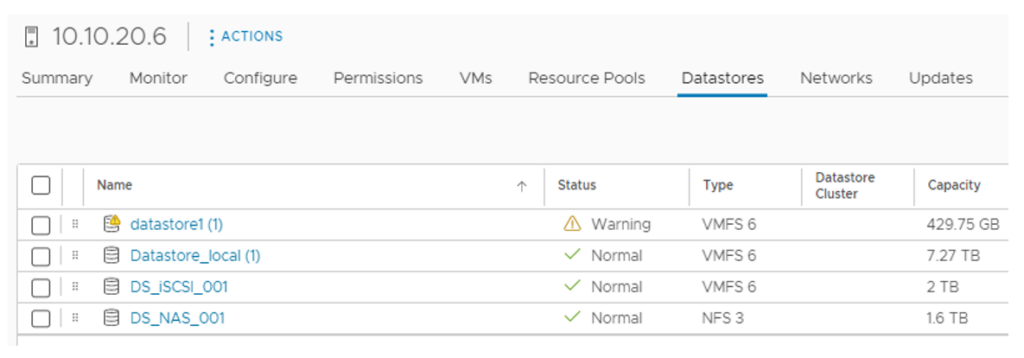
Datastore example on VMware host:
2.2.2 Other Hardware Configuration
Table 1-2 Hardware Configuration
| Name | description | Quantity | Usage |
| VMWare ESXi Server | x86 server CPU:2* Gold 6130Memory: 256 GBNetwork: 4 x 10GE optical ports | 1 | VMWare VM Backup and Restoration |
| Veeam Backup server | x86 server CPU: 4* vCore (Gold 6130)Memory: 16 GBPrimary storage disk: 2 x 3.84 TB SSDNetwork: 10GE vNIC | 1 | Deploys backup software to schedule backup tasks and transfer backup data. |
| Ethernet switch | Huawei 6855 10GE Network Switch | 2 | 10GE network switch on the OceanProtect and OceanStor Dorado backup service plane |
2.2.3 Test software and tools
Table 1-3 Test Software and Tool List
| Software Name | description | Quantity |
| Veeam Backup & Recovery 12 | Version 12 enterprise plus edition | 1 |
| VMWare ESXi 7.0u3 | VMware virtualization platform | 1 |
| Windows Server 2022 | Installing Windows Hosts | 1 |
3 OceanStor Dorado SAN backup source Interconnection with Veeam
3.1 Add SAN backed VM inventory and configure backup tasks
| Test Purpose | Dorado SAN volume datastore backed VMs can work with Veeam Virtual Infrastructure inventory properly, and backup tasks can be configured for these VMs. |
| Test Networking | Huawei OceanStor Function Compatibility Test Networking |
| Prerequisites | iSCSI datastore has been configured on the ESXi.Some VMs are running on the iSCSI datastore. |
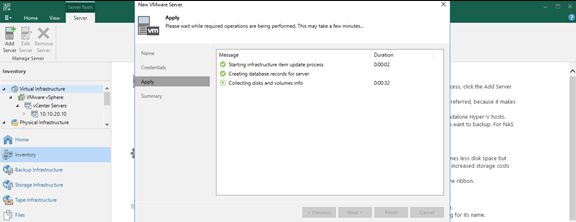
| Test Procedure | Add the vCenter to Veeam 12 under “Inventory -> Virtual Infrastructure -> VMware vSphere”.All VMs including ones running on iSCSI datastore are recognized. |
| Expected Result | No error message should occur. |
| Test Result | Passed |
3.2 Full VM backup
| Test Purpose | Full VM backup |
| Test Networking | Huawei OceanStor Function Compatibility Test Networking |
| Prerequisites | Storage devices, backup servers, and deployment and networking have been completed.Backup task has been configured for each type of external storage.No backup operation was previously performed. |
| Test Procedure | Right-click the backup task and choose “start” from menu.Check the task completion status and statistics. |
| Expected Result | The task status window title bar should show backup type “full”. All backups should complete successfully, data copy speed should be reasonable. |
| Test Result | Passed |
3.3 Incremental VM backup
| Test Purpose | Incremental VM backup |
| Test Networking | Huawei OceanStor Function Compatibility Test Networking |
| Preset Condition | A full backup operation was already completed. |
| Test Procedure | Right-click the backup task and choose “start” from menu. Check the task completion status and statistics. |
| Expected Result | Incremental backup is started using exact same procedure as full backup, when there was a full backup, Veeam should automatically perform incremental backup, and should show that on the task status window title bar. The task complete successfully, with reasonable performance. |
| Test Result | Passed |
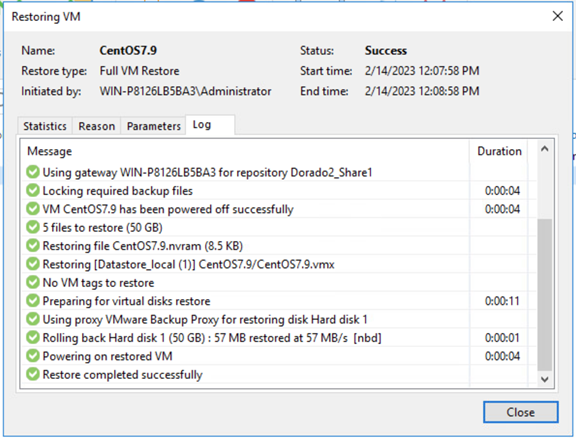
3.4 Full VM restore
| Test Purpose | Restoring the VM |
| Test Networking | Huawei OceanStor Function Compatibility Test Networking |
| Prerequisites | Backup is available for the target VM, with at least one valid restore point. |
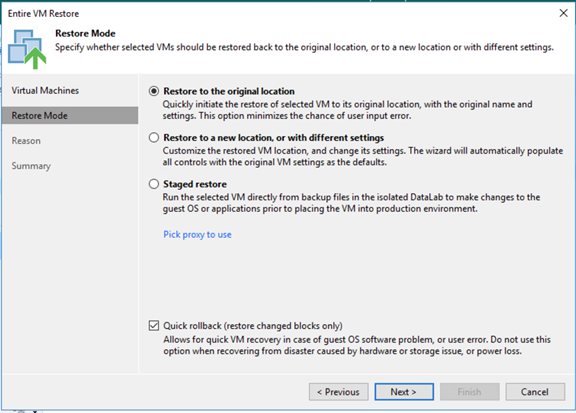
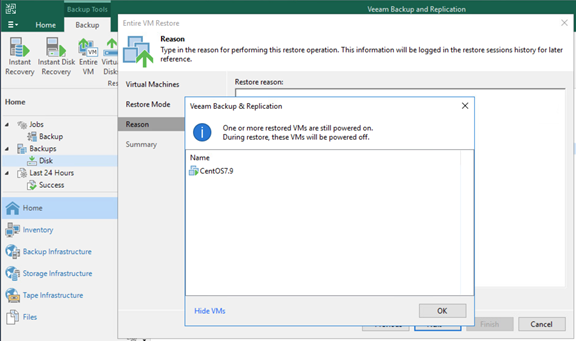
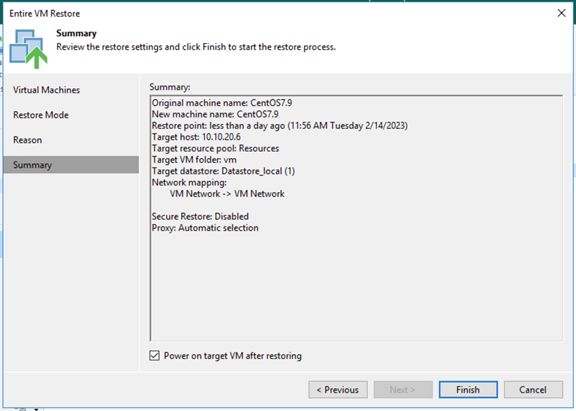
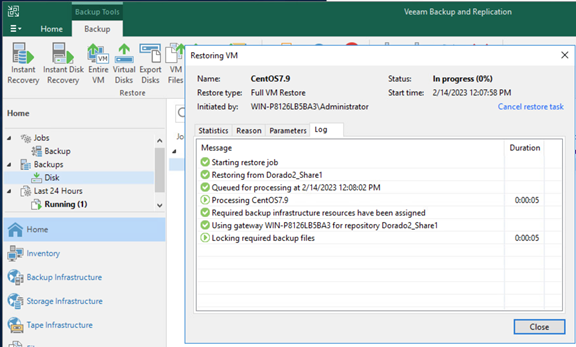
| Test Procedure | Choose VM Recovery from the main menu. Select Entire VM restore. Select the restore point from the backup. Select revert to new location. Perform recovery and observe. |
| Expected Result | The backed up can be identified and displayed properly. The restoration is successful and the VM is started. Previously changed files are restore. |
| Test Result | Passed |
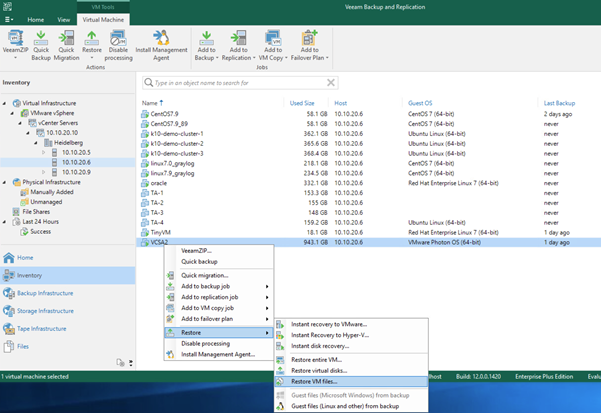
3.5 Restoring Specified VM Files
| Test Purpose | Restoring Specified VM Files |
| Test Networking | Huawei OceanStor Function Compatibility Test Networking |
| Prerequisites | Backup is available for the target VM, with at least one valid restore point. |
| Test Procedure | 1. Choose VM recovery from the main menu. 2. Select guest files restore. 3. Select the VM type and backup set. 4. In the displayed dialog box, select the file to be restored. 5. Enter VM login credentials. 6. Perform restoration and observe the file restoration. |
| Expected Result | In step 3, the backup set is displayed properly. In step 4, the file is correctly identified and displayed. In step 6, the file is successfully restored, and the data is consistent. |
| Test Result | Passed |
4 OceanProtect NAS backup target Interconnection with Veeam
4.1 Configure backup repository and backup tasks
| Test Purpose | Add NAS shares to the backup server as the backup media. |
| Test Networking | Huawei OceanProtect Function Compatibility Test Networking |
| Prerequisites | 1. Storage devices, backup servers, and deployment and networking have been completed. 2. NAS share volumes has been created on OceanProtect devices. |
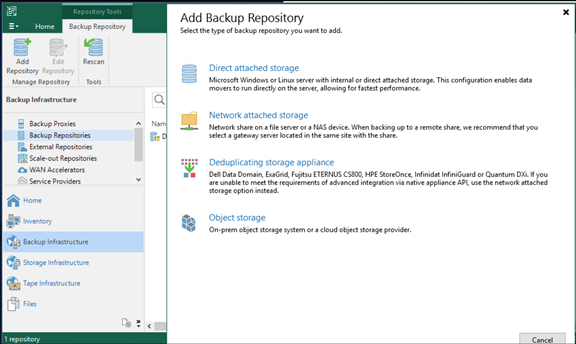
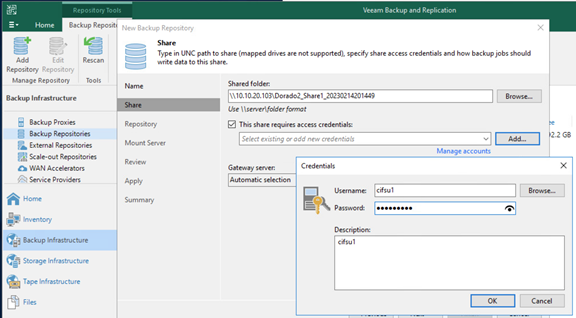
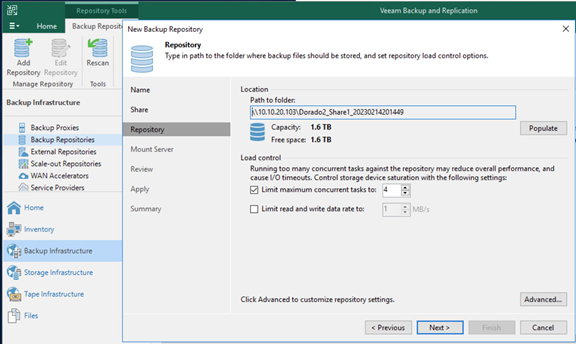
| Test Procedure | 1. Select BACKUP INFRASTRUCTURE on the backup server. 2. Add Network attached storage and select SMB share or NFS share. 3. Enter the name, SMB shared directory, account password, or NFS path. 4. Complete the configuration and set the permission to Allow to everyone. |
| Expected Result | 1. In step 3, the backup media is successfully added. 2. In step 4, the shared path and capacity are displayed properly. |
| Test Result | Passed (Test Output – Section 6.1.1) |
4.2 Full VM backup
| Test Purpose | Full VM backup |
| Test Networking | Huawei OceanProtect Function Compatibility Test Networking |
| Prerequisites | 1. Storage devices, backup servers, and deployment and networking have been completed. 2. NAS services (including file systems, shares, and authentication account passwords) have been configured on the storage device. 3. The backup media is configured. 4. The backup task is successfully set. |
| Test Procedure | 1. Right-click the backup task and choose Active full to perform full backup. 2. Viewing Task Completion Status |
| Expected Results | 1. The full backup is successfully executed, and no error is reported. 2. The task is displayed as Full. |
| Test Result | Passed (Test Output – Section 6.1.5) |
4.3 Incremental VM backup
| Test Purpose | Incremental VM backup |
| Test Networking | Huawei OceanProtect Function Compatibility Test Networking |
| Prerequisites | A full backup has completed successfully for the selected VM. |
| Test Procedure | Right-click the backup task to start the backup task. Check backup type and monitor task progress. |
| Expected Results | The incremental operation is successful and no error is reported. The task is displayed as (incremental). |
| Test Result | Passed (Test Output – Section 6.1.6) |
4.4 Restoring the VM
| Test Purpose | Restoring the VM |
| Test Networking | Huawei OceanProtect Function Compatibility Test Networking |
| Prerequisites | 1. Storage devices, backup servers, and deployment and networking have been completed. 2. NAS-related services (including file systems, sharing, and authentication account passwords) have been configured on the storage device. 3. The backup media is configured. 4. Full backup or incremental backup has been completed. |
| Test Procedure | 1. Choose VM Recovery from the main menu. 2. Select Entire VM restore. 3. Select the VM to be restored from the backup set. 4. Select Revert to New Location. 5. Perform recovery and observe. |
| Expected Results | 1. The backed up VMs can be identified and displayed properly. 2. In step 5, the restoration is successful, and the VM is started and used properly. |
| Test Result | Passed (Test Output – Section 6.1.9) |
4.5 Restoring Specified VM Files
| Test Purpose | Restoring Specified VM Files |
| Test Networking | Huawei OceanProtect Function Compatibility Test Networking |
| Prerequisites | 1. Storage devices, backup servers, and deployment and networking have been completed. 2. NAS-related services (including file systems, sharing, and authentication account passwords) have been configured on the storage device. 3. The backup media has been configured. 4. Back up the test data files stored on the VM. 5. Full backup or incremental backup has been completed. |
| Test Procedure | 1. Choose VM Recovery from the main menu. 2. Select Guest files restore. 3. Select the VM type and backup set. 4. In the displayed dialog box, select the file to be restored. 5. Enter the VM login credentials and perform the recovery. 6. Perform restoration and observe the file restoration. |
| Expected Results | 1. In step 3, the backup set is displayed properly. 2. In step 4, the file is correctly identified and displayed. 3. In step 6, the file is successfully restored and the data is consistent. |
| Test Result | Passed (Test Output – Section 6.1.10) |
5 OceanStor Pacific NAS backup target Interconnection with Veeam
5.1 Configure backup repository and backup tasks
| Test Purpose | Configure OceanStor Pacific NAS volume as backup repository on the Backup Server. |
| Test Networking | Huawei OceanStor Pacific Function Compatibility Test Networking |
| Prerequisites | 1. Storage devices, backup servers, and deployment and networking have been completed. 2. The storage device has been configured successfully. NAS services (including accounts, file system and service networks) |
| Test Procedure | 1. Select Backup Server Infrastructure. 2. Select NAS for Add Backup Repository. 3. Enter the IP and credential. 4. Complete the configuration |
| Expected Result | 1. In step 3, the backup media is successfully added. 2. In step 4, the directory structure is successfully identified. |
| Test Result | Passed (Test Output – Section 6.3.1) |
5.2 Full VM backup
| Test Purpose | Full VM backup |
| Test Networking | Huawei OceanStor Pacific Function Compatibility Test Networking |
| Prerequisites | 1. Storage devices, backup servers, and deployment and networking have been completed. 2. The storage device has been configured successfully. 3. The backup repository configuration has been completed. |
| Test Procedure | 1. Select a VM on the backup server. 2. Create a backup job and select Virtual Machine. 3. Enter the name, select the VM to be backed up and select the repository backed by OceanStor Pacific NAS volume. 4. Complete the configuration and start the full backup task (Active full). |
| Expected Result | 1. In step 3, the backup media can be successfully selected. 2. In step 4, the configuration is successful and the backup task is successful. No error is reported. |
| Test Results | Passed (Test Output – Section 6.3.4) |
5.3 Incremental VM backup
| Test Purpose | Incremental backup of VMs |
| Test Networking | Huawei OceanStor Pacific Function Compatibility Test Networking |
| Prerequisites | 1. A full backup was completed as described in section 5.2. |
| Test Procedure | 1. Right-click the backup task and start backup. 2. Check the task window title to make sure it is incremental backup, and monitor completion status. |
| Expected Results | 1. In step 2, the task is displayed as (incremental), and complete successfully without error. |
| Test Result | Passed (Test Output – Section 6.3.5) |
5.4 Restoring the VM
| Test Purpose | Restoring the VM |
| Test Networking | Huawei OceanStor Pacific Function Compatibility Test Networking |
| Prerequisites | 1. Storage devices, backup servers, and deployment and networking have been completed. 2. The storage device has been configured successfully.S3 related services (including accounts, access certificates, security certificates, and service networks) 3. The namespace of the S3 account has been configured on the storage device and the object protocol has been enabled. 4. The configuration has been completed. 5. Full backup in section 4.4 has been performed. |
| Test Procedure | 1. Choose VM Recovery from the main menu. 2. Choose Entire VM Restore. 3. Select the VM to be restored from the backup set. 4. Select to restore to a new location. 5. Perform recovery and observe. |
| Expected Result | 1. The backed up VM can be identified and displayed. 2. In step 5, the restoration is successful and the VM is started. |
| Test Result | Passed (Test Output – Section 6.3.6) |
6 OceanStor Pacific S3 backup target Interconnection with Veeam
6.1 Configure backup repository and backup tasks
| Test Purpose | Adding an S3 Bucket on the Backup Server |
| Test Networking | Huawei OceanStor Pacific Function Compatibility Test Networking |
| Prerequisites | 1. Storage devices, backup servers, and deployment and networking have been completed. 2. The storage device has been configured successfully. S3 related services (including accounts, access certificates, security certificates, and service networks) 3. The namespace of the S3 account has been configured on the storage device and the object protocol has been enabled. |
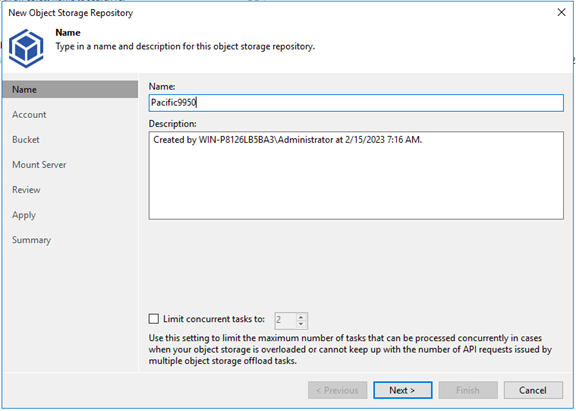
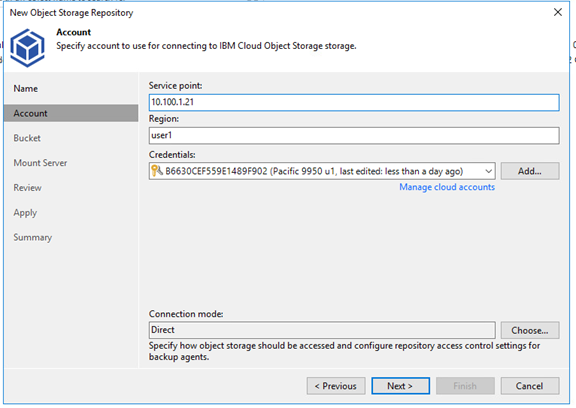
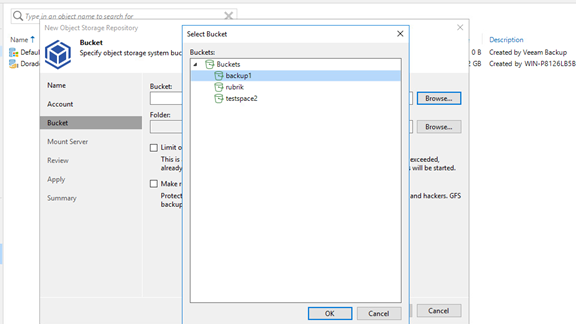
| Test Procedure | 1. Select Backup Server Infrastructure. 2. Select Object storage for Add Backup Repository and S3 Compatible. 3. Enter the name, Service point (https), region, and credential. 4. Select the created bucket and folder. 5. Complete the configuration |
| Expected Result | 1. In step 3, the backup media is successfully added. 2. In step 4, the bucket and directory are successfully identified. |
| Test Result | Passed (Test Output – Section 6.3.1) |
6.2 Full VM backup
| Test Purpose | Full VM backup |
| Test Networking | Huawei OceanStor Pacific Function Compatibility Test Networking |
| Prerequisites | 1. Storage devices, backup servers, and deployment and networking have been completed. 2. The storage device has been configured successfully. S3 related services (including accounts, access certificates, security certificates, and service networks). 3. The namespace of the S3 account has been configured on the storage device and the object protocol has been enabled. 4.The configuration has been completed. |
| Test Procedure | 1. Select on the backup server. 2. Create a backup job and select Virtual Machine. 3. Enter the name, select the VM to be backed up and select the Scale-out Repository created in 4.3 as the Storage. 4. Complete the configuration and start the full backup task (Active full). 5. After the backup is complete, check whether an Offload task synchronizes data to the S3 bucket. |
| Expected Result | 1. In step 3, the backup media is successfully added. 2. In step 4, the configuration is successful and the backup task is successful. No error is reported. 3. In step 5, the Offload task is successfully started and data synchronization is successful. |
| Test Results | Passed (Test Output – Section 6.3.4) |
6.3 Incremental VM backup
| Test Purpose | Incremental backup of VMs |
| Test Networking | Huawei OceanStor Pacific Function Compatibility Test Networking |
| Prerequisites | Full backup has been completed successfully for the selected VM. |
| Test Procedure | 1. Right-click the backup task and start backup task. 2. Check the operation type and monitor task completion status. |
| Expected Results | In step 1, the incremental operation is successful, and no error is reported. In step 2, the task is displayed as (incremental). |
| Test Result | Passed (Test Output – Section 6.3.5) |
6.4 Restoring the VM
| Test Purpose | Restoring the VM |
| Test Networking | Huawei OceanStor Pacific Function Compatibility Test Networking |
| Prerequisites | 1. Storage devices, backup servers, and deployment and networking have been completed. 2. The storage device has been configured successfully. S3 related services (including accounts, access certificates, security certificates, and service networks) 3. The namespace of the S3 account has been configured on the storage device and the object protocol has been enabled. 4. The configuration has been completed. 5. Full backup in section 4.4 has been performed. |
| Test Procedure | 1. Choose VM Recovery from the main menu. 2. Choose Entire VM Restore. 3. Select the VM to be restored from the backup set. 4. Select to restore to a new location. 5. Perform recovery and observe. |
| Expected Result | 1. The backed up VM can be identified and displayed. 3. In step 5, the restoration is successful and the VM is started. |
| Test Result | Passed (Test Output – Section 6.3.6) |
7 Verification Result
7.1 Test Environment Preparation
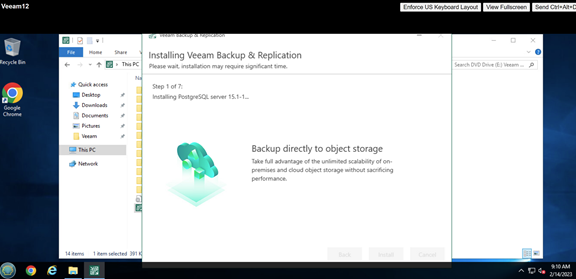
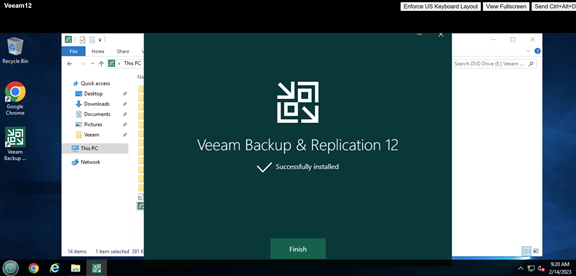
7.1.1 Installing Veeam Backup and Replication version 12
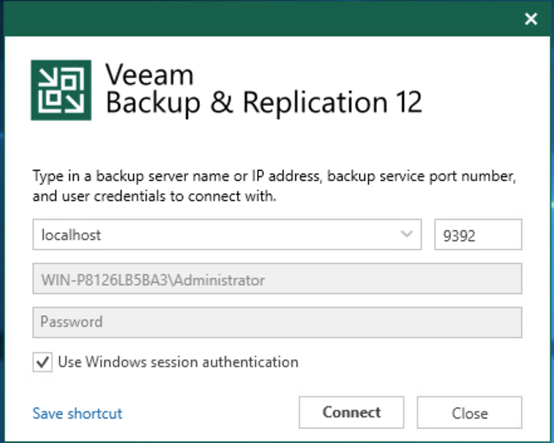
Start the client and connect to default local server:W
7.1.2 Adding VMware infrastructure
Some VMs are backed by iSCSI SAN datastore:
7.1.3 OceanStor storage device preparation
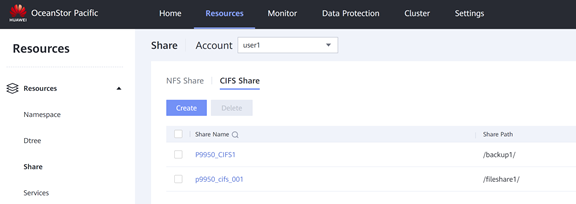
Create NAS share and S3 volumes:
On OceanStor Dorado V6:

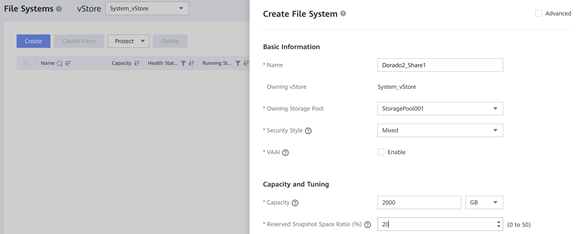
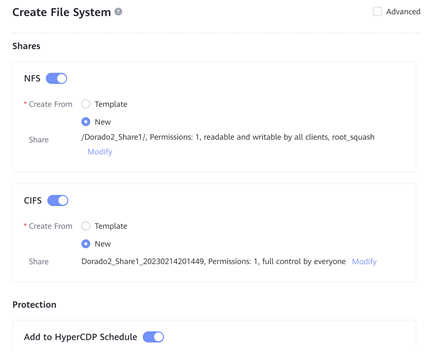
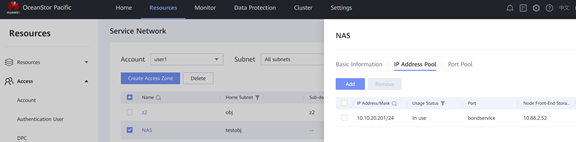
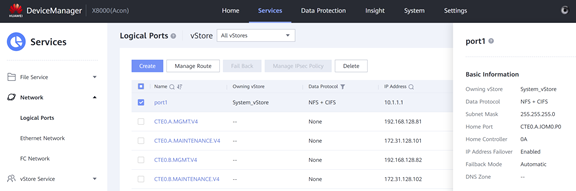
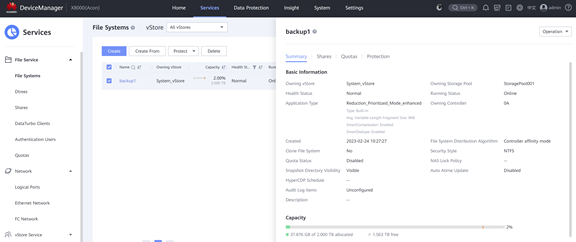
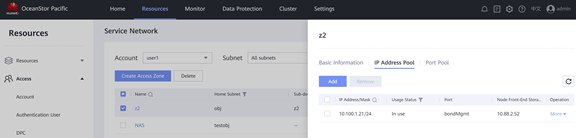
On OceanStor Pacific:

On OceanProtect:
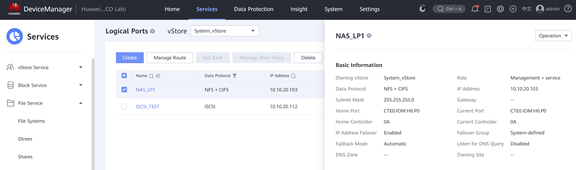
S3 service configured on OceanStor Pacific:

7.1.4 Verify storage volume access from Veeam server
Verify CIFS access from Veeam 12 server:
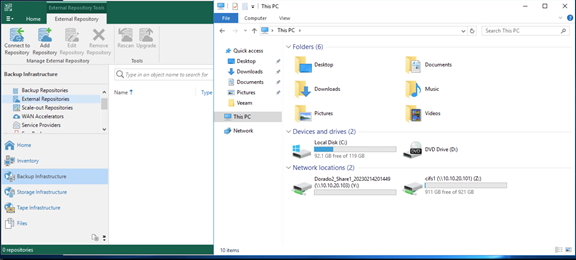
Verify NFS access from Linux host:

Verify S3 storage pre-configured on OceanStor Pacific is accessible from the Veeam server using S3 browser:
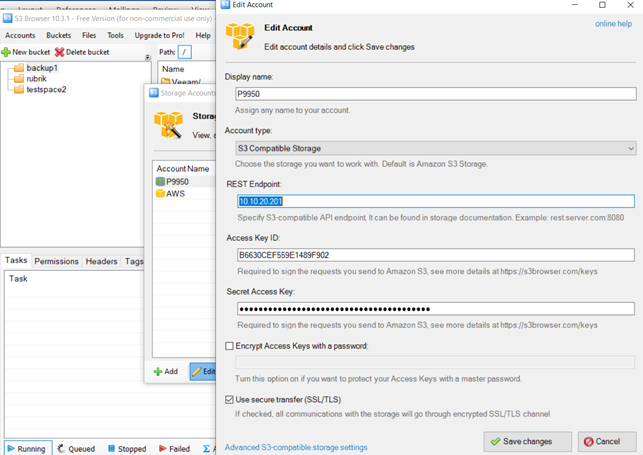
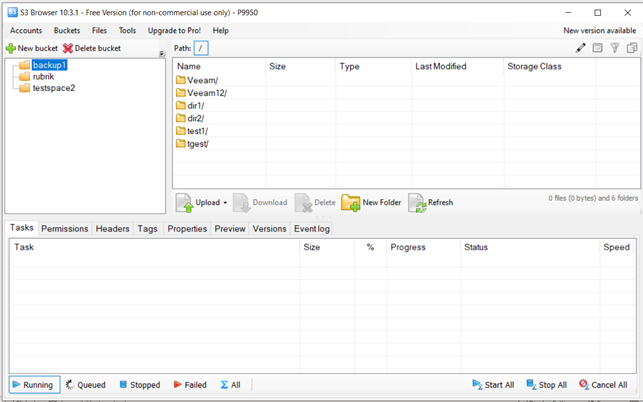
File upload / download and listing all work properly without any error message.
7.2 Veeam 12 interoperation with OceanStor Testing
7.2.1 Create backup respositories (NAS)
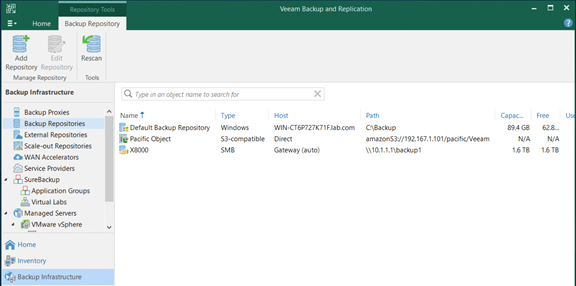
Create a backup repository using NAS volume from OceanStor Dorado V6, Pacific or OceanProtect:

Backup repository backed up by OceanProtect:
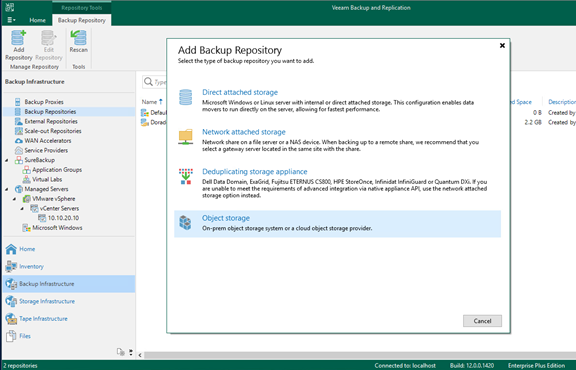
7.2.2 Create backup respositories (S3)
Create a backup repository using S3 volume from OceanStor Pacific:
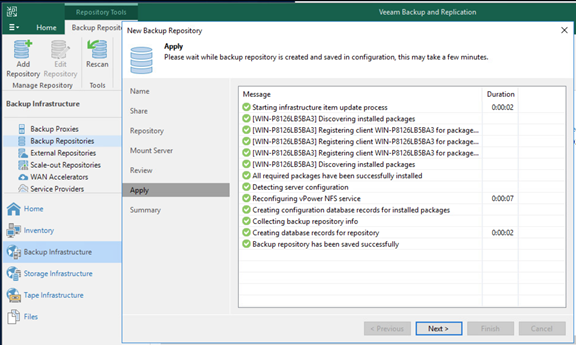
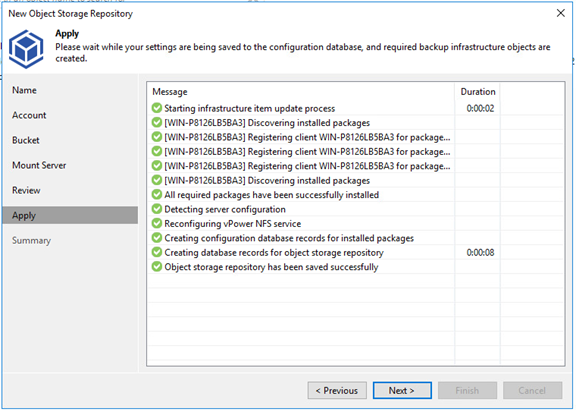
Add S3 storage as backup repo:
Choose a bucket and folder after successful connection:
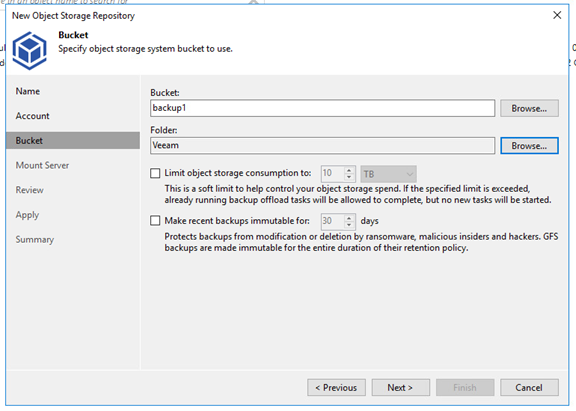
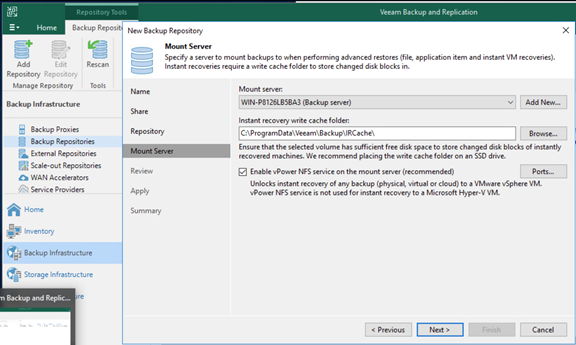
Stay with default options after the selection:
7.2.3 Create backup jobs (NAS and S3)
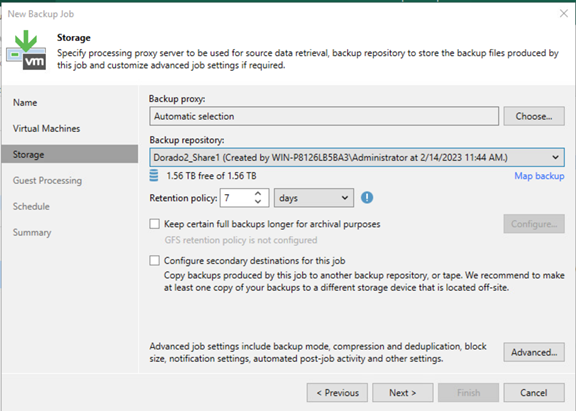
Create a backup job using repository backed by NAS volume:
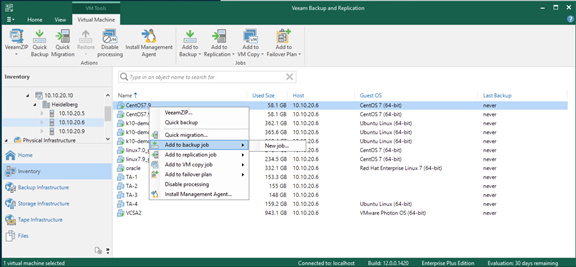
Choose the NAS repository as target:
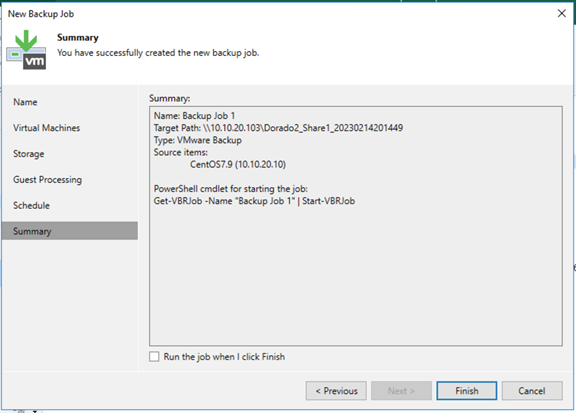
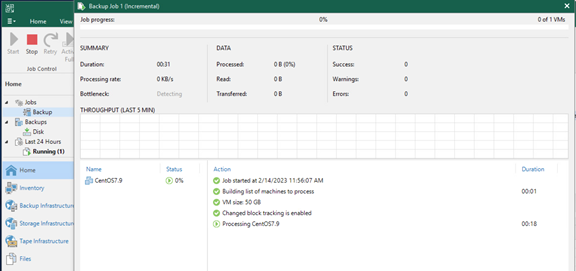
7.2.4 Perform backup jobs (full and incremental)
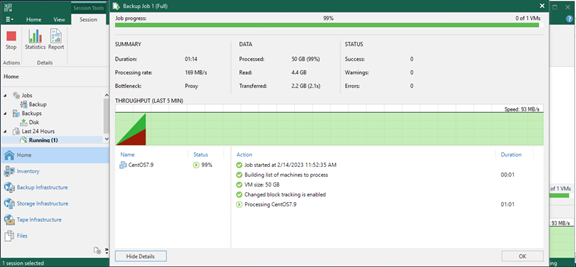
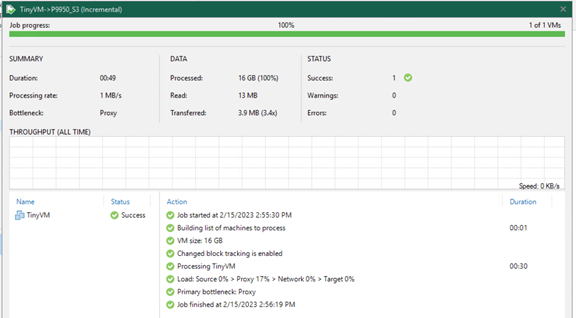
Start the job: “(Full)” backup type is displayed in window title.
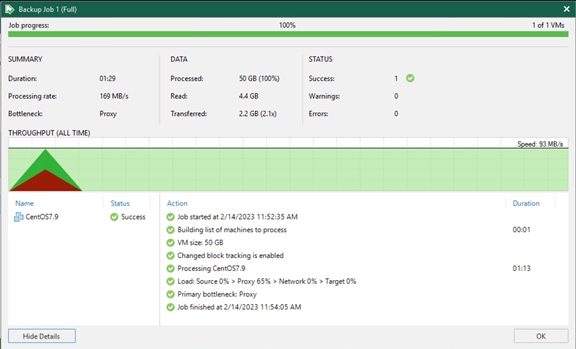
Statistics after successful completion:
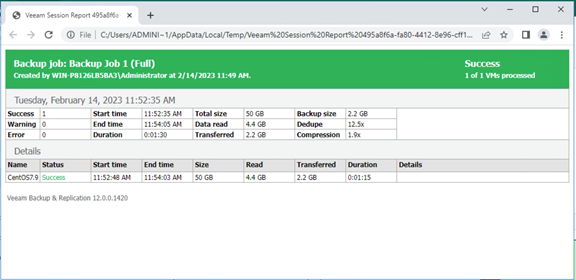
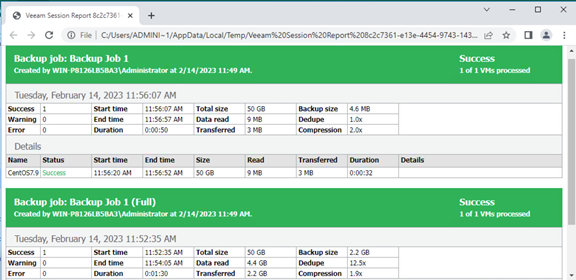
Job report:
Run the job again, this time the type shows “incremental”
Report showing both jobs – full and incremental.
7.2.5 Restore from backups (full VM)
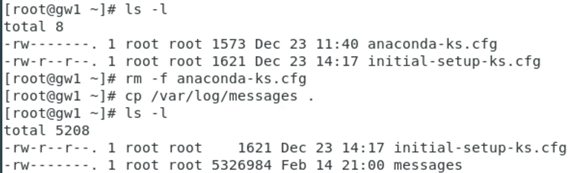
Original status of files under /root/ directory when making the backup:

Remove anaconda-ks.cfg, and copied /var/log/messages:
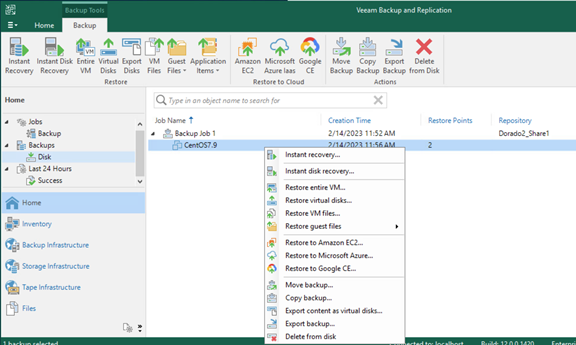
Create a restore job:
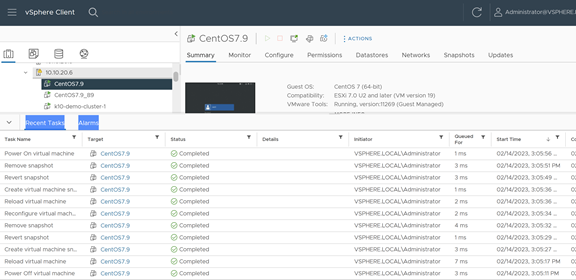
Activities observed on vCenter:
After restore from backup, we get back the original files:

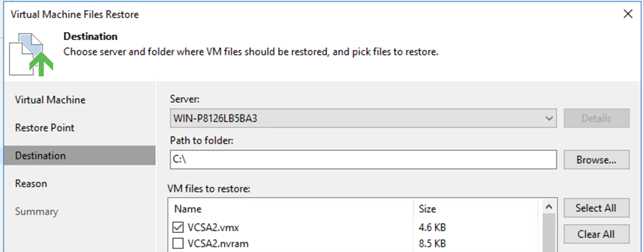
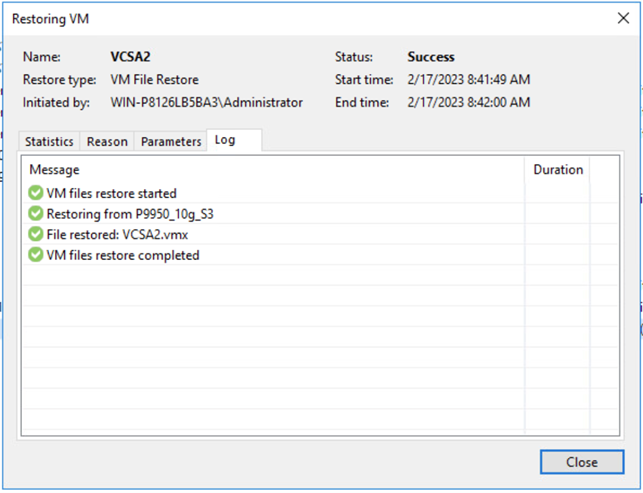
7.2.6 Restore from backups (partial VM files)
Pick a restore point:
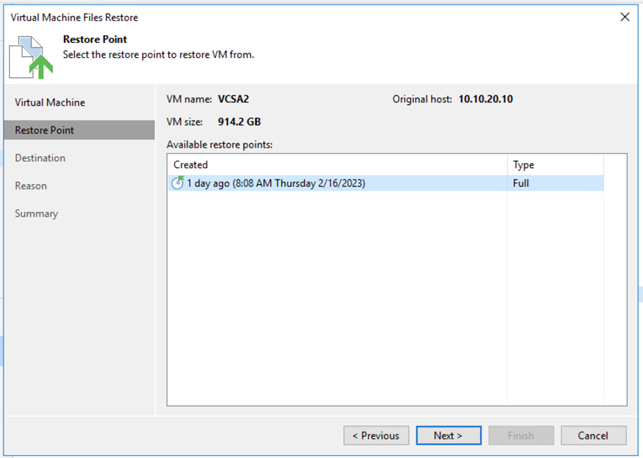
Pick the file(s) to restore and perform the restore:
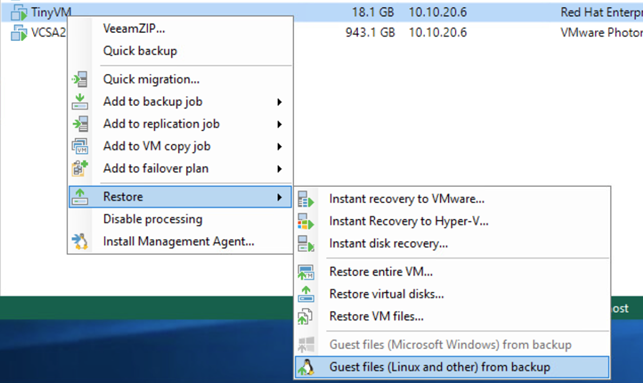
7.2.7 Restore from backups (files from within the guest OS)
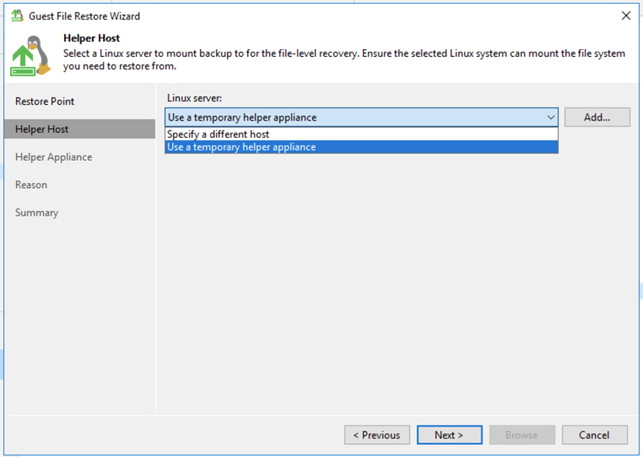
Use “Guest files” option as shown below:
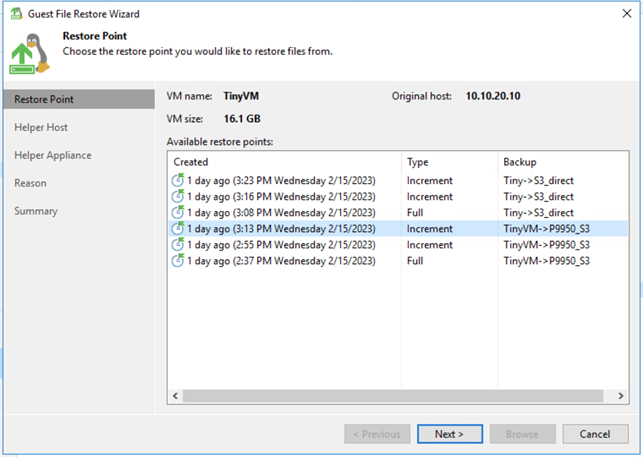
Pick a restore point: (same step as full restore)
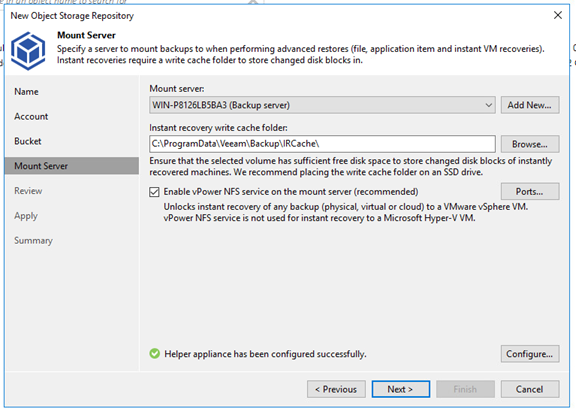
Choose a temporary workspace: (we will use the default “temporary helper appliance”)
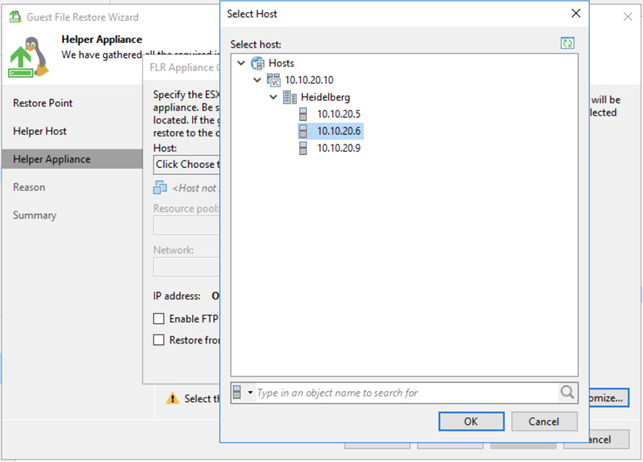
You will be asked to manually pick a host for the appliance:
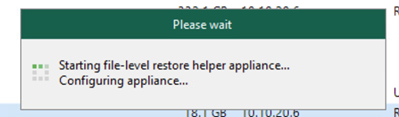
After final confirmation, Veeam will start to prepare the helper appliance, which is a temporary VM:
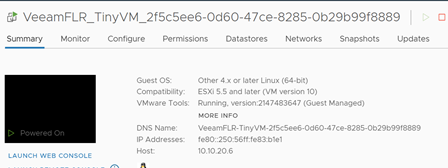
Activities are observed on vCenter:

A new temporary VM is registered:
Once the new VM is ready, you will be able to “browse” the guest files and pick the ones you want to restore.
This procedure is slower than a full VM restore, since it does involve a full restore to a temporary VM, and then setting up the file access.
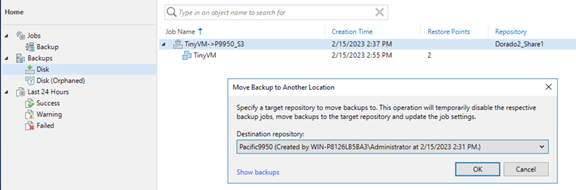
7.2.8 Move backups between S3 and NAS repositories (new feature in Veeam 12)
With an existing backup stored on S3 repository, you can go to the storage submenu from home, right click the backup, and choose “Move backup”, to get the following destination choice popup:
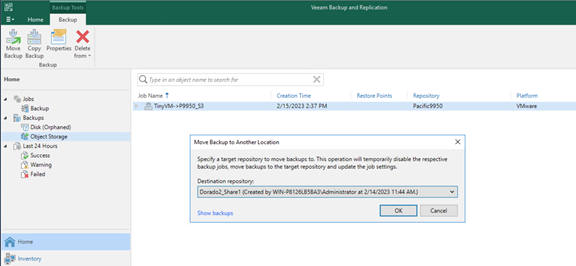
Choose a NAS volume and start the move:
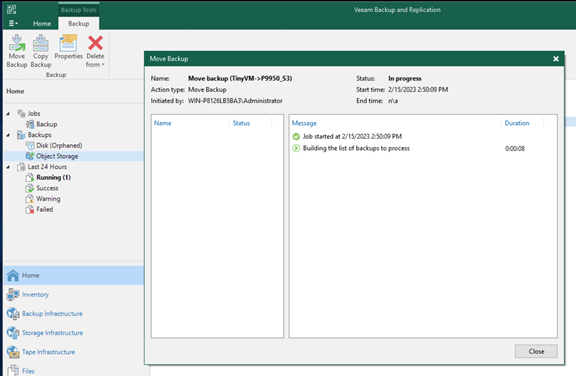
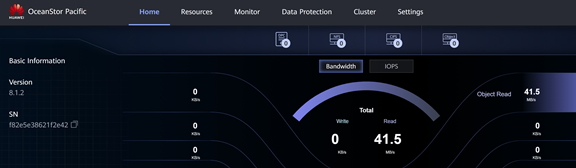
Activity observed on Pacific storage:
Job complete:
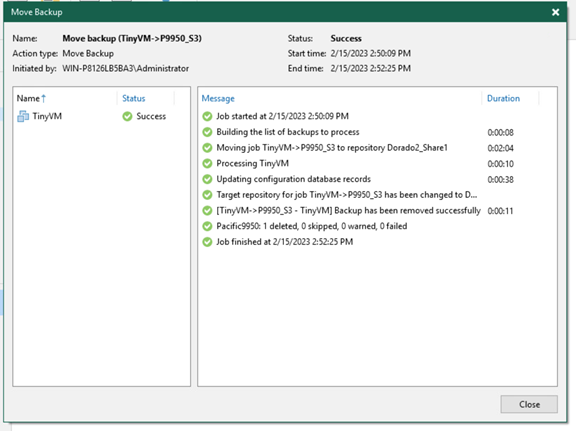
Now backup is stored on NAS volume: (from home -> disk)

Starting backup job again showing up as incremental on NAS target:
Next move back to S3 target:
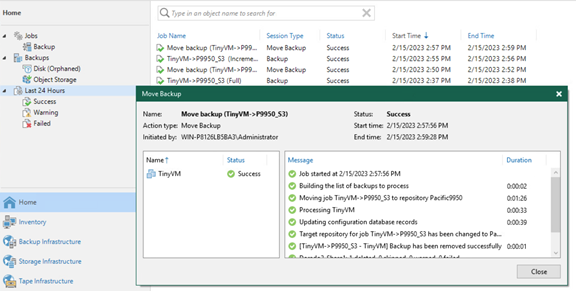
Now the backup is stored on Pacific 9950 with both restore points:

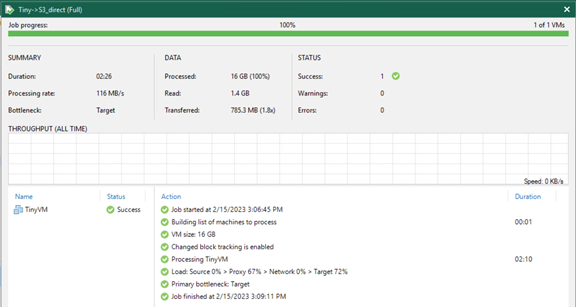
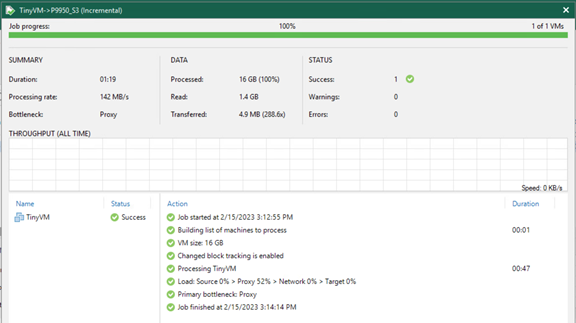
7.2.9 Performance comparison between S3 direct and proxy modes
S3 compatible storage has a “connection” option that defaults to “direct” mode:
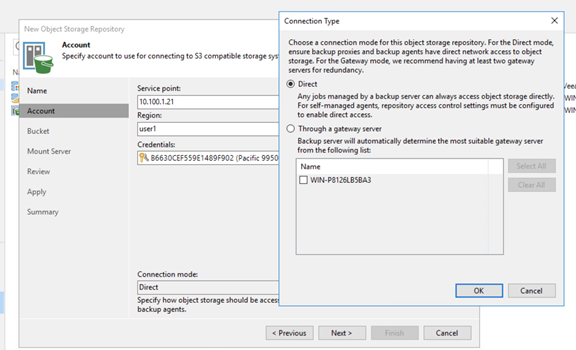
During our testing, the performance difference of direct mode vs. proxy mode seems to be not significant.
Direct mode:
Proxy mode:
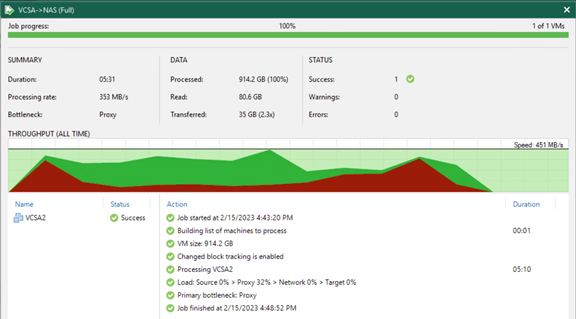
7.2.10 Performance comparison between S3 and NAS
NAS target over 10g network backed by Pacific 9950 AFA:
S3 over the same 10g network backed by Dorado V6 AFA:
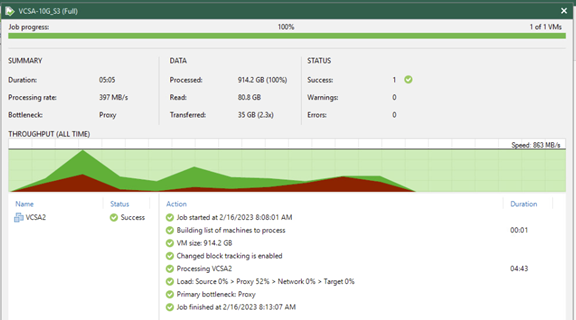
We can see that in both cases, bottleneck is “Proxy”, or the backup service layer.
Pacific S3 storage actually showed slightly higher throughput compared to NAS, which fully demonstrates the strong performance and efficiency offered by OceanStor S3 service.
For reference, native file and object operations initiated from Windows system shows about double throughput (over 700MB/s for both file and object) compared to what is reported in the backup job.
8 Instant Backup and Restore Using Storage Snapshot
Previous tests demonstrated that VMs running on datastores backed by OceanStor block and NAS volumes works as expected when using Veeam 12 to backup and restore. This chapter will discuss alternatives to Veeam instant backup/restore feature.
Veeam 12 no longer have built-in support for OceanStor devices based instant backup and restore, however, all OceanStor devices support manual and automatically scheduled snapshots. Same functionality can be achieved by the methods introduced below. While integrated operations from Veeam can be convenient at times, OceanStor HyperCDP based automatically snapshots also require 0 intervention after initial set up, and support industry leading snapshot density (as low as 3 seconds interval) and quantity (60k snapshots). We will also demonstrate hwo to use script to automate recovery from snapshots, to make things as easy or even more convenient than using Veeam’s integrated GUI.
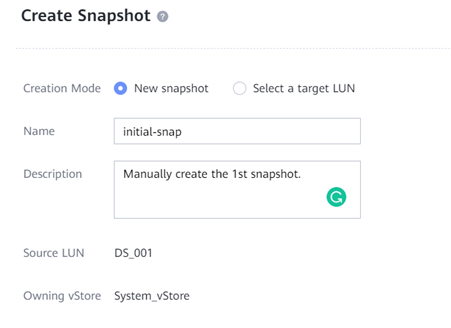
8.1 Manual and Scheduled Snapshot on OceanStor
Manual snapshot can be created for each LUN / File System on demand:
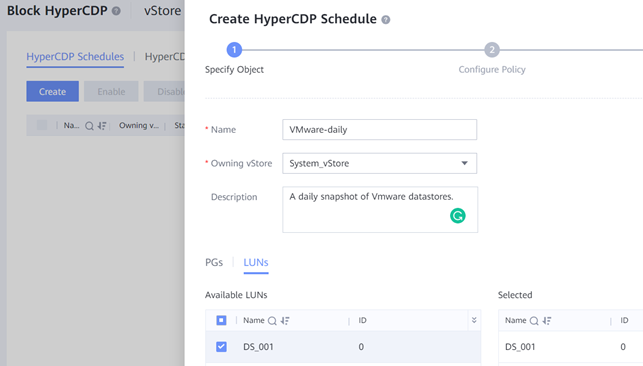
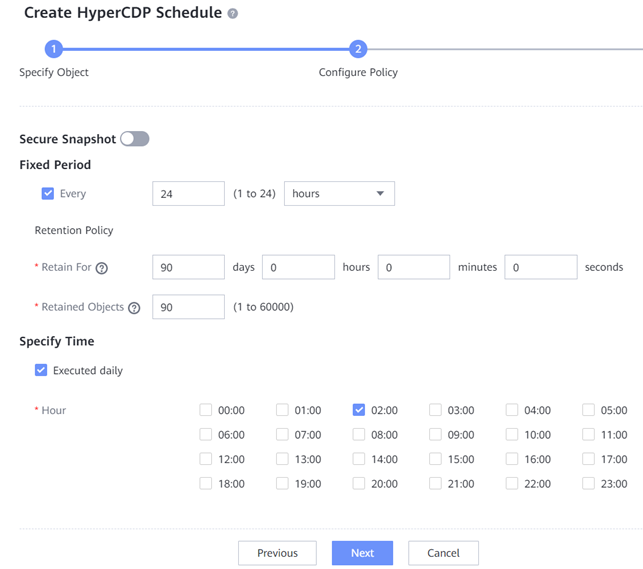
Scheduled snapshot using HyperCDP can be configured with extremely low interval (3 seconds) and retain up to 60,000 copies:

8.2 Restore from snapshot
8.2.1 Manual restore
Manually restore a VM using snapshot of its backend datastore volume includes following steps:
- Figure out the VM’s datastore LUN name on the storage.
- Decide a snapshot you want to use for the restore.
- Clone a writable restore volume from the snapshot.
- Map the new volume to VMware.
- Restore the VM by relocate the data backend to new volume.
8.2.2 Automatic restore using script
The restore procedure used above can be fully automated using PowerCli script combined with REST API of OceanStor devices. Here is a sample script that restore a VM using its latest snapshot:
| # Connect to vSphere environment with PowerCLI Connect-VIServer vSphereServer # Set the name of the VM to restore $vmName = « MyVM » # Locate the underlying NFS volume using PowerCLI $vm = Get-VM $vmName $datastore = $vm.ExtensionData.Config.Hardware.Device | where {$_.Backing -is [VMware.Vim.VirtualDisk.RawDiskMappingVer1BackingInfo]} | select -First 1 | %{$_.Backing.LunUuid} $nfsVolume = Get-Datastore -VM $vm | where {$_.ExtensionData.Info.GetType().Name -eq « NasDatastoreInfo » -and $_.ExtensionData.Info.GetField(« nas »).GetField(« remoteHost ») -eq « dorado.nfs.share » -and $_.ExtensionData.Info.GetField(« nas »).GetField(« remotePath ») -like « $datastore* »} # Use REST API to find the most recent snapshot in Dorado $apiUrl = « https://dorado.nfs.share/rest/snapshot » $authToken = « your_auth_token » # Replace with your actual auth token $headers = @{ « Authorization » = « Bearer $authToken » } $response = Invoke-RestMethod -Uri $apiUrl -Method Get -Headers $headers $mostRecentSnapshot = $response | Sort-Object -Property time -Descending | Select-Object -First 1 $restoreVolumeName = « RestoreVolume_ » + (Get-Date -Format « yyyyMMdd_HHmmss ») # Clone a writable restore volume from the most recent snapshot $apiUrl = « https://dorado.nfs.share/rest/clone » $body = @{ « snapshot_id » = $mostRecentSnapshot.id « name » = $restoreVolumeName } $response = Invoke-RestMethod -Uri $apiUrl -Method Post -Headers $headers -Body ($body | ConvertTo-Json) # Map the restore volume as a new datastore in vSphere $restoreVolume = New-Datastore -Nfs -Name $restoreVolumeName -Path $response.path -NfsHost « dorado.nfs.share » Add-DatastoreCluster -Datastore $restoreVolume -Cluster « MyCluster » # Restore the VM from the restore volume $spec = New-Object VMware.Vim.VirtualMachineRelocateSpec $spec.Datastore = $restoreVolume $vm.ExtensionData.RelocateVM($spec, $null) |
This script is for your reference, please refer to the product manual and test to ensure production quality.
1 commentaire