Huawei OceanProtect Backup Storage and Veeam Backup & Replication v12
Interoperability Test Report
1 Executive Summary
Axians Global (“Axians”) assessed the interoperability of Veeam Backup & Replication version 12 software with Huawei OceanProtect Backup Storage. The goal of the assessment is to validate that Veeam Backup & Replication version 12 is interoperable with Huawei OceanProtect Backup Storage.
In the assessment, Axians has determined that Veeam Backup & Replication version 12 backup and restore jobs will function with Huawei OceanProtect Backup Storage for the following scenarios:
| System Involved | Test Scenario | Result |
| OceanProtect Backup Storage | Backup Target – NAS | Passed |
In this document, you will find details on the above test cases and the captured output. The procedures conducted in the tests are referenced from standard online documentation from Veeam and Huawei.
2 Environment Configuration
2.1 Networking diagram
Figure 1.1 Huawei OceanProtect Backup Storage Function Compatibility Test Networking
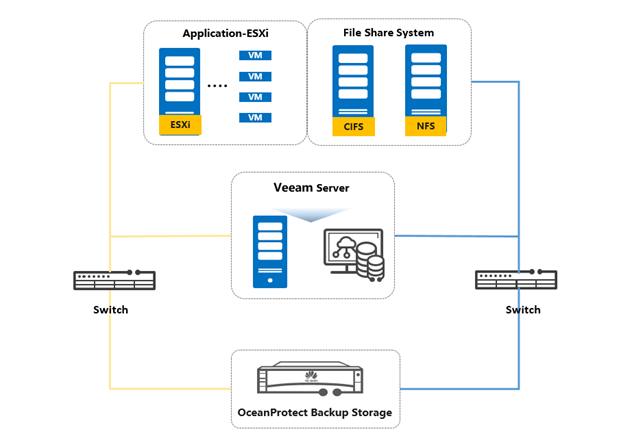
Note: This networking diagram is for reference only.
Networking description:
- Deployment at the production end:
1) Deploy one ESXi physical host, install the VMware VM software, create a VM, and preconfigured production data as the production end for VM backup.
(2) The management network and service network are connected to the Veeam backup software and OceanProtect backup storage through switches.
- Deploy the Veeam backup software: Use one Windows server VM as the Veeam server and proxy.
- Storage devices connect to the Veeam backup server via 10g ethernet.
2.2 Hardware and software configuration
2.1.1 Storage Configuration
Table 1-1 Huawei storage configuration table
| Name | Model & software version | Quantity |
| OceanProtect Backup Storage | OceanProtect X8000/X9000, version 1.3.0 | 1 |
2.1.2 Other Hardware Configuration
Table 1-2 Hardware Configuration
| Name | description | Quantity | Usage |
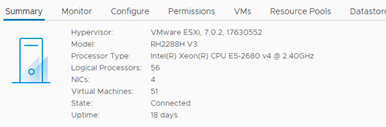
| VMWare ESXi Server | x86 server CPU:2* Gold 6130Memory: 256 GBNetwork: 4 x 10GE optical ports | 1 | VMWare VM Backup and Restoration |
| Veeam Backup server | x86 server CPU: 4* vCore (Gold 6130)Memory: 16 GBPrimary storage disk: 2 x 3.84 TB SSDNetwork: 10GE vNIC | 1 | Deploys backup software to schedule backup tasks and transfer backup data. |
| Ethernet switch | Huawei 6855 10GE Network Switch | 2 | 10GE network switch on the OceanProtect backup service plane |
2.1.3 Test software and tools
Table 1-3 Test Software and Tool List
| Software Name | description | Quantity |
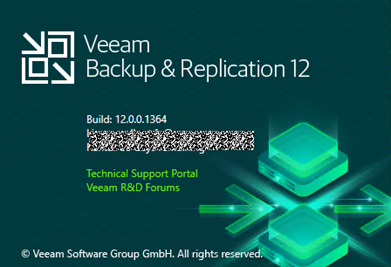
| Veeam Backup & Recovery 12 | Version 12 enterprise plus edition | 1 |
| VMWare ESXi 7.0u2 | VMware virtualization platform | 1 |
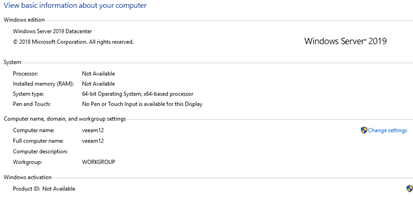
| Windows Server 2019 | Installing Windows Hosts | 1 |
3 OceanProtect NAS Backup Target Interconnection with Veeam
3.1 Adding NAS Shared Backup Media to the Backup Server
| Test Purpose | Add NAS shares to the backup server as the backup media. |
| Test Networking | Huawei OceanProtect Backup Storage Function Compatibility Test Networking |
| Prerequisites | 1. The Veeam Backup & Replication server, OceanProtect storage device and networking have been deployed successfully. 2. NAS services (including file systems, sharing, and authentication account passwords) have been configured on the storage device. |
| Test Procedure | 1. Select BACKUP INFRASTRUCTURE on the backup server. 2. Add Network attached storage and select SMB share or NFS share. 3. Enter the name, SMB shared directory, account password, or NFS path. 4. Complete the configuration and set the permission to Allow to everyone. |
| Expected Result | 1. In step 3, the backup media is successfully added. 2. In step 4, the shared path and capacity are displayed properly. |
| Test Result | Passed (Test Output – Section 4.1) |
3.2 Full VM Backup
| Test Purpose | Full VM backup |
| Test Networking | Huawei OceanProtect Backup Storage Function Compatibility Test Networking |
| Prerequisites | 1. The Veeam Backup & Replication server, OceanProtect storage device and networking have been deployed successfully. 2. NAS services (including file systems, shares, and authentication account passwords) have been configured on the storage device. 3. The backup media is configured. 4. The backup task is successfully set. |
| Test Procedure | 1. Right-click the backup task and choose Active full to perform full backup. 2. Viewing Task Completion Status |
| Expected Results | 1. The full backup is successfully executed, and no error is reported. 2. The task is displayed as (Full). |
| Test Result | Passed (Test Output – Section 4.2) |
3.3 Incremental VM backup
| Test Purpose | Incremental VM backup |
| Test Networking | Huawei OceanProtect Backup Storage Function Compatibility Test Networking |
| Prerequisites | 1. The Veeam Backup & Replication server, OceanProtect storage device and networking have been deployed successfully. 2. NAS services (including file systems, shares, and authentication account passwords) have been configured on the storage device. 3. The backup media is configured. 4. The backup task is successfully set 5. A full backup has completed successfully for the selected VM. |
| Test Procedure | 1. Right-click the backup task to start the backup task. 2. Check backup type and monitor task progress. |
| Expected Results | 1. The incremental operation is successful and no error is reported. 2. The task is displayed as (incremental). |
| Test Result | Passed (Test Output – Section 4.3) |
3.4 Restoring the VM
| Test Purpose | Restoring the VM |
| Test Networking | Huawei OceanProtect Backup Storage Function Compatibility Test Networking |
| Prerequisites | 1. The Veeam Backup & Replication server, OceanProtect storage device and networking have been deployed successfully. 2. NAS-related services (including file systems, sharing, and authentication account passwords) have been configured on the storage device. 3. The backup media is configured. 4. Full backup or incremental backup has been completed. |
| Test Procedure | 1. Choose VM Recovery from the main menu. 2. Select Entire VM restore. 3. Select the VM to be restored from the backup set. 4. Select Revert to New Location. 5. Perform recovery and observe. |
| Expected Results | 1. The backed up VMs can be identified and displayed properly. 2. In step 5, the restoration is successful, and the VM is started and used properly. |
| Test Result | Passed (Test Output – Section 4.4) |
3.5 Restoring Specified VM Files
| Test Purpose | Restoring Specified VM Files |
| Test Networking | Huawei OceanProtect Backup Storage Function Compatibility Test Networking |
| Prerequisites | 1. The Veeam Backup & Replication server, OceanProtect storage device and networking have been deployed successfully. 2. NAS-related services (including file systems, sharing, and authentication account passwords) have been configured on the storage device. 3. The backup media has been configured. 4. Back up the test data files stored on the VM. 5. Full backup or incremental backup has been completed. |
| Prerequisites | 1. The Veeam Backup & Replication server, OceanProtect storage device and networking have been deployed successfully. 2. NAS-related services (including file systems, sharing, and authentication account passwords) have been configured on the storage device. 3. The backup media has been configured. 4. Back up the test data files stored on the VM. 5. Full backup or incremental backup has been completed. |
| Test Procedure | 1. Choose VM Recovery from the main menu. 2. Select Guest files restore. 3. Select the VM type and backup set. 4. In the displayed dialog box, select the file to be restored. 5. Enter the VM login credentials and perform the recovery. 6. Perform restoration and observe the file restoration. |
| Expected Results | 1. In step 3, the backup set is displayed properly. 2. In step 4, the file is correctly identified and displayed. 3. In step 6, the file is successfully restored and the data is consistent. |
| Test Result | Passed (Test Output – Section 4.5) |
3.6 Full File Backup
| Test Purpose | Full file backup |
| Test Networking | Huawei OceanProtect Backup Storage Function Compatibility Test Networking |
| Prerequisites | 1. The Veeam Backup & Replication server, OceanProtect storage device and networking have been deployed successfully. 2. NAS services (including file systems, shares, and authentication account passwords) have been configured on the storage device. 3. The backup media is configured. 4. The backup task is successfully set. |
| Test Procedure | 1. Right-click the backup task and choose Start to perform full backup. 2. Viewing Task Completion Status |
| Expected Results | 1. The full backup is successfully executed, and no error is reported. 2. The task is displayed as (Full). |
| Test Result | Passed (Test Output – Section 4.6) |
3.7 Restoring the File Share
| Test Purpose | Restoring the file share |
| Test Networking | Huawei OceanProtect Backup Storage Function Compatibility Test Networking |
| Prerequisites | 1. The Veeam Backup & Replication server, OceanProtect storage device and networking have been deployed successfully. 2. NAS-related services (including file systems, sharing, and authentication account passwords) have been configured on the storage device. 3. The backup media is configured. 4. Full backup or incremental backup has been completed. |
| Test Procedure | 1. Choose File Share from the Restore main menu. 2. Select Restore Entire share. 3. Select the File Share to be restored from the backup set. 4. Restore to New Location. 5. Perform recovery and observe. |
| Expected Results | 1. The backed up File Share can be identified and displayed properly. 2. In step 5, the restoration is successful |
| Test Result | Passed (Test Output – Section 4.7) |
3.8 Restoring Specified File
| Test Purpose | Restoring Specified File |
| Test Networking | Huawei OceanProtect Backup Storage Function Compatibility Test Networking |
| Prerequisites | 1. The Veeam Backup & Replication server, OceanProtect storage device and networking have been deployed successfully. 2. NAS-related services (including file systems, sharing, and authentication account passwords) have been configured on the storage device. 3. The backup media is configured. 4. Full backup or incremental backup has been completed. |
| Test Procedure | 1. Choose File Share from the Restore main menu. 2. Select ‘Restore individual files and folders’. 3. Select the backup set to restore files from and click ‘Browse’. 4. In the displayed dialog box, select the file to be restored. 5. Perform Restore to original location and Copy to new location. |
| Expected Results | 1. The backed up File Share can be identified and displayed properly. 2. In step 5, the restoration is successful |
| Test Result | Passed (Test Output – Section 4.8) |
4 Verification Result
Create CIFS and NFS share in OceanProtect storage
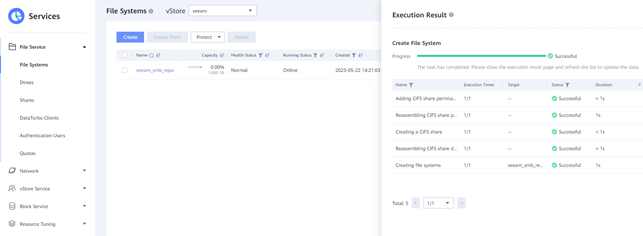
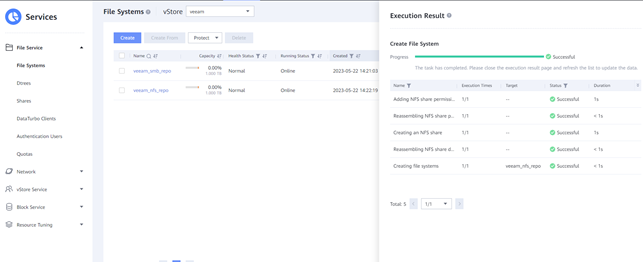
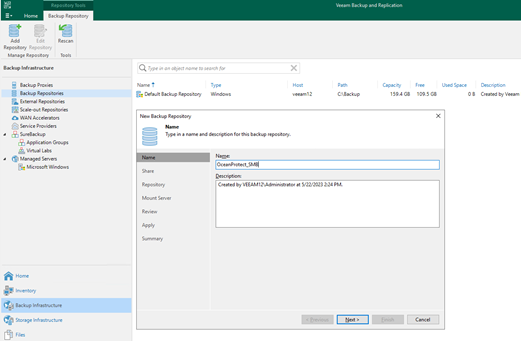
4.1 Adding NAS Shared Backup Media to the Backup Server
1. Select BACKUP INFRASTRUCTURE on the backup server.
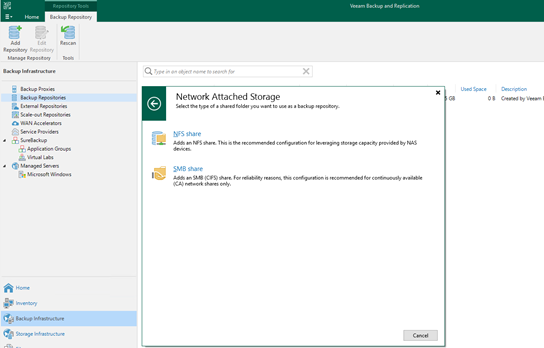
2. Add Network attached storage and select SMB share or NFS share.
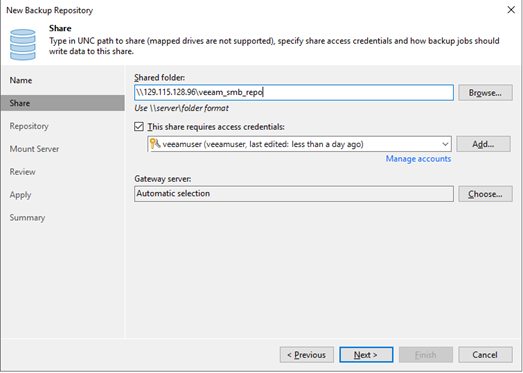
SMB share
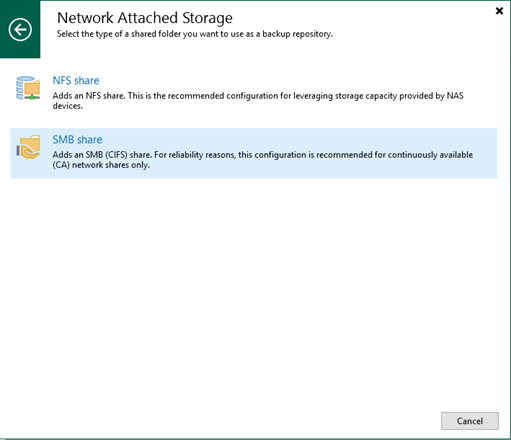
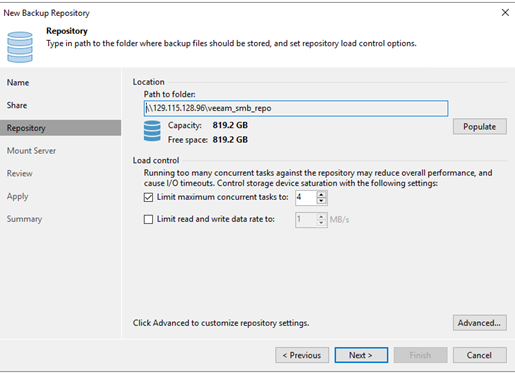
3. Enter the name, SMB shared directory, account password, or NFS path.


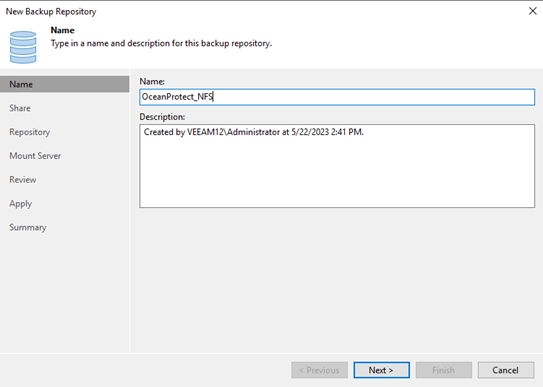
NFS share

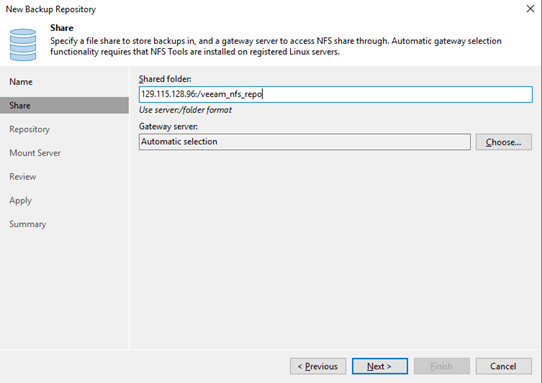
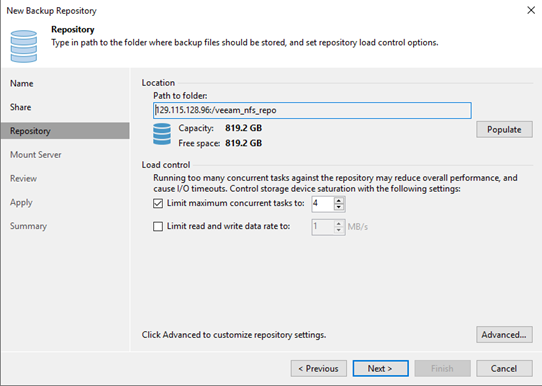
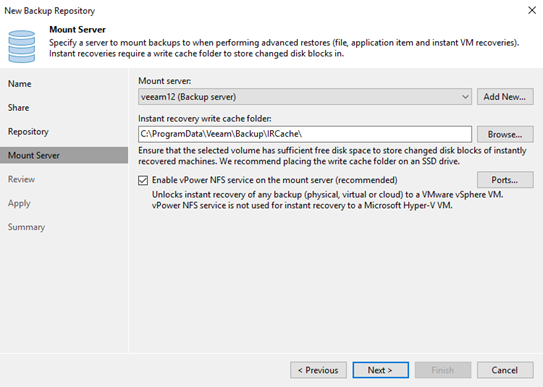
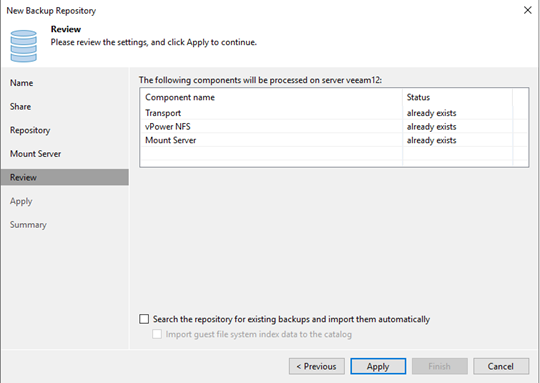
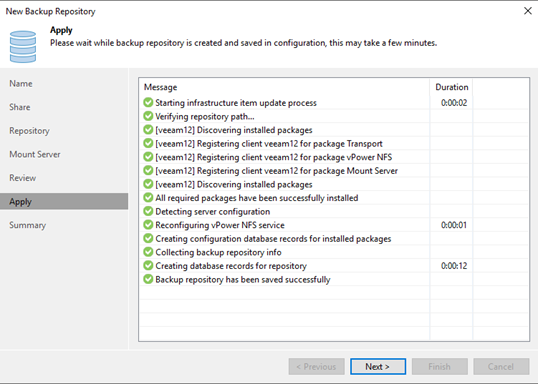
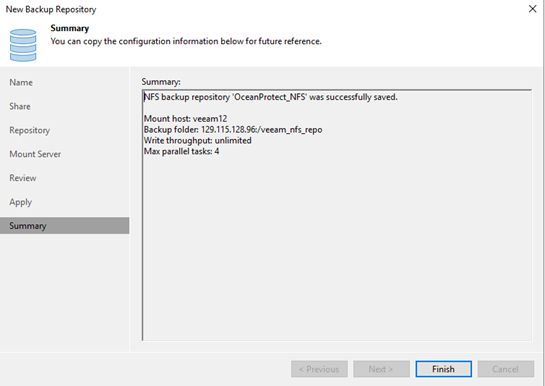
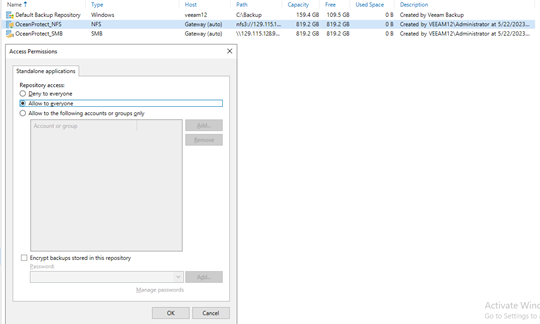
4. Complete the configuration and set the permission to Allow to everyone.
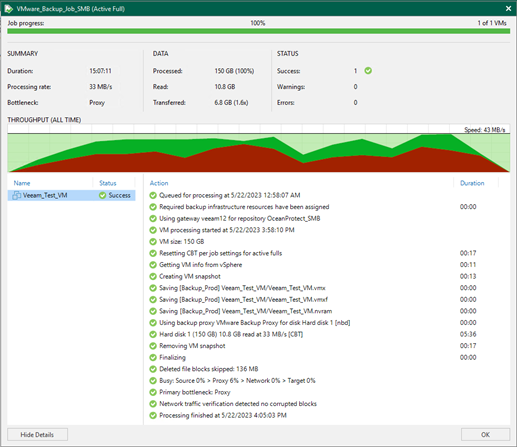
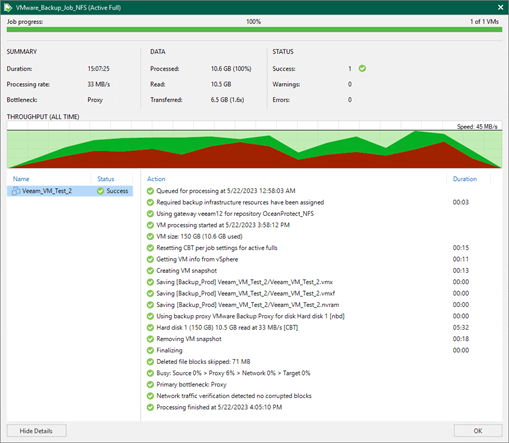
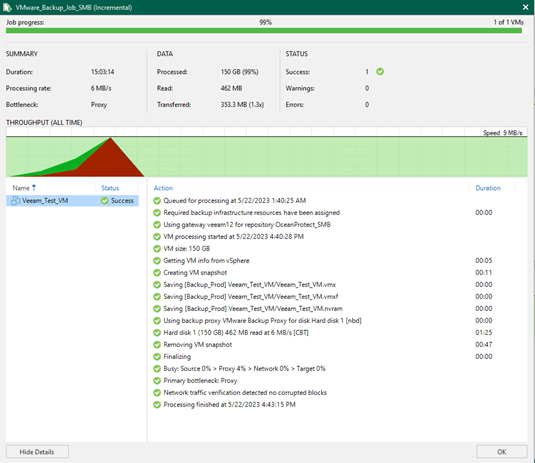
4.2 Full VM Backup
1. Right-click the backup task and choose Active full to perform full backup.
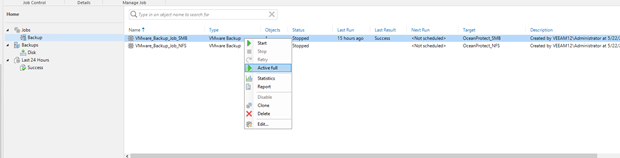
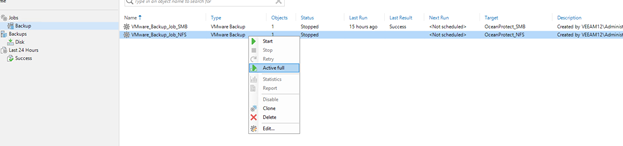
2. Viewing Task Completion Status
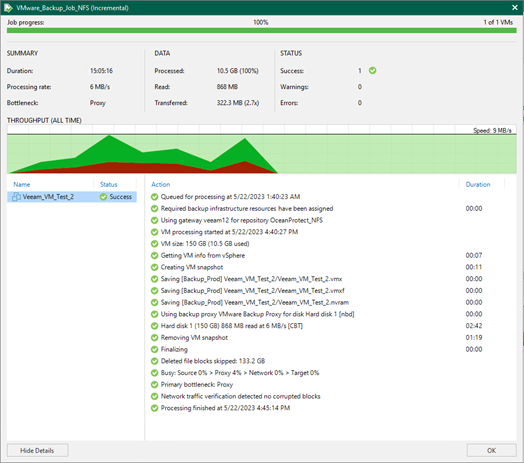
4.3 Incremental VM backup
1. Right-click the backup task to start the backup task.
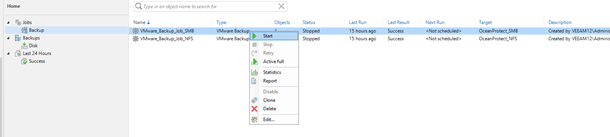

2. Check backup type and monitor task progress.
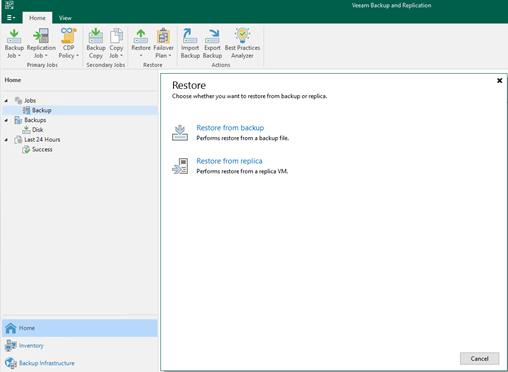
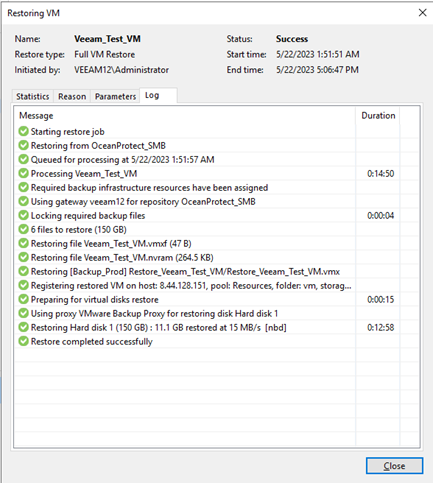
4.4 Restoring the VM
1. Choose VM Recovery from the main menu.
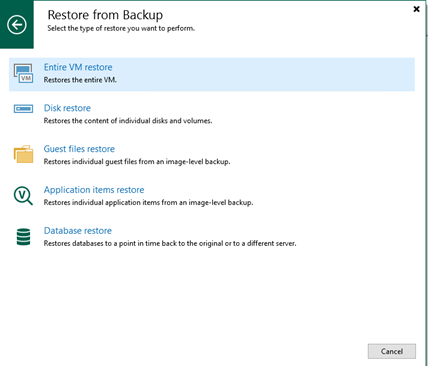
2. Select Entire VM restore.
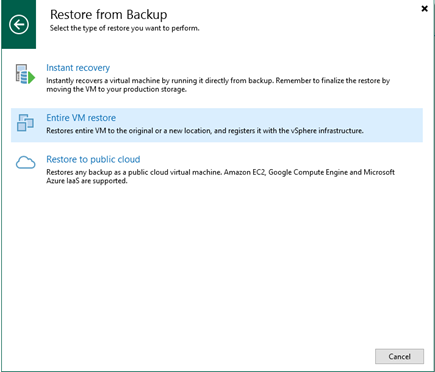
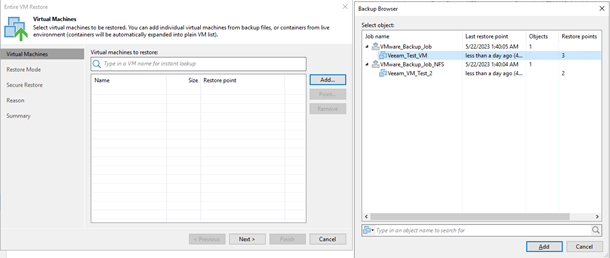
3. Select the VM to be restored from the backup set.
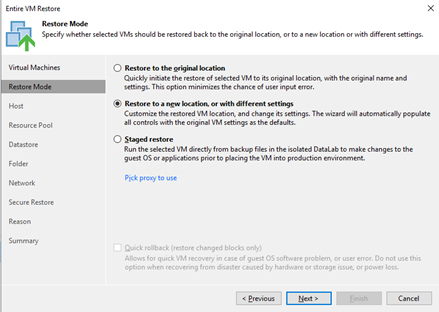
4. Select Revert to New Location.
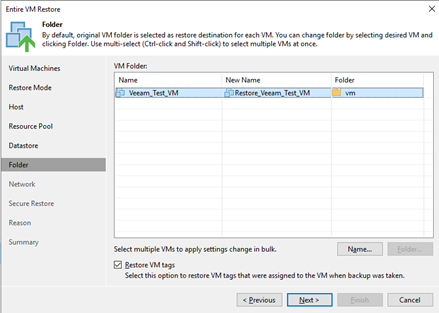
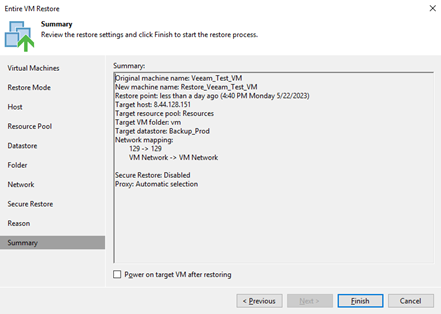
5. Perform recovery and observe.
4.5 Restoring Specified VM Files
1. Choose VM Recovery from the main menu.
2. Select Guest files restore.
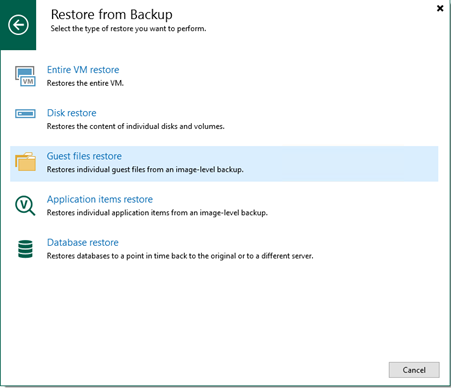
3. Select the VM type and backup set.
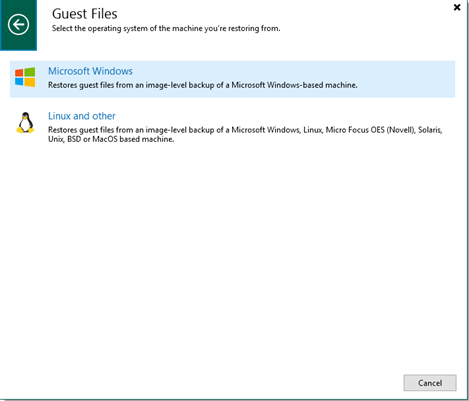
4. In the displayed dialog box, select the file to be restored.
5. Enter the VM login credentials and perform the recovery.
6. Perform restoration and observe the file restoration.
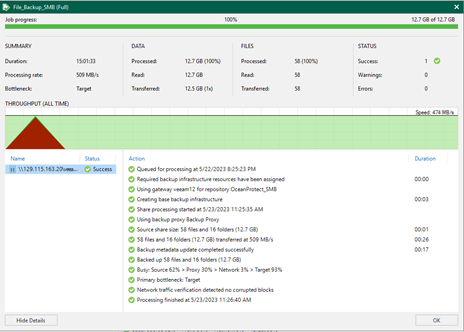
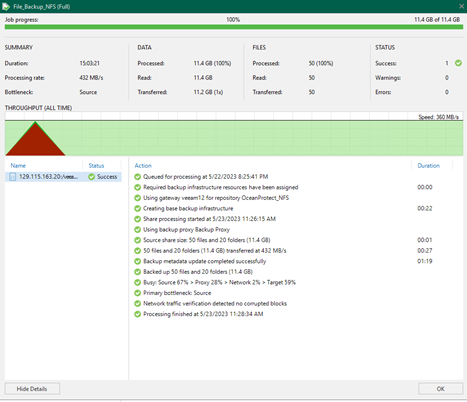
4.6 Full File Backup
File Backup jobs

1. Right-click the backup task and choose Start to perform full backup.
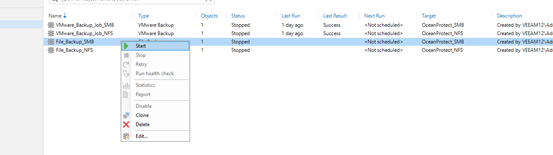
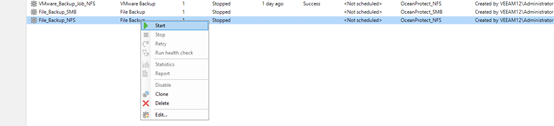
2. Viewing Task Completion Status
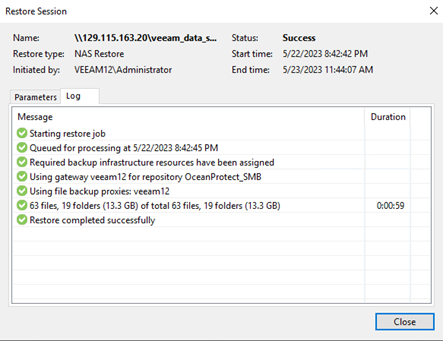
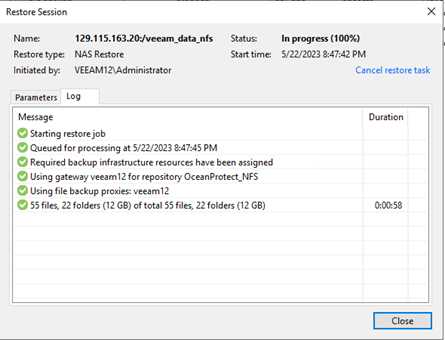
4.7 Restoring the File Share
1. Choose File Share from the Restore main menu.
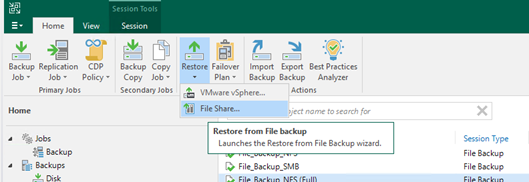
2. Select Restore Entire share.

3. Select the File Share to be restored from the backup set.


4. Restore to New Location.
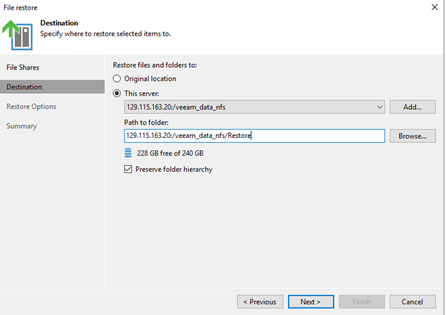
5. Perform recovery and observe.
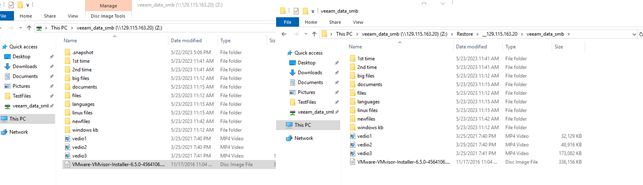
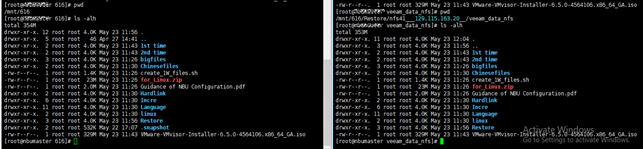
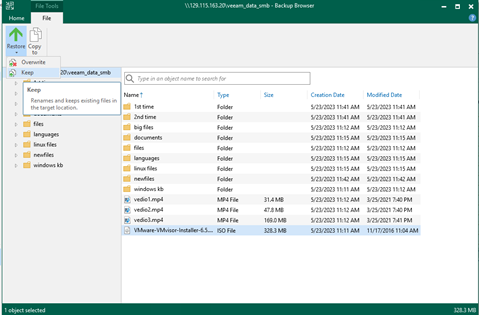
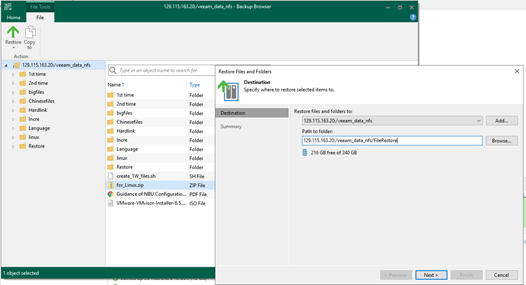
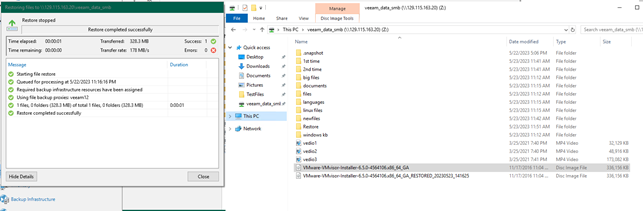
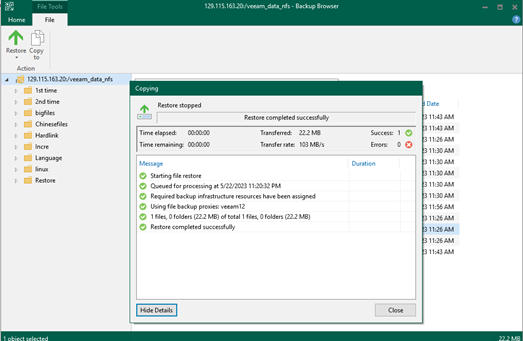
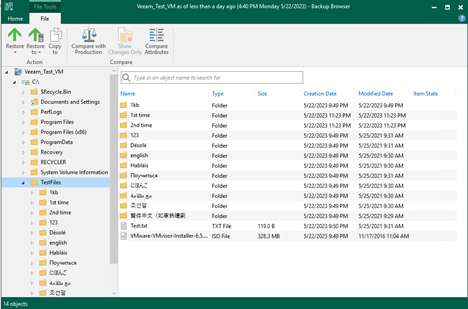
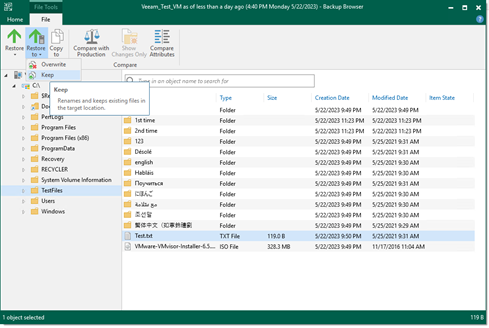
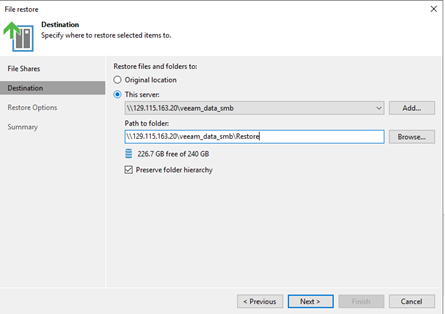
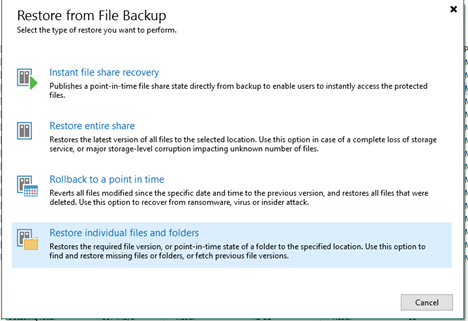
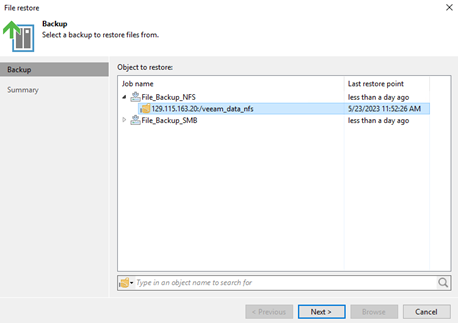
4.8 Restoring Specified File
1. Choose File Share from the Restore main menu.
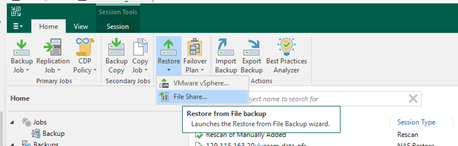
2. Select ‘Restore individual files and folders’.
3. Select the backup set to restore files from and click ‘Browse’.
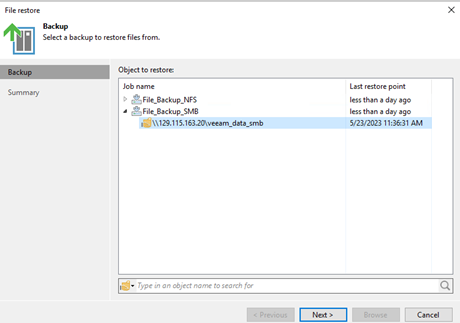
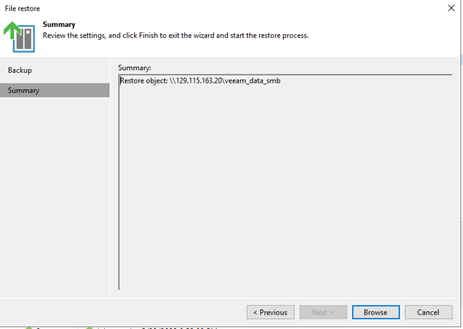
4. In the displayed dialog box, select the file to be restored.

5. Perform Restore to original location and Copy to new location.