OceanProtect 1.6.0 Backup Storage Ransomware Protection Solution Best Practice (Integration with NetBackup)
Interoperability Test Report
Axians Global
All Rights Reserved
1. Overview
Ransomware is a type of malware that encrypts the victim’s files or locks the system to require ransom payment to restore access. Ransomware is usually spread through phishing emails, malicious links, or vulnerabilities. Ransomware mainly leads to the following hazards:
Data loss: After files are encrypted by ransomware, victims cannot access key data, causing service interruptions.
Financial loss: Ransom payment does not guarantee data restoration, and the ransom amount is usually high.
Reputation damage: Data leakage or service interruptions can seriously damage enterprises’ reputation.
Compliance risks: Data leakage may cause enterprises to encounter lawsuits and fines due to violation of data protection laws and regulations.
Traditional network security measures, such as firewalls, intrusion detection systems (IDSs), and antivirus software, are mainly used to defend against known threats. However, attackers continuously use new technologies and means, making it difficult for traditional security measures to effectively cope with the attacks.
Based on different application scenarios, the ransomware protection storage solution can be divided into:
- Ransomware protection storage solution for SAN
- Ransomware protection storage solution for NAS
- Ransomware protection storage solution for backup storage
- Ransomware protection solution for backup appliances
This best practice describes the ransomware protection storage solution for backup storage (OceanProtect X8000 1.7.0+NetBackup 10.3), where:
- OceanProtect Air Gap is used to establish an isolation zone.
- OceanProtect file system WORM ensures data anti-tampering.
- OceanProtect backup link encryption prevents data theft and tampering on backup links, and array encryption and replication link encryption prevent data leakage on the storage and replication link layers.
- The detection and analysis of OceanCyber 300 protect data on the OceanProtect Backup Storage devices, and provide functions such as ransomware detection and data restoration.
The solution helps users build data foundation resilience to implement secure data restoration.
1.1 Introduction
This document describes the best practices of the ransomware protection solution using the OceanCyber 300 1.2.0, OceanProtect X8000 1.7.0, NetBackup 10.3, and OceanStor BCManager eReplication 8.6.0.
1.2 Intended Audience
This document is intended for:
- Marketing engineers
- Technical support engineers
1.3 Change History
Issue 02 (2025-10-22)
This issue is the second official release.
Issue 01 (2025-06-18)
This issue is the first official release.
2. Solution Overview
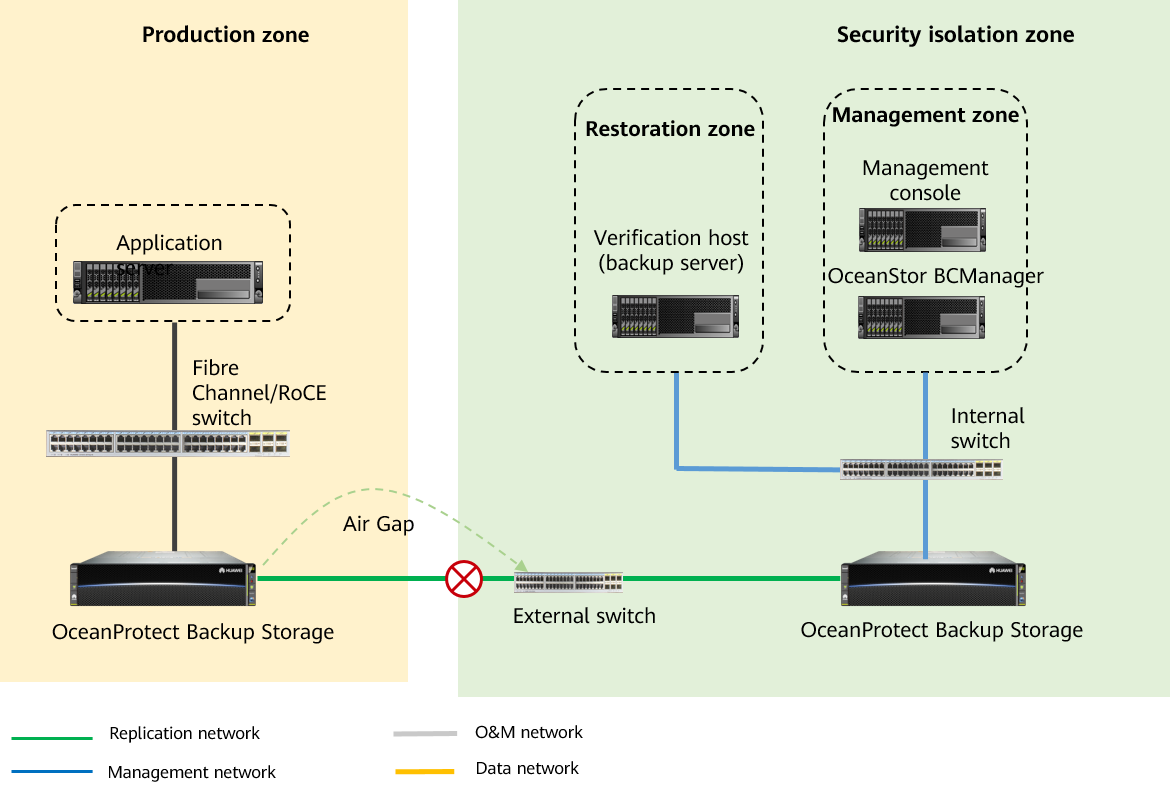
OceanProtect X8000 1.7.0 integrates NetBackup and connects to the data security appliance (OceanCyber 300) to perform ransomware detection and analysis on backup data and generate secure snapshots of uninfected backup copies. Based on Air Gap of the OceanStor BCManager eReplication component, data is periodically replicated from specified file systems in the production zone to the security isolation zone. After the replication is complete, secure snapshots are automatically generated for secure isolation and anti-tampering of critical data. In addition, replication link encryption, backup link encryption, and array encryption prevent data theft on transmission links and backup links between backup storage devices, and on storage layers.
The entire network consists of a production zone and a security isolation zone. The security isolation zone connects to the production zone only via specified replication ports. Generally, the replication ports are disconnected and is connected only during replication. If restoration verification is required for the security isolation zone, you are advised to deploy a restoration verification host in the security isolation zone to verify the data in the isolation zone.
2.4 Typical Application Scenarios
2.1 Solution Architecture
Figure 2-1 Solution architecture
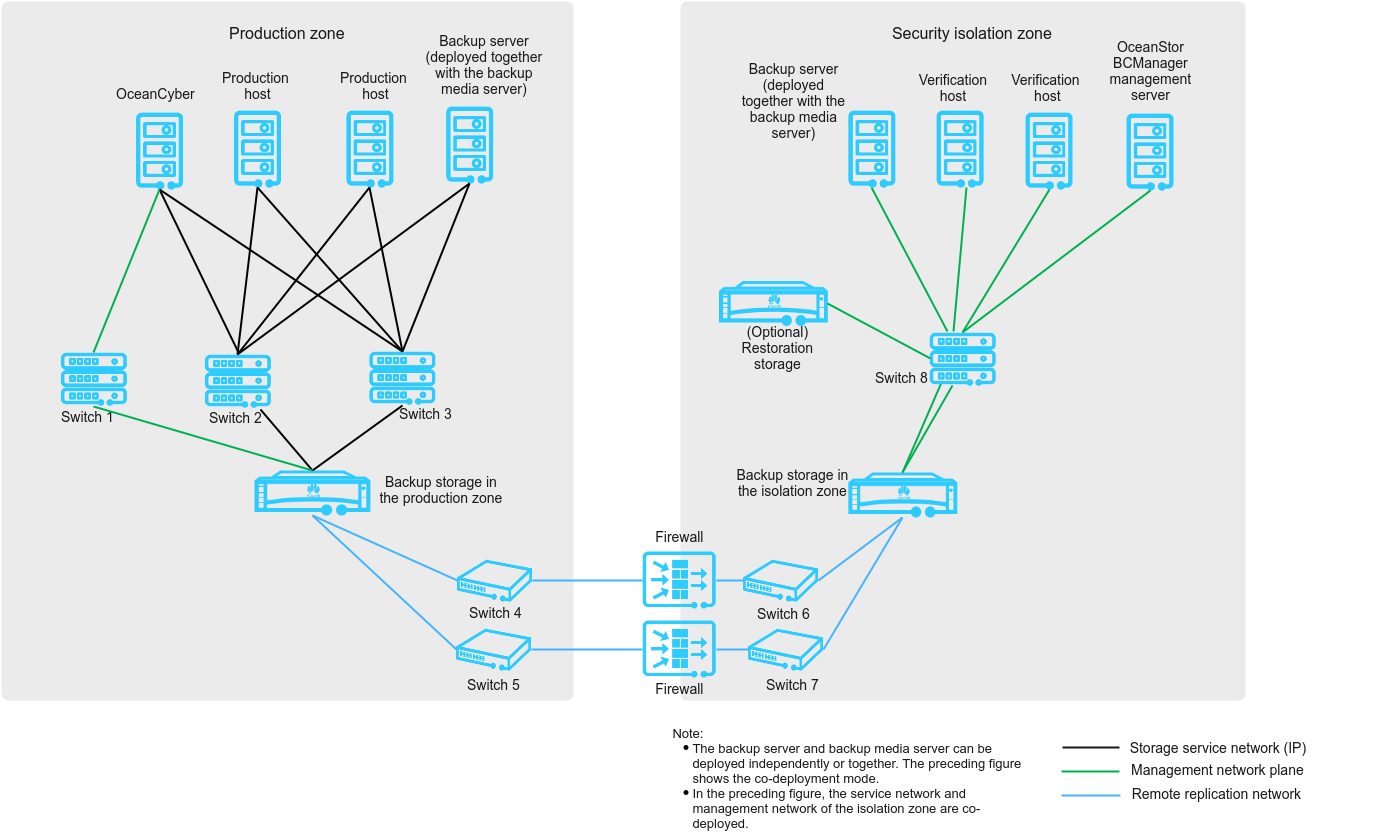
As shown in Figure 2-1, the network is composed of a production zone and an isolation zone.
- Production zone
Consists of the production hosts, backup server, OceanCyber 300, backup storage, and switches connected to the backup storage in the isolation zone.
- Isolation zone
Consists of the verification hosts, OceanStor BCManager eReplication management server, backup server, backup storage, restoration storage (optional), and switches connected to the backup storage in the isolation zone.
- The verification hosts in the isolation zone can verify the consistency of replication data.
- The OceanStor BCManager eReplication management server must communicate with the storage management network in the isolation zone. This server controls the connectivity of replication links of storage in the isolation zone by enabling or disabling the ports used by these links. In this way, the links are connected during data transmission and disconnected after data transmission is complete.
- Ethernet switches or Fibre Channel switches are used to connect replication links between storage devices in the production and isolation zones (Ethernet switches are used in this solution). Firewalls can be configured between replication links to further improve replication link security.

The ransomware protection solution uses Air Gap to manage replication network connectivity between the production and isolation zones, and uses the file system remote replication function of the storage system. In this case, you need to create a remote device and configure a replication pair, and the entire file system will be created. However, A.I.R. copy replication of NetBackup uses the FileCopy function of the storage system. In this case, you only need to create a remote device without creating a replication pair, and copy files in the file system will be replicated. The two solutions differ in their technologies and capabilities.
2.2 Solution Components
Table 2-1 Components in the solution architecture
Component | Description | Deployment Position | Configuration Requirement |
|---|---|---|---|
Production host | Functions as an application system host in the data center of the production zone, which can be a common production host, such as Oracle database host or VMware ESXi host. | Production zone | The production host is configured based on actual service requirements. |
Backup server (deployed together with the media server) | Creates, executes, and schedules backup jobs, and configures backup policies. | Production zone | The backup server and backup media server can be deployed independently or together. The backup server is deployed together with the media server in this best practice. |
OceanCyber 300 | Protects data of OceanProtect backup storage and provides functions such as ransomware detection and data restoration. | Production zone | Two 25GE or 100GE ports are configured. |
Switch 1 | Functions as a service switch deployed in the data center of the production zone, which is used for data transmission between the data security appliance and storage in the production zone. | Production zone |
|
Switch 2/3 | Functions as a service switch deployed in the data center of the production zone, which is used for data transmission between the data security appliance, production host, and storage in the production zone. | Production zone |
|
Backup storage in the production zone | Stores data. | Production zone |
|
Switch 4/5 | Functions as an Air Gap replication link switch deployed in the data center of the production zone, which is used to synchronize data from storage in the production zone to that in the isolation zone. | Production zone |
|
Switch 6/7 | Air Gap replication link switch deployed in the data center of the isolation zone, which is used to synchronize data from storage in the production zone to that in the isolation zone. | Security isolation zone |
|
(Optional) Firewall | Restricts the communication of non-replication ports. A firewall is recommended when replication links are not in point-to-point connections or pass through public network links. | Production zone | A firewall restricts the communication of non-replication ports only and is not for enabling or disabling replication ports. In deployment, the replication link traffic needs to be evaluated to prevent the firewall from becoming a bottleneck. |
Restricts the communication of non-replication ports. A firewall is recommended when replication links are not in point-to-point connections or pass through public network links. | Security isolation zone | A firewall restricts the communication of non-replication ports only and is not for enabling or disabling replication ports. In deployment, the replication link traffic needs to be evaluated to prevent the firewall from becoming a bottleneck. | |
Verification host | Functions as an application system host in the data center of the isolation zone, which can be used to start applications and detect virus for application data in the isolation zone. | Security isolation zone | Verification hosts are configured based on customers’ services. Typical hardware configurations of production hosts are recommended. |
Switch 8 | Used for the communication among the host, OceanStor BCManager eReplication management server, and the storage. | Security isolation zone |
|
OceanStor BCManager eReplication management server | Connects or disconnects the Air Gap replication link. | Security isolation zone |
|
Backup storage in the isolation zone | Protects and rolls back production data. | Security isolation zone |
|
Backup server (deployed together with the media server) | Creates, executes, and schedules backup jobs, and configures backup policies. | Security isolation zone | It can be deployed independently or together with the media server. The backup server is deployed together with the media server in this best practice. |
2.3 Key Technologies
- Air Gap
Functions as a replication link isolation switch, which enables the replication links only when a replication job is running and disables the replication links after the replication job is complete. The enabling and disabling of the entire replication links can be controlled only in the isolation zone. This solution uses the OceanStor BCManager eReplication software in the isolation zone to configure Air Gap replication policies. In this way, the replication links are enabled only during data replication and disabled immediately after data replication is complete.
The Air Gap capability of OceanCyber 300 and that of OceanStor BCManager eReplication are described as follows:
OceanStor BCManager eReplication is deployed in the isolation zone. Its Air Gap capability asynchronously replicates differential data from the storage in the production zone to the storage in the isolation zone based on policies. After the replication is complete, the replication port of the storage in the isolation zone is disconnected and secure snapshots are automatically created. OceanCyber 300 is deployed in the production zone. The Air Gap capability of OceanCyber 300 only disconnects the replication port in the production zone when an exception is detected to prevent infected data from being replicated to the isolation zone. Air Gap replication of OceanStor BCManager eReplication can be used together with Air Gap link disconnection of OceanCyber 300. However, Air Gap link disconnection of OceanCyber 300 cannot replace the Air Gap replication capability of OceanStor BCManager eReplication.

Built-in detection of the OceanProtect Backup Storage does not support the Air Gap link disconnection capability.
- WORM
WORM can be configured for file systems in backup storage, preventing backup copy data from being tampered with after the backup storage is attacked by ransomware.
- Secure snapshot
Ensures storage data is read-only and cannot be modified or deleted within a specified time range in the production center and isolation zone.
- Detection and analysis of OceanCyber 300
- Based on a predefined policy, OceanCyber 300 periodically creates snapshots for the OceanProtect Backup Storage and performs in-depth detection on the snapshots to check whether the backup data of files, NAS, and VMware VMs has been encrypted by ransomware. If an exception is detected, the backup copy is marked as infected, and alarms and Air Gap link disconnection are triggered to prevent infected data from being replicated to the isolation zone. If no exception is found, the backup copy is marked as uninfected and converted to a secure snapshot.
- Real-time ransomware detection generates secure snapshots when ransomware is detected.
- Real-time ransomware detection generates secure snapshots when ransomware is detected.
Storage audit logs are analyzed in real time to analyze storage I/O behaviors. When the I/O behaviors match the ransomware signature model library, a secure snapshot is immediately generated (for timely loss cutting) and an alarm is reported. During restoration, a rollback is performed based on the secure snapshot to restore data to the point in time with the least infected data.
- Intelligent ransomware detection periodically generates snapshots for detection.
A scheduled protection policy is created to periodically generate snapshots. A comparison is conducted on the change trend of data characteristics between the current snapshot and historical snapshots in terms of file name extensions, number of created, modified, or deleted files, file entropy, or other aspects to detect whether the files in the snapshot are encrypted by ransomware. If not encrypted, the common snapshot is converted into a secure snapshot; if encrypted, a warning is sent to users indicating that data has been encrypted by ransomware. After the core service system is encrypted by ransomware, the latest uninfected snapshot can be used to restore the data to the point in time before the ransomware attack.

The detection and analysis function of OceanCyber 300 provides ransomware encryption detection and in-depth detection on backup copies. The built-in detection function of the OceanProtect Backup Storage (X8000 and later models) supports only ransomware encryption detection on backup copies.
Ransomware encryption detection on backup copies: After data backup is complete, ransomware encrypts backup copies. The detection and analysis function can identify the backup copies that are attacked by ransomware and mark them as infected.
In-depth detection on backup copies: If a large amount of production data, such as data in files or VMware, is encrypted by ransomware, the detection and analysis function parses the contents of the backup copies after the backup software backs up the data. This function can identify whether the original files or files in VMware are infected. If yes, the backup copies they will be marked as infected.
2.4 Typical Application Scenarios
- Protection of core service systems in the production zone:
- A core service system, if encrypted by ransomware, can be quickly restored to the latest time point before encryption. The backup software uses the latest snapshot copy to restore service data. The restoration process in this scenario is the same as that in the centralized backup solution and is not described here. OceanCyber 300 performs data source backtracking on backup storage copies through restoration to the original or shared location.
- File systems are deleted by an attacker of the backup server after the attacker obtains backup storage administrator permissions, or the storage file systems and backup data are maliciously deleted.
- A core service system, if encrypted by ransomware, can be quickly restored to the latest time point before encryption. The backup software uses the latest snapshot copy to restore service data. The restoration process in this scenario is the same as that in the centralized backup solution and is not described here. OceanCyber 300 performs data source backtracking on backup storage copies through restoration to the original or shared location.
In this scenario, data cannot be deleted in the WORM file system data retention period, preventing backup data from being tampered with.
- After the production zone is infected, data can be restored from the isolation zone, ensuring that a copy of secure and reliable data is available for quick restoration.
If the backup storage in the production zone is attacked (for example, the ransomware latency period exceeds the backup data retention period, causing all backup data to be infected), a security isolation zone further improves the data security assurance capability and ensures that a copy of clean data can be used to restore data and even provide the minimum service running capability.
- During routine operation, data in the isolation zone can be used to start applications as required for testing or virus detection, reducing the impact on the running of core systems in the production zone.
Through Air Gap replication links, storage data in the production zone can be periodically synchronized to the isolation zone. After verification hosts are configured in the isolation zone, system services can be started based on the storage data in the isolation zone for service system testing or virus detection after virus scanning software is connected.
2.5 Precautions
- Detection is not supported if encryption, deduplication, or compression is enabled for NetBackup.
- Whether the original backup data of NetBackup is high-entropy files cannot be detected.
- A DataTurbo administrator can be created only under vStore System_vStore.
- A maximum of 16 DataTurbo users can be created.
- Enabling DataTurbo is mutually exclusive with pre-event blacklisting, in-event I/O behavior detection, and honeyfile detection.
- OceanCyber 300 supports a maximum of eight storage devices and a maximum of 16 concurrent detection jobs.
- Currently, in-depth detection is supported only for NetBackup-based backup copies of files, VMware, and databases (Oracle and MySQL).
3. Planning and Configurations
This section describes the planning and configurations of the production zone and isolation zone.
3.3 Software and Hardware Planning
3.1 Configuration Planning
3.1.1 Backup Storage Planning
- Capacity planning for the backup storage in the production zone:
- The backup storage capacity is determined by the NetBackup backup policy and WORM period. Enabling WORM requires an additional 20% space. For example, if the original storage pool has a capacity of 400 TB space, it needs to be expanded to 480 TB for enabling WORM.
- Capacity planning for the backup storage in the isolation zone
- Scenario 1: The snapshot copy retention in the production zone is the same as that in the isolation zone, and the capacity planning is the same.
- Scenario 2: The snapshot copy retention in the production zone is different from that in the isolation zone. The isolation zone has scenarios where periodic secure snapshots are used to prolong the data retention period and snapshot clone volumes are used for restoration verification. Therefore, you are advised to reserve at least 20% of the space in addition to the space for the original file system to be replicated. This prevents insufficient capacity of the storage pool in the isolation zone from affecting data synchronization from the production zone to the isolation zone.
3.1.2 Verification Host Planning
Verification hosts are configured as required. Backup storage data can be accessed from the isolation zone. It is recommended that at least one verification host and backup server be deployed for periodic data consistency check.
3.1.3 Policy Planning
- Policy planning for the production zone
- Backup and detection policy planning
For small-scale data (less than 100 TB), you are advised to back up data once a day and check the backup data after all backup jobs are complete on the same day.
For large-scale data, no detection time window can be reserved. You are advised to select a time window with a small number of backup jobs for detection. For example, only archive log backup jobs are available.
- Other planning
After the detection is complete, uninfected snapshots are converted to secure snapshots. Secure snapshots occupy space and can be deleted only after they expire. Therefore, you are advised to retain secure snapshots for one month.
- Policy planning for the isolation zone
- Deploying OceanStor BCManager eReplication
The management network of the OceanStor BCManager eReplication management server must be able to communicate with storage in the isolation zone. This server can be deployed on a physical server or VM platform, and must be deployed on an independent server for security, which is isolated from the service host.
- Configuring protection policies on OceanStor BCManager eReplication eReplication
OceanStor BCManager eReplication is deployed in the isolation zone and is isolated from the network in the production zone. Therefore, the status of OceanCyber detection jobs cannot be detected. You need to configure a scheduled Air Gap replication policy on OceanStor BCManager eReplication. The typical Air Gap replication time window is from 00:00 to 06:00 and data is synchronized every 24 hours. It is recommended that data be replicated once a day and the replication duration be at most 4 hours. If the daily replication volume is 10 TB, the required bandwidth is about 720 MB/s (10 TB/4/3600). A replication logical port is created based on a 10GE physical port, and each controller of the storage devices in the production and isolation zones provides one replication logical port to meet bandwidth requirements.
After the synchronization is complete, a secure snapshot is generated. You can adjust the policy based on service requirements.
- Configuring policies for secure snapshots
It is recommended that a secure snapshot be generated in the isolation zone every day and the protection period be one month. The secure snapshot policy is configured on OceanStor BCManager eReplication. In the protection policy, a secure snapshot is created in the isolation zone each time after data synchronization is complete by using Air Gap. You can adjust the policy based on service requirements.
- Overall policy planning for ransomware protection
The overall policy planning for ransomware protection involves the backup policy, detection policy, Air Gap replication policy, and secure snapshot creation policy after replication. The general principle is to execute the backup, detection, Air Gap replication, and secure snapshot creation jobs in sequence. That is, detection is performed after all backup jobs are complete, Air Gap replication is performed after detection is complete, and a secure snapshot is created in the isolation zone after Air Gap replication is complete. This ensures that all data is complete, clean, and valid.
On the live network, the backup data volume is excessively large. As a result, the backup, detection, and Air Gap replication jobs cannot be completed within one day. In this case, you can start detection at the minimum time period of the backup job. If the sum of the detection duration and Air Gap replication duration exceeds 24 hours, you are advised to configure detection and Air Gap replication to run concurrently. If an exception is detected and an Air Gap replication job is in progress, OceanCyber proactively stops the replication job to prevent infected data from being replicated to the isolation zone. If the Air Gap replication job has ended and infected data has been replicated to the isolation zone, you can manually roll back the latest snapshot in the isolation zone to the time point before replication. (This operation is optional because there is no execution environment for instantly infected data replication to the isolation zone and the data will not be transmitted to other snapshot copies in the isolation zone.)

After in-depth detection of backup copies is enabled, the system performs in-depth parsing and detection for backup copies on the backup storage, which may prolong the overall detection time. You are advised to enable this function if the intelligent detection policy is applied to file systems of an OceanProtect storage device.
If in-depth detection of copies is enabled, the detection performance will be compromised. It will drop from 50 TB/hour to 12 TB/hour if this function is enabled.
Self-learning supports only in-depth detection. You are advised to perform self-learning for one month. During self-learning, all backup copies are clean by default, and the detection results will show as uninfected.
3.1.4 Network Planning
Figure 3-1 Logical diagram of the production zone network

Table 3-1 Network description
Name | Description |
|---|---|
BMC/Management network | The BMC network is used to connect to the management network port of the OceanCyber Data Security Appliance to manage the hardware device. The management network is used to manage and maintain the service system of the OceanCyber Data Security Appliance and deliver security policies to the connected storage devices. |
Service network | The service network is used to connect to a protected storage device (using NFSv3) and to perform ransomware detection and analysis on the NAS file system of the storage device. |
- Storage network planning for the production and isolation zones
Figure 3-2 Network planning
- Network planes
- The management network is used for system management and network communication between devices.
- The Air Gap replication network is used for replication data communication between the backup storage in the production zone and that in the isolation zone.
- The service network is used for network communication between hosts and storage devices.
- The management network is used for system management and network communication between devices.
- Network planning for backup storage between the production and isolation zones
- Physical port planning: You need to consider the network ports for connecting hosts to storage devices and those for connecting replication links between the production zone and isolation zone. In the performance and single point of failure (SPOF) scenarios, at least two controllers are required and each controller must have at least two ports.
- Logical port planning: Logical ports are created for remote replication Air Gap services and connections between hosts and storage devices. Considering the bandwidth requirements of replication, you are advised to select at least two independent physical ports on each controller to create replication logical ports. The physical ports that have been used to create replication logical ports cannot be used to create service logical ports.
- Physical port planning: You need to consider the network ports for connecting hosts to storage devices and those for connecting replication links between the production zone and isolation zone. In the performance and single point of failure (SPOF) scenarios, at least two controllers are required and each controller must have at least two ports.
- Network planning for hosts
Physical port planning: Plan physical ports based on the service pressure and the type of links between hosts and storage devices. If the upper-layer service is Oracle RAC, plan Ethernet ports on current hosts for service transmission with Oracle RAC hosts. Plan Fibre Channel or Ethernet ports on current hosts for data transmission with the storage based on the site requirements.
- Network planning for backup media servers
Physical port planning: Plan physical ports based on the data to be backed up. It is recommended that each backup media server have at least four 10GE physical ports.
- Network planning for backup servers
Physical port planning: Ensure that the management network of the backup server can communicate with that of the backup media server.

- For details about the network planning and configuration of OceanCyber 300, see Network Planning in the OceanCyber 300 1.2.0 Installation Guide.
- OceanCyber 300 can automatically create shares for NAS file systems on protected storage devices, map the shares to itself, and perform ransomware detection. You do not need to configure shares for NAS file systems on storage devices.
3.2 Planning Networks
This chapter describes how to configure and verify protection in the production and isolation zones of the OceanCyber 300+OceanProtect X8000 1.7.0+NetBackup 10.3 backup storage ransomware protection solution.
- Networking diagram 1 in the LLD template for reference
Figure 3-3 Template of the ransomware protection storage solution (for external OceanCyber)

Figure 3-4 Networking diagram of the configuration example
The networking is described as follows:
- Production zone: In this document, the production zone consists of one production host, one set of OceanProtect X8000 Backup Storage, one backup server (deployed together with the media server), one data security appliance, and one 10GE switch.
- The production host is connected to the backup media server through at least two 10GE ETH links of a 10GE switch.
- The OceanProtect X8000 Backup Storage is connected to the backup media server through at least two 10GE links of a 10GE switch.
- The backup server and backup media server are deployed together on the same server.
- The data security appliance is connected to OceanProtect X8000 through a 10GE switch. For details about the port connection, see « Installation Planning and Preparation > Network Planning » in the OceanCyber 300 1.2.0 Installation Guide.
- Isolation zone: In this document, the isolation zone consists of one verification host (optional), one backup storage device OceanProtect X8000, one backup server (deployed together with the media server) (optional), one OceanStor BCManager eReplication management server, and one 10GE switch.
- The verification host is connected to the backup media server through at least two 10GE links of a 10GE switch.
- The OceanProtect X8000 Backup Storage is connected to the backup media server through at least two 10GE links of a 10GE switch.
- The backup server and backup media server are deployed together on the same server.
- The management network of the OceanStor BCManager eReplication management server can communicate with that of the OceanProtect X8000 Backup Storage in the isolation zone.
- Replication link
In the actual test, the replication links between the production zone and isolation zone are connected to one switch. The storage devices in the production zone and isolation zone are connected to the switch through four 10GE optical fibers, two for controller A and the other two for controller B of each storage device.
Table 3-2 Example of IP address planning for the networking (public IP addresses are in the same network segment)
Component | Network Type | Port Rate | IP Address Planning |
|---|---|---|---|
Production host | Management network | One GE port: 1000 Mbit/s | Public IP address (Set this parameter based on the site requirements.) |
Backup service network (connected to the 10GE switch) | One 10GE port: 10 Gbit/s | 192.168.100.x | |
Data security appliance | Management network | One GE port: 1000 Mbit/s | Public IP address (Set this parameter based on the site requirements.) |
Detection and analysis service network (connected to the 10GE switch) | One 10GE port: 10 Gbit/s | 192.168.100.x | |
Backup server | Management network | One GE port: 1000 Mbit/s | Public IP address (Set this parameter based on the site requirements.) |
Backup service network (connected to the 10GE switch) | One 10GE port: 10 Gbit/s | 192.168.100.x | |
OceanProtect X8000 | Management network | One GE port per controller: 1000 Mbit/s | Public IP address (Set this parameter based on the site requirements.) |
Backup service network (connected to the 10GE switch) | Two 10GE ports per controller: 10 Gbit/s | Controller A: 192.168.100.x Controller B: 192.168.100.x | |
Replication link network (connected to the 10GE switch) | Two 10GE ports per controller: 10 Gbit/s | 192.168.101.x to 192.168.101.x | |
OceanStor BCManager eReplication | Management network | One GE port: 1000 Mbit/s | Public IP address (Set this parameter based on the site requirements.) |

The IP address planning is for reference only. The actual configuration depends on the live network.
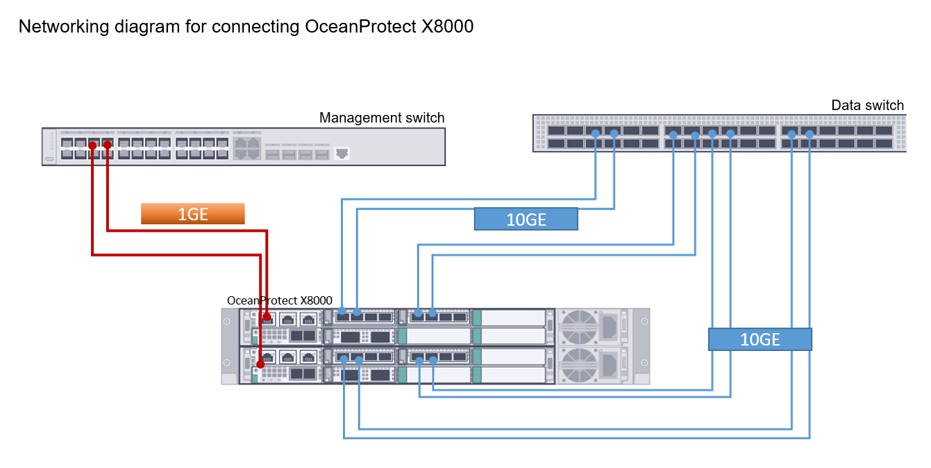
Figure 3-5 Networking for connecting OceanProtect X8000 to switches
3.3 Software and Hardware Planning
3.3.1 Hardware Planning
Table 3-3 Hardware configuration
Name | Description | Quantity | Function |
|---|---|---|---|
Production/Verification host |
| 2 | Data host running the SUSE Linux Enterprise Server 12 |
Backup server |
| 2 | Creates, executes, and schedules backup jobs, and configures backup policies. |
OceanStor BCManager eReplication server |
| 1 | Server where OceanStor BCManager eReplication is installed in the isolation zone. The server management network can communicate with the storage management network in the isolation zone. |
Backup storage in the production zone/isolation zone | Huawei OceanProtect X8000, dual-controller, twelve 1.92 TB SSDs, and two 4-port FE 10GE I/O modules | 2 | Stores backup data. |
10GE switch | Huawei CE6850 | 5 | Used between replication links, between the backup media server and backup storage, and between the backup media server and host |
OceanCyber 300 |
| 1 | Used for backup data detection and analysis in the production zone. |
3.3.2 OceanProtect X8000 Configuration
Table 3-4 Configurations of OceanProtect X8000 in the production zone
Name | Description | Quantity |
|---|---|---|
OceanProtect engine | Huawei OceanProtect X8000 with two controllers | 2 |
10GE front-end interface module | 10 Gbit/s SmartIO interface module | 2 |
10GE interface module for replication between storage devices (If replication link encryption is required, an encryption module must be configured.) | 10 Gbit/s SmartIO interface module | 2 |
SSD | Huawei 1.920 TB SSDs | 12 |

If the production center is also used for backup and disaster recovery (DR), you are advised to use two physical ports of each replication NIC for Air Gap replication and the other two physical ports for backup and DR. Each replication NIC has four physical ports. This is to prevent a single replication NIC from being faulty.
Table 3-5 Configurations of OceanProtect X8000 in the isolation zone
Name | Description | Quantity |
|---|---|---|
OceanProtect engine | Huawei OceanProtect X8000 with two controllers | 2 |
10GE front-end interface module | 10 Gbit/s SmartIO interface module | 2 |
10GE interface module for replication between storage devices (If replication link encryption is required, an encryption module must be configured.) | 10 Gbit/s SmartIO interface module | 2 |
SSD | Huawei 1.920 TB SSDs | 12 |
3.3.3 Software and Tools
Table 3-6 Software description
Software Name | Description | Function |
|---|---|---|
OceanStor BCManager eReplication 8.6.0 | OceanStor BCManager eReplication management software | It controls the Air Gap policy to manage replication links and replication ports in the production and isolation zones. It can be deployed on physical servers or mainstream VMs (such as VMware or Hyper-V VMs). If the virtualization platform is VMware ESXi, the version must be 6.5 U1 or later to prevent VMs from restarting unexpectedly due to compatibility issues. |
SUSE12 | SUSE Linux OS | It is deployed on a VM or physical host. |
Red Hat Enterprise Linux 8.5 | Red Hat OS | OS of the NetBackup media server and backup server. |
Xshell | SSH terminal connection tool | Tool for remotely connecting to a host to generate simulated data sources. |
OceanStor DataTurbo 1.5.0 | Client software for source deduplication | This client is deployed on the backup server to perform source deduplication and compression on backup data, reducing the amount of physical data to be transmitted from the backup server to the storage and improving the overall bandwidth capability of backup services. |
OceanCyber 300 1.2.0 | OceanCyber 300 uses the Huawei-developed ransomware detection algorithm and supports unified ransomware protection management for multiple devices of different types. It features accurate detection, high detection performance, comprehensive protection, and fast data restoration. | The entire system is deployed to identify clean copies and perform in-depth copy detection on backup copies generated by backup software for ransomware protection. |
OceanProtect X8000 1.7.0 | OceanProtect X8000 is a high-performance backup storage solution developed by Huawei to meet enterprise-level data protection requirements. | It serves as a backup copy storage device and snapshot storage device for ransomware detection. The entire device is deployed. |
NetBackup OST | NetBackup OpenStorage Technology (OST) provides NetBackup 6.5 and later versions with common interfaces for third-party storage. NetBackup treats OST-enabled devices as disks and enables functions such as intelligent capacity management, media server load balancing, reporting, and lifecycle policies. In addition, NetBackup provides optimized replication. | During backup, data is replicated by the device with OST enabled. In addition, the data does not pass through the NetBackup media server. Only changed data is replicated, saving bandwidth and time. |
4. Configuration Example
This chapter describes how to configure and verify the ransomware protection in the production and isolation zones with OceanProtect X8000 1.7.0+NetBackup 10.3.
4.1 Production Zone Protection
4.1 Production Zone Protection
4.1.1 Configurations in the Production Zone
This section describes how to configure NetBackup, OceanCyber 300, OceanProtect X8000, WORM properties, and backup jobs (for files, VMware, and Oracle).
Configuration process in the production zone

4.1.1.1 Configuring Backup Storage
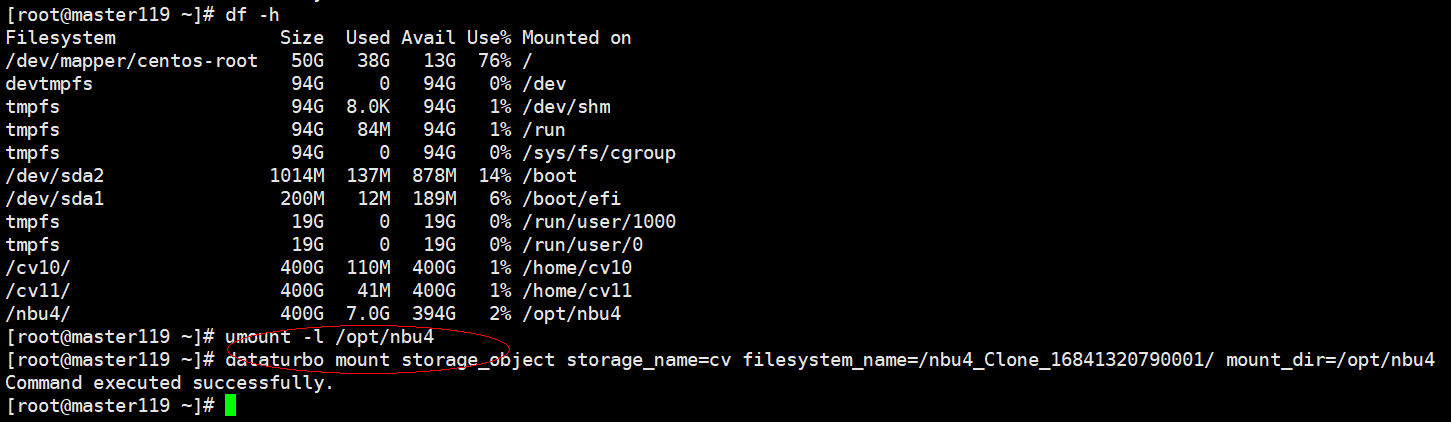
According to the plan in this solution, create one file system and DataTurbo share on OceanProtect X8000. The configuration procedure is as follows: Create a logical port, a file system, and a DataTurbo share.
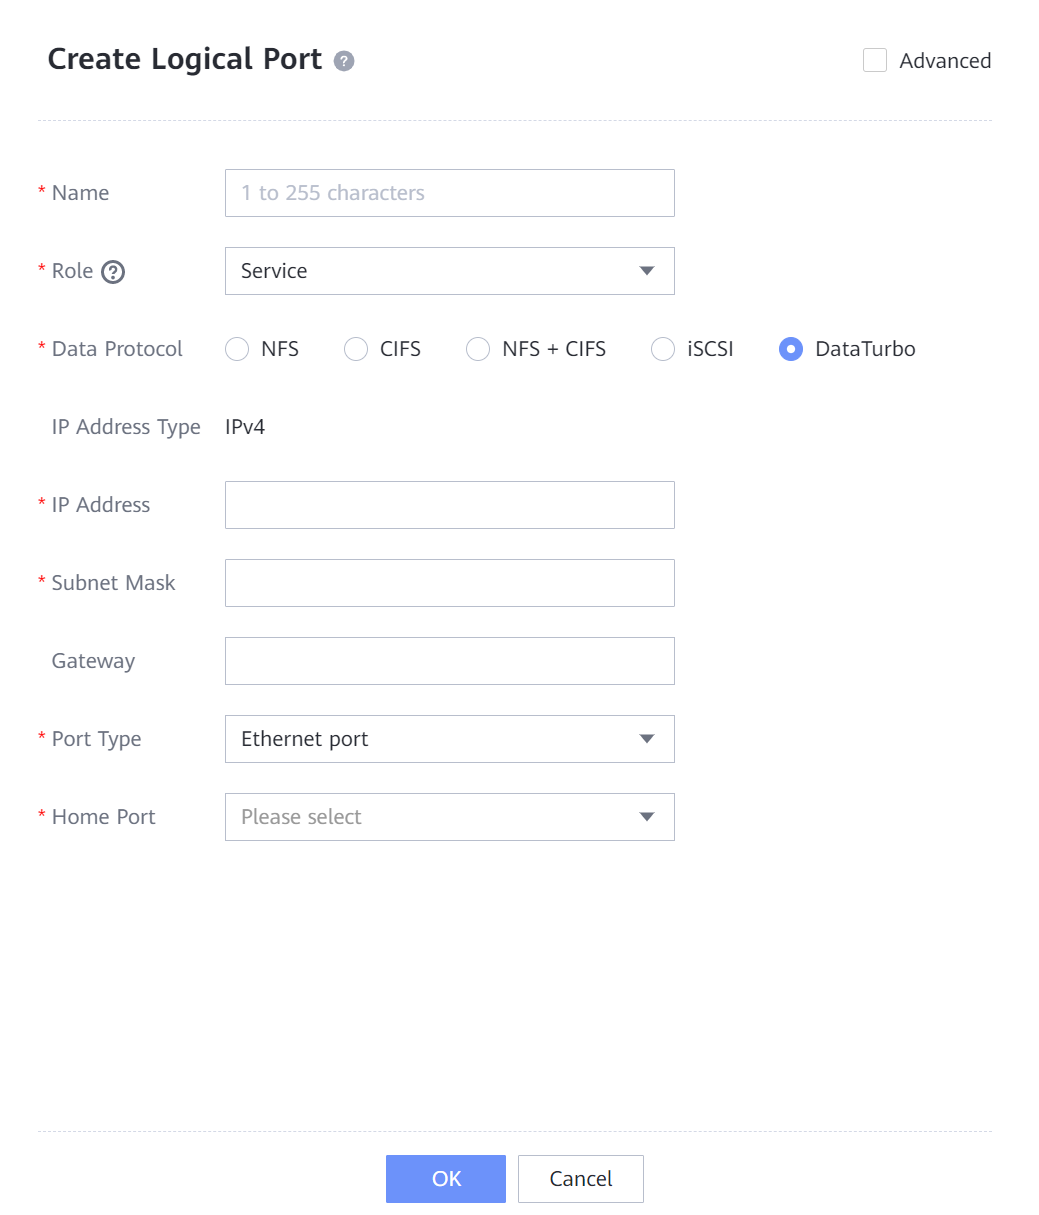
4.1.1.1.1 Creating a Logical Port on OceanProtect X8000
In this practice, OceanProtect X8000 has three physical ports. Configure one physical port as the logical port of the DataTurbo data protocol for mounting the file system to the NetBackup backup software.
Select System_vStore to create a logical port. Set Role to Service and Data Protocol to DataTurbo to match the mounting mode of the third-party backup software, as shown in the following figure.
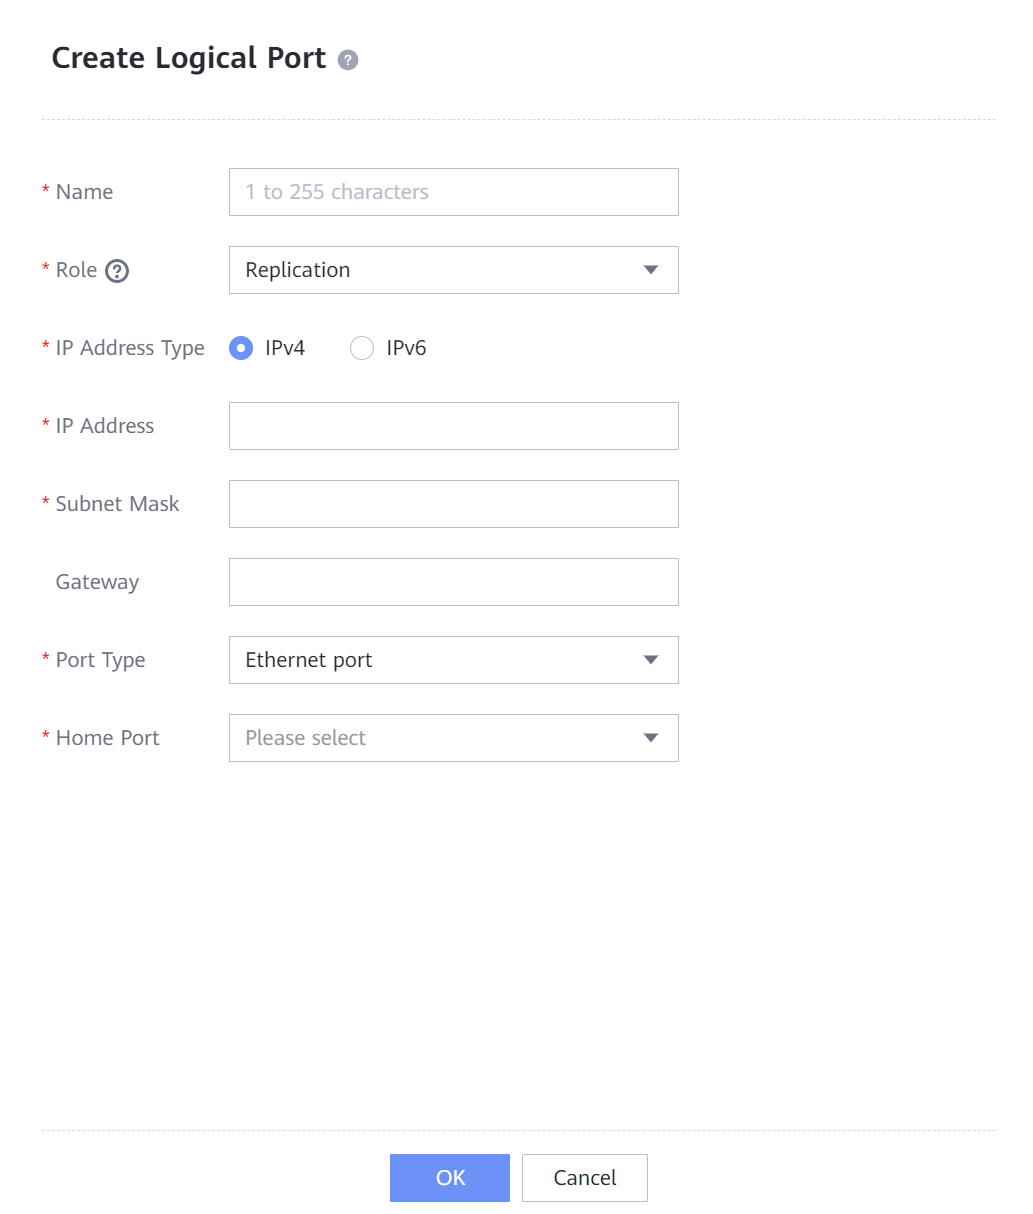
Configure the other two physical ports as replication logical ports, which are used for remote replication. Set Role to Replication. The following figure shows a replication logical port configuration example.

- Options of Role include:
- Management: A port of this role is used by a vStore administrator to log in to the system for management.
- Service: A port of this role is used to access services, such as accessing CIFS shares of file systems.
- Management + service: A port of this role is used to access services or for a vStore administrator to log in to the storage system for management.
- Data Protocol is displayed only when Role is set to Service or Management + service.
- NFS, CIFS, and NFS + CIFS are applicable to file service configuration.
- iSCSI is applicable to block service configuration.
- DataTurbo is applicable to DataTurbo client service configuration.
- DataTurbo can implement source deduplication from NetBackup to the OceanProtect, further improving the backup performance. To use this function, you need to install the plug-in on NetBackup. The compatibility requirements must be met. For details, visit the OceanProtect Compatibility Query website.
- Enabling DataTurbo is mutually exclusive with pre-event blacklisting, in-event I/O behavior detection, and honeyfile detection.
4.1.1.1.2 Creating an OceanProtect X8000 vStore DataTurbo Administrator

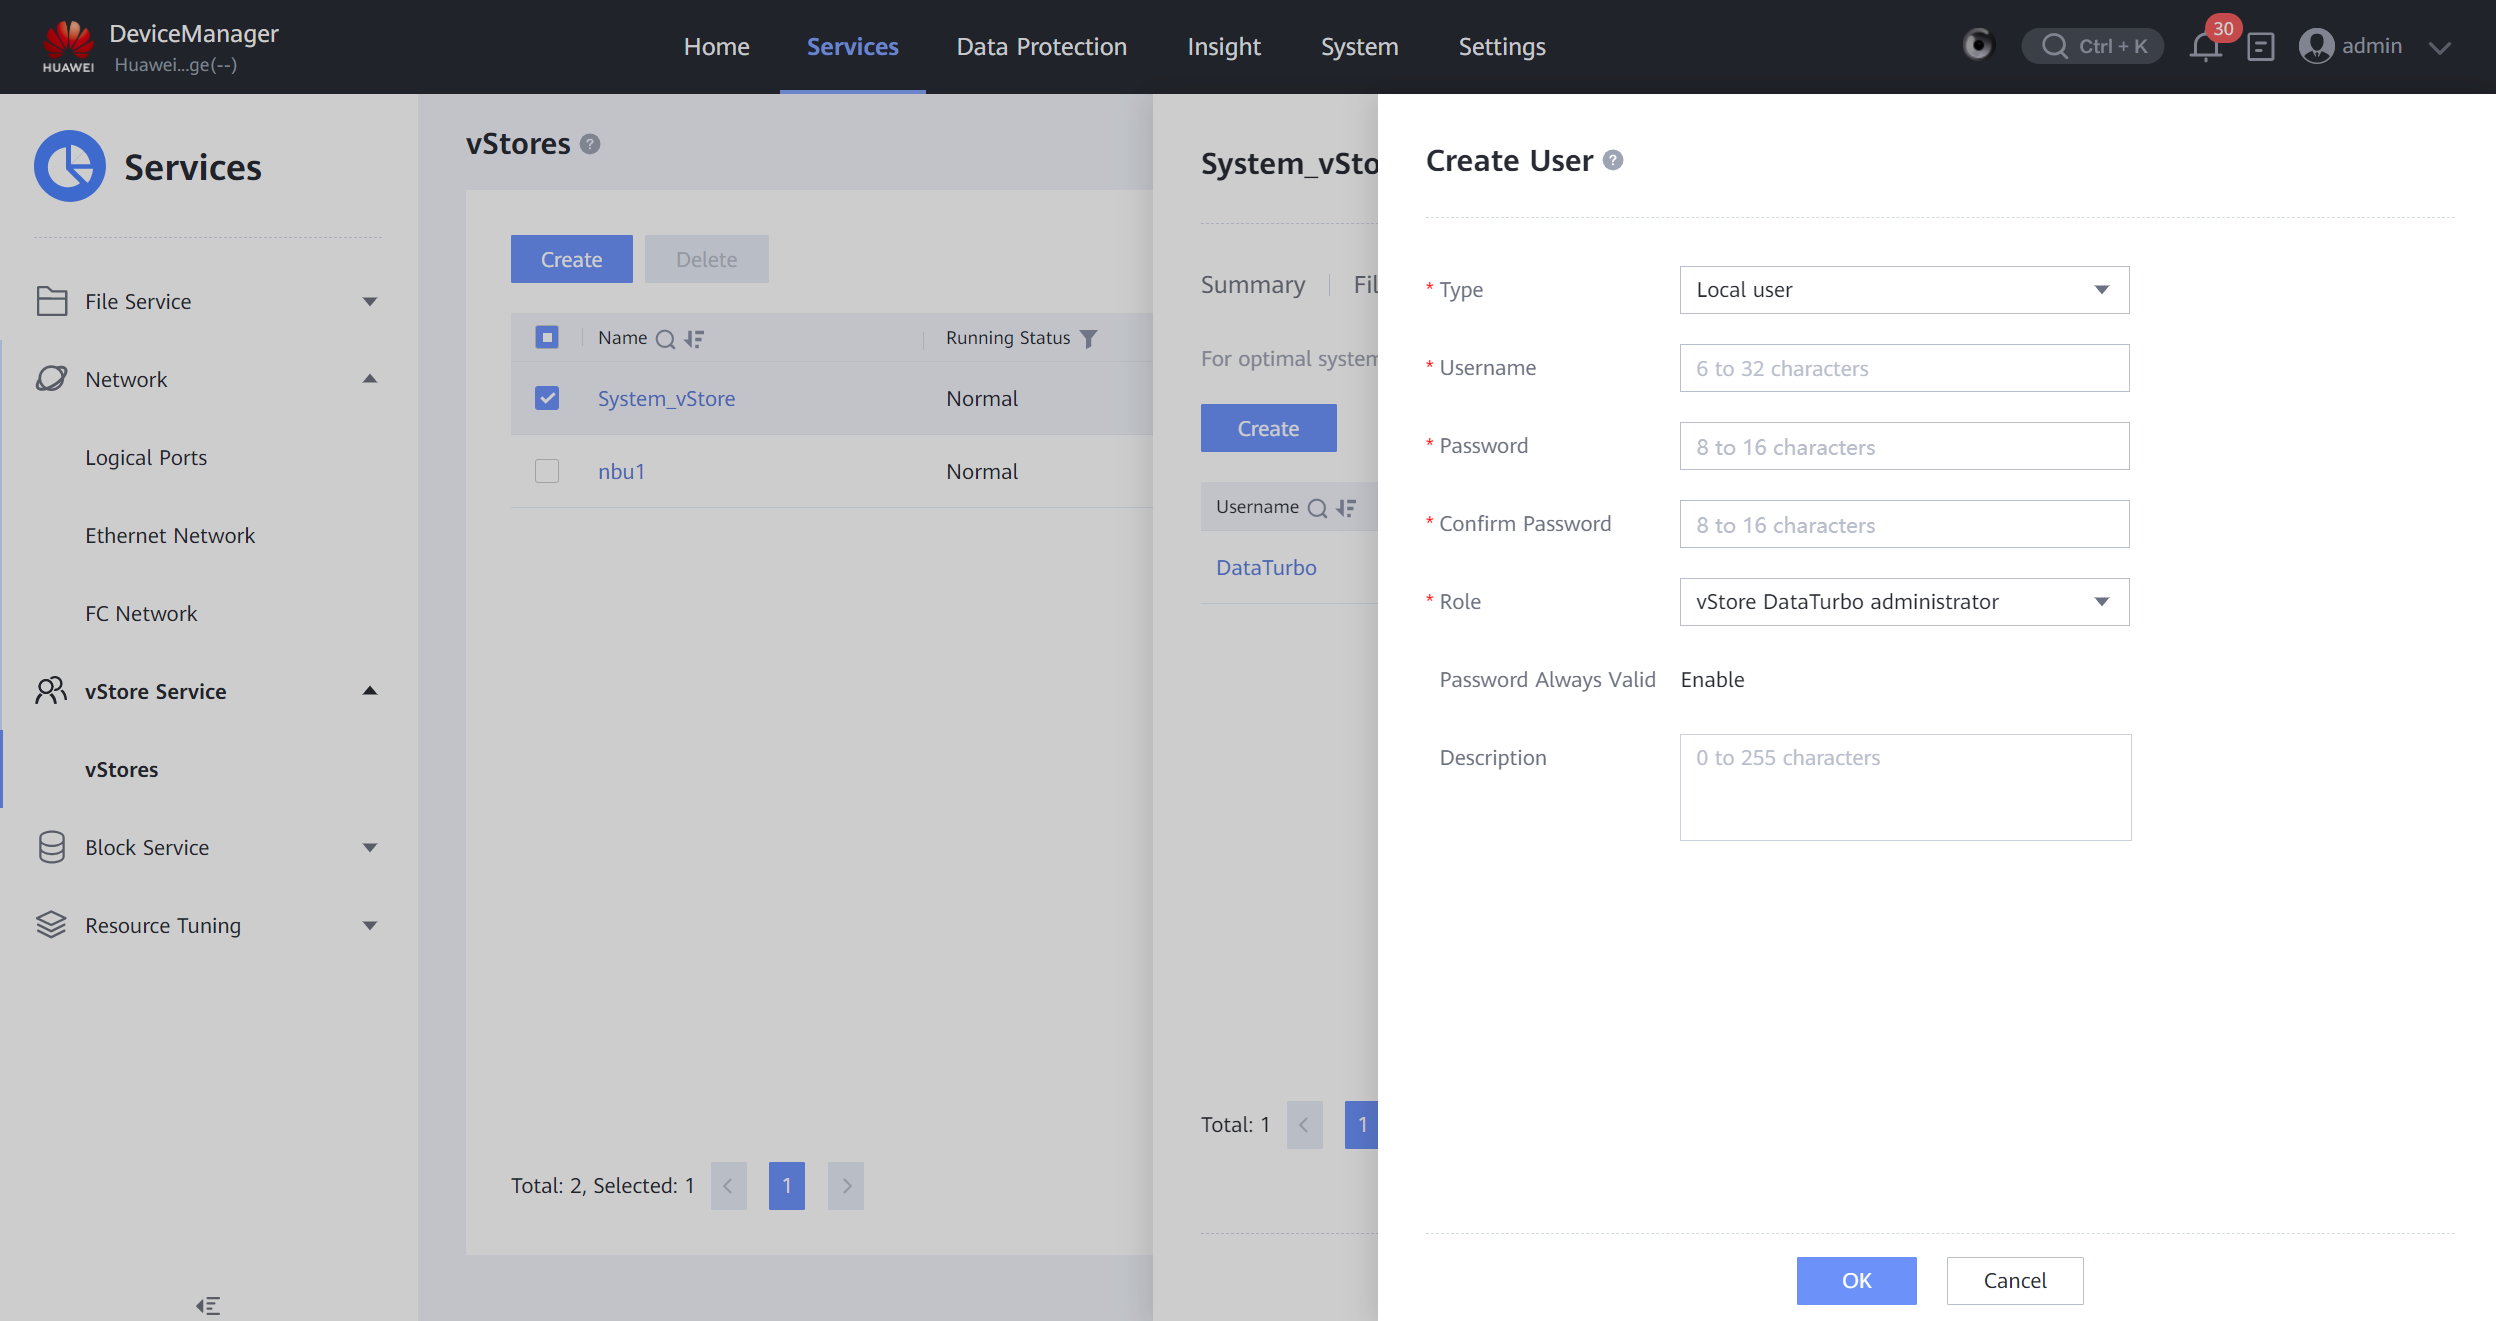
- By creating a DataTurbo user, a client can access the shared file system over the network.
2. A DataTurbo administrator can be created only under vStore System_vStore.
3. A maximum of 16 DataTurbo users can be created.
To create a DataTurbo user, choose Services > vStore Service > vStores, select a vStore in use, select User Management, and click Create. The Create User page is displayed. On the Create User page, set Type to Local user, enter the name and password, and set Role to vStore DataTurbo administrator. The following figure shows a configuration example.
4.1.1.1.3 Creating a Data Protection Administrator for OceanProtect X8000
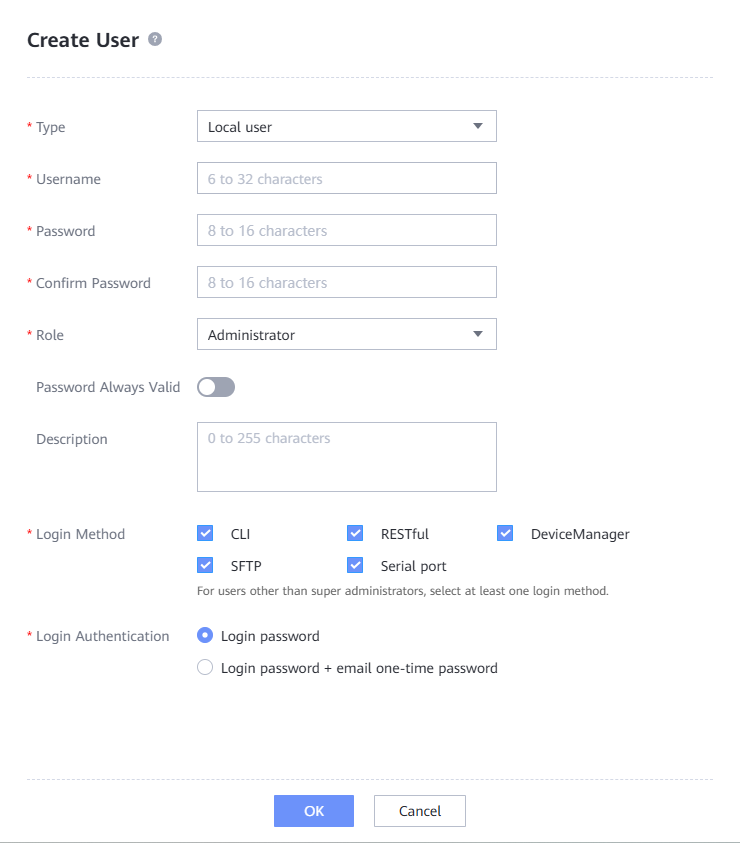
Create a data protection administrator for adding an OpenStorage Server to NetBackup. To be specific, choose Settings > Users and Roles. On the Users tab page, create a user with Role set to Data protection administrator and set other parameters, as shown in the following figure.

4.1.1.1.4 Creating a File System and a Share
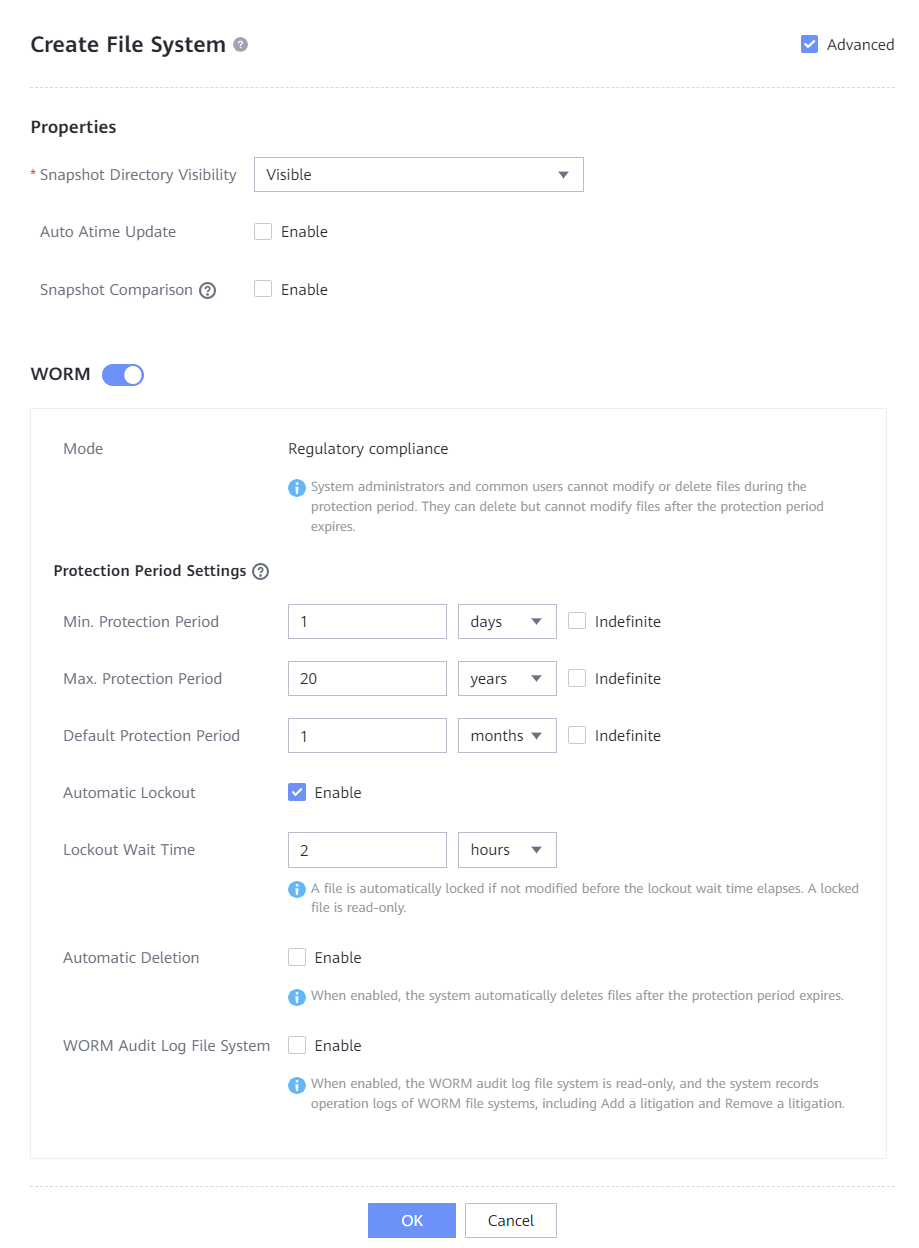
Step 1 Create a file system, enter the file system name, set Owning vStore and Owning Storage Pool, and set Security Style to UNIX. Select Advanced, and configure the WORM properties of the file system. Set Min. Protection Period, Max. Protection Period, and Default Protection Period (the retention period of WORM backup copies is the same as that of backup policies of the backup software, and must be within the minimum to maximum protection period of the file system). Enable Automatic Lockout, and set Lockout Waiting Time (2 hours is recommended in this practice). Data of backup copies is locked after the lock waiting period expires. The protection period of backup copies is the default protection period.
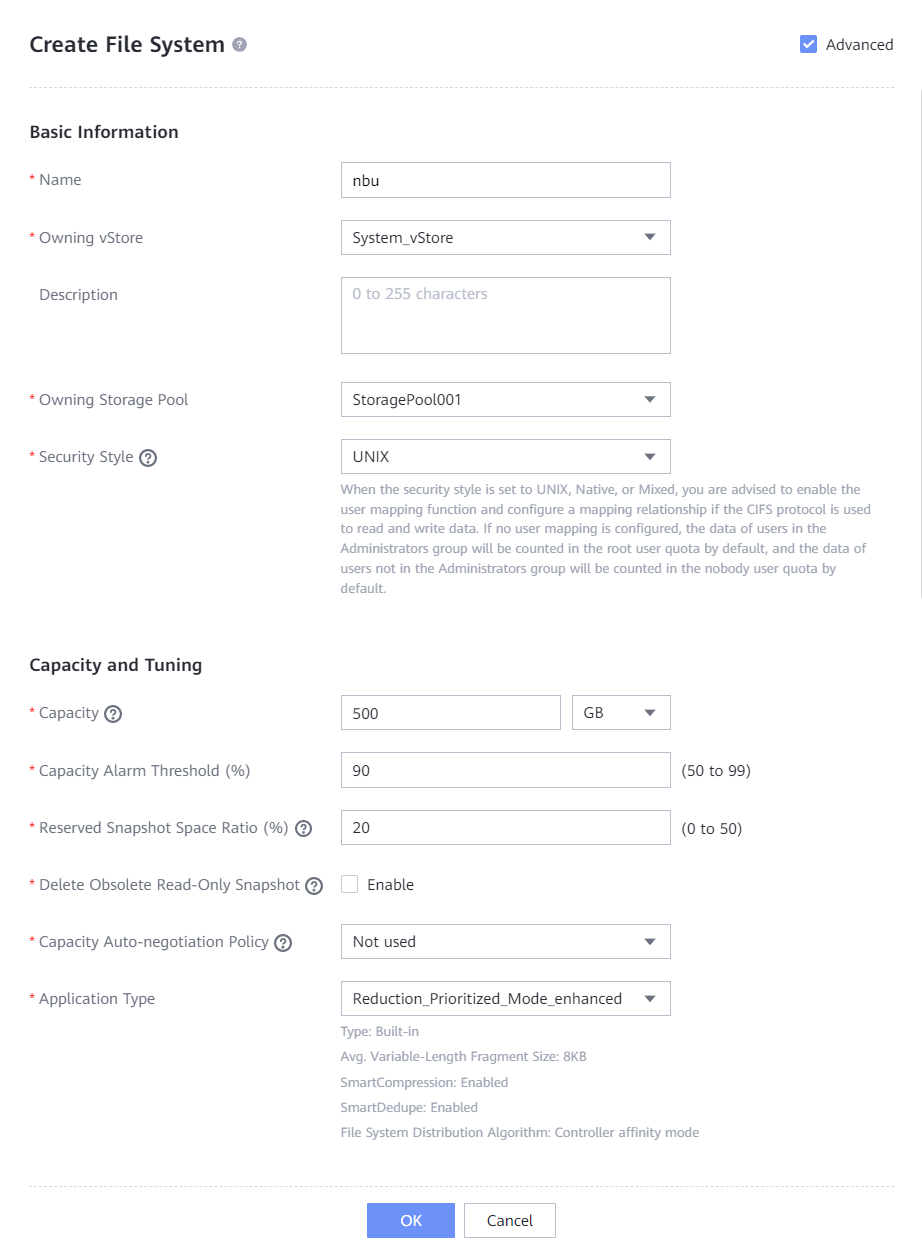
Step 2 Choose Services > Shares > DataTurbo Shares > Create, select the file system for which you want to create a share, click Add, and select the created vStore DataTurbo administrator.

Step 3 Select Advanced, configure the WORM properties of the file system, set Min. Protection Period, Max. Protection Period, and Default Protection Period of the file system, and disable Automatic Lockout.
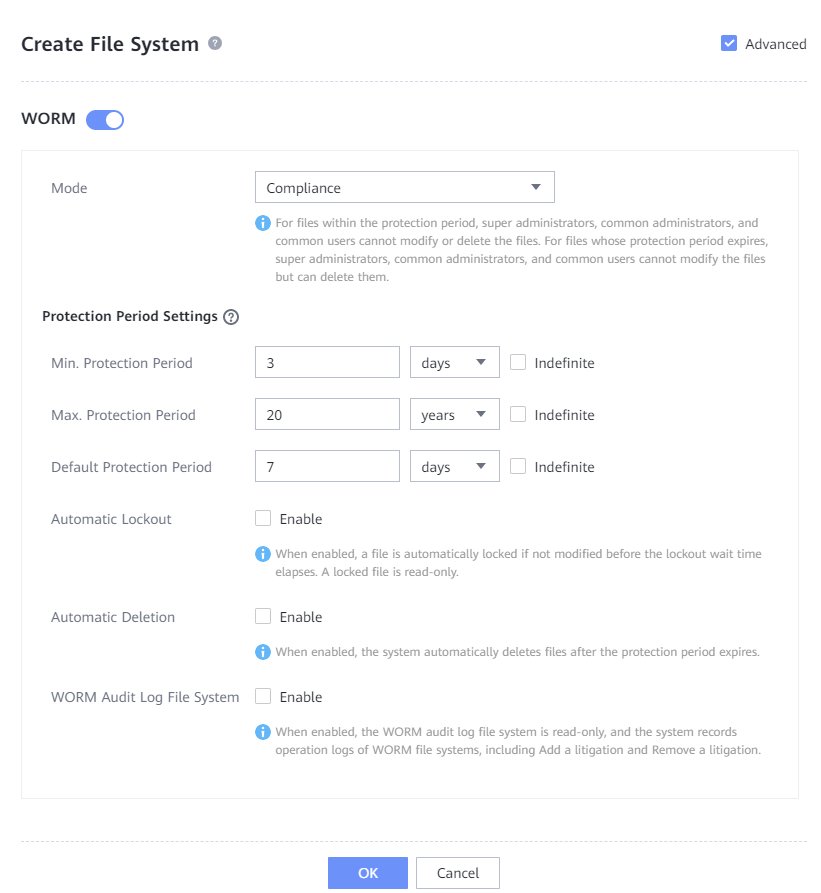

- Min. Protection Period: indicates the minimum protection period of a file in the WORM file system. The protection period of a file in the WORM file system cannot be shorter than the minimum protection period.
[Value range]
0 to 70 years or Indefinite.
- Max. Protection Period: indicates the maximum protection period of a file in the WORM file system. The protection period of a file in the WORM file system cannot be longer than the maximum protection period.
[Value range]
1 day to 70 years or Indefinite.
—-End
4.1.1.2 Installing NetBackup and Its OST Plug-in
NetBackup needs to be installed for on the NetBackup media server, NetBackup master server, and production server. For details about NetBackup installation, see the NetBackup official documentation. In addition, the OST plug-in needs to be installed on the NetBackup media server. For details about the installation, see the HyperProtect Backup Storage OST Plug-in User Guide.

The host names of the NetBackup media server, NetBackup master server, and host running the NetBackup client in the isolation zone must be the same as those in the production zone.
4.1.1.3 Integrating Using OceanStor DataTurbo
4.1.1.3.1 Integrating with the Backup Host
In this practice, the OceanStor DataTurbo protocol is used for integration with the backup host. For details, see the OceanProtect Backup Storage 1.6.0-1.7.0 SourceDedupe User Guide.
Step 1 Run the unzip OceanStor_DataTurbo_X.X.X_Linux.zip command to decompress the OceanStor_DataTurbo_X.X.X_Linux.zip software package.
Step 2 Go to the OceanStor_DataTurbo_X.X.X_Linux directory and install the software.
Run the sh install.sh command to install the software as the default DataTurbo user and select a desired performance level as prompted.
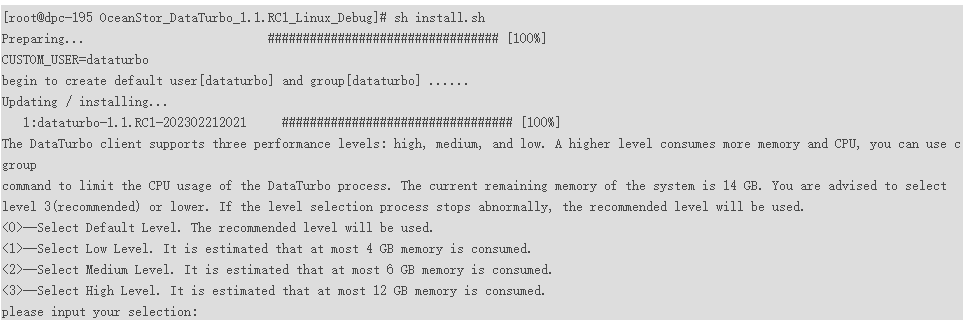
Step 3 After the required performance level is selected, check that the installation is successful.

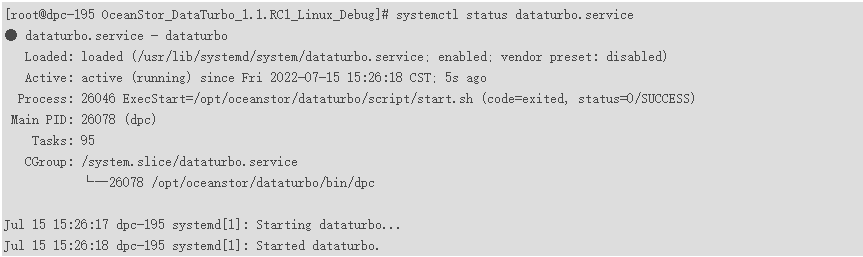
Step 4 After the installation is complete, run the systemctl start DataTurbo.service command to start the DataTurbo service.
Step 5 Run the systemctl status DataTurbo.service command to check whether the service is started successfully.
If the command output contains Active: active (running), the service is started successfully.
—-End
4.1.1.3.2 Integrating Third-Party Backup Software
4.1.1.3.2.1 Not Using NetBackup OST
In this practice, the DataTurbo protocol is used for integration with the backup host. For details, see the OceanProtect Backup Storage 1.6.0-1.7.0 SourceDedupe User Guide.
4.1.1.3.2.2 Using NetBackup OST
Step 1 Log in to NetBackup media server and add a DataTurbo link.


When creating a DataTurbo link, set the storage_name field to the management IP address of the backup storage and ensure that the IP address is the same as that for adding an OpenStorage Server.
In the following example, the storage name is xx and the logical port IP addresses are IP1 and IP2.
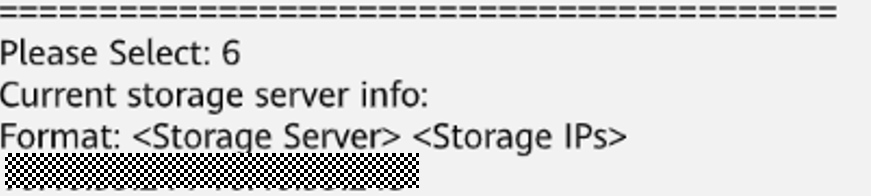
Step 2 an LSU according to the following table.

Step 3 Log in to the media server node, go to the /opt/HyperProtect/scripts directory, and run the command in the following figure to add the storage IP address.
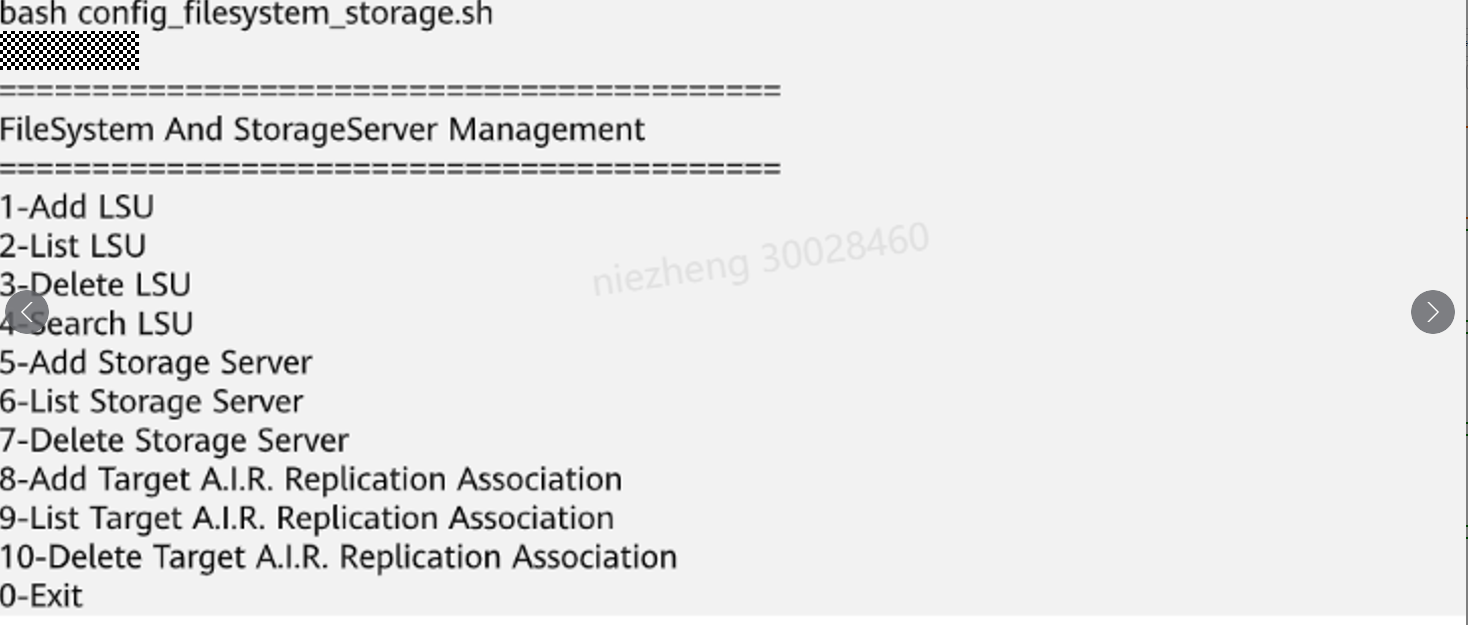
- Enter 5 to add a storage server.
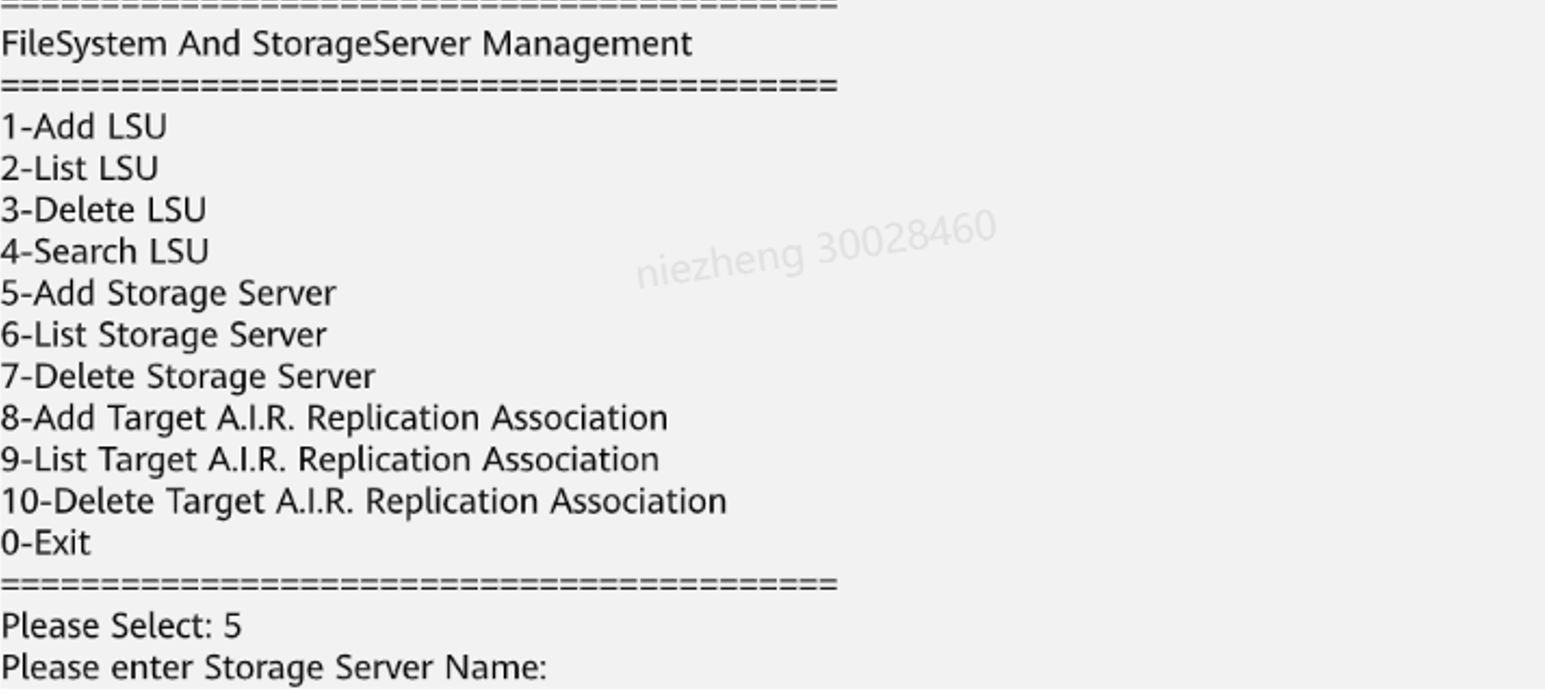
- Enter the storage server name. The IP address entered following Please enter StorageServer Name: must be the same as the management IP address specified when the LSU is added.

- Enter the logical IP address of DataTurbo created on the storage device.

- Enter 6 to check whether the addition is successful.
—-End
4.1.1.4 Configuring the NetBackup Backup Environment (Not Using NetBackup OST)
4.1.1.4.1 Starting NetBackup Administrator Console
Step 1 Log in to the NetBackup master server host and import environment variables. The IP address in the following command is a local IP address.
export DISPLAY=IP:0.0
Step 2 Run the following script in the bin directory where NetBackup is installed to switch to the login GUI:
./jnbSA
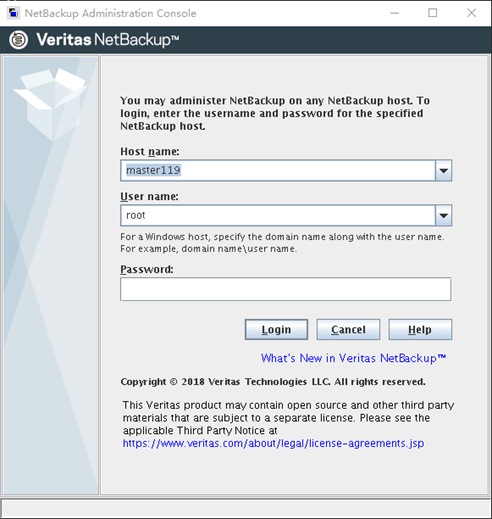
Step 3 On the login page that is displayed, enter the password of user root of the NetBackup master server and click Login. The NetBackup configuration management page is displayed.
—-End
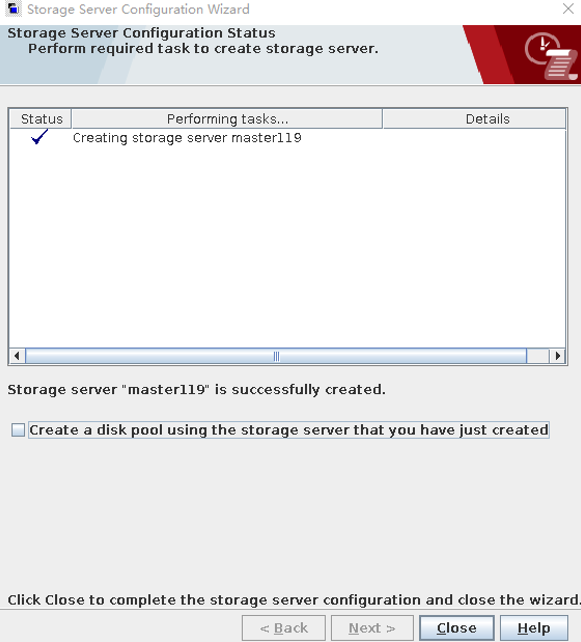
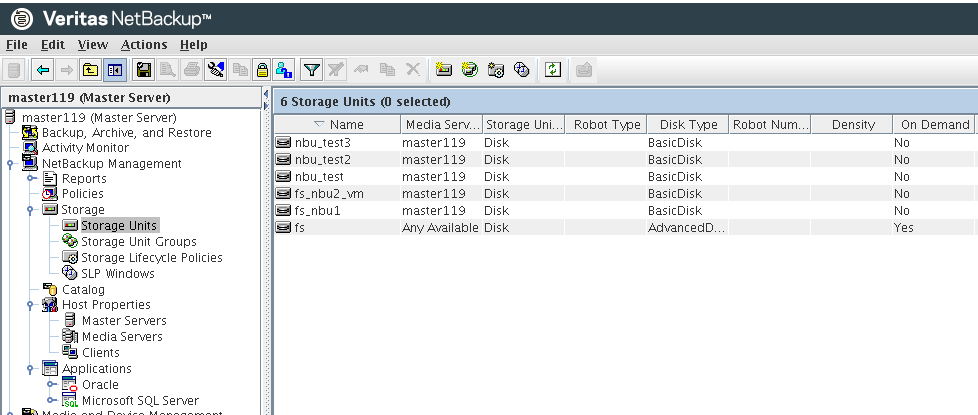
4.1.1.4.2 Configuring Storage Units
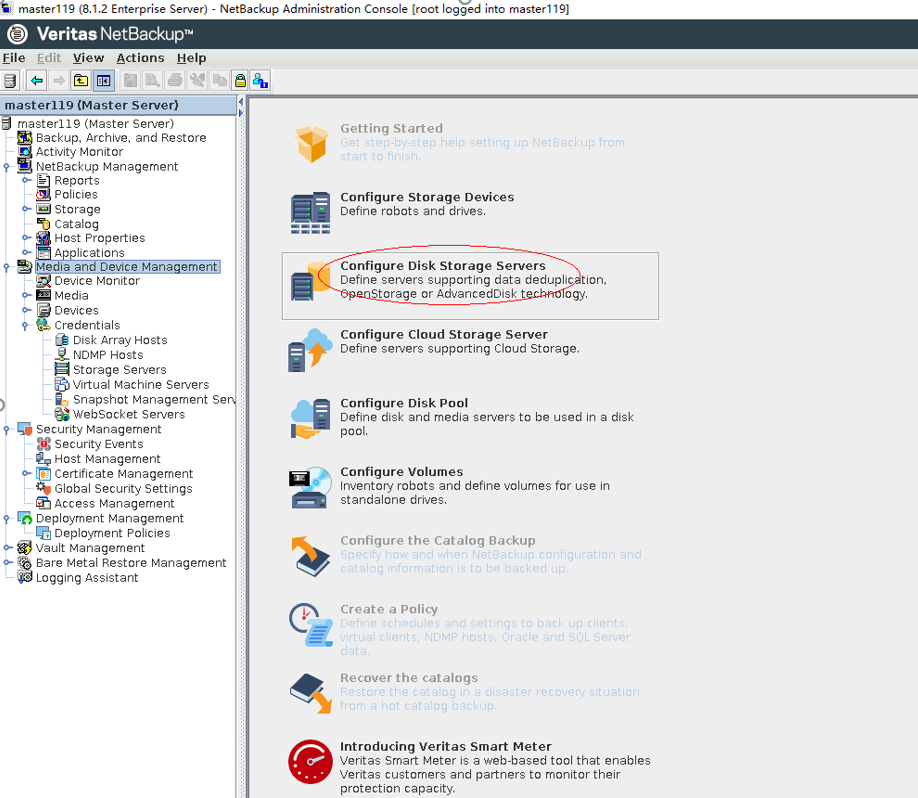
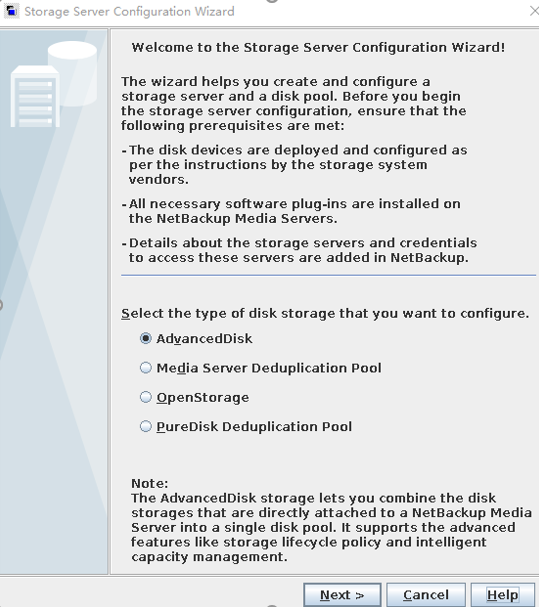
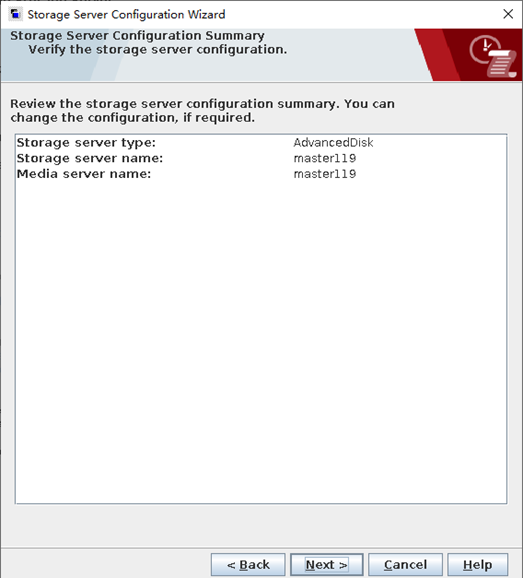
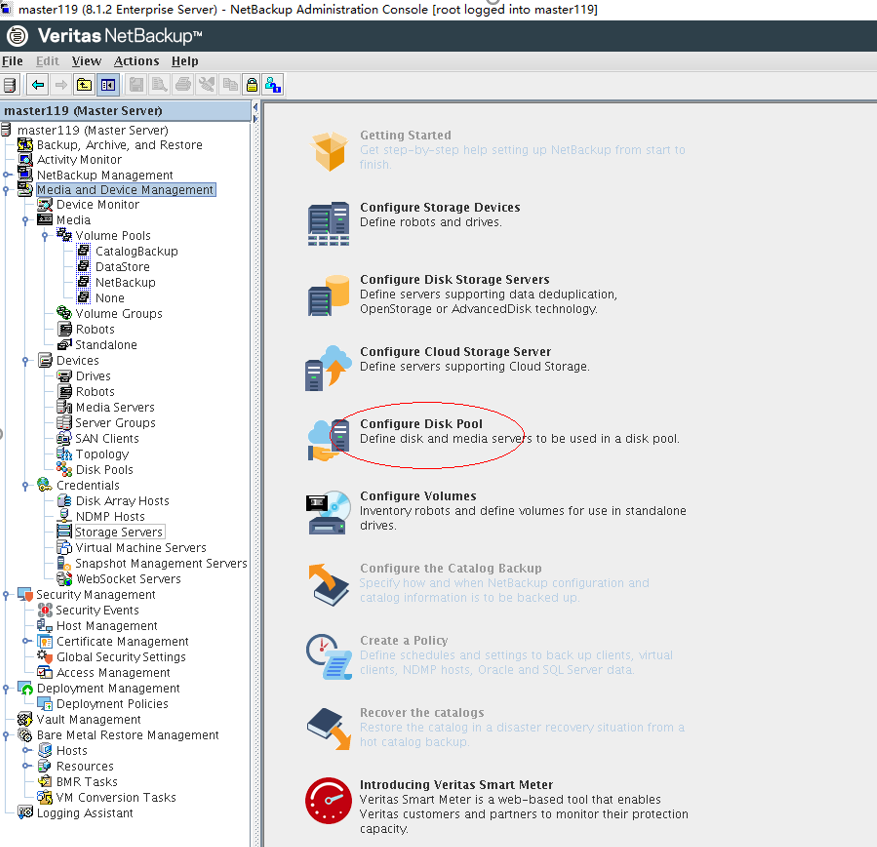
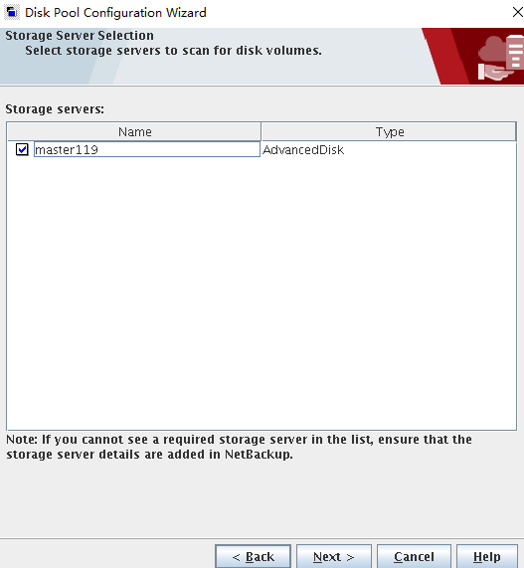
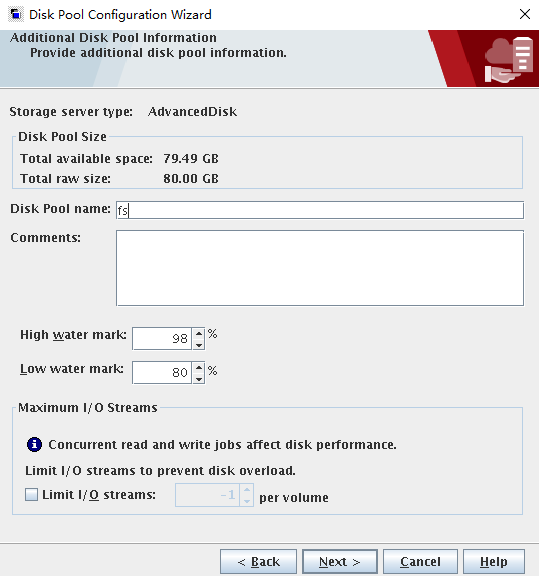
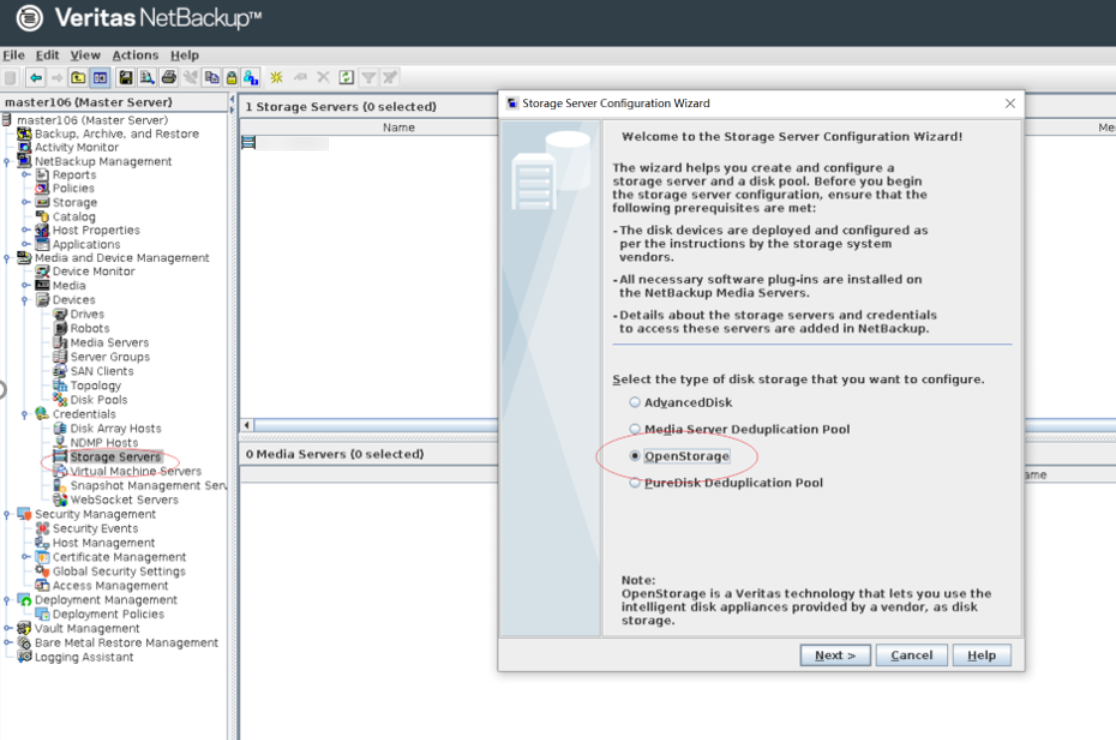
Step 1 On the Media and Device Management page, select Configure Disk Storage Servers. On the configuration wizard page that is displayed, select AdvancedDisk and complete the configuration as prompted.
Step 2 Configure a disk pool. On the Media and Device Management page, select Configure Disk Pool. The configuration wizard page is displayed.
Select AdvancedDisk and click Next.

Select storage servers.
Select a path. The path has been mounted to the OceanProtect X8000 storage file system using the DataTurbo protocol.

Enter a name.
Step 3 Create a storage unit. Go to the page for creating a storage unit. Choose Storage > Storage Units, right-click and select New Storage Unit from the shortcut menu to create a storage unit. Enter a name and create a storage unit as instructed.
—-End
4.1.1.4.3 Configuring the NetBackup Policy
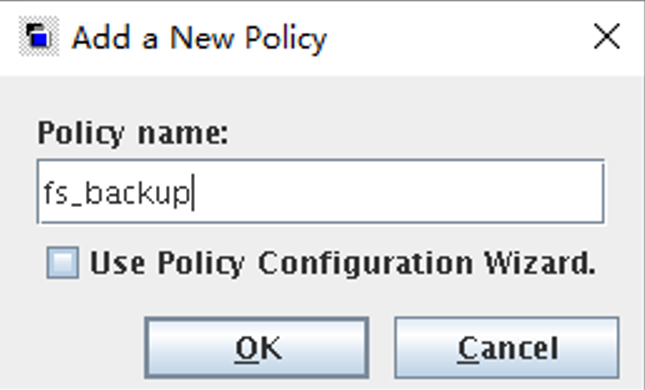
Step 1 Choose Policies on the left, click Add new policy, and enter a policy name. The following figure shows a configuration example.
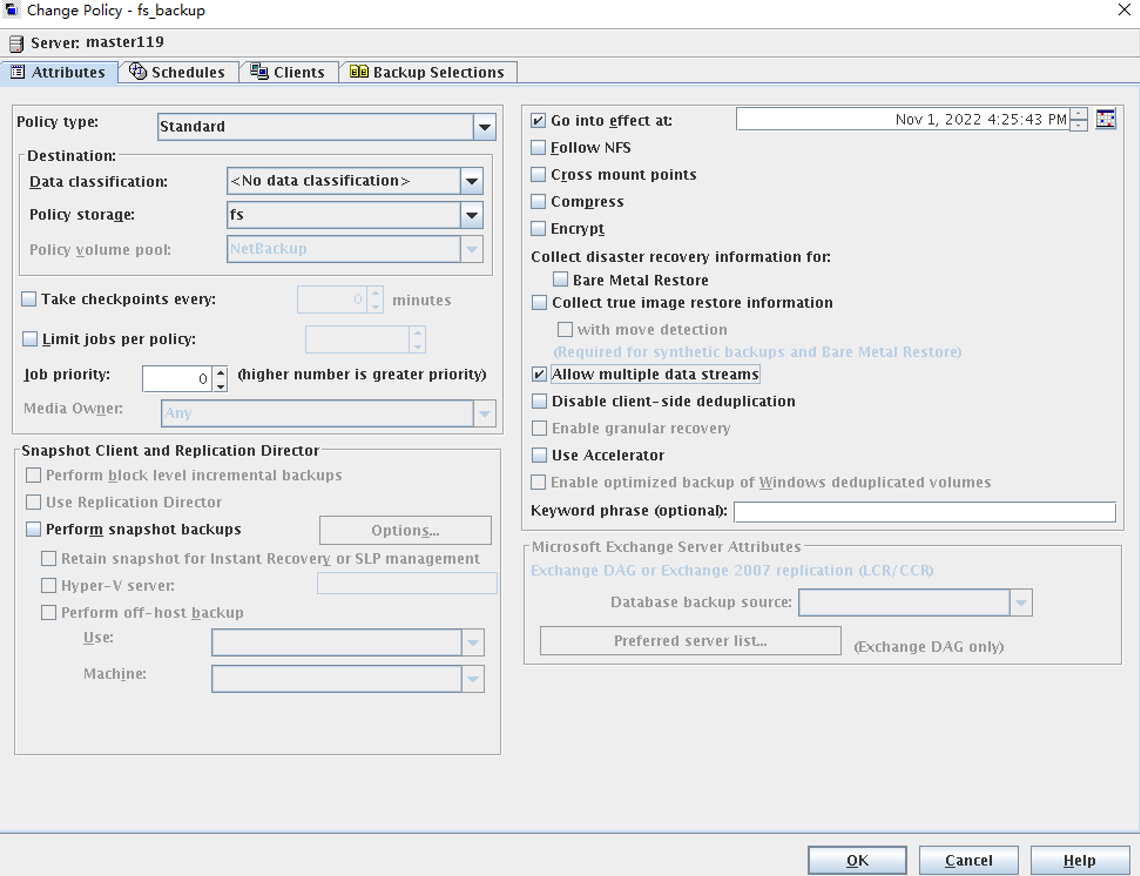
Step 2 On the Attributes tab, set Policy type to Standard and select a created storage unit group in Policy storage.
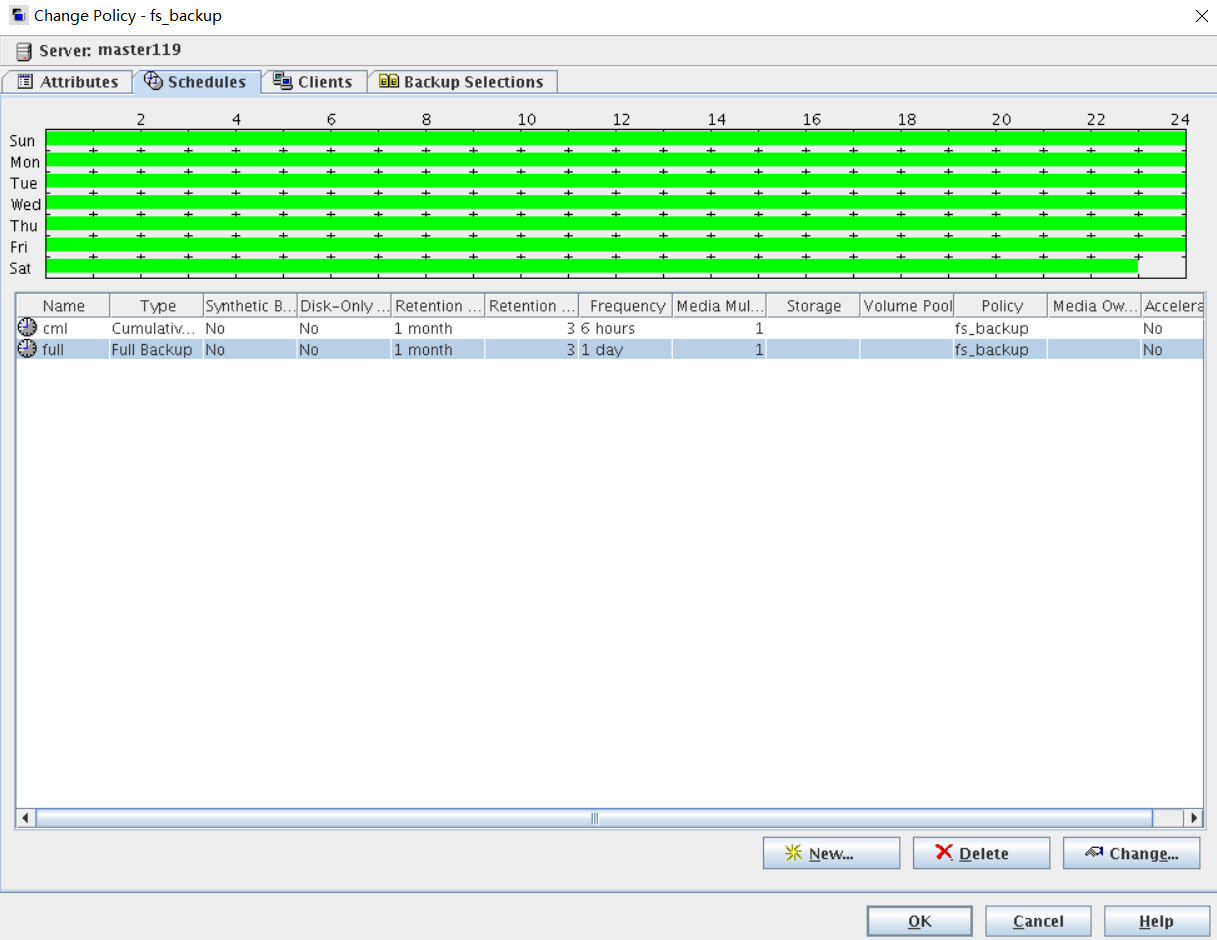
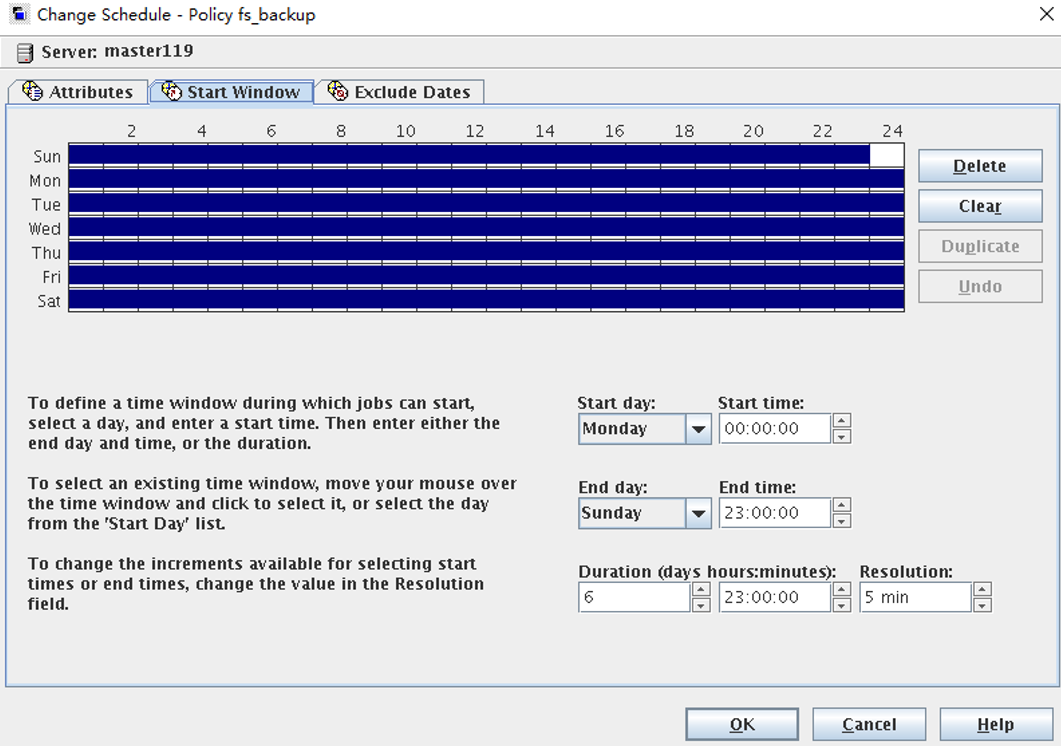
Step 3 On the Schedules tab, create a full or incremental backup policy (the retention period must be the same as that of the OceanProtect WORM file system) and set the open time window.
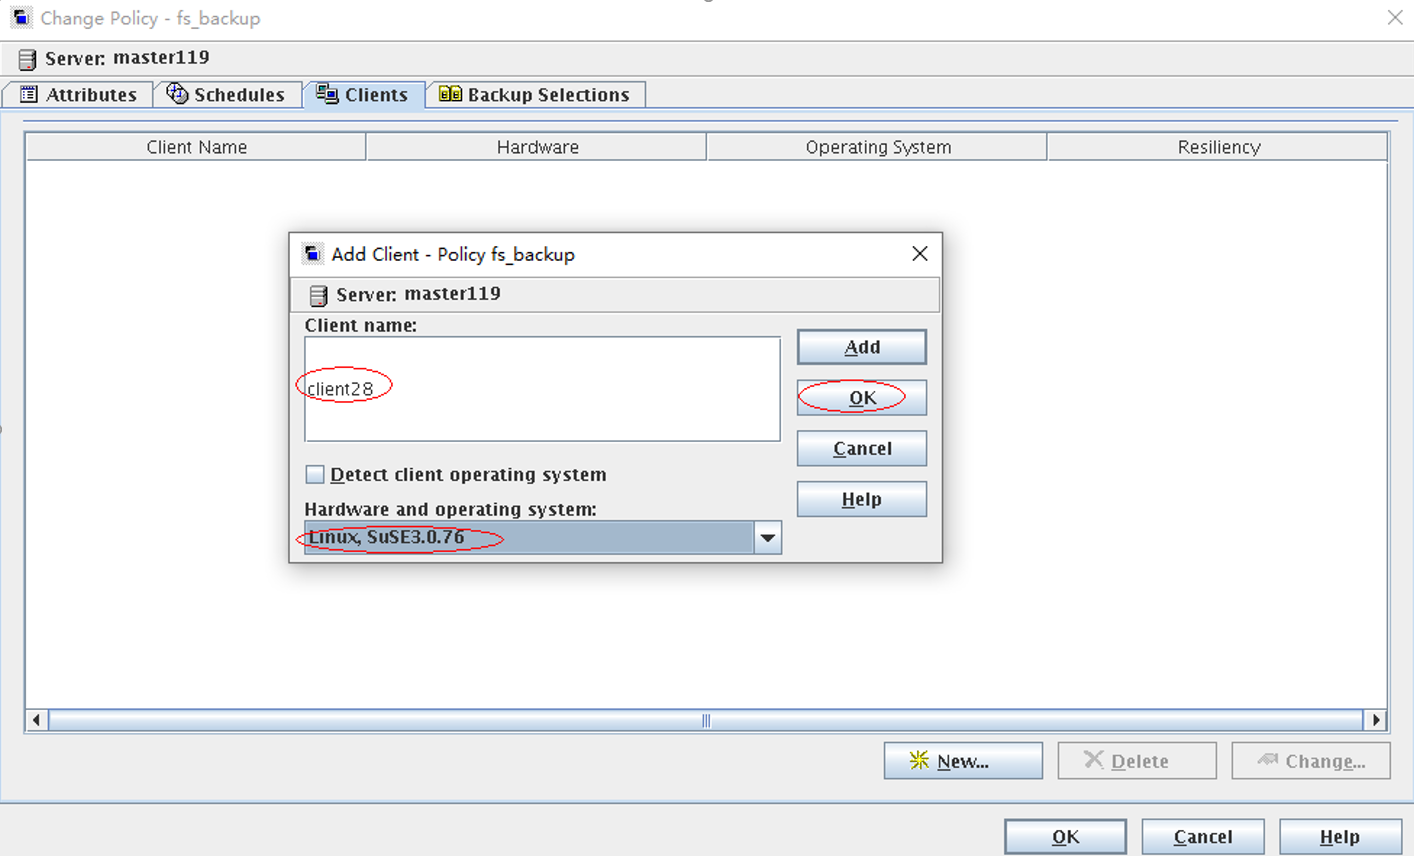
Step 4 On the Clients tab, add the client host.
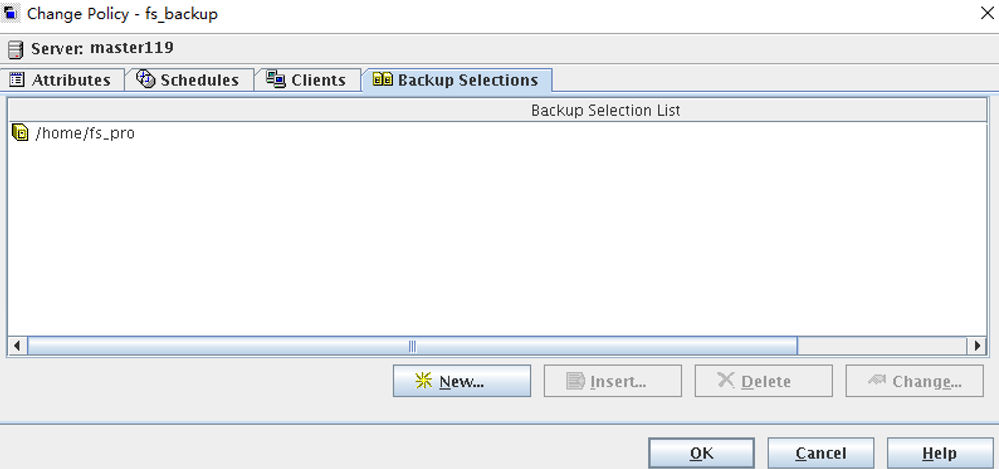
Step 5 On the Backup Selections tab, click New and select the file directory to be backed up.
—-End
4.1.1.5 Configuring the NetBackup Backup Environment (Using NetBackup OST)
4.1.1.5.1 Starting NetBackup Administrator Console
Step 1 Log in to the NetBackup master server host and import environment variables. The IP address in the following command is a local IP address.
export DISPLAY=IP:0.0
Step 2 Run the ./jnbSA command in the bin directory of the NetBackup master server to switch to the GUI. On the displayed page, enter the password of user root of the NetBackup master server and click Login. The NetBackup configuration management page is displayed.

—-End
4.1.1.5.2 Adding an OpenStorage Server
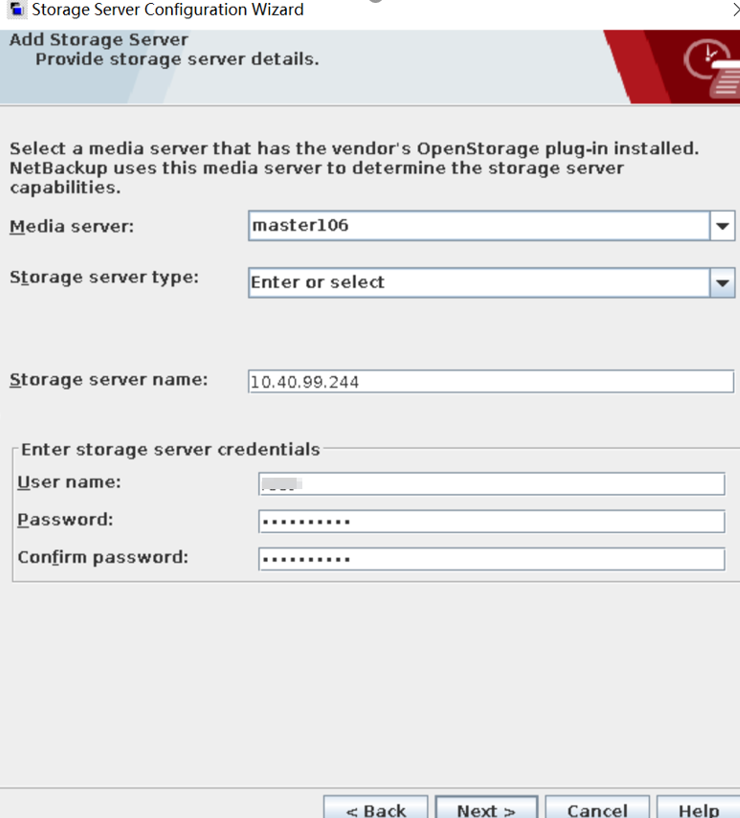
Step 1 Log in to the NetBackup master server, choose Media and Device Management > Credentials > Storage Server, and create a storage server. Select the OpenStorage type. On the storage server details page, set Media server, enter Hyperprotect in the Storage server type text box, and set Storage server name to the storage name set in Using NetBackup OST. Set User name and Password to the username and password of the data protection administrator created in 4.1.1.1.3 Creating a Data Protection Administrator for OceanProtect X8000. After the information is entered, click Next to create the storage server.
Click Next to complete the creation.
—-End
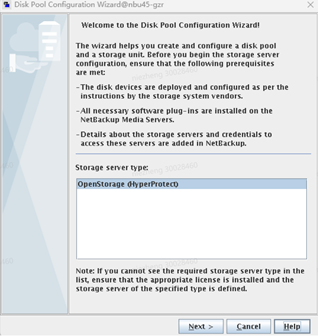
4.1.1.5.3 Creating a Disk Pool
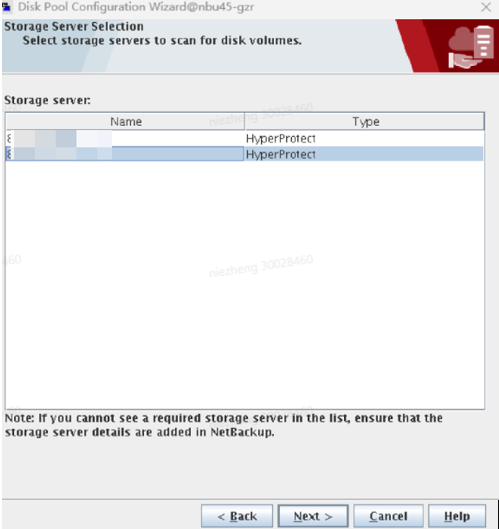
Step 1 Log in to the NetBackup master server, choose Media and Device Management > Devices > Disk Pools, and create a disk pool. Set Storage server type to OpenStorage(HyperProtect). If OpenStorage(HyperProtect) is not displayed, add an OpenStorage Server by referring to 4.1.1.5.2 Adding an OpenStorage Server.
Step 2 Select an OpenStorage Server.
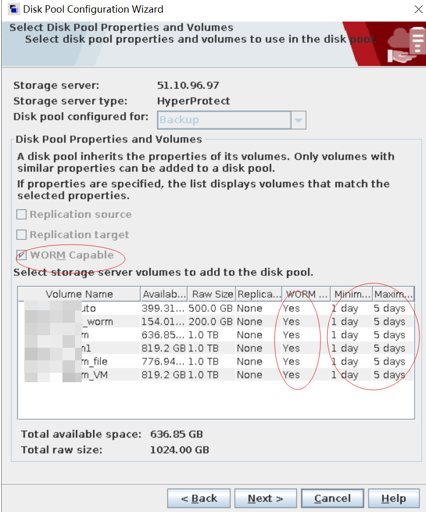
Step 3 Select WORM Capable to filter WORM file systems and select disk volumes.
—-End
4.1.1.5.4 Configuring Storage Units
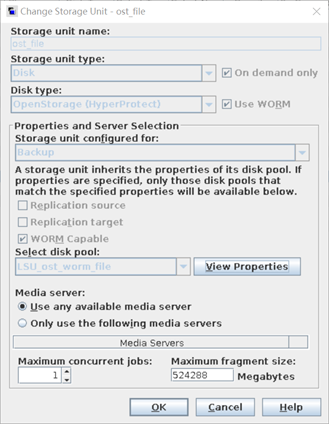
Step 1 On the NetBackup management console, choose NetBackup Management > Storage > Storage Units, right-click on the page to create a storage unit, and set the parameters as follows:
● Set Storage unit type to Disk.
● Set Disk type to OpenStorage(HyperProtect). If this option is unavailable, check whether the OpenStorage Server is successfully created.
● Select a created disk pool under Select disk pool.
● Set Media Server as required and ensure that the HyperProtect plug-in is correctly installed on the NetBackup media server.
—-End
4.1.1.6 Configuring the Data Security Appliance
This section describes how to manually install OceanCyber 300. For details, see the OceanCyber 300 1.2.0 Installation Guide.
Prerequisites
- The hardware is available.
- The OS has been installed.
- You have obtained the OceanCyber installation packages OceanCyber_1.2.0_chart_ARM_64.tgz, OceanCyber_1.2.0_image_ARM_64.tgz, and OceanCyber_1.2.0_SimbaOS_ARM_64.tar.gz.
Procedure
Step 1 Use PuTTY to log in to the server of OceanCyber 300 as user kadmin. For the default password, see the OceanCyber 300 1.2.0 Account List.
Step 2 Use WinSCP to upload the OceanCyber_1.2.0_chart_ARM_64.tgz, OceanCyber_1.2.0_image_ARM_64.tgz, and OceanCyber_1.2.0_SimbaOS_ARM_64.tar.gz software packages to the /home/kadmin directory.
Step 3 Run the su root command to switch to user root.
Step 4 Run the chown kadmin:kgroup /home/kadmin/OceanCyber_1.2.0* command to change the permissions on the software packages.
Step 5 Run the mkdir /opt/k8s/chart command to create the /opt/k8s/chart directory for storing the software packages, and run the tar -zxvf /home/kadmin/OceanCyber_1.2.0_chart_ARM_64.tgz -C /opt/k8s/chart command to decompress the chart package to the directory.
Step 6 Run the sh /opt/k8s/chart/install_script/config_network.sh command to generate the network configuration.
Step 7 Change the IP address of the management network port by referring to steps 4 to 7 in Method 1: Logging In to the iBMC WebUI to Change the IP Address of the Management Network Port.
Step 8 Change the IP address of the service network port by referring to steps 3 to 6 in eth2 (10GE/25GE NIC).
Step 9 Run the reboot command to restart the system.
Step 10 After the system is restarted, perform the following operations:
- Run the following commands to decompress and distribute the container base packages:
- tar -zxvf /home/kadmin/OceanCyber_1.2.0_SimbaOS_ARM_64.tar.gz
- mv SimbaOS/* /opt/k8s/SimbaOS/package/
- chown -R kadmin:kgroup /opt/k8s/SimbaOS/package
2. Run the following command to install the smartkube tool:
- install /opt/k8s/SimbaOS/package/action/smartkube /usr/bin
3. Run the following commands to initialize the container platform. 172.16.128.101 is the IP address of the cluster node, that is, the IP address of NIC eth1. 192.168.145.165 is the new IP address of the management network port. 172.16.145.166 and 172.16.145.167 are the cluster floating IP addresses. They must be available and in the same network segment as the IP addresses of cluster nodes.
- su kadmin
- cd /opt
- /opt/k8s/SimbaOS/package/repo/conf/scripts/appctl.py install –managementIP=192.168.145.165 –nodeIP=172.16.128.101 –k8sVIP=172.16.145.166 –serviceVIP=172.16.145.167
Step 11 Run the following commands to install OceanCyber 300:
- su – root
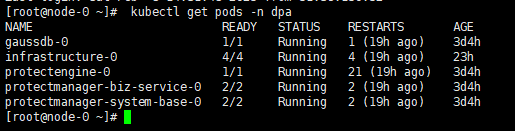
- sh /opt/k8s/chart/install_script/install_oceancyber.sh
Step 12 After the installation is complete, run the kubectl get pod -n dpa command to query the pod information. If the installation is successful, the following information will be displayed.
—-End
4.1.1.6.1 Adding a Storage Device
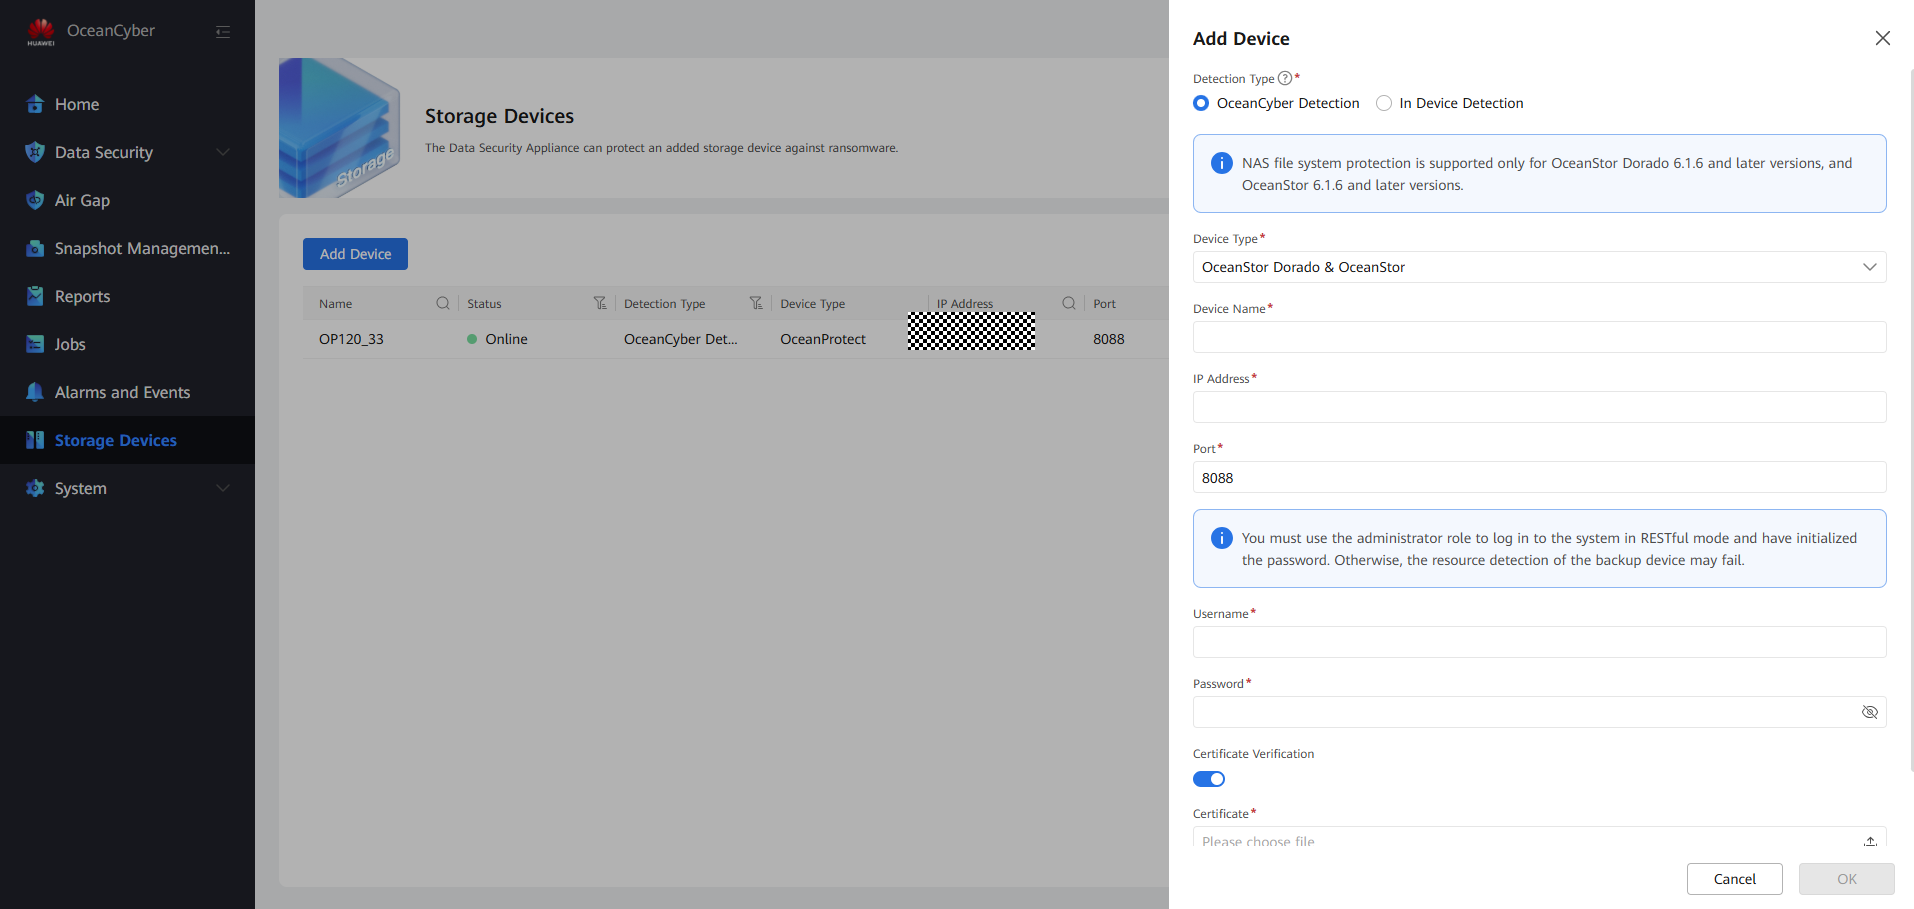
Step 1 Log in to the security appliance, choose Data Security > Storage Device, and click Add Device. The Add Device page is displayed. Set Detection Type to OceanCyber Detection and Device Type to OceanProtect. Customize the device name, enter the storage IP address, username, and password of OceanProtect X8000 at the production end, and click OK.
Step 2 After the storage device is added, locate it on the list, choose More > Resource Scan to scan the local file system of the storage device.
—-End
4.1.1.6.2 Creating and Associating an Intelligent Detection Policy
Step 1 Choose Data Security > Intelligent Detection, click the Intelligent Detection Policies tab, and click Create. Set the policy name. Set Detection Method to Start detection immediately after ransomware detection snapshot generation, enable Uninfected Snapshot Lock (after the function is enabled, uninfected snapshots will change to secure snapshots), and set parameters such as the execution period, retention period, and time window of the detection and analysis snapshot based on service requirements.
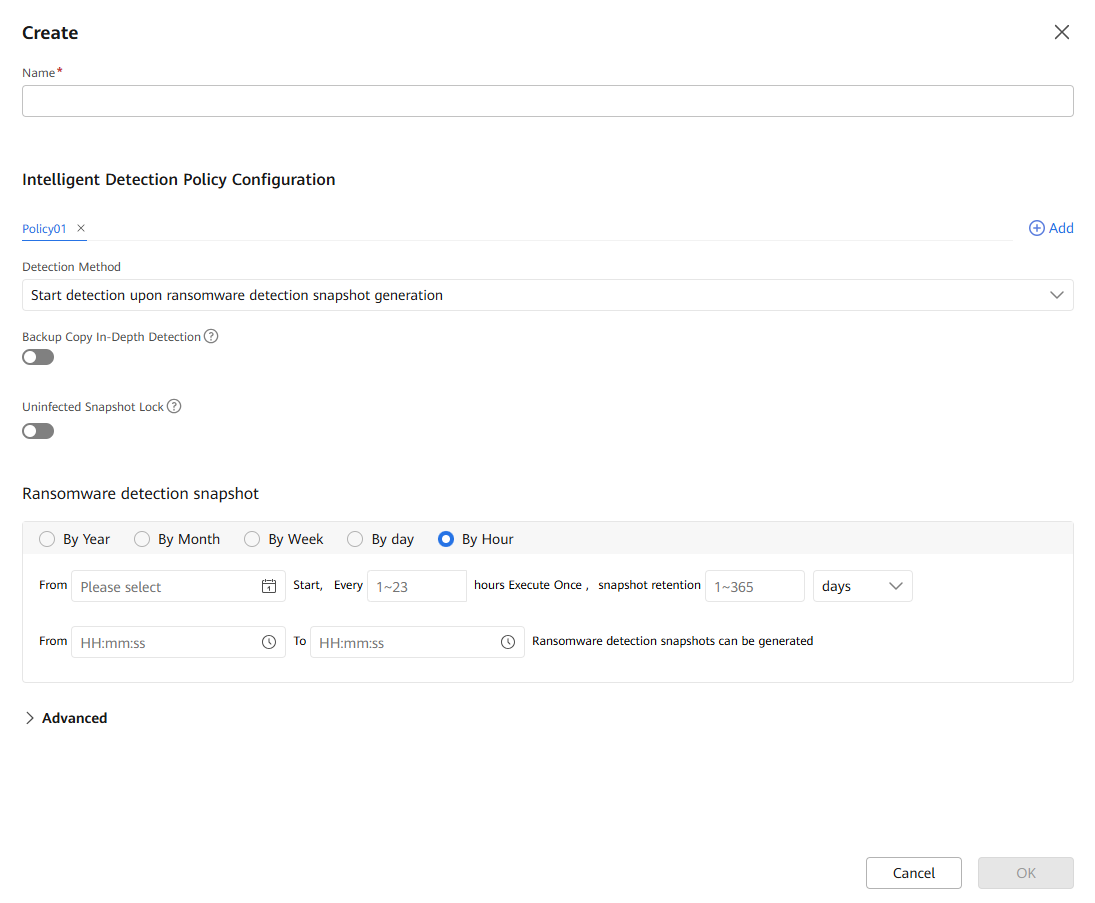
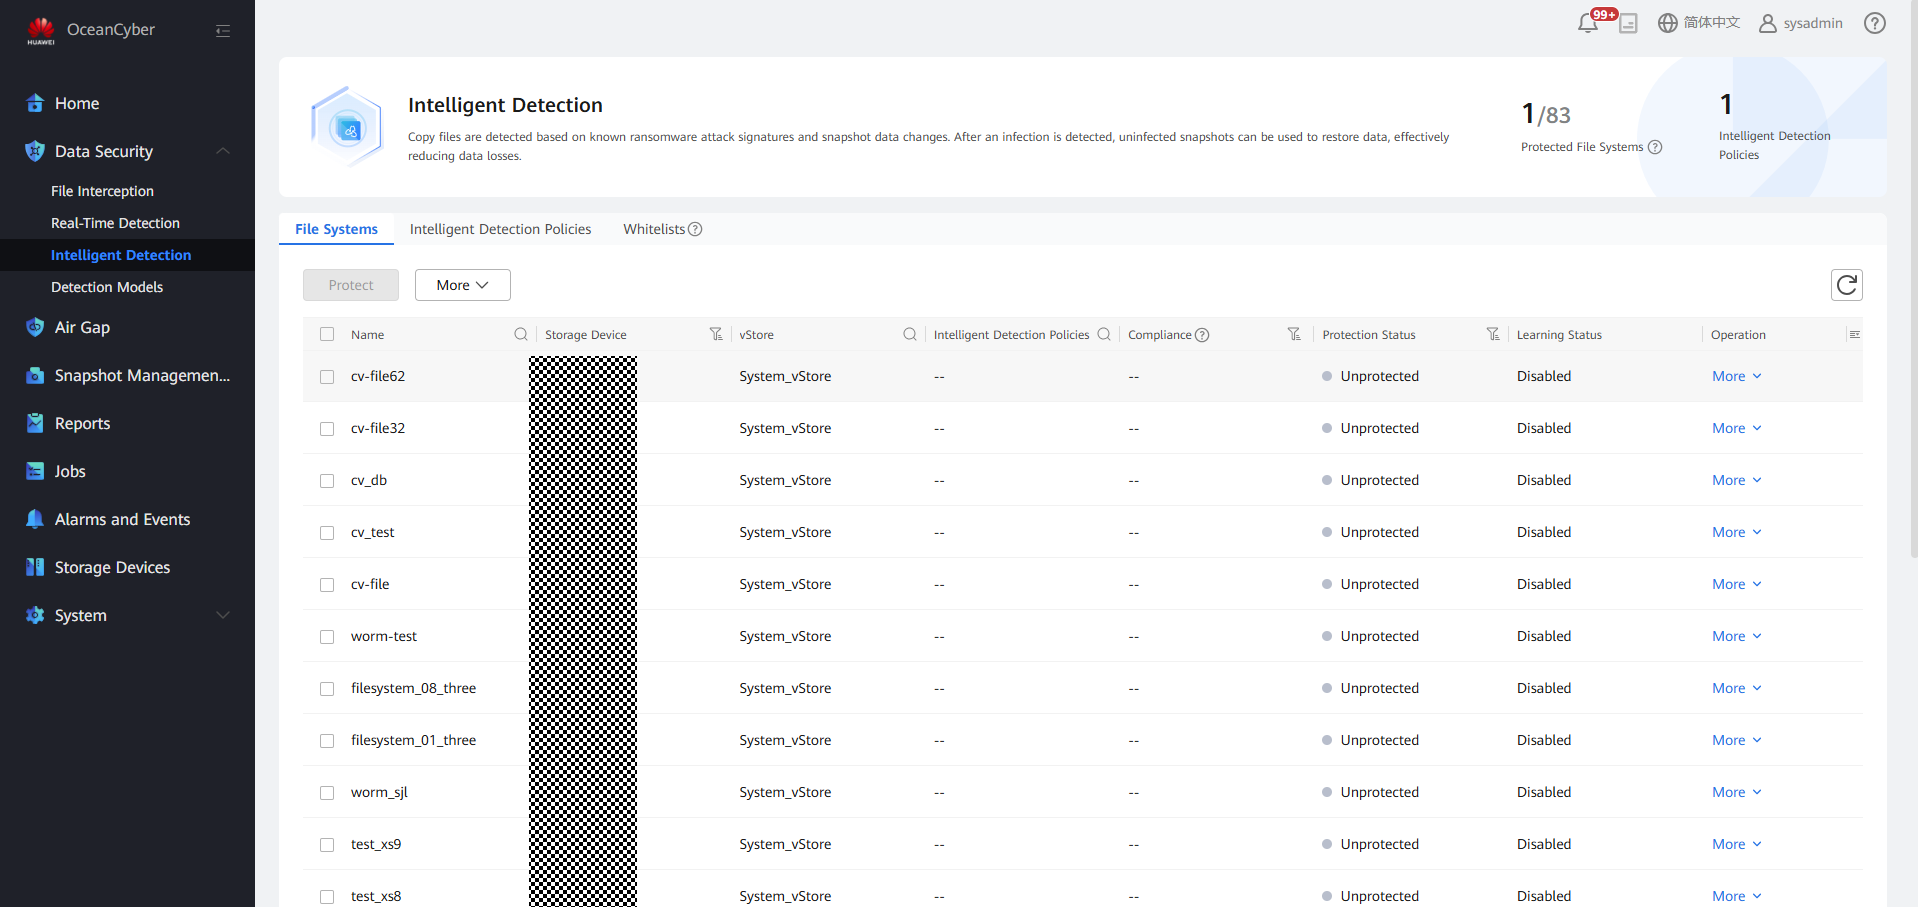
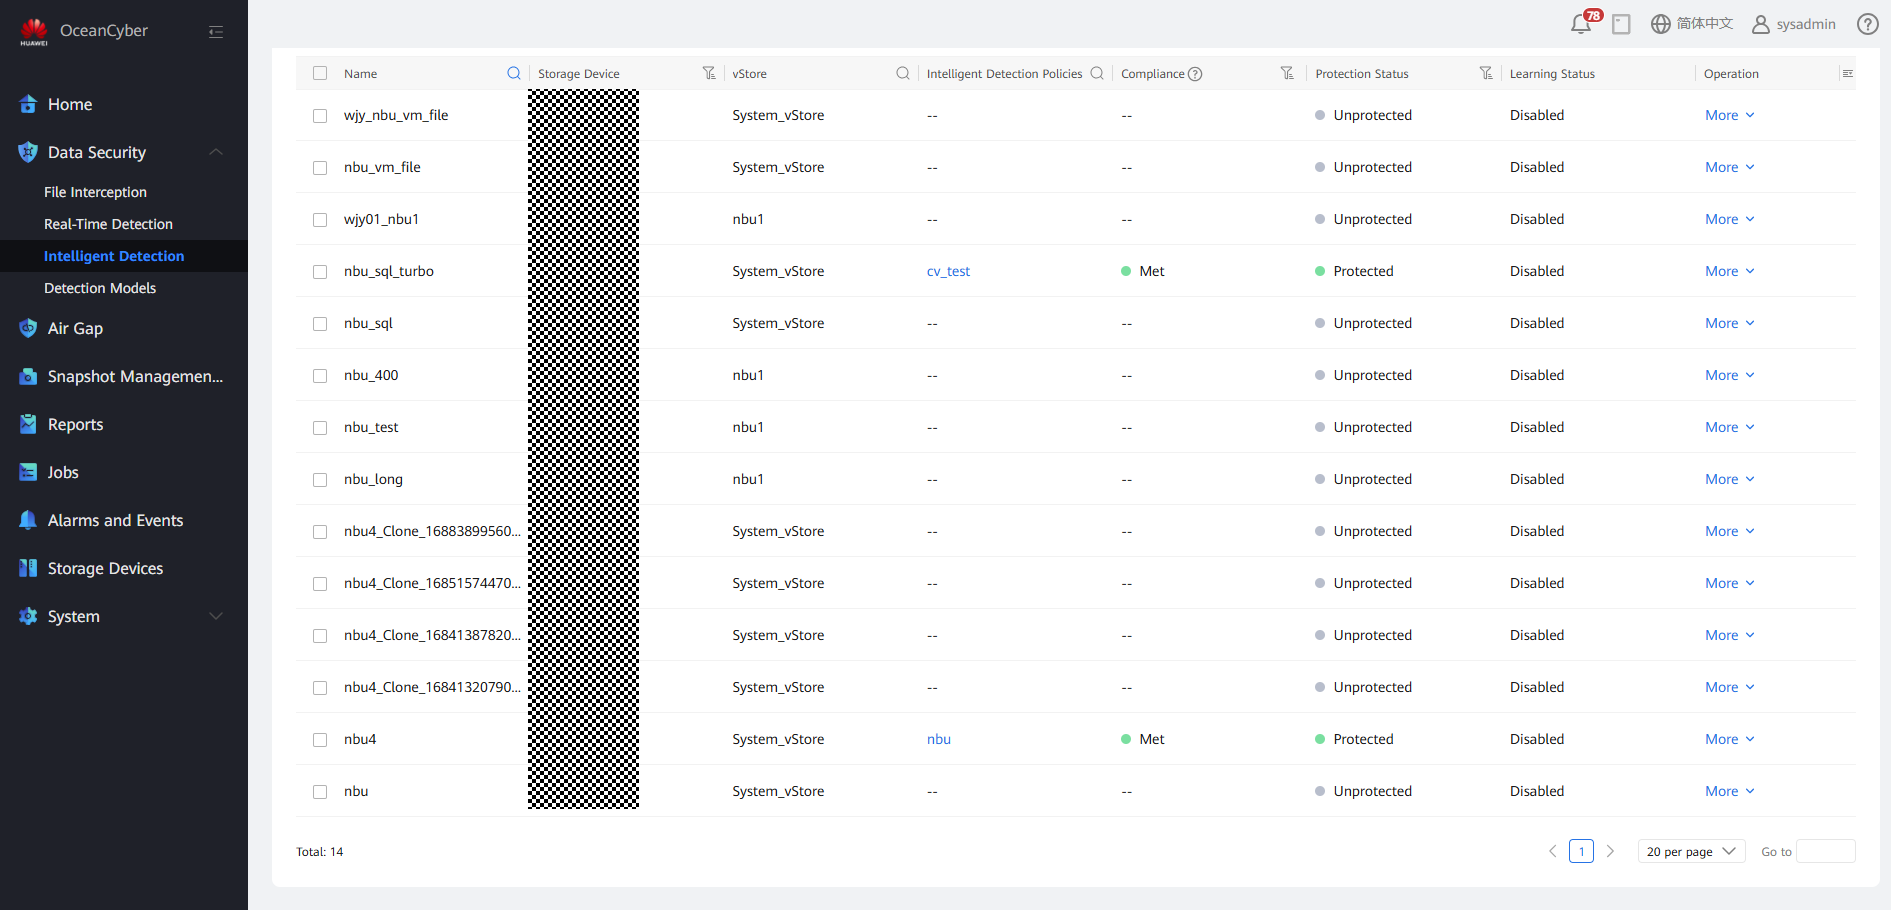
Step 2 Choose Data Security > Intelligent Detection > File System. Locate the file system to be protected and choose More > Protect to associate the file system with the created detection policy.
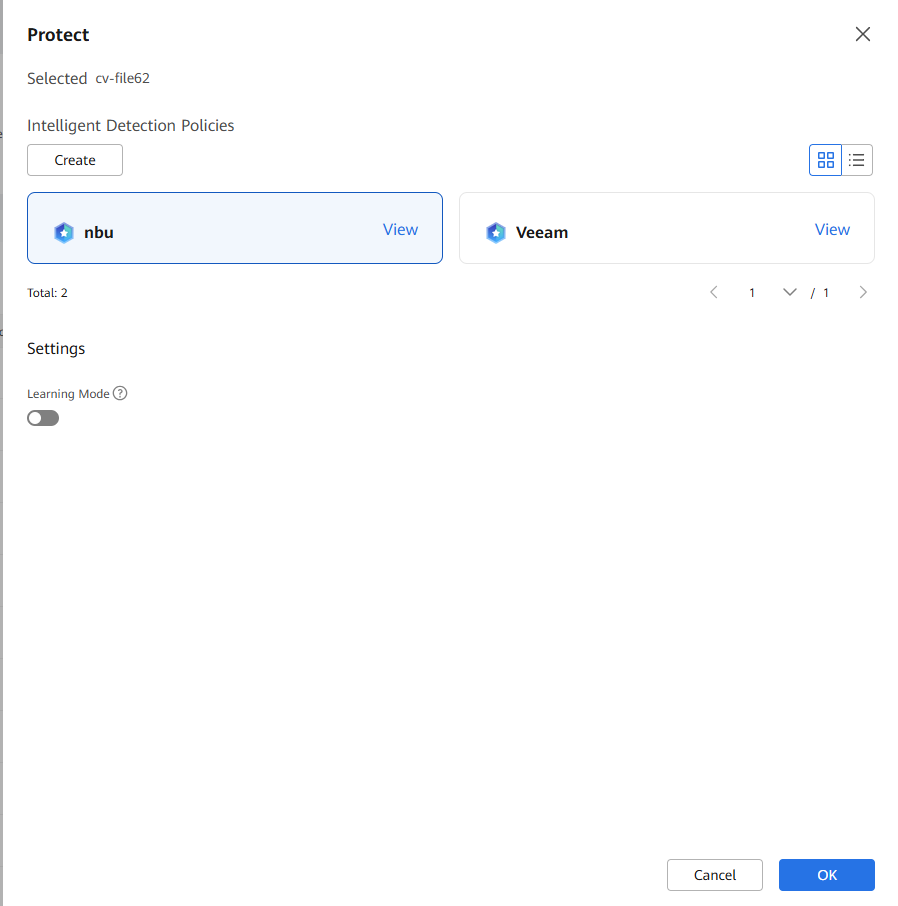

- You are advised to enable Learning Mode so that you can better evaluate the data features of backup copies. No alarm or infected content will be reported before the learning is complete. Learning Mode is valid only when the storage device type is OceanProtect and the backup copy in-depth detection function is enabled. If Learning Mode is disabled, false detection results may be generated during copy in-depth detection.
2. The configured learning duration (learning times) is the minimum learning duration (minimum number of learning times). To evaluate the data features of backup copies based on a required amount of data, the actual learning duration (learning times) may be longer than the configured learning duration (greater than the configured learning times).
3. You are advised to learn by learning duration, which can greatly ensure that the file system obtains the required amount of data.
—-End
4.1.2 Verification of Production Zone Protection
4.1.2.1 Executing a Backup Job
Right-click the created policy and choose Manual Backup from the shortcut menu. On the page that is displayed, select the full or incremental backup policy and click OK.

4.1.2.2 Verifying the Anti-tampering Function of WORM
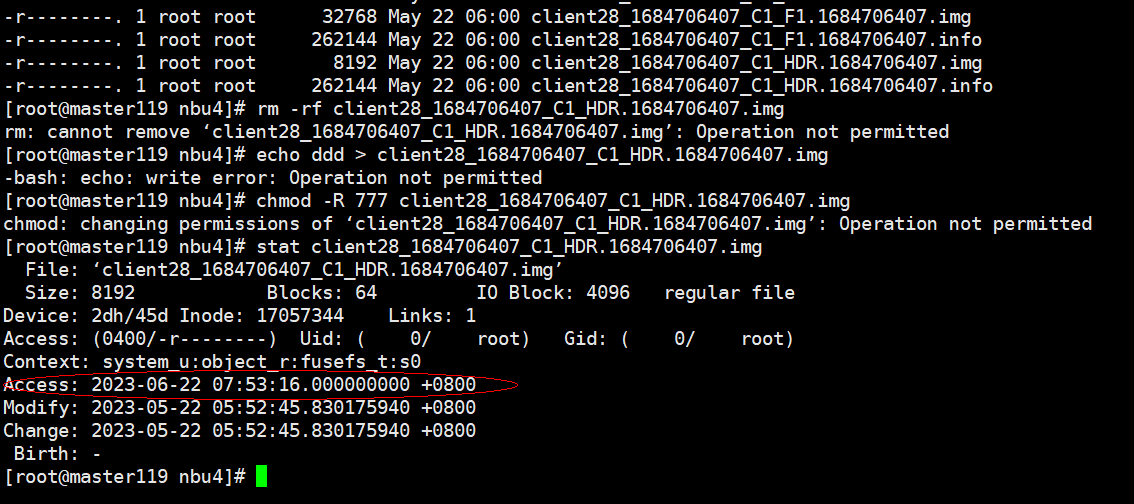
Backup data is locked after the lock waiting period expires. The protection period of backup copies is the default protection period. Log in to the OceanProtect X8000 WORM file system. In this practice, the default protection period of the WORM file system is one month. Therefore, you can view that the Access duration of the backup file is one month. The following error message is reported after modifying and deleting the backup copy file, which verifies the WORM anti-tampering feature.
4.1.2.3Restoring Data Using Uninfected Secure Snapshots of the Security Appliance After Production Data Is Encrypted by Ransomware
- Scenario: When the backup system in the production zone is attacked and the data security appliance detects that a backup copy is encrypted, the data security appliance uses the latest uninfected secure snapshot to split the clone and creates a backup copy. The backup software uses the backup copy to restore service data.
Step 1 The following figure shows the original data on the production host.

Step 2 Run the openssl enc -e -aes-256-cbc -in Source file -out Source file.ransomware suffix -pass pass:Password && rm -rf Source file command to simulate the infection of some files on the production host.
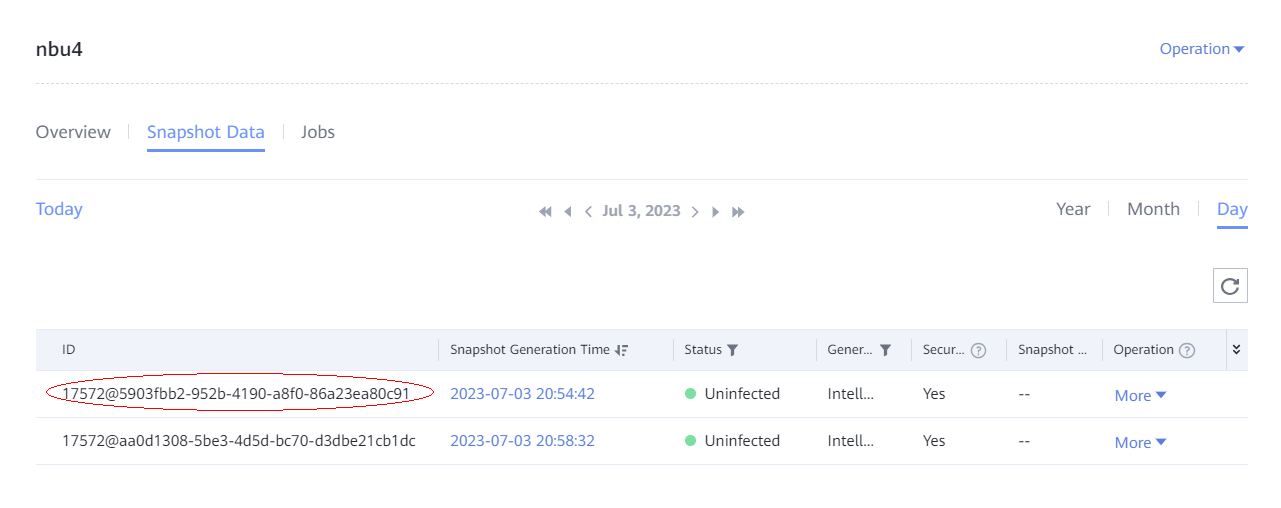
Step 3 Log in to the data security appliance, and choose Data Security > Snapshot Data. Select an uninfected secure snapshot and record its ID.
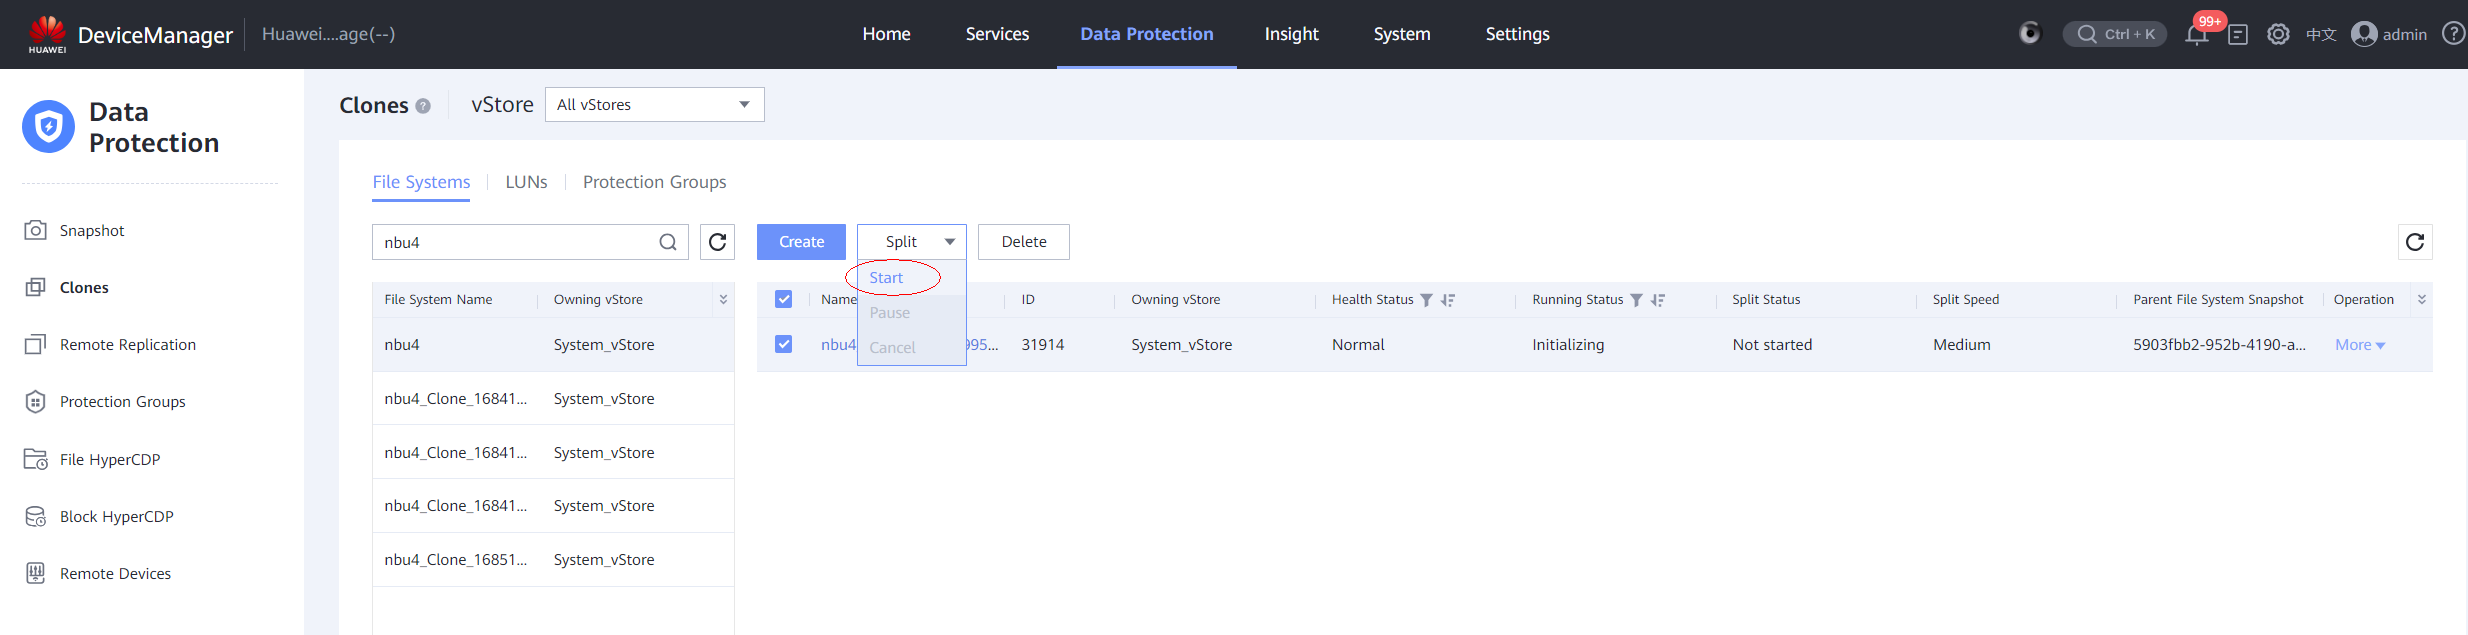
Step 4 Log in to DeviceManager and choose Data Protection > Clones. On the page that is displayed, select the corresponding file system and click Create. On the page that is displayed, select an uninfected secure snapshot corresponding to the data security appliance and click OK. After the clone is complete, click Split.

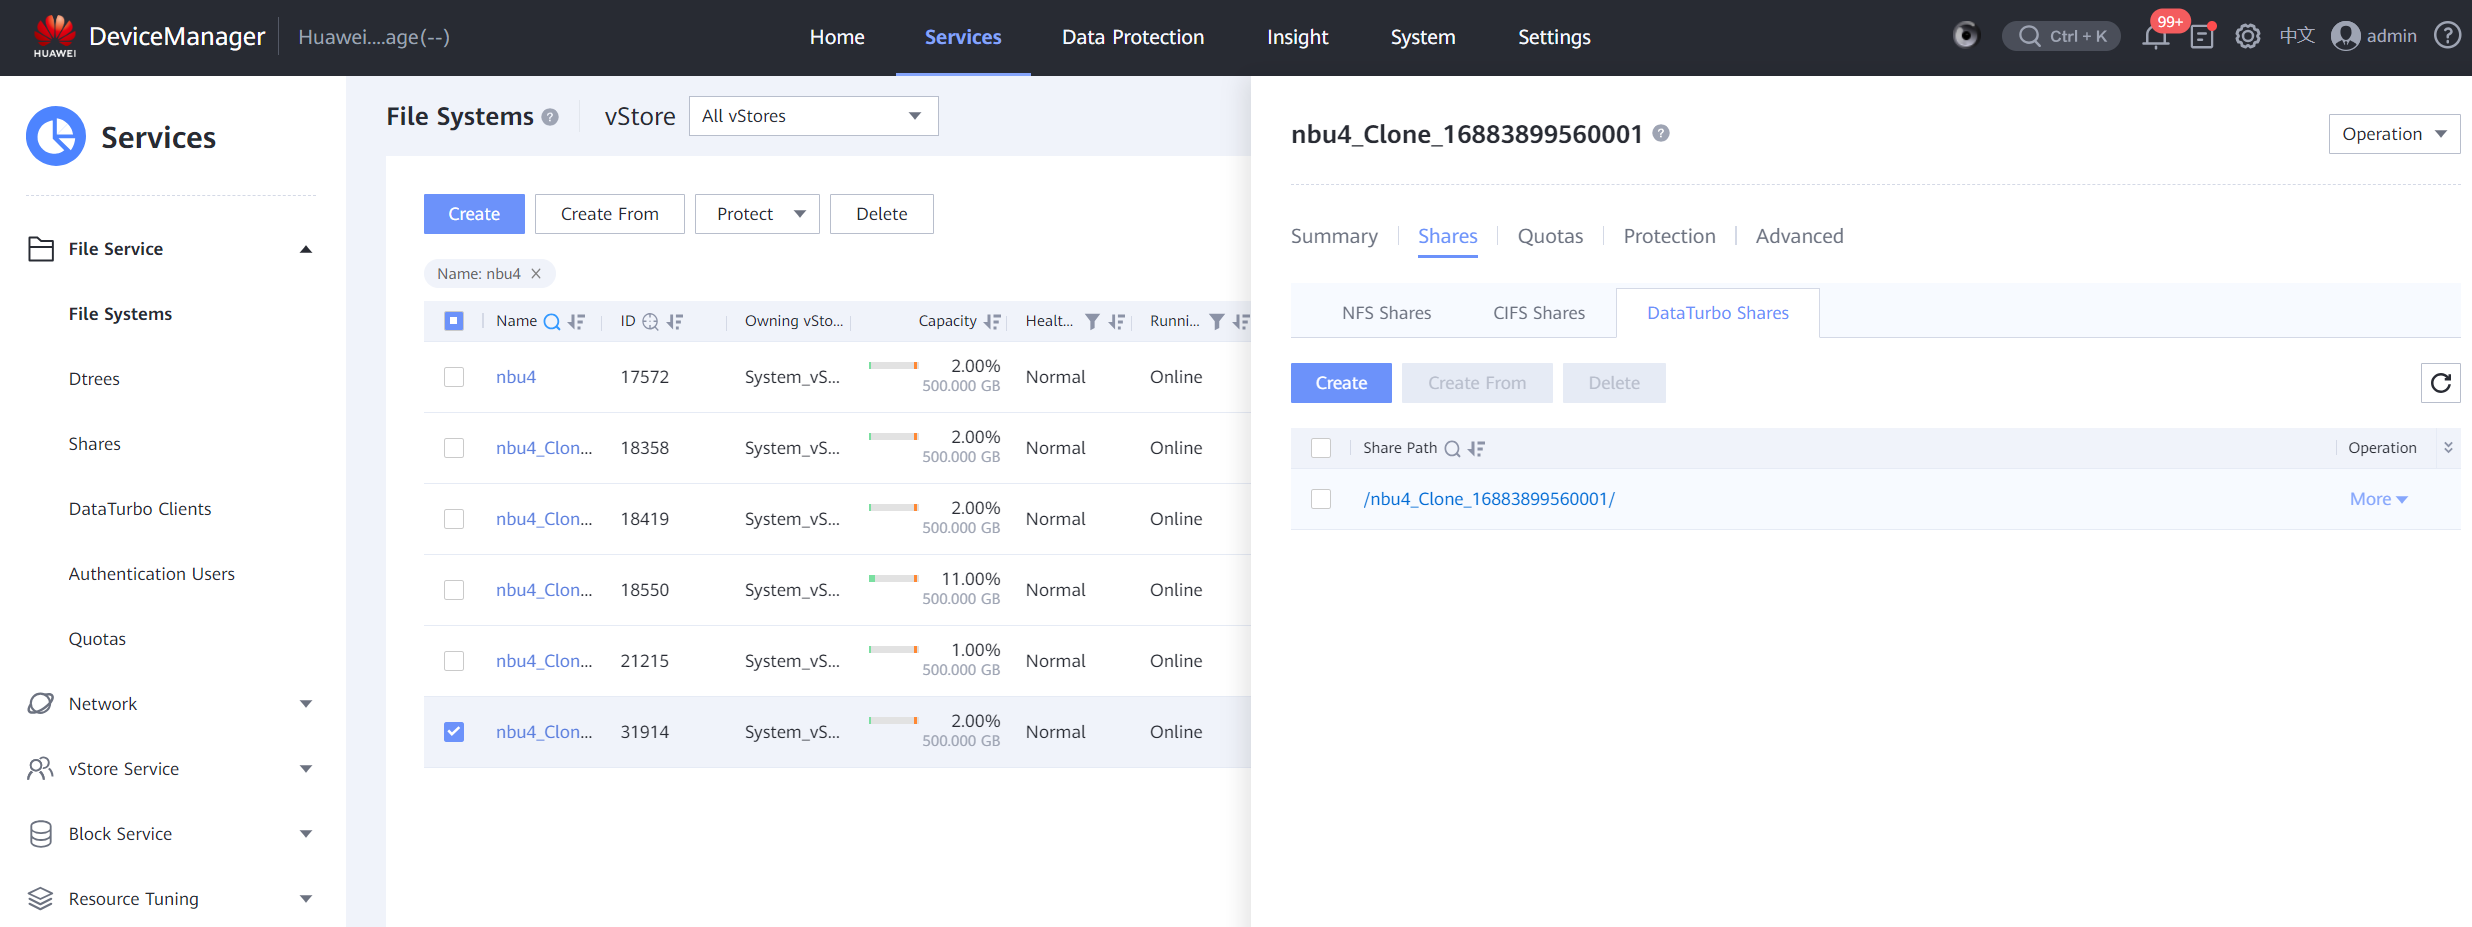
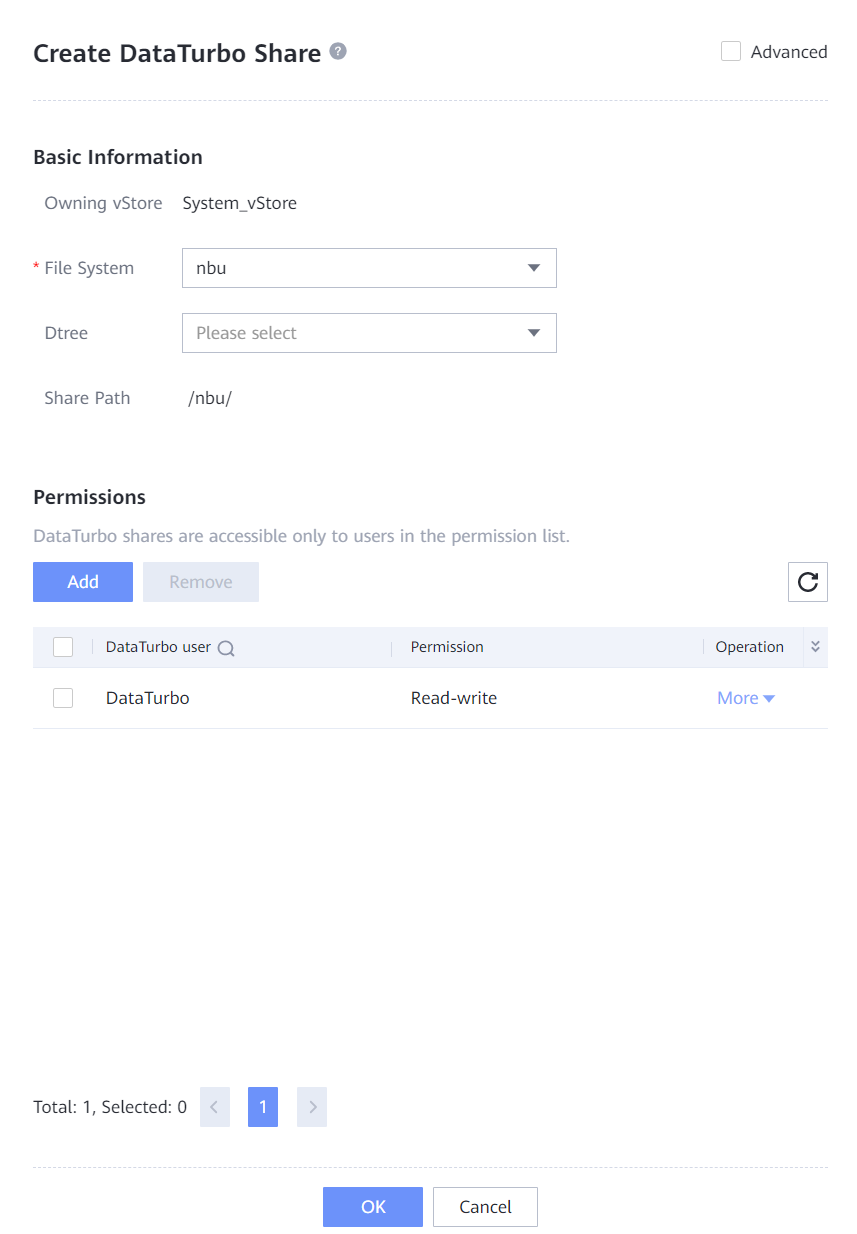
Step 5 After the splitting is complete, create a DataTurbo share for the clone file system. The share will be used for authenticating new mounting.
- Choose Services > Shares > DataTurbo Shares > Create, select the file system for which you want to create a share, click Add, and select the created vStore DataTurbo administrator.
Step 6 Switch the mount point of the NetBackup server host to the clone file system. For details, see 4.1.1.3 Integrating Using OceanStor DataTurbo.
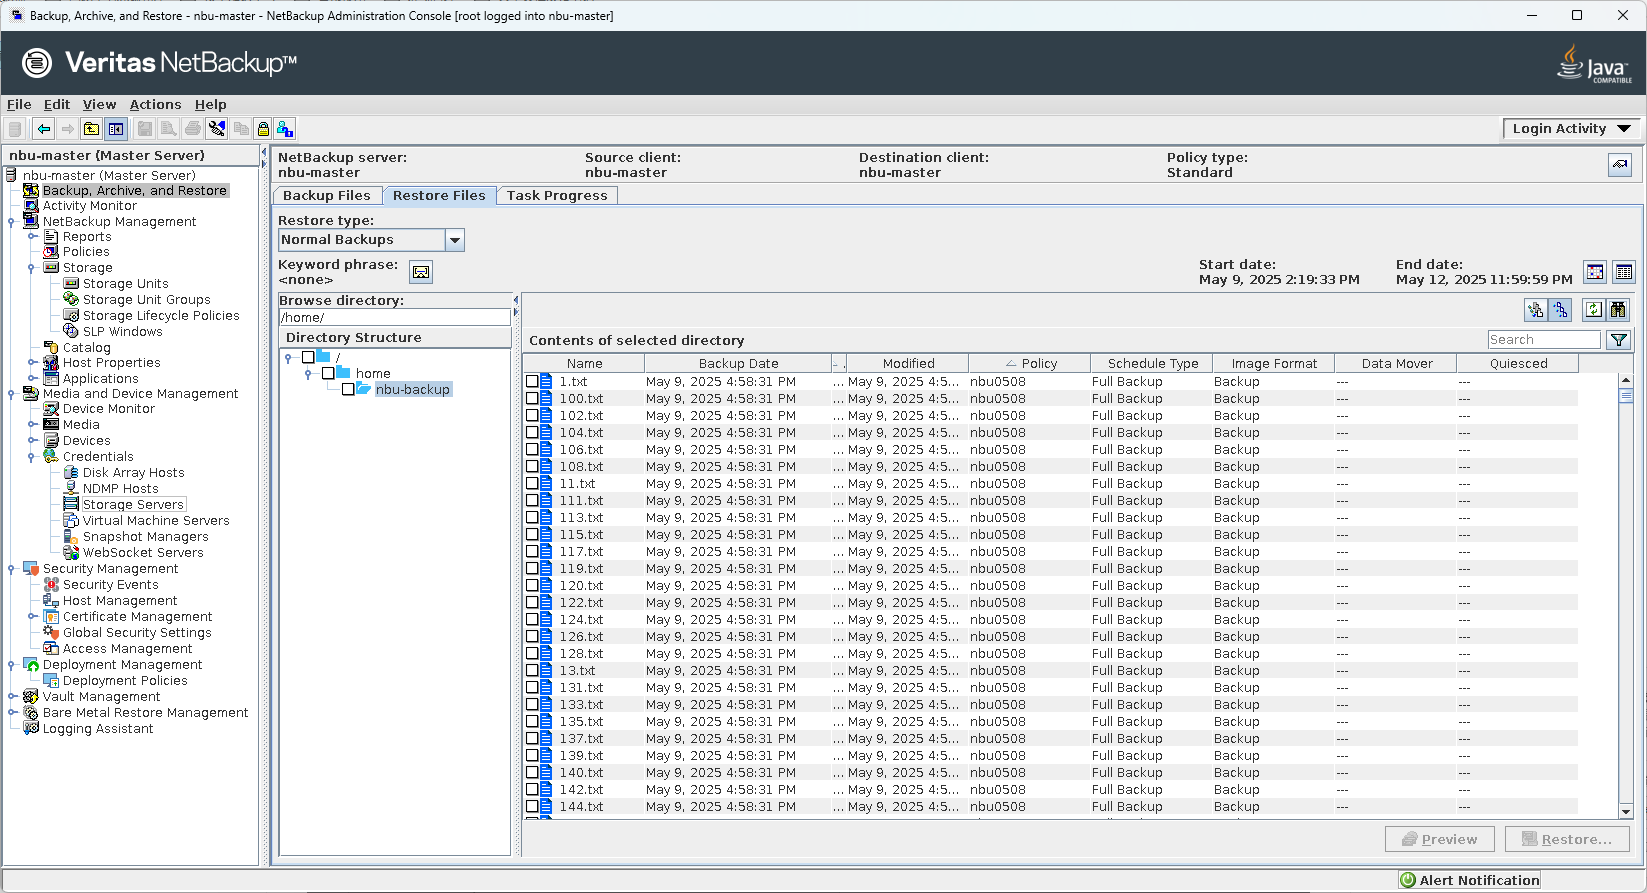
Step 7 Log in to the NetBackup WebUI. On the Backup, Archive, and Restore page, click .


Step 8 Set parameters on the Specify NetBackup Machine and Policy Type page. Set Server to use for backups and restores to the NetBackup master server, Source client for restores and Destination client for restores to the server where the NetBackup client is installed, and Policy type for restores to Standard. Click OK.

Step 9 On the Restore Files page, enter / in Browse directory, select a copy generated at a certain time, and click Restore.
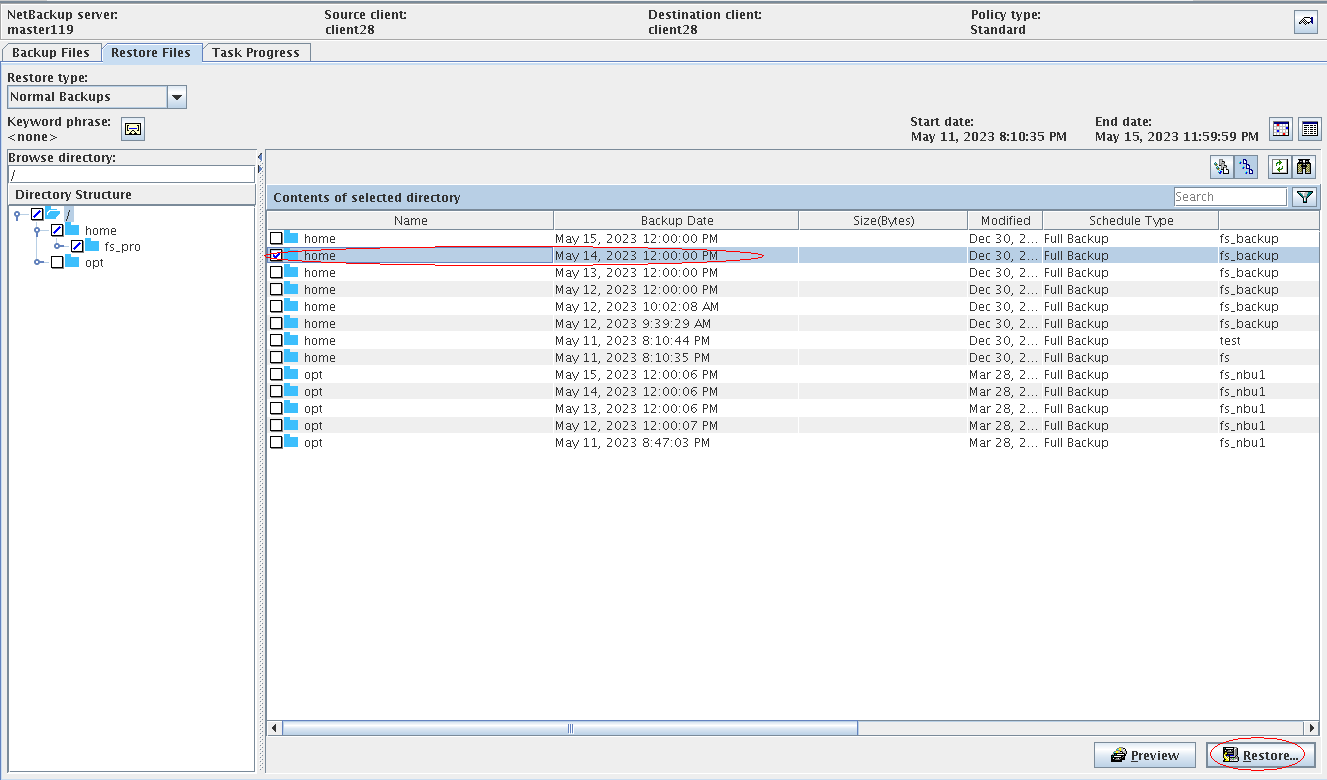
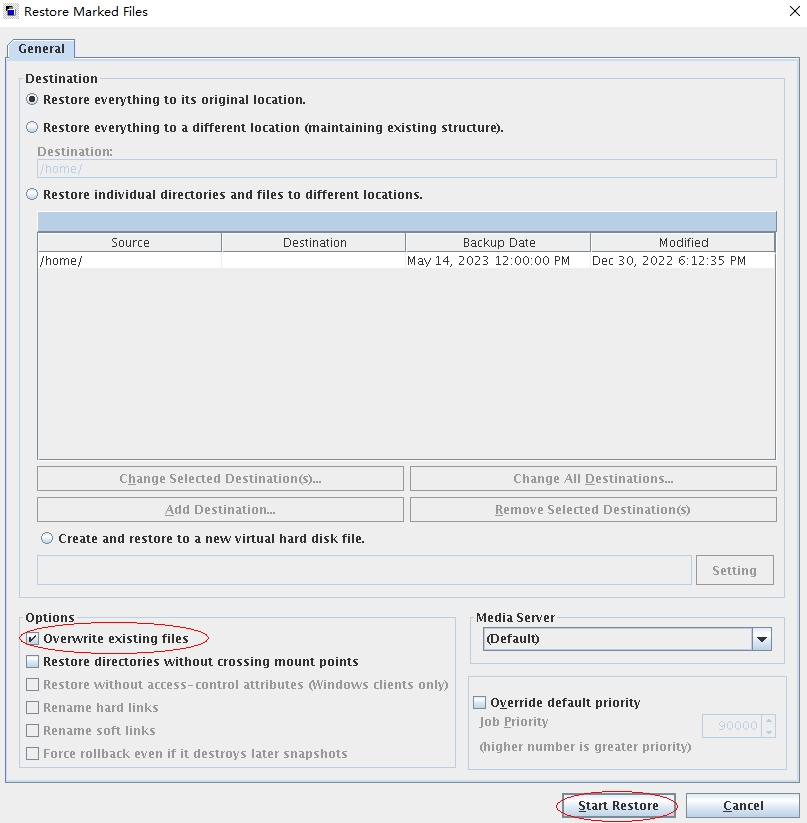
On the Restore Marked Files page, set parameters and click Start Restore.
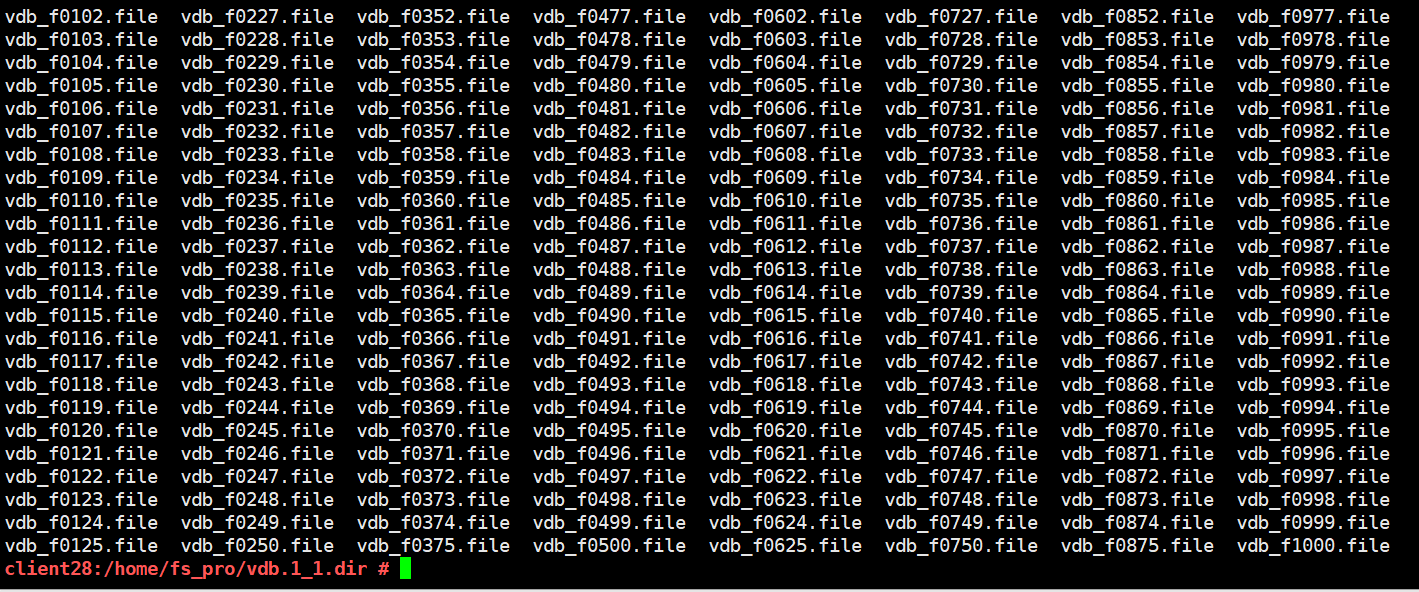
Step 10 After the restoration job is complete, verify that the infected data on the production host is successfully restored.
—-End
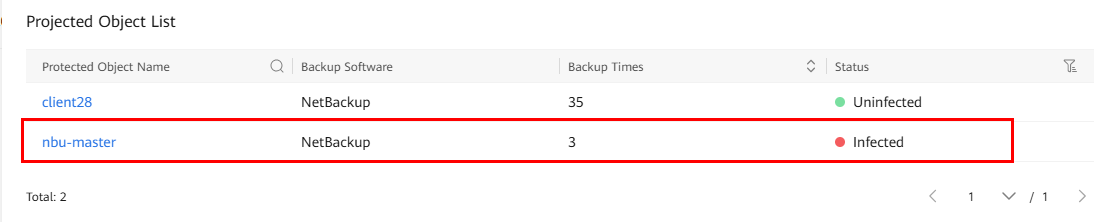
4.1.2.4 File System Infection on the Production Host
All NetBackup copies are encrypted, and the historical snapshots of the file system are clean. In this case, the data security appliance is used to select the previous clean file system snapshot for file system restoration.
Step 1 Find the file copies generated in NetBackup backup.

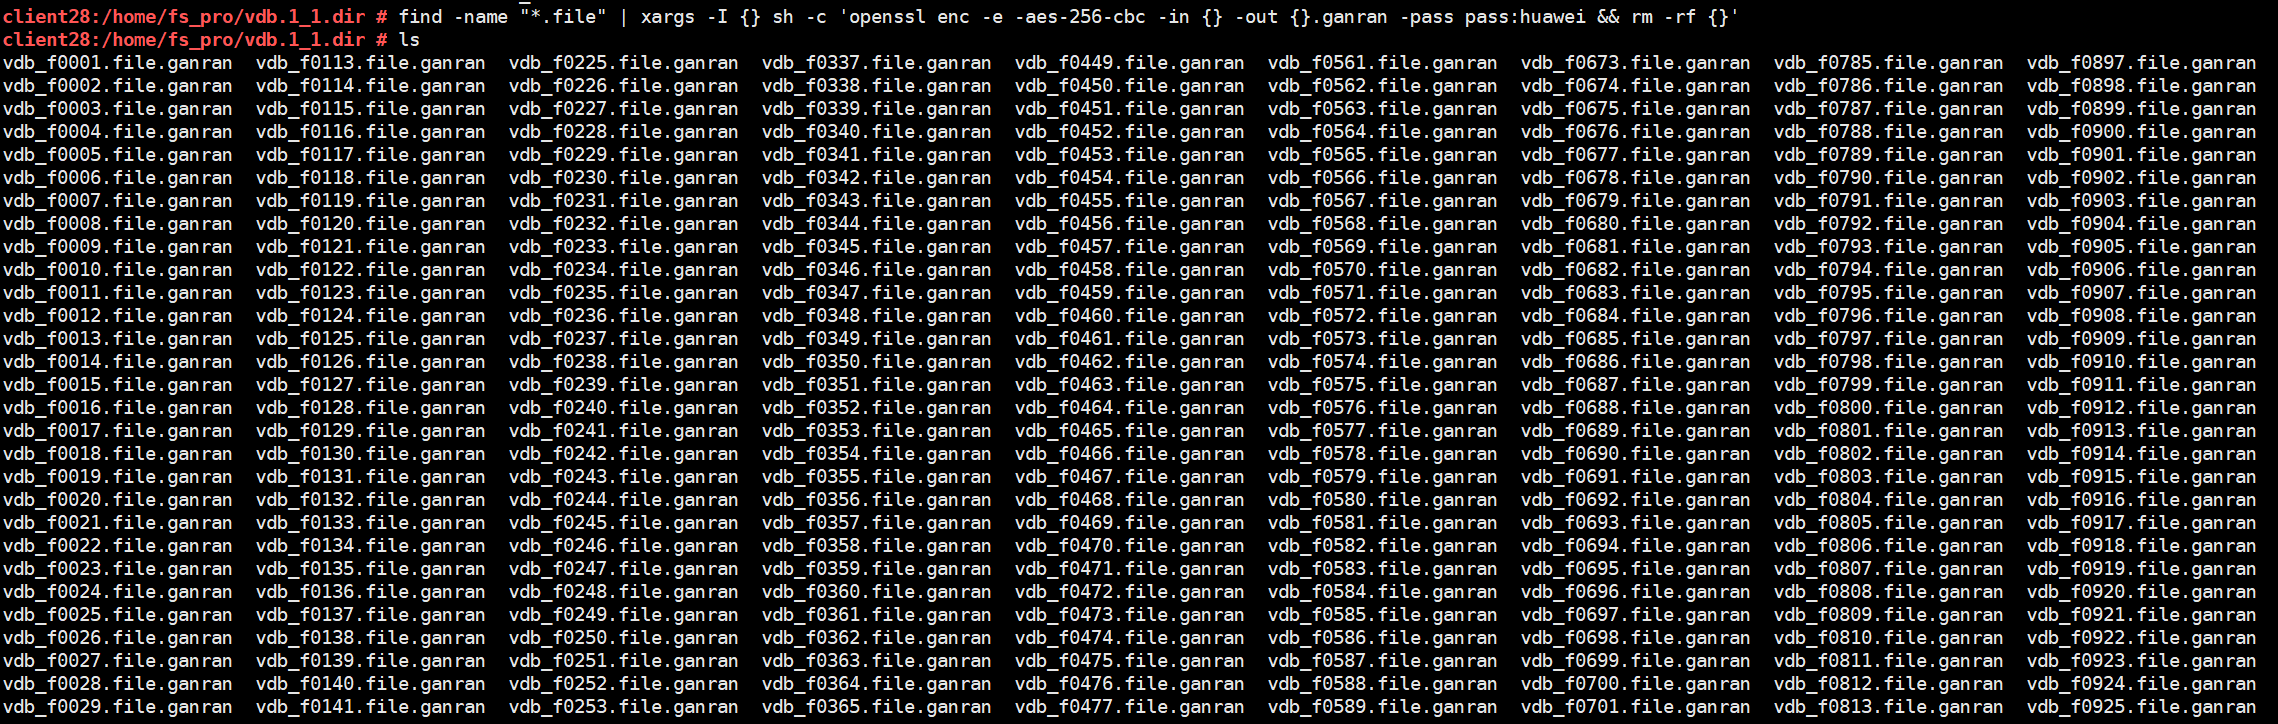
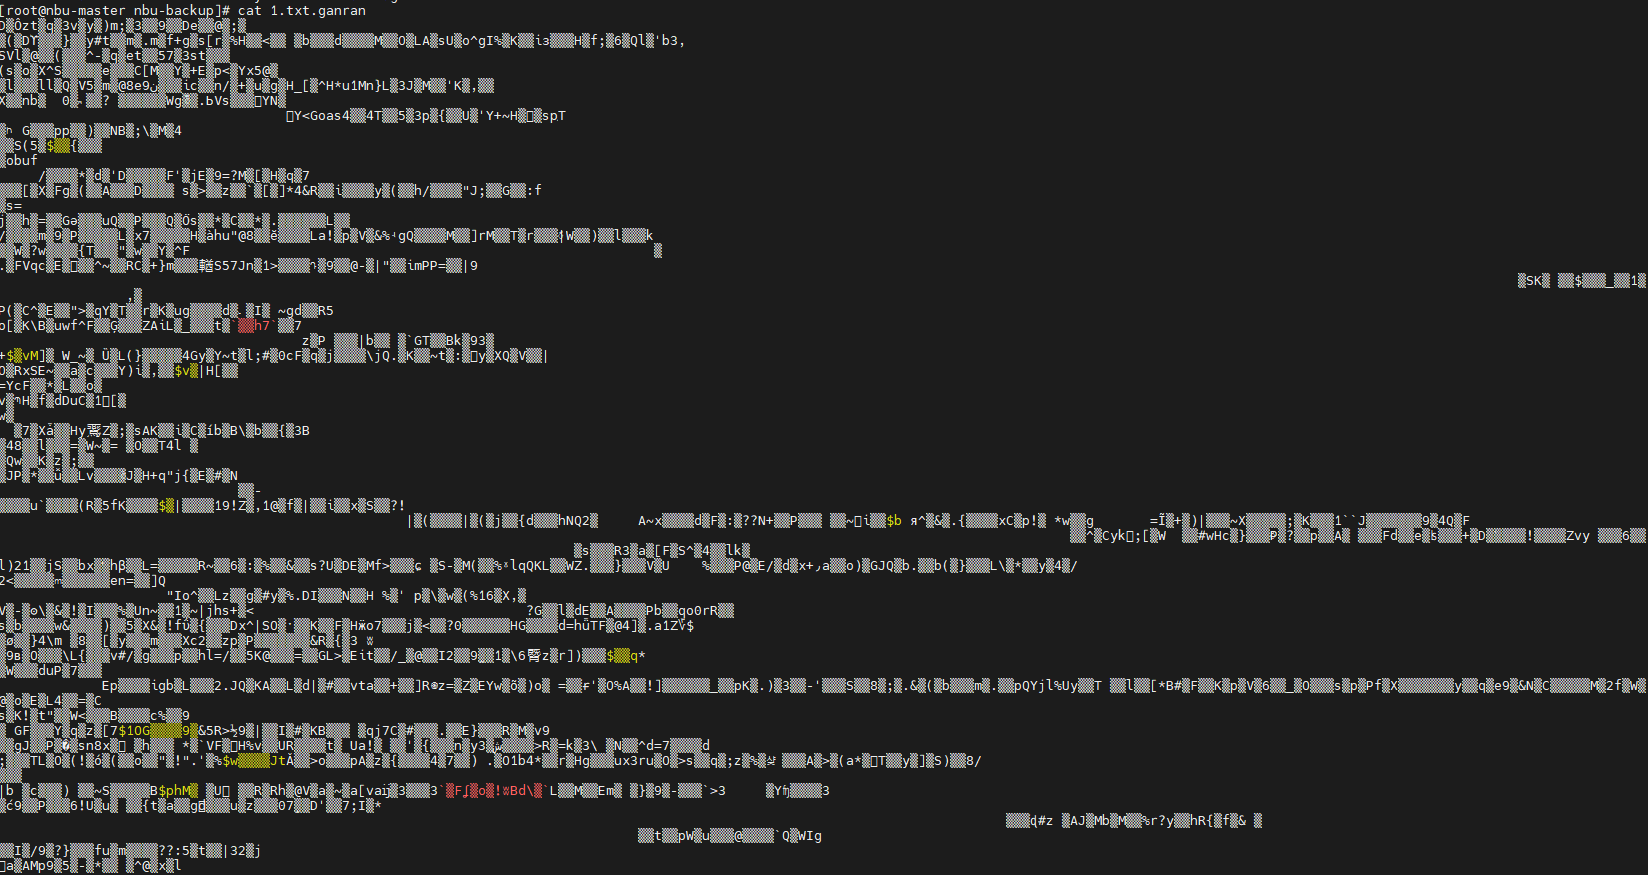
Step 2 Run the find ./ -maxdepth 1 -name « *nbu-master* » | xargs -I {} sh -c ‘openssl enc -e -aes-256-cbc -in {} -out {}.ganran -pass pass:huawei && rm -rf {} command to simulate a ransomware attack on the backup copy.

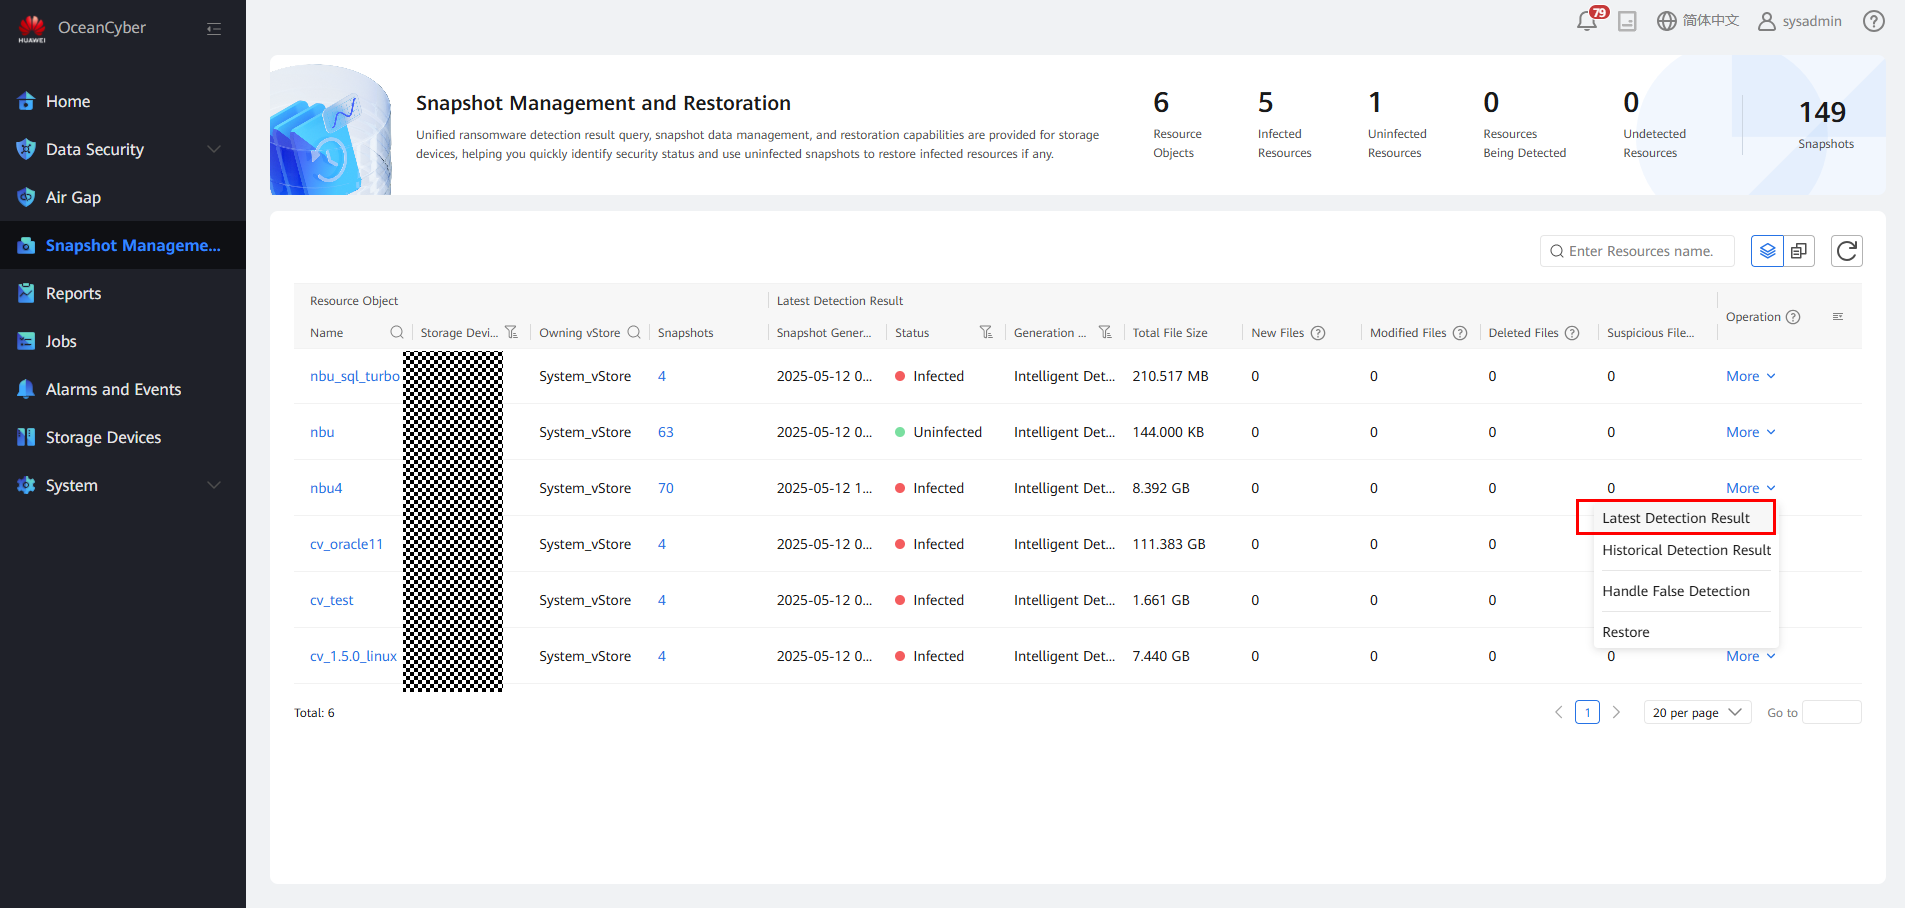
Step 3 Log in to OceanCyber 300, locate the file system, and choose More > Manually Detect.
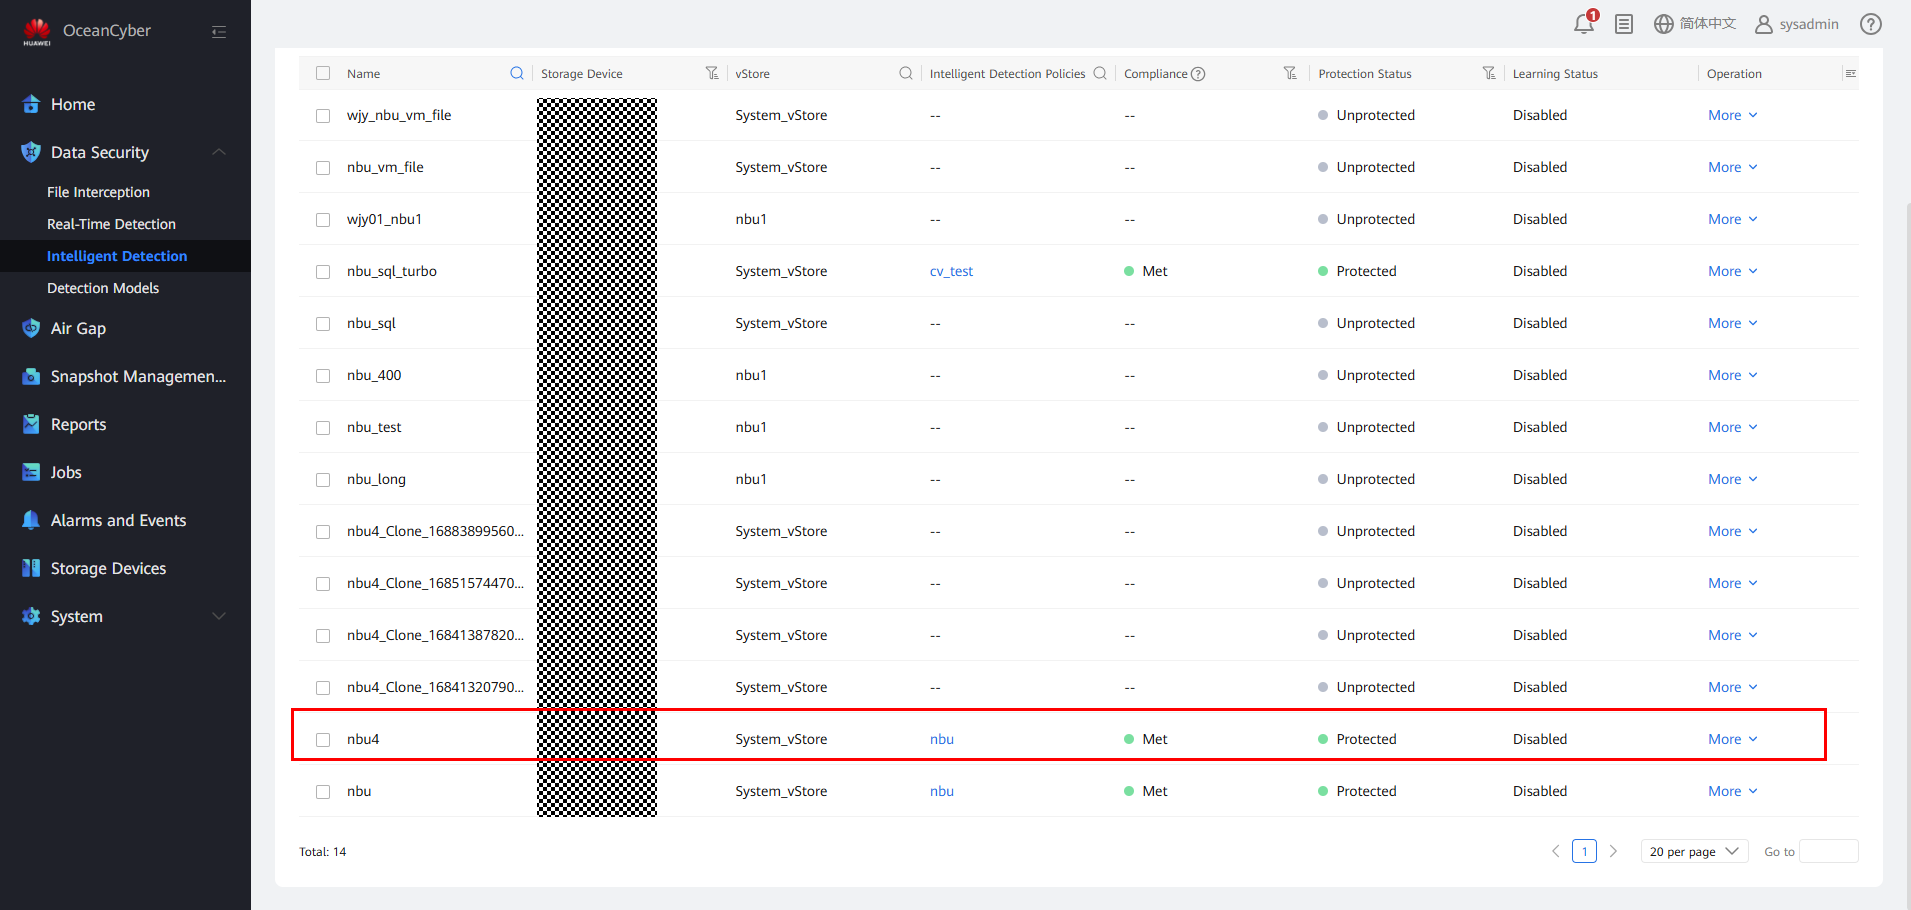
Step 4 After the detection is complete, view the detection result (Infected) on the Snapshot Management and Restoration page.
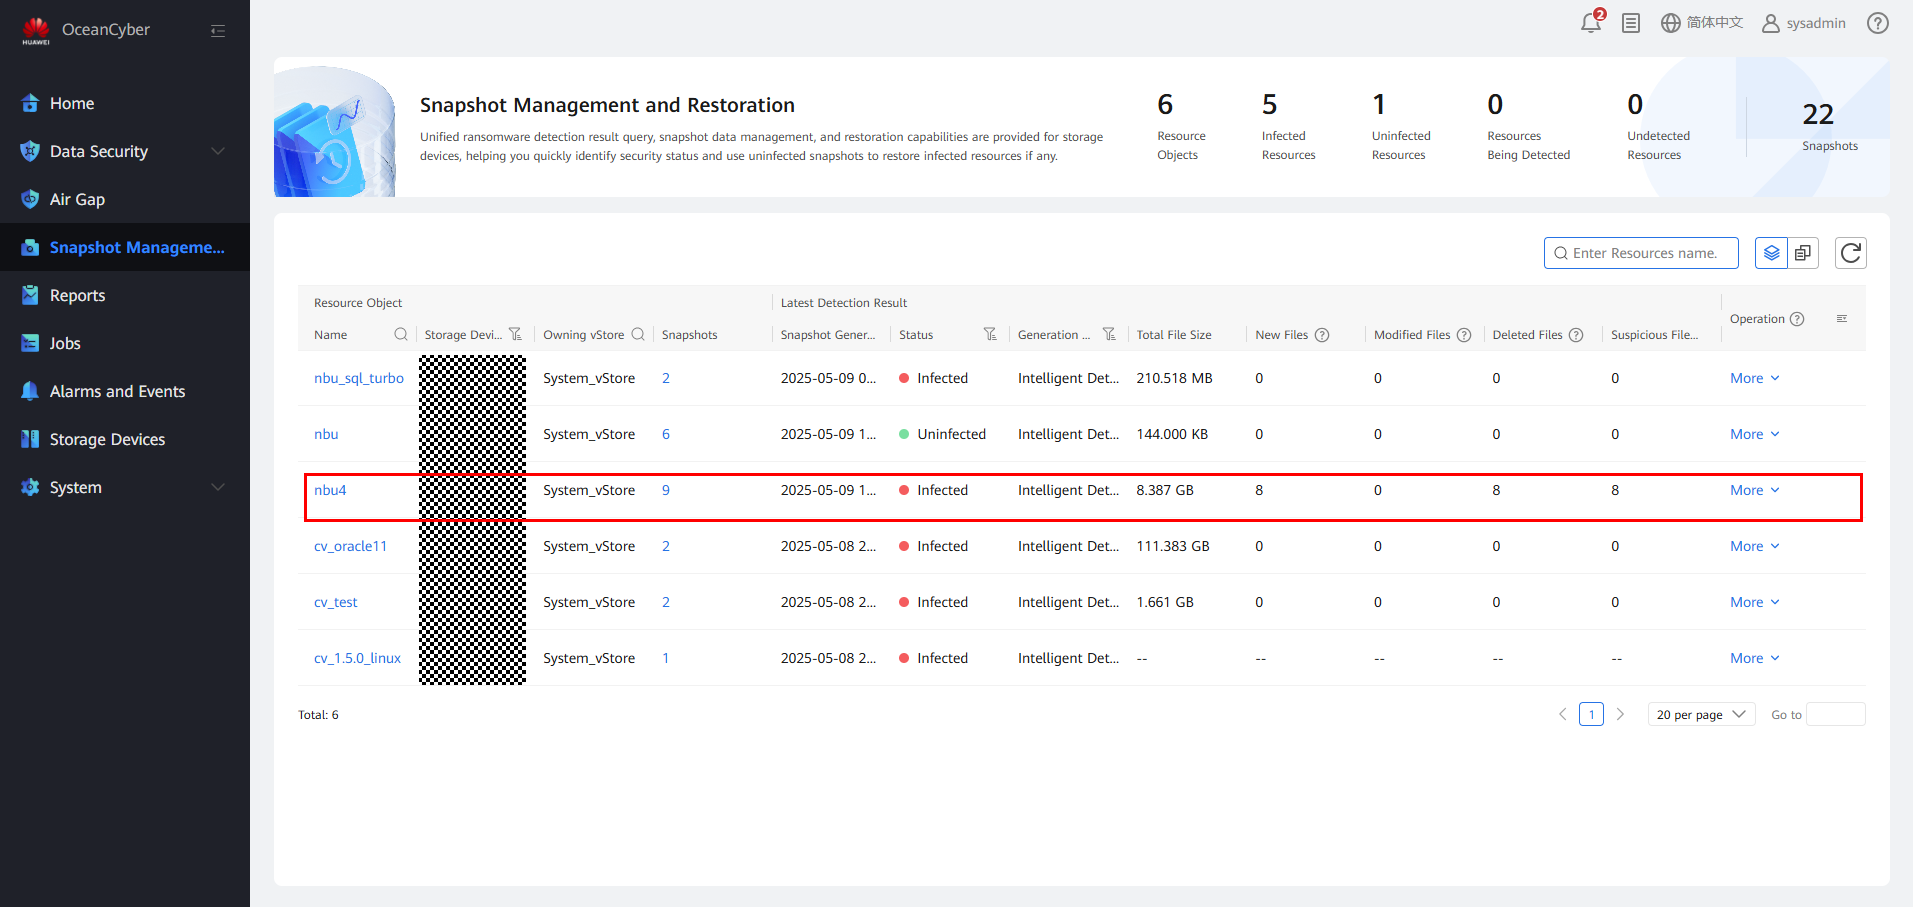
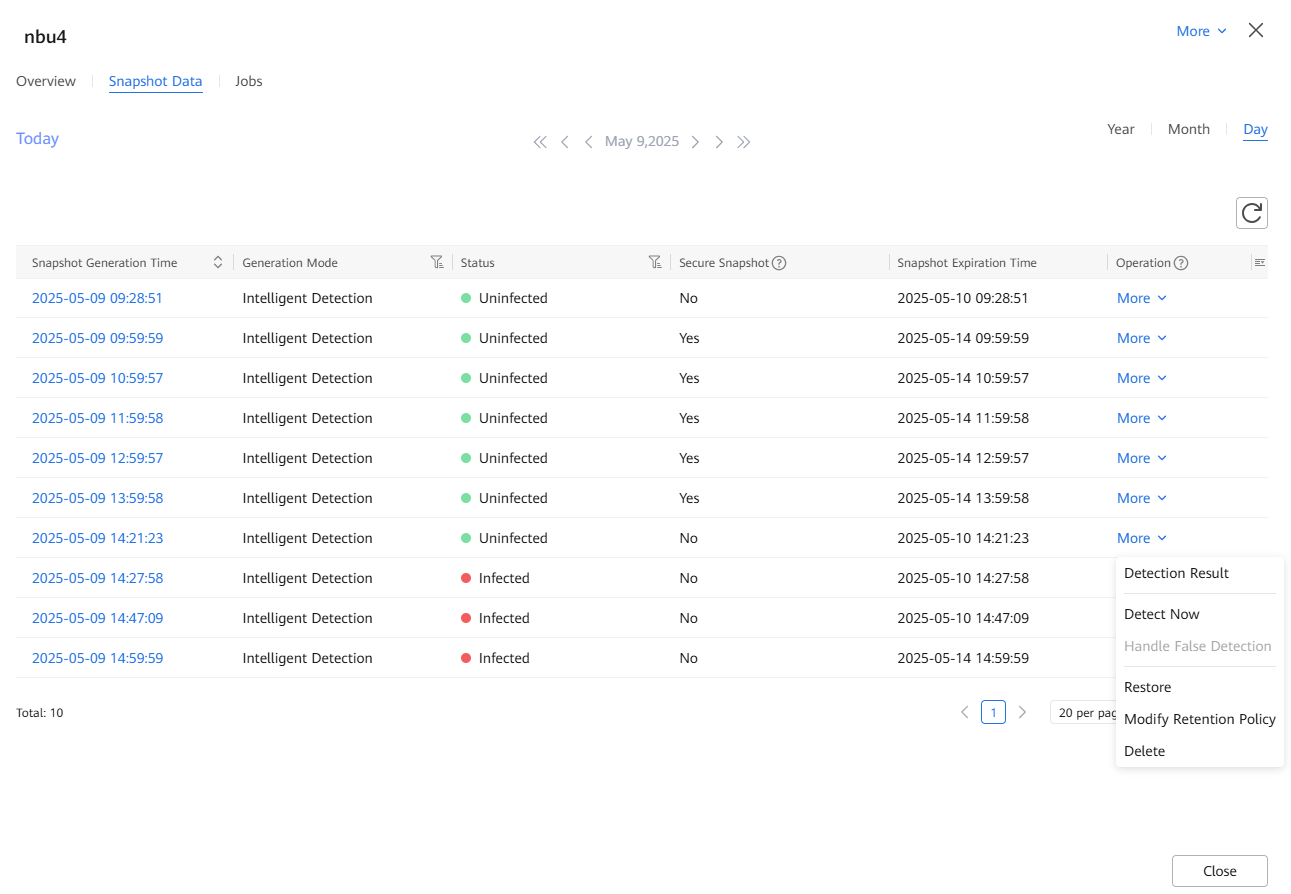
Step 5 Use OceanCyber 300 to view infected and uninfected copies, and restore data using the uninfected copy at the time point immediately preceding the infected copy.
Step 6 WORM file systems cannot be restored. Find the corresponding clean snapshot for backup on the storage and restore the data using the backup software.
Restore the data by referring to 4.1.2.3 Restoring Data Using Uninfected Secure Snapshots of the Security Appliance After Production Data Is Encrypted by Ransomware.
Check the backup copies on VMs.

—-End
4.1.2.5 Verifying the Intelligent Detection Result of the Data Security Appliance for Backup of Files Using NetBackup
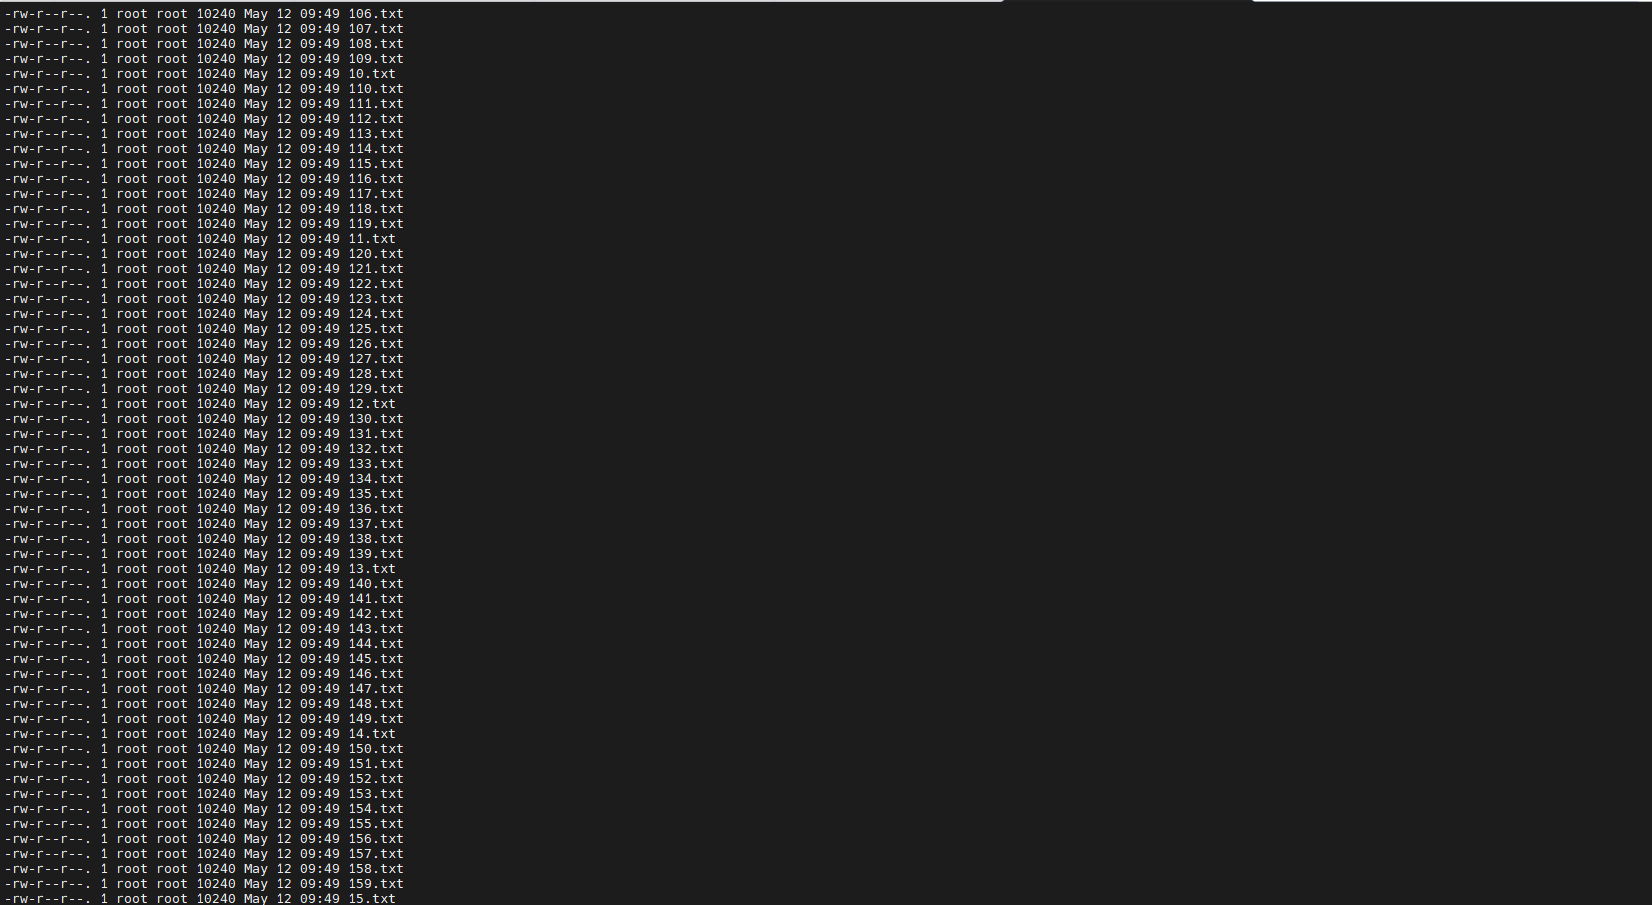
Step 1 Run the for i in $(seq 1 10000); do yes « abc_$i » | dd of=$i.txt bs=10K count=1 ;done command to preset txt data on the production host. (for test and verification only)

Step 2 Run the openssl enc -e -aes-256-cbc -in Source file -out Source file.ransomware suffix -pass pass:Password && rm -rf Source file command to infect the preset data on the production host. (for test and verification only)
Step 3 Back up data by referring to 4.1.2.1 Executing a Backup Job.
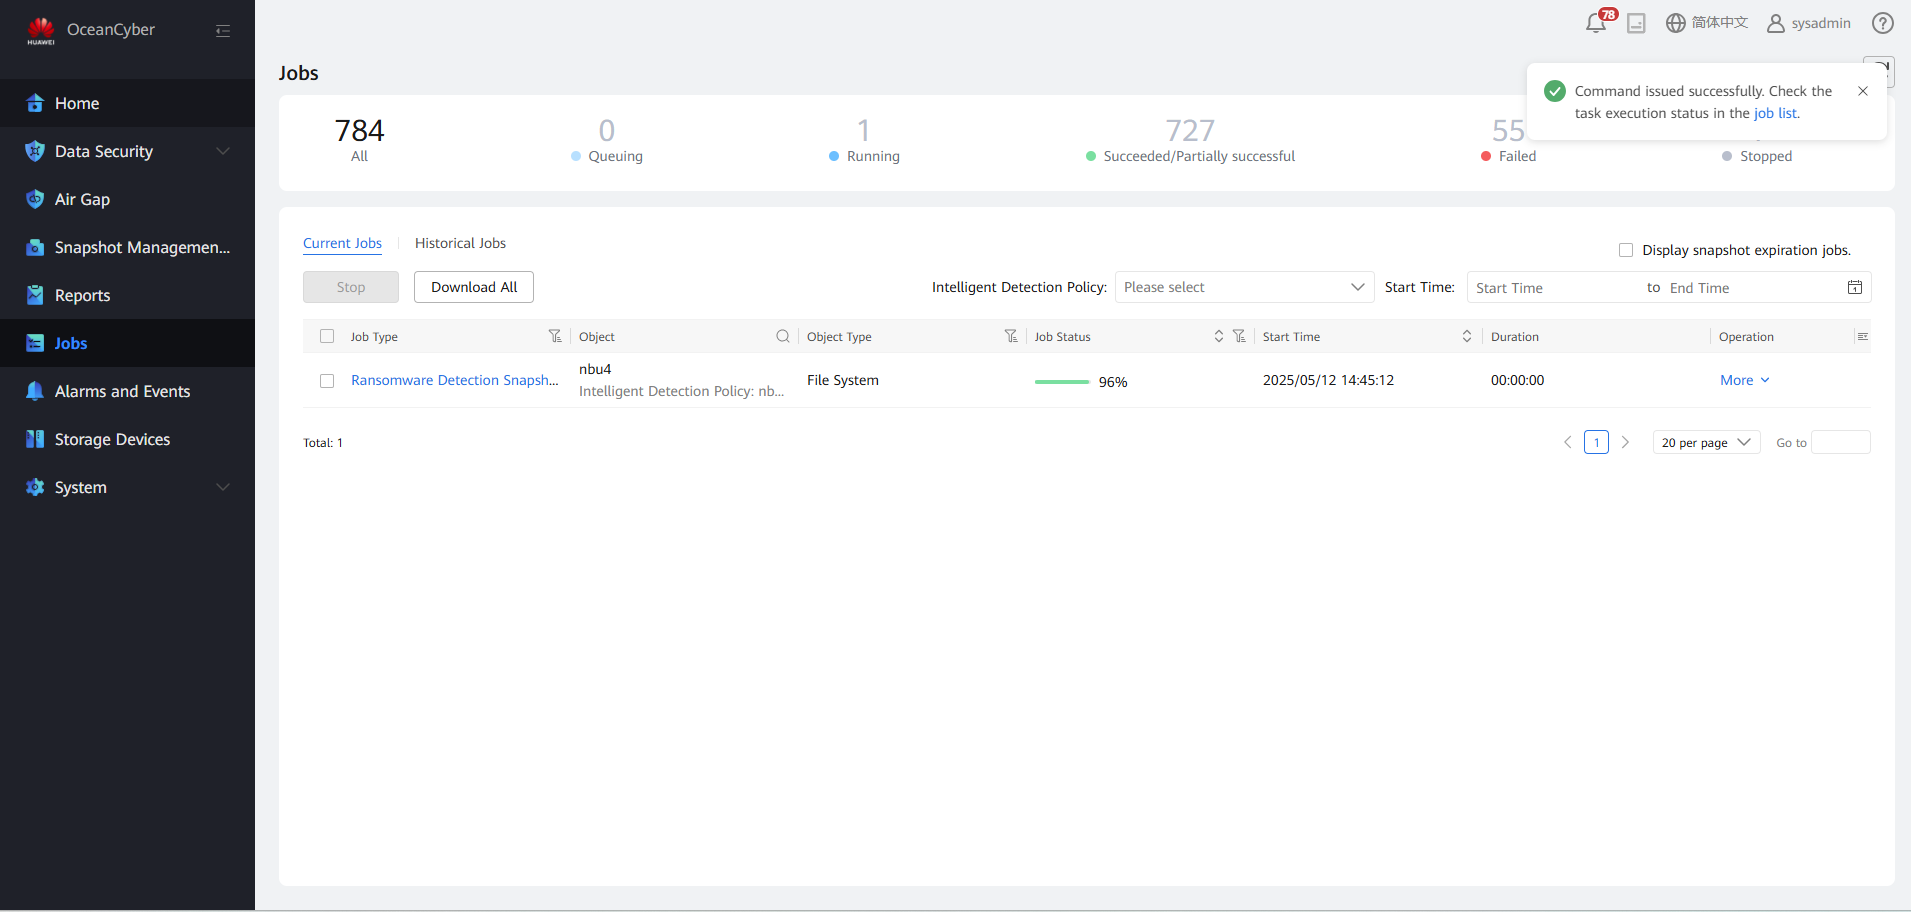
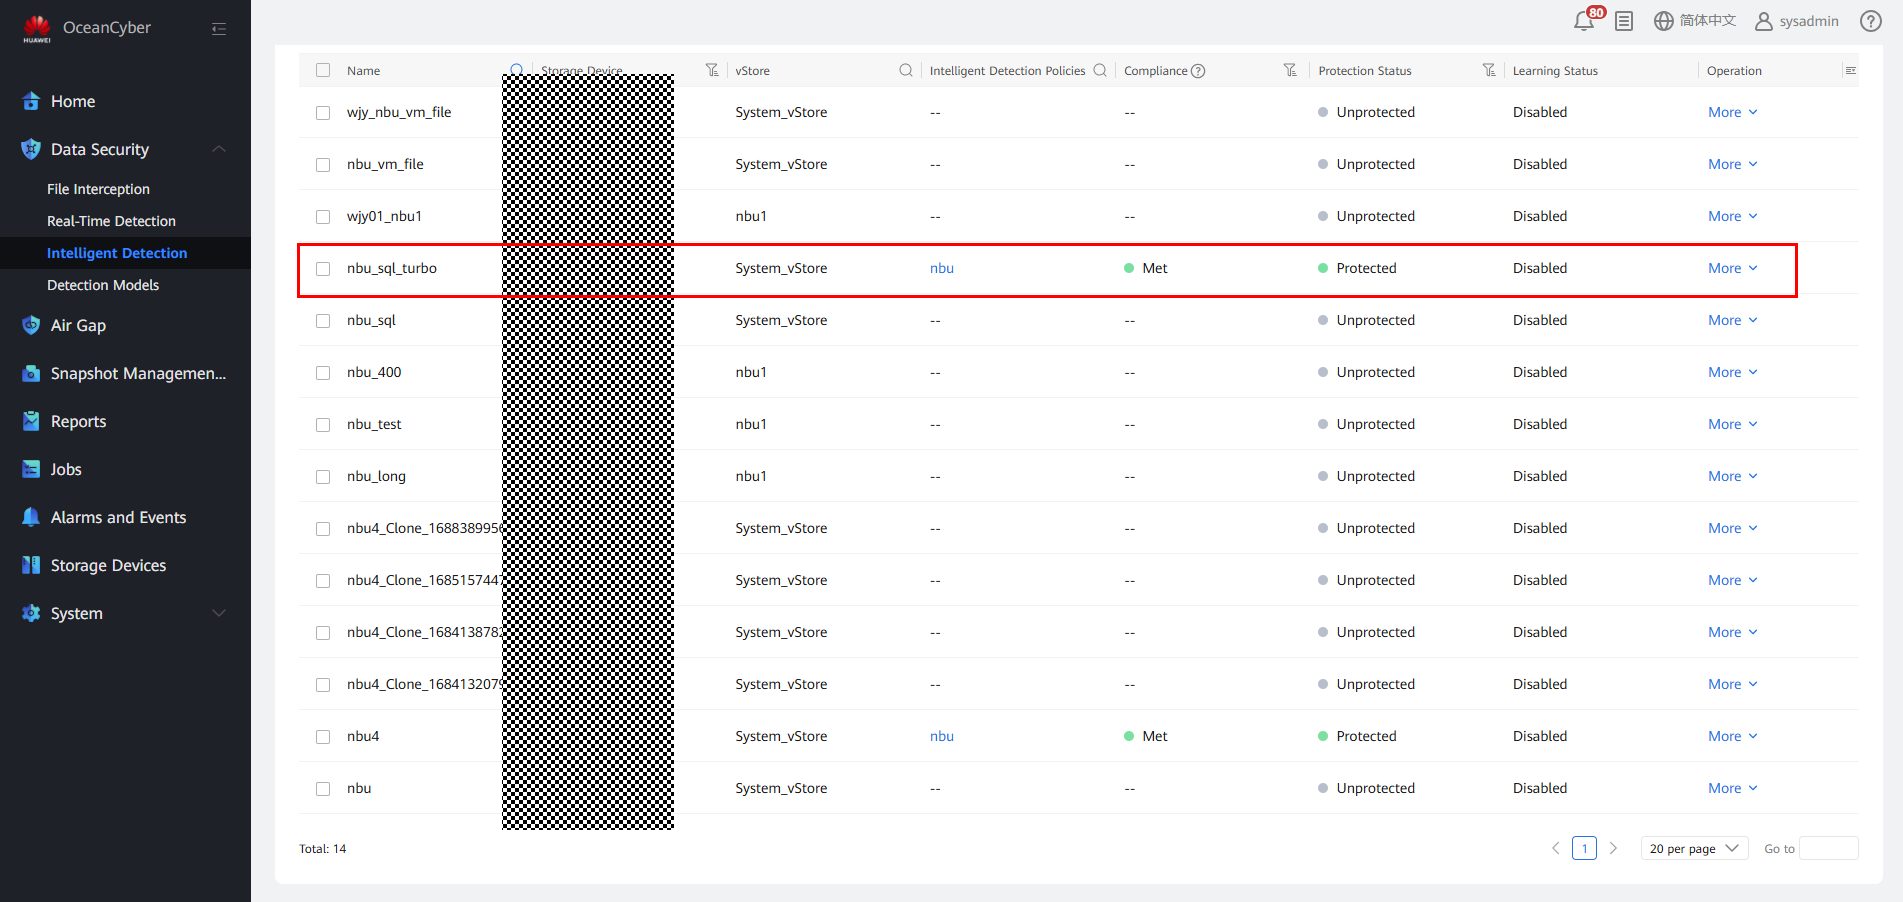
Step 4 On the Data Security > Intelligent Detection page, locate the target file system, and choose More > Manually Detect.
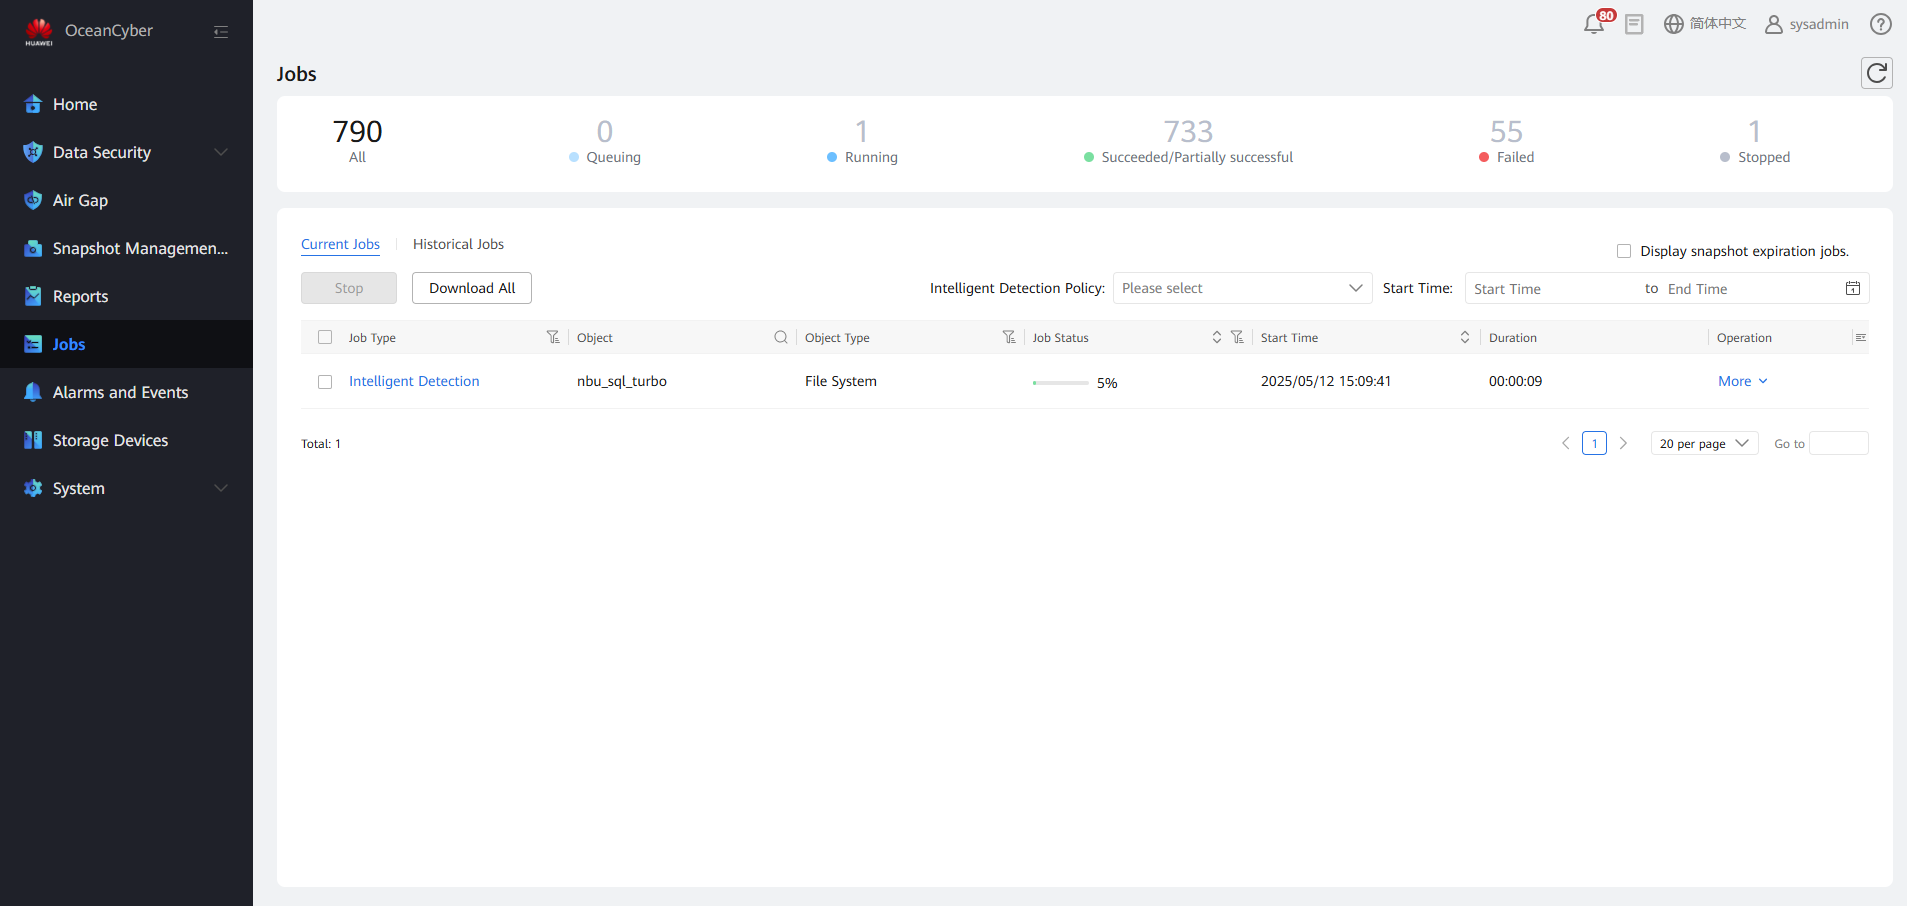
Step 5 On the Jobs page, view the real-time detection job progress.
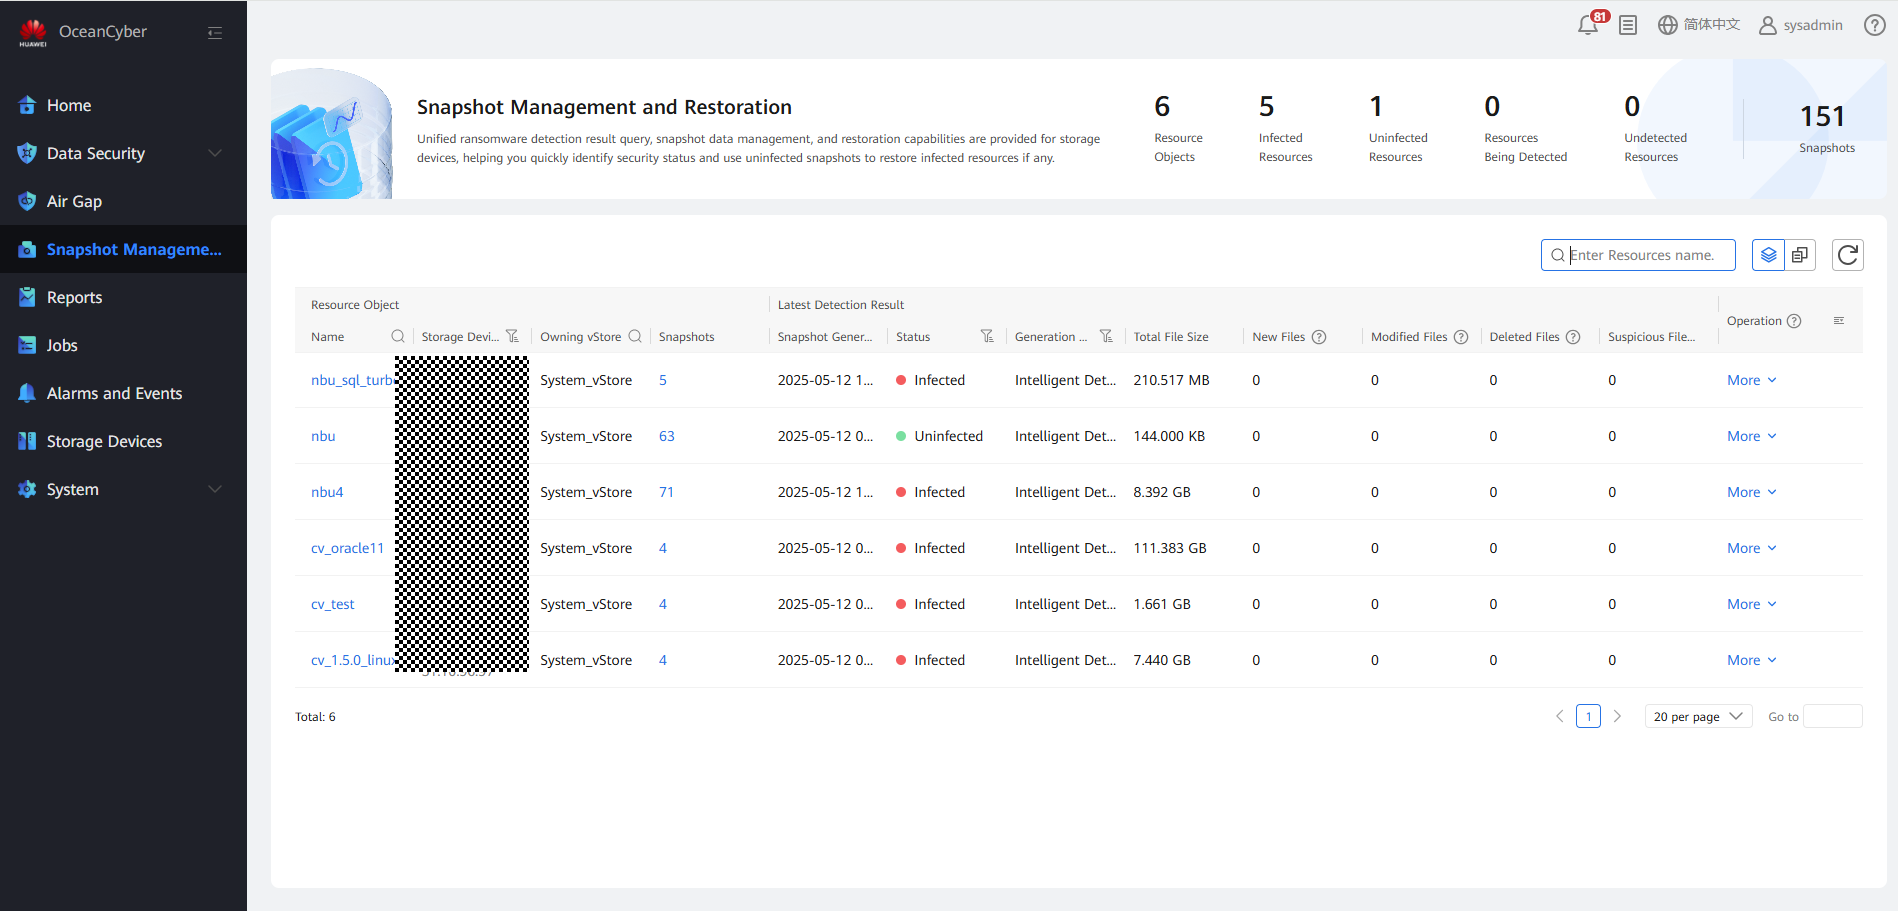
Step 6 On the Snapshot Management and Restoration page, view the detection status of all copies.
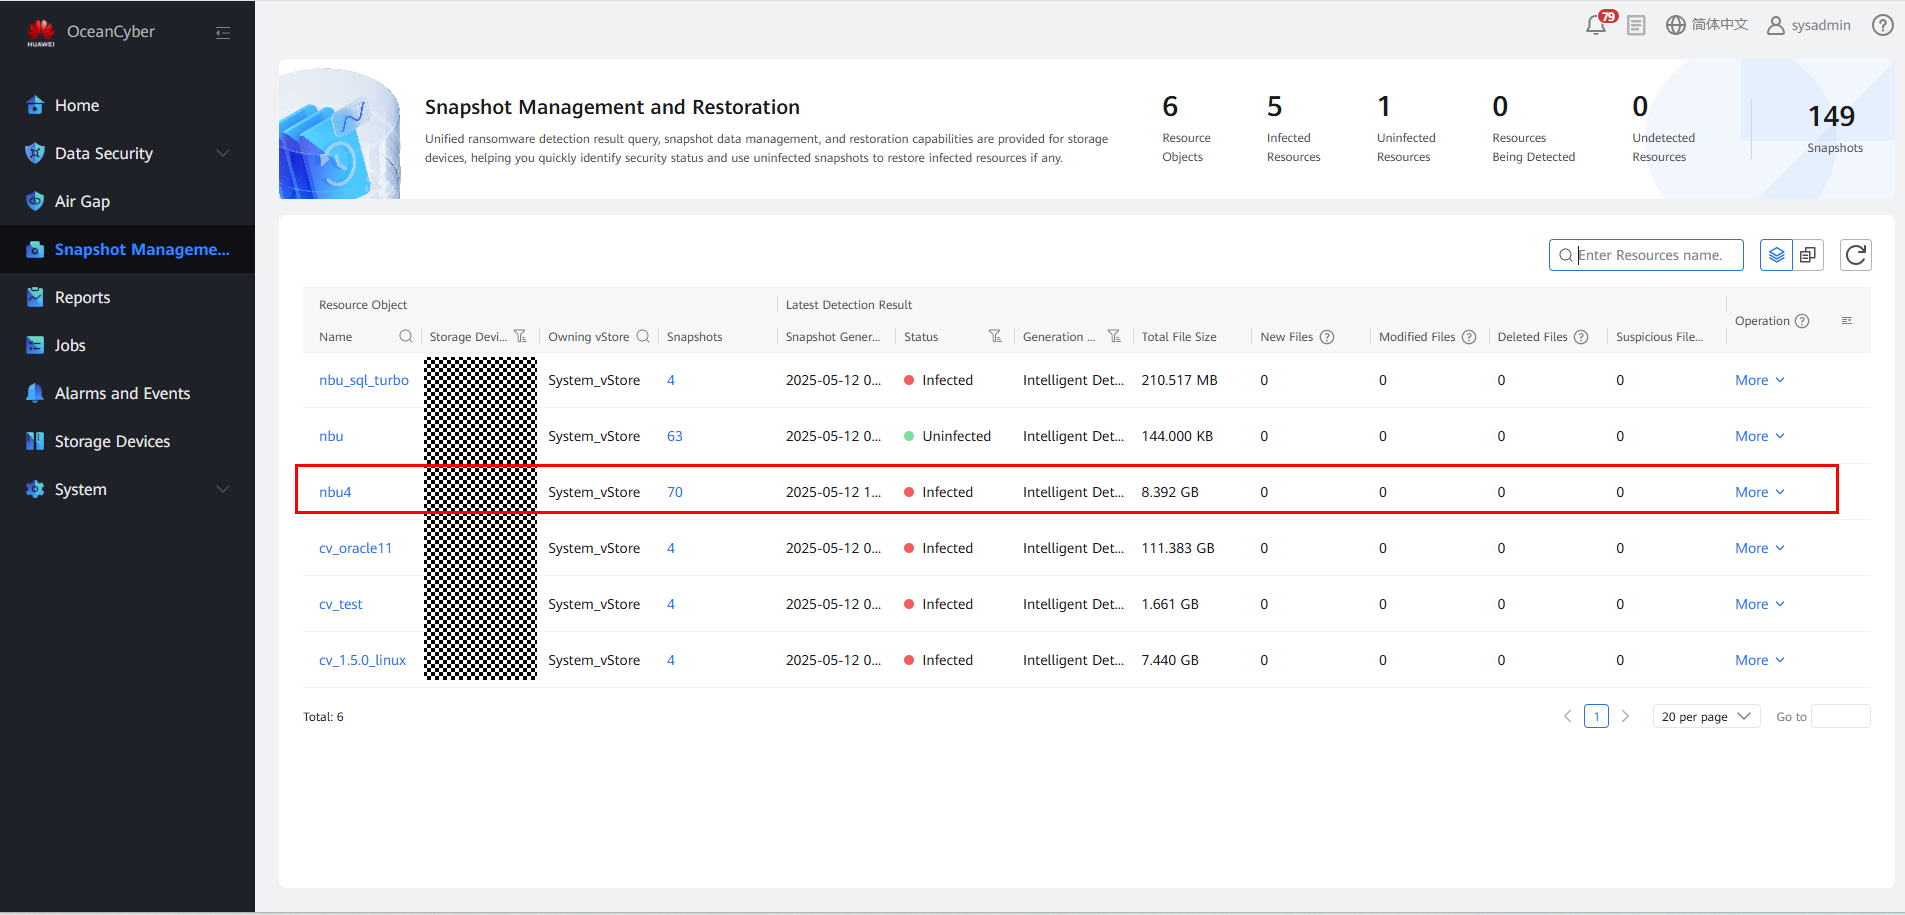
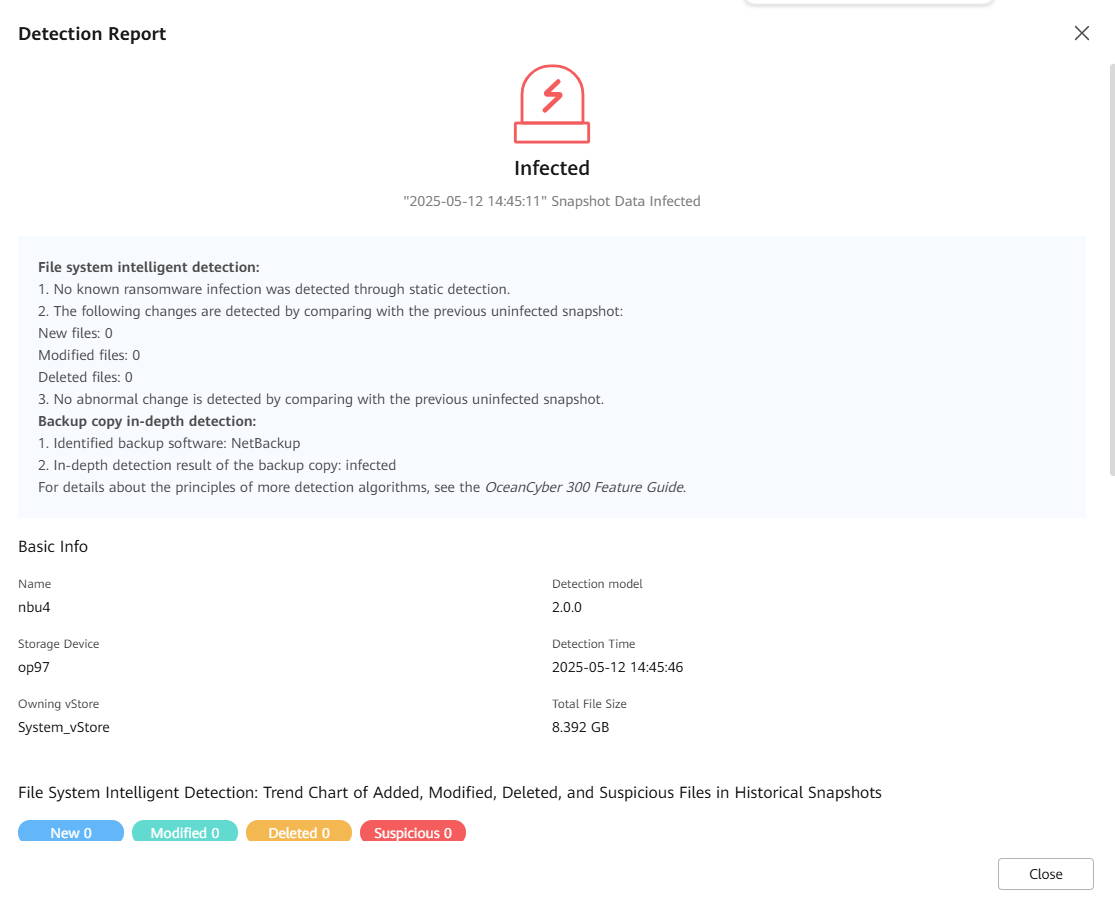
Step 7 On the Snapshot Management and Restoration page, select a file system to view the latest detection result. Click the file system to view the in-depth detection result.

Viewing the detection report

Viewing the list of suspicious files
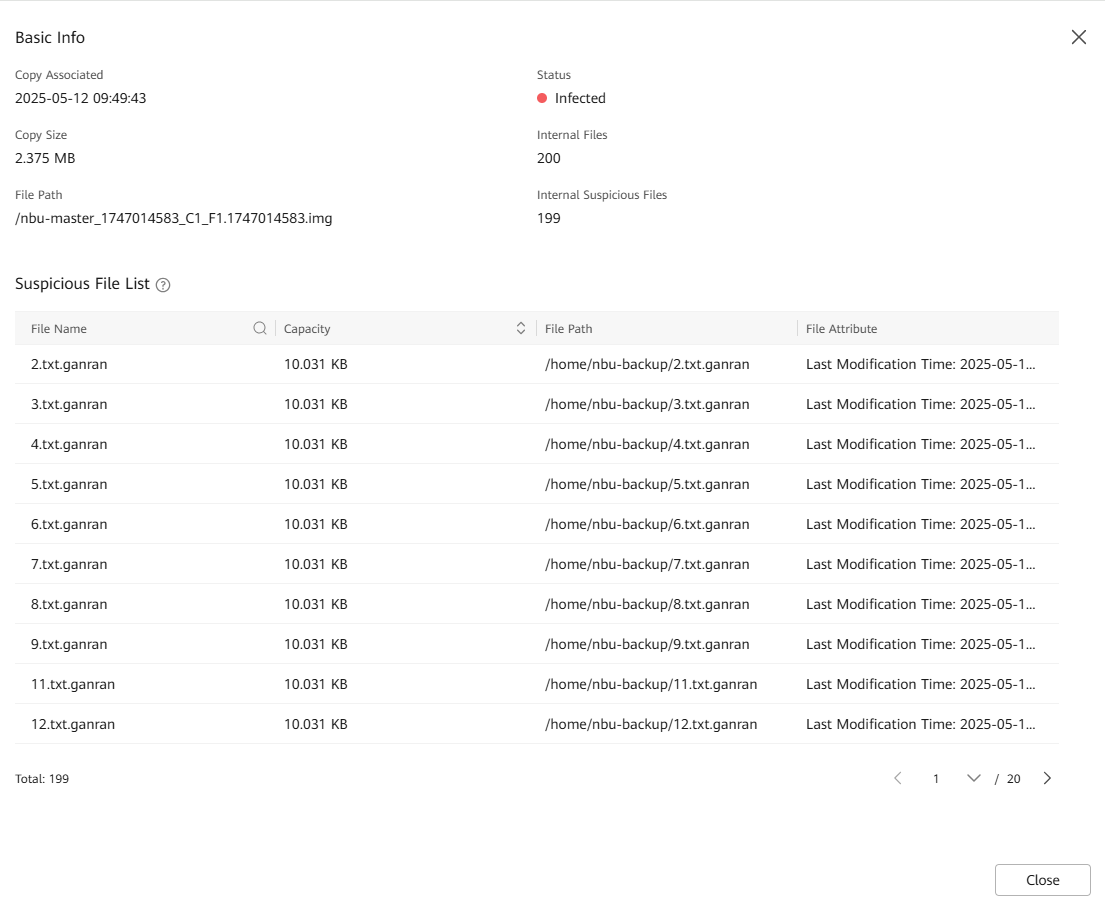
—-End
4.1.2.6 Verifying the Intelligent Detection Result of the Data Security Appliance for Backup of VMware VMs Using NetBackup
Step 1 Run the for i in $(seq 1 10000); do yes « abc_$i » | dd of=$i.txt bs=10K count=1 ;done command to preset txt data on the production host. (for test and verification only)
Step 2 Run the openssl enc -e -aes-256-cbc -in Source file -out Source file.ransomware suffix -pass pass:Password && rm -rf Source file command to infect the preset data on the production host. (for test and verification only)

Step 3 Perform the backup job by referring to 4.1.2.1 Executing a Backup Job.
Step 4 On the Data Security > Intelligent Detection page, locate the target file system, and choose More > Manually Detect.

Step 5 On the Jobs page, view the real-time detection job progress.

Step 6 On the Snapshot Management and Restoration page, view the detection status of all copies.

Step 7 On the Snapshot Management and Restoration page, select a file system to view the latest detection result. Click the file system to view the in-depth detection result.
Viewing the detection report

Viewing the list of suspicious files

—-End
4.1.2.7 Verifying the Intelligent Detection Result of the Data Security Appliance for Backup of Oracle Databases Using NetBackup
Prerequisites
In this best practice, the DBMS_CRYPTO package of the database is used to encrypt the database.

The functions and stored procedures provided by the DBMS_CRYPTO package allow you to encrypt or decrypt RAW, BLOB, or CLOB data.
If the DBMS_CRYPTO package is unavailable, use the DBMS_OBFUSCATION_TOOLKIT package instead. By default, only user SYSDBA can use the DBMS_CRYPTO package. Therefore, any other user requires user SYSDBA to grant them permissions.
Run the sqlplus / as sysdba command to log in as user sysdba.
Run the grant execute on sys.dbms_crypto to username command to grant the execute permission on the DBMS_CRYPTO package to users using the DBMS_CRYPTO package.
Procedure
Step 1 Customize the encryption and decryption functions.
Encryption function:
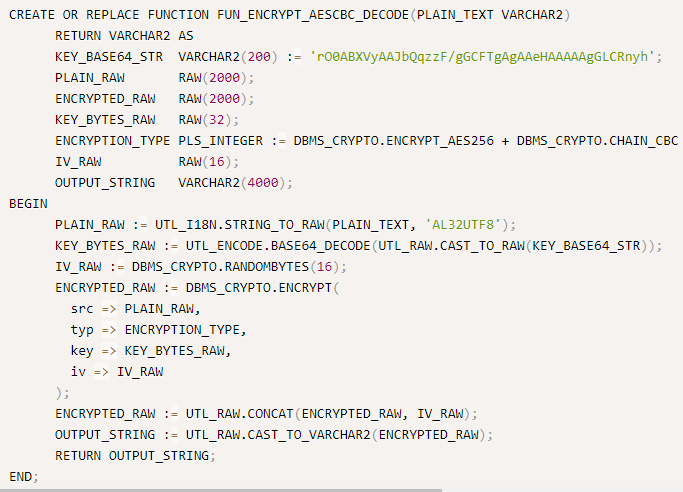
Decryption function:

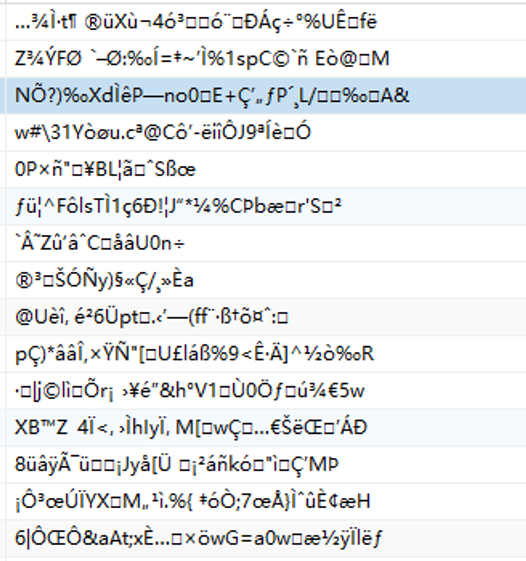
Step 2 Encrypt data using a custom encryption function by running the command UPDATE « table_name » SET column1=FUN_ENCRYPT_AESCBC_DECODE(column1), column2=FUN_ENCRYPT_AESCBC_DECODE(column2), column3=FUN_ENCRYPT_AESCBC_DECODE(column3);.
Step 3 Perform the backup job by referring to 4.1.2.1 Executing a Backup Job.
Step 4 On the Data Security > Intelligent Detection page, locate the target file system, and choose More > Manually Detect.
Step 5 On the Jobs page, view the real-time detection job progress.
Step 6 On the Snapshot Management and Restoration page, view the detection status of all copies.
Step 7 Viewing the copy detection and infection information

—-End
4.1.2.8 Restoring Data Using Backup Copies After Production Data Is Encrypted by Ransomware
This best practice verifies that OceanCyber 300 can detect infected copies and restore production data using qualified backup copies before the infection.
This best practice uses the WORM file system. For details about how to restore data, see the OceanProtect Backup Storage 1.6.0 NetBackup Integration User Guide (Backup Storage Solution). If this document does not meet your requirement, obtain the related documents for reference.
The path is Support > Product Support > Data Storage > Data Protect > Data Protect > Data Protection > OceanProtect > OceanProtect 1 > OceanProtect 1 > OceanProtect 1.6.0.

To select uninfected copies for restoration, perform the following operations in sequence:
1. Perform full backup. Copy 1 is uninfected and can be used for restoration.
2. Perform incremental backup. Copy 2 is uninfected and can be used for restoration.
3. Add infected files for incremental backup. Copy 3 is infected and cannot be used for restoration.
4. Perform incremental backup. Copy 4 is uninfected but cannot be used for restoration because the infected data of copy 3 will be restored.
In conclusion, copies 1 and 2 can be used for restoration, but copies 3 and 4 cannot be used for restoration.
4.1.2.8.1 Restoring File Data Using Uninfected Backup Copies
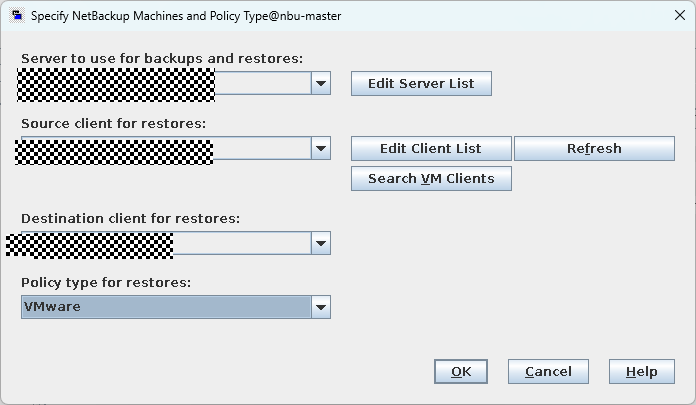
Step 1 On the Backup, Archive, and Restore page, click .


Set parameters on the Specify NetBackup Machine and Policy Type page.
- Set Server to use for backups and restores to the name of the NetBackup master server.
- Select the file system host to be restored under Source client for restores.
- Select a restoration path for the file system under Destination client for restores.
- Set Policy type for restores based on the type of the file system host. For a Windows host, select MS-Windows. For a non-Windows host, select Standard. Click OK.

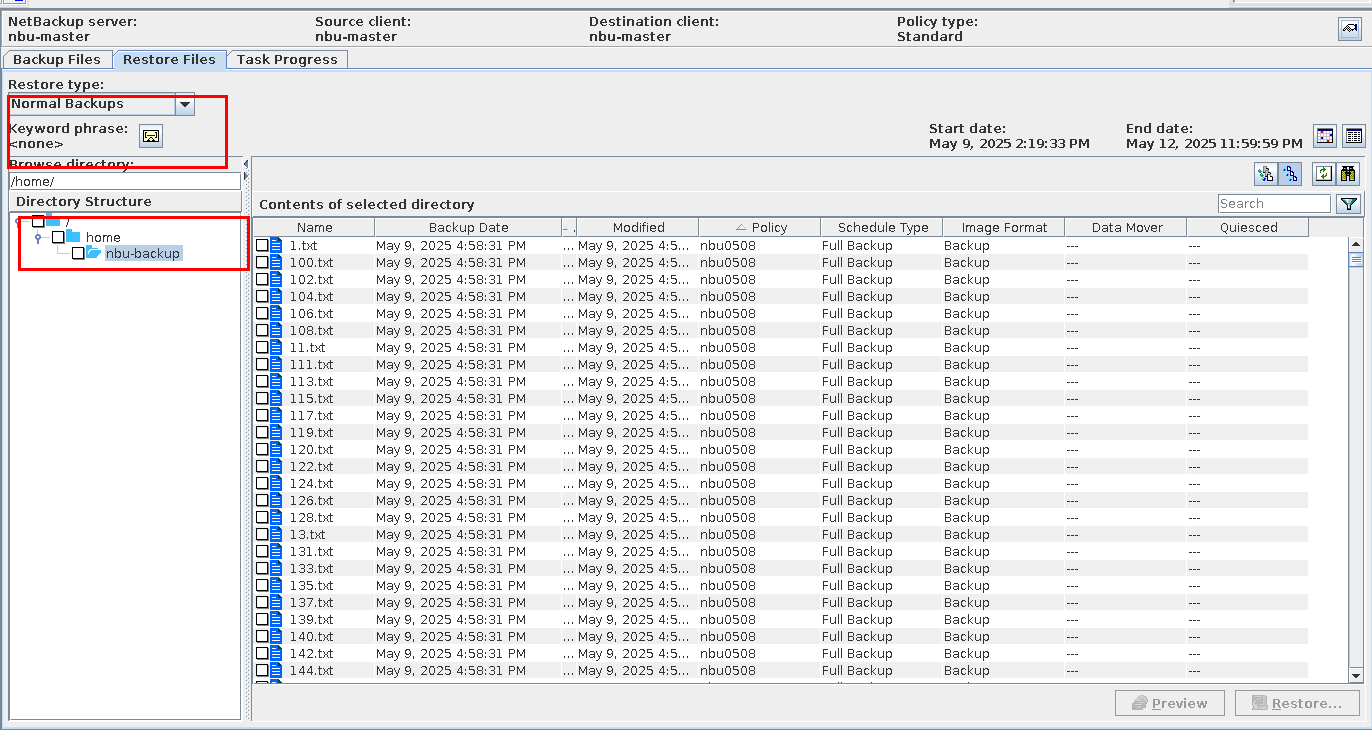
Step 3 On the Restore Files page, set Restore type to Normal Backups and Browse directory to /. When the backup copy is displayed, click Restore to restore the entire data or select several data records for restoration.
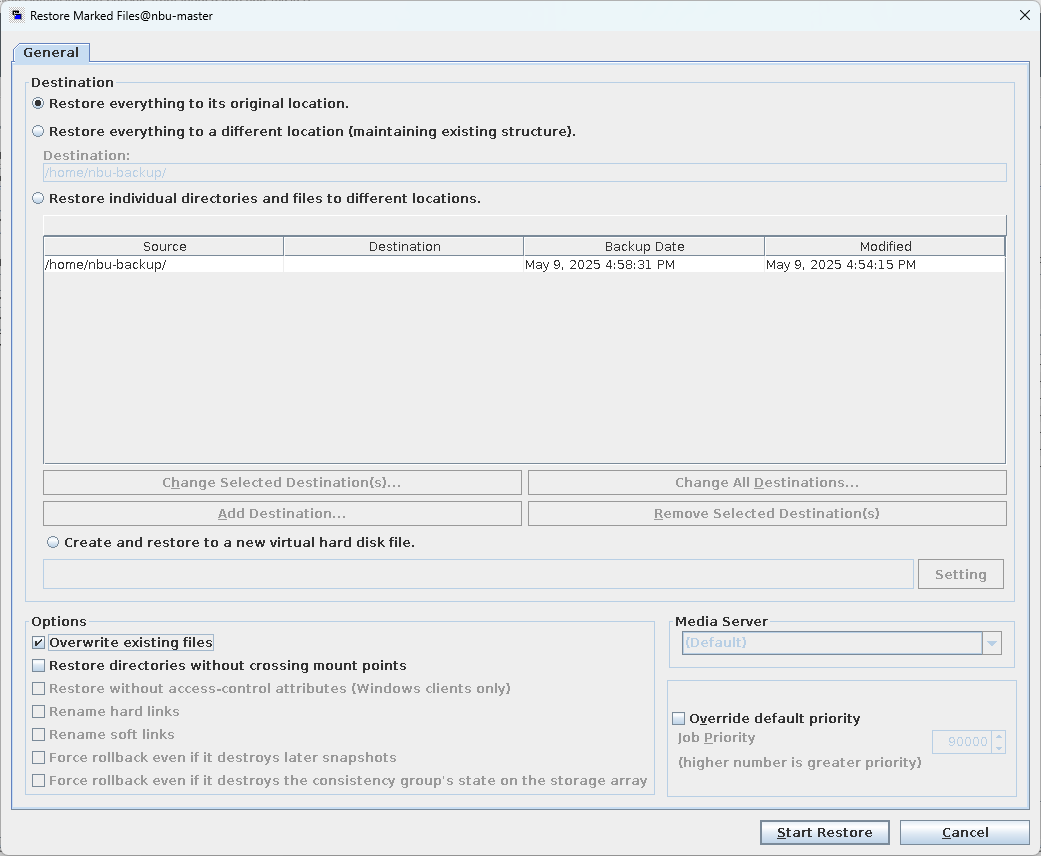
Step 4 On the page that is displayed, select Restore everything to its original location and click Start Restore.
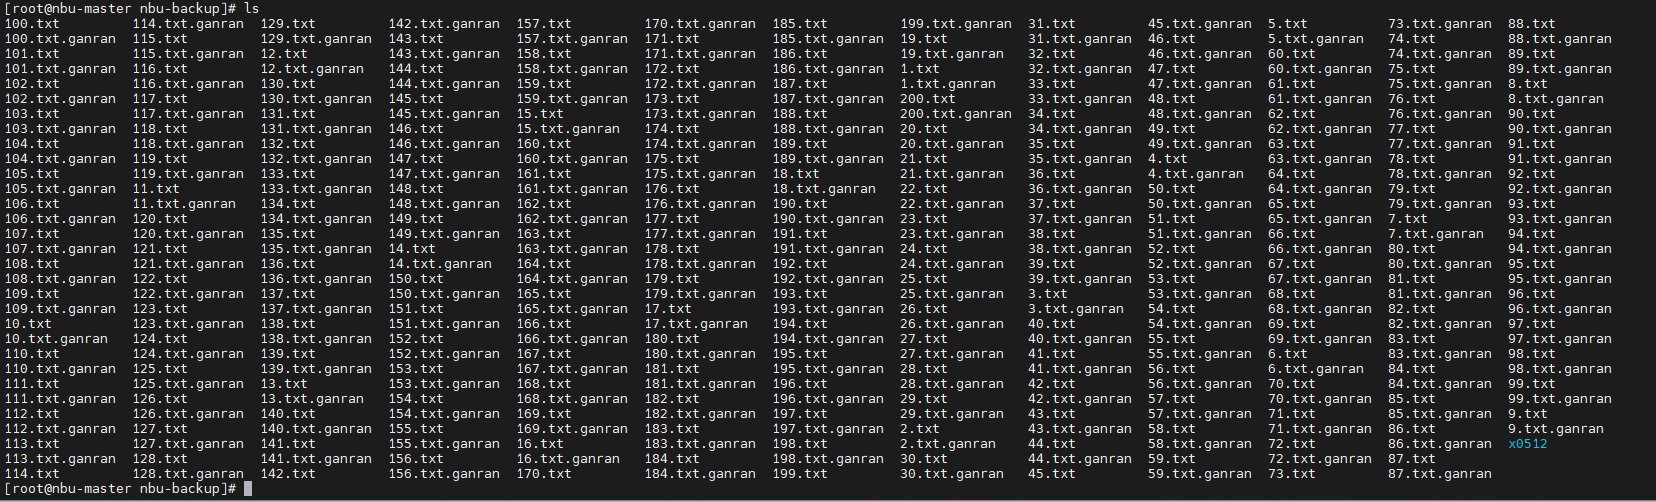
Step 5 Check the restoration result.
The result of restoring data to the original location is as follows:
—-End
4.1.2.8.2 Restoring VMware VMs Using Uninfected Backup Copies
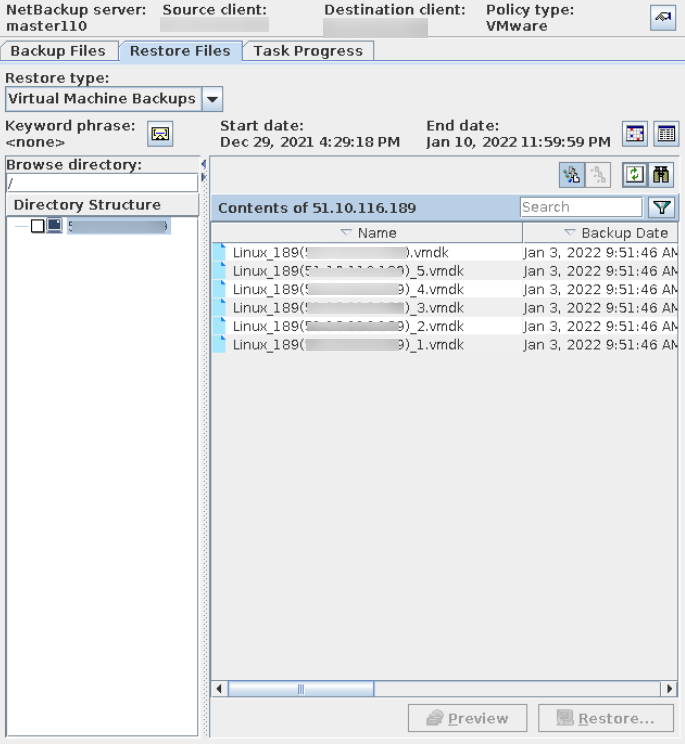
Step 1 On the Backup, Archive, and Restore page, click .

Step 2 Set parameters on the Specify NetBackup Machine and Policy Type page. Set Server to use for backups and restores to the NetBackup master server, select the VM to be restored under Source client for restores, select a restoration path for the VM under Destination client for restores, and set Policy type for restores to VMware. Click OK.
Step 3 On the Restore Files page, set Restore type to Virtual Machine Backups.
Step 4 On the Virtual Machine Recovery page, select Original Location and click Next.

Step 5 In the Transport modes area, select the transmission mode and adjust the priority based on the networking environment. In this example, select san: Use san to move virtual disk data and click Next.
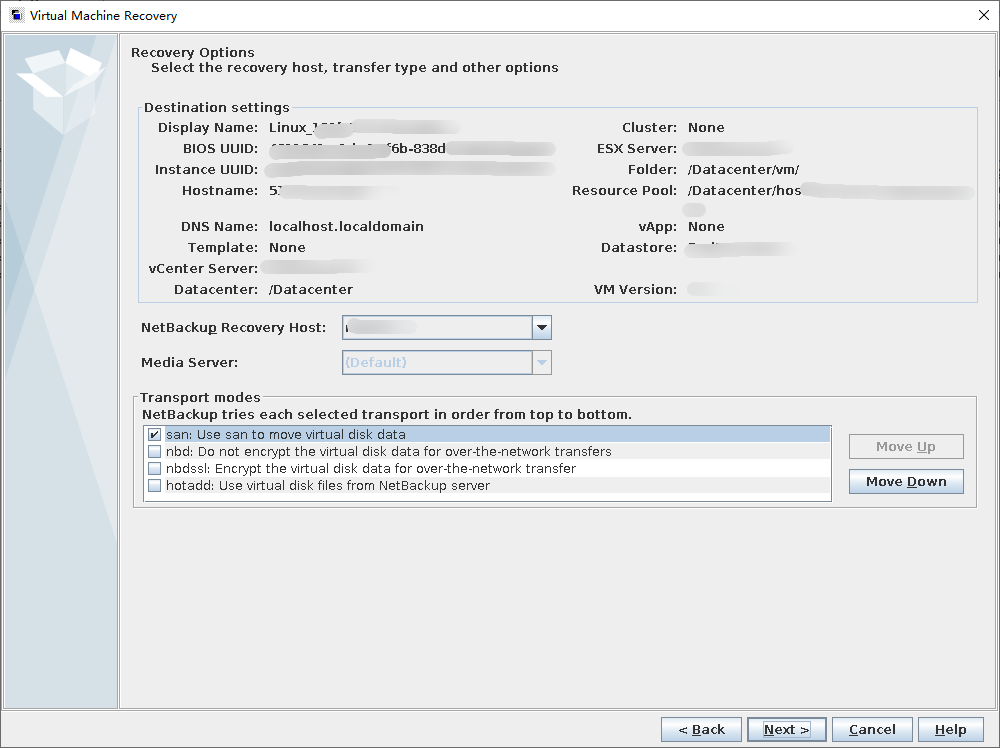
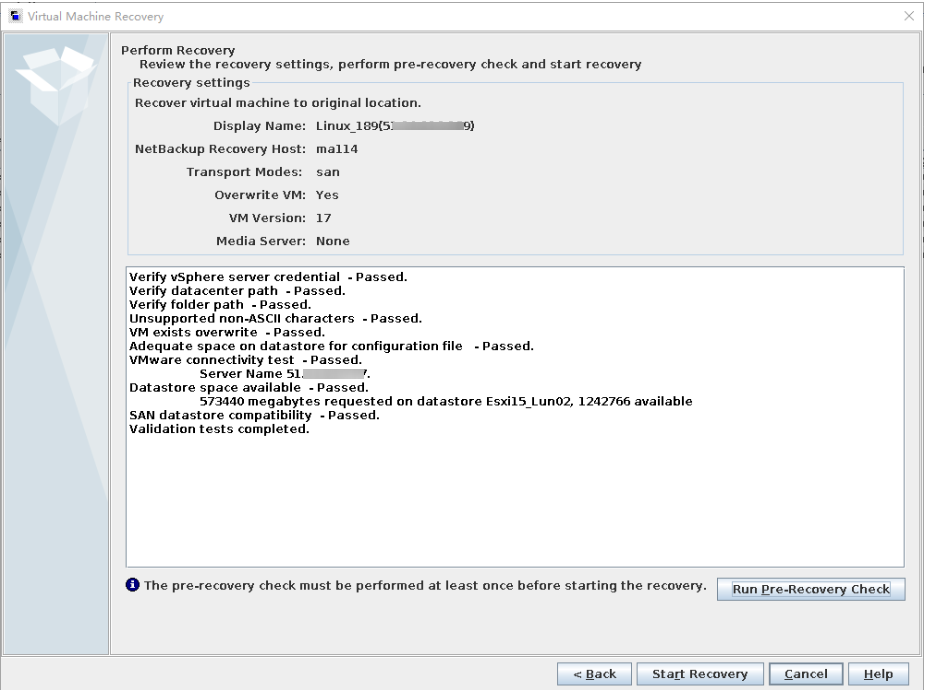
Step 6 Select Overwrite the existing virtual machine.
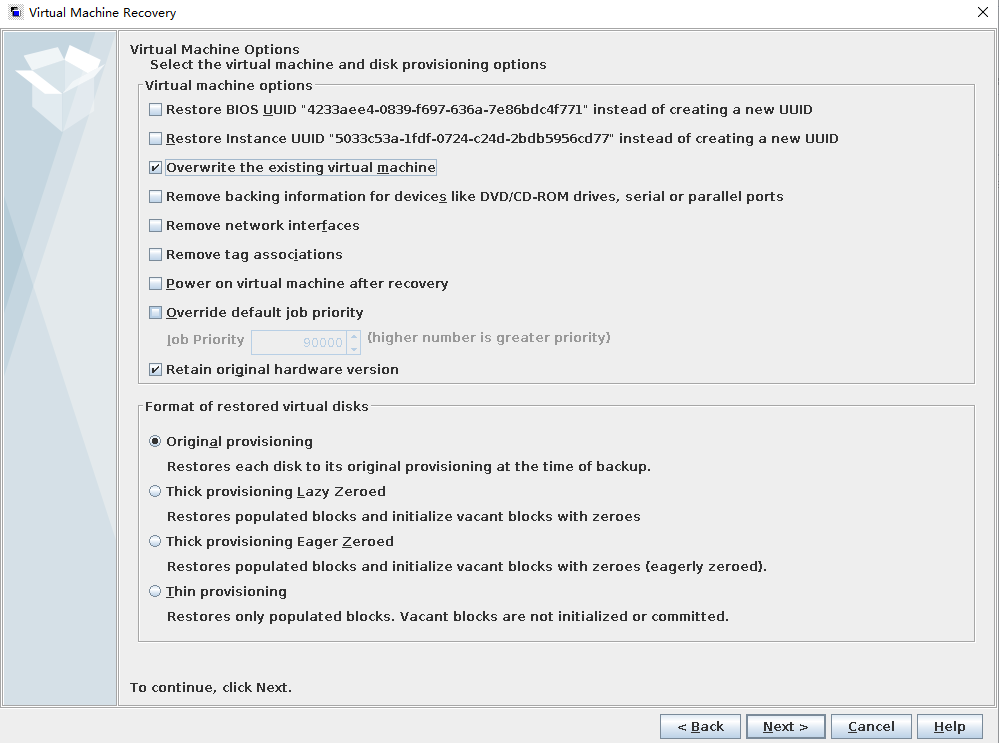
Step 7 Start the health check and click Run Pre-Recovery Check. After the health check is complete, start the restoration.
—-End
4.1.2.8.3 Restoring an Oracle Database Using an Uninfected Backup Copy

This section describes only how to restore the entire Oracle database to the original host. Restore the Oracle database as required. For details about the restoration command, see the NetBackup official documentation.
Run the following commands on the RMAN page of the Oracle database to restore the Oracle database:
1.Log in to the Oracle host, switch to the Oracle user, and access RMAN.
RMAN TARGET/
2.Run the following command to query the RMAN configuration:
SHOW ALL;
3.Run the following command to change DEFAULT DEVICE TYPE to SBT_TAPE:
CONFIGURE DEFAULT DEVICE TYPE TO ‘SBT_TAPE’;
4.Run the following command to configure the number of channels:
CONFIGURE DEVICE TYPE ‘SBT_TAPE’ PARALLELISM 20 BACKUP TYPE TO BACKUPSET;
5.Set the SBT_TAPE parameter to enable SBT_LIBRARY to specify the NetBackup API path. Generally, the API path is /usr/openv/NetBackup/bin/libobk.so64.
CONFIGURE CHANNEL DEVICE TYPE ‘SBT_TAPE’ PARMS ‘SBT_LIBRARY=/usr/openv/NetBackup/bin/libobk.so64’;
6.Run the following commands to restore the Oracle database:
RUN {
SHUTDOWN IMMEDIATE;
STARTUP MOUNT;
RESTORE DATABASE;
RECOVER DATABASE;
}
4.2 Isolation Zone Protection
4.2.1 Configuring an Isolation Zone
Prerequisite: Protection has been configured for the production zone.
Figure 4-2 Process for configuring isolation zone protection
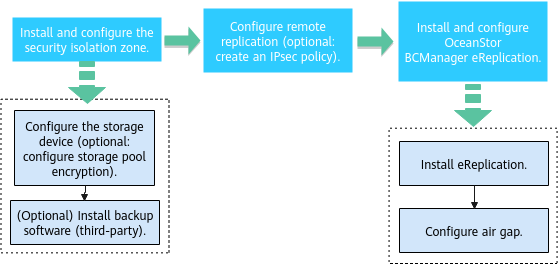
4.2.1.1 Installing and Configuring the Security Isolation Zone
For the storage configuration of the isolation zone, you only need to create a storage pool, and see the configuration for the production zone. For details about how to install the backup software, see the official documentation.
4.2.1.2 Configuring Remote Replication
To implement remote replication, you need to create logical ports on both the backup storage in the production zone and that in the isolation zone. If replication link encryption is required, configure at least one encryption module on controllers A and B at both the production zone and the isolation zone. In addition, create a remote device administrator on the backup storage in the isolation zone.

This section describes how to use the file system replication function of the storage device. If you want to use A.I.R. copy replication of NetBackup, see the OceanProtect 1.6.0 Backup Storage Solution Best Practice (Integration with NetBackup).
Step 1 Create a remote device.
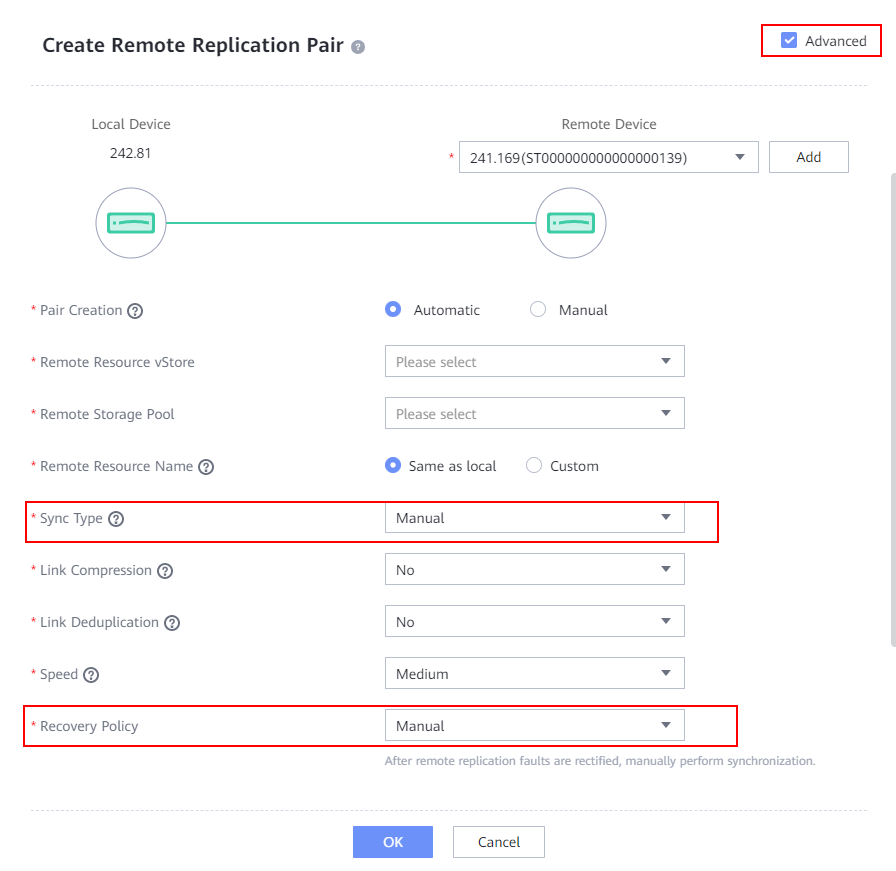
Step 2 Create a file system remote replication pair. Select the file system for which a remote replication pair is to be created. The replication mode must be asynchronous. Set Sync Type and Recovery Policy to Manual. Retain the default values for other parameters.
Step 3 After the remote replication pair is created, start initial synchronization.
—-End
4.2.1.3 Creating an OceanProtect X8000 vStore DataTurbo Administrator
For details, see 4.1.1.1.2 Creating an OceanProtect X8000 vStore DataTurbo Administrator.
4.2.1.4 Installing and Configuring OceanStor BCManager eReplication
The OceanStor BCManager eReplication software is configured in the isolation zone, and its management network must communicate with the storage in the isolation zone. This section describes how to configure OceanStor BCManager eReplication. For details about its installation, see the user guide of the specific version.

For details about how to install and deploy OceanStor BCManager eReplication, see the OceanStor BCManager 8.6.0 eReplication User Guide.
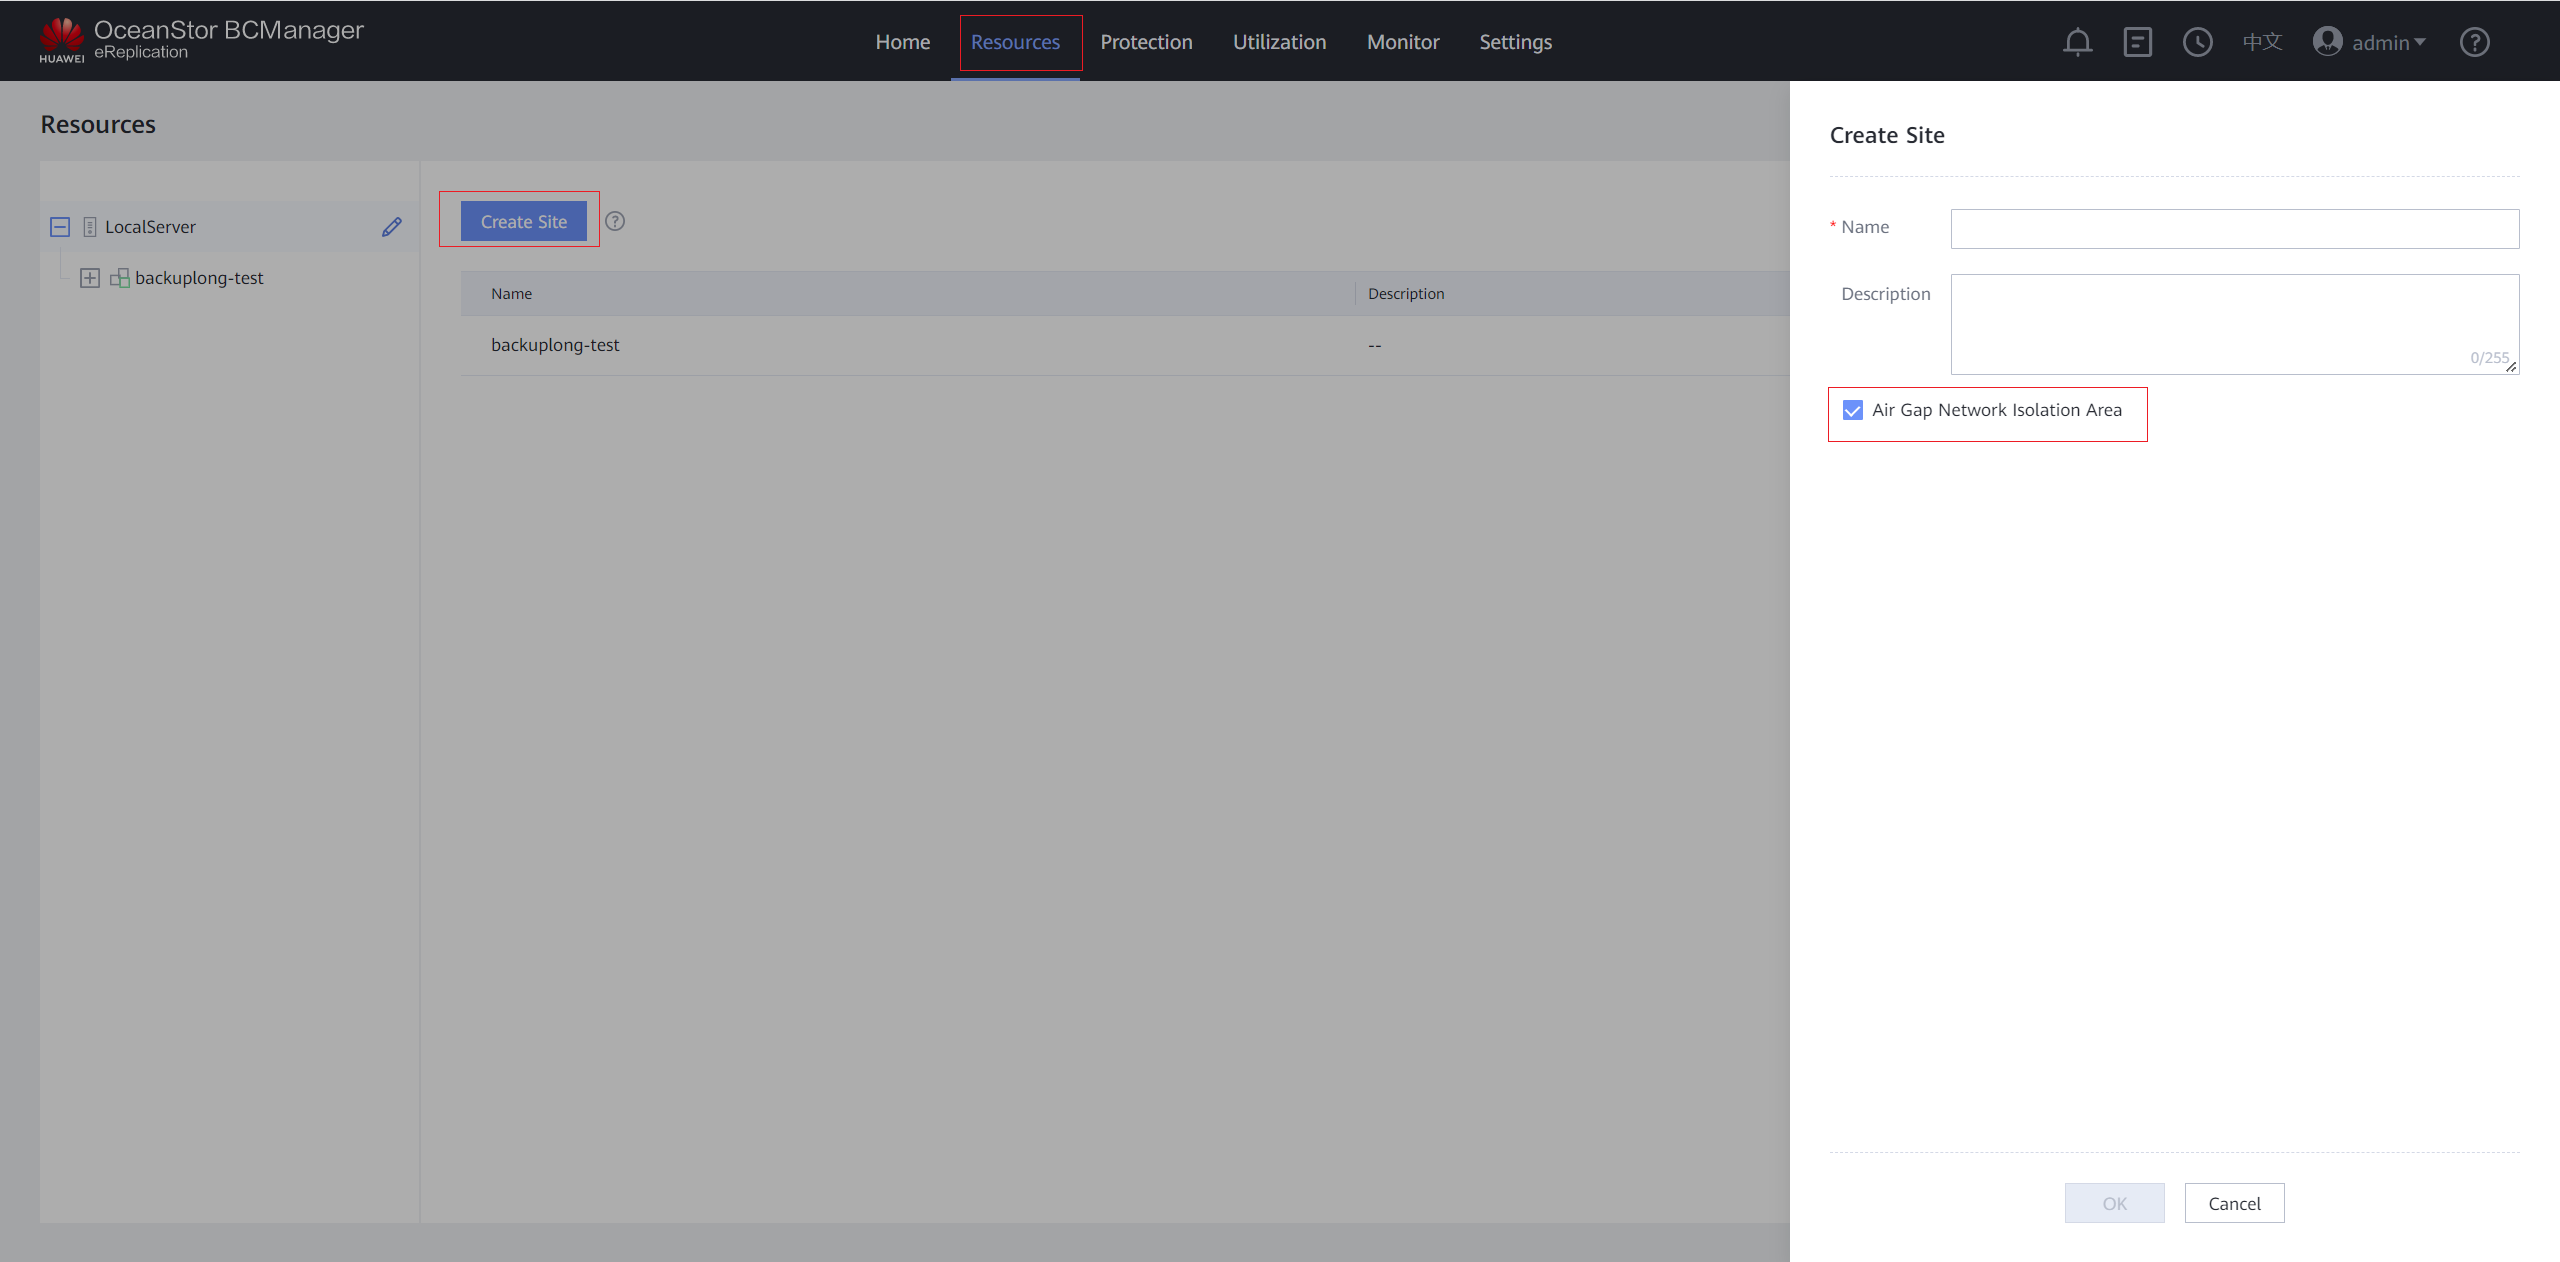
Step 1 Log in to OceanStor BCManager eReplication, choose Resources > Create Site, and select Air Gap Network Isolation Area.
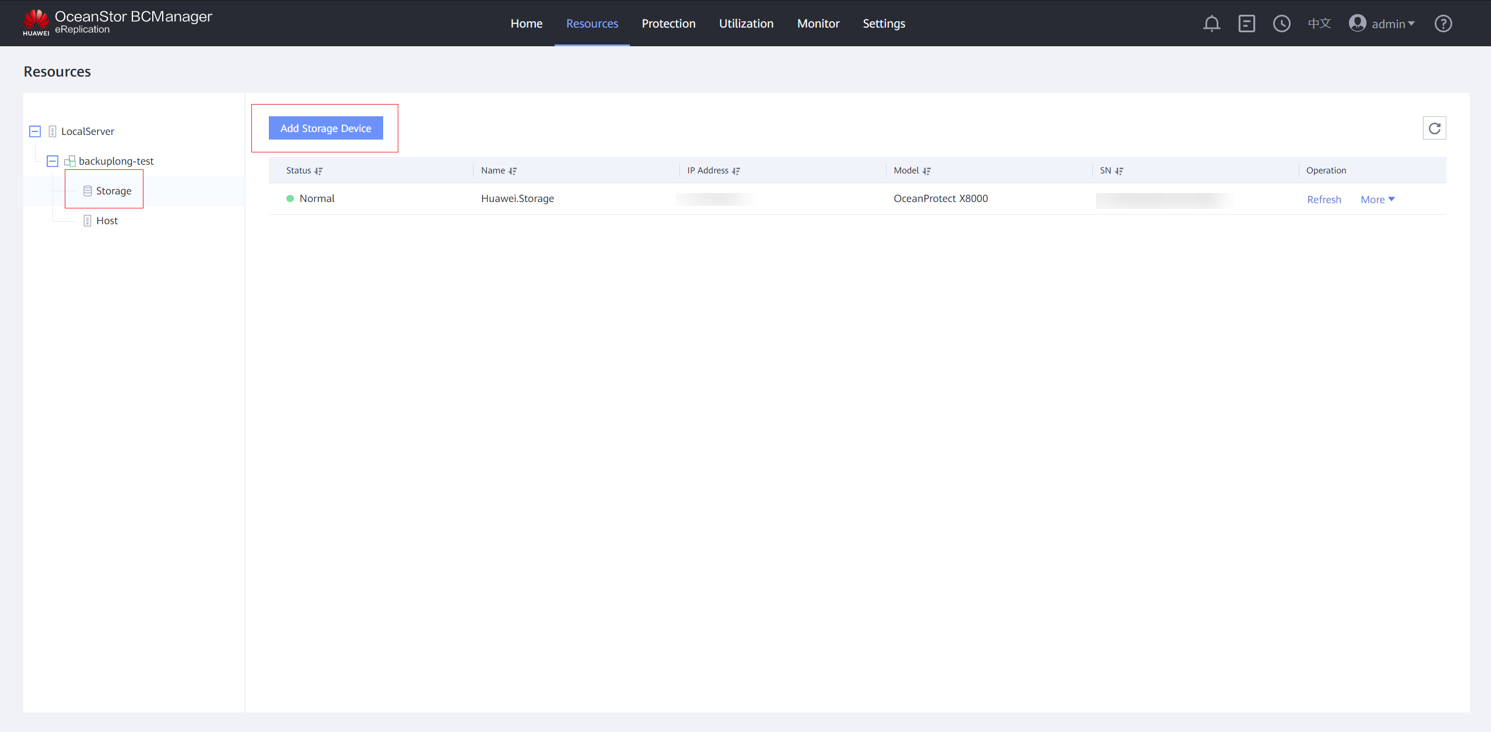
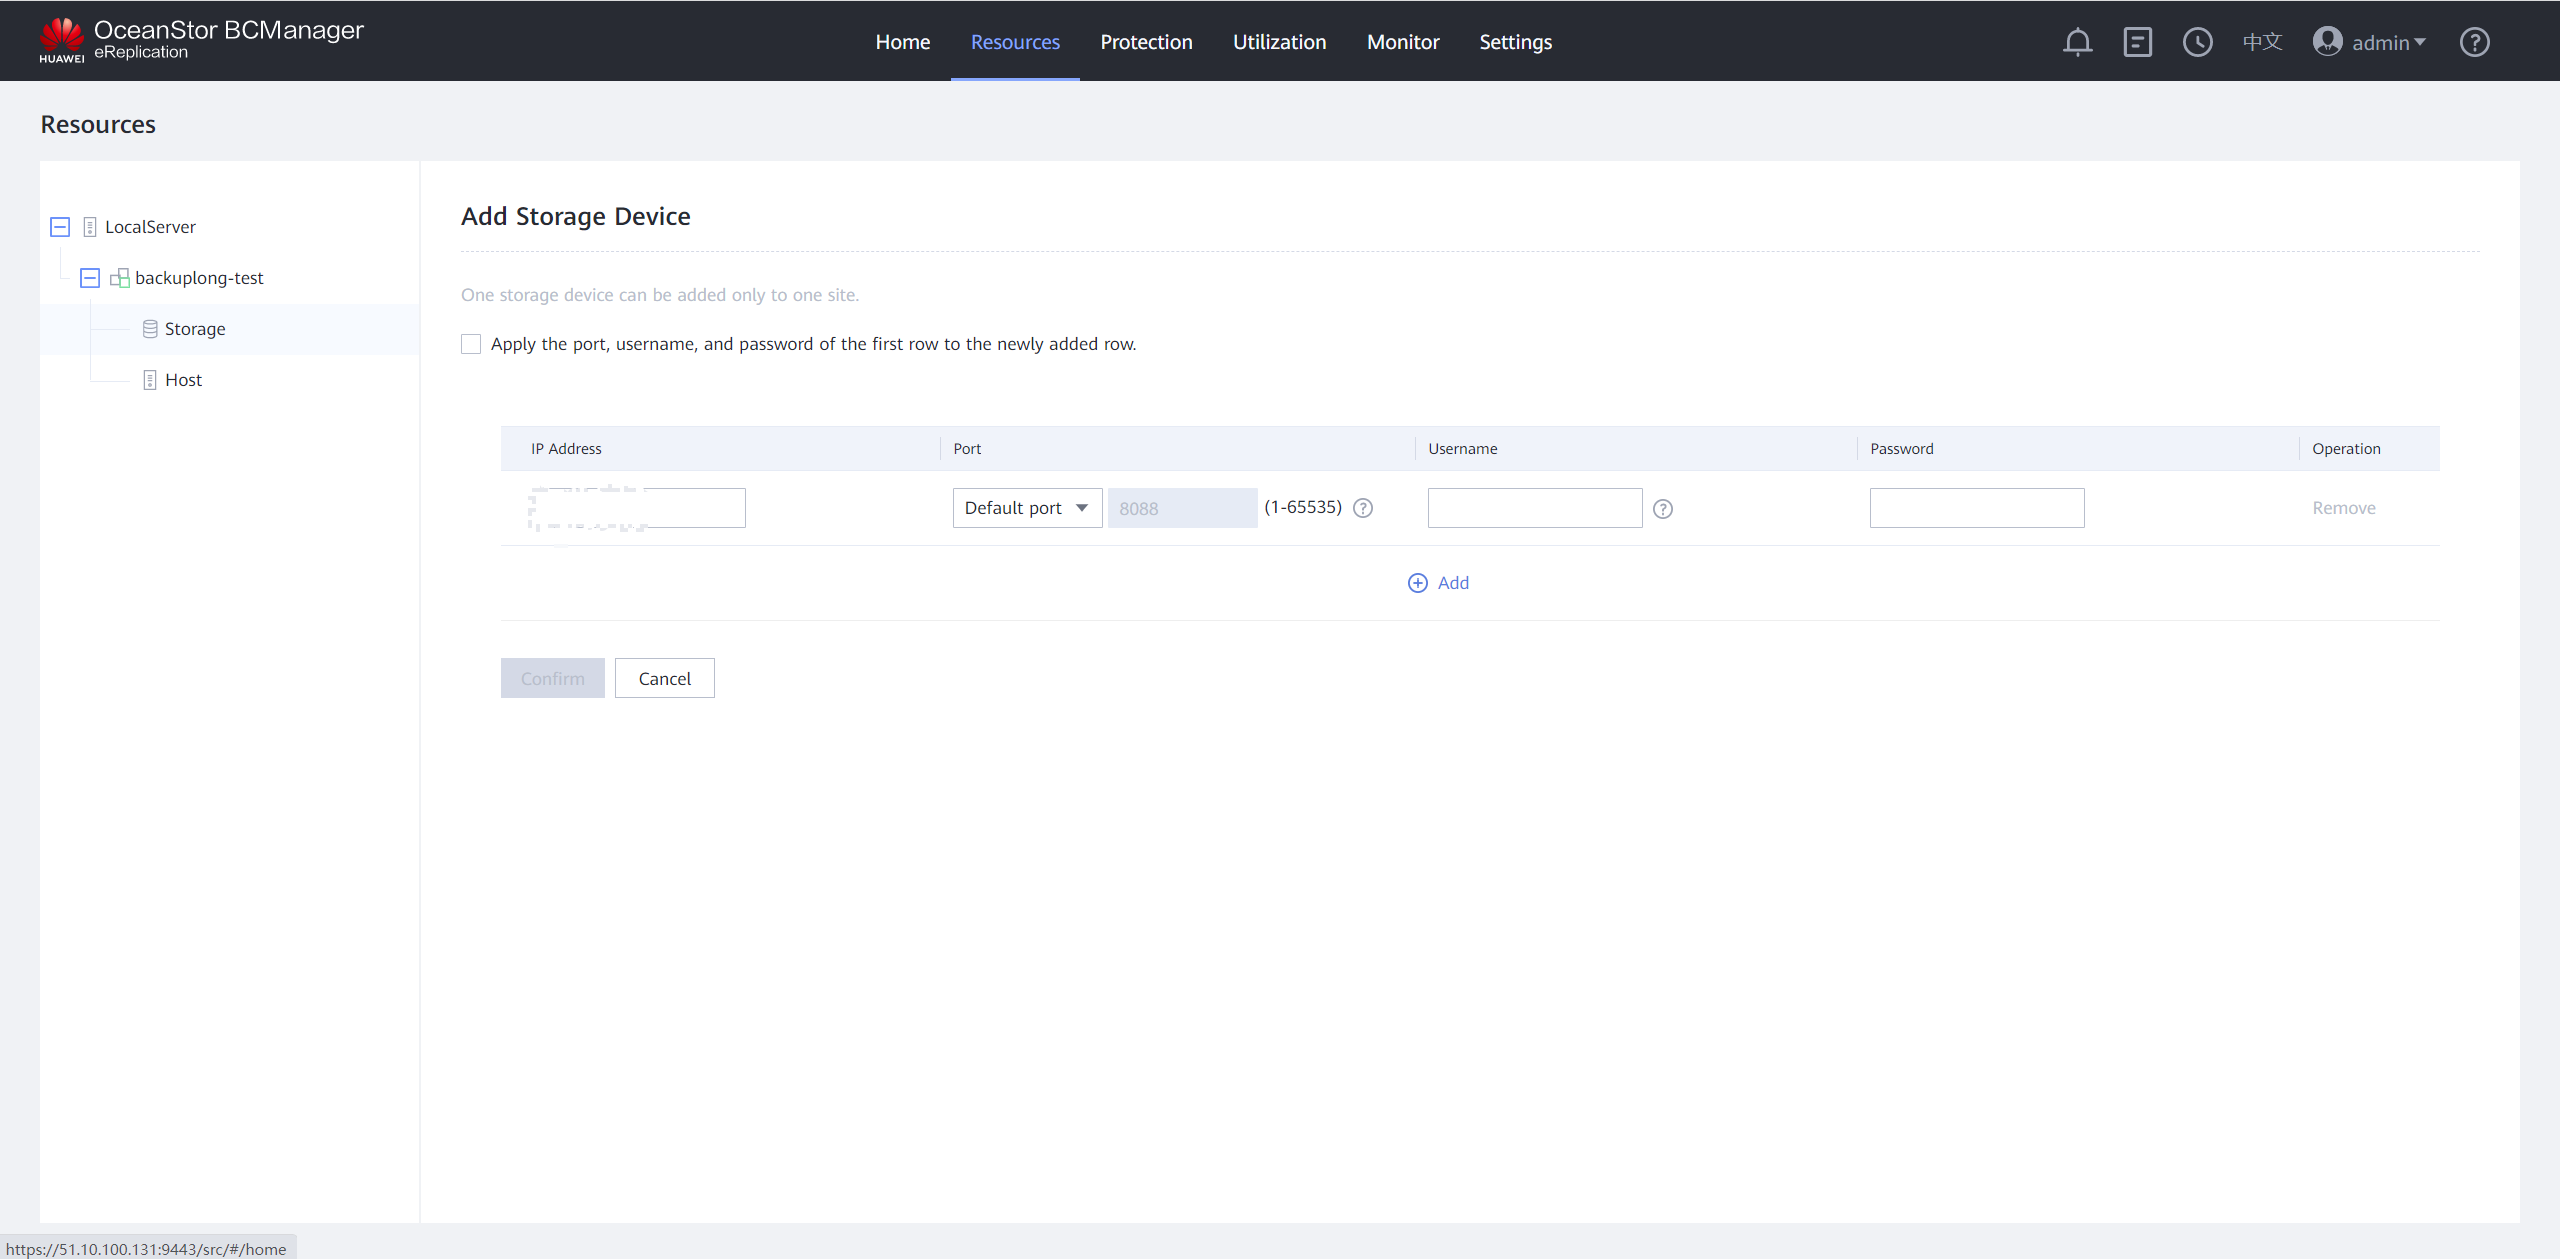
Step 2 After the site is created, add a storage device to the site.
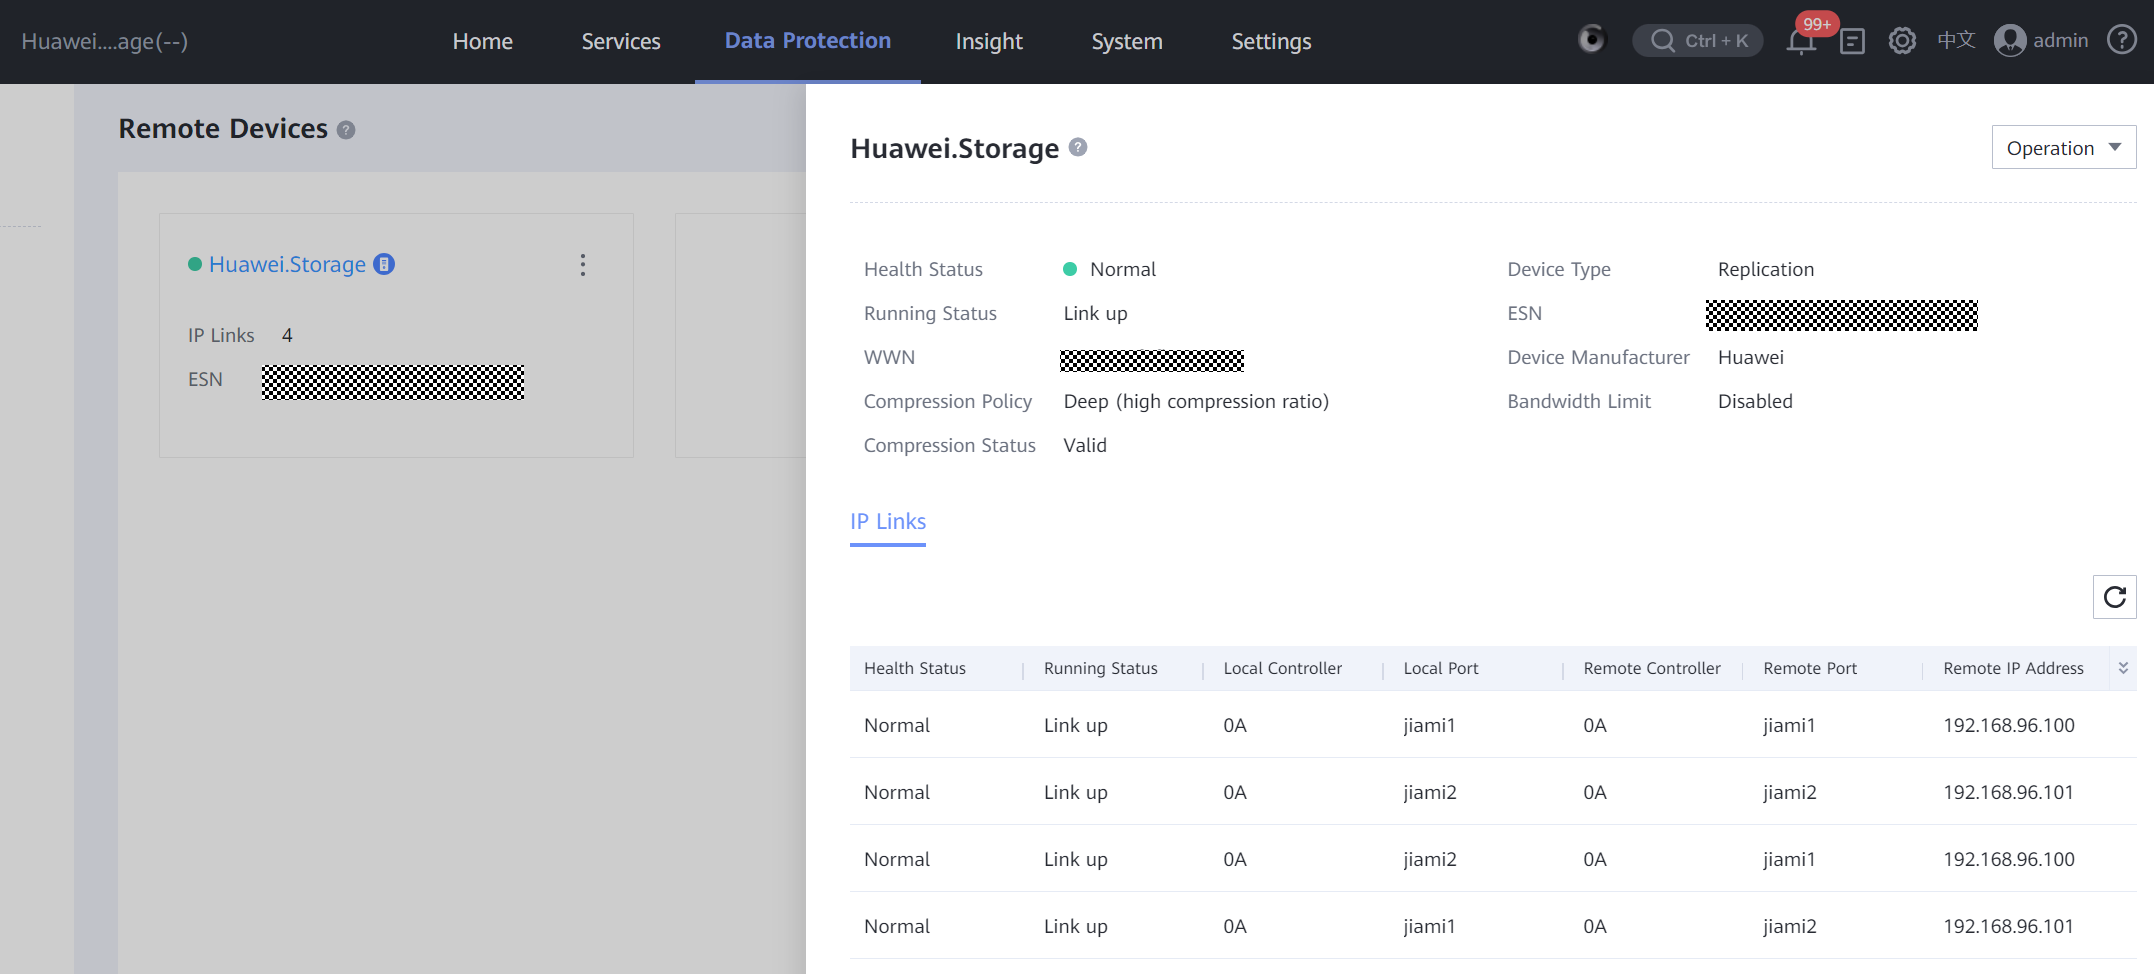
Step 3 Enter the IP address, username and password for logging in to DeviceManager of the storage device in the isolation zone, and click Confirm. After the storage device is added, the corresponding ports in the Air Gap Port Group are in the inactive state.
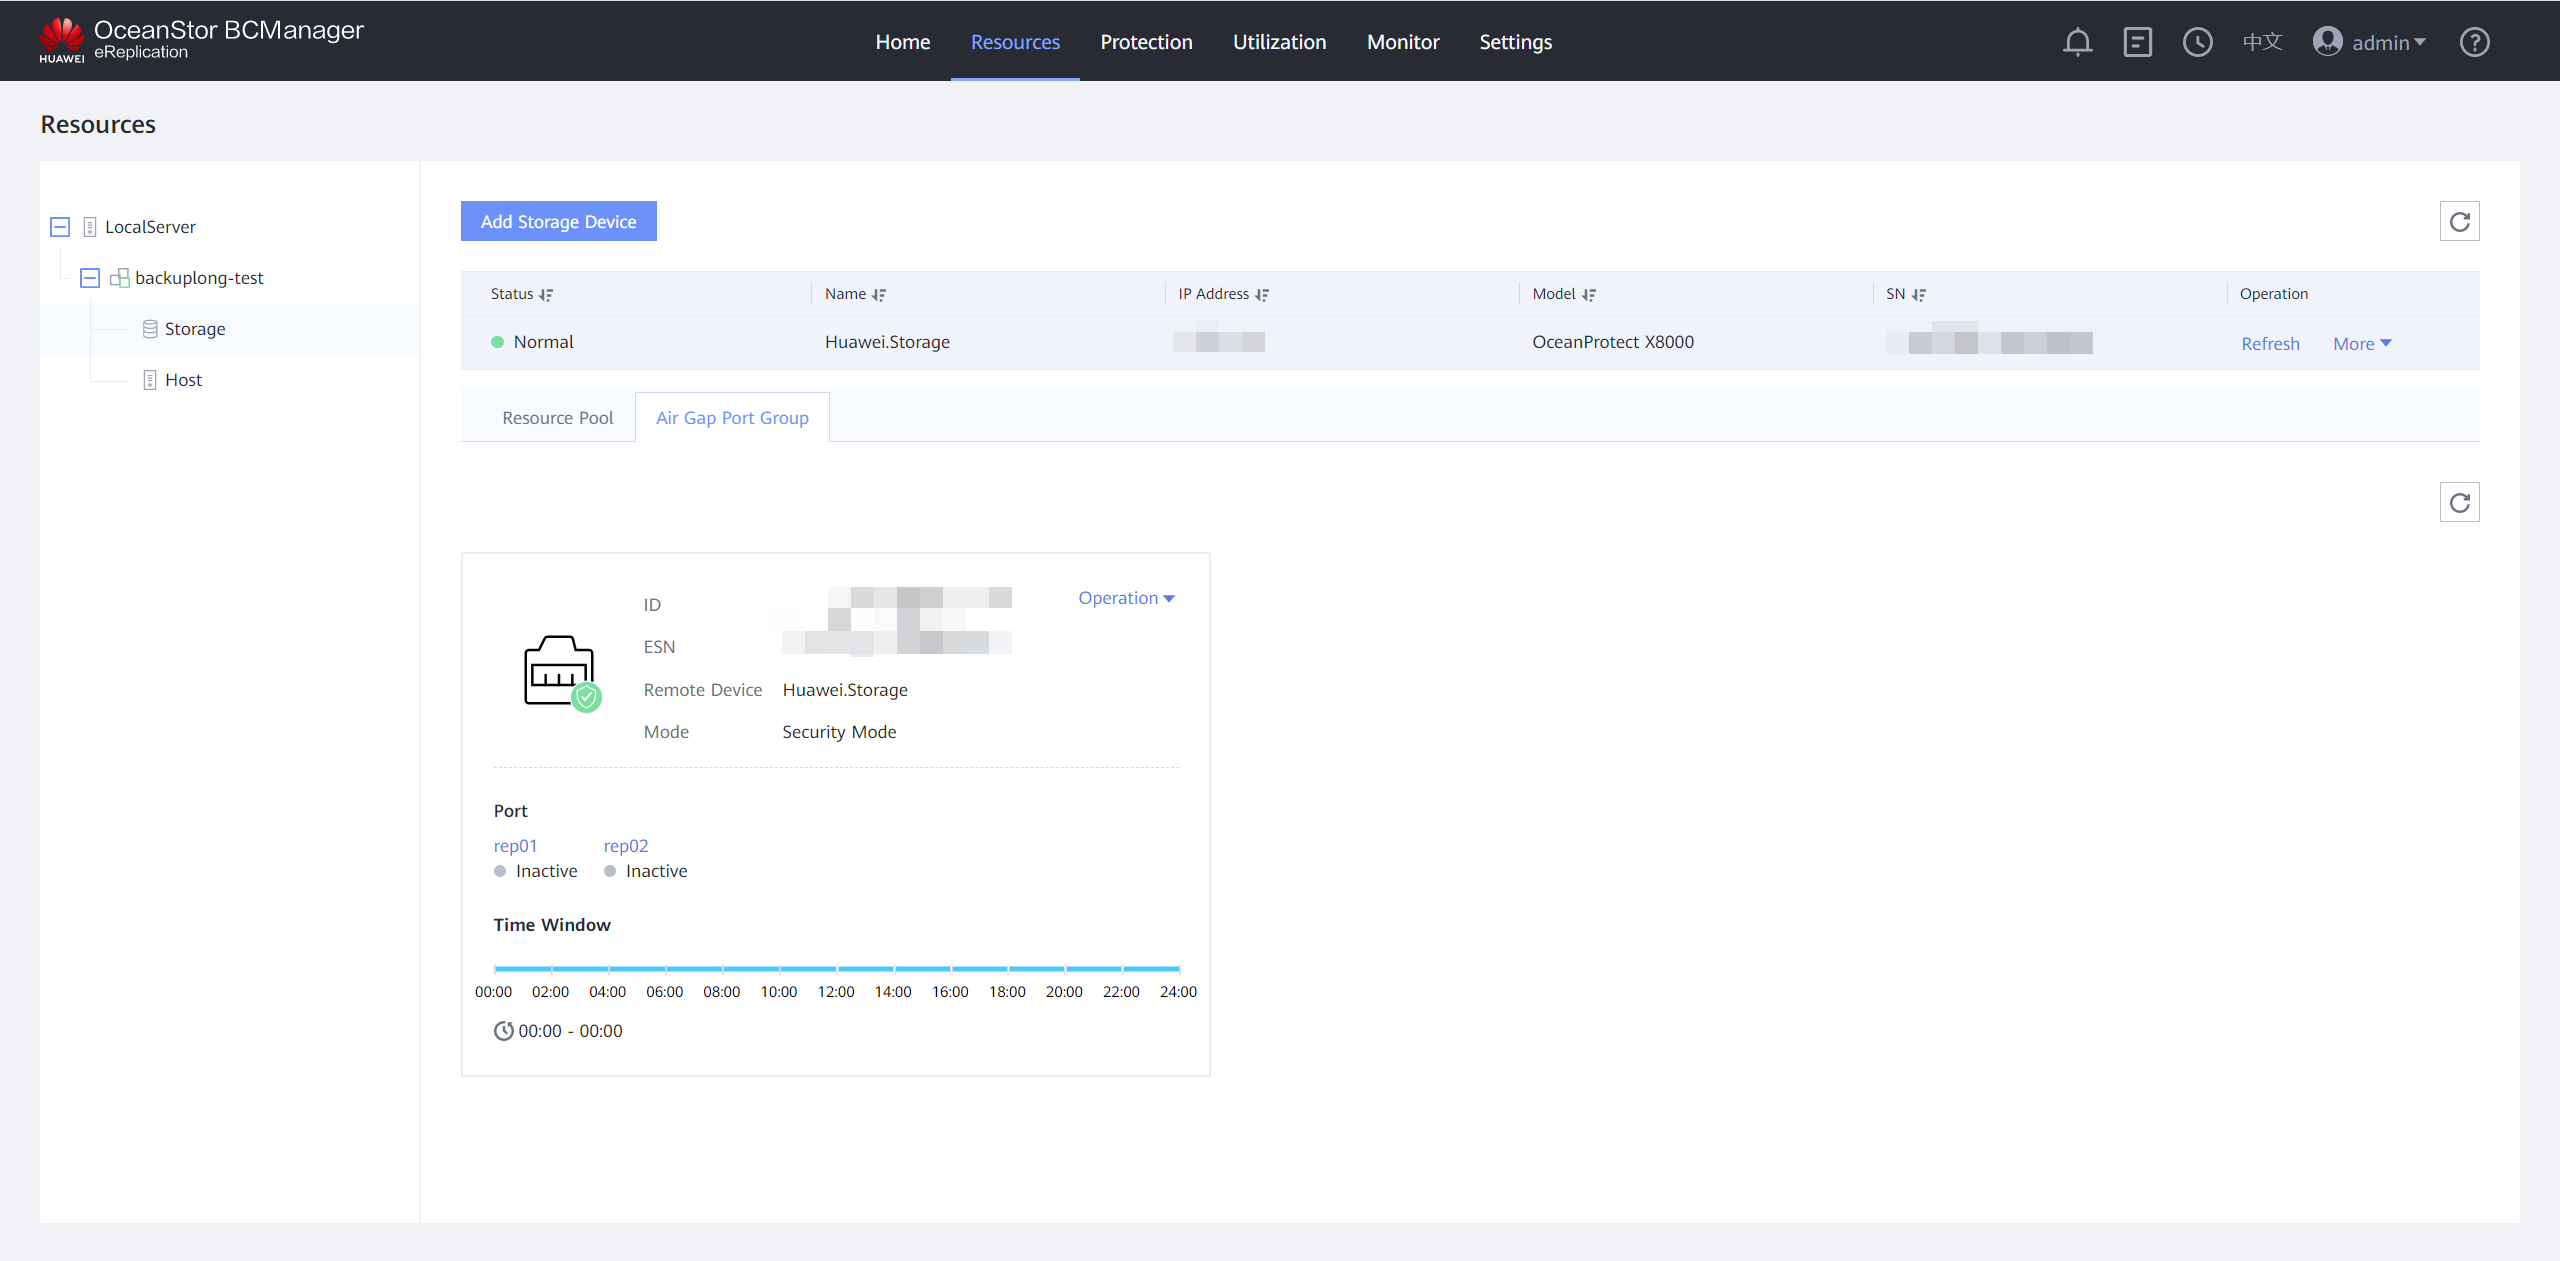
Step 4 Choose Resources > Storage, view the Air Gap storage information, and click Refresh to update the isolation zone storage information.
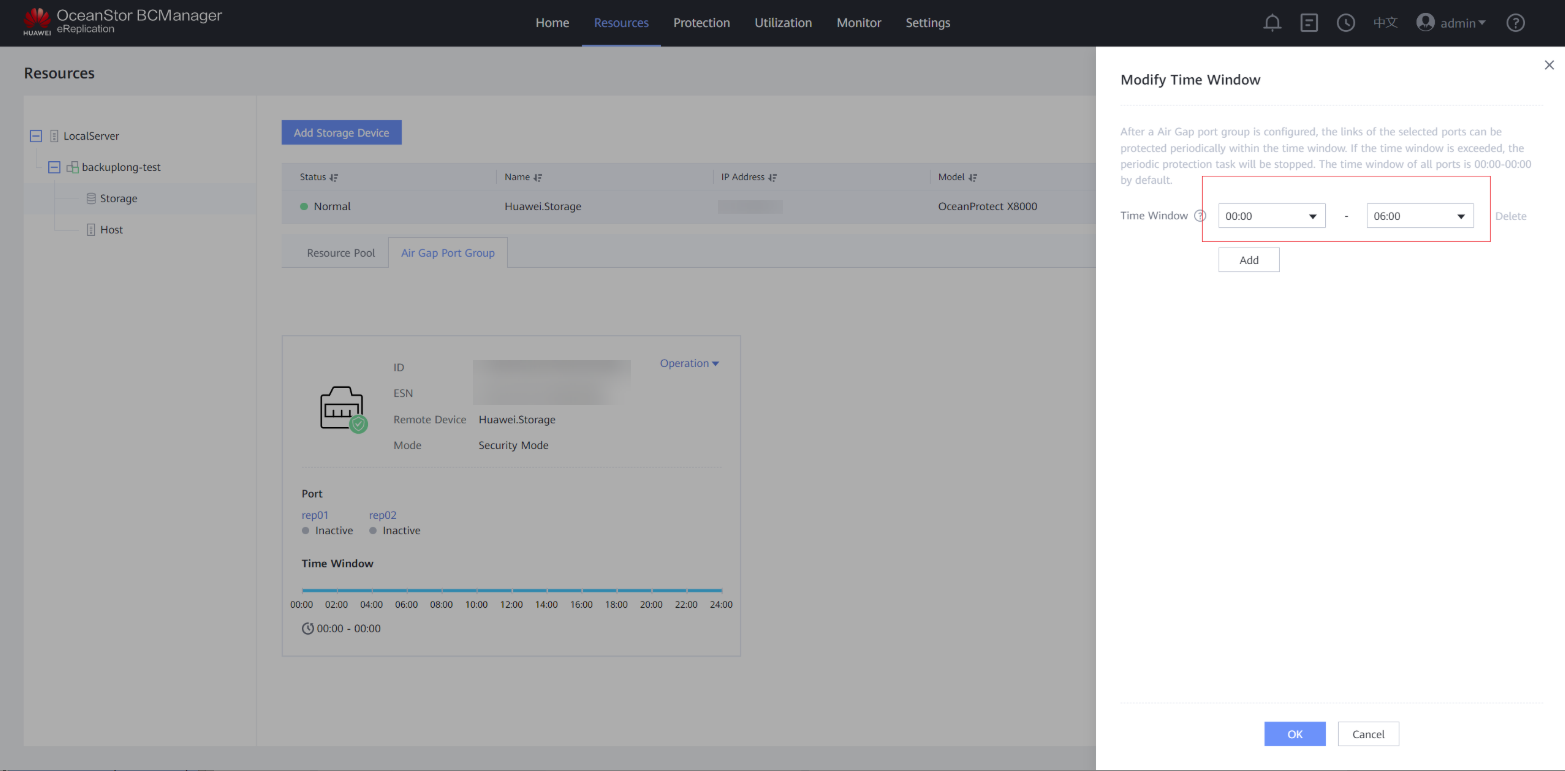
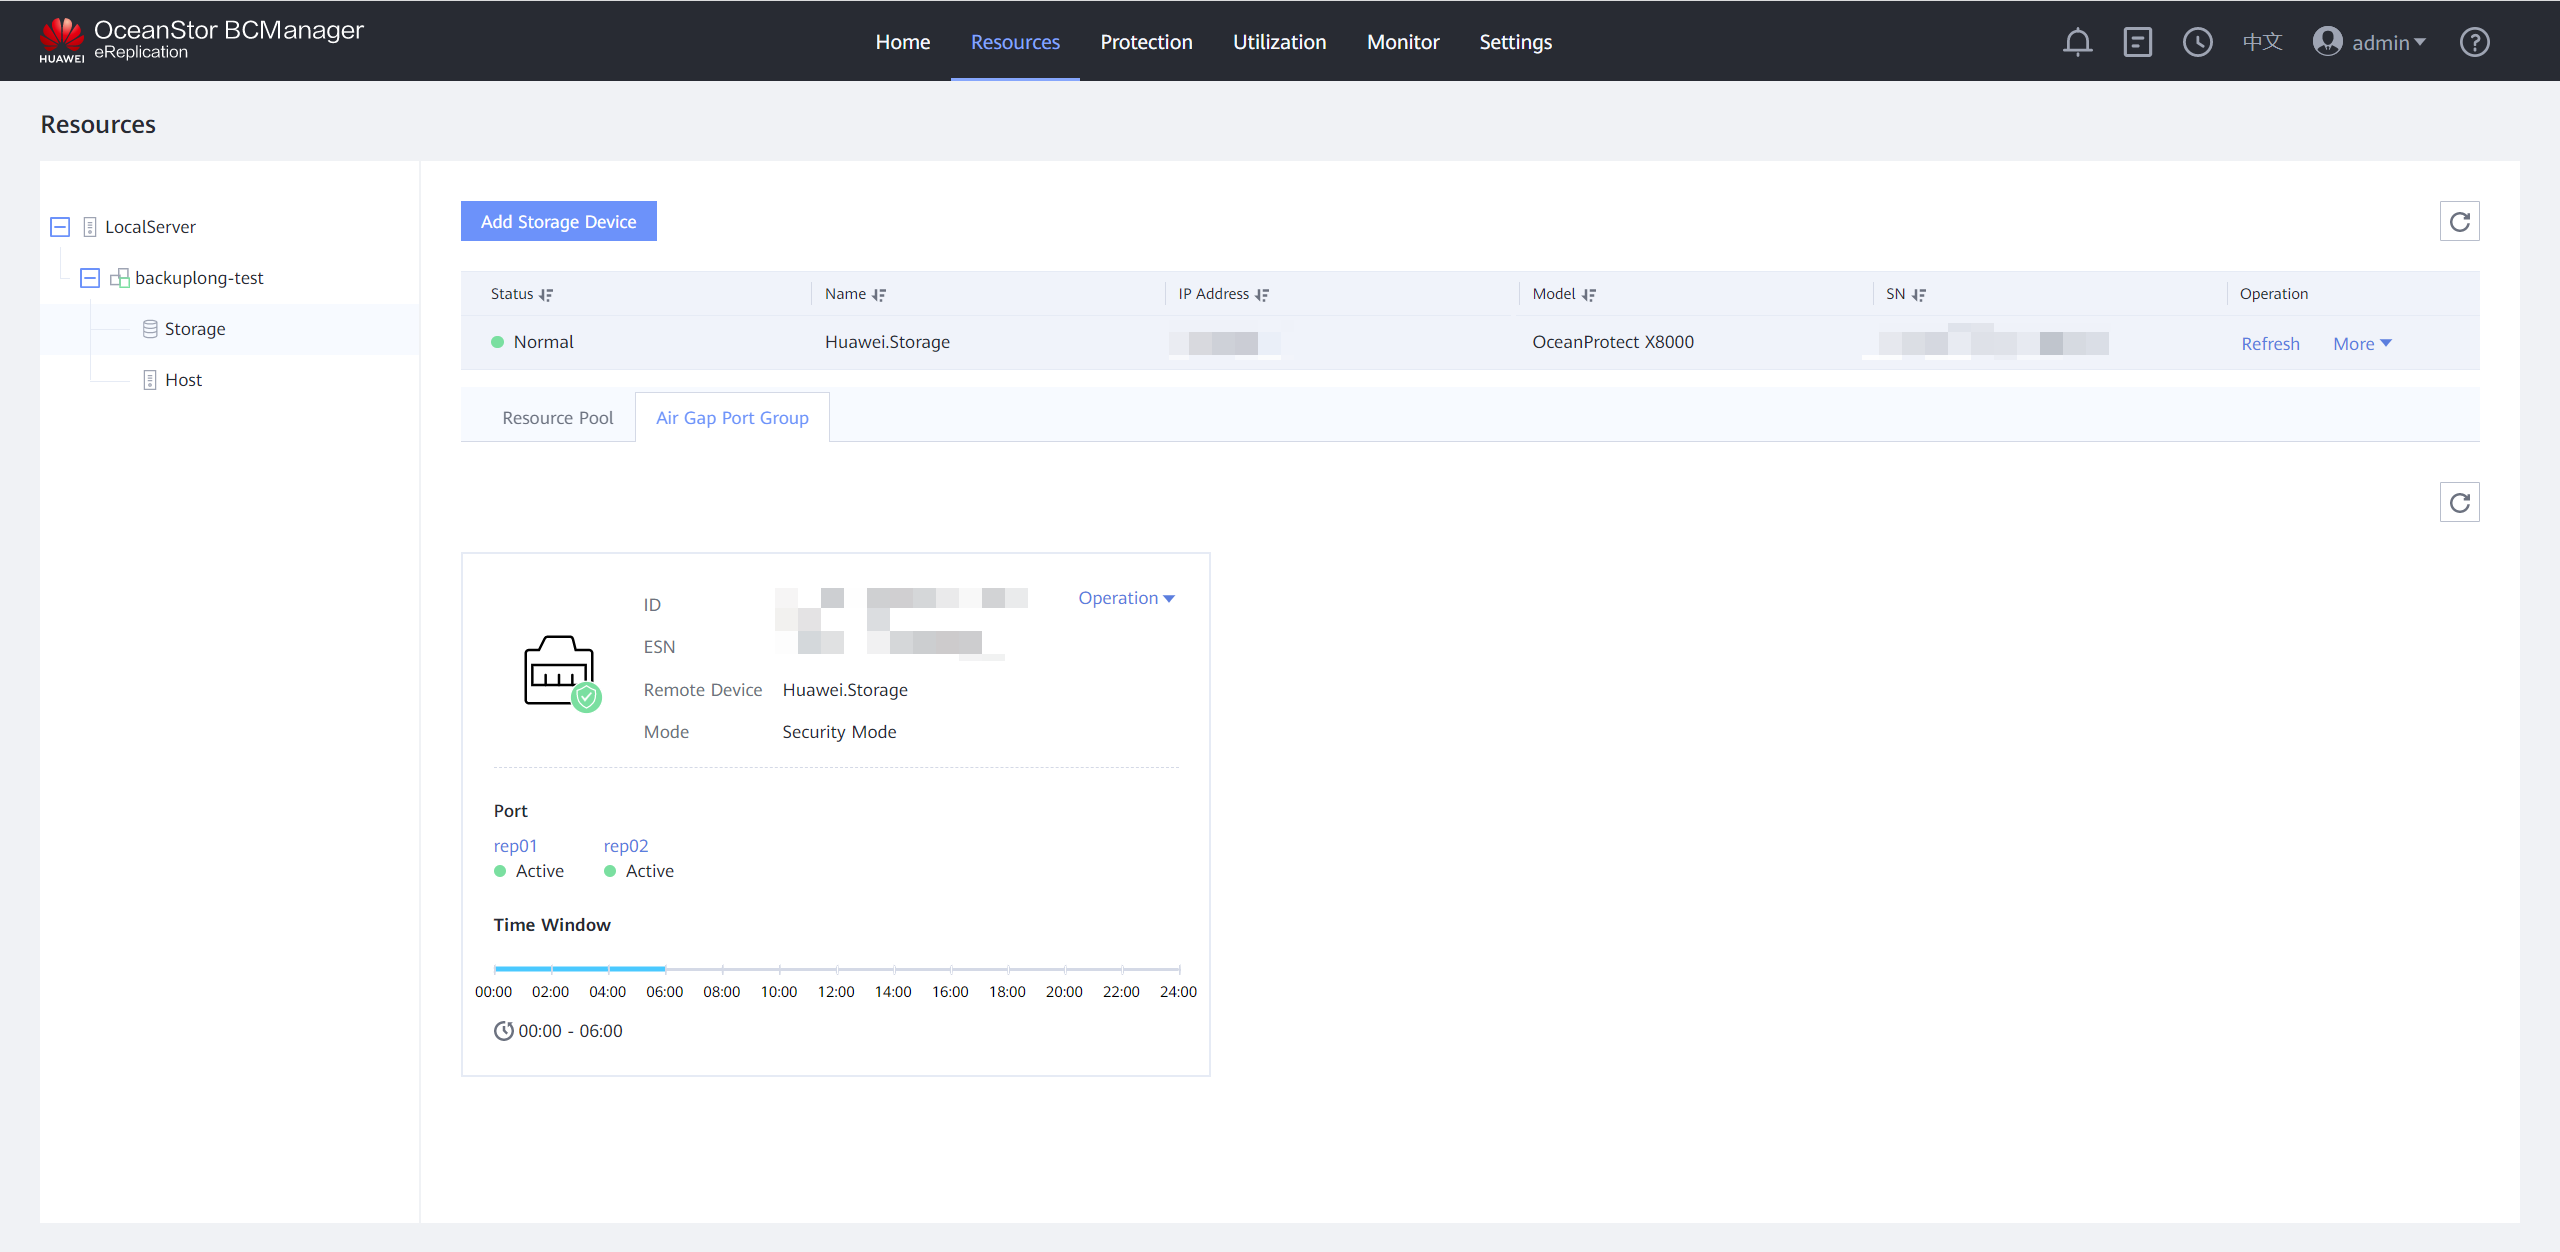
Step 5 Modify the time window. Click the Air Gap Port Group tab, select the corresponding remote device and choose Operation > Modify Time Window. Set the time window based on your service requirements. You are advised to set the time window to off-peak hours, for example, 00:00 to 06:00.
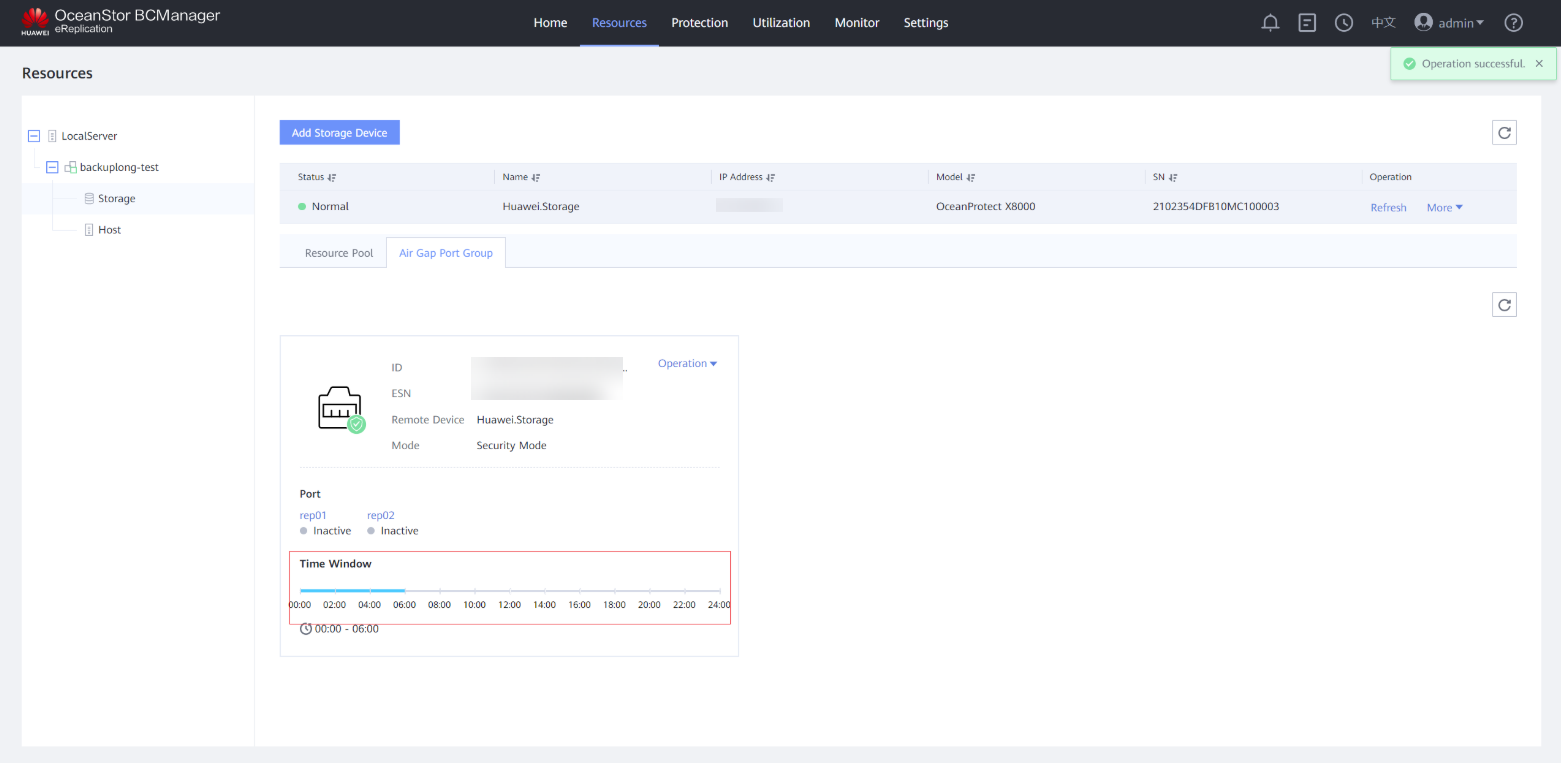
Step 6 View the modified time window on the Air Gap Port Group tab page.
Step 7 Choose Protection > Create to create protection.

Before creating protection, choose Resources > Storage and click Refresh to update the storage information of the isolation zone.
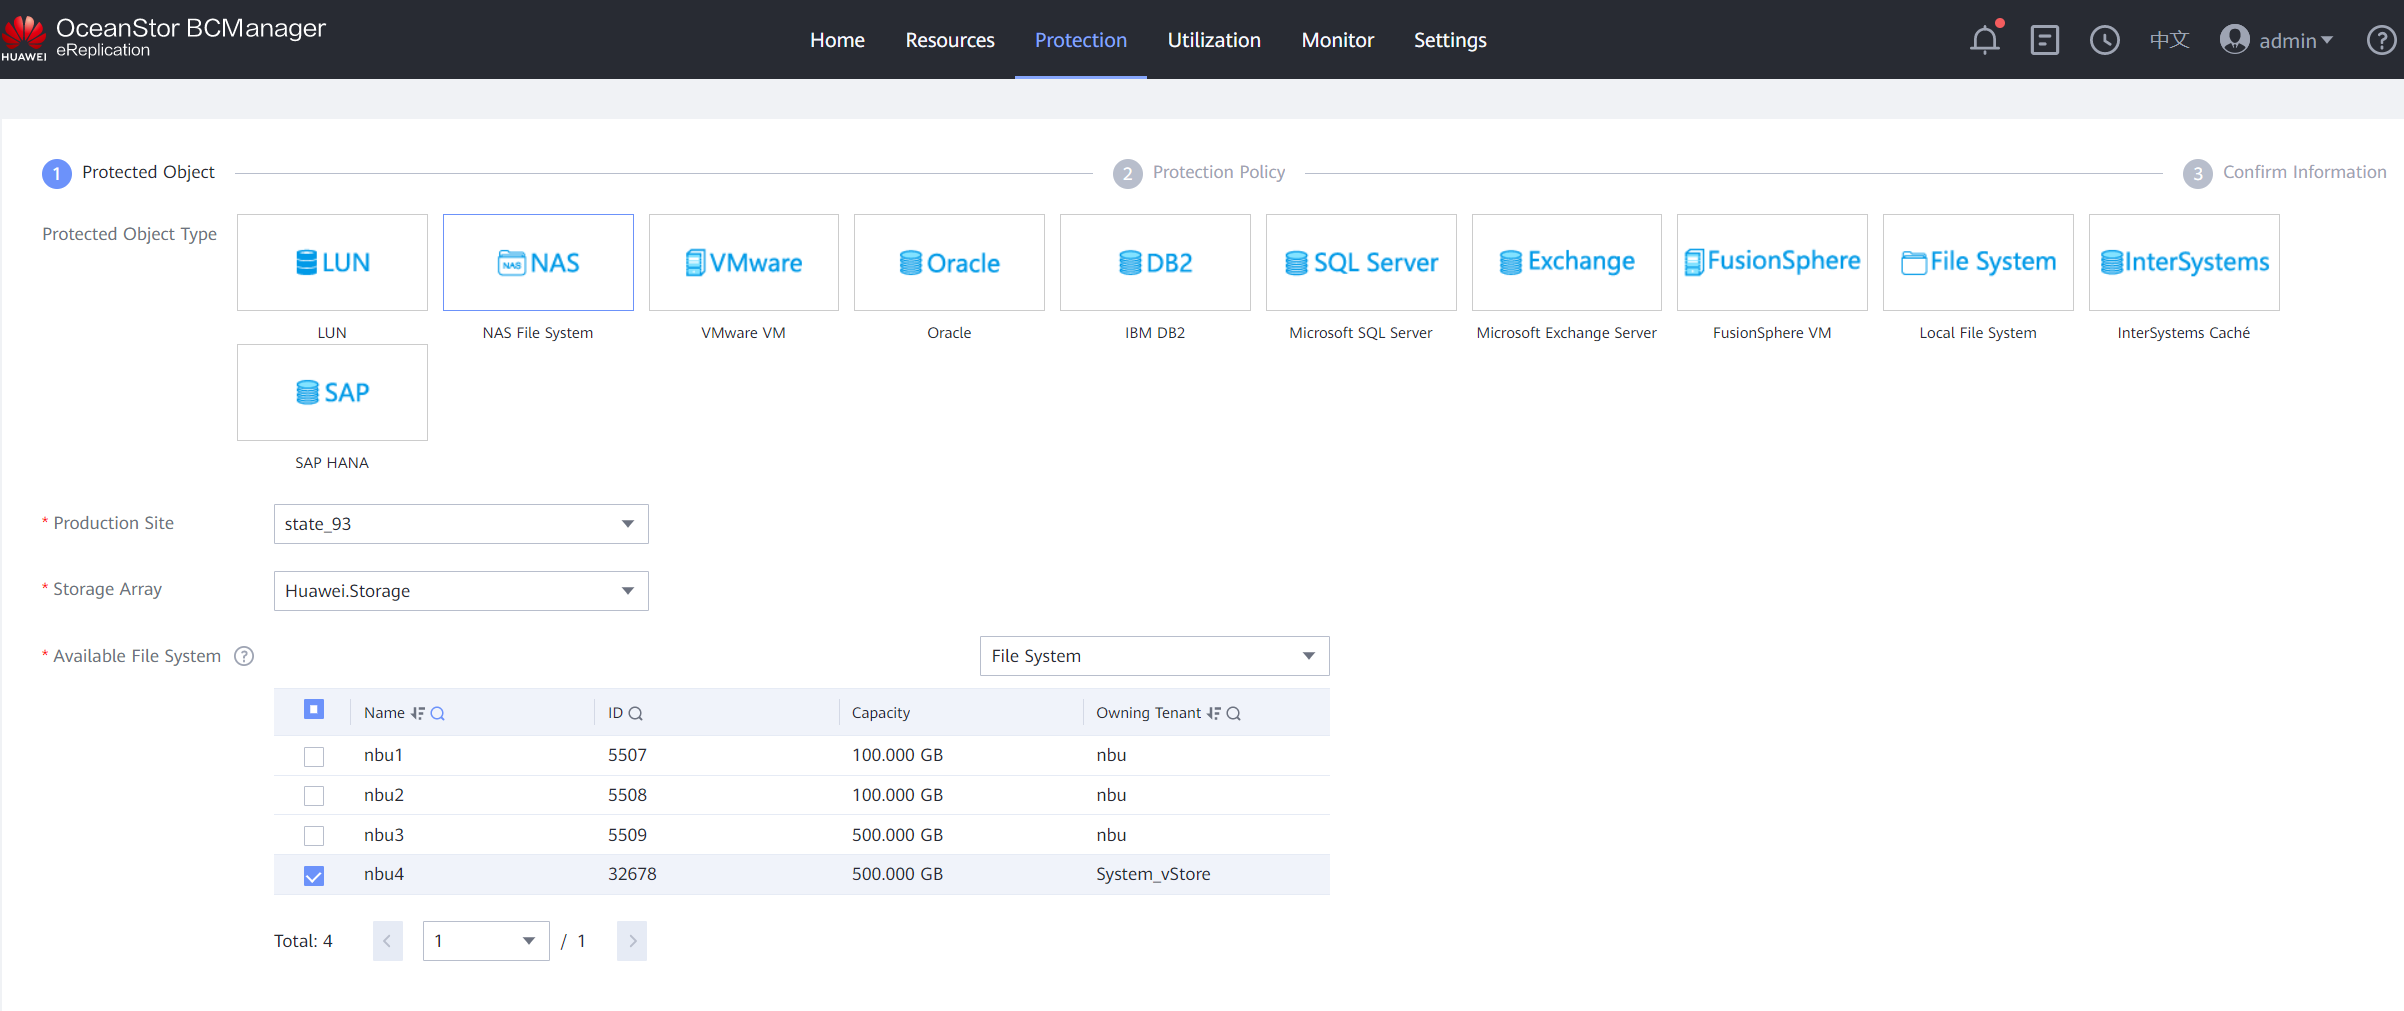
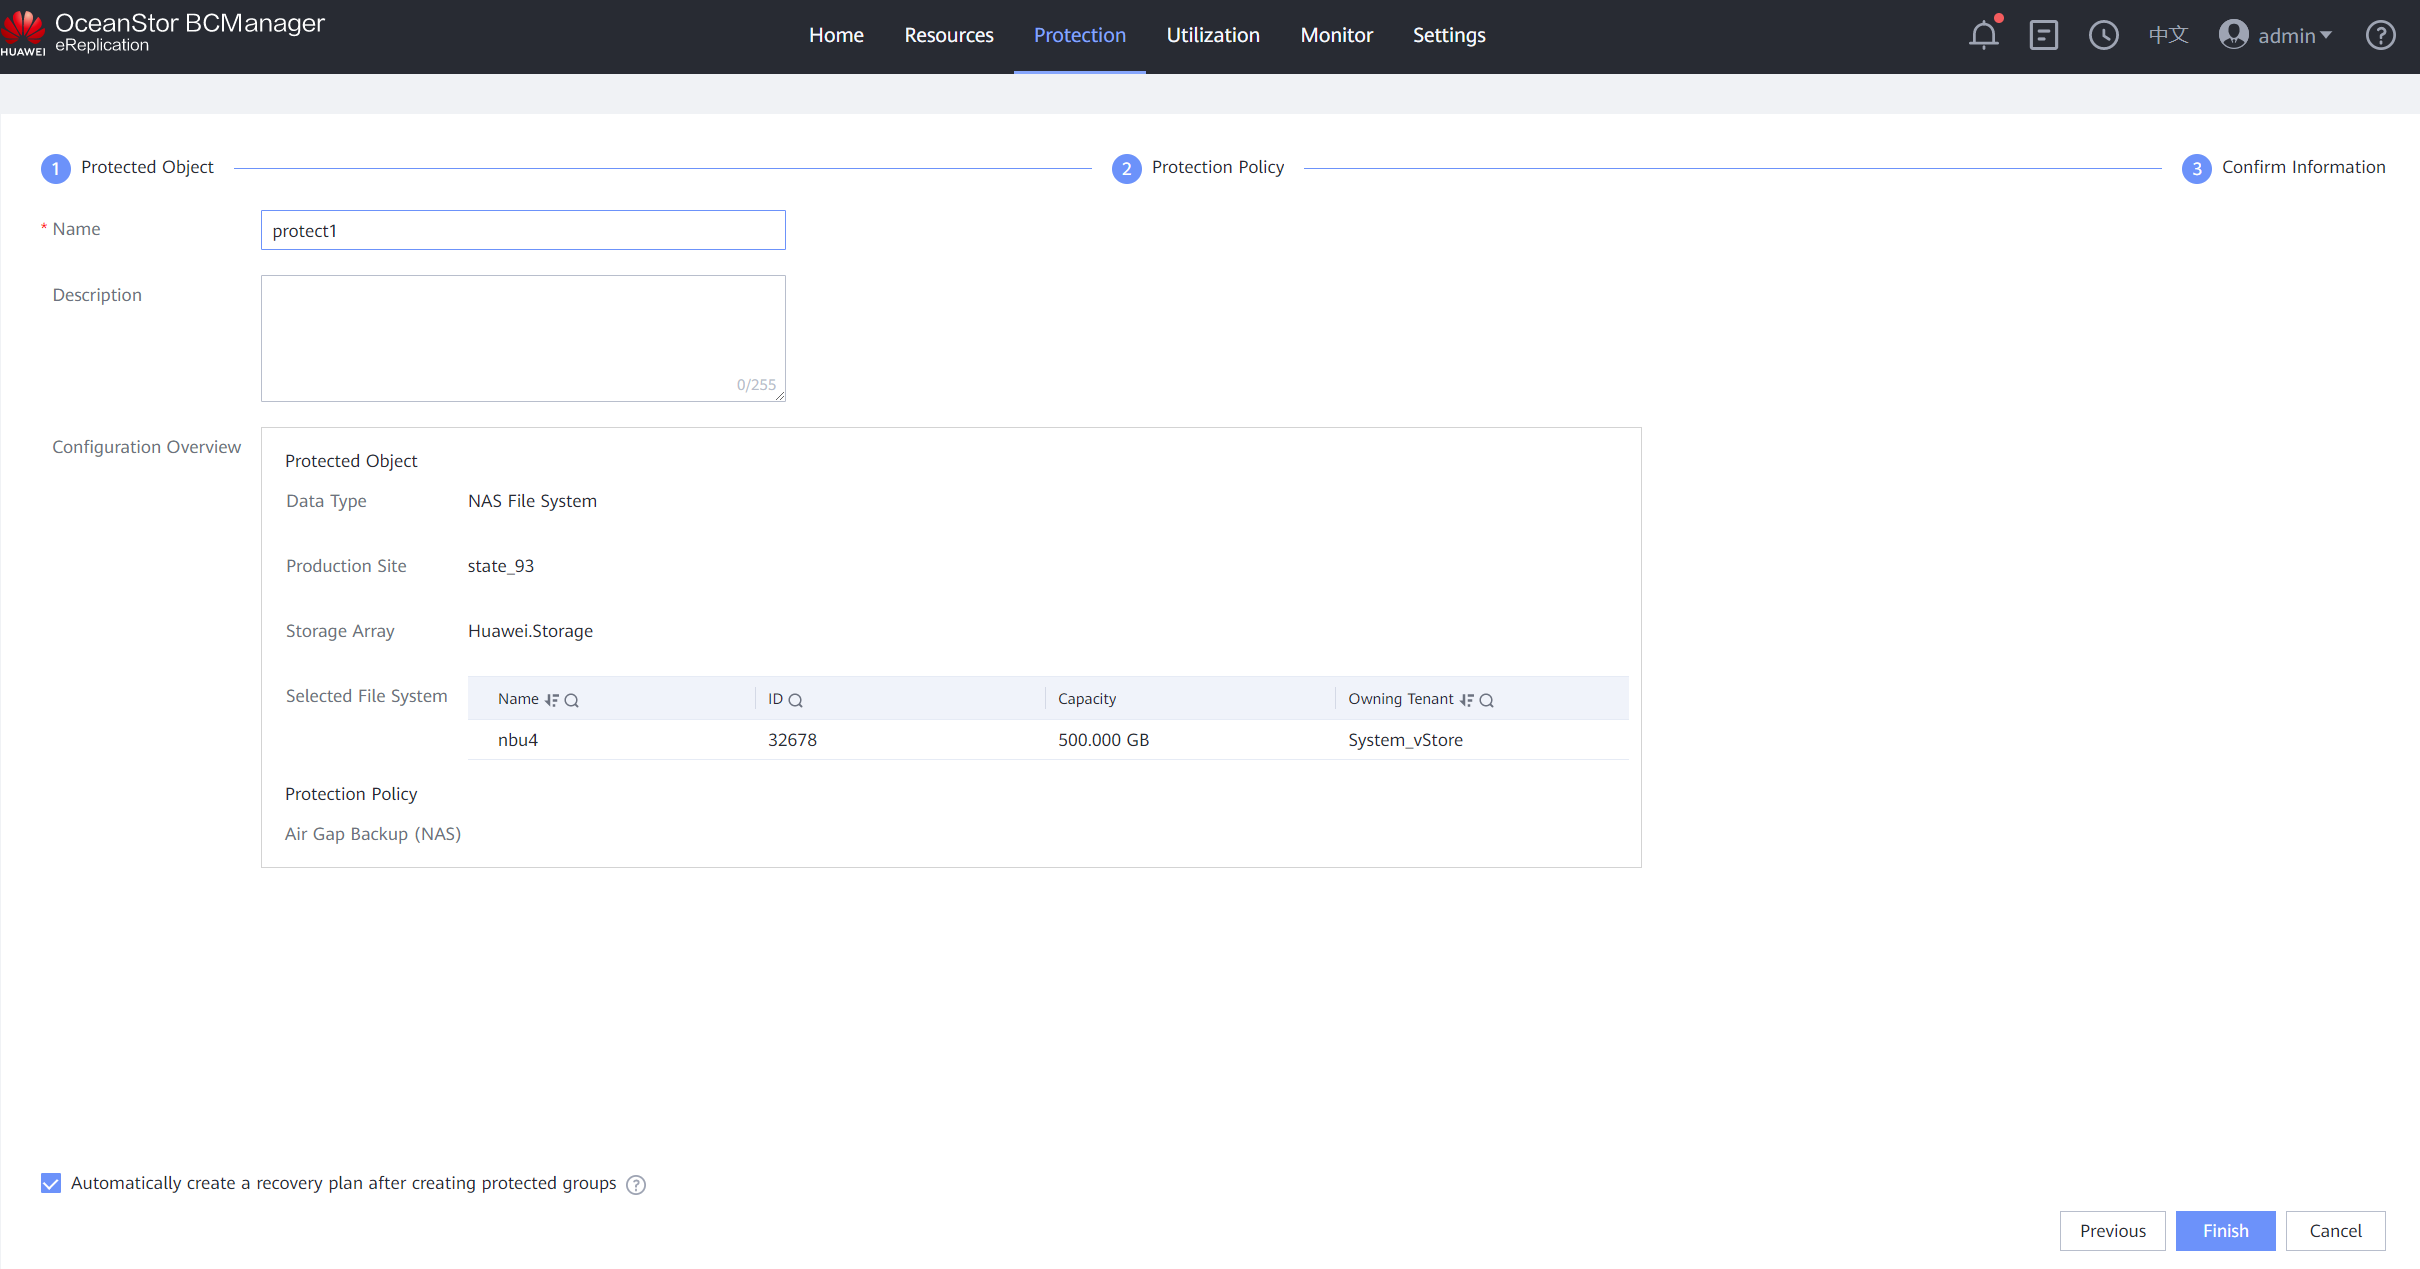
Step 8 On the Protected Object page, set Protected Object Type to NAS File System, Production Site to the created site, and Storage Array to the isolation zone storage device added to the site. In the Available File System area, select vStore or File System, select the file system to be protected, and click Next.
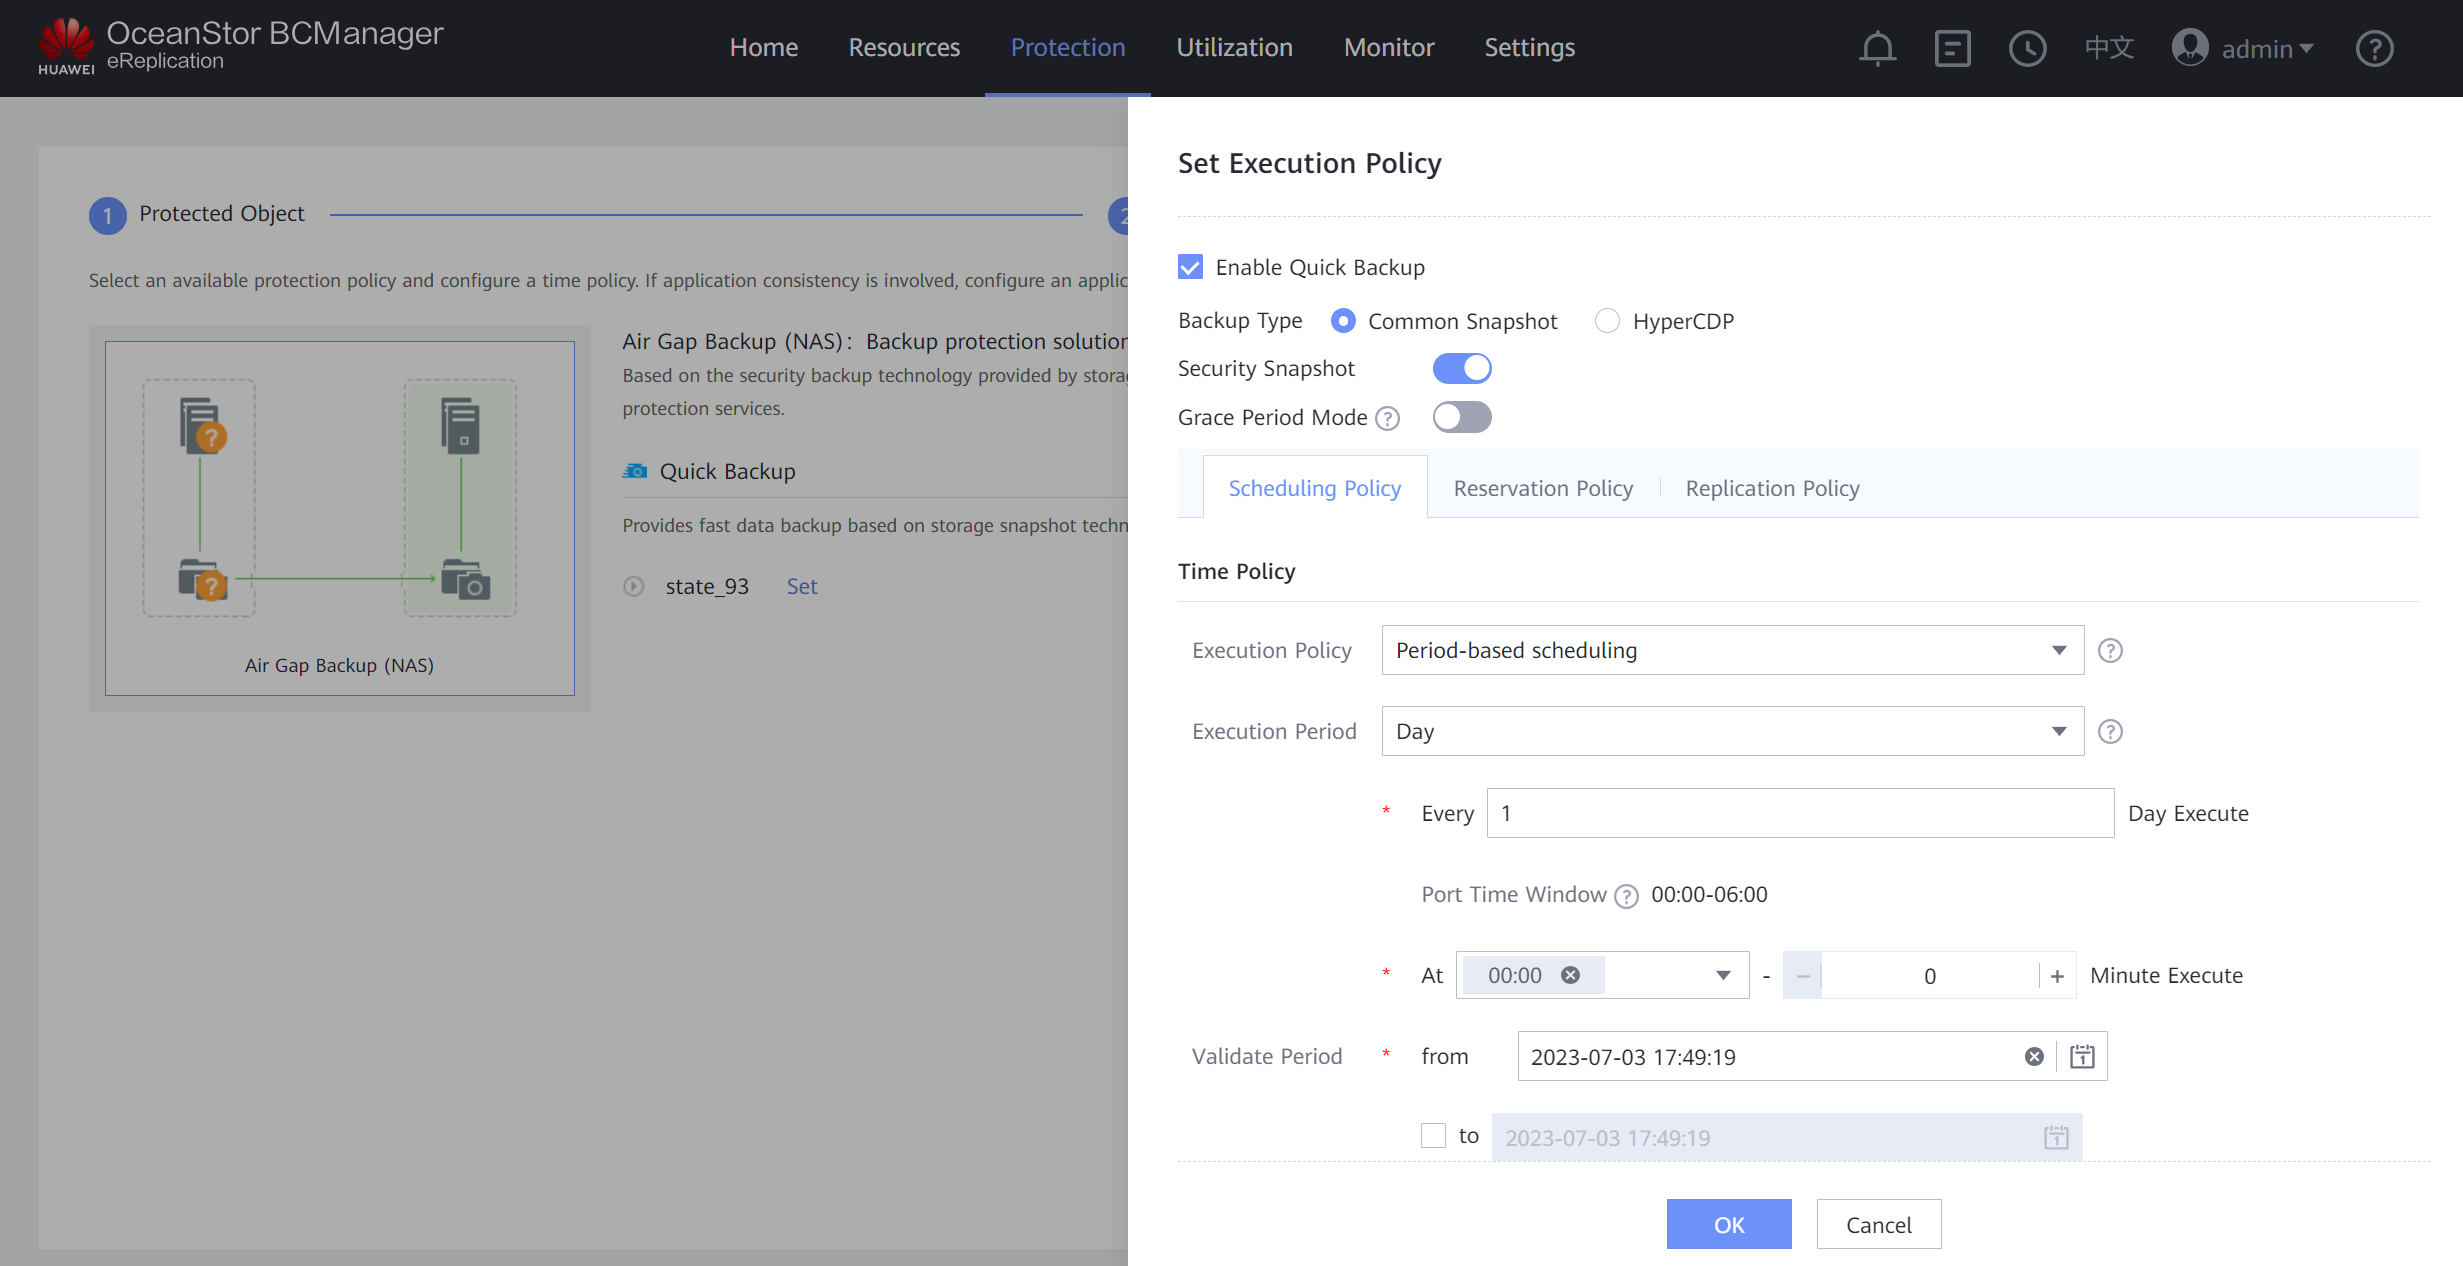
Step 9 On the Protection Policy page, click Set in the Quick Backup area, select Enable Quick Backup, and set a protection policy. You are advised to enable Security Snapshot. On the Scheduling Policy tab page, set the time policy to execute once every day at 00:00. On the Reservation Policy tab page, set Copy Validity Period to 30 days. Click OK.
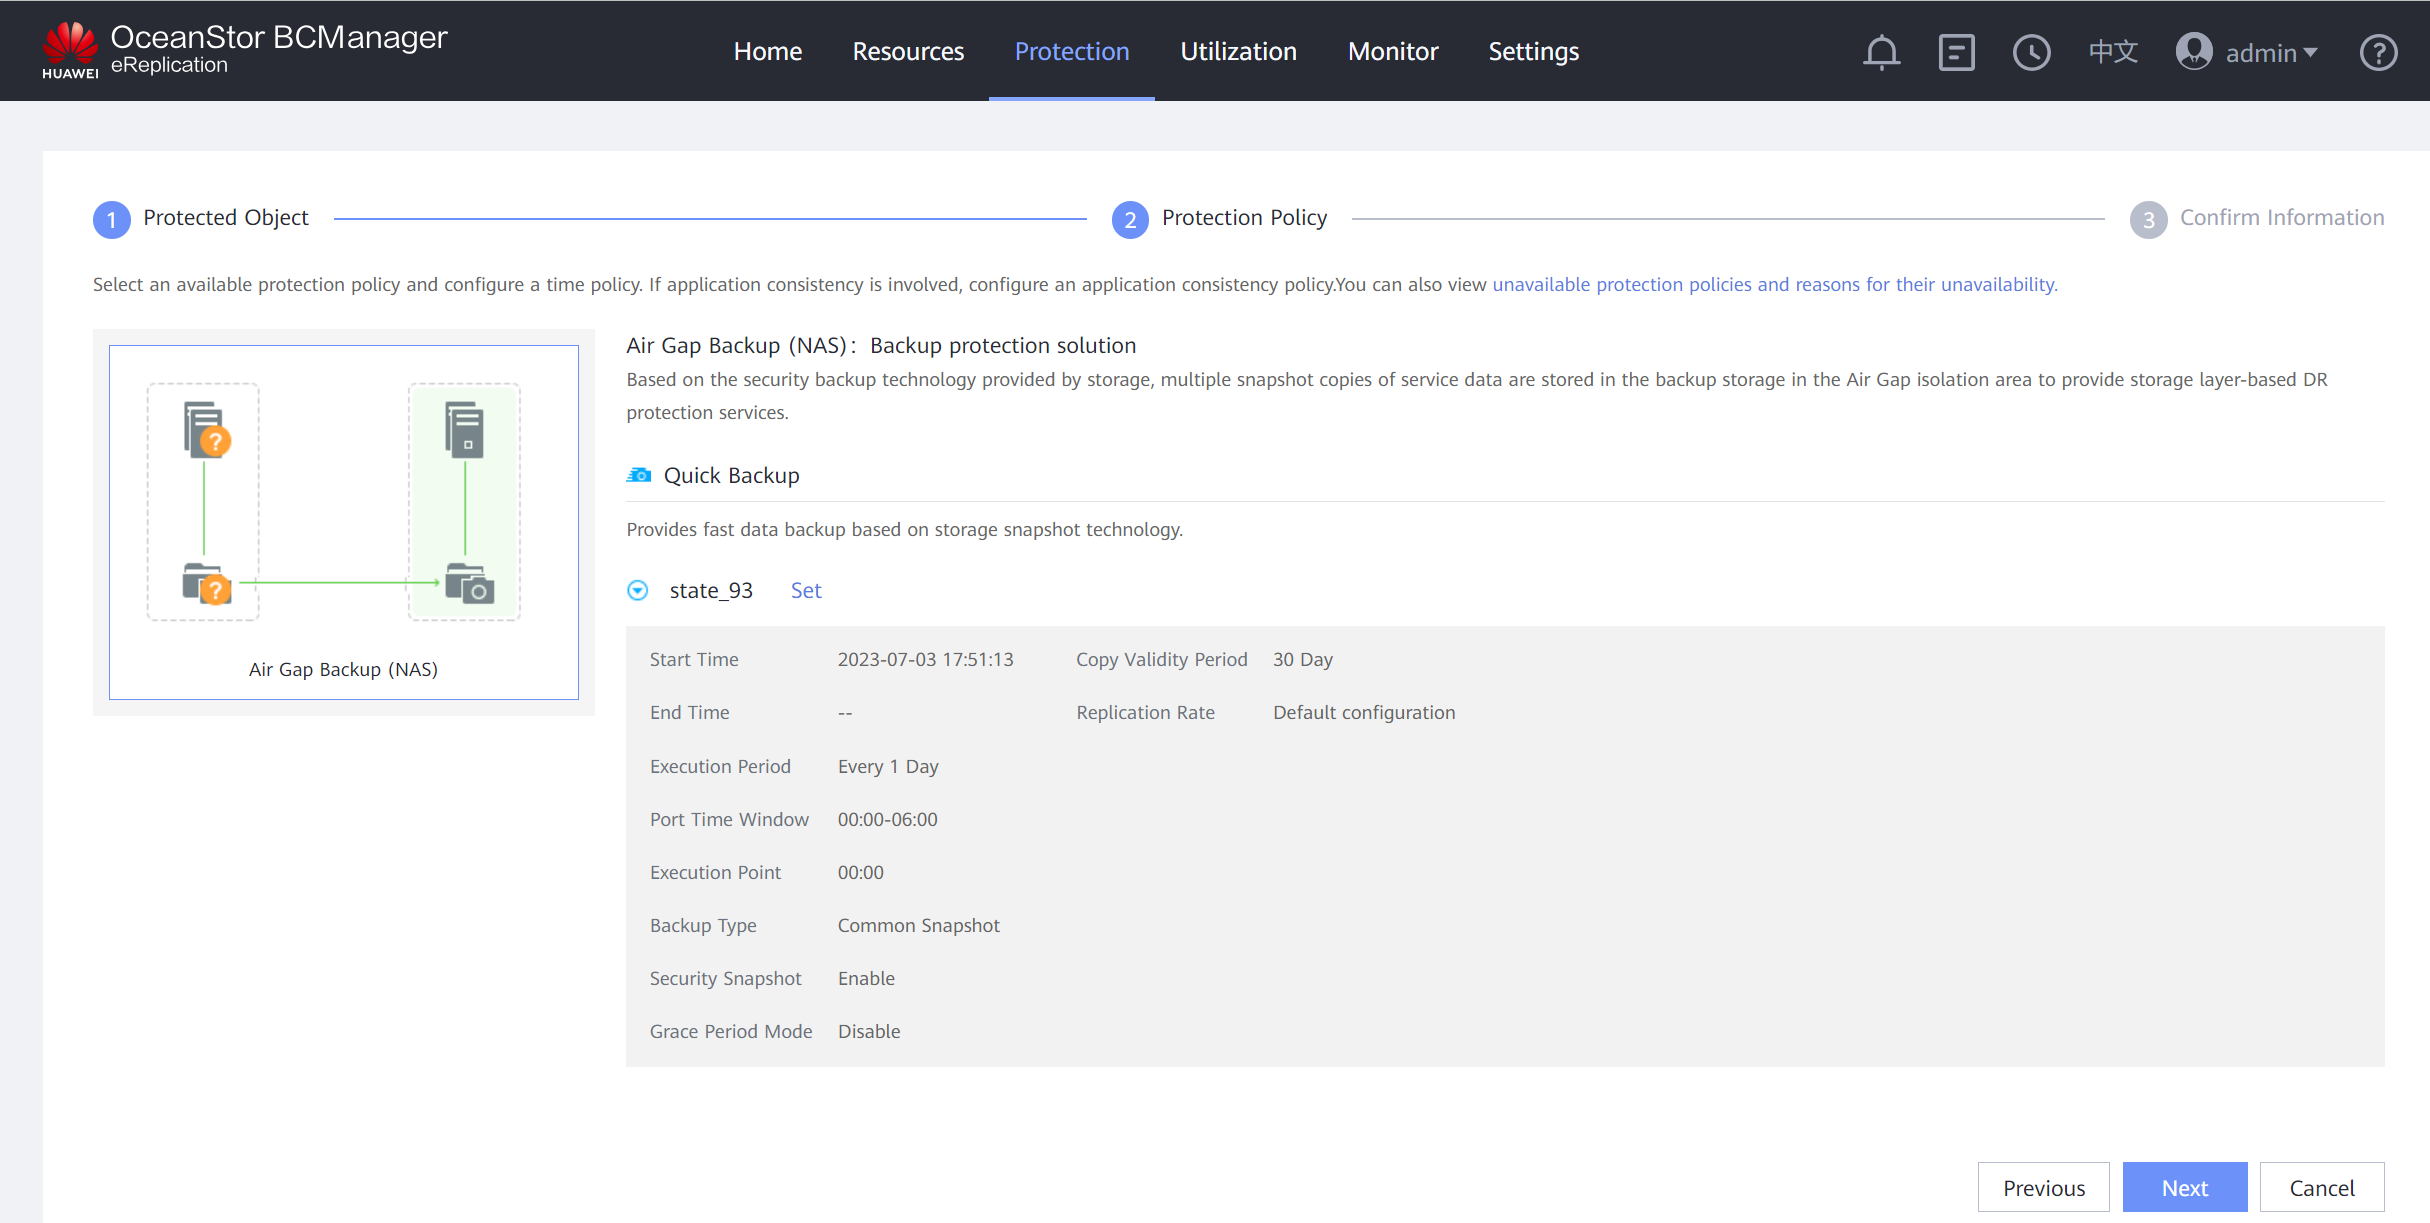
Step 10 Confirm the quick backup policy.
Step 11 On the Confirm Information page, set Name, deselect Automatically create a recovery plan after creating protected groups, and click OK.
—-End
4.2.2 Verification of Isolation Zone Protection
4.2.2.1 Controlling the Connectivity of the Replication Link in the Security Isolation Zone by Using Air Gap
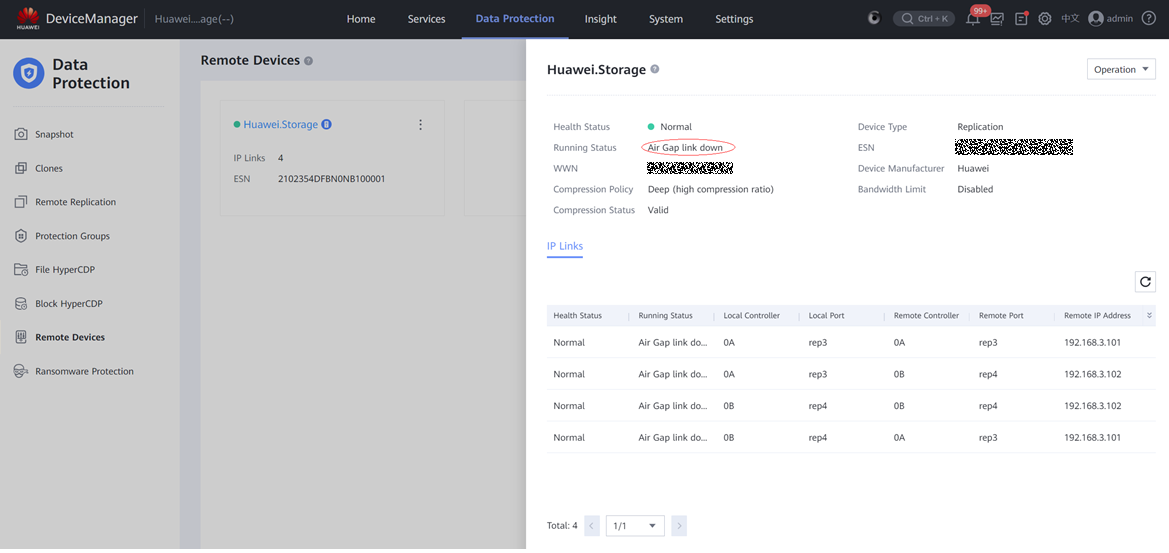
Step 1 Log in to OceanStor BCManager eReplication as an administrator and check the time window of the storage device. The ports are in the inactive state.

Step 2 Check the running status of remote devices on storage devices in the production and isolation zones. It is in the Air Gap link down state.
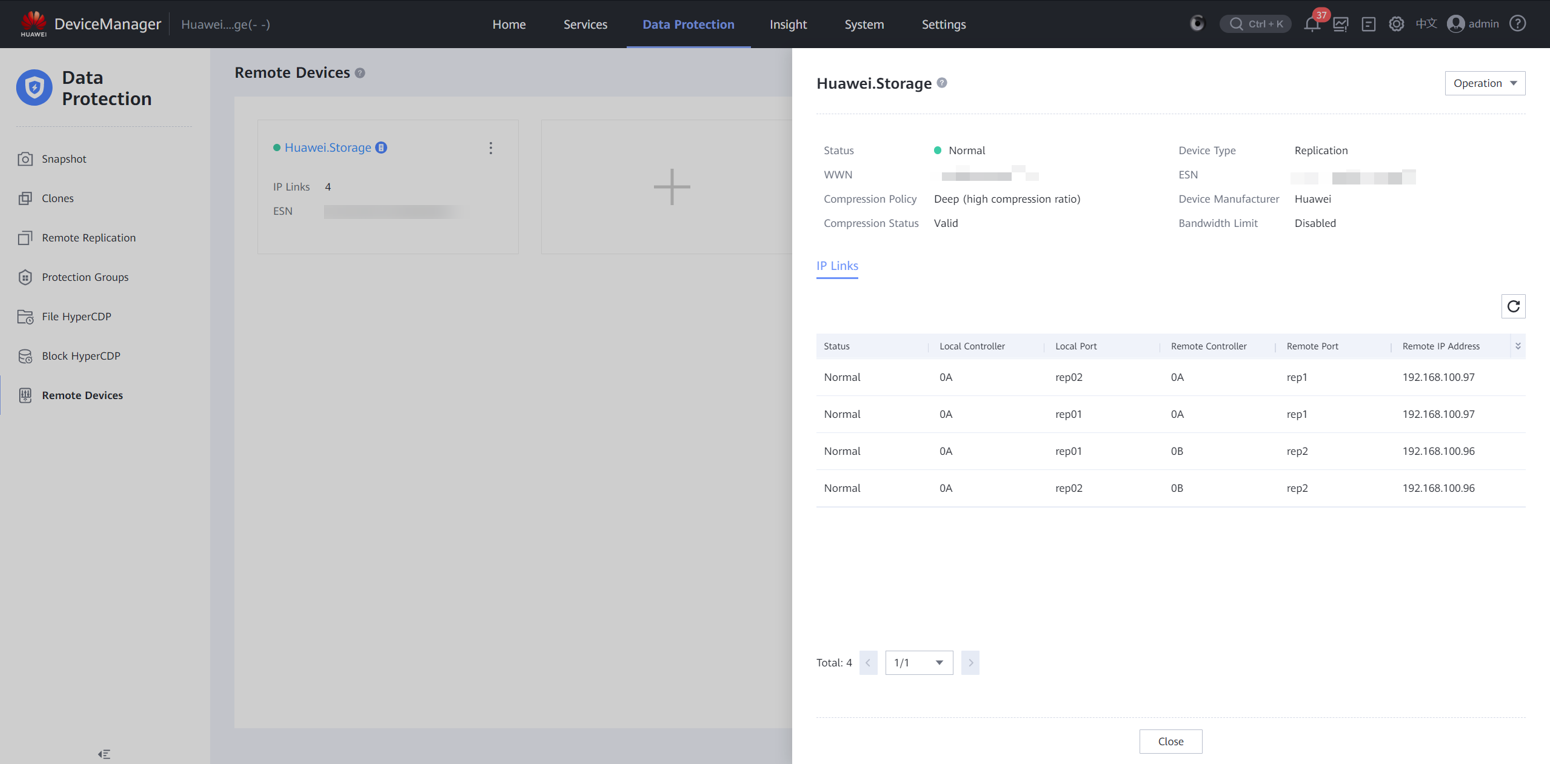
Step 3 Log in to OceanStor BCManager eReplication as an administrator and verify that the ports are in the active state during protection execution.
Step 4 Check the status of the remote device on the storage devices in the production and isolation zones. It is in the normal state.
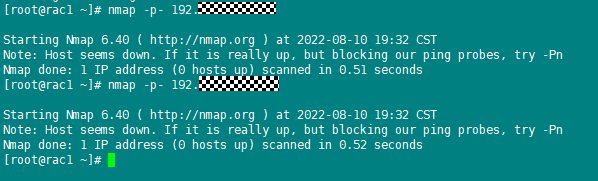
Step 5 To check whether the replication link ports comply with the Air Gap replication policy to connect and disconnect ports, run the nmap -p- IP address of the remote replication logical port in the isolation zone command to scan a port, as shown in the following figure.
—-End
4.2.2.2 Restoring Production Data Based on the File System Remotely Replicated to the Isolation Zone After the Production Zone Is Infected by Ransomware
- Scenario: If host services are infected by ransomware and copies in the storage device in the production zone are also infected, host data can be restored using secure snapshots at earlier time points in the isolation zone. This best practice focuses on the verification of scenario 2. Host data is encrypted by running an encryption command to simulate ransomware encryption, and is restored using secure snapshots at earlier time points in the isolation zone.
Procedure
Step 1 Check the data before encryption. The host data has been backed up and synchronized to the isolation zone through remote replication at least once before being encrypted. That is, there is the host service data at a certain point in time in the isolation zone.
Step 2 Run the openssl enc -e -aes-256-cbc -in Source file -out Source file.Ransomware suffix -pass pass:Password &&rm -rf Source file command to simulate ransomware encryption of a part of the file on the production host. Back up the infected file. No copy is available in the production zone to restore the host data. Use a secure snapshot of an earlier time point in the isolation zone to restore the host data.

Step 3 Log in to the OceanStor BCManager eReplication WebUI, choose Resources, select the specific site, and click Storage. Click the Air Gap Port Group tab, and switch the mode to Maintenance Mode to connect the remote replication links.
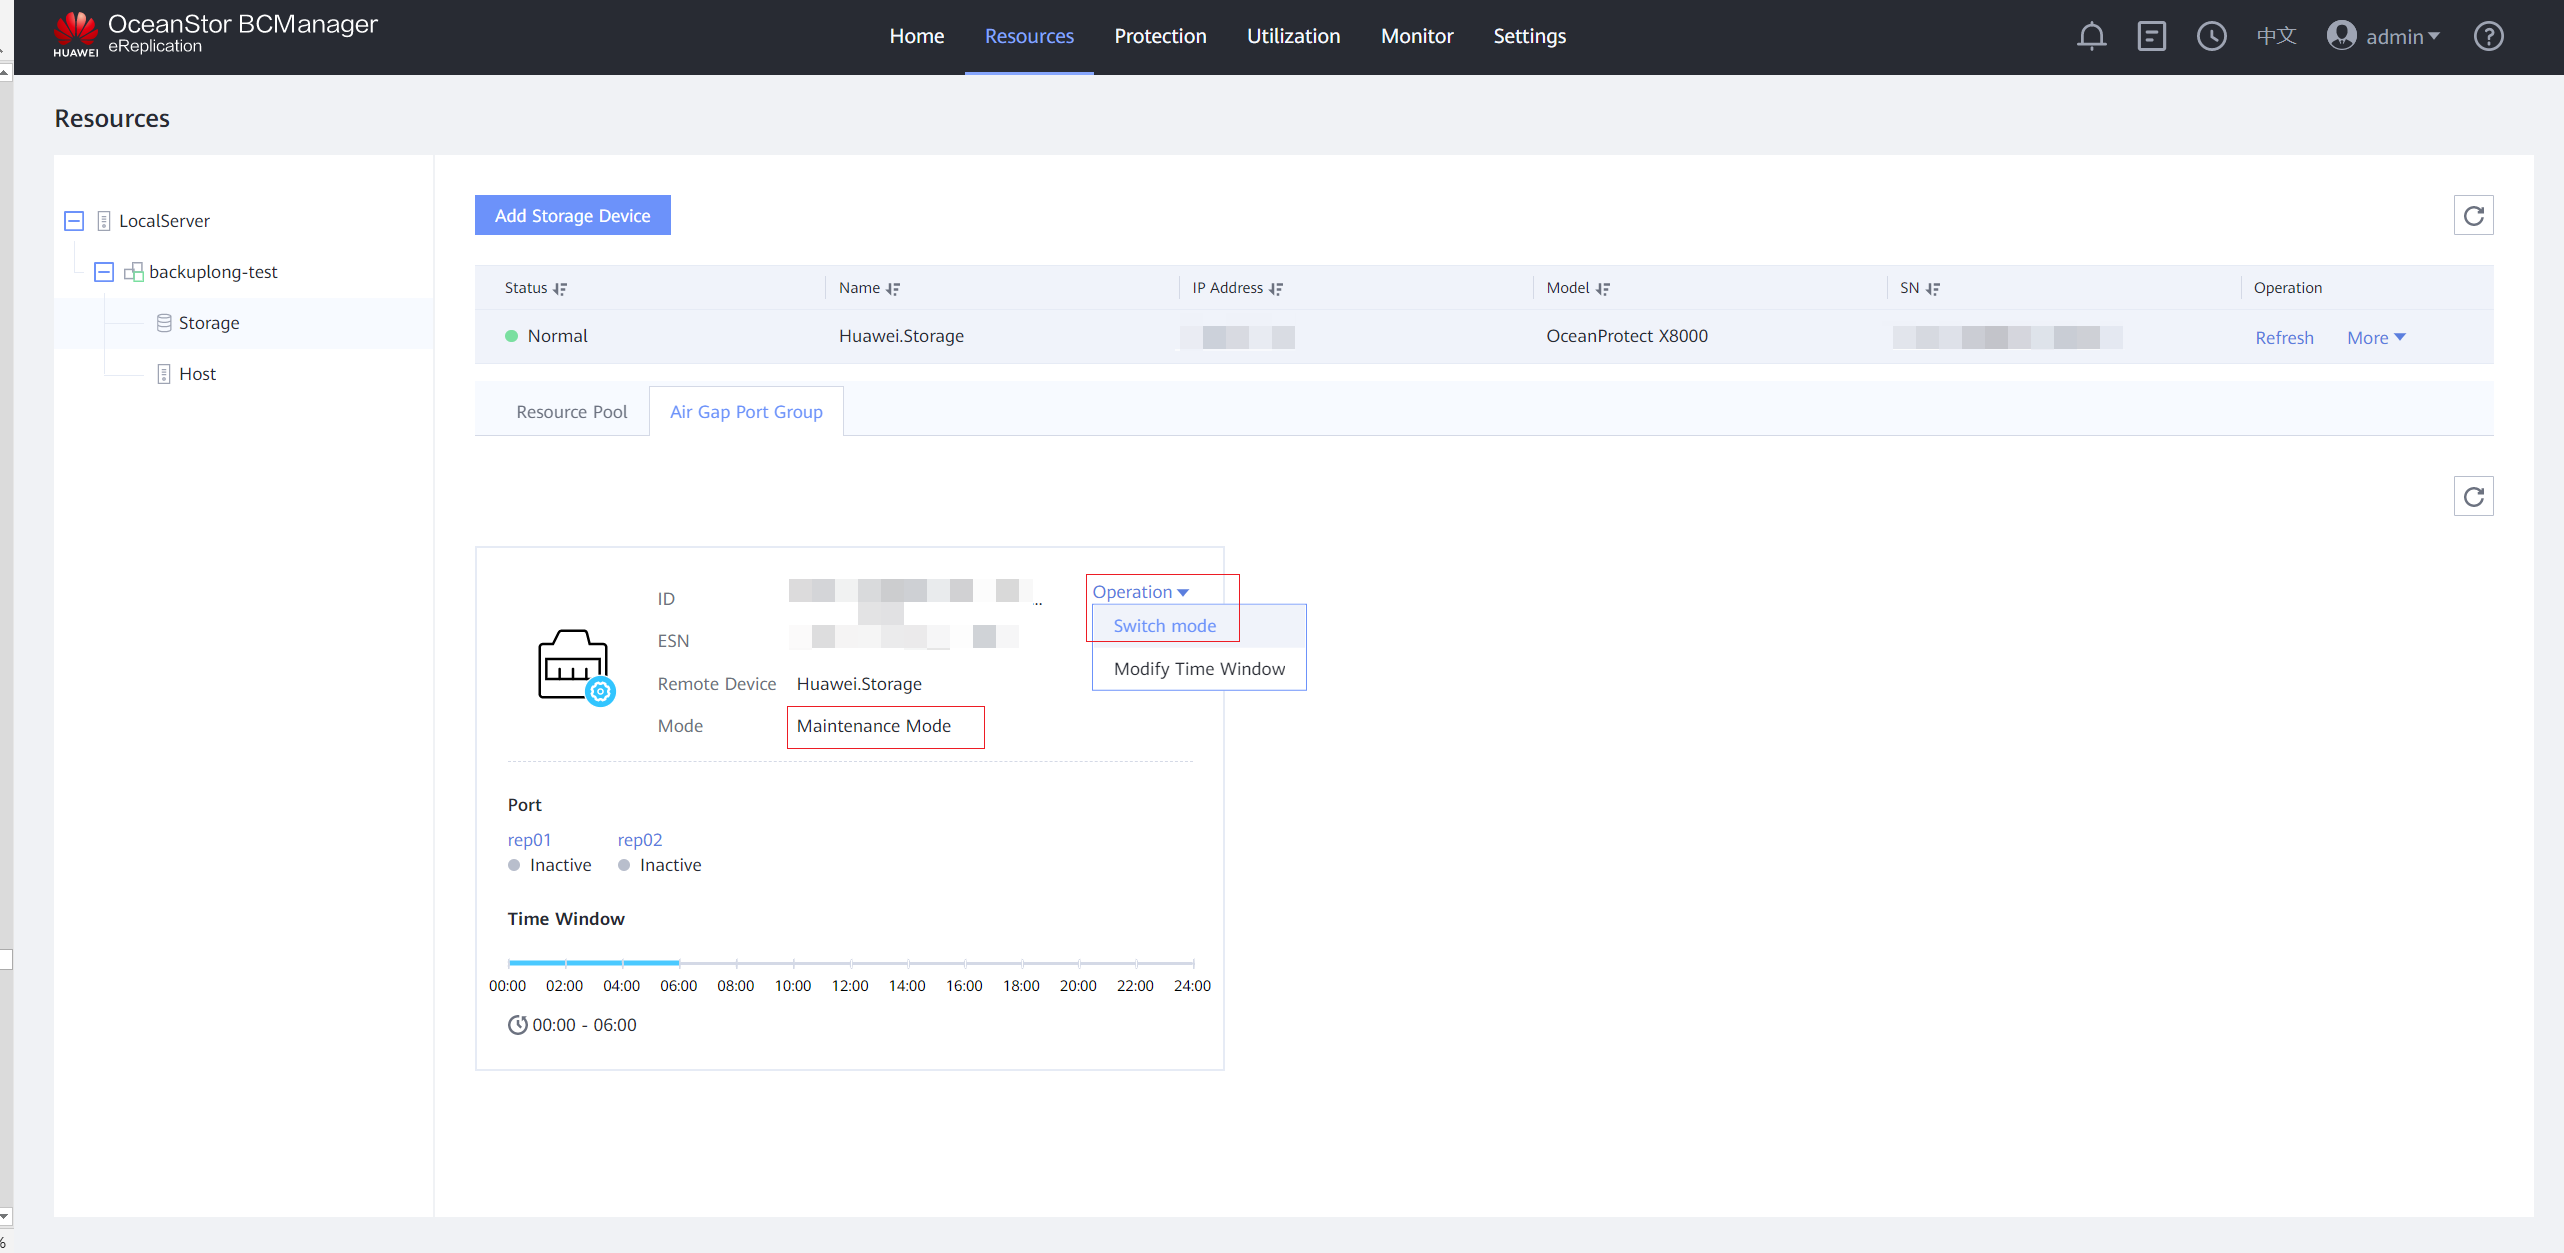
Step 4 On the Air Gap Port Group tab page, the port status is Active.

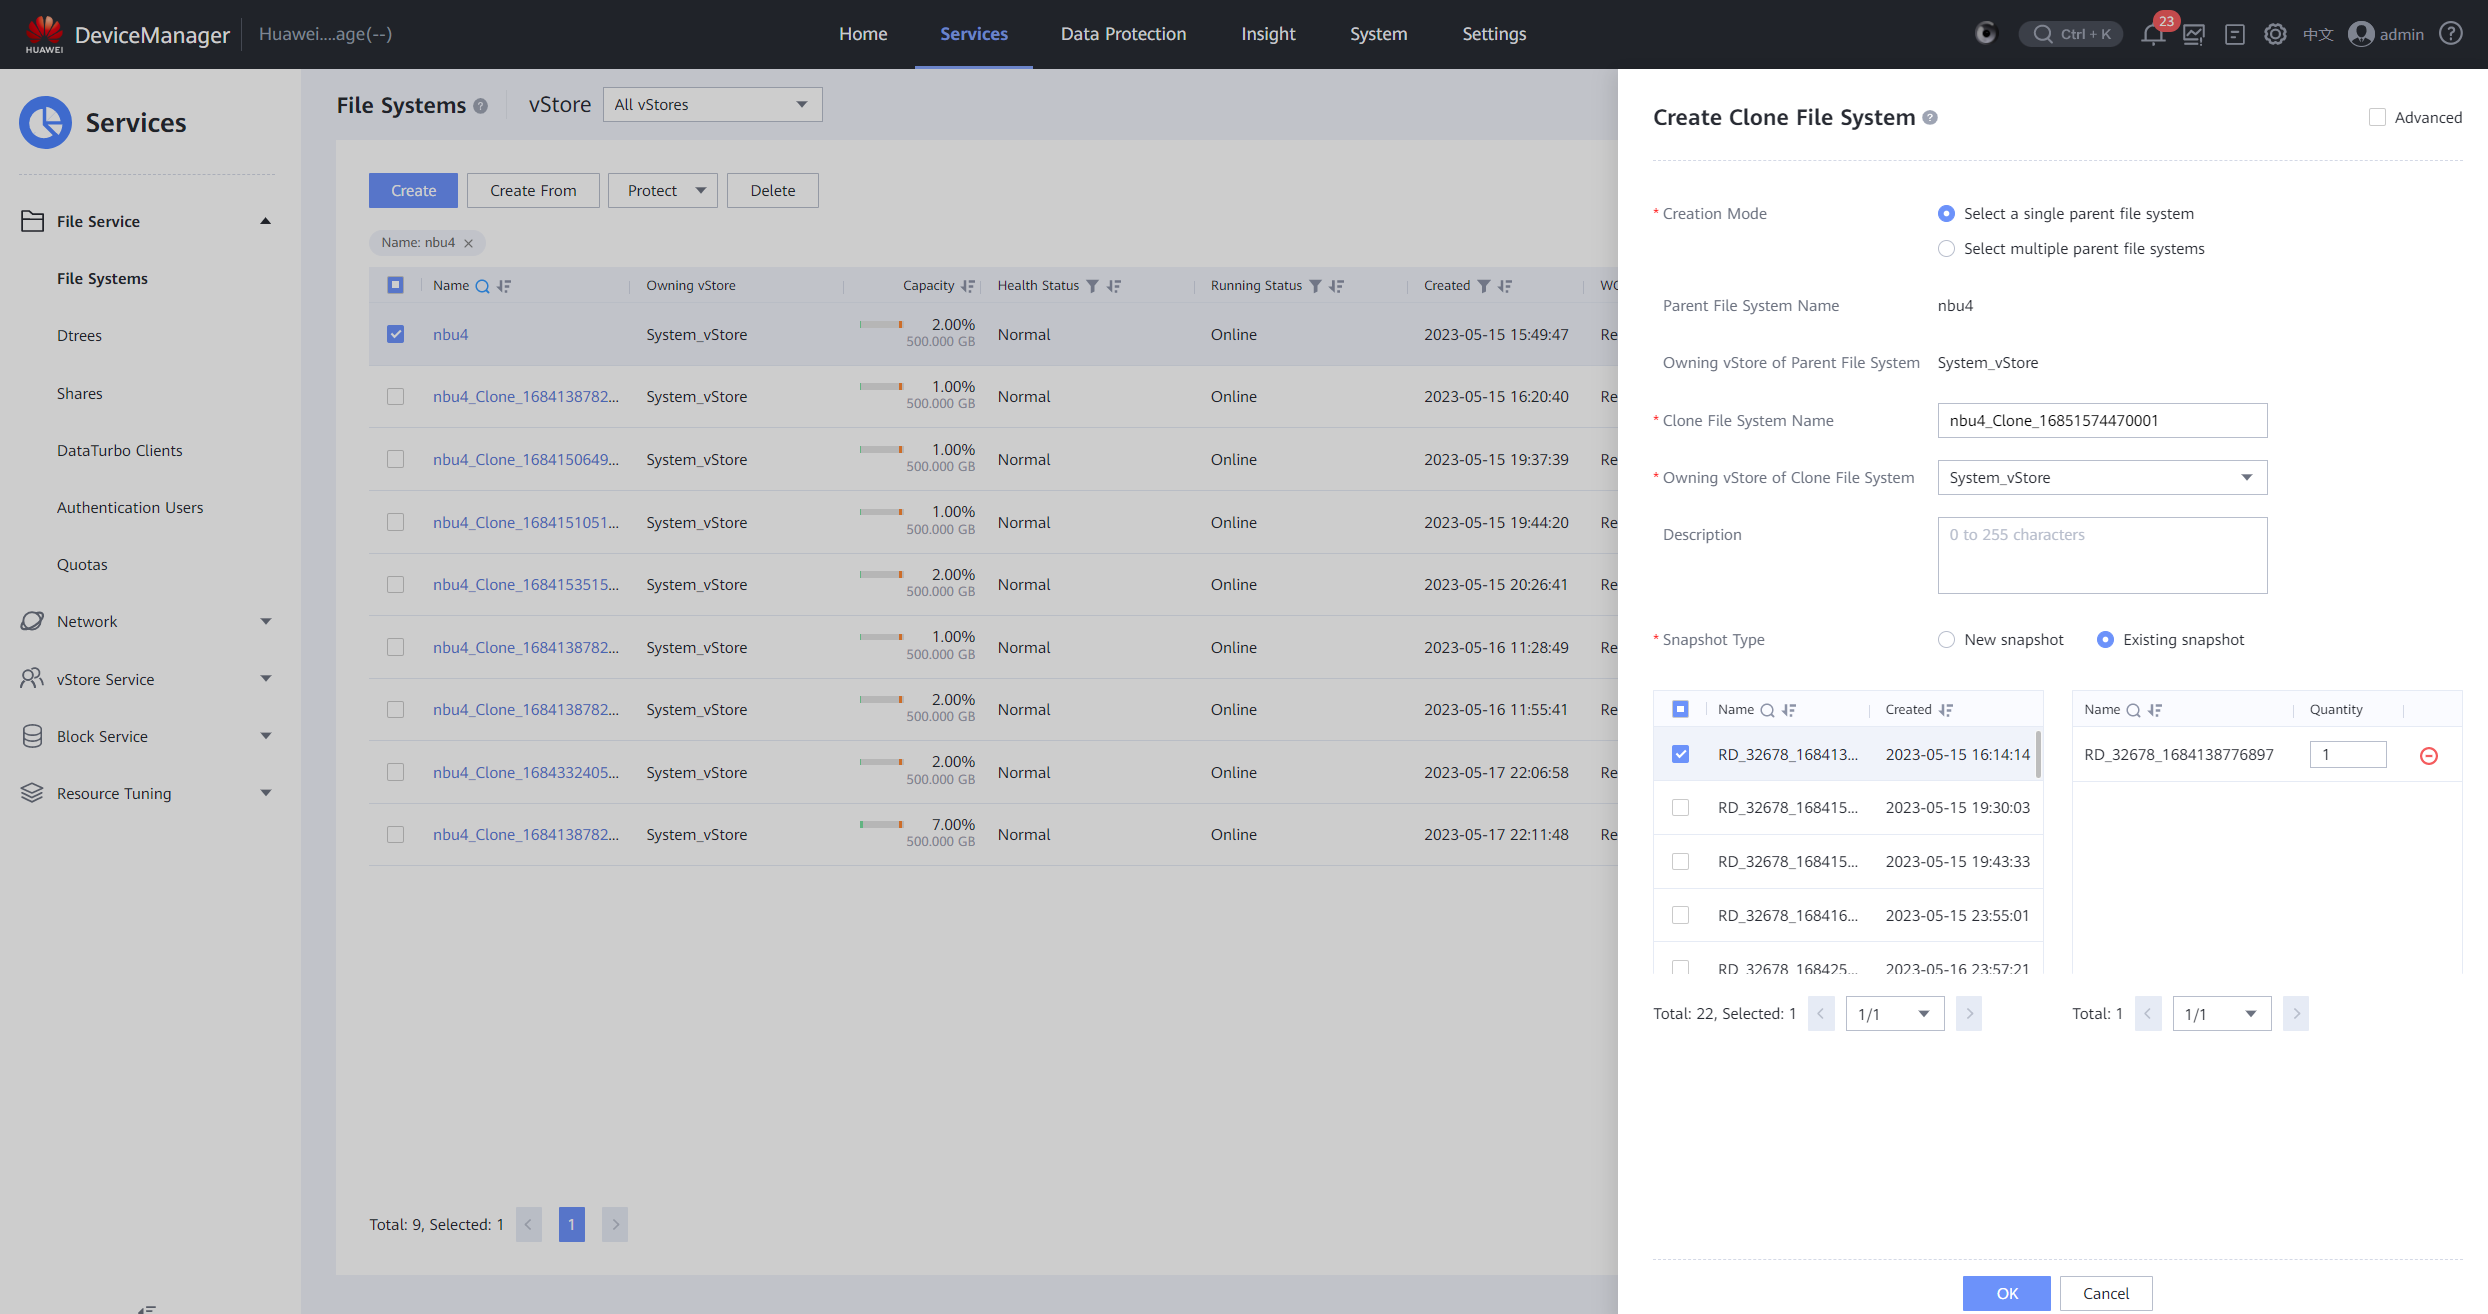
Step 5 Log in to DeviceManager of the storage device in the isolation zone, choose Services > File Service > File Systems, locate the file system corresponding to the remote replication pair of the file system whose data you want to restore, choose More > Create Clone, and select the latest secure snapshot that contains normal data to create a clone.
Step 6 After the clone is created, choose Data Protection > Clones, select the clone of the corresponding file system, and choose Split > Start.
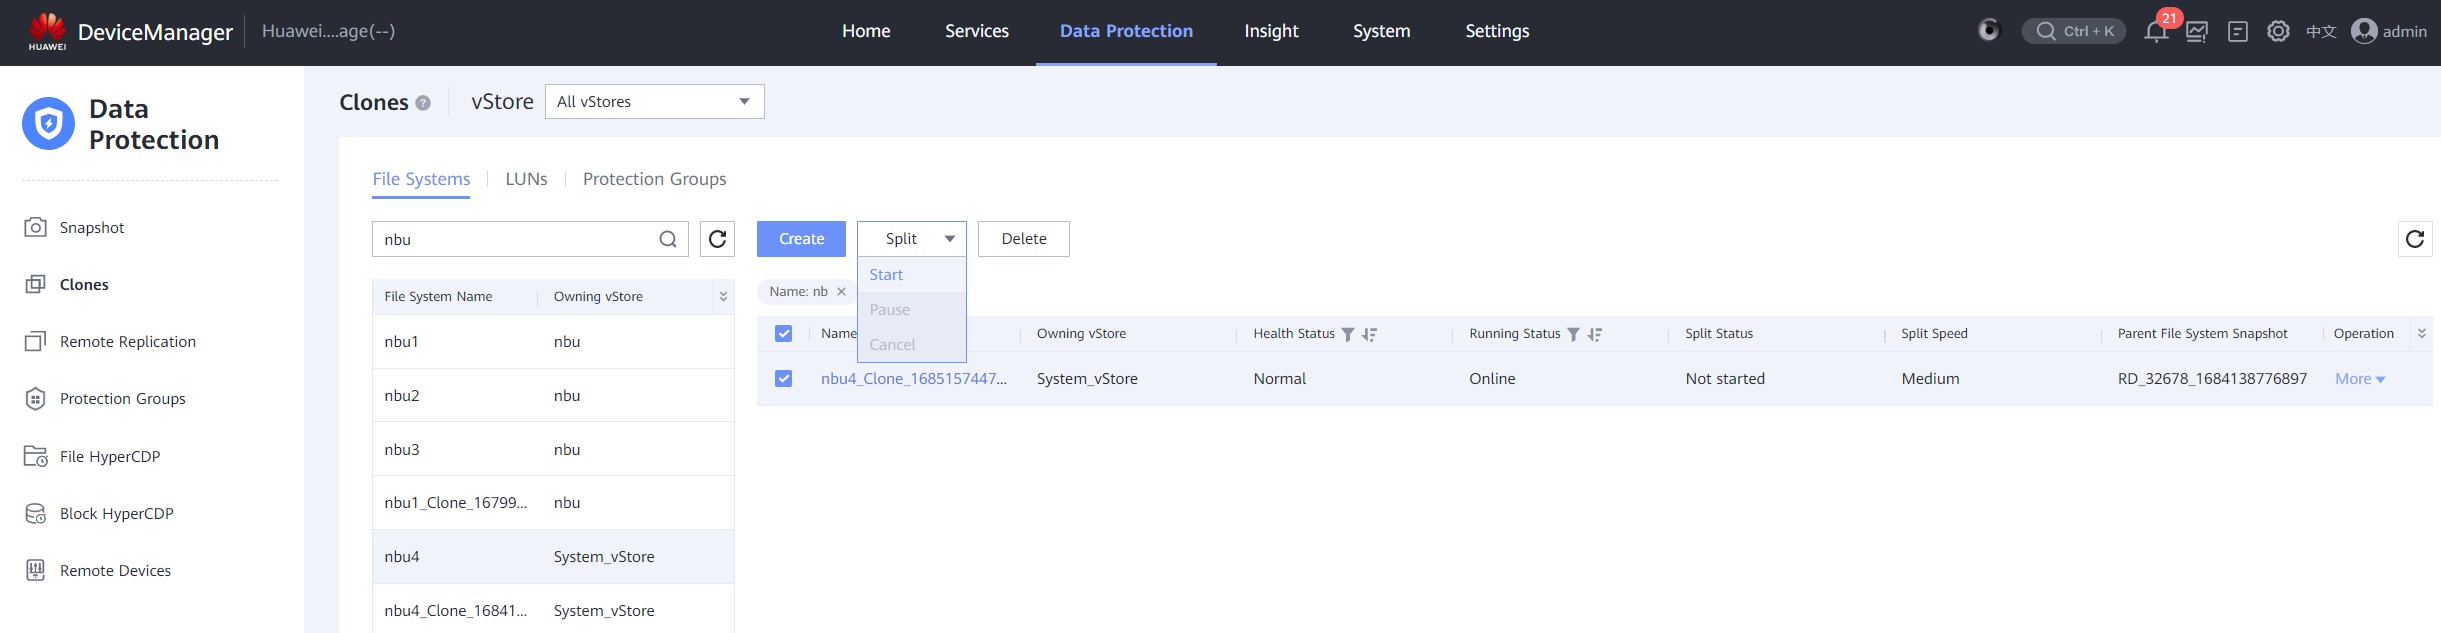
Step 7 After the splitting is complete, create a remote replication pair from the clone file system to the storage device in the production zone. Choose Services > File Service > File Systems, locate the split file system, and choose More > Create Remote Replication. Retain the default parameter settings and click OK. After the remote replication pair is created, the initial synchronization is complete.
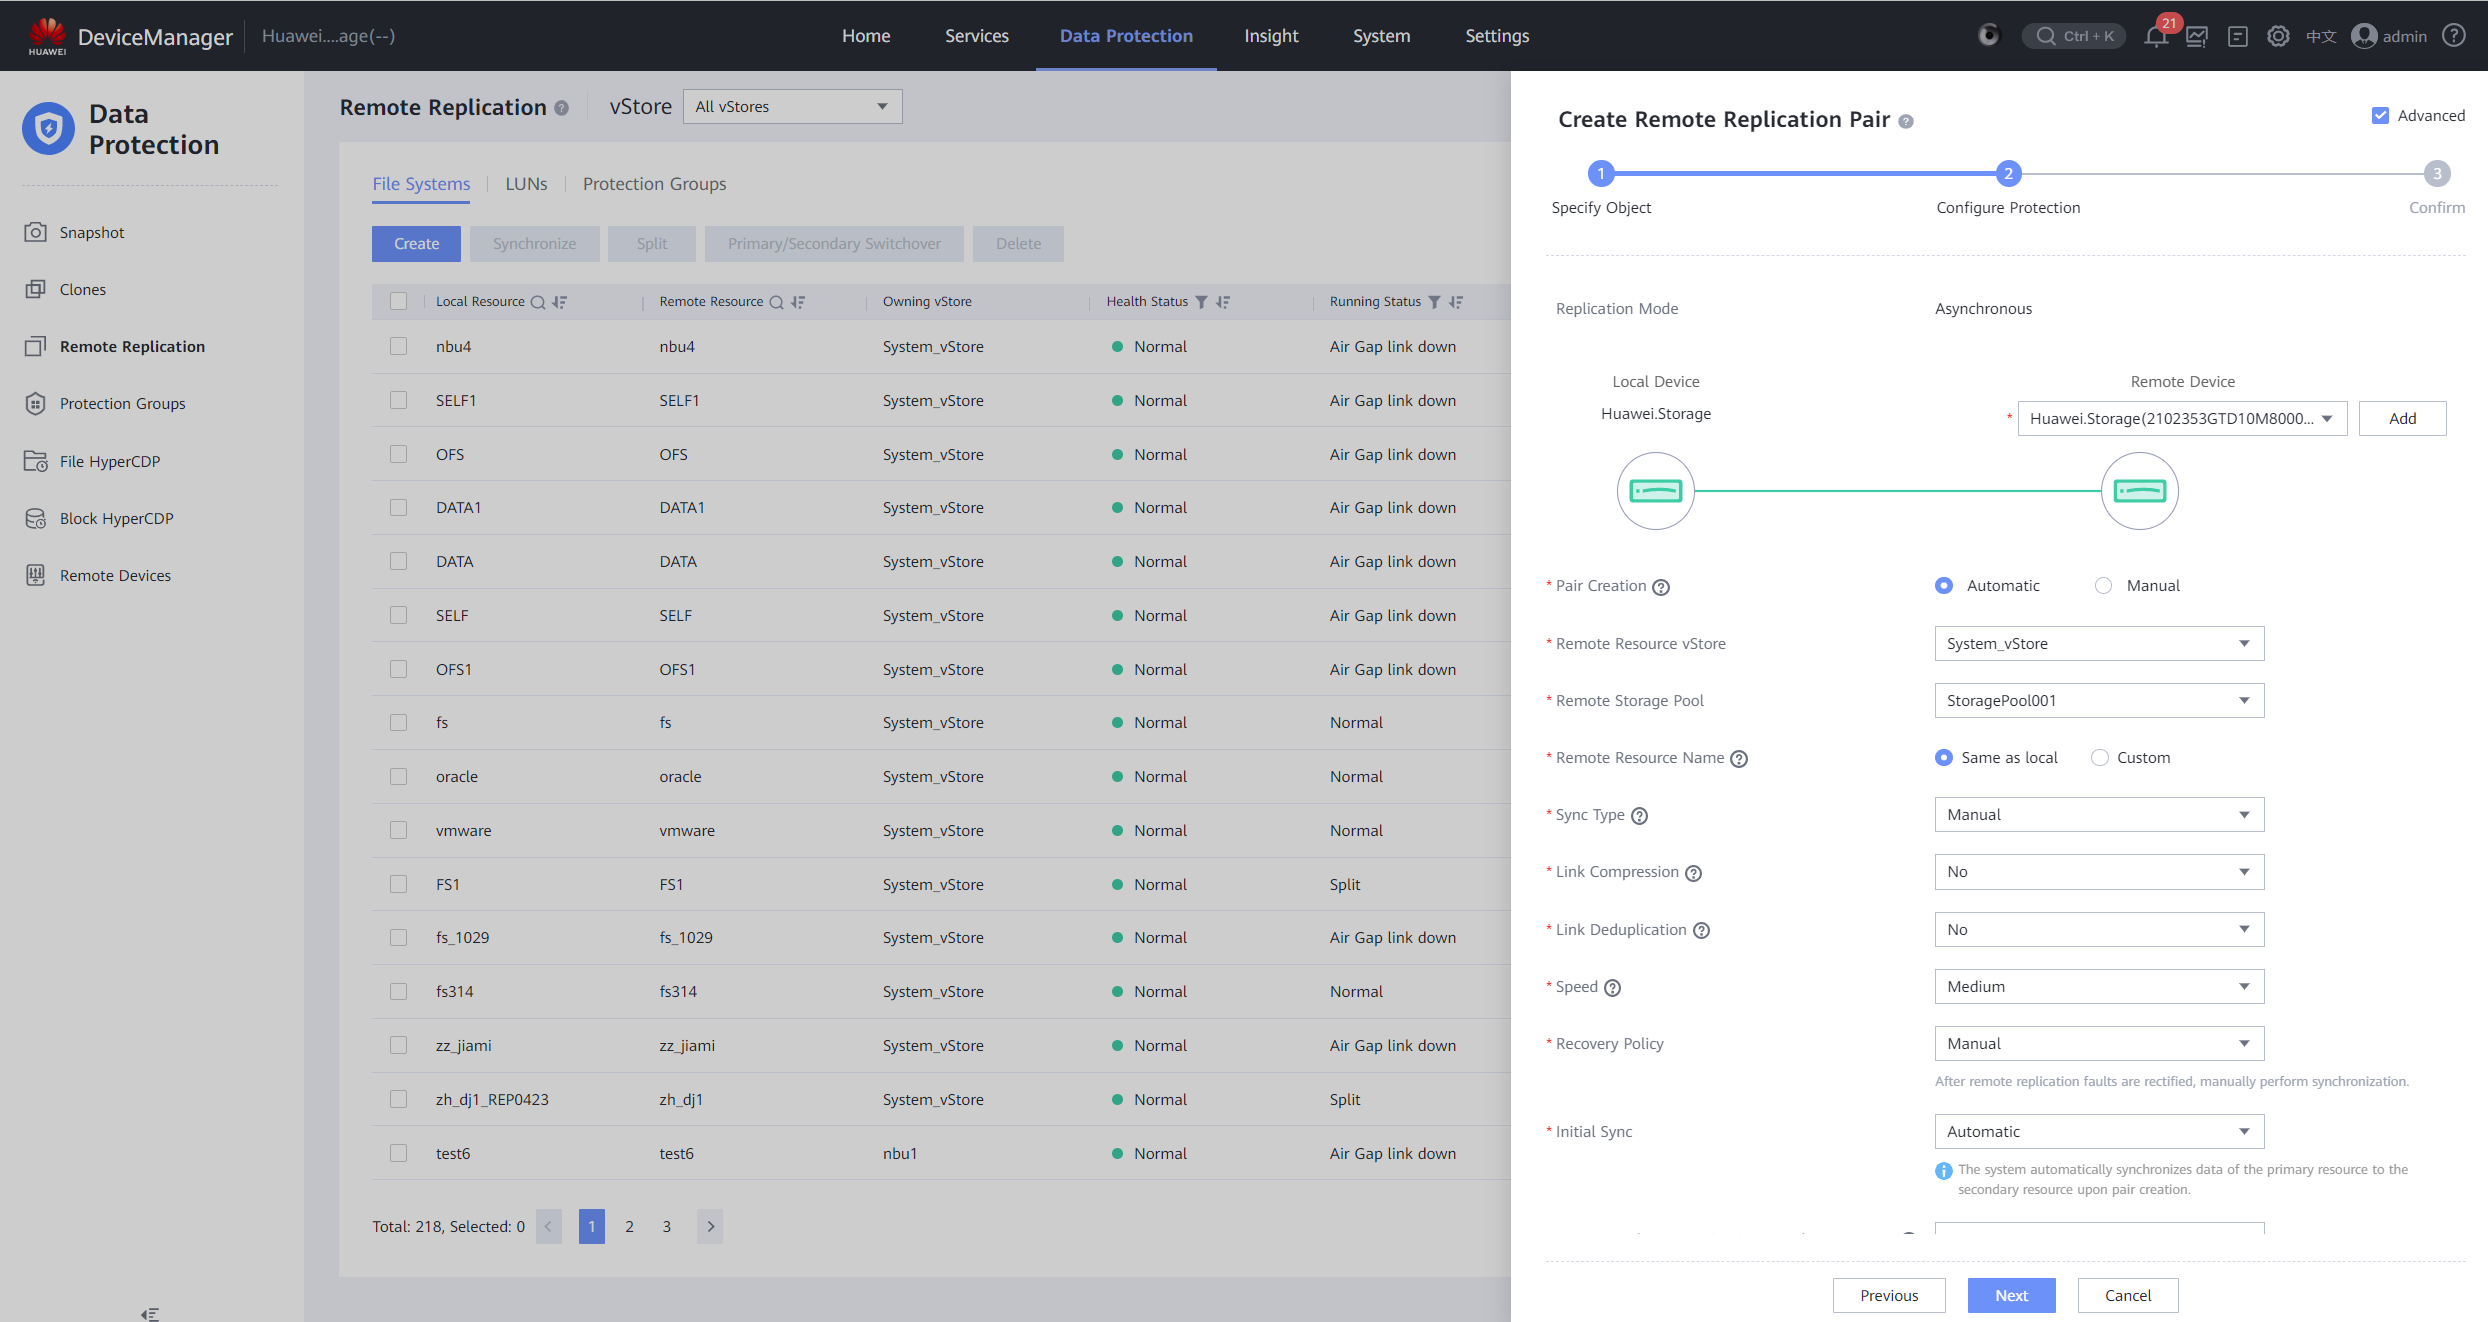
Step 8 Choose Data Protection > Remote Replication to view the status of the remote replication from the isolation zone to the production zone.
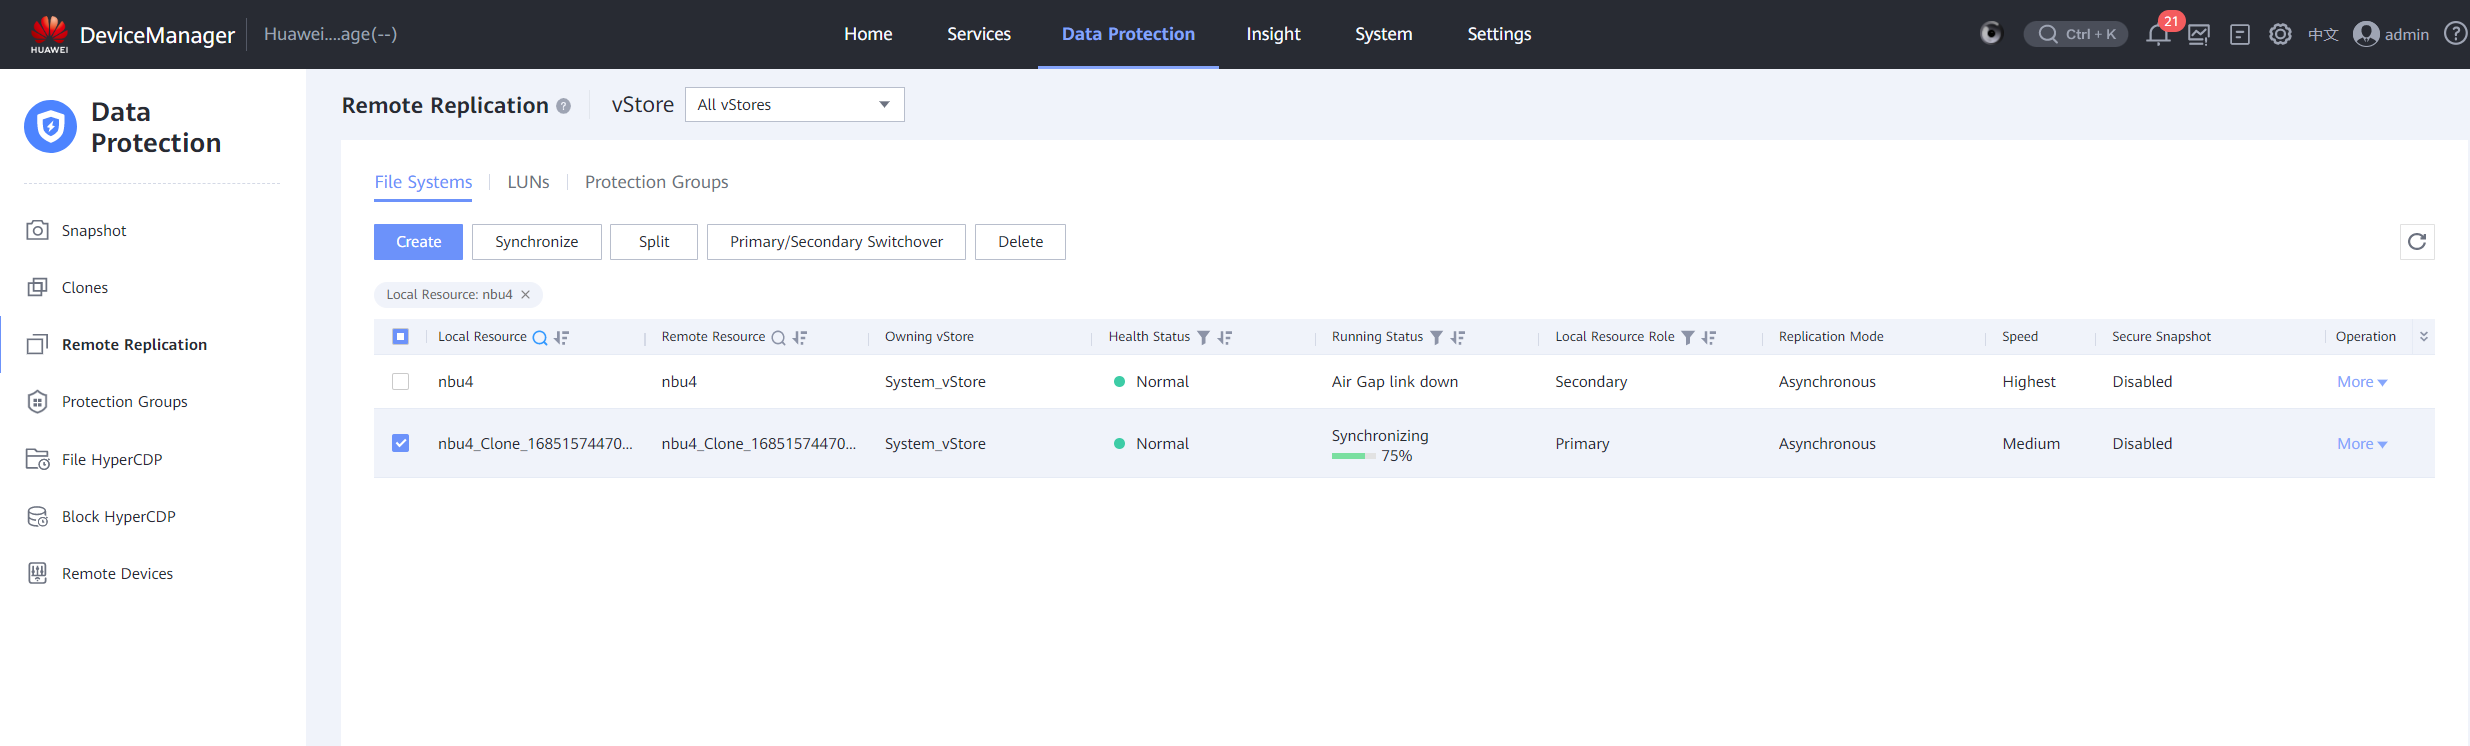
Step 9 Log in to DeviceManager of the backup storage in the production zone. Choose Data Protection > Remote Replication > File Systems, locate the replication pair created for the clone file system in the isolation zone, and choose More > Split.

Step 10 After the splitting is complete, delete the remote replication pair. Select the remote replication pair and choose More > Delete. In the displayed warning information, select I have read and understand the consequences associated with performing this operation. and click OK.
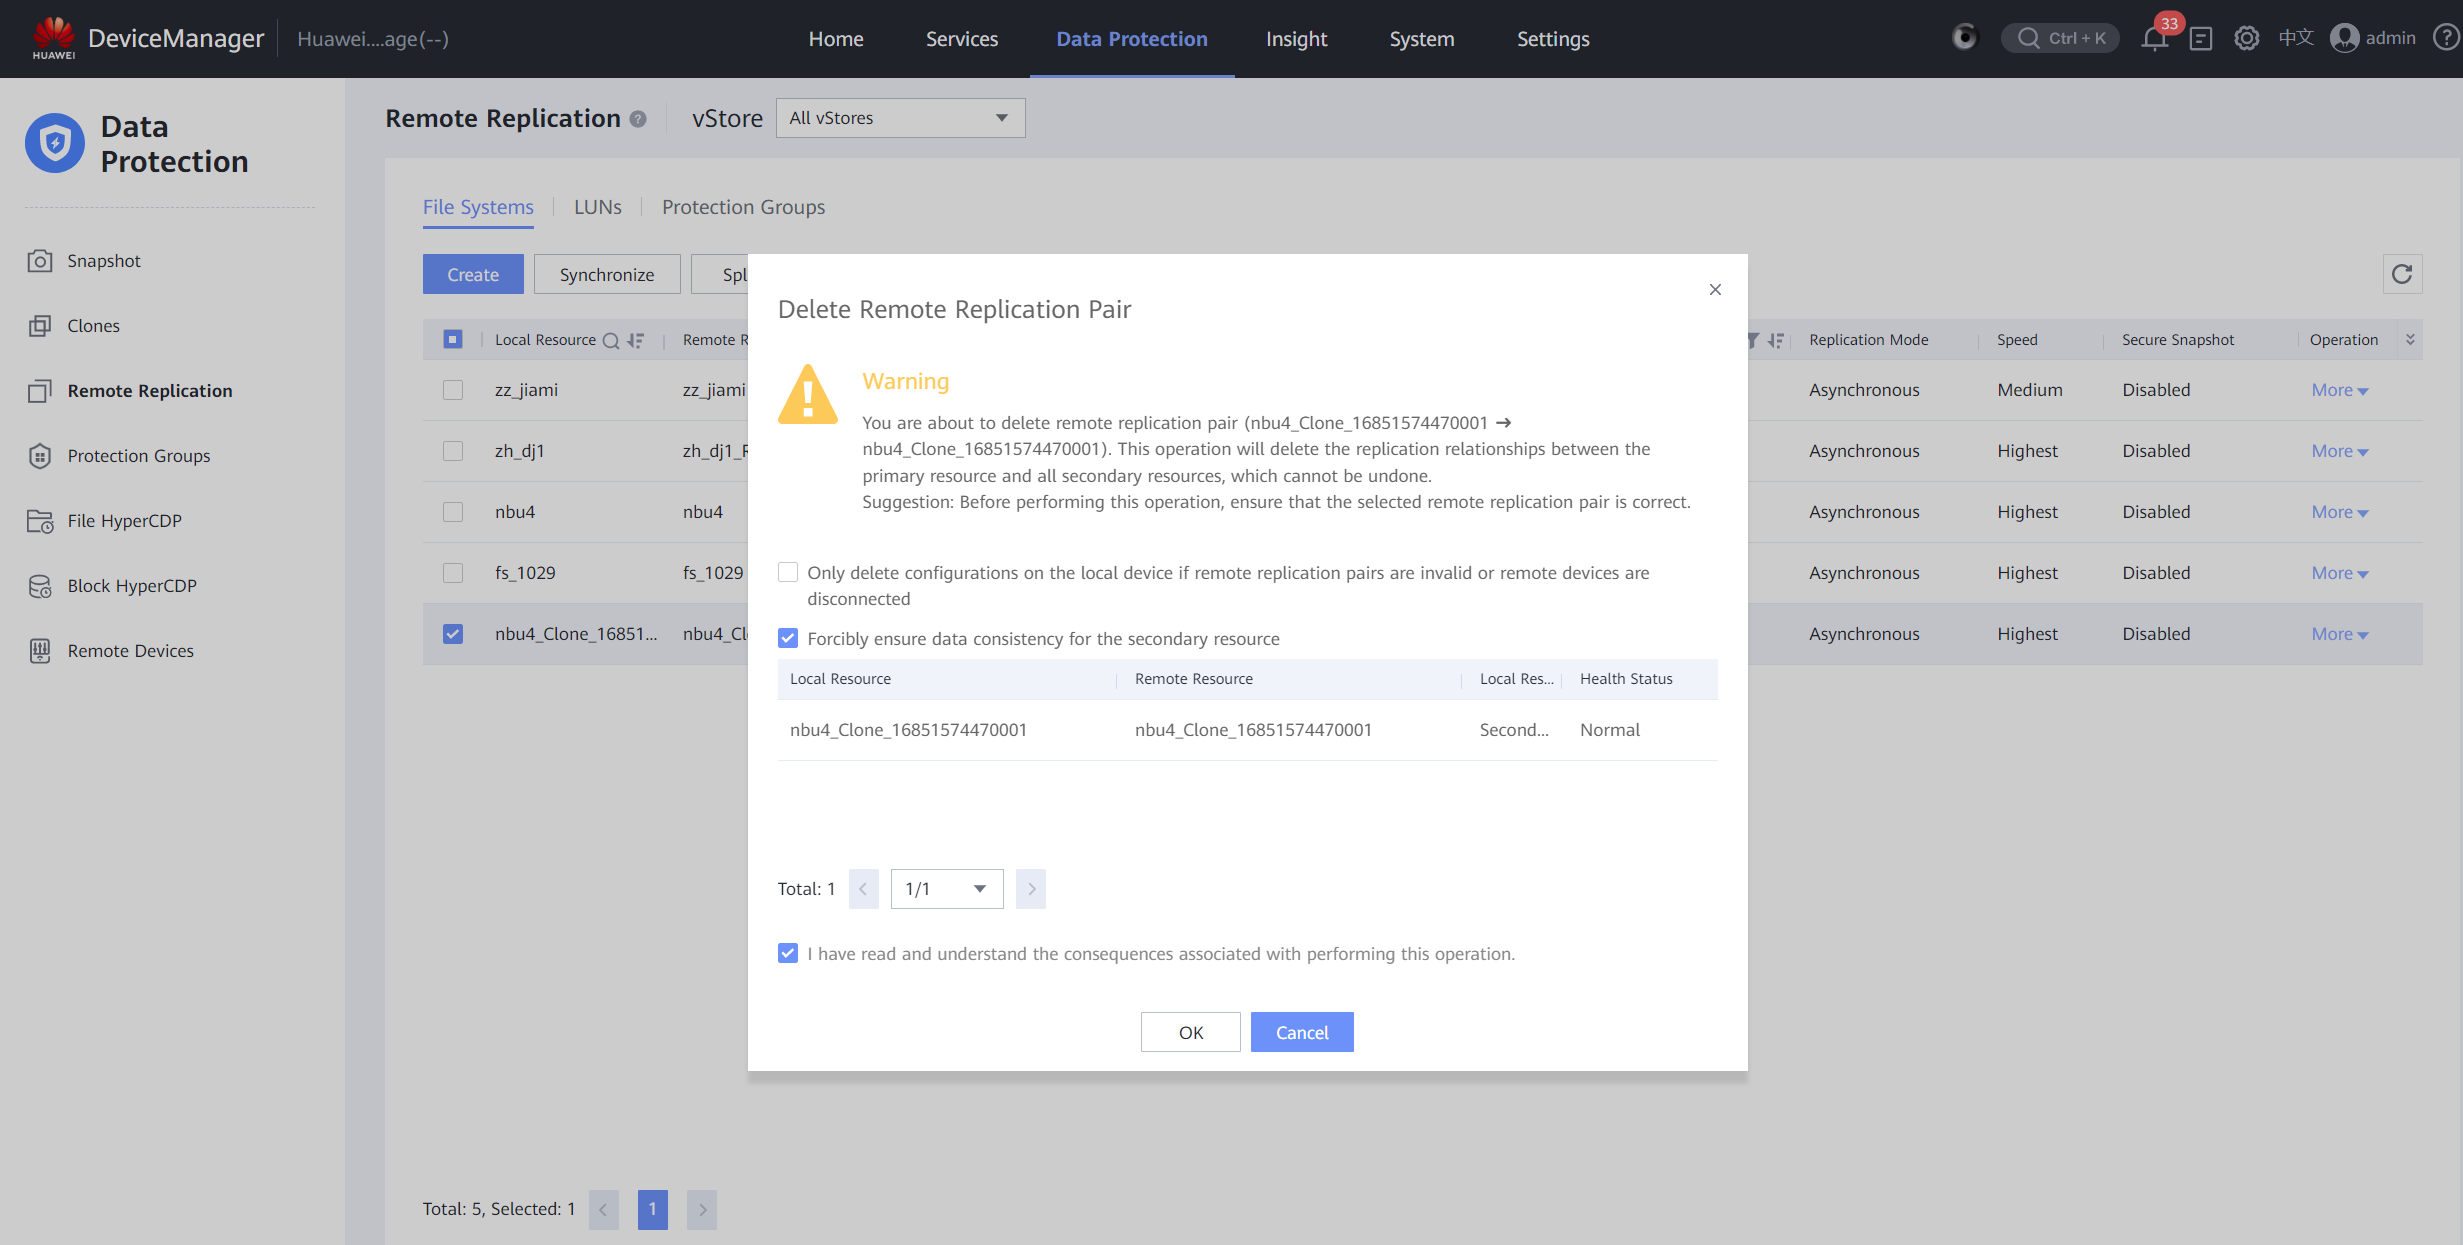
Step 11 To create a share for a file system, choose Services > File Service > File Systems, locate the file system, choose More > Create DataTurbo Share, and click OK.
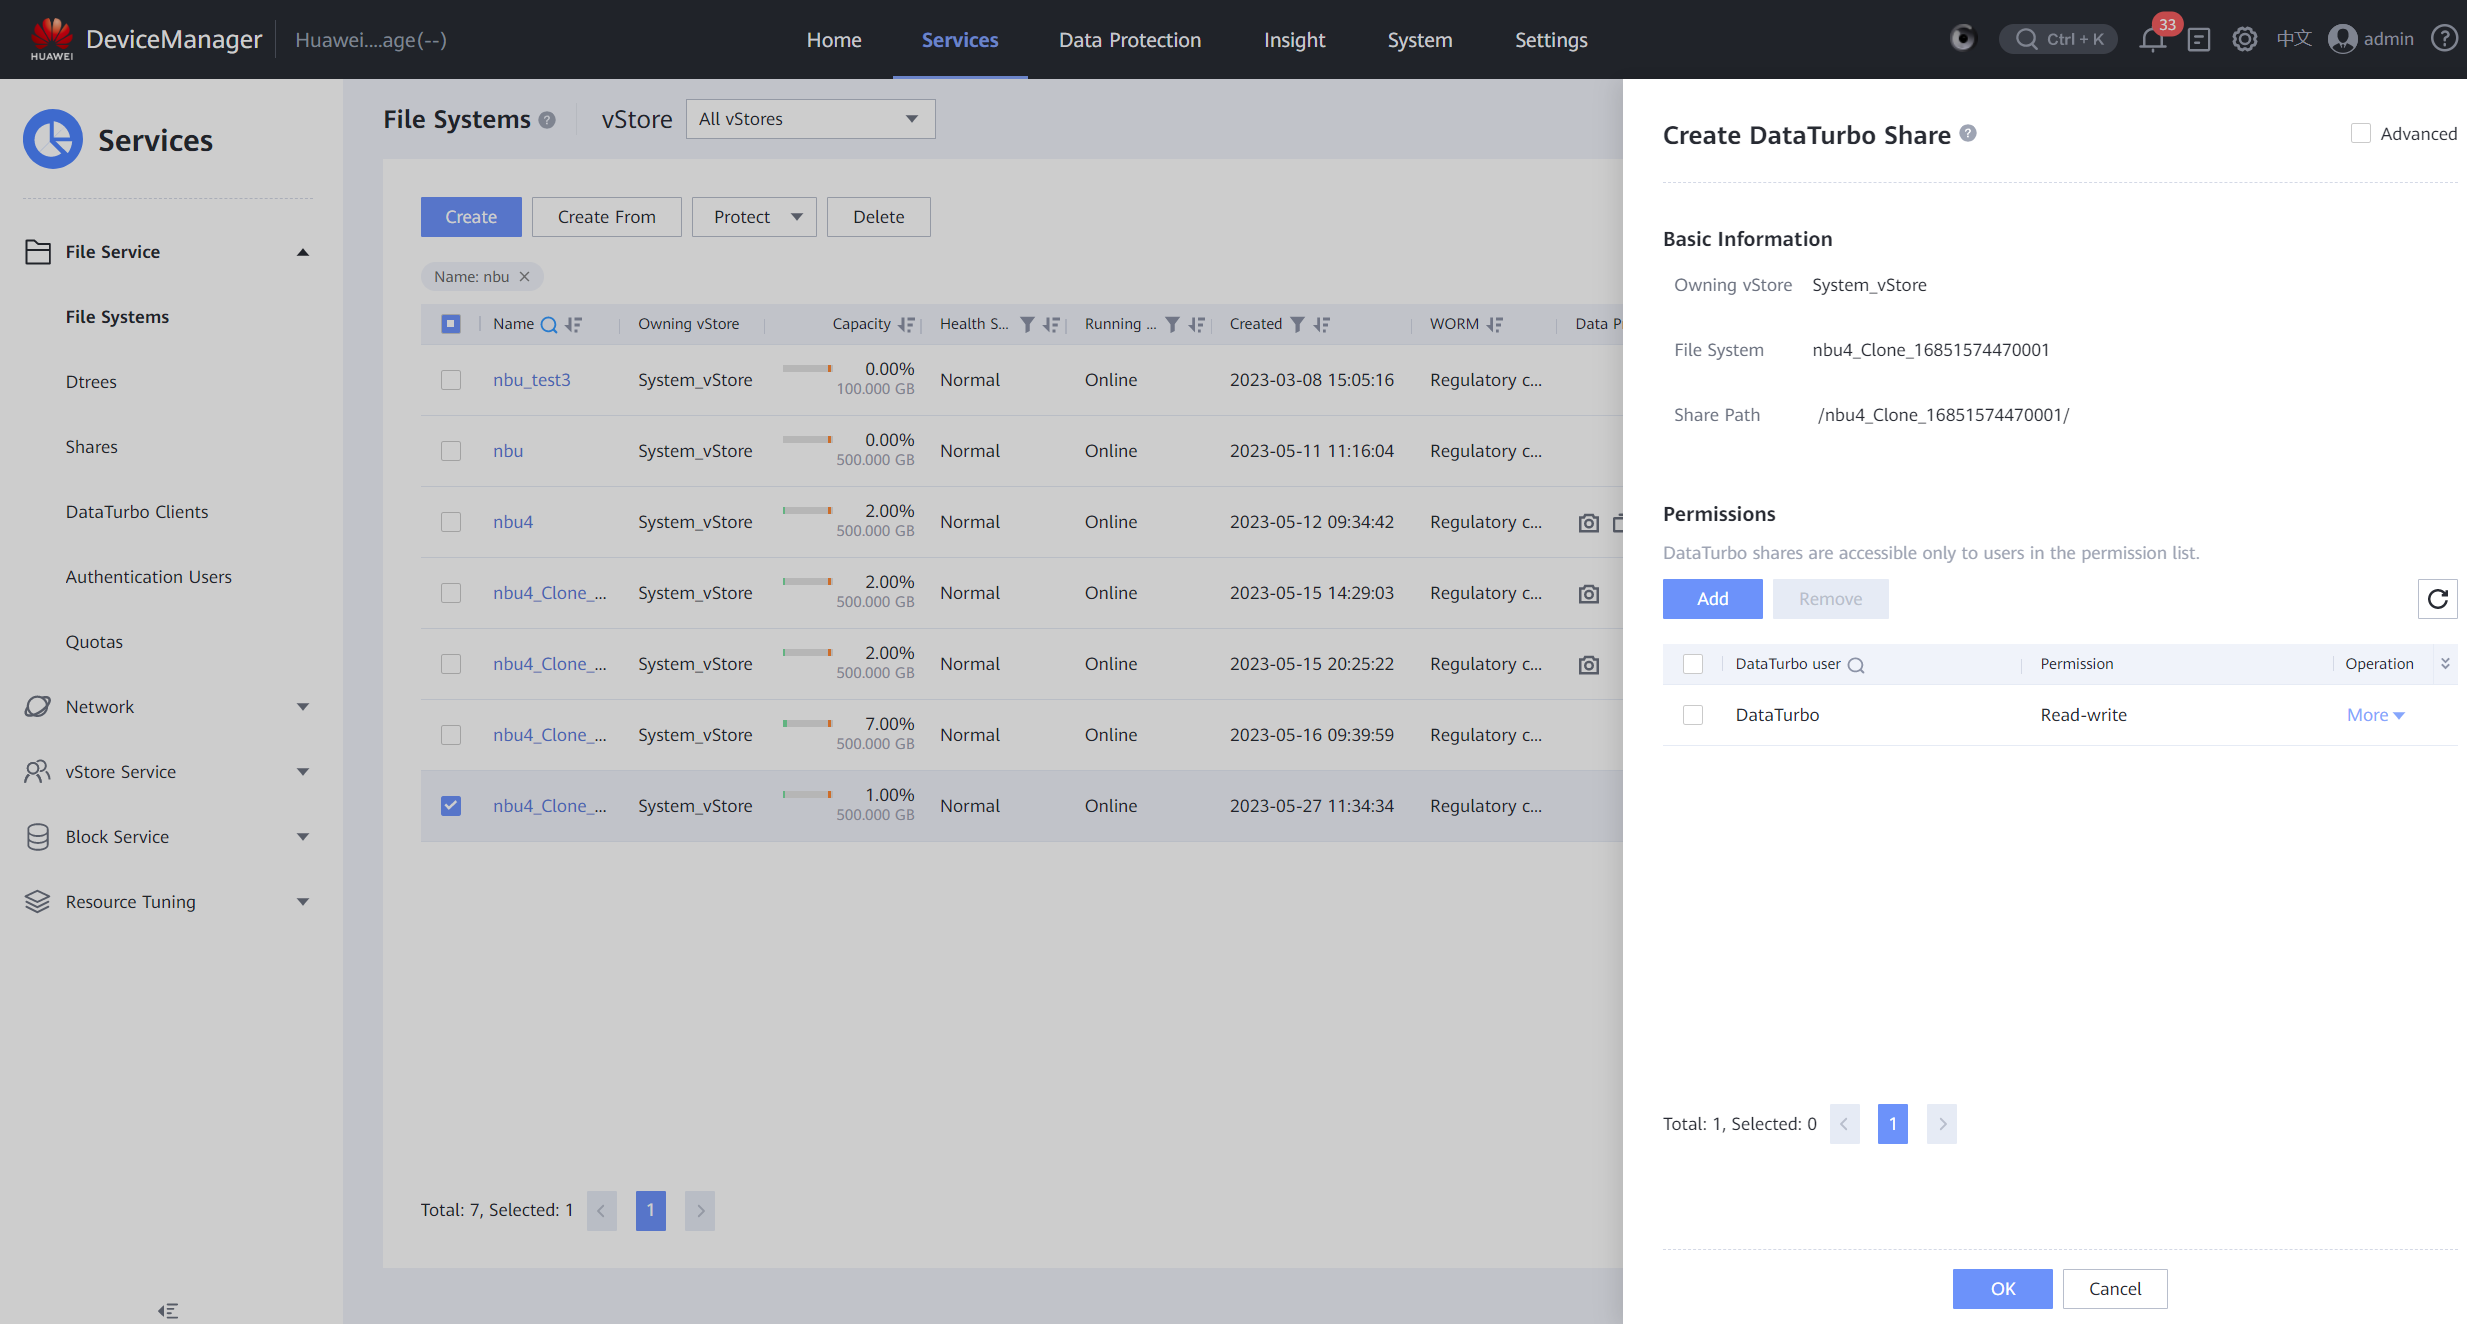
Step 12 Switch the mount point of the NetBackup server host in the production zone to the clone file system. For details, see 4.1.1.3 Integrating Using OceanStor DataTurbo.
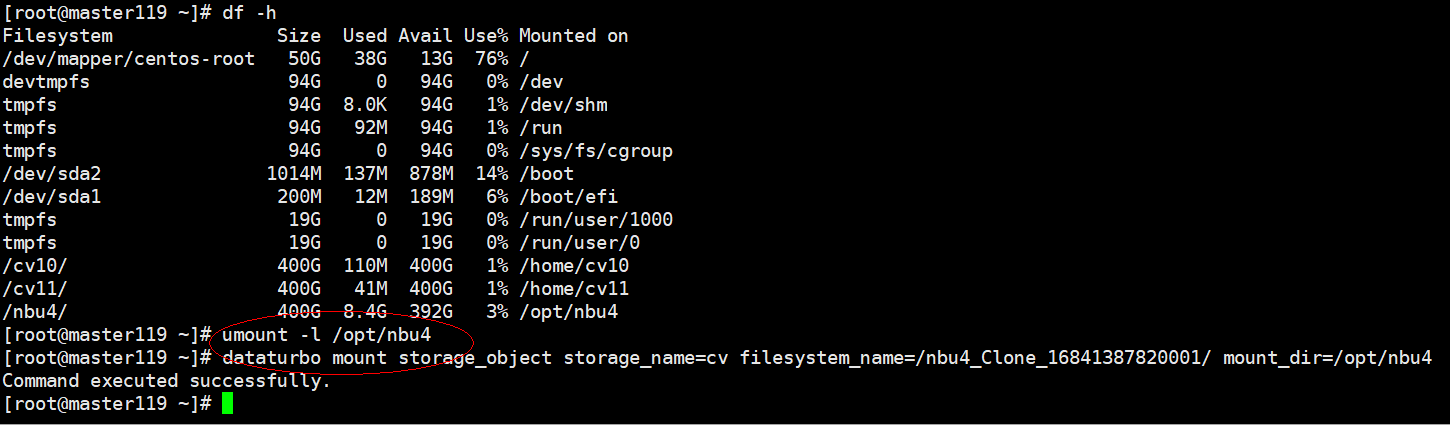
Step 13 Log in to the NetBackup of the production zone, choose Catalog > Search, set Action to Verify, set Data/Time Range, and click Search Now to query the previous backup copy records. Select all query records, right-click, and click Expire from the shortcut menu to invalidate all backup copies.
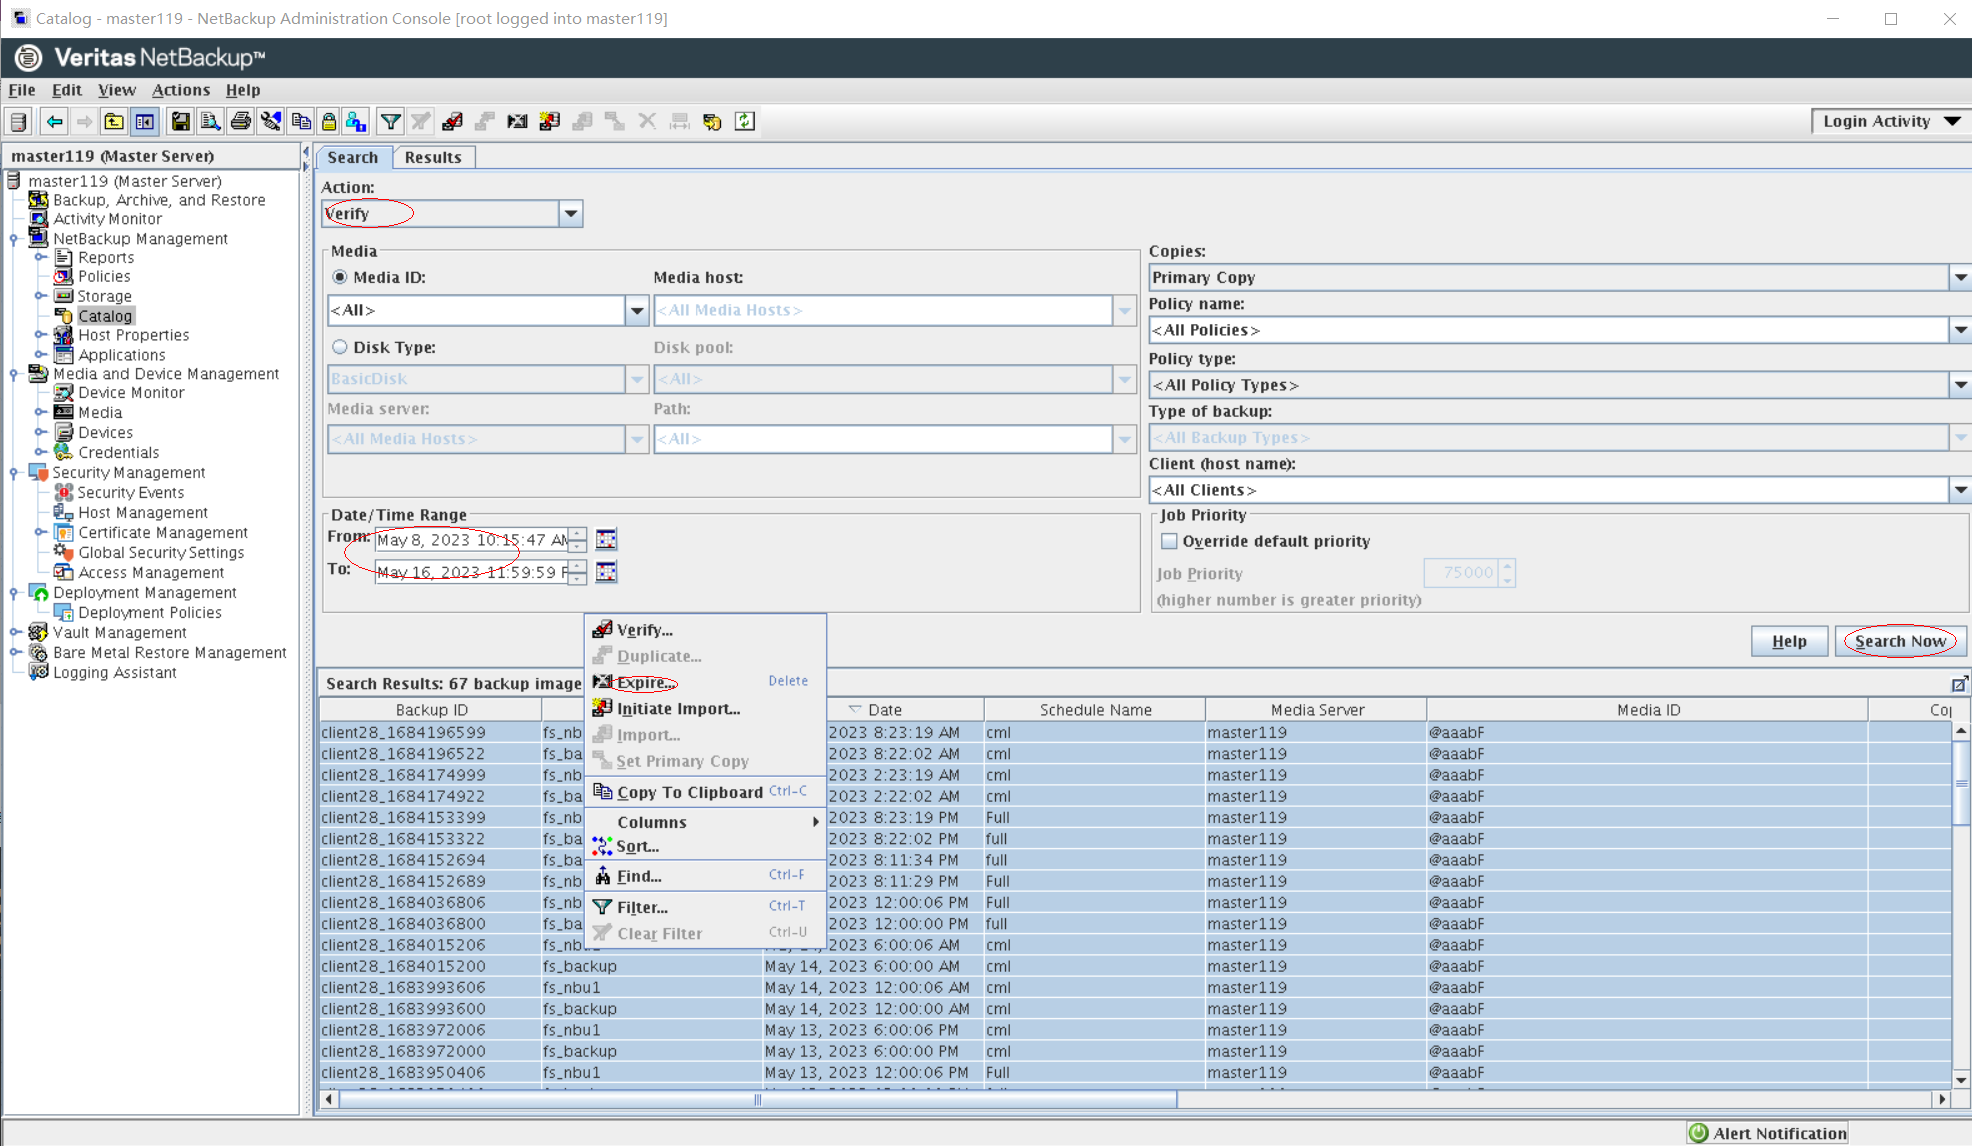
Step 14 Choose Actions > Initiate Import.

On the Initiate Import page, set Image Type to Disk, and Disk Type to AdvancedDisk. Set Disk pool and Volume to the disk pool and volume created in 4.1.1.4.2 Configuring Storage Units, and click OK.

Step 15 You can view the import completion status on the Activity Monitor page.

Choose Catalog, click the Search tab, set Action to Import, set Data/Time Range, and click Search Now. The copies imported by Initiate Import are queried. Select all copies, right-click, and choose Import from the shortcut menu. You can view the import completion status on the Activity Monitor page.
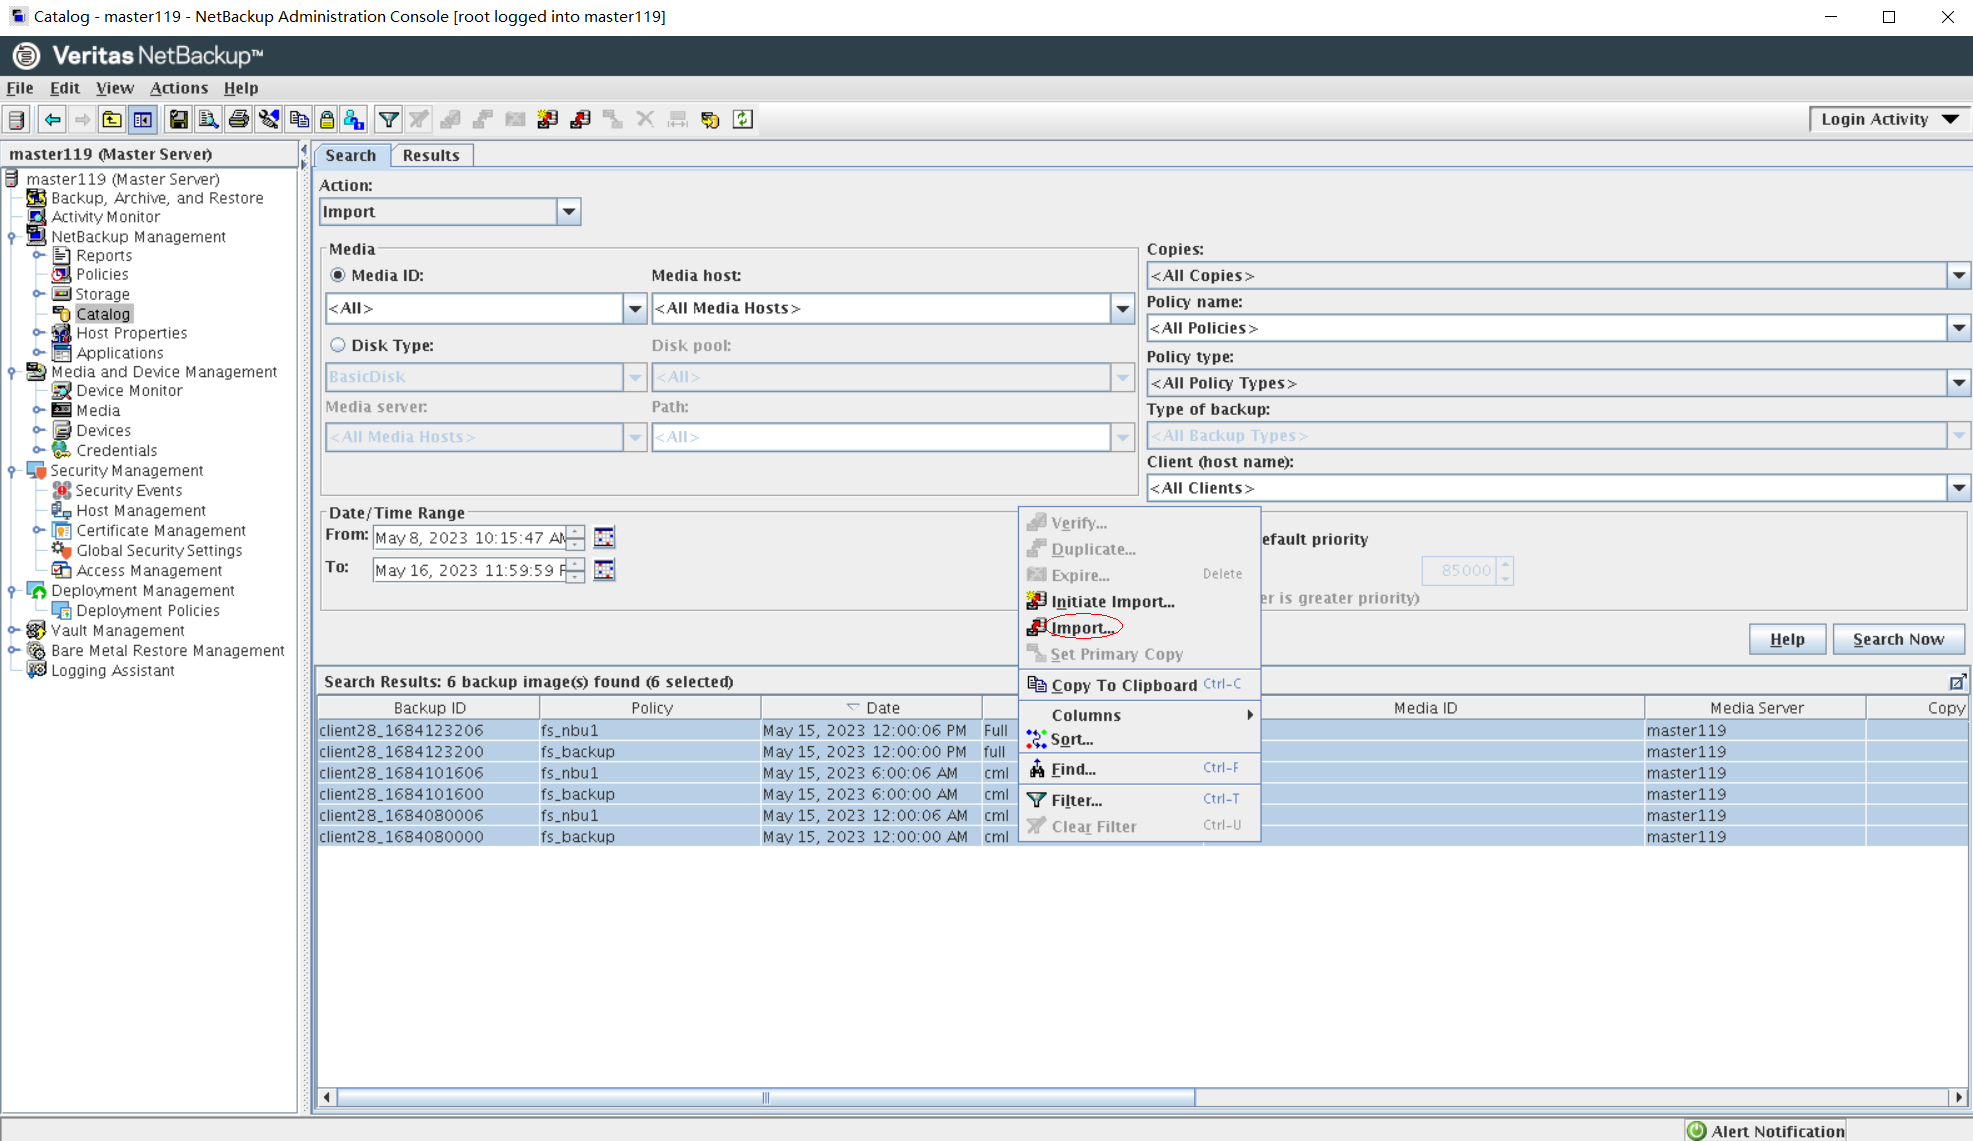

Step 16 On the Backup, Archive, and Restore page, click .

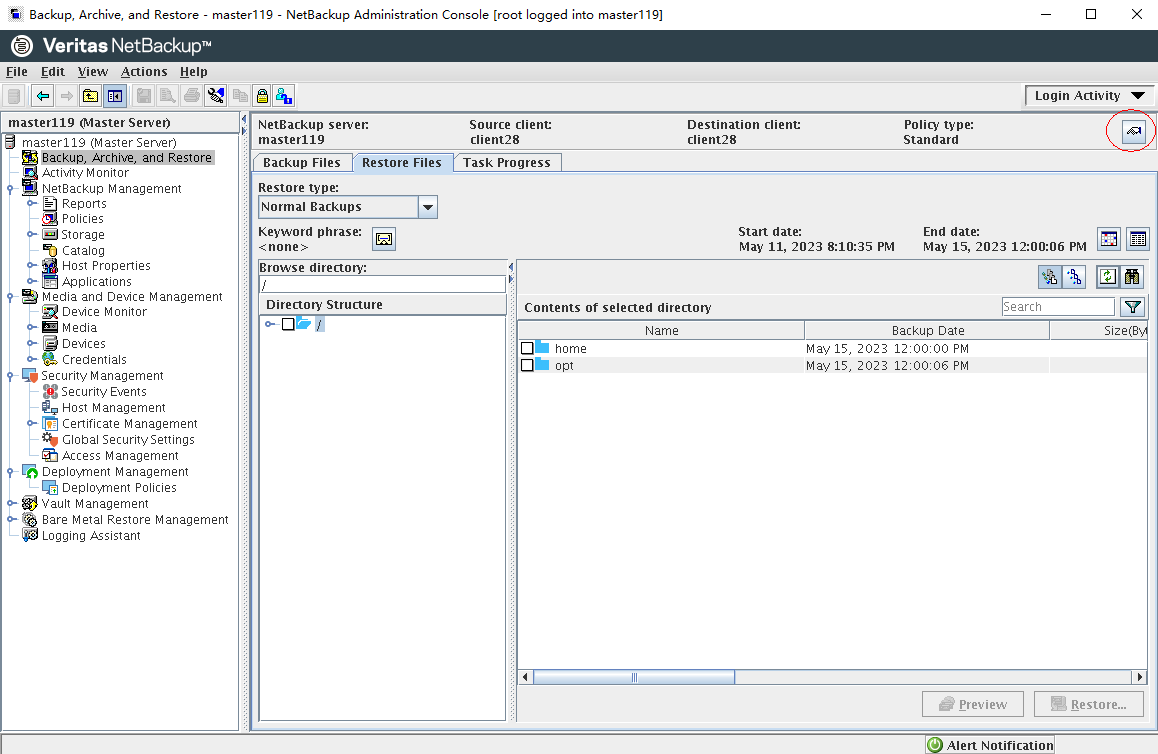
Step 17 Set parameters on the Specify NetBackup Machine and Policy Type page. Set Server to use for backups and restores to the NetBackup master server, Source client for restores and Destination client for restores to the server where the NetBackup client is installed, and Policy type for restores to Standard. Click OK.

Step 18 On the Restore Files page, enter / in Browse directory, select a copy generated at a certain time, and click Restore.
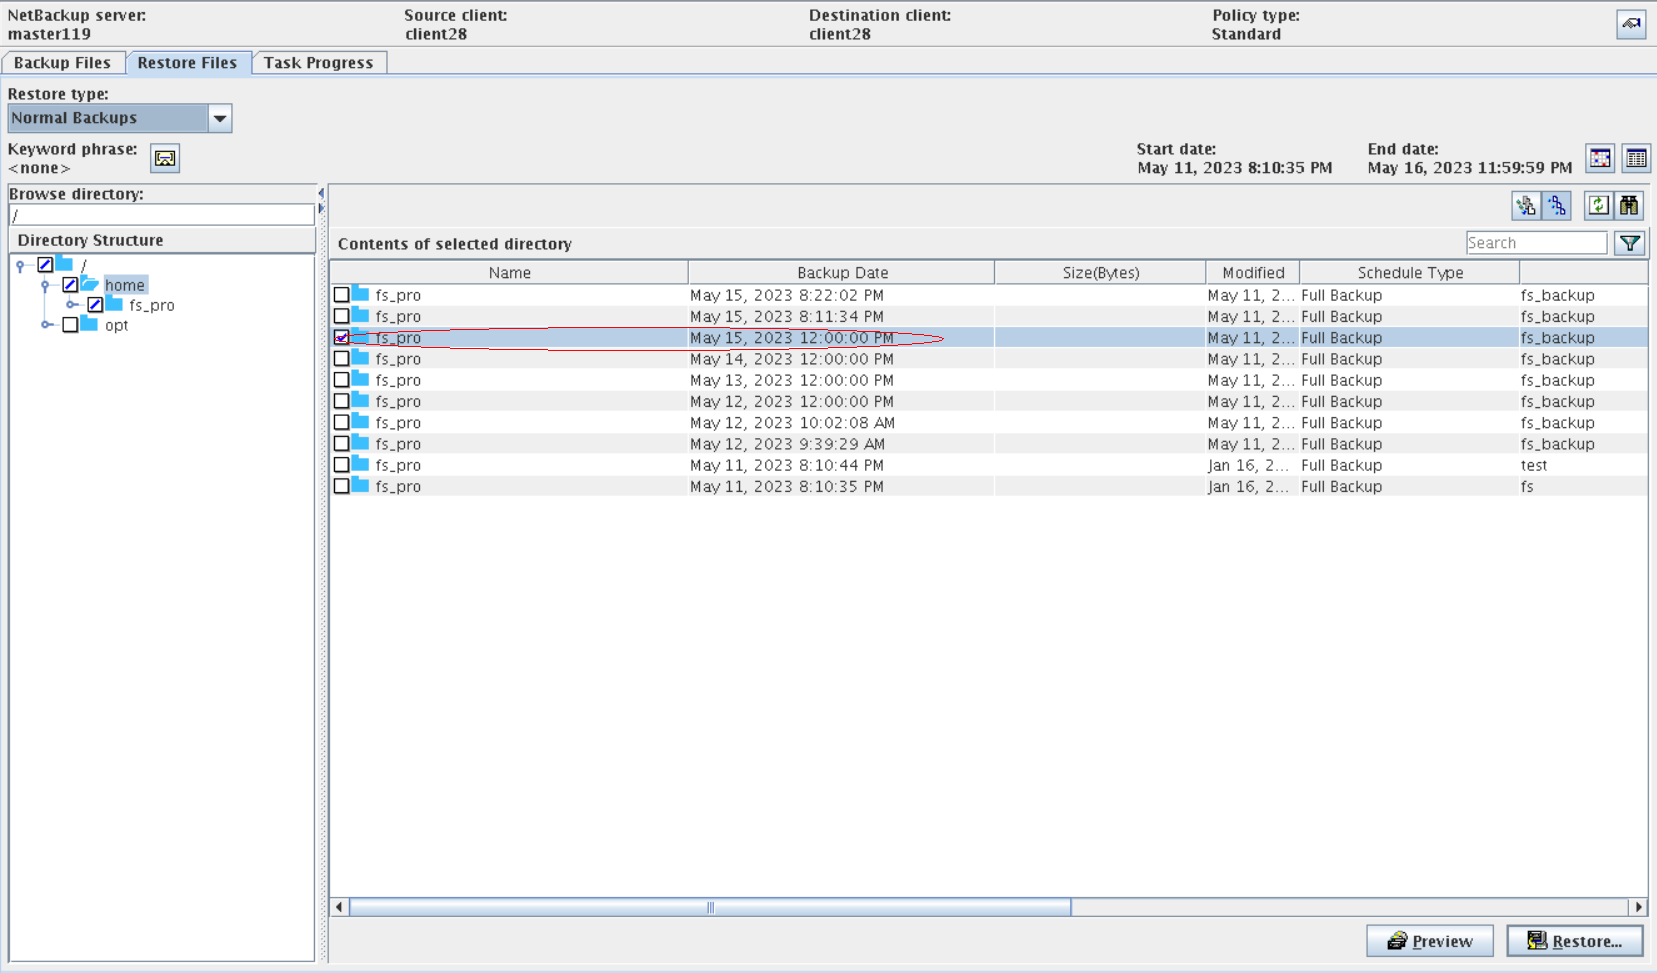
Step 19 On the Restore Marked Files page, set parameters and click Start Restore.

Step 20 After the restoration job is complete, verify that the infected data on the production host is successfully restored.

—-End
4.2.2.3 Restoring the Isolation Zone Using the Image Import
Scenario: A small amount of data needs to be backed up using a simple backup policy without strict requirements on restoration time.
Step 1 Log in to DeviceManager of the storage device in the isolation zone. Choose Services > File Service > File Systems, and select the file system that is remotely replicated to the isolation zone. Choose More > Create Clone, and select the latest secure snapshot that contains normal data to create a clone.

Step 2 After the clone is created, choose Data Protection > Clones, select the clone of the corresponding file system, and choose Split > Start.
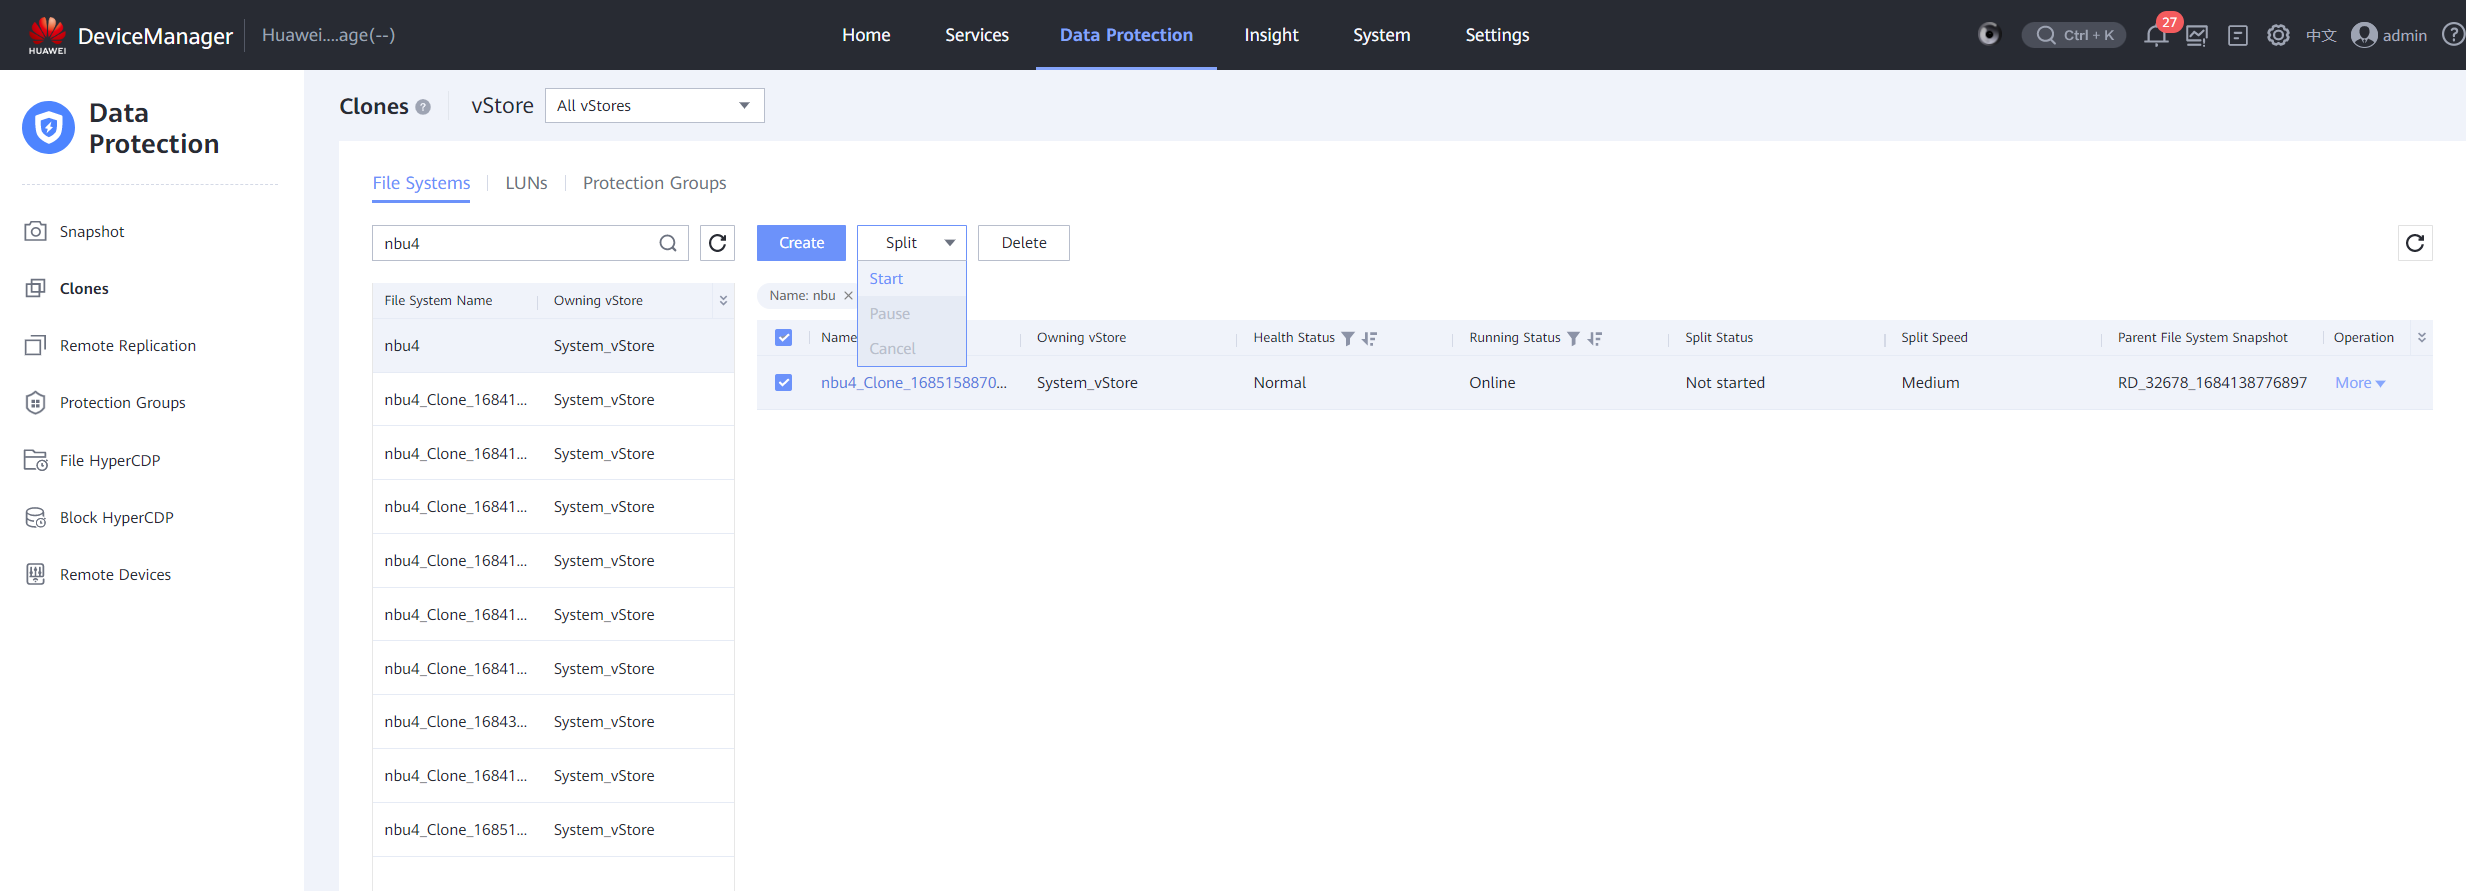
Step 3 After the splitting is complete, create a DataTurbo share for the clone file system. For details, see 4.1.1.1.4 Creating a File System and a Share.

Step 4 Mount the clone file system to the NetBackup server host in the isolation zone. For details, see 4.1.1.3 Integrating Using OceanStor DataTurbo.

Step 5 Log in to NetBackup in the isolation zone, and configure the storage servers, disk pools, and storage units for the isolation zone by referring to 4.1.1.4.2 Configuring Storage Units. When configuring storage server volumes for disk pools, select the path for mounting the clone file system, as shown in the following figure. Other operations are the same as those in 4.1.1.4.2 Configuring Storage Units.
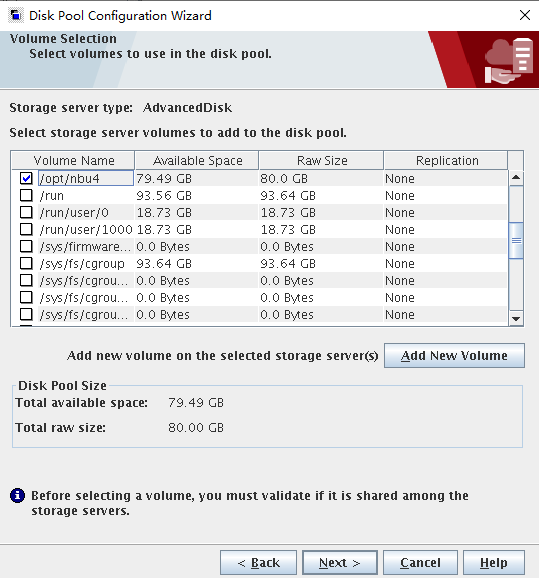
Step 6 Log in to NetBackup of the isolation zone and choose Actions > Initiate Import.
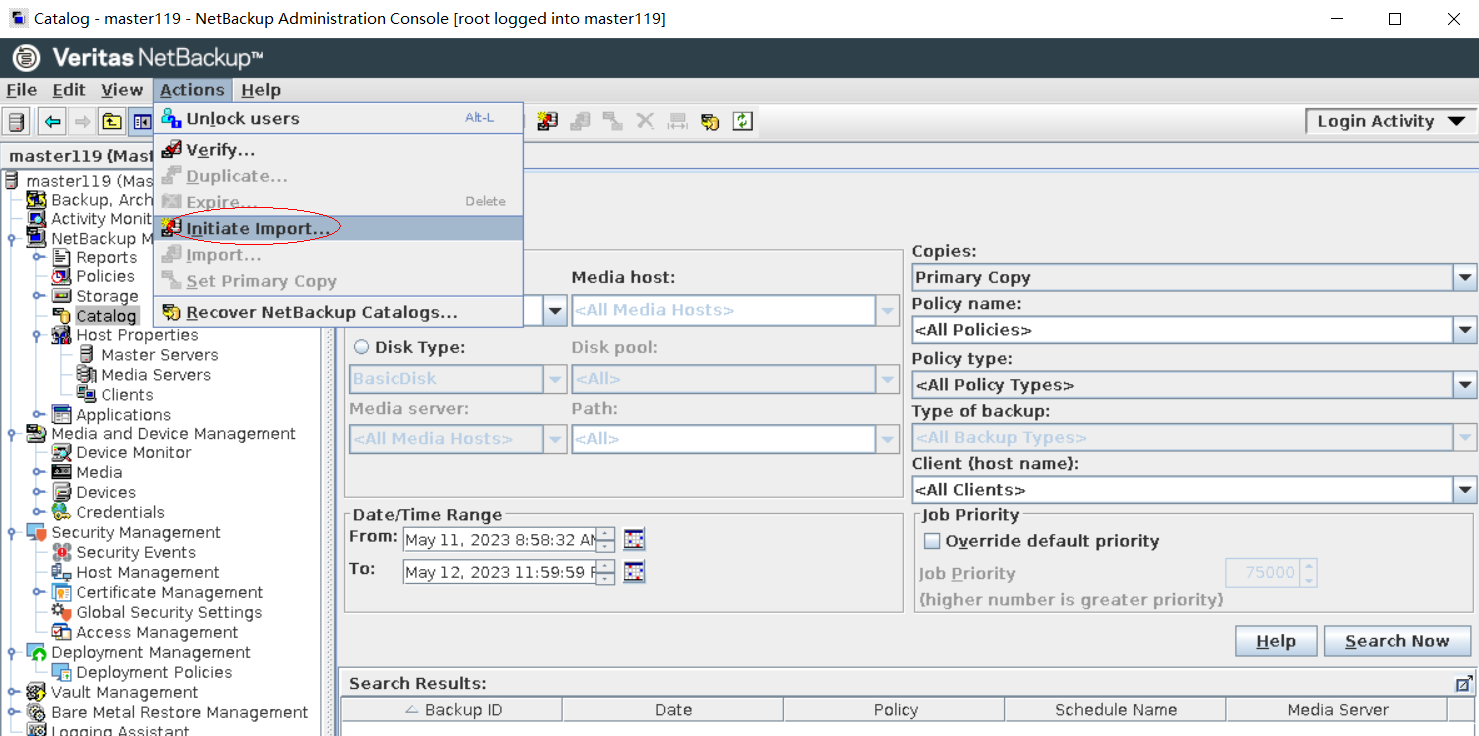
Step 7 On the Initiate Import page, set Image Type to Disk, and Disk Type to AdvancedDisk. Set Disk pool and Volume to the created disk pool and volume respectively, and click OK.
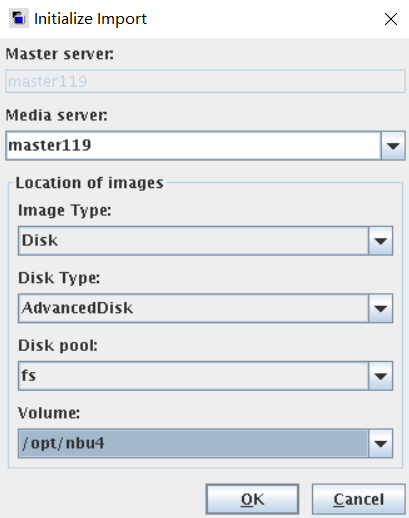
Step 8 You can view the import completion status on the Activity Monitor page.
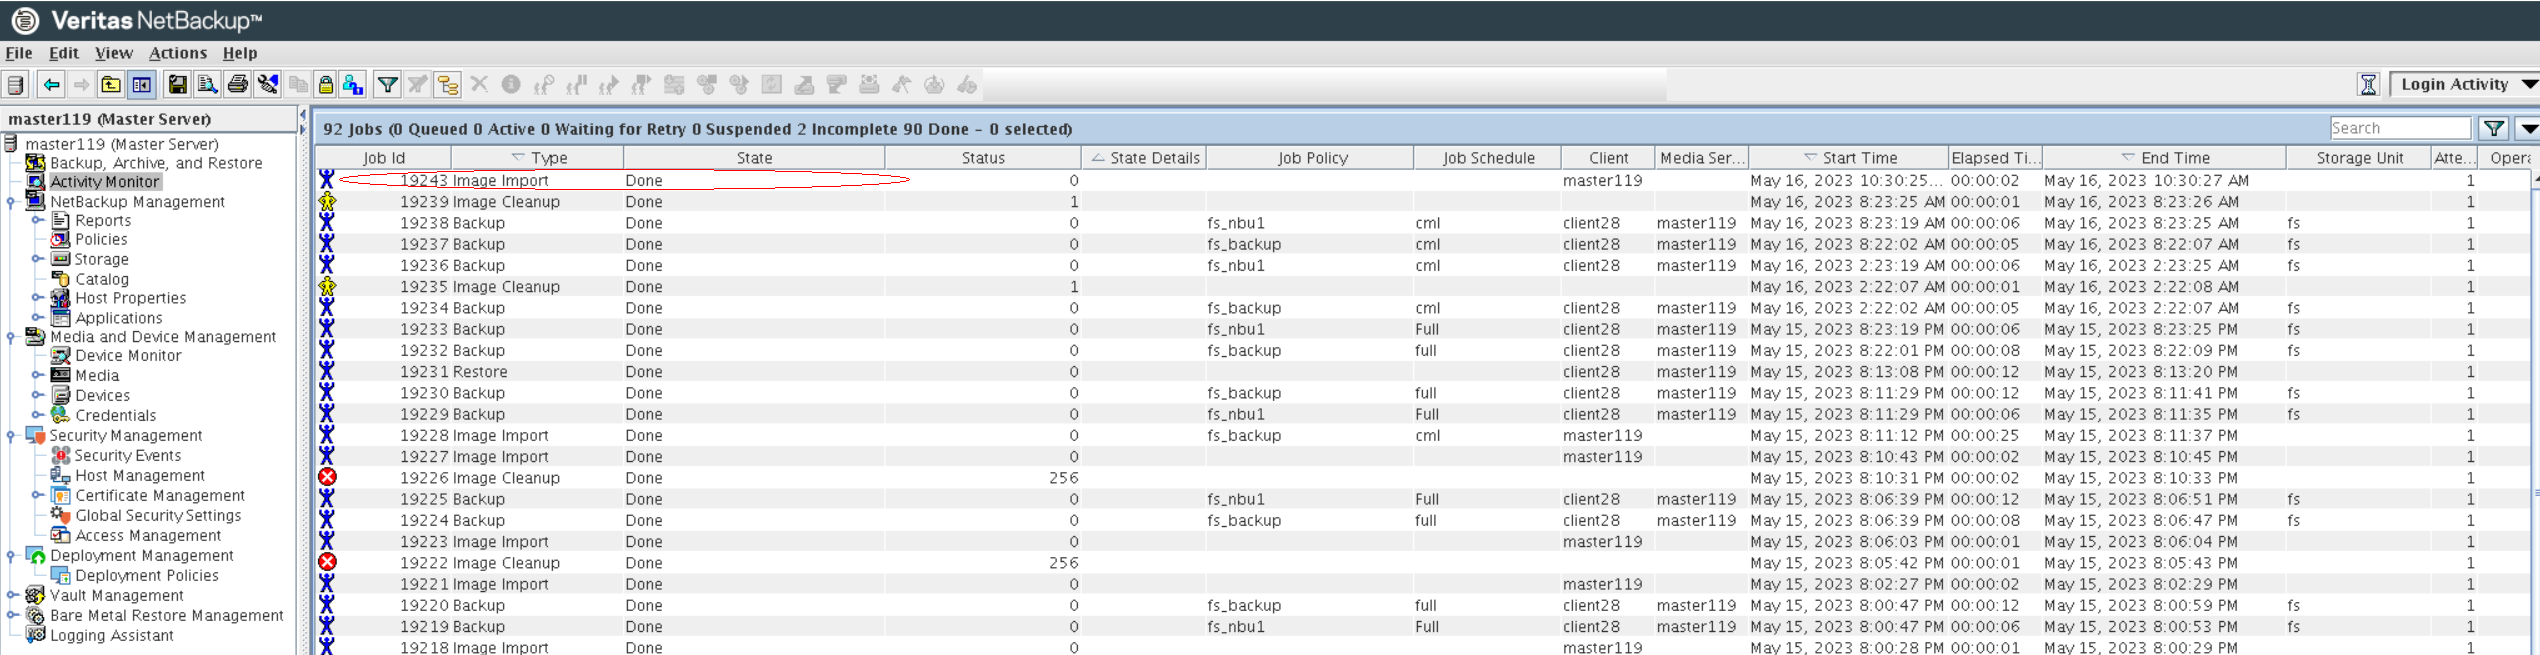
Step 9 Choose Catalog, click the Search tab, set Action to Import, set Data/Time Range, and click Search Now. The copies imported by Initiate Import are queried. Select all copies, right-click, and choose Import from the shortcut menu. You can view the import completion status on the Activity Monitor page.
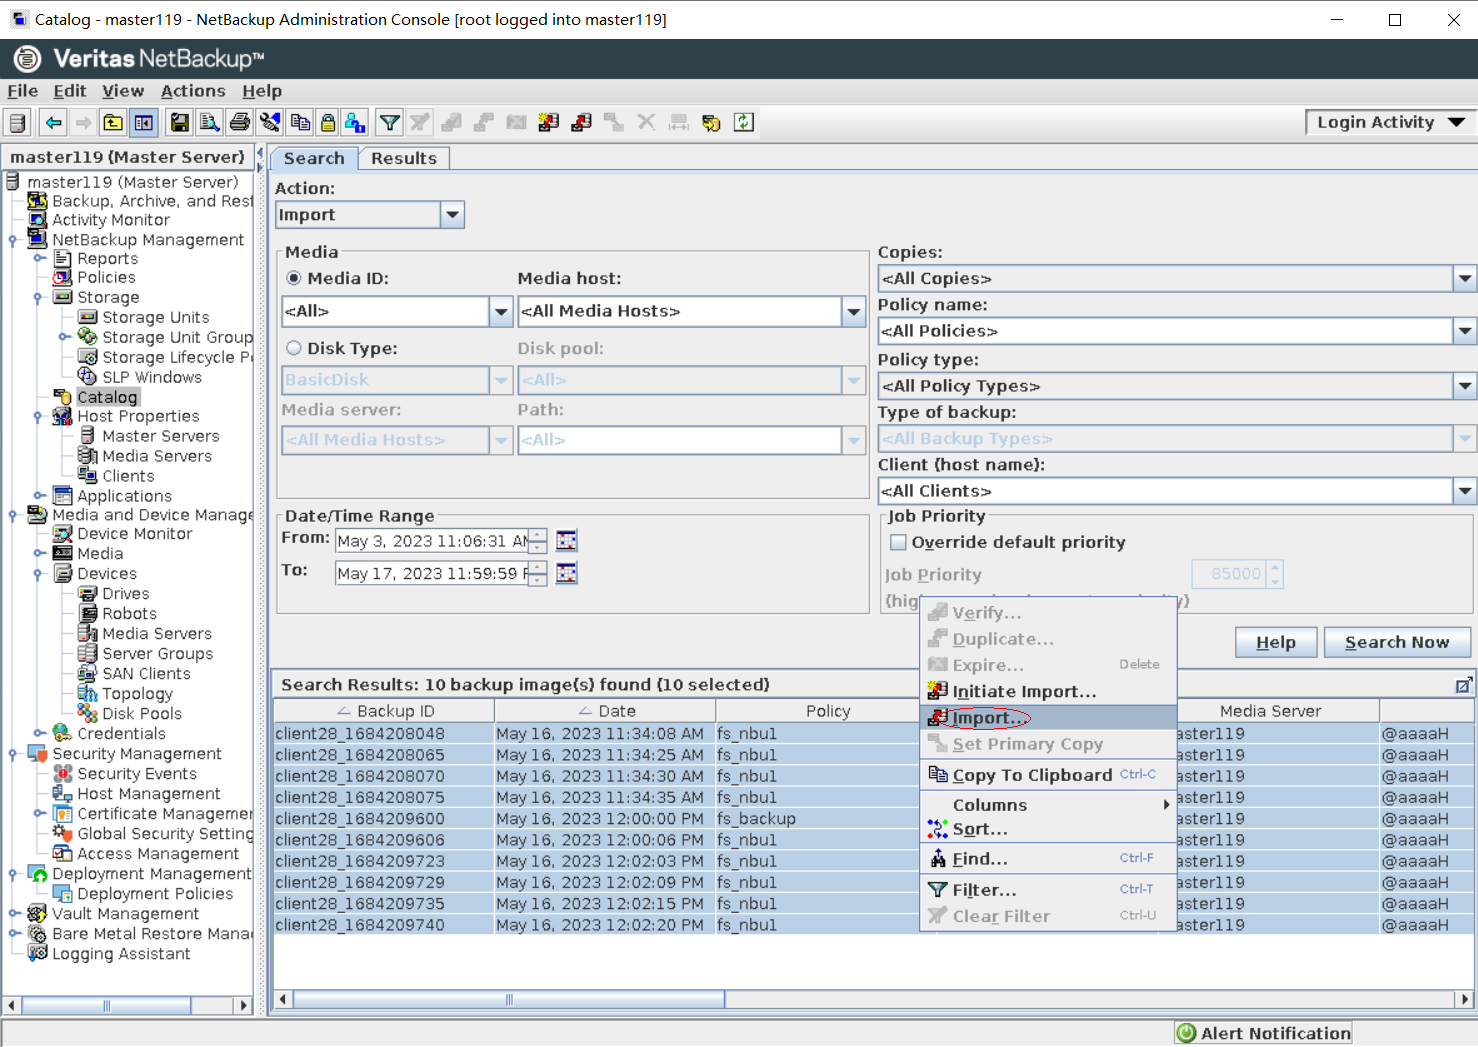
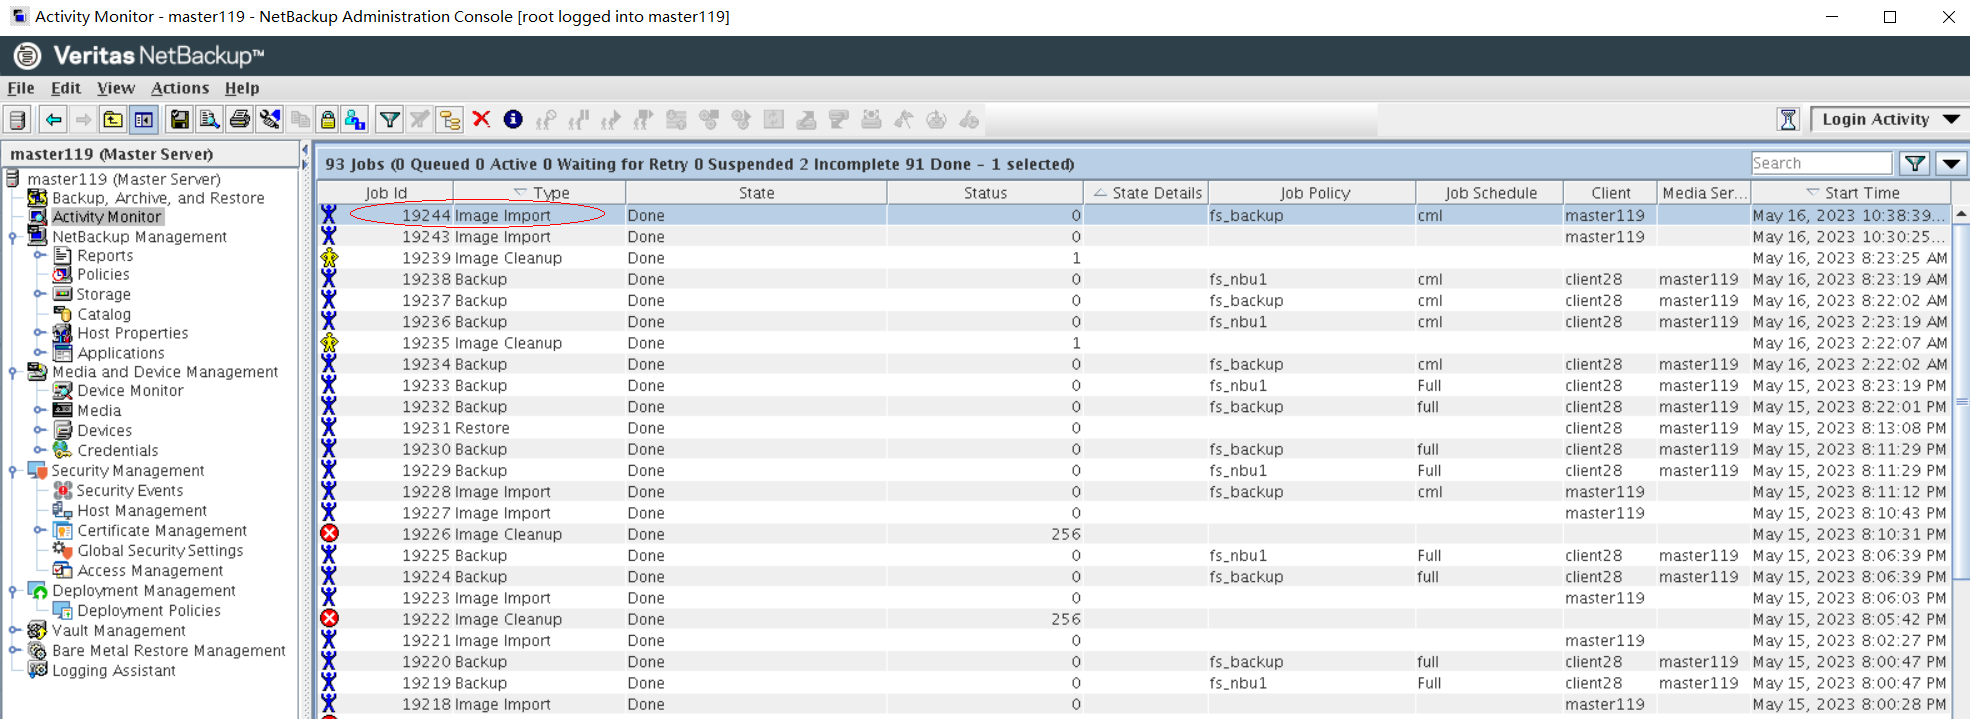
Step 10 On the Backup, Archive, and Restore page, click .


Step 11 Set parameters on the Specify NetBackup Machine and Policy Type page. Set Server to use for backups and restores to the NetBackup master server, Source client for restores and Destination client for restores to the server where the NetBackup client is installed, and Policy type for restores to Standard. Click OK.

Step 12 On the Restore Files page, enter / in Browse directory, select a copy generated at a certain time, and click Restore.
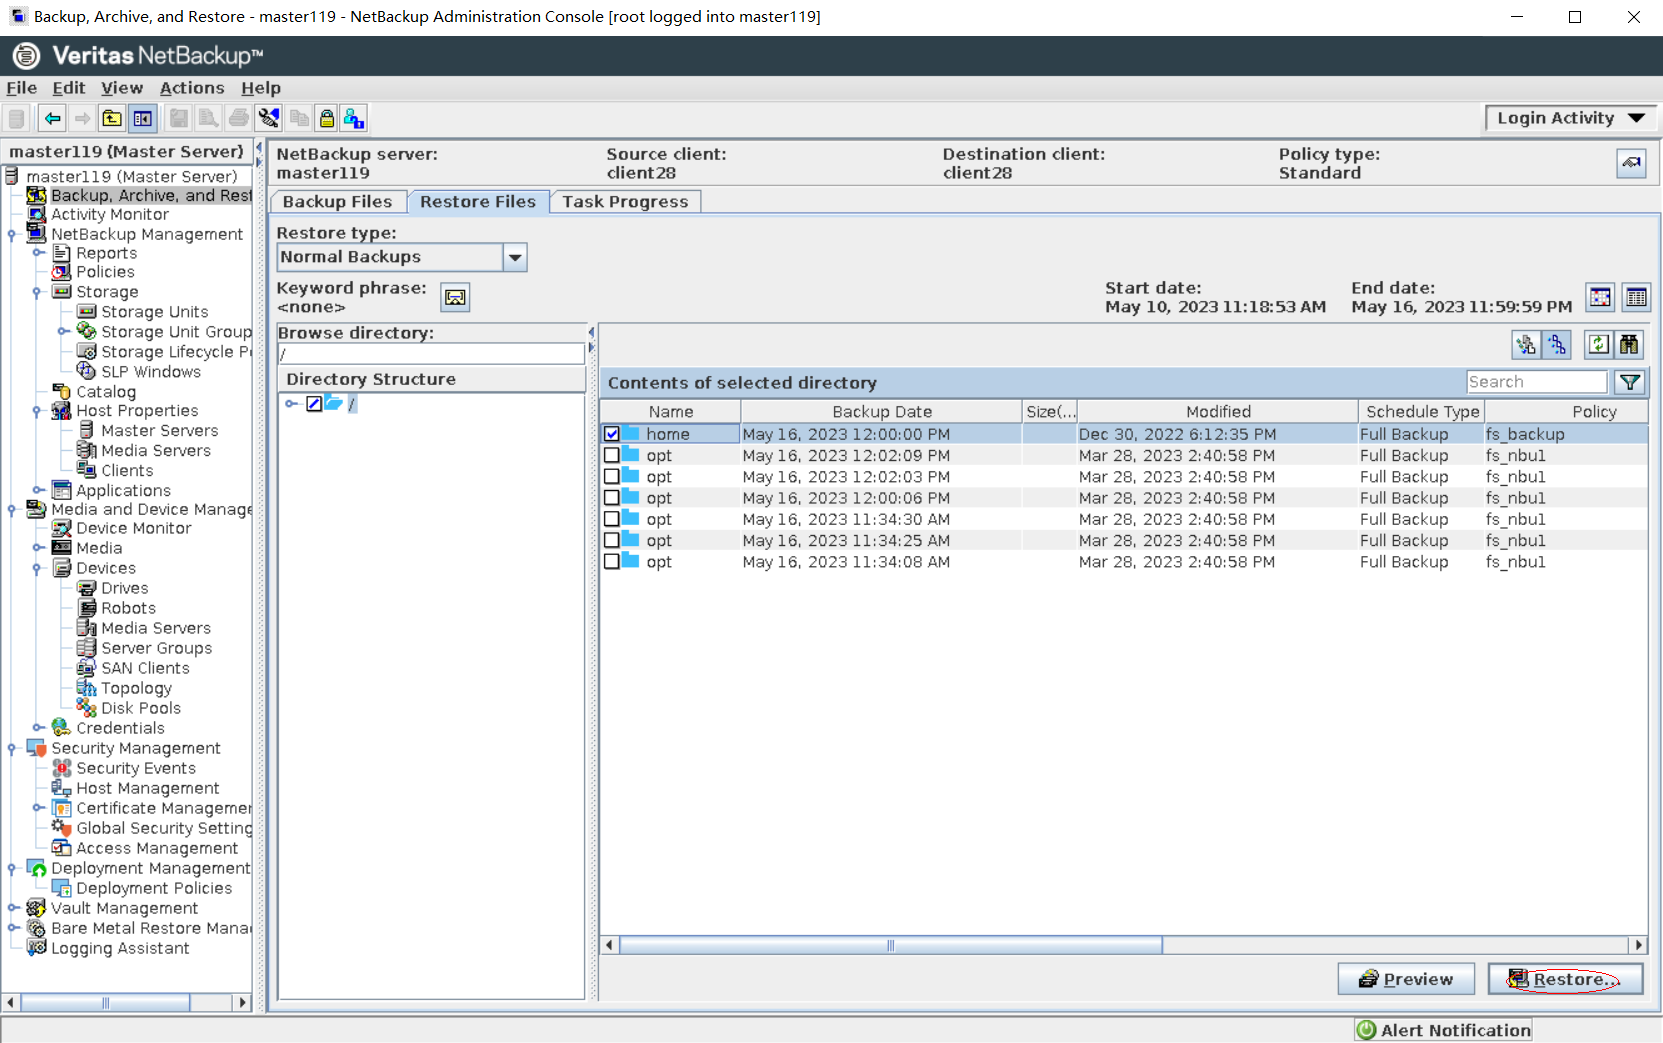
Step 13 On the Restore Marked Files page, set parameters and click Start Restore.
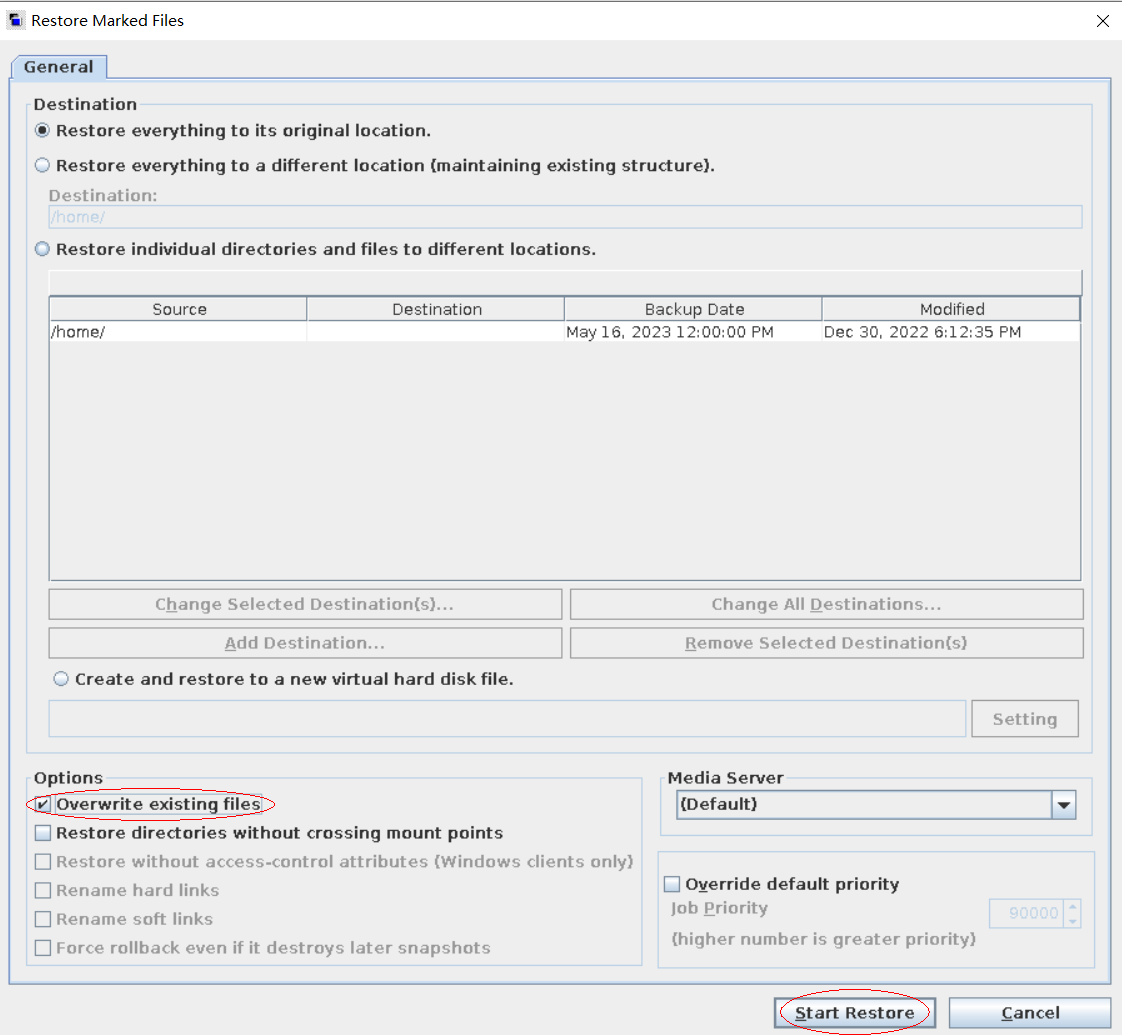
Step 14 After the restoration job is complete, verify that the infected data on the production host is successfully restored.

—-End
4.2.2.4 Restoring the Isolation Zone Using the Metadata Self-backup File
Scenario: A large amount of data needs to be backed up using a complex backup policy with a specific requirement on the restoration time.
Prerequisites
You have configured catalog self-backup in the production zone and Air Gap remote replication of the file system corresponding to the self-backup in advance.
4.2.2.4.1.1 Backing Up Catalog Files for DR
Step 1 Create a file system on the storage in the production zone to store NetBackup catalog files for DR, and create a DataTurbo share.

Step 2 Mount the created file system to the NetBackup server host in the production zone. For details, see 4.1.1.3 Integrating Using OceanStor DataTurbo.

Step 3 Log in to NetBackup in the production zone. Create disk pools and storage units for the catalog DR files by referring to 4.1.1.4.2 Configuring Storage Units. When configuring storage server volumes for disk pools, select the path for storing the clone file system, as shown in the following figure. Other operations are the same as those in 4.1.1.4.2 Configuring Storage Units.
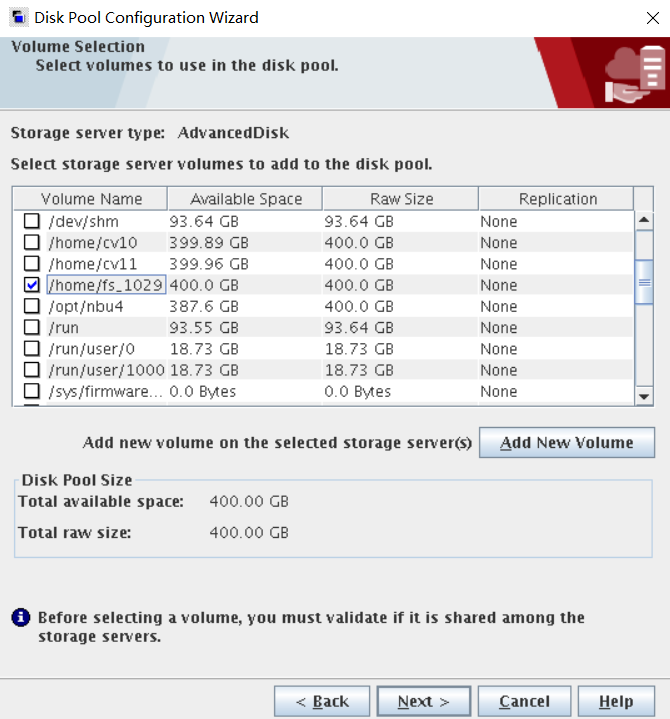
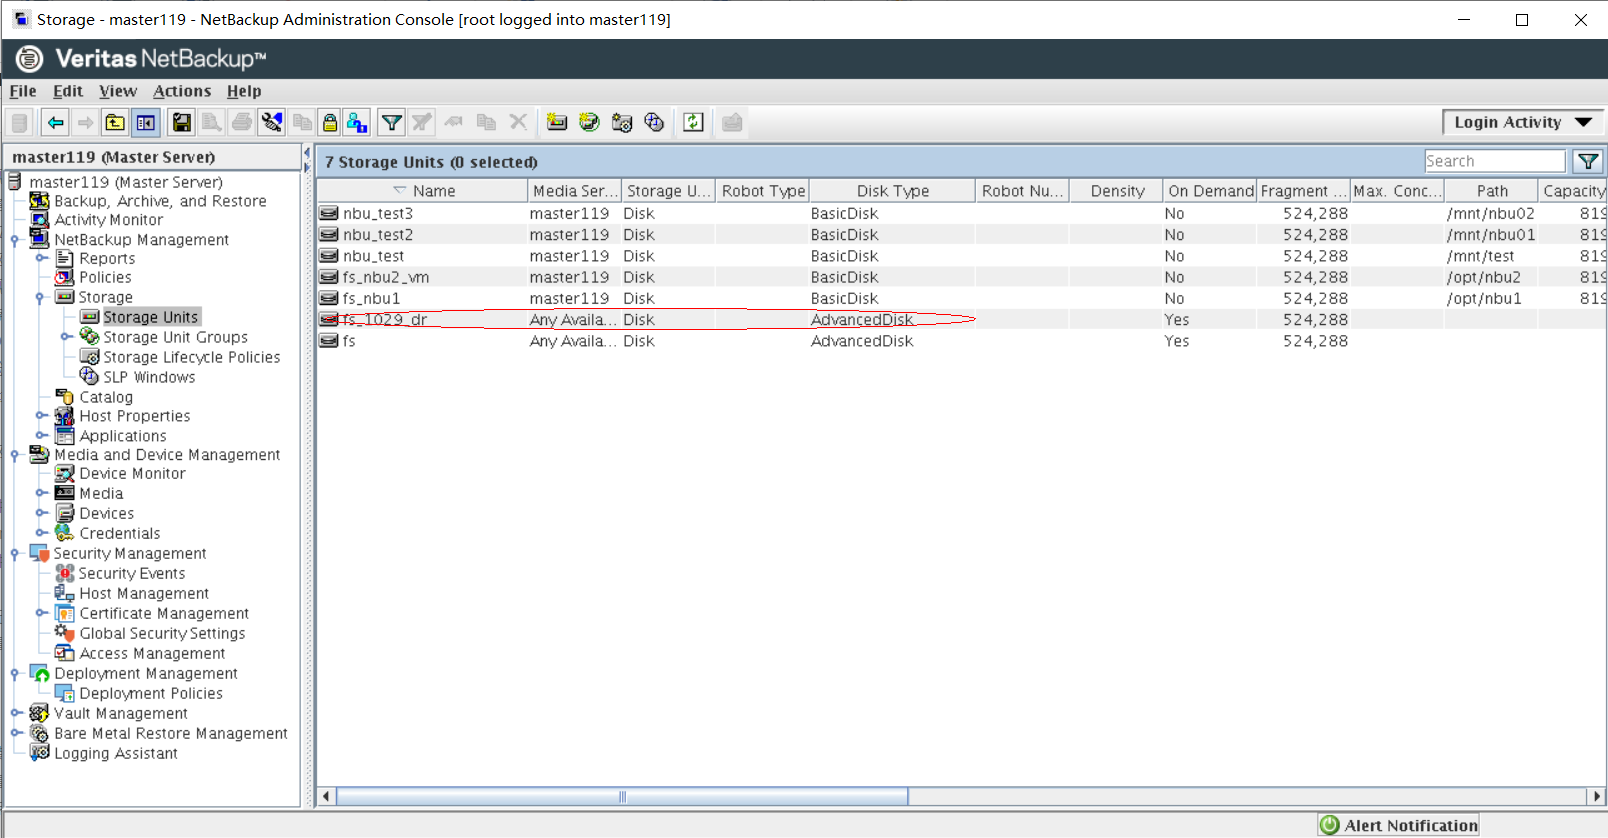
Step 4 Choose Security Management > Global Security Settings, click the Disaster Recovery tab page, and set Passphrase.
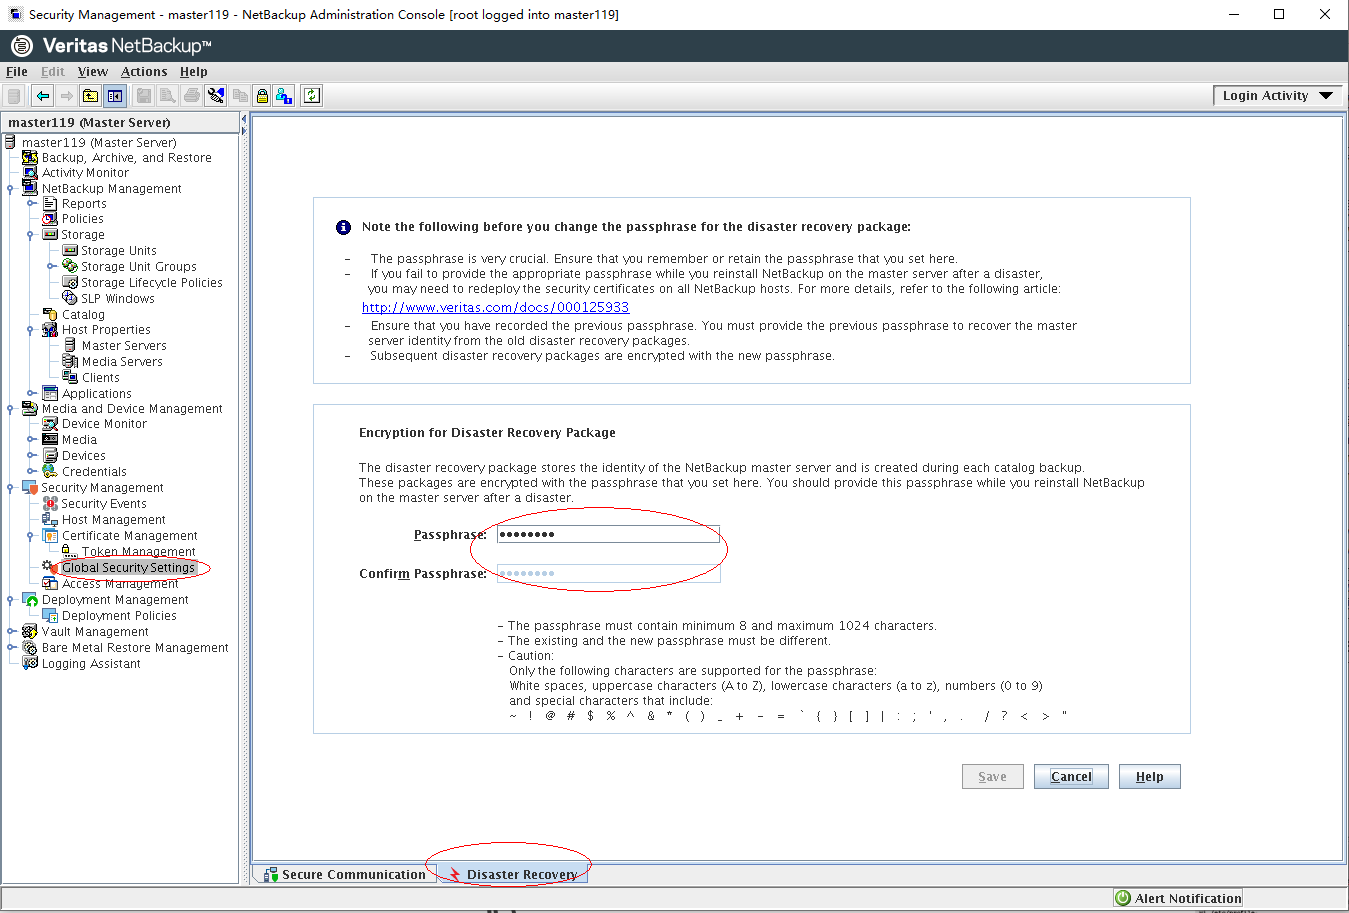
Step 5 On the Policies page, create a backup policy. On the Attributes tab page, set Policy type to NBU-Catalog and Policy storage to the created storage unit.
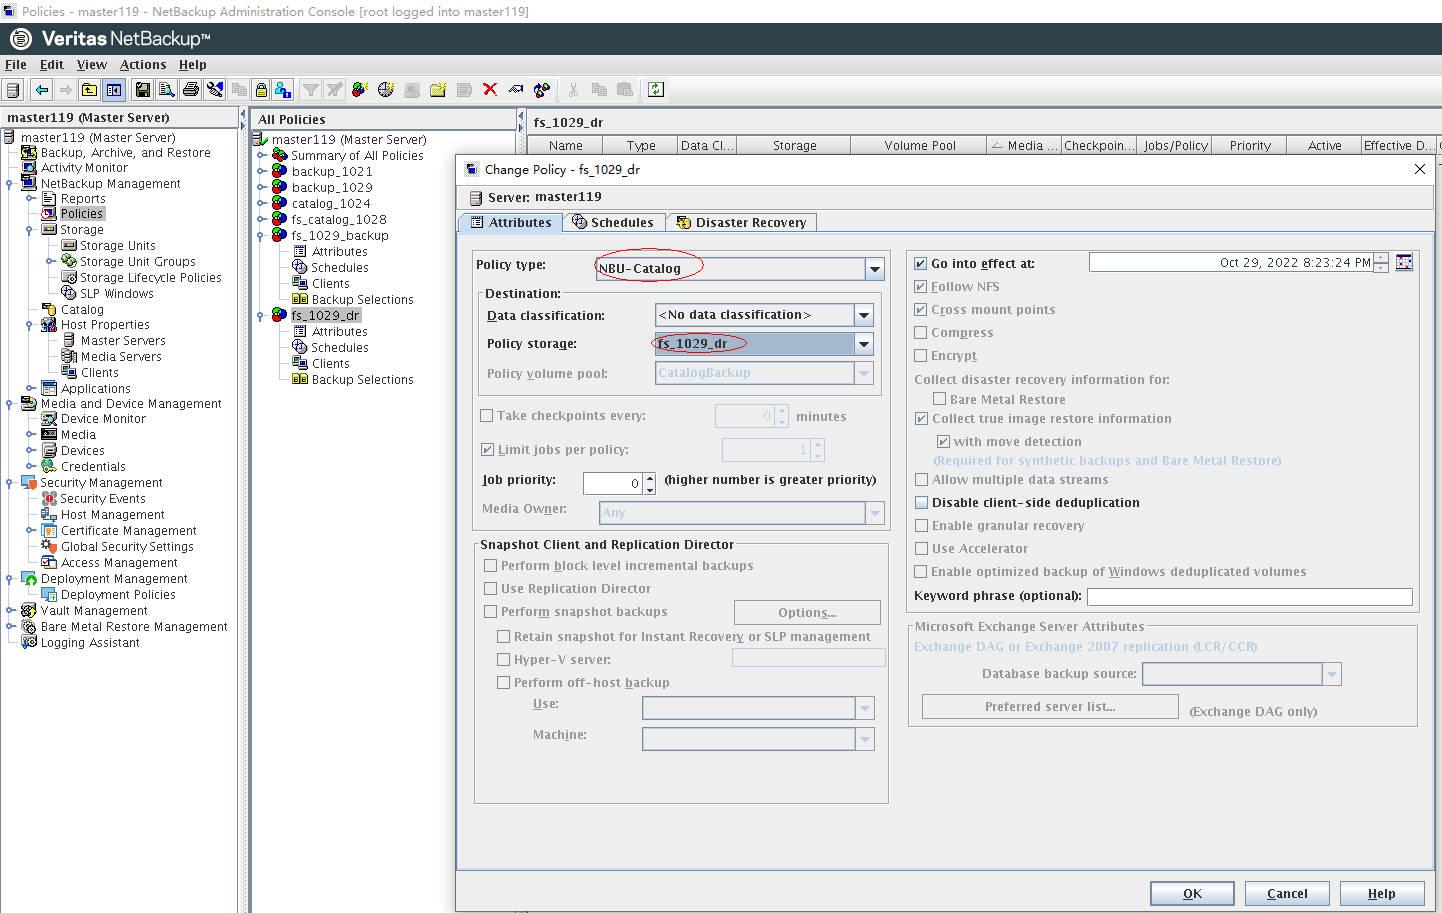
Step 6 Configure a backup policy.

Step 7 On the Disaster Recovery tab page, select a path for saving the DR files and click OK.
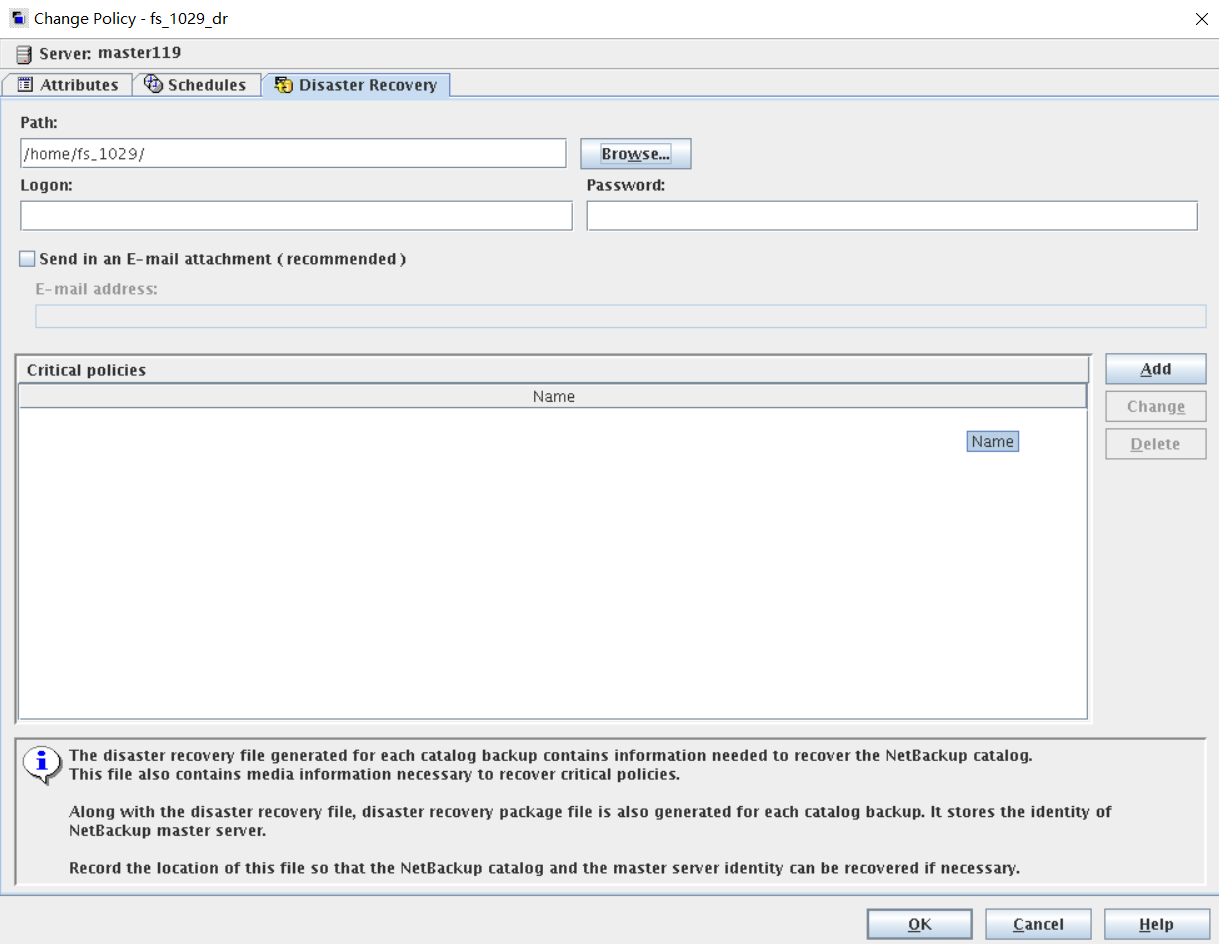
Step 8 On the Schedules page of the created policy, right-click the full backup policy, and choose Manual Backup from the shortcut menu to back up metadata.
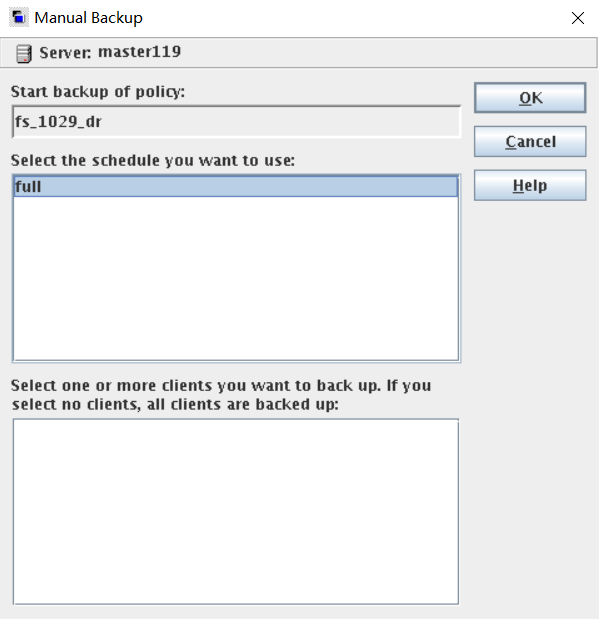

—-End
4.2.2.4.1.2 Performing Remote Replication
This section describes how to remotely replicate the file system that stores catalog DR files from the production zone to the isolation zone. For details, see 4.2.1.2 Configuring Remote Replication and 4.2.1.4 Installing and Configuring OceanStor BCManager eReplication.
4.2.2.4.2 Mounting File Systems Using DataTurbo Shares
Step 1 Log in to DeviceManager of the storage device in the isolation zone. Choose Services > File Service > File Systems, and select the file system that is remotely replicated to the isolation zone. Choose More > Create Clone, and select the latest secure snapshot that contains normal data to create a clone.
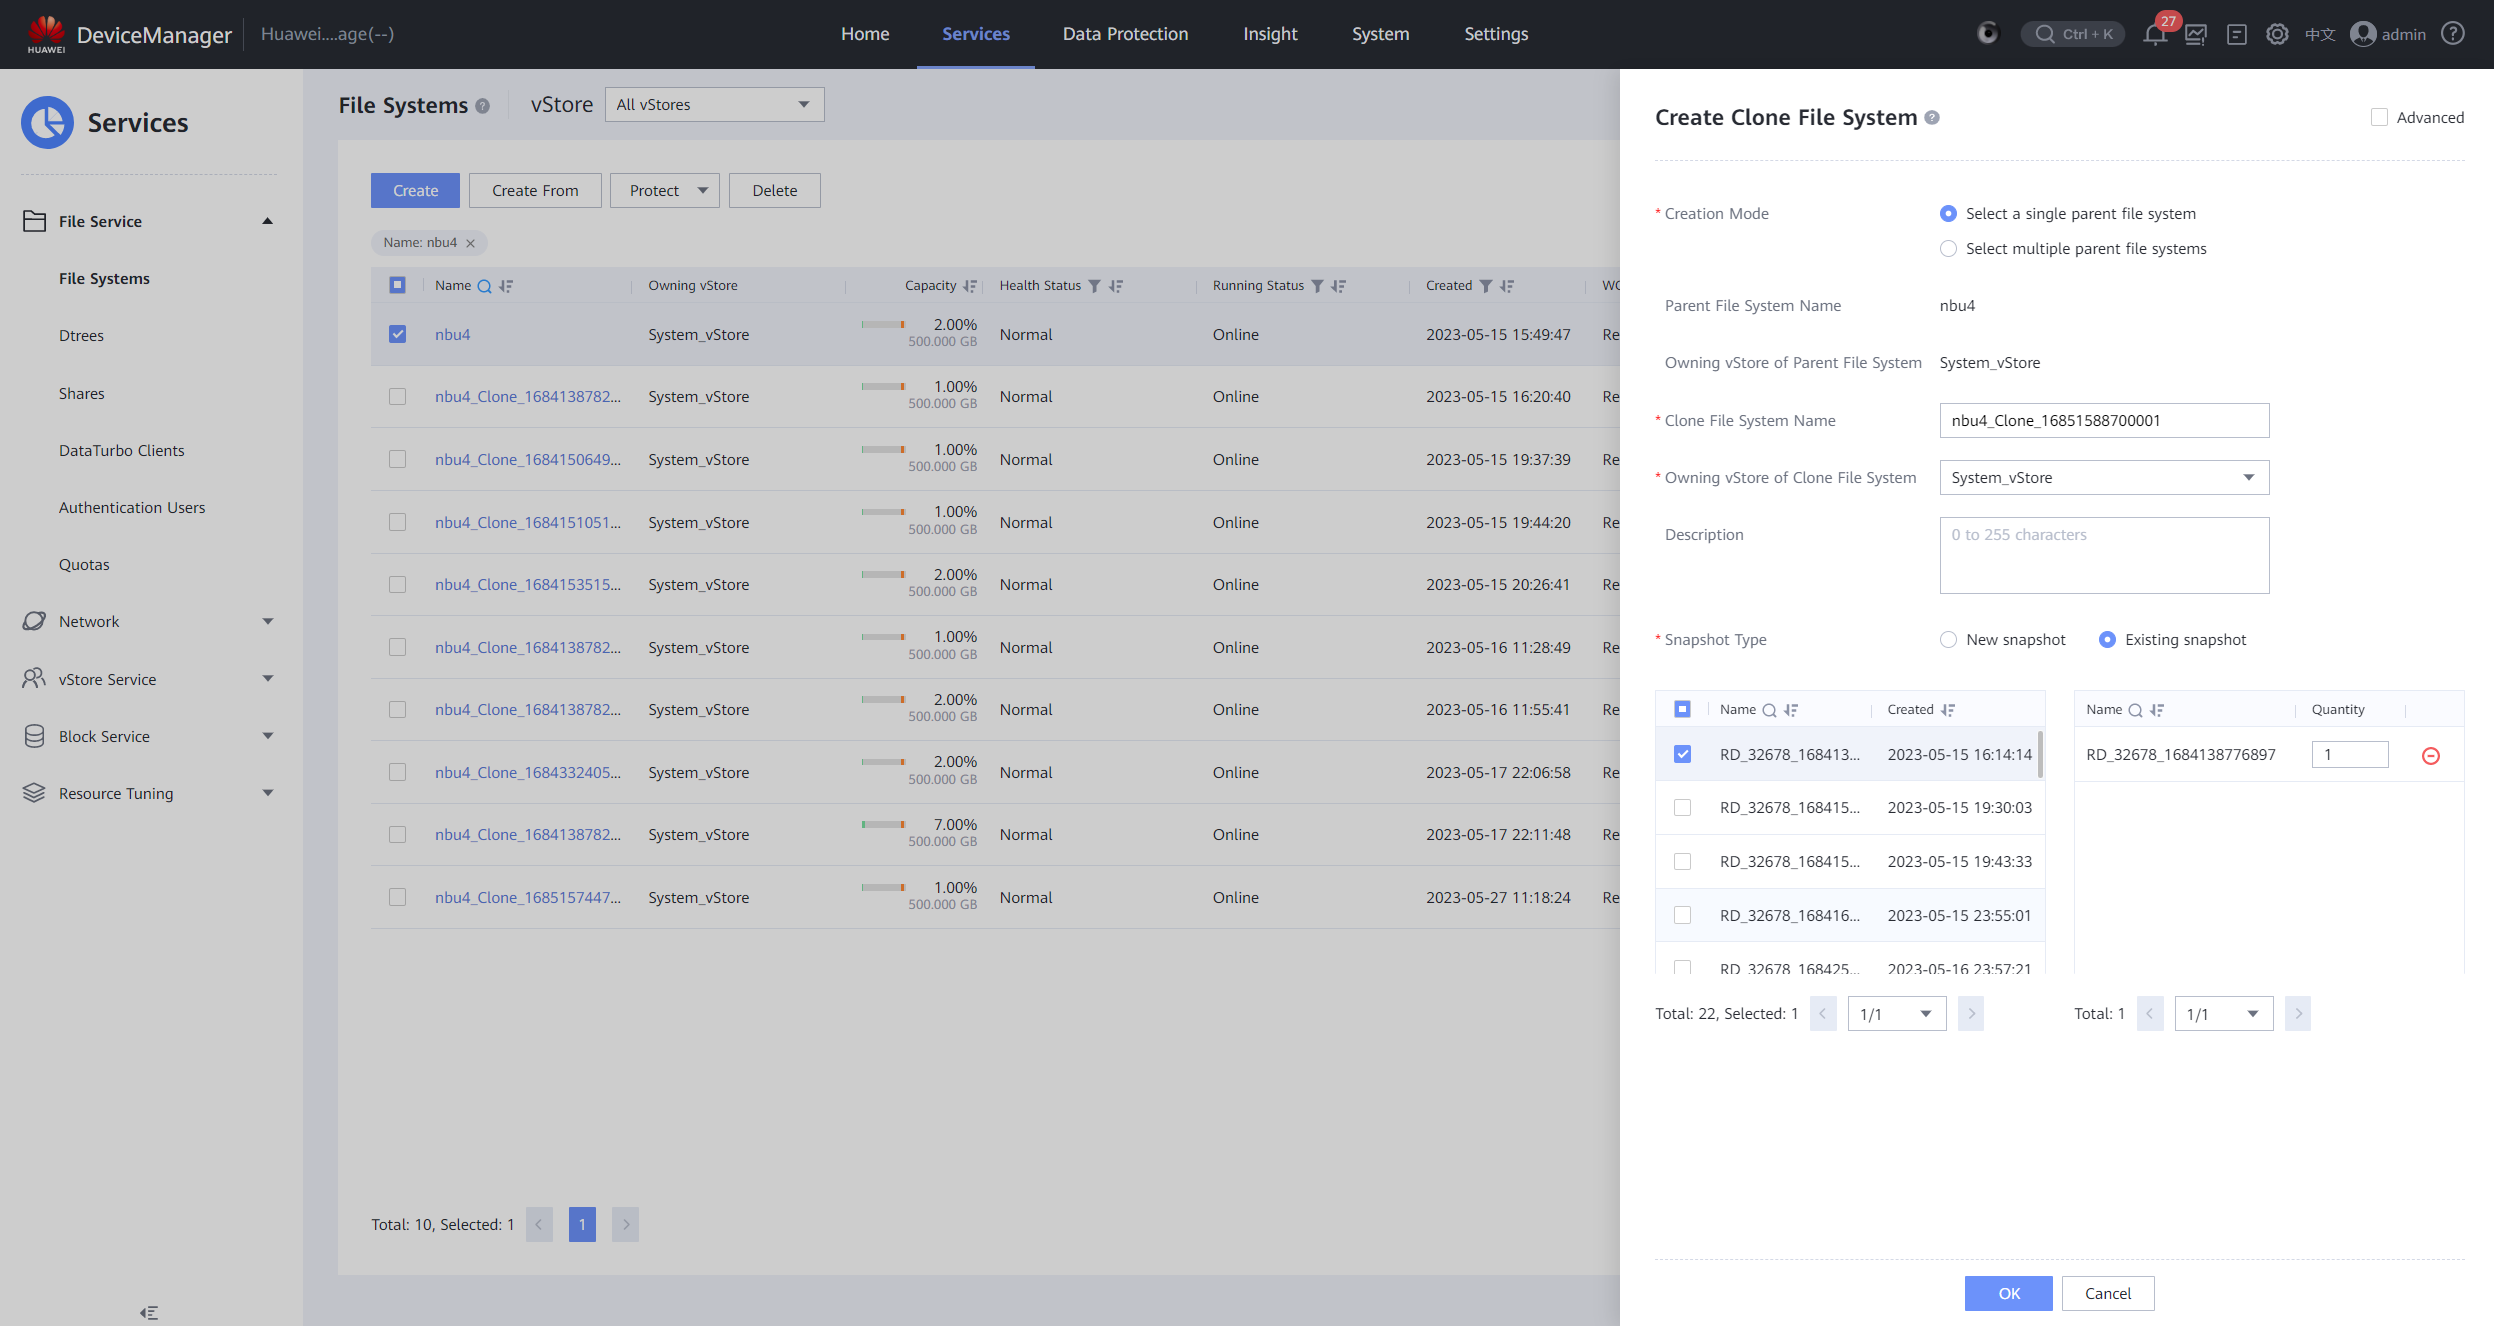
Step 2 After the clone is created, choose Data Protection > Clones, select the clone of the corresponding file system, and choose Split > Start.

Step 3 After the splitting is complete, create a DataTurbo share for the clone file system. For details, see 4.1.1.1.4 Creating a File System and a Share.
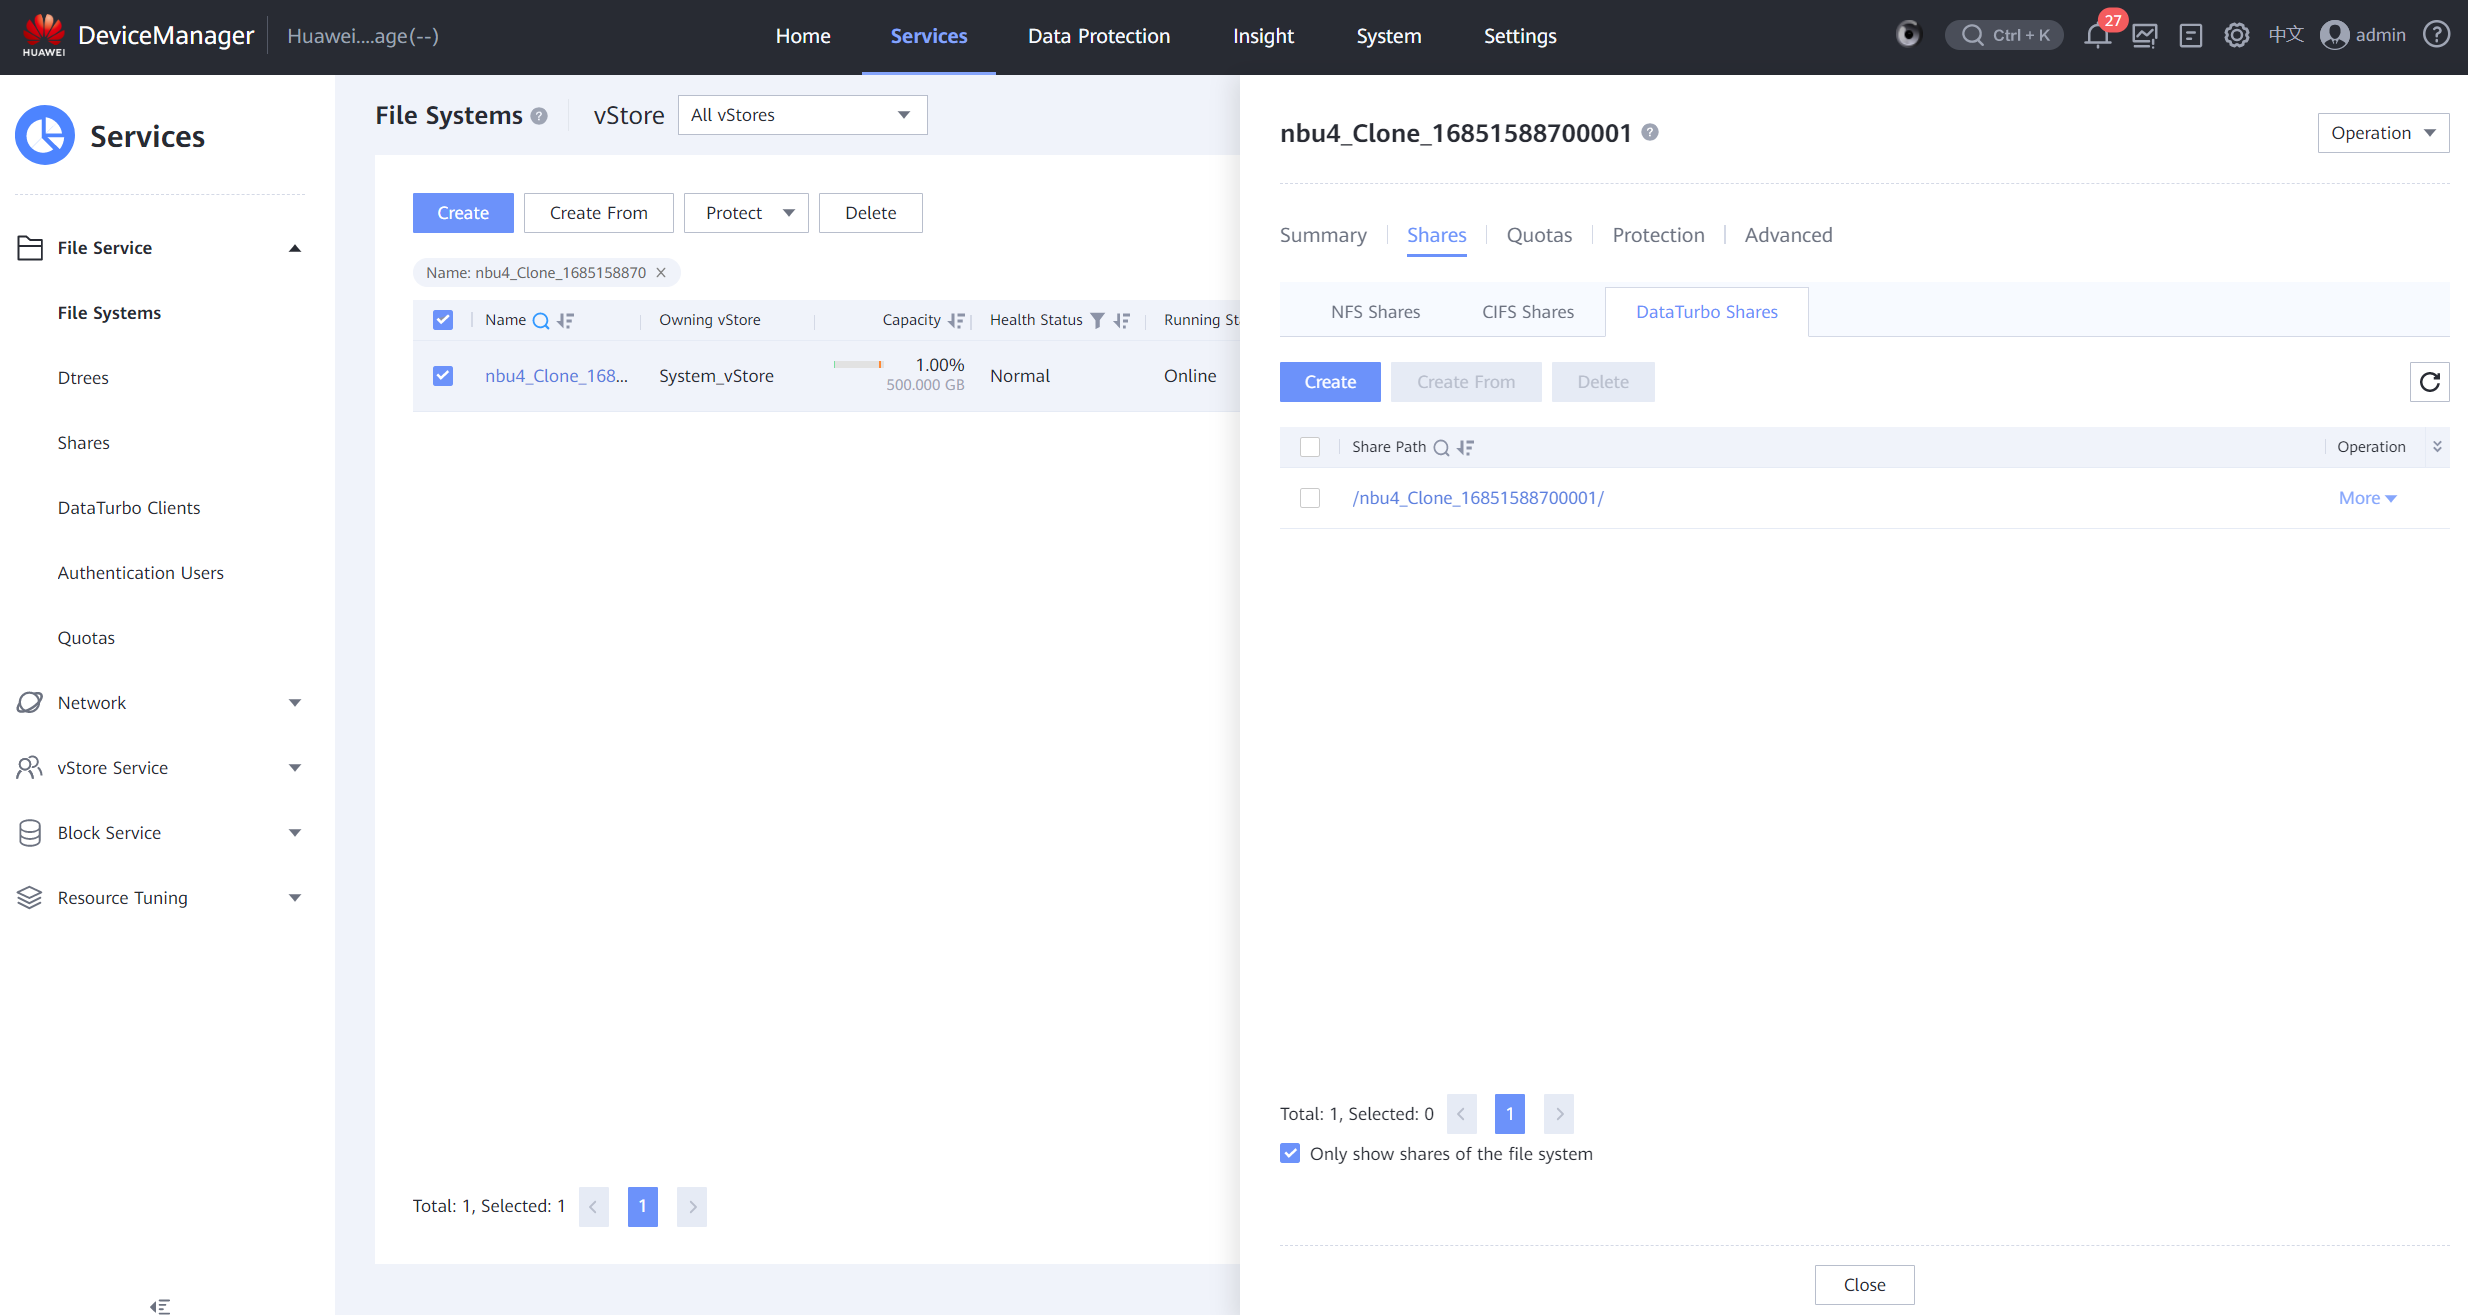
Step 4 Mount the clone file system to the NetBackup server host in the isolation zone. For details, see 4.1.1.3 Integrating Using OceanStor DataTurbo.

—-End
4.2.2.4.3 Importing a Catalog File for DR
Step 1 On the NetBackup Administration Console in the isolation zone, choose Security Management > Global Security Settings, click the Disaster Recovery tab, and set parameters to be the same as those of NetBackup in the production zone.
Step 2 In the left navigation pane, right-click Catalog and choose Recover NetBackup Catalogs from the shortcut menu. The wizard for importing catalog files is displayed.
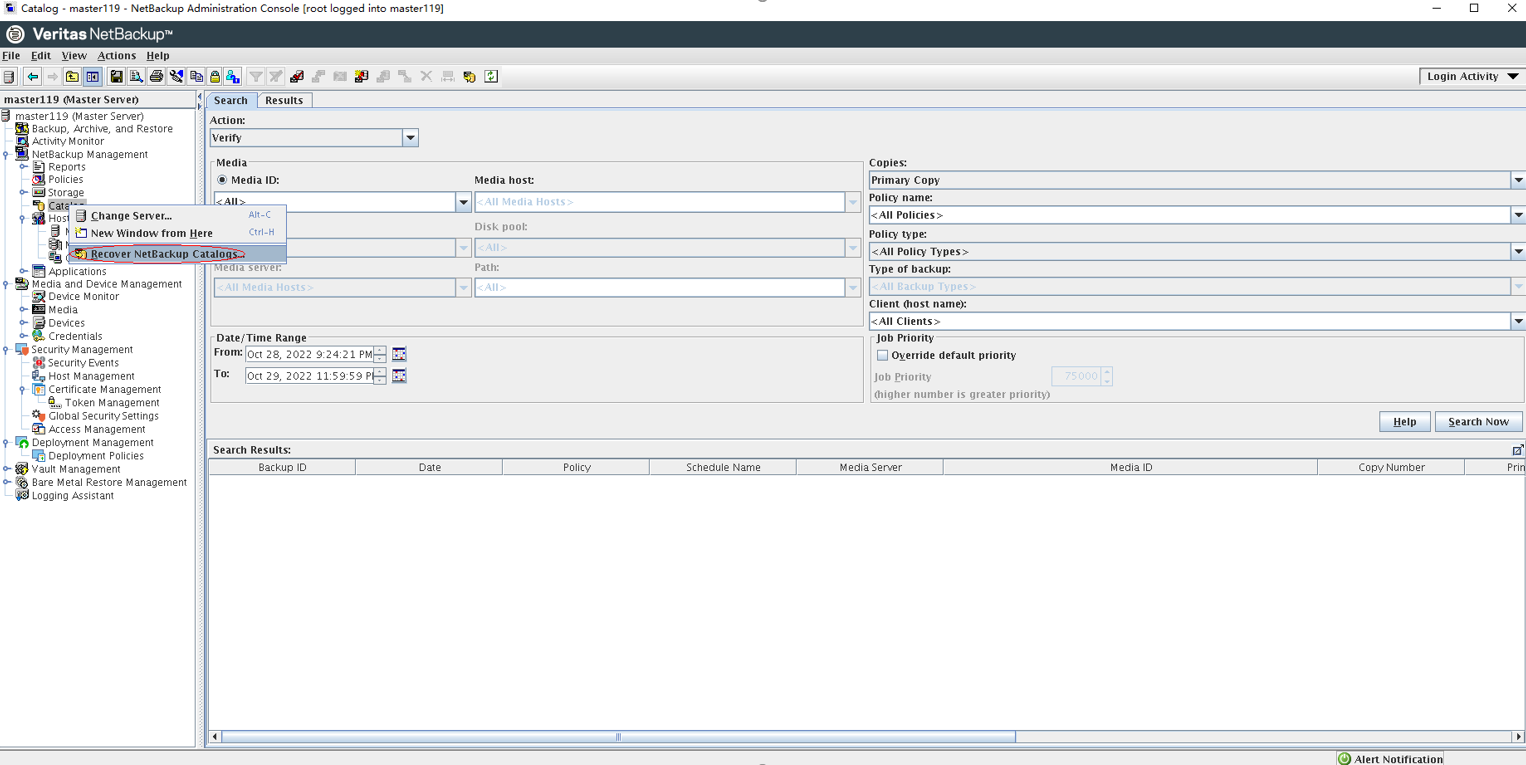
Step 3 Select a FULL file in the catalog data to be imported and import the copies according to the import wizard.
Step 4 Check that the restoration is complete.
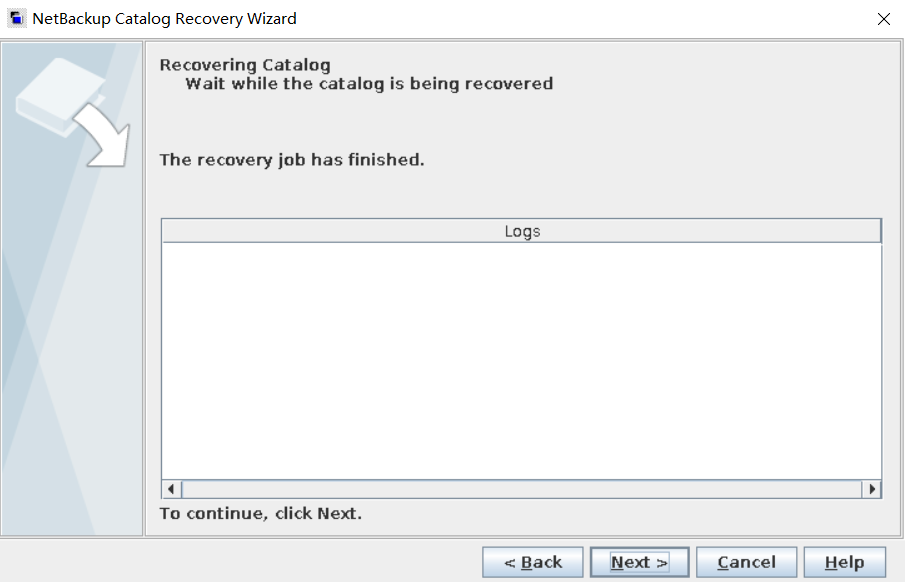
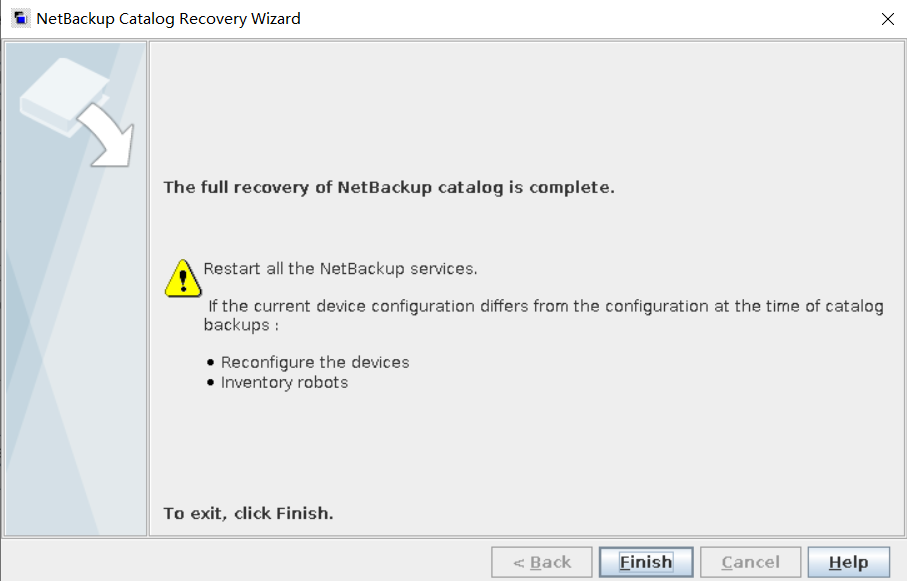
Step 5 Check that the policies on NetBackup in the isolation zone are changed to be the same as those in the production zone.
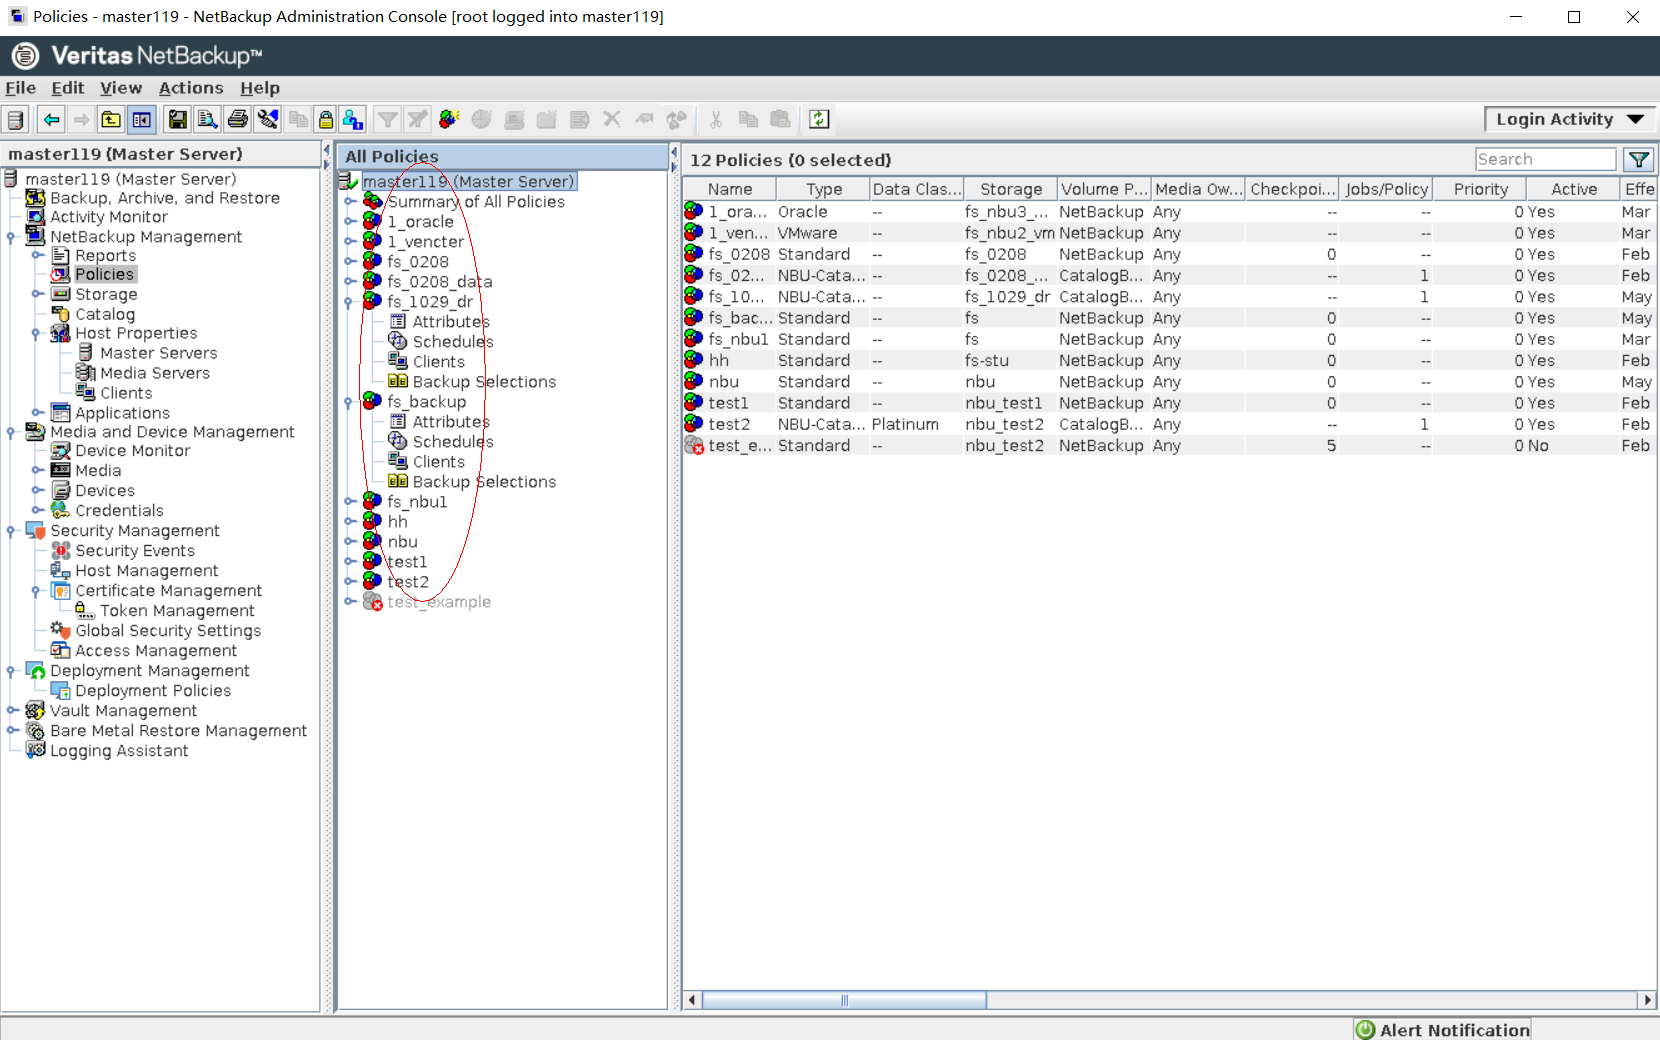
—-End
4.2.2.4.4 Updating the Host Certificate of the NetBackup Master Server in the Isolation Zone
Step 1 Go to the /usr/openv/NetBackup/bin directory on the NetBackup master server host in the isolation zone. Run the shutdown and startup commands to restart the NetBackup services.
Shutdown command: /usr/openv/NetBackup/bin/bp.kill_all
Startup command: /usr/openv/NetBackup/bin/bp.start_all
Step 2 Run the ./nbcertcmd -listAllCertificates command in the /usr/openv/NetBackup/bin directory to query the host ID of the certificate that contains NetBackup_HOSTS.
Step 3 Log in to the NetBackup server in the isolation zone, go to the Security Management > Host Management page, and check the value of NetBackup Host ID of the master server. Compare the host ID with that obtained in step 2. If they are the same, skip this section. Otherwise, perform the next step.
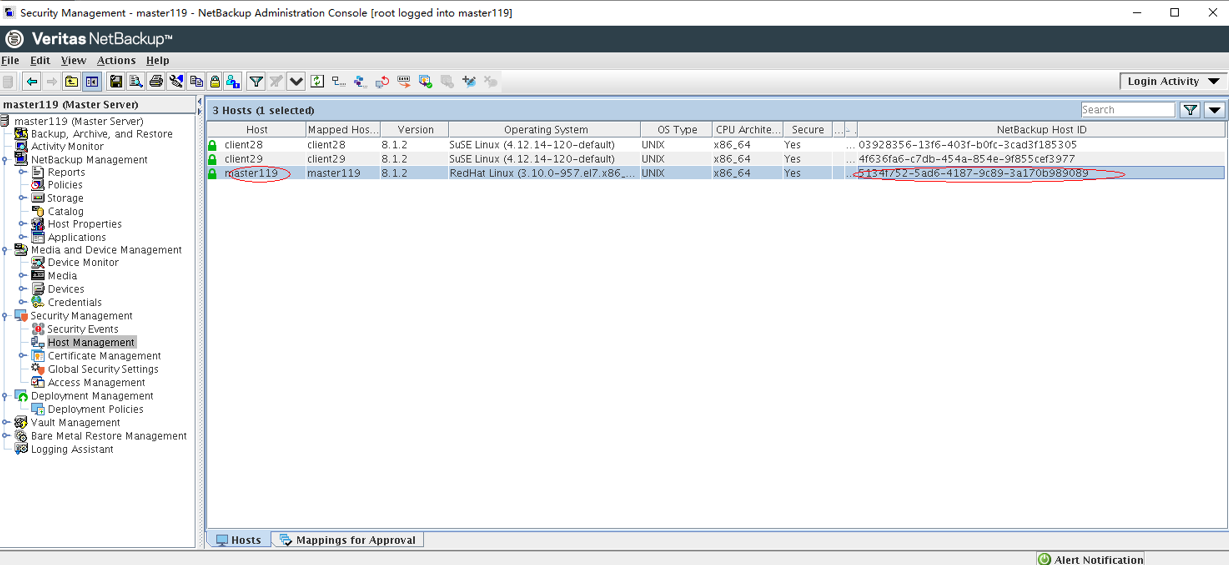
Step 4 Go to the /usr/openv/NetBackup/bin directory of the master server host in the isolation zone and run the ./bpnbat -login -logintype WEB command to log in to the background system of the master server host.
Enter information as prompted:
Set Authentication Broker to the host name of the master server (master119 in this practice).
Retain the default value for Authentication port.
Set Authentication type to unixpwd.
Set Domain to the host name of the master server (master119 in this practice).
Set Login Name and Password to the username and password for logging in to NetBackup.
[root@master119 bin]# ./bpnbat -login -logintype WEB
Authentication Broker: master119
Authentication port [0 is default]:
Authentication type (NIS, NISPLUS, WINDOWS, vx, unixpwd, ldap): unixpwd
Domain: master119
Login Name: root
Password:
Operation completed successfully.
Step 5 Run the ./nbcertcmd -createToken -name token_name -reissue -host master_hostname command to generate a new token. In the command, token_name indicates the user-defined token name, and master_hostname indicates the host name of the NetBackup master server.
In this practice, token_name is token_1029 and master_hostname is master119.
[root@master119 bin]# ./nbcertcmd -createToken -name token_1029 -reissue -host master119
Token HWEBGBCCCRERWEDB created successfully.
Step 6 Run the ./nbcertcmd -deleteCertificate -hostId Host ID command to delete the host ID certificate. The host ID is the ID queried in step 2.
[root@master119 bin]# ./nbcertcmd -deleteCertificate -hostId 372d51ed-e4a3-4101-835c-a1bb634addd8
Deleting security certificates can adversely impact the NetBackup functionality.
Do you want to proceed? (y/n) y
Certificate is successfully removed.
Step 7 Run the ./nbcertcmd -getCertificate -token Token command. Token is the new token generated in step 5.
[root@master119 bin]# ./nbcertcmd -getCertificate -token HWEBGBCCCRERWEDB
Host certificate and certificate revocation list received successfully from server master119.
Step 8 Run the /usr/openv/NetBackup/bin/nbcertcmd -renewcertificate command to generate a new host certificate.
[root@master119 bin]# /usr/openv/NetBackup/bin/nbcertcmd -renewcertificate
Host certificate renewed successfully.
—-End
4.2.2.4.5 Reconnecting the NetBackup Master Server and Client in the Isolation Zone
After a catalog file is imported, the NetBackup master server in the isolation zone is disconnected from NetBackup client. Therefore, you need to reconnect them.
Step 1 Log in to the host where the client is installed, go to the /usr/openv/NetBackup/bin directory, and run the ./nbcertcmd -deleteAllCertificates command to delete all certificates.
client28:/usr/openv/NetBackup/bin # ./nbcertcmd -deleteAllCertificates
Deleting all certificates can adversely impact the NetBackup functionality.
Do you want to proceed? (y/n) y
Certificates and key files are removed successfully.
Step 2 Run the ./nbcertcmd -listCACertDetails command to query CACertDetails. Then, run the ./nbcertcmd -removeCACertificate -fingerPrint Fingerprint command to delete the CACertificate, in which Fingerprint is the SHA1 Fingerprint parameter queried in CACertDetails.
client28:/usr/openv/NetBackup/bin # ./nbcertcmd -listCACertDetails
Subject Name : /CN=nbatd/OU=root@master119/O=vx
Start Date : Oct 29 10:51:38 2022 GMT
Expiry Date : Oct 24 12:06:38 2042 GMT
SHA1 Fingerprint : 39:84:99:8B:2B:42:9E:11:30:49:17:23:14:0F:32:56:34:EE:1B:4C
Operation completed successfully.
client28:/usr/openv/NetBackup/bin # ./nbcertcmd -removeCACertificate -fingerPrint 39:84:99:8B:2B:42:9E:11:30:49:17:23:14:0F:32:56:34:EE:1B:4C
Removing the CA certificate can adversely impact the NetBackup functionality.
Do you want to remove the CA certificate? (y/n) y
The CA certificate removed successfully.
Step 3 Run the ./nbcertcmd -getcacertificate -server master_hostname command to obtain the certificate of the NetBackup master server. In the command, master_hostname indicates the host name of the NetBackup master server.
client28:/usr/openv/NetBackup/bin # ./nbcertcmd -getcacertificate -server master119
Authenticity of root certificate cannot be established.
The SHA1 fingerprint of root certificate is 39:84:99:8B:2B:42:9E:11:30:49:17:23:14:0F:32:56:34:EE:1B:4C.
Are you sure you want to continue using this certificate ? (y/n): y
The validation of root certificate fingerprint is successful.
CA certificate stored successfully from server master119.
Step 4 Log in to the NetBackup master server in the isolation zone and choose Security Management > Host Management. On the page that is displayed, right-click the client host to be reconnected and choose Generate Reissue Token from the shortcut menu.
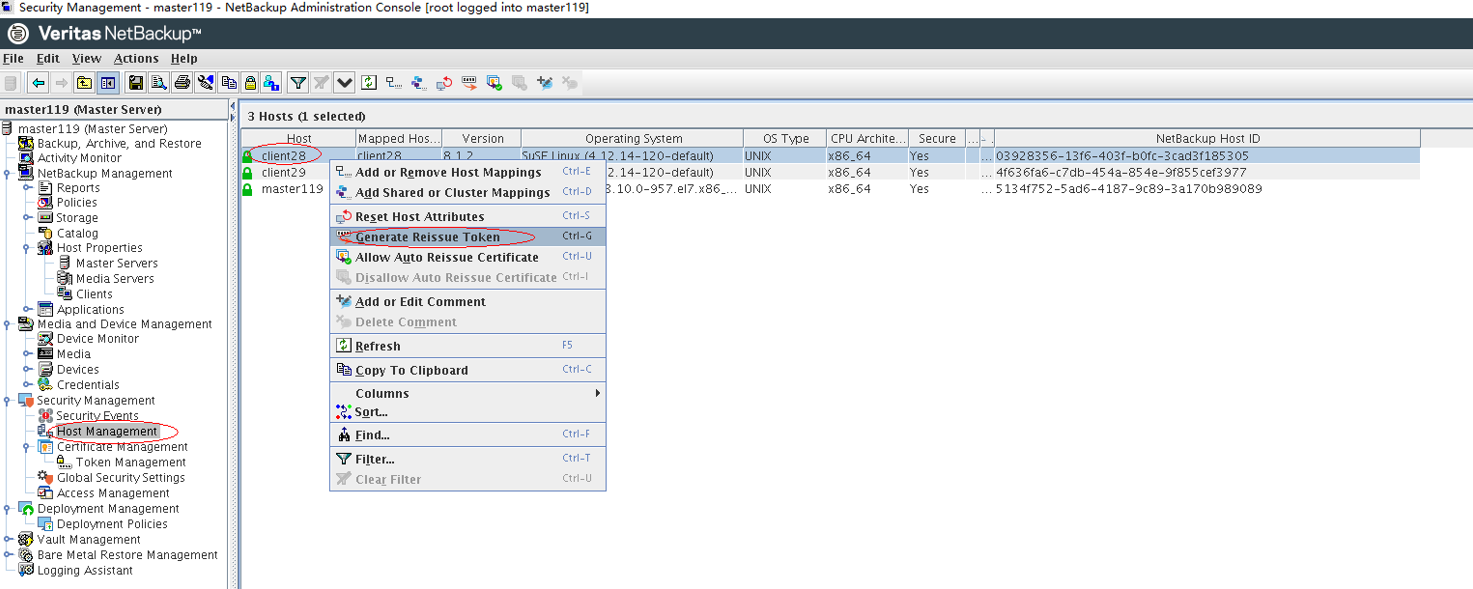
Step 5 In the dialog box that is displayed, set parameters and click Create to generate a token. Then, click Copy to copy the token.
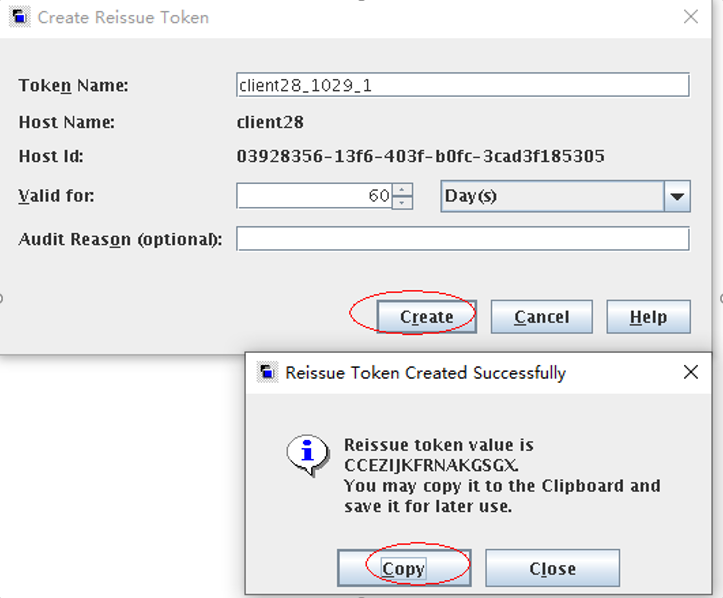
Step 6 Go to the /usr/openv/NetBackup/bin directory on the client host and run the ./nbcertcmd -getcertificate -token Token command, in which Token is the token copied in step 5.
client28:/usr/openv/NetBackup/bin # ./nbcertcmd -getcertificate -token CCEZIJKFRNAKGSGX
Host certificate and certificate revocation list received successfully from server master119.
Step 7 Check that the master server is successfully connected to the client.
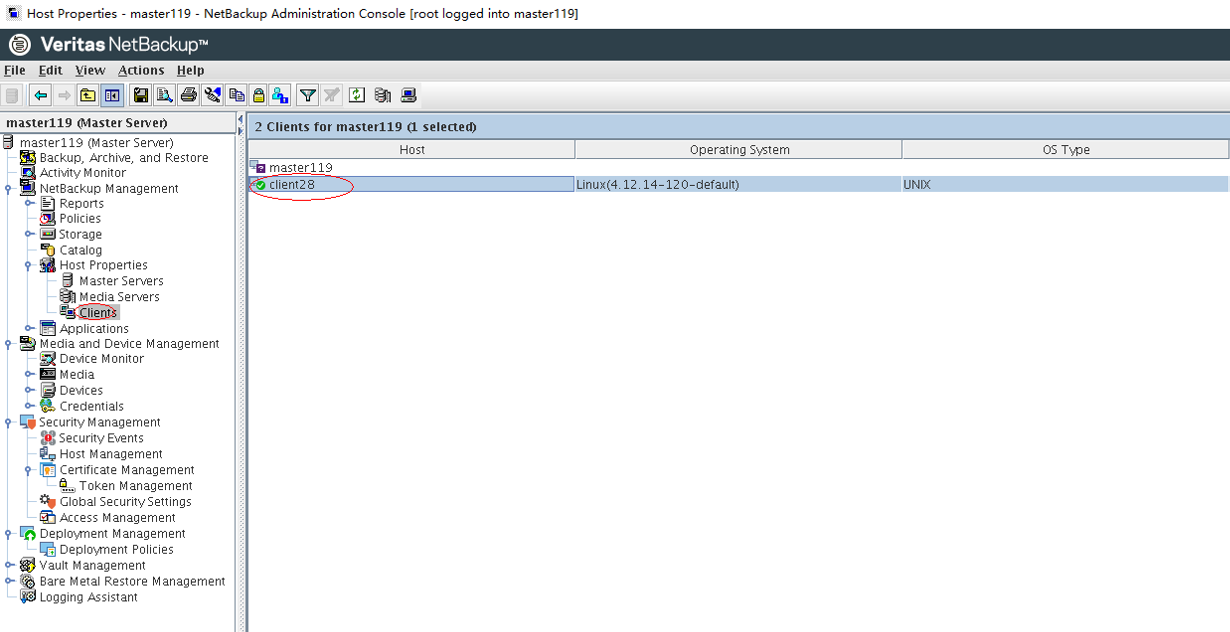
—-End
4.2.2.4.6 Executing the Restoration
Step 1 Before executing the restoration, ensure that the file system that stores backup copies has been remotely replicated to the isolation zone for cloning and splitting and mounted to the NetBackup media server host in the isolation zone. The mount path must be the same as that in the production zone. In this practice, the mount path of the backup copy file system is /opt/nbu4.
For details, see steps 1 to 4 in 4.2.2.3 Restoring the Isolation Zone Using the Image Import.

Step 2 On the Backup, Archive, and Restore page, click .

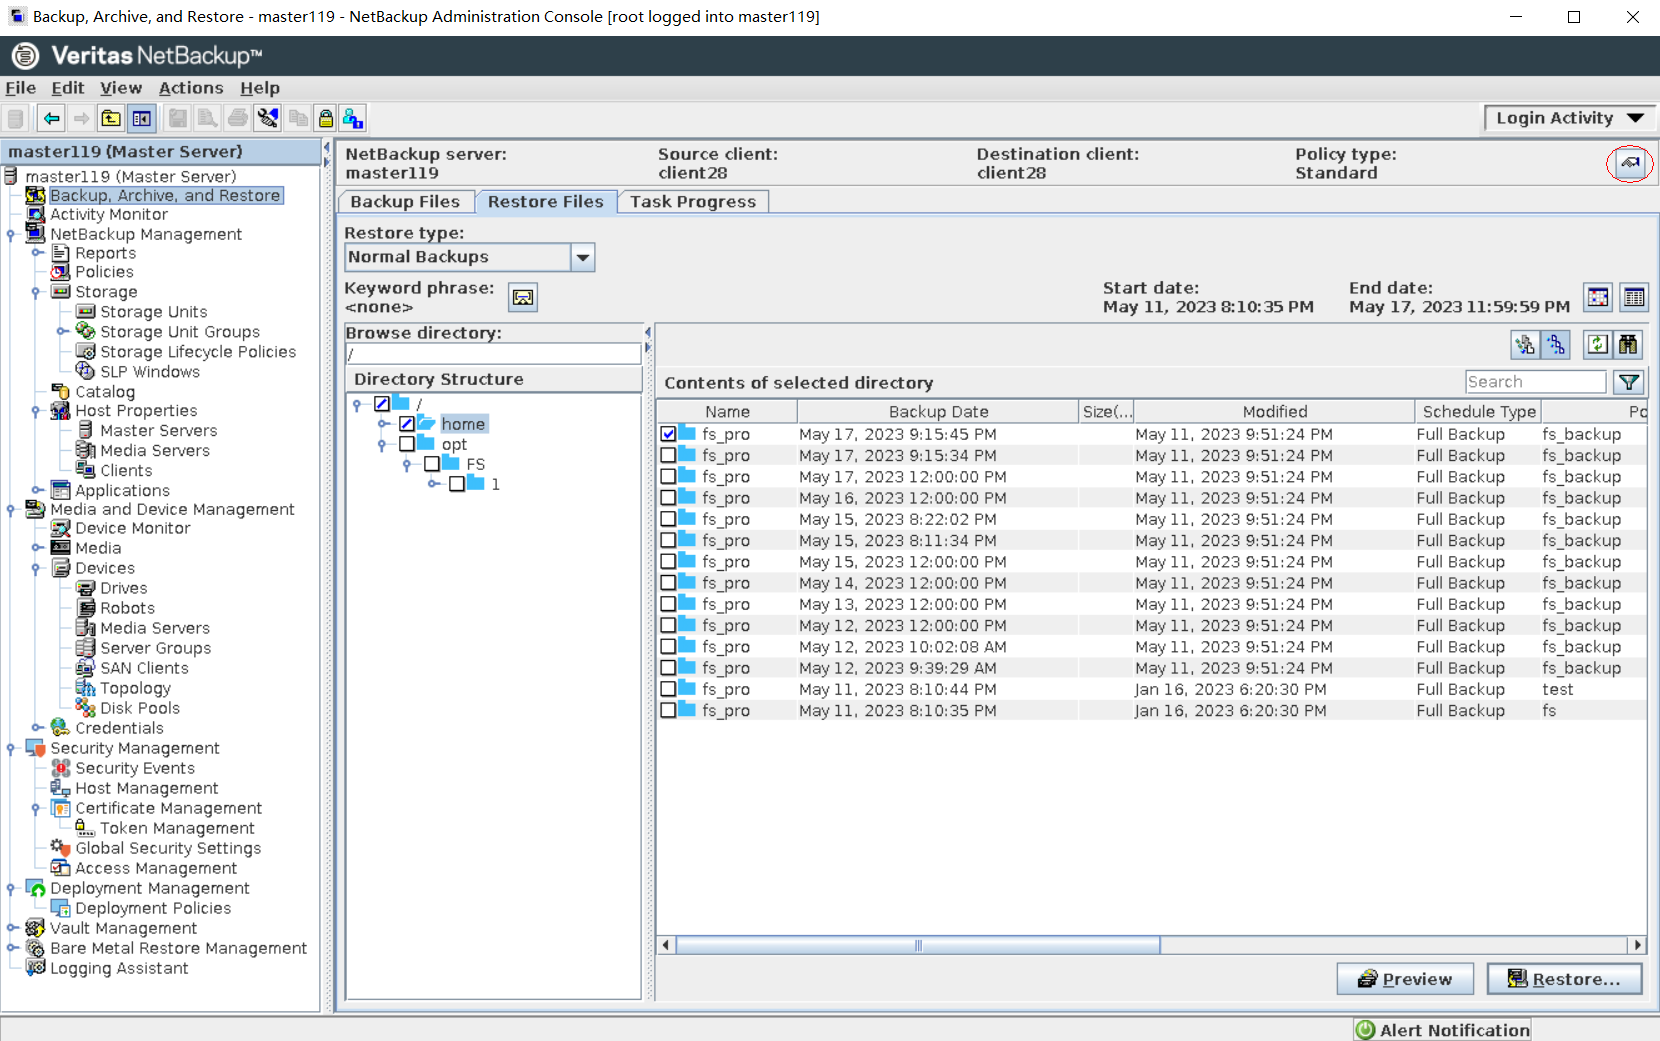
Step 3 Set parameters on the Specify NetBackup Machine and Policy Type page. Set Server to use for backups and restores to the NetBackup master server, Source client for restores and Destination client for restores to the server where the NetBackup client is installed, and Policy type for restores to Standard. Click OK.

Step 4 On the Restore Files page, enter / in Browse directory, select a copy generated at a certain time, and click Restore.
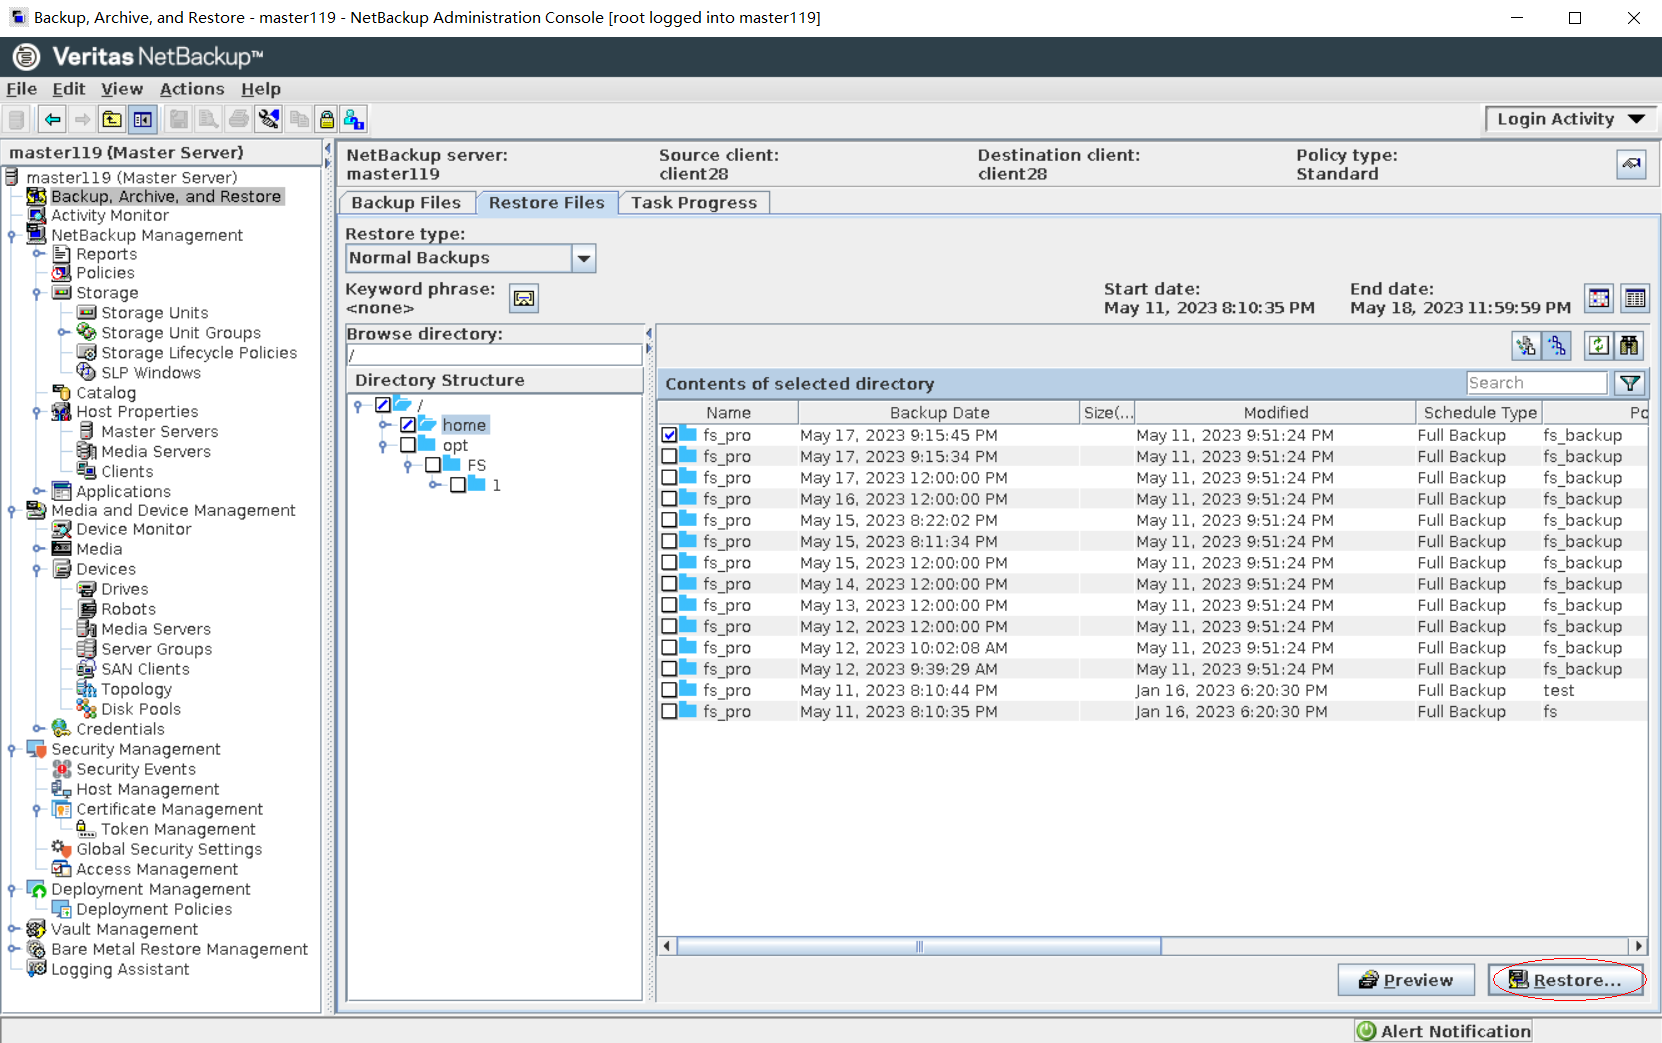
Step 5 On the Restore Marked Files page, set parameters and click Start Restore.
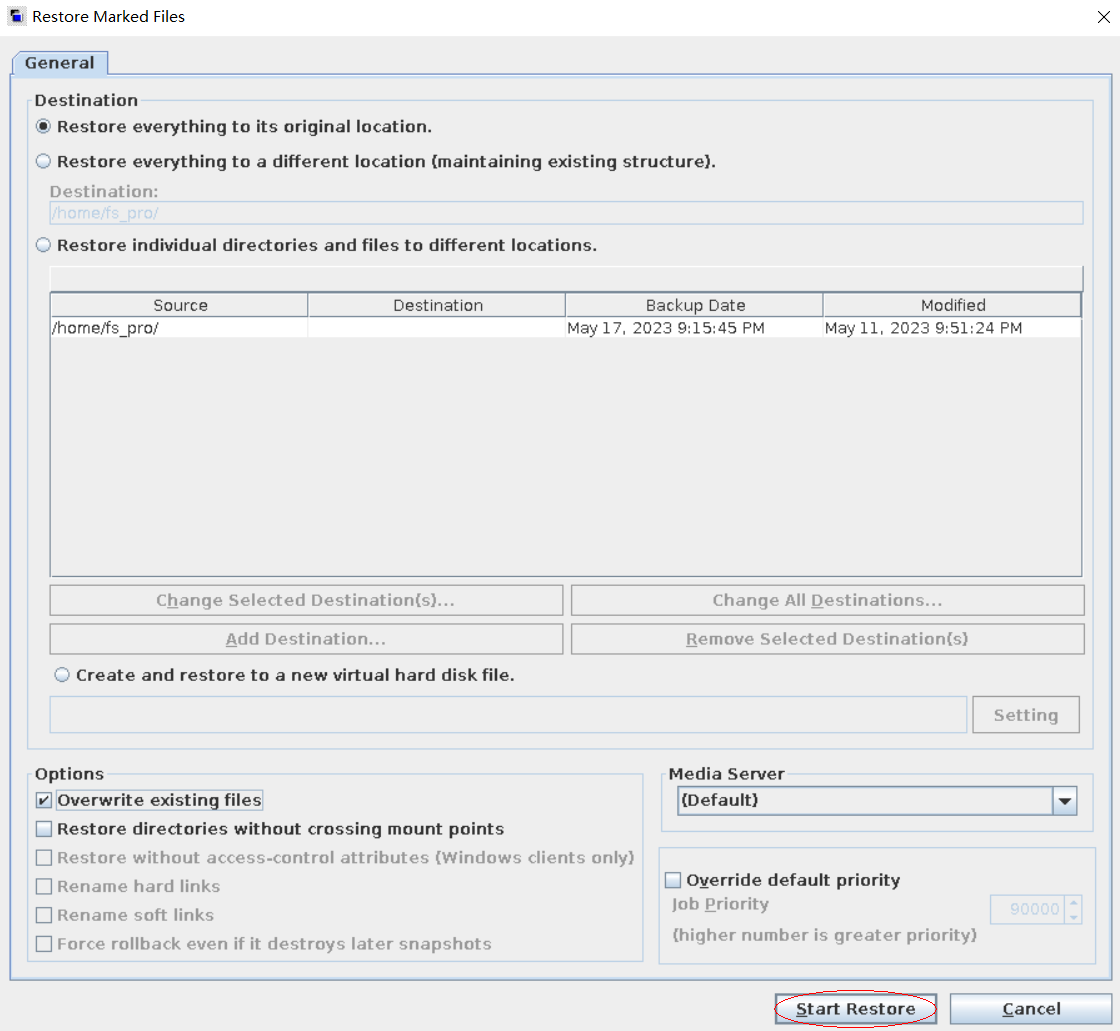
Step 6 After the restoration job is complete, verify that the infected data on the production host is successfully restored.
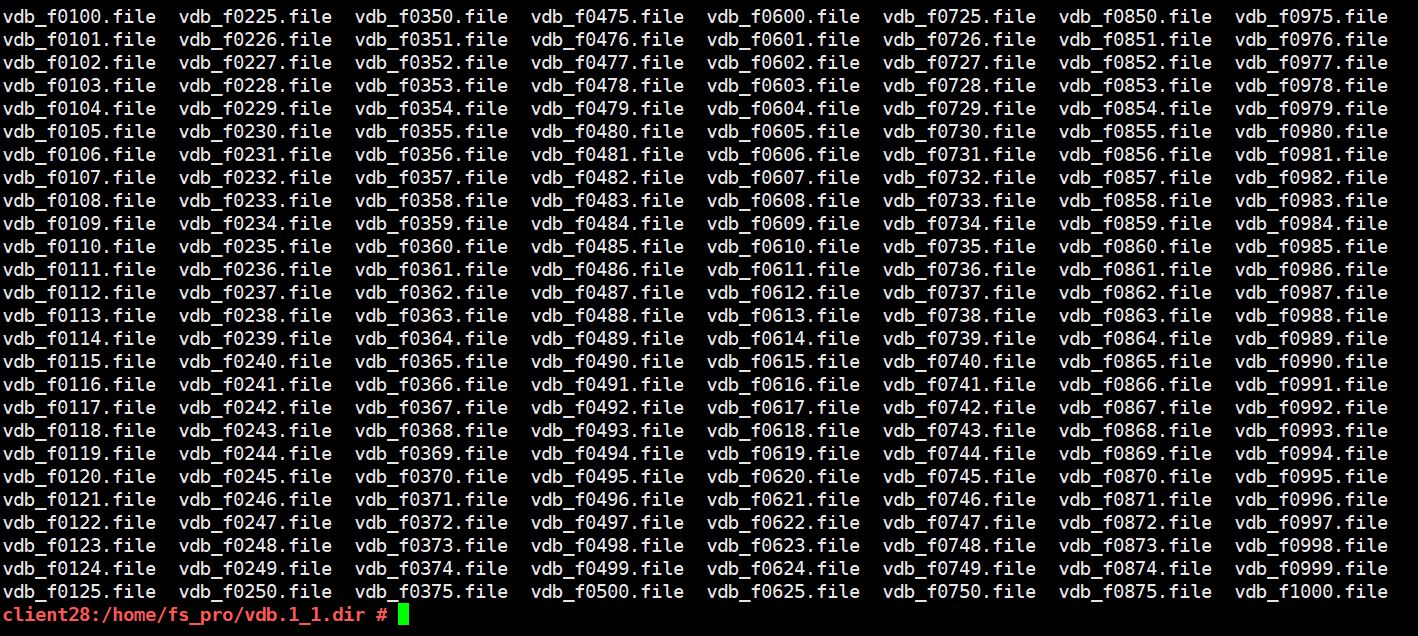
—-End
5. Summary
The NetBackup+OceanProtect X8000 ransomware protection storage solution uses the enterprise mission-critical service system model and adopts a secure architecture consisting of production and isolation zones. The WORM, secure snapshot, detection and analysis of the security appliance, and Air Gap features can protect data. If service systems are encrypted by ransomware, management networks are intruded, or the production zone is attacked by ransomware, service data can be rapidly restored by using secure snapshots in the isolation zone and Air Gap, ensuring service continuity.
The NetBackup+OceanProtect X8000 ransomware protection storage solution can implement multi-level protection for the production zone and isolation zone based on the actual test configuration of this best practice. The suggestions and guidance in this document provide reference for IT system solutions of users and improve the deployment and O&M efficiency using the NetBackup+OceanProtect X8000 ransomware protection storage solution.