Huawei OceanStor Dorado All-Flash Storage and Proxmox VE
Interoperability Test Report

Axians Global
All Rights Reserved
Executive Summary
Axians Global (“Axians”) assessed the interoperability of Proxmox VE with Huawei OceanStor Dorado All-Flash Storage. The goal of the assessment is to validate that Proxmox VE is interoperable with Huawei OceanStor Dorado All-Flash Storage.
During the assessment, all interoperability test cases were successfully completed. Proxmox VE can use Huawei OceanStor Dorado All-Flash storage as external storage for creating LVM Storage.
Axians has determined that Proxmox VE operating system will function with Huawei OceanStor Dorado All-Flash Storage for the following scenarios:
Test Scenario | Storage Involved | Protocol Tested | Result | |
1.Basic Connectivity Test | Proxmox VE 9 | Huawei OceanStor Dorado All-Flash Storage | FC and iSCSI | Passed |
2.Reliability Test | Passed | |||
3.Performance and Stability Test | Passed |
Tips:All test results are also applicable to Huawei OceanStor Capacity Flash Storage and Huawei OceanStor Hybrid Flash Storage.
1.Environment Configuration
1.1 Network Diagram
Figure 1.1 Huawei OceanStor Dorado All-Flash Storage and Proxmox VE Compatibility Test network diagram
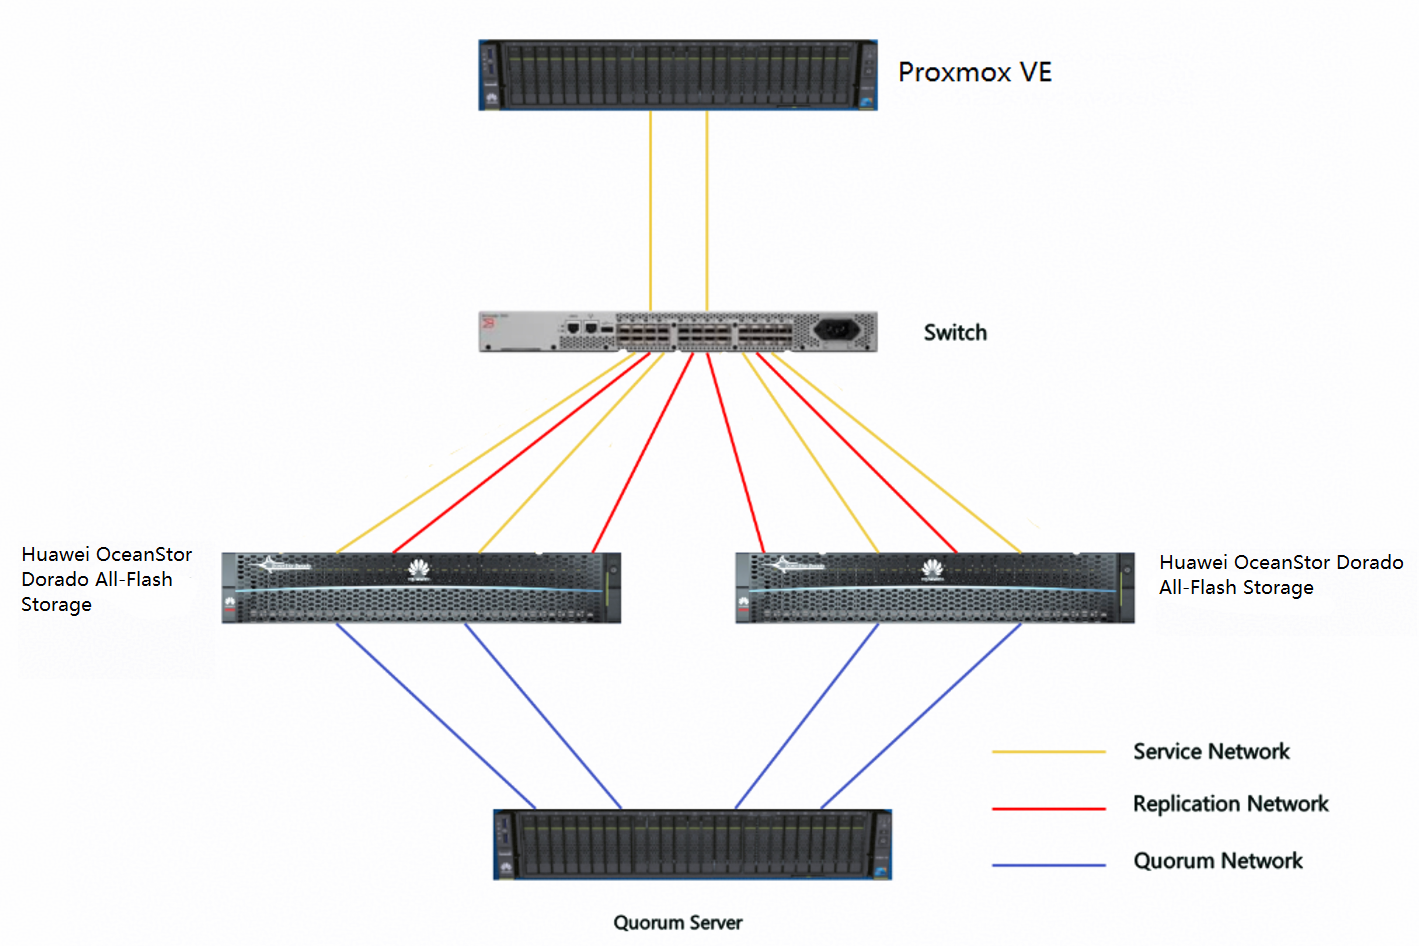
Networking description:
- Both HBA ports of the host are connected to the switch.
- Each controller of storage is connected to 2 ports to the switch, 1 of which are business ports and the other is a replication link port.
- Two host ports on the switch is zoned with all storage business ports.
- The replication link ports of the two storage are zoned correspondingly (2 zones, each containing one replication link port for each of the two storage ports).
- Each controller has a network port configured with an IP to connect to the quorum server network.
1.2 Hardware and Software Configuration
1.2.1 Hardware Configuration
Table 1-1 Hardware Configuration table
Hardware Name | Configuration | Usage | Quantity |
Storage1 |
| Storage Array | 2 |
Proxmox VE Server |
| Host Server | 1 |
Fibre Channel Switch |
| Service Network Switch | 1 |
Ethernet switch |
| Service Network Switch | 1 |
1.2.2 Software and Tools
Table 1-2 Software and Tool table
Software Name | Usage | Version | Quantity |
OceanStor Dorado Software | Deploy and manage Huawei OceanStor Dorado 3000 V6 storage. | V6 | 2 |
Proxmox VE | Proxmox VE Virtualization Platform | 9 | 1 |
Vdbench | IO Test Tool | 50407 | 1 |
Red Hat Enterprise Linux | Virtual Machine | 7.4 | 1 |
Tips:The test results of the storage version V6 are also applicable to the version V700.
2.Test Preparation
2.1 Huawei OceanStor Dorado All-Flash Storage Pre-configuration
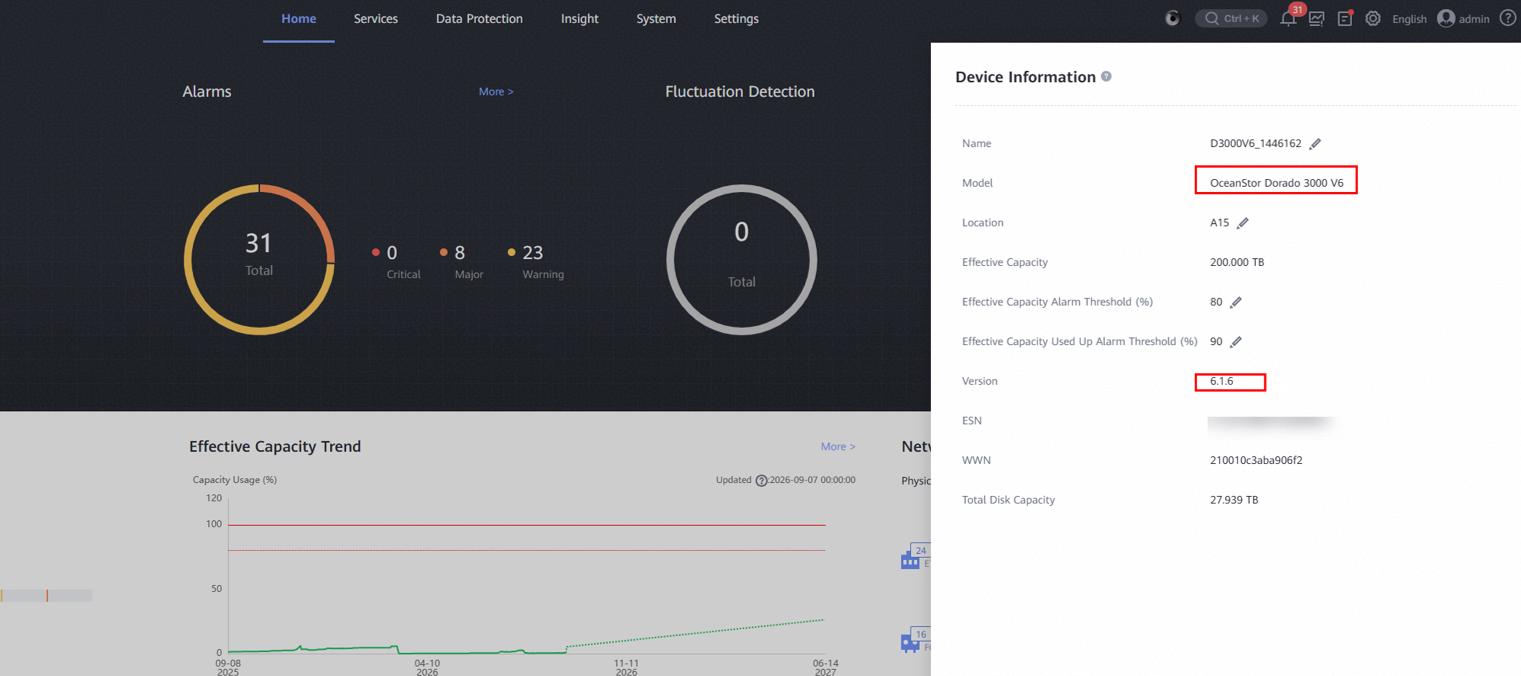
2.1.1 Check the basic information of Dorados
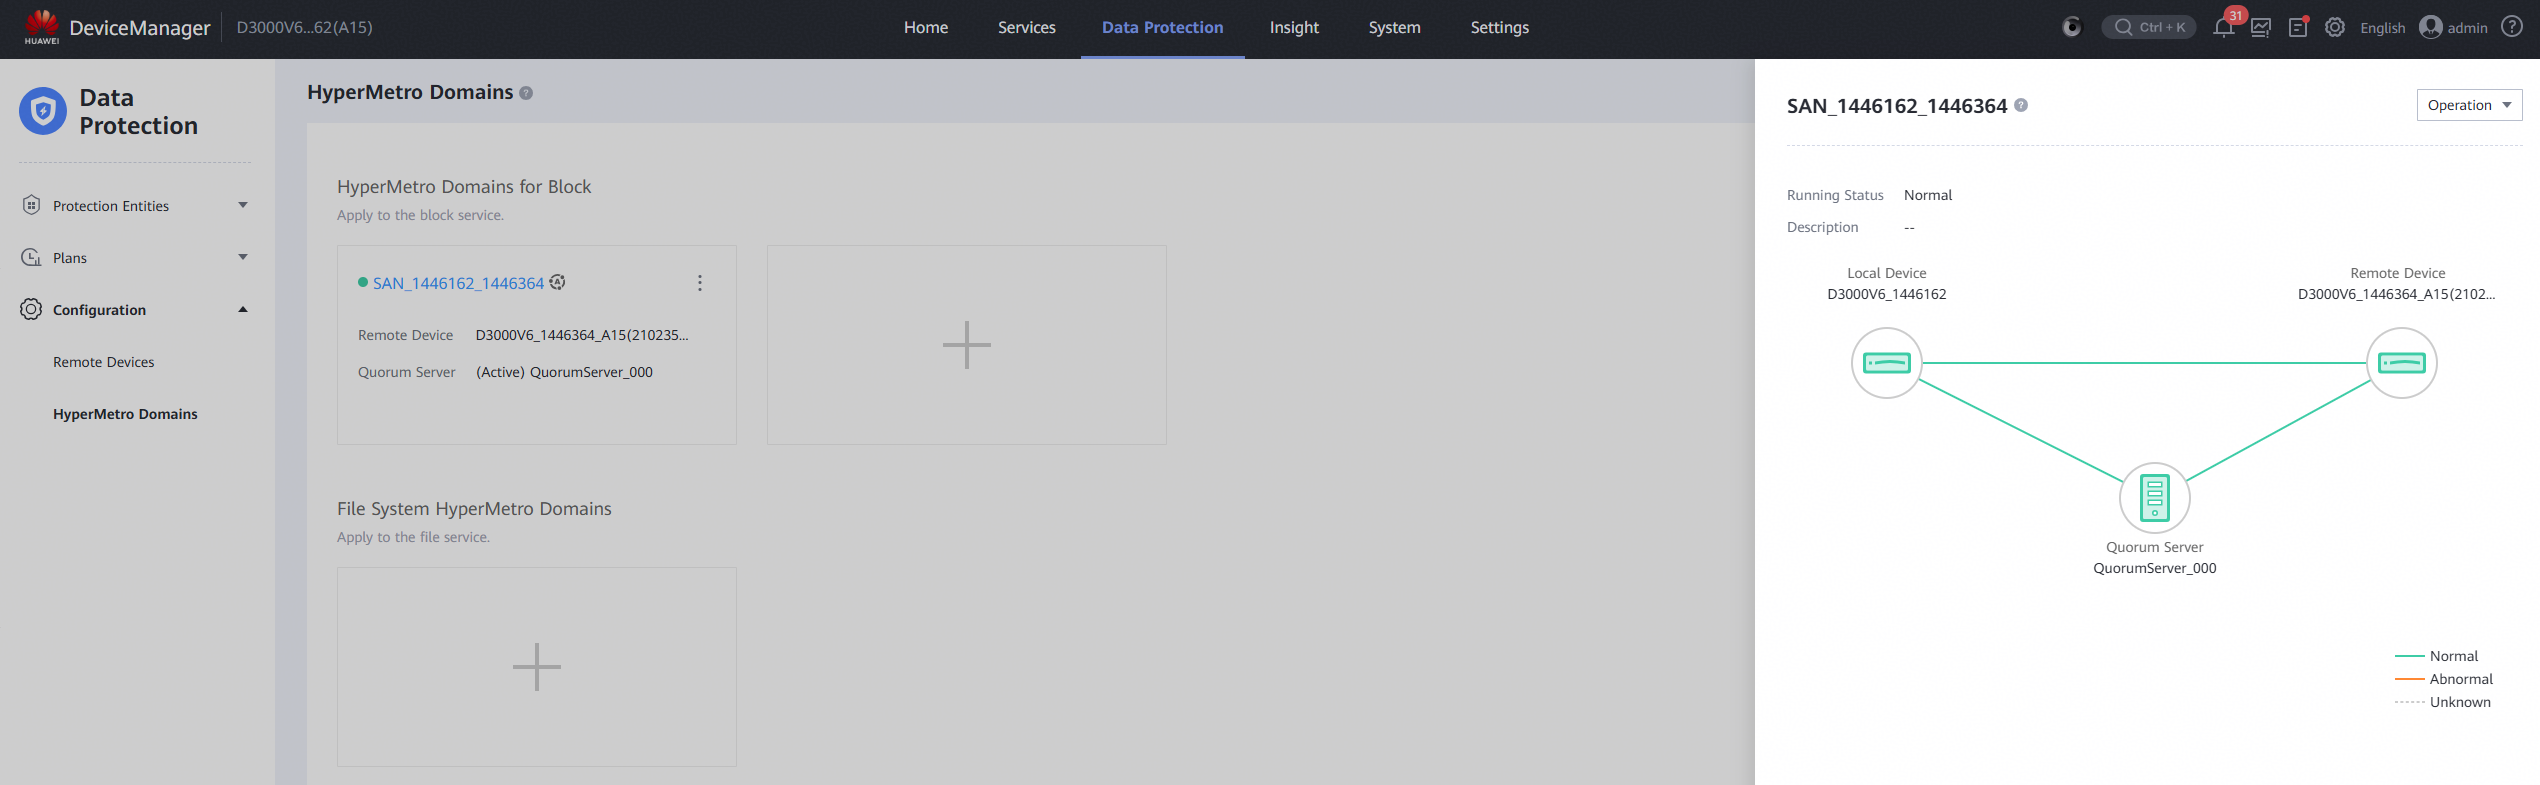
2.1.2 Create the HyperMetro domain for block
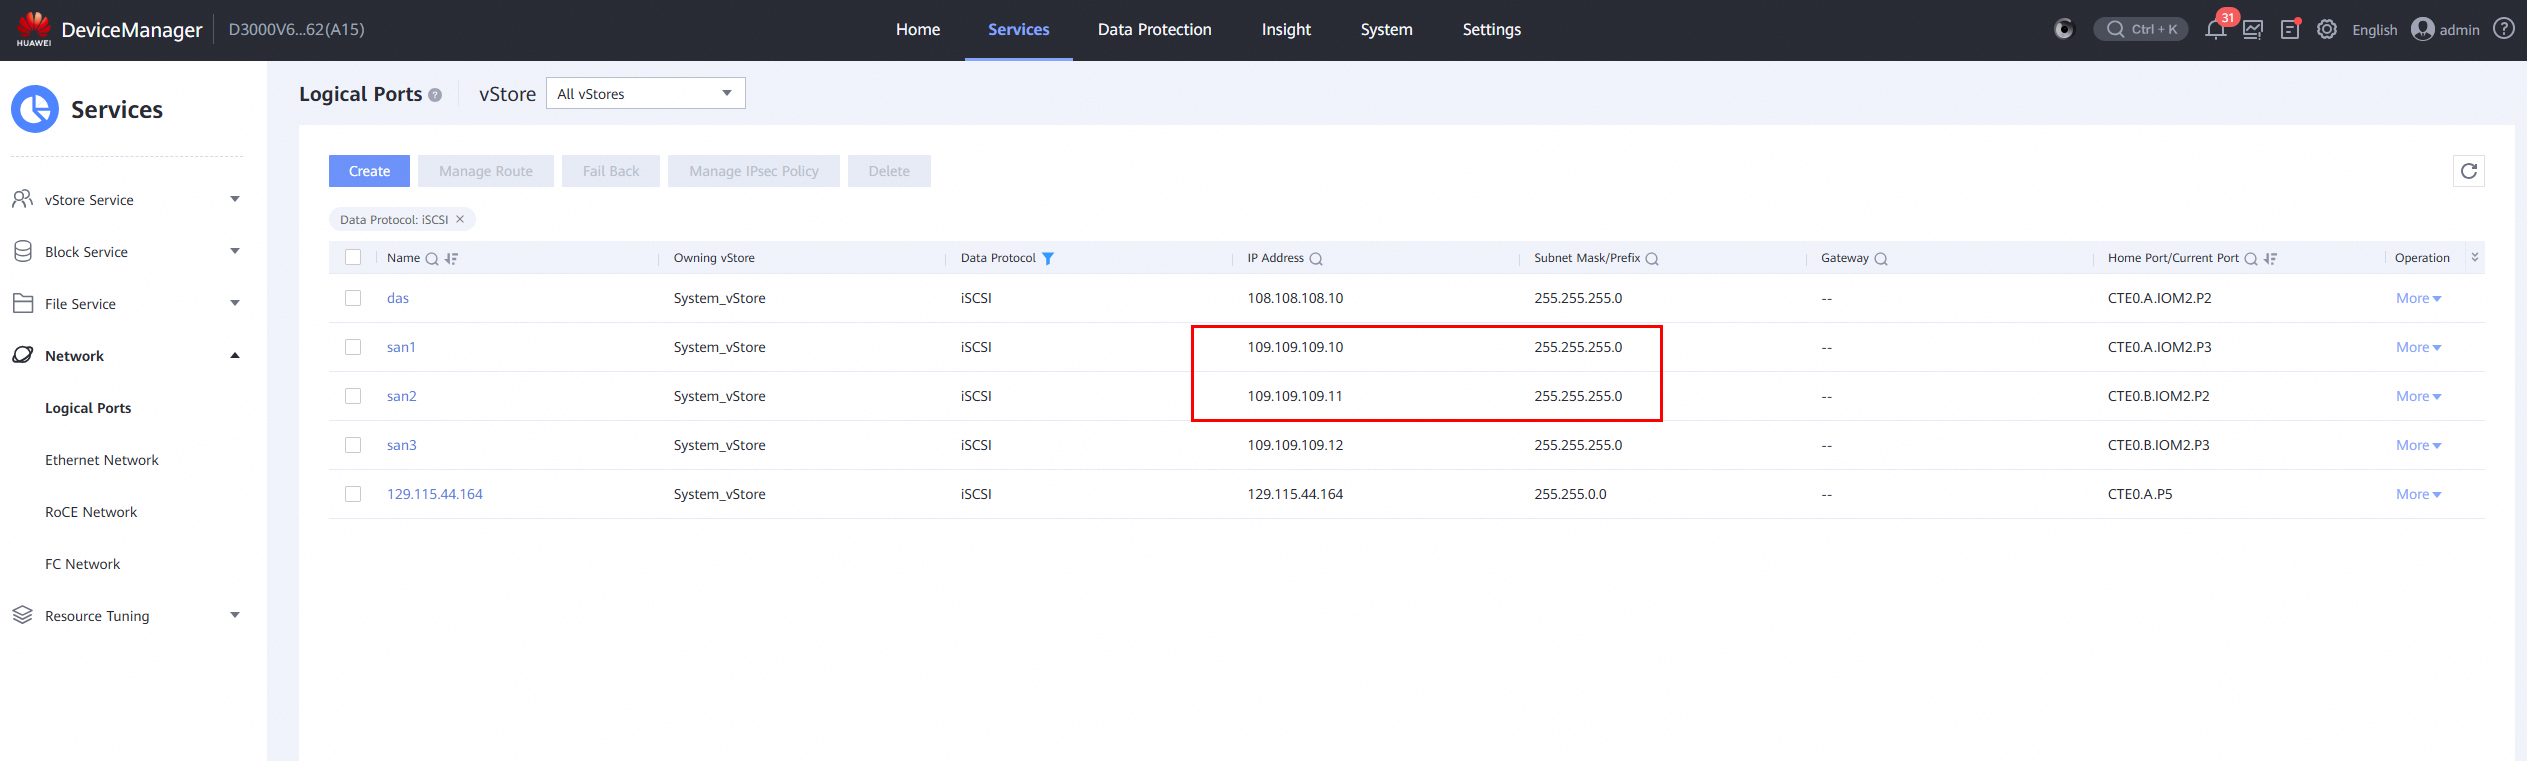
2.1.3 Create the Logical Port
2.2 Proxmox VE Pre-configuration
2.2.1 Check the basic information of Proxmox VE
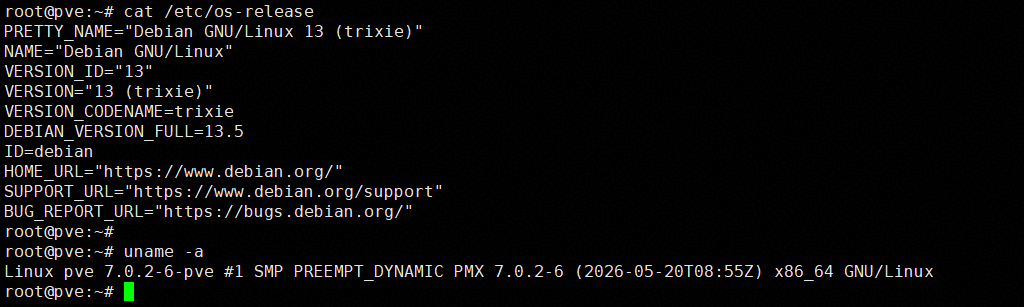
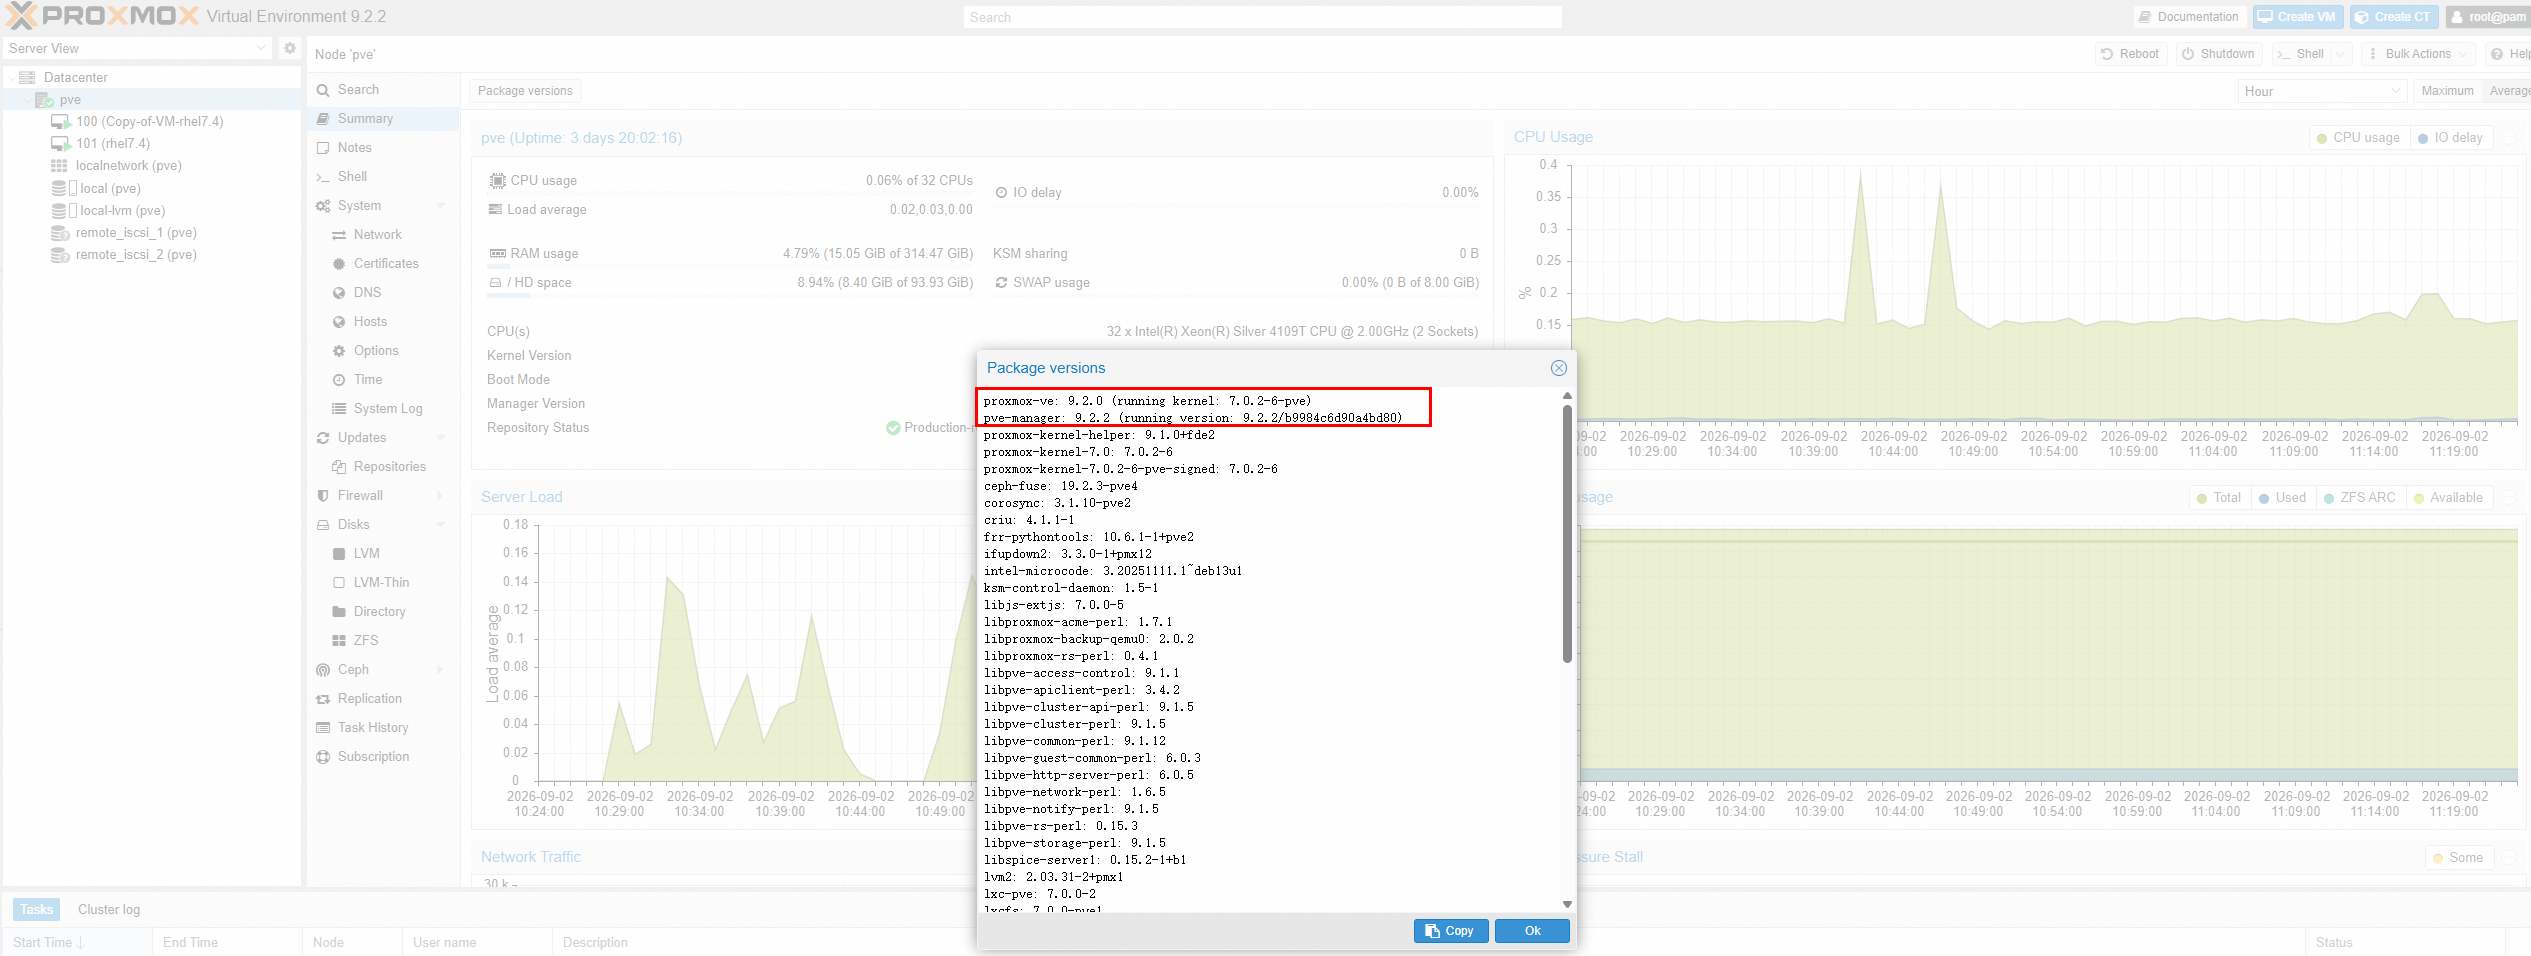
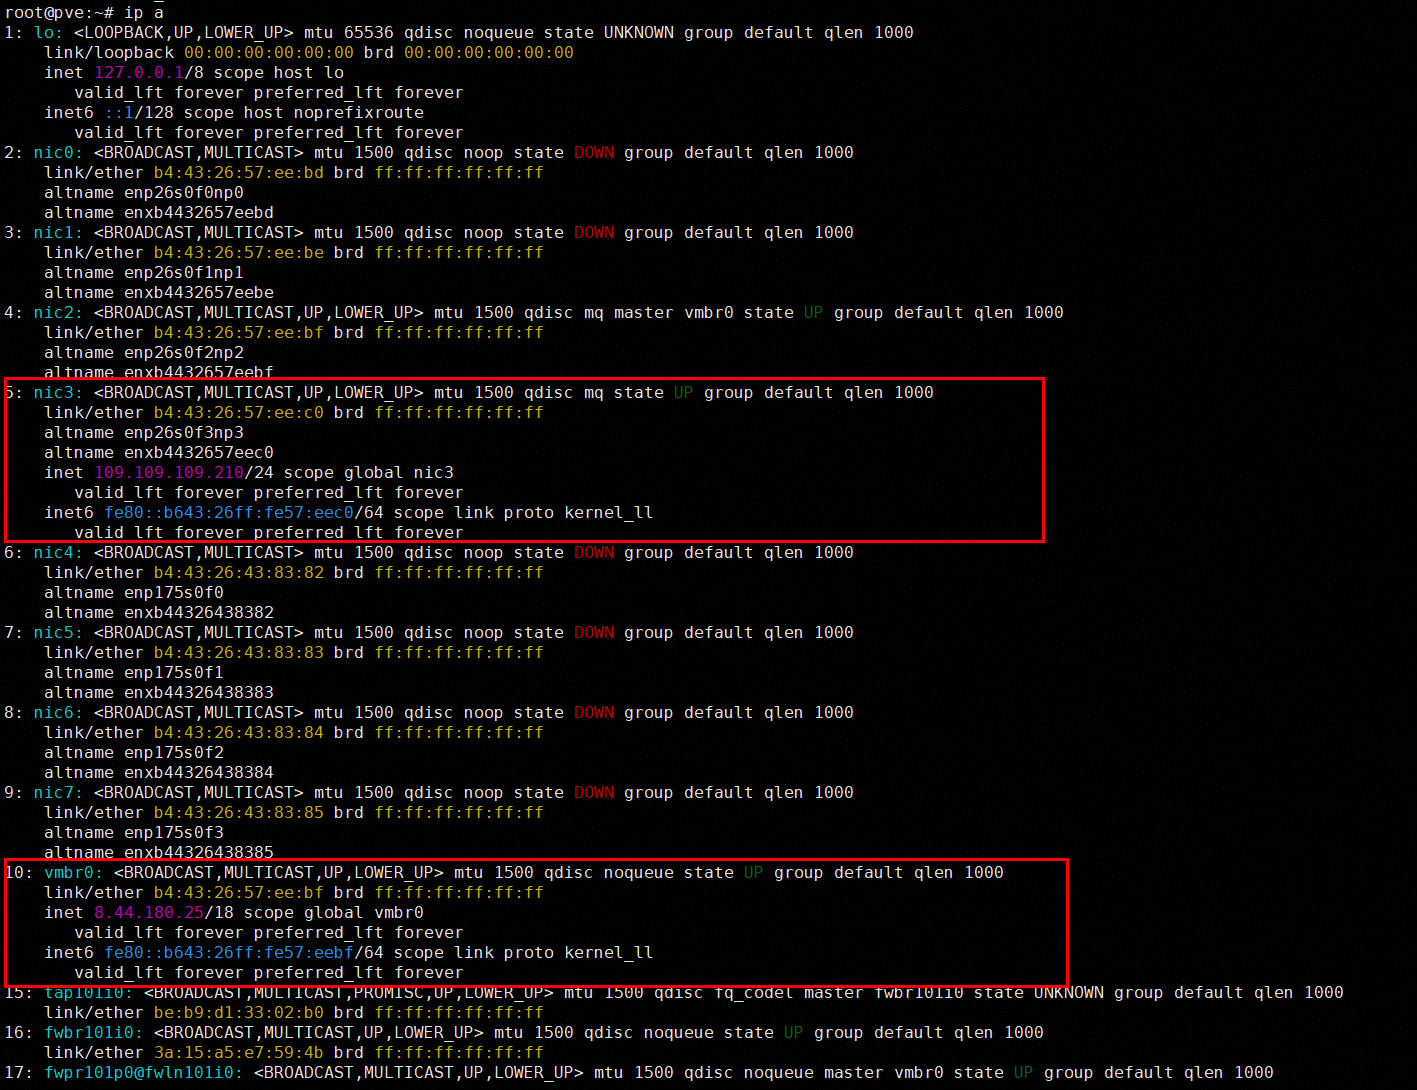
2.2.1 Configure the network
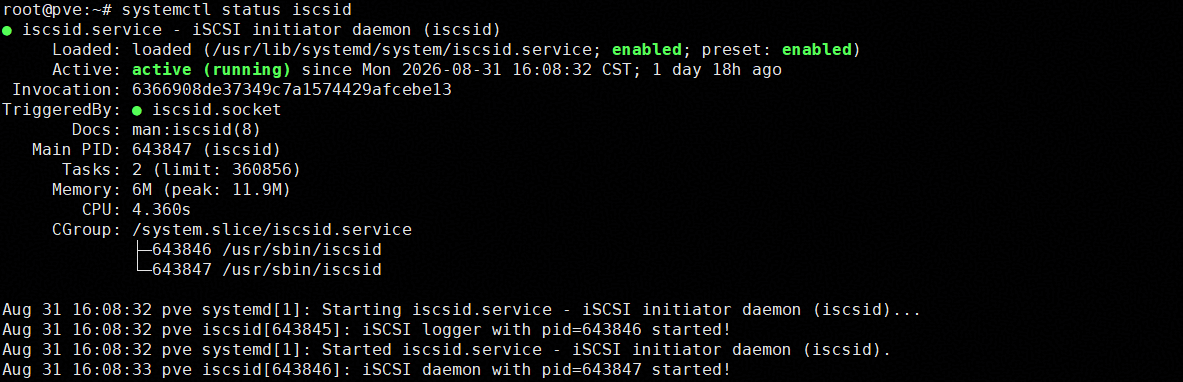
2.2.2 Installing iscsid
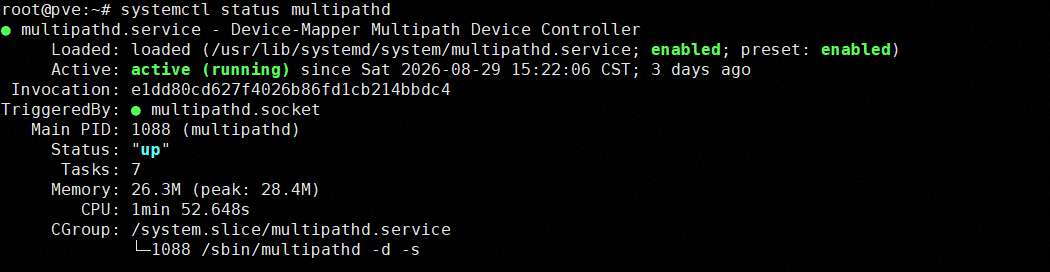
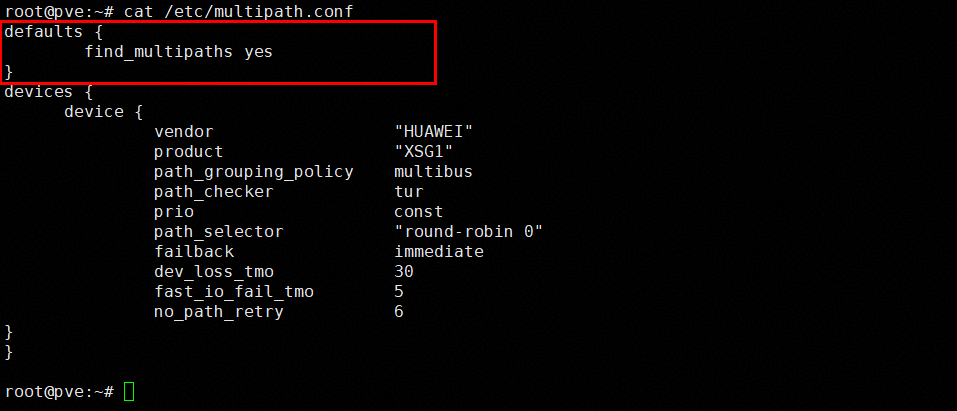
2.2.3 Installing Multipath and Edit the Multipath configuration file
3.Test Scenario 1: Basic Connectivity Test and Results
3.1 Port Mapping
Test Purpose | To Verify That the Host Initiator Status is Online |
Network Diagram | Reference to Figure 1.1 |
Prerequisites | 1.The network has been correctly set up according to the corresponding scenario and the physical links are functioning properly. 2.The host system is operating normally. 3.The Storage system is operating normally. |
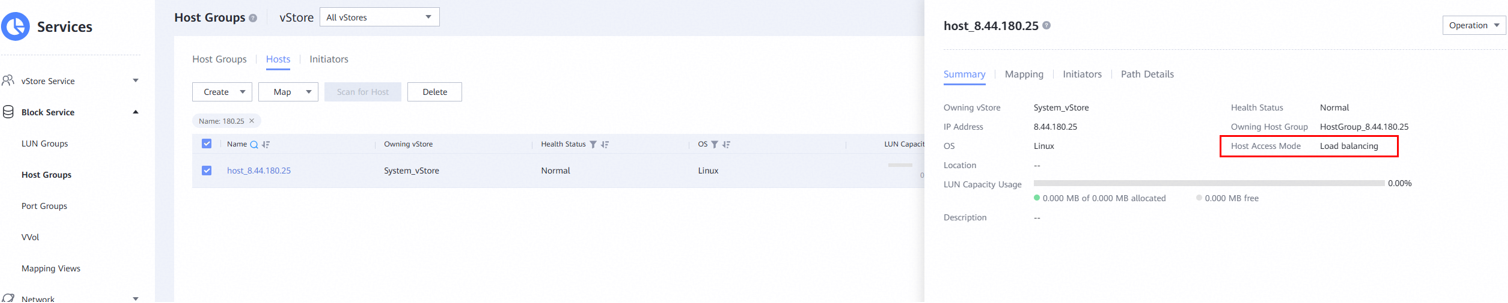
Test Procedures | 1.Log into the storage management system, add the host initiator to the corresponding host, and configure the host mode to load balancing. 2.Observe the initiator connection status. |
Expected Results | 1.In step 1, the host initiator is added successfully and host mode is configured correctly. 2.In step 2, the host initiator status is online. |
Test Results | 1.Log into the storage management system, add the host initiator to the corresponding host, and configure the host mode to load balancing. 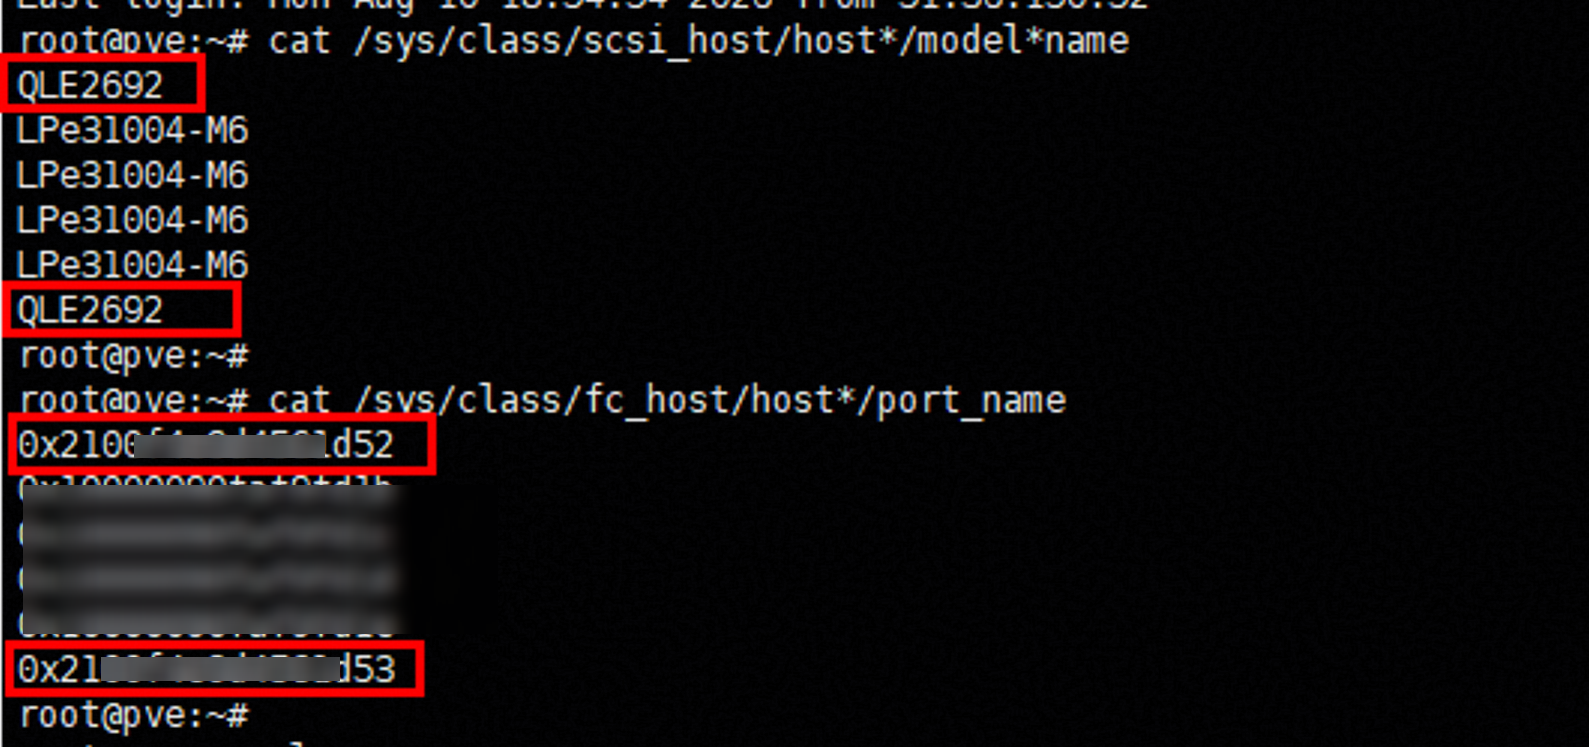
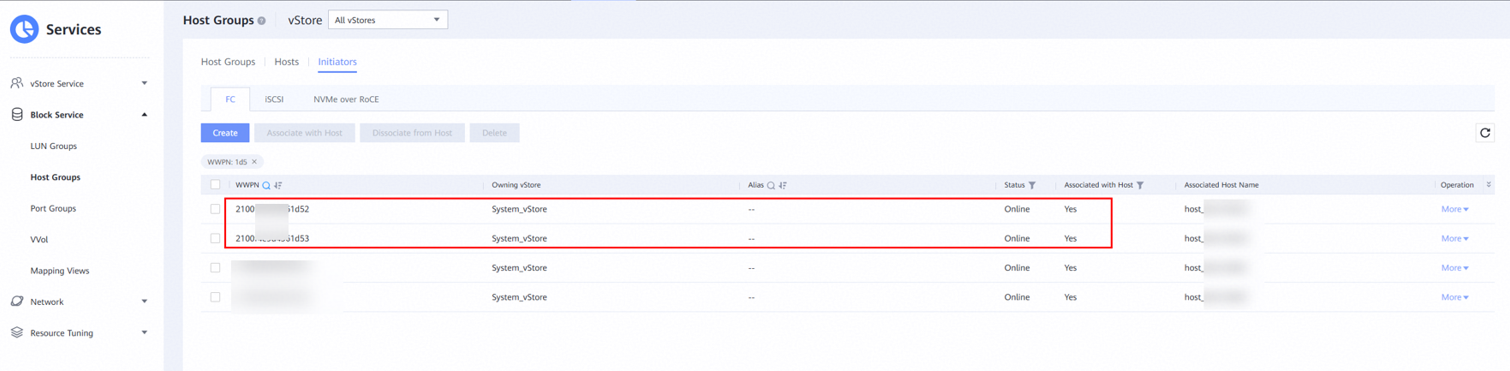
2.Observe the initiator connection status. 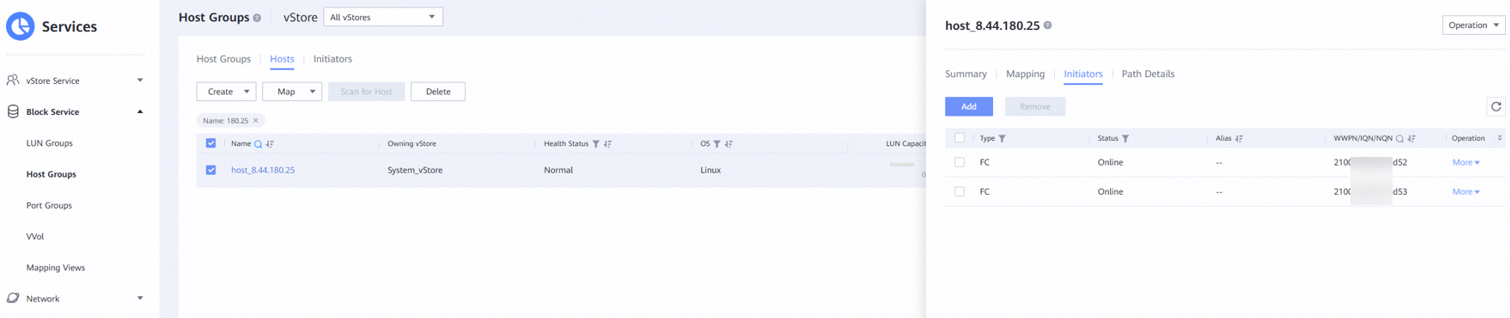
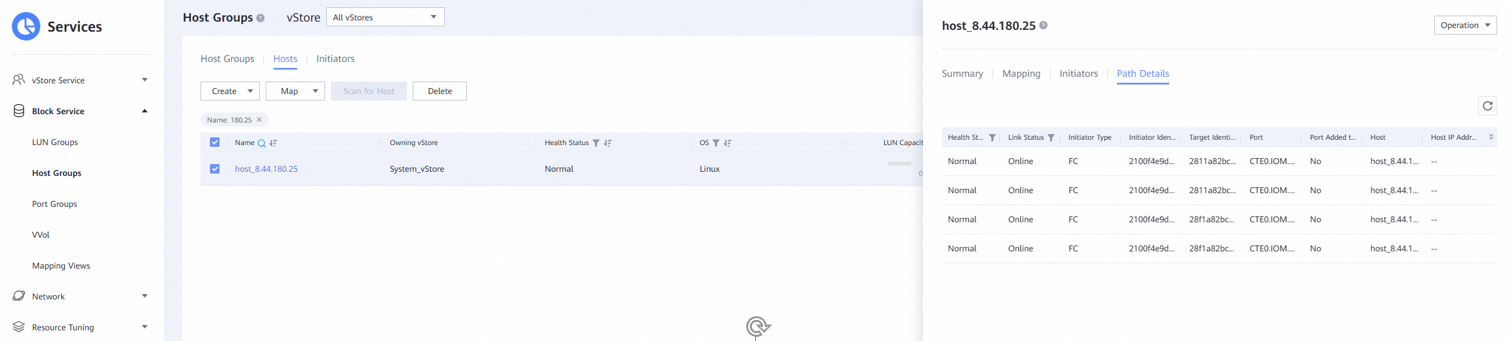
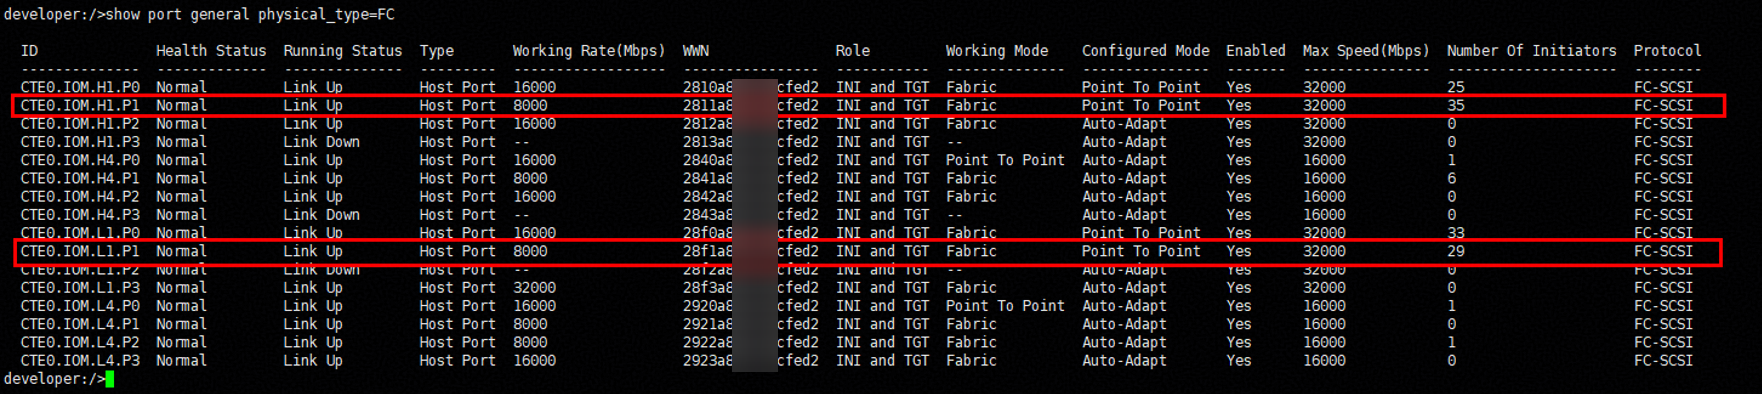
|
Test Conclusion | Passed |
3.2 LUN Mapping
Test Purpose | To Verify That the LUN can be properly mapped to the Host |
Network Diagram | Reference to Figure 1.1 |
Prerequisites | 1.The network has been correctly set up according to the corresponding scenario and the physical links are functioning properly. 2.The host system is operating normally. 3.The Storage system is operating normally. 4.The Host has been created on the storage device and the initiator has been added |
Test Procedures | 1.Log into the storage management system, map a 1GB LUN and a 20TB LUN from the Storage to the Host. 2.Viewing information about the mapped LUNs on the host. |
Expected Results | 1.In step 1, LUN successfully mapped. 2.In step 2, The LUNs can be identified on the Host. |
Test Results | 1.Map a 1GB LUN and a 20TB LUN from the Storage to the Host 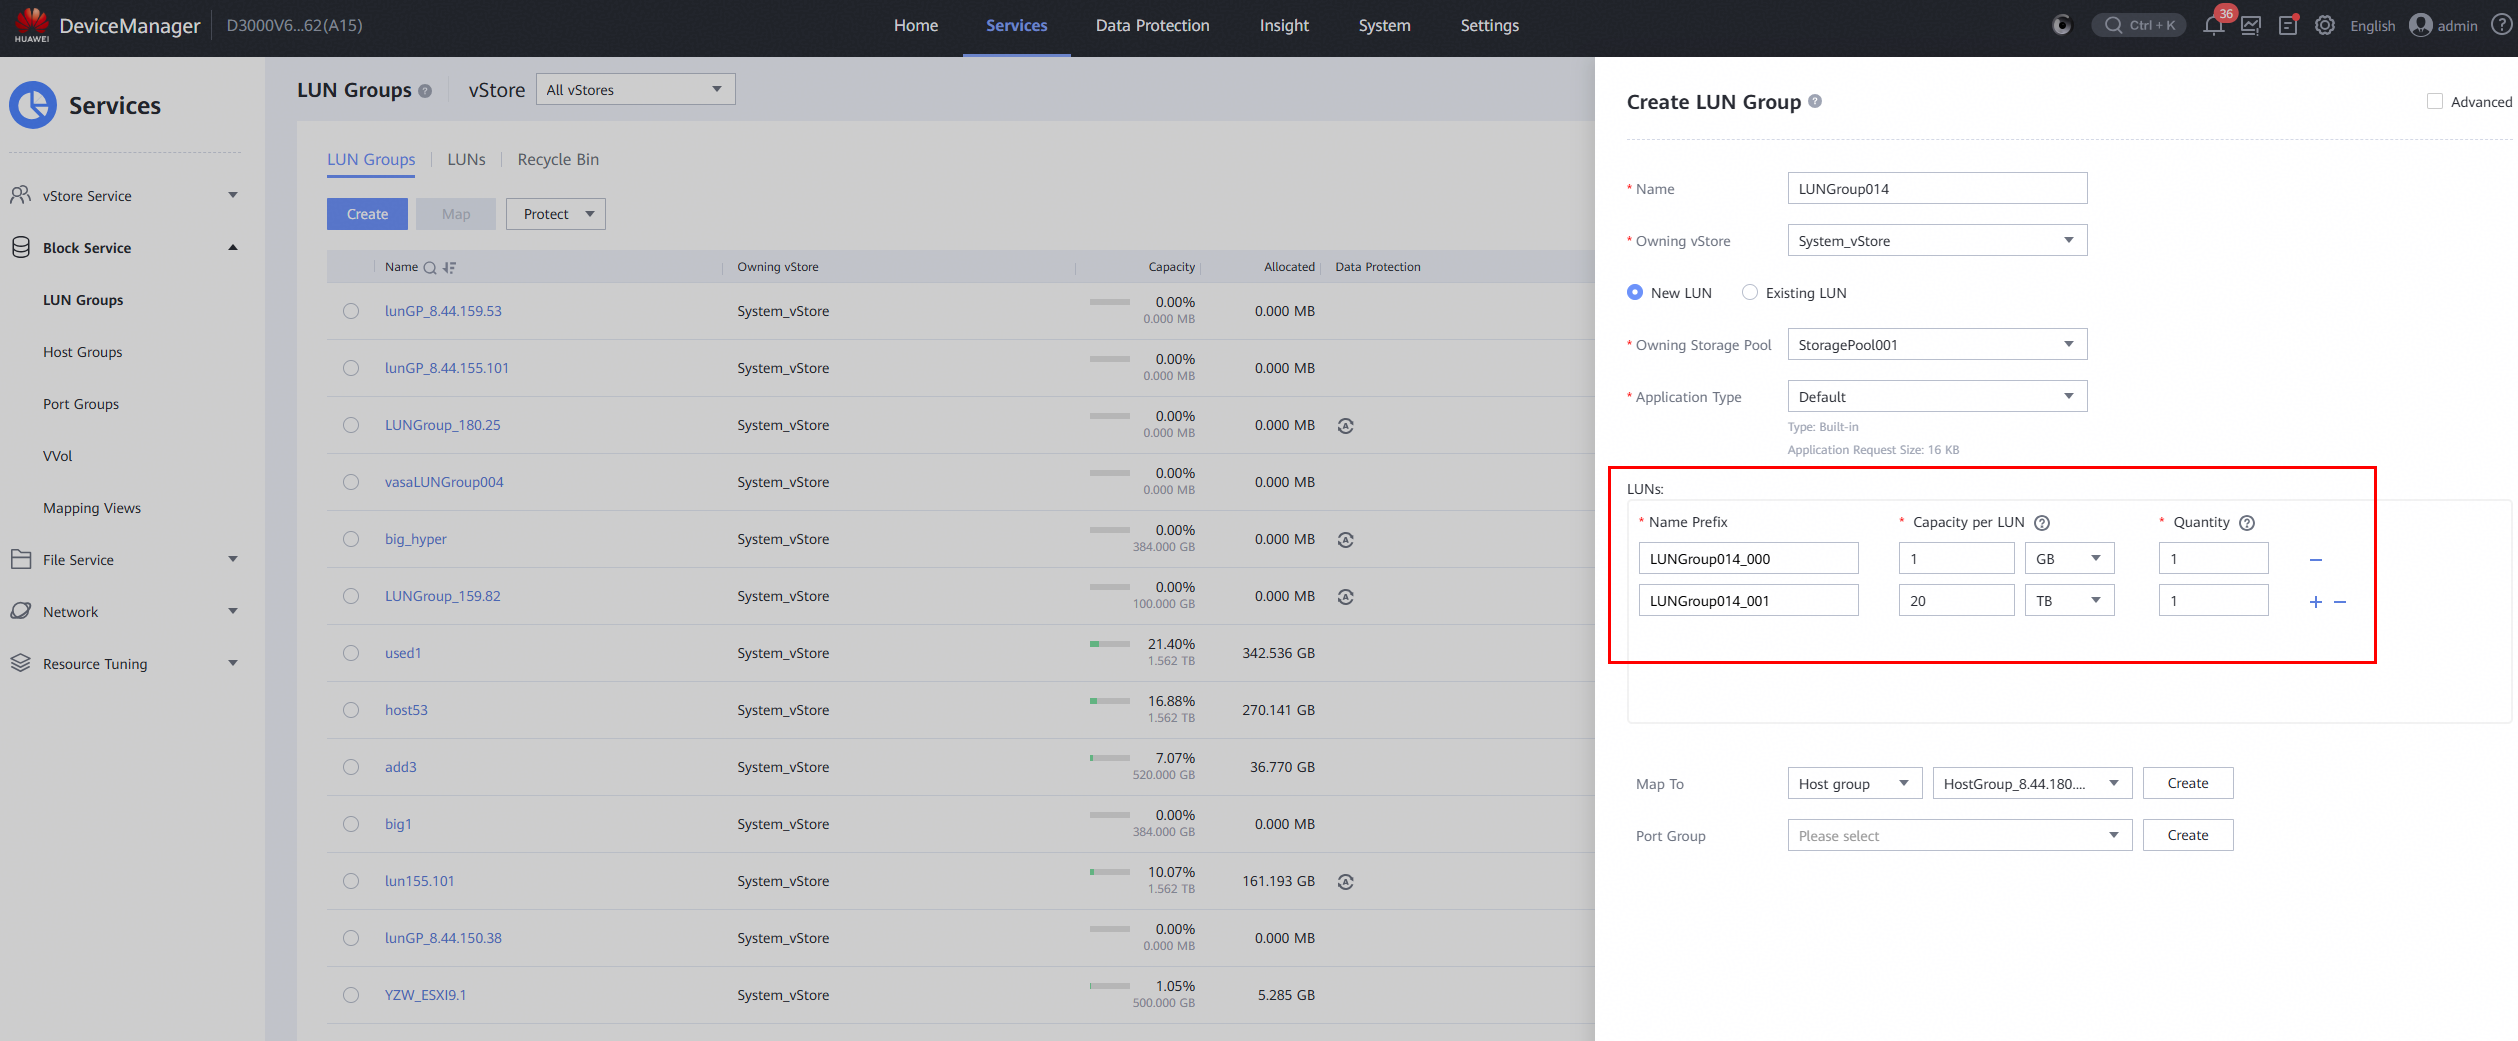
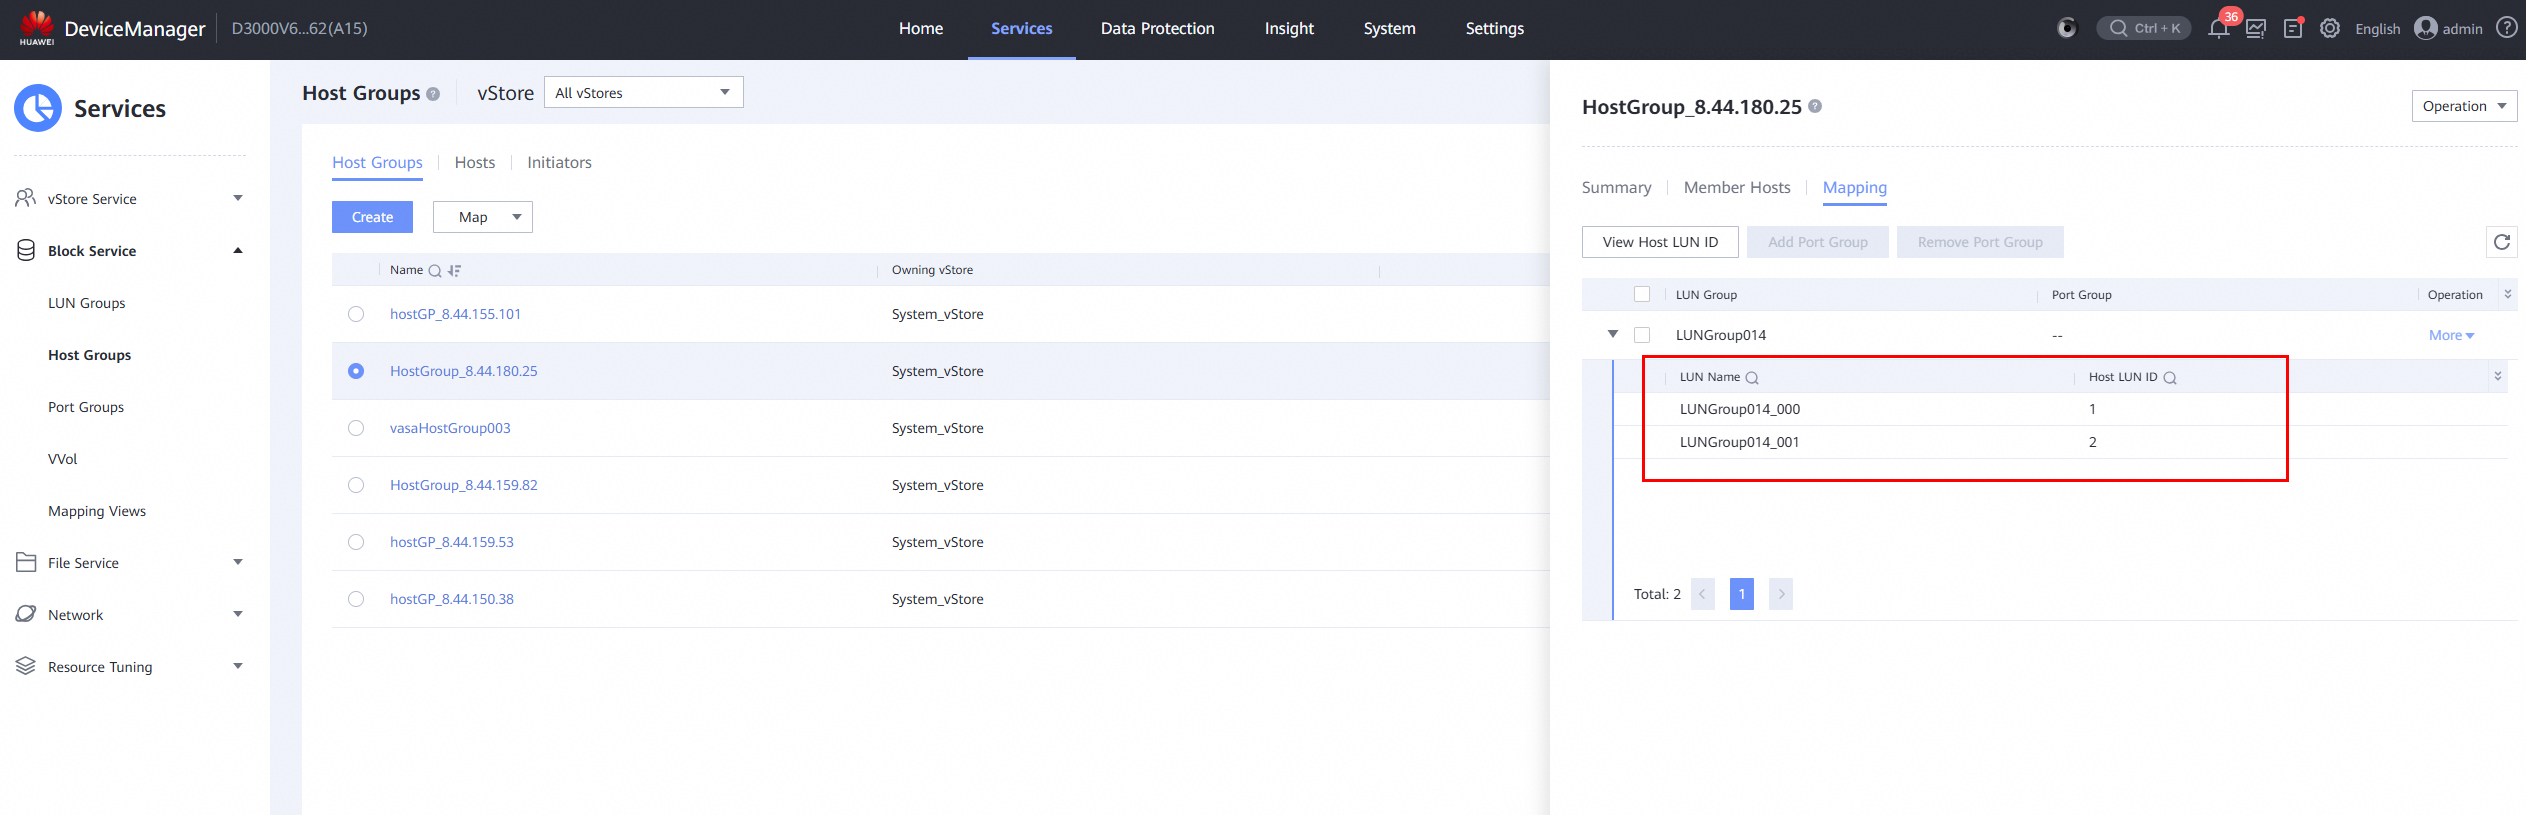
2. Viewing information about the mapped LUNs on the host. 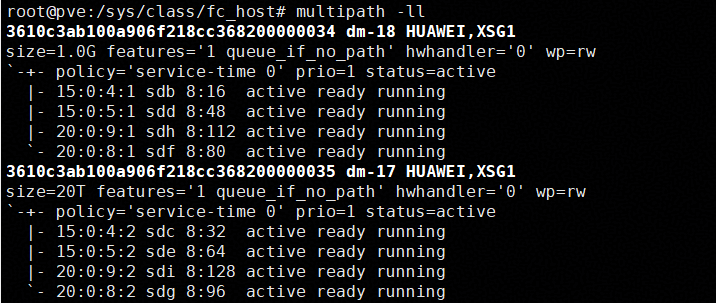
|
Test Conclusion | Passed |
3.3 Virtual Machine Deployment
Test Purpose | To Verify That the Virtual Machine Could be Deployed on the LUN Mapped from Storage |
Network Diagram | Reference to Figure 1.1 |
Prerequisites | 1.The physical link is functioning properly. 2.The host system is operating normally. 3.The storage system is functioning properly. |
Test Procedures | 1.Log into the storage management system, map a 500GB LUN from the storage to the host. 2.Log into Proxmox VE backend and scan the LUN and create Volume Group on the LUN. 3.Log into the Proxmox VE host management interface and create LVM Storage on the Datacenter that use the Volume Group created in step 2. 4.Right-click on the Proxmox VE host, click « Create VM » and follow the wizard to complete the virtual machine creation on the Storage created in step 3. 5.Install the operating system on the newly created virtual machine. |
Expected Results | 1.In step 2, the datastore is created successfully. 1.In step 5, the virtual machine is created successfully. 2.In step 5, the installation of the guest operating system (GOS) is completed successfully. |
Test Results | 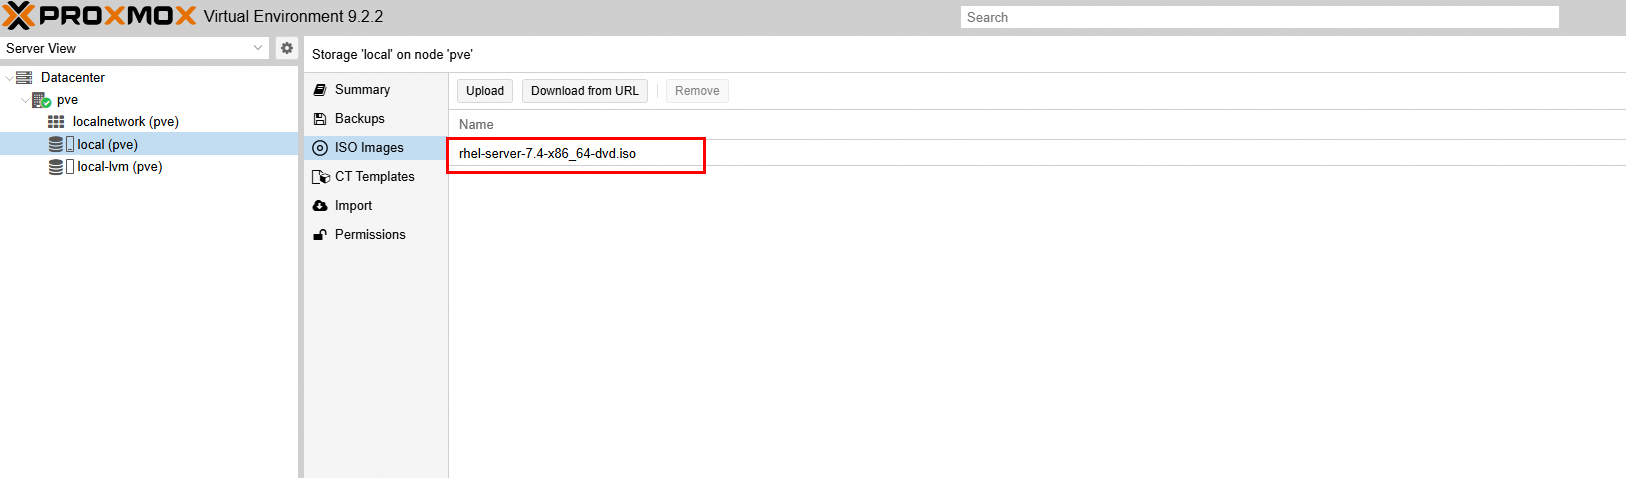
1.Log into the storage management system, map a 500GB LUN from the storage to the host. 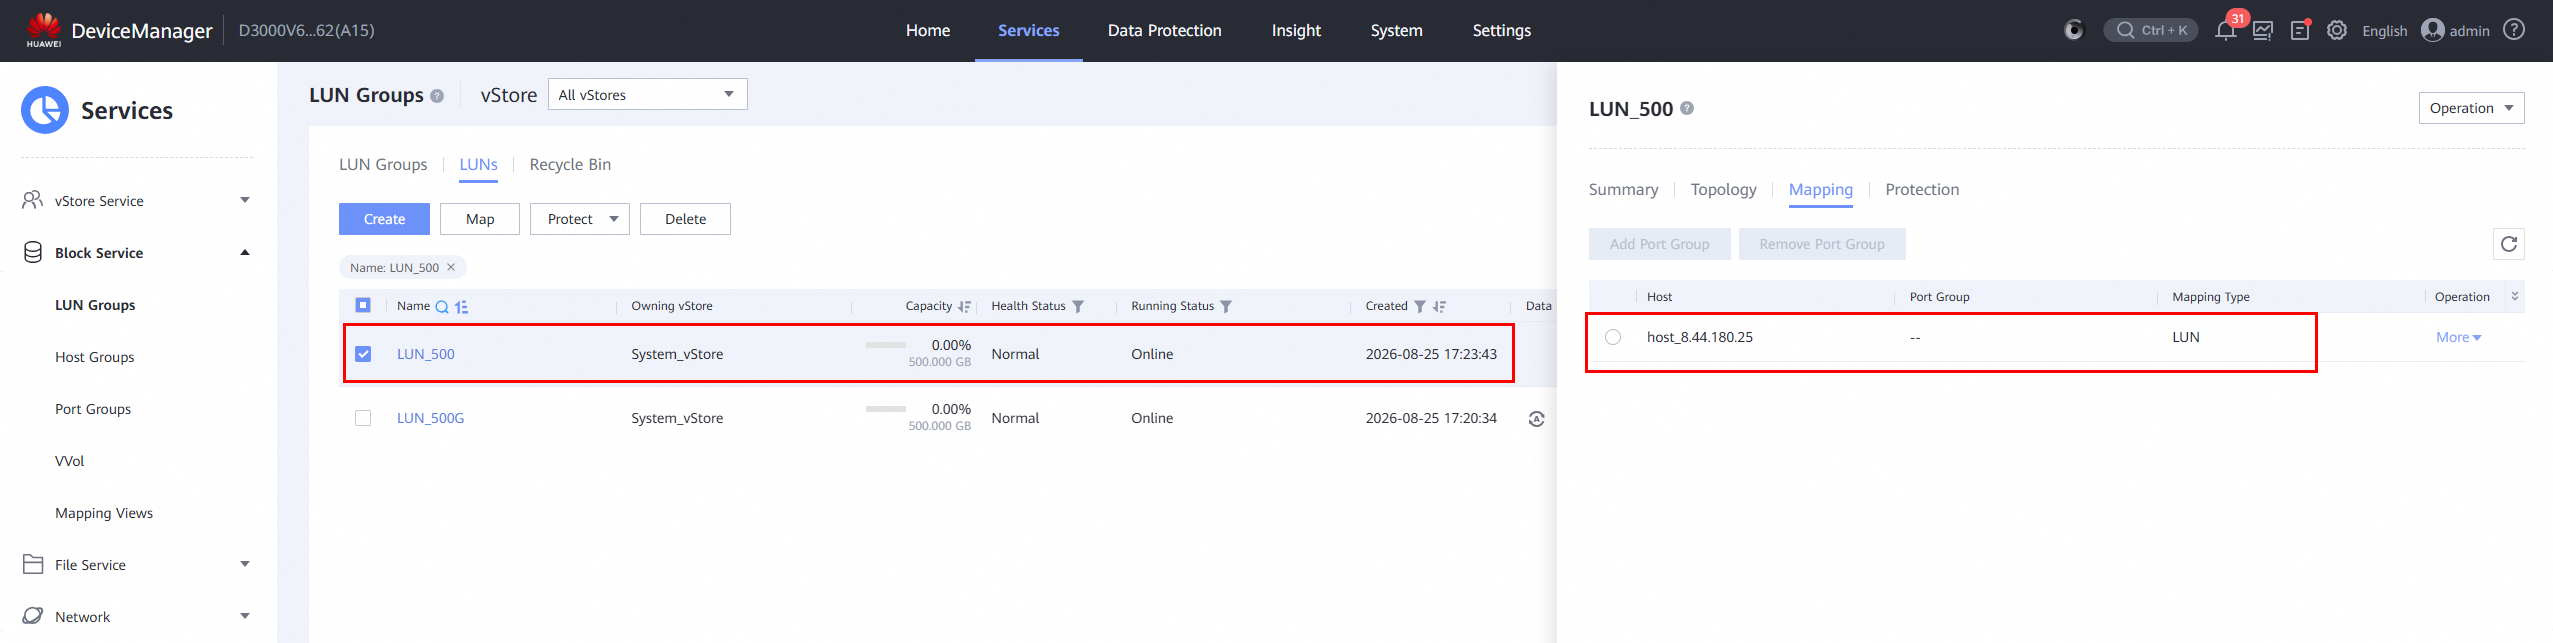
2.Log into Proxmox VE backend and scan the LUN and create Volume Group on the LUN. 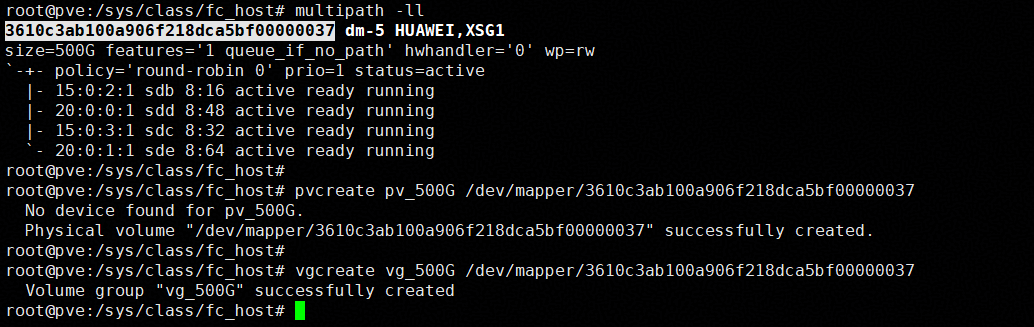
3.Log into the Proxmox VE host management interface and create LVM Storage on the Datacenter that use the Volume Group created in step 2. 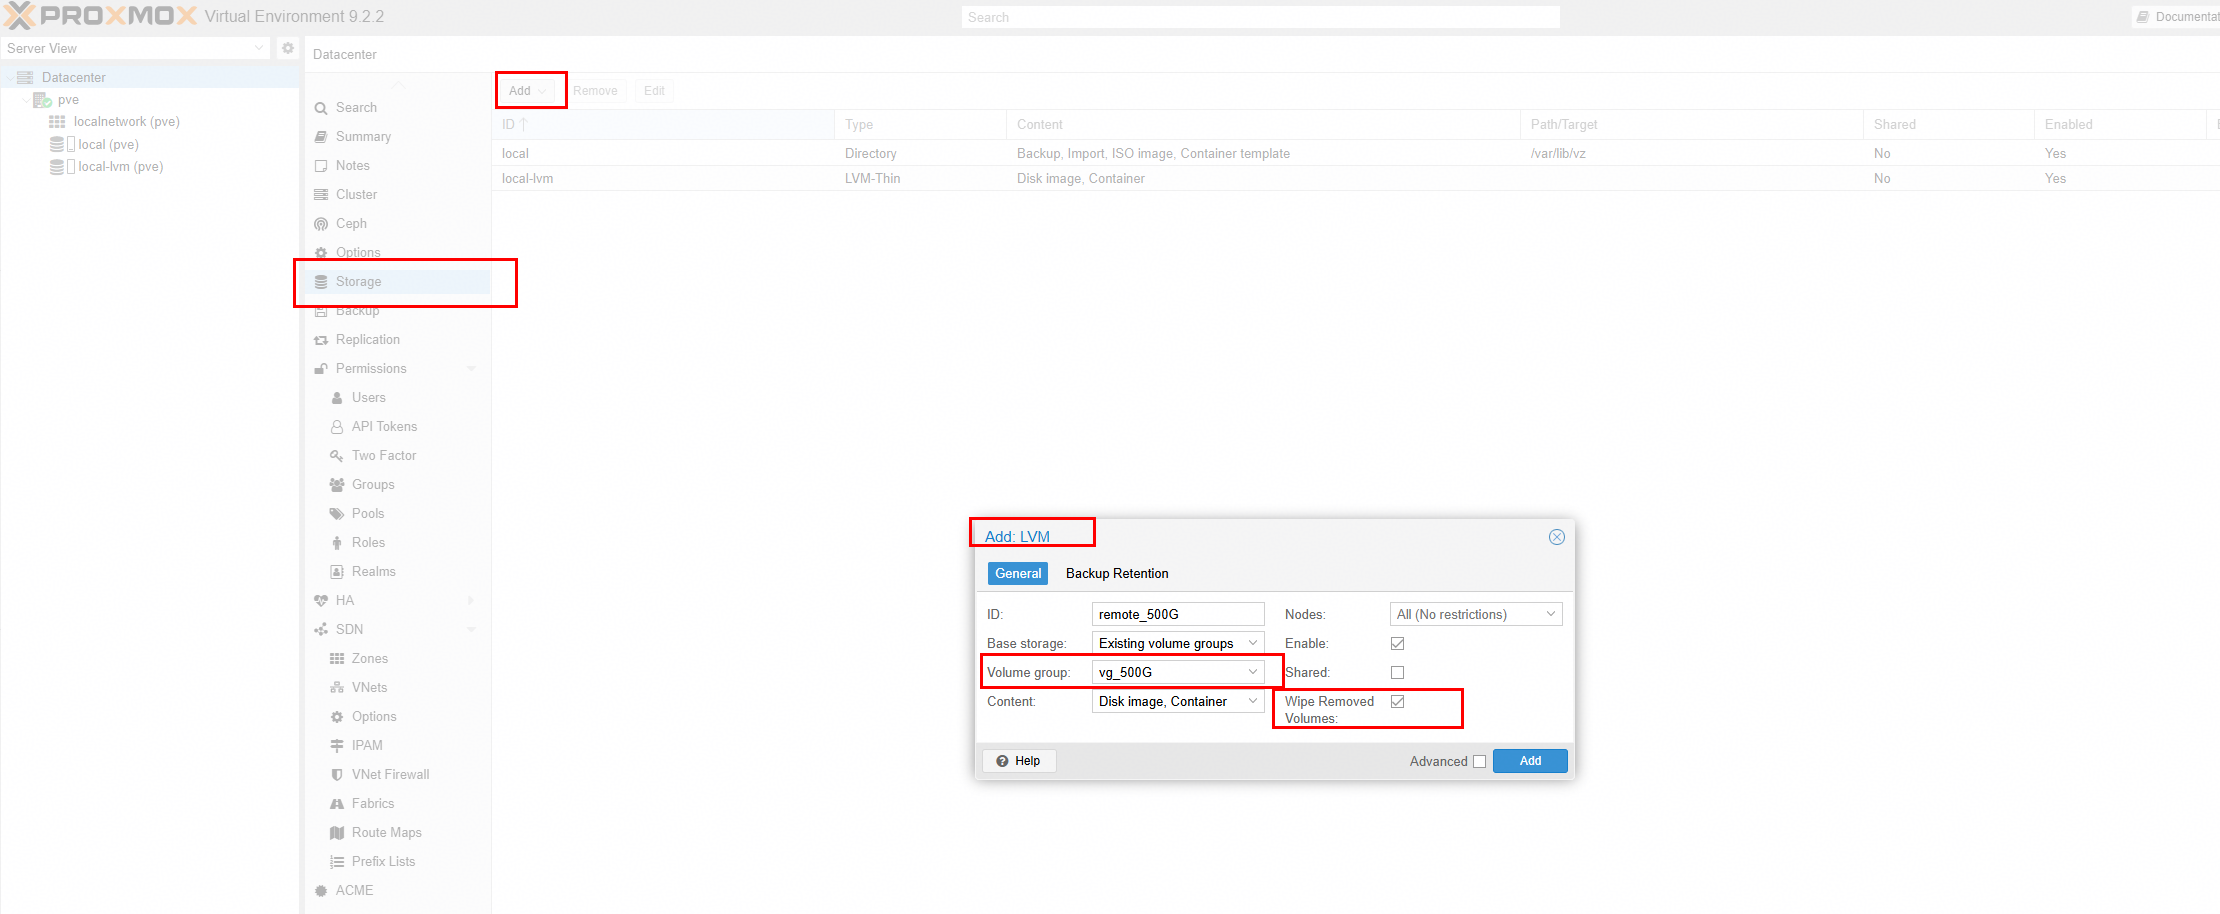

4.Right-click on the Proxmox VE host, click « Create VM » and follow the wizard to complete the virtual machine creation on the Storage created in step 3. 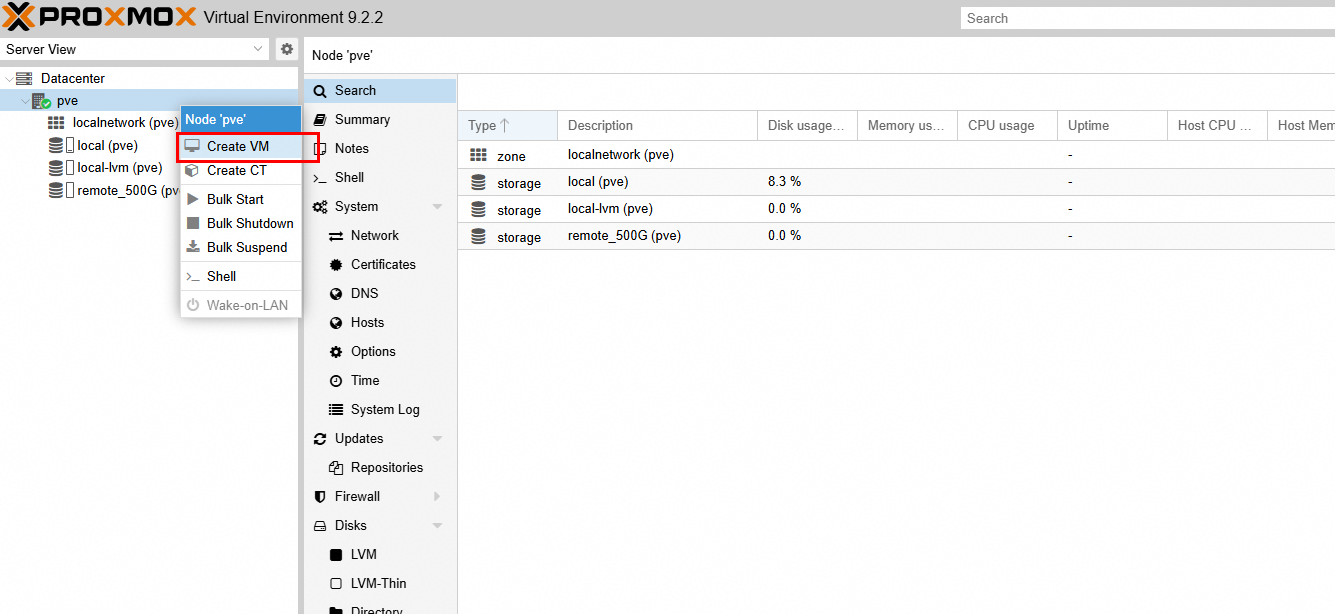
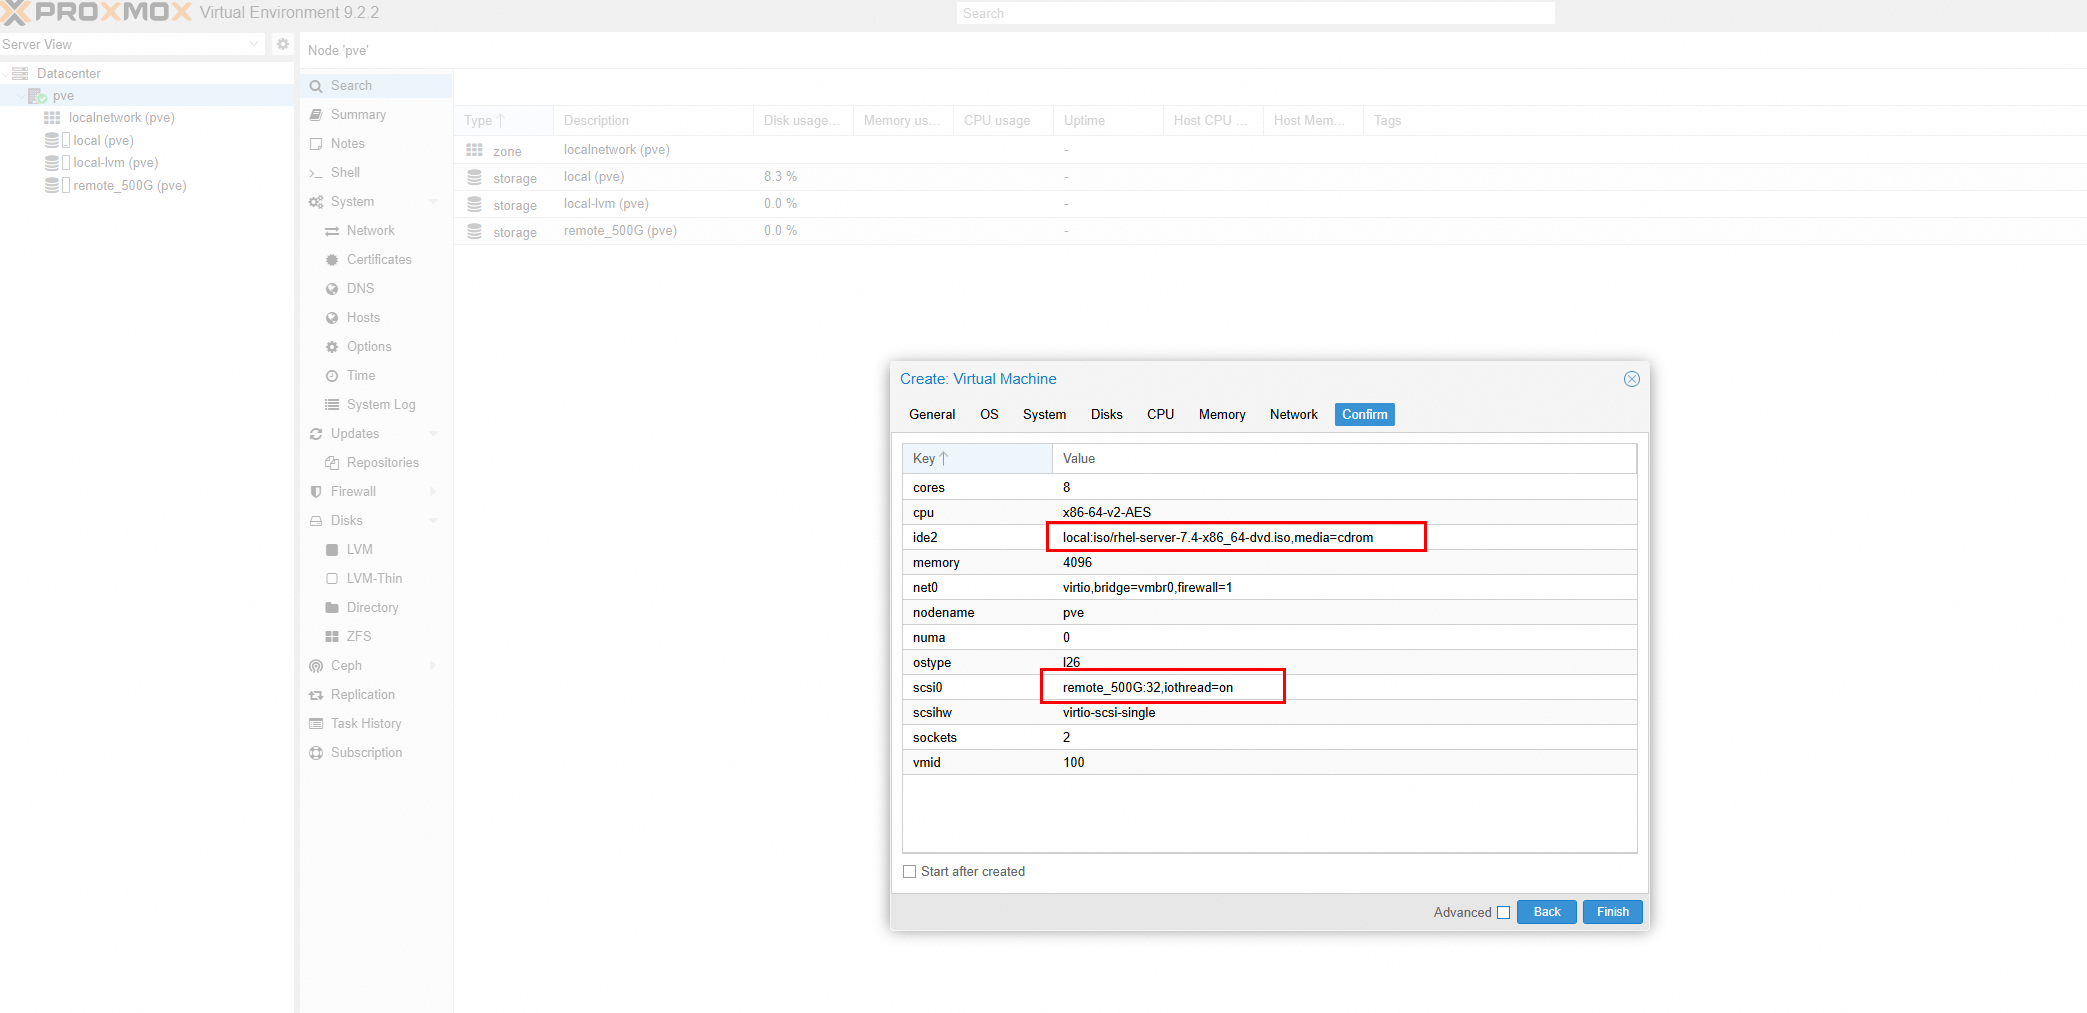
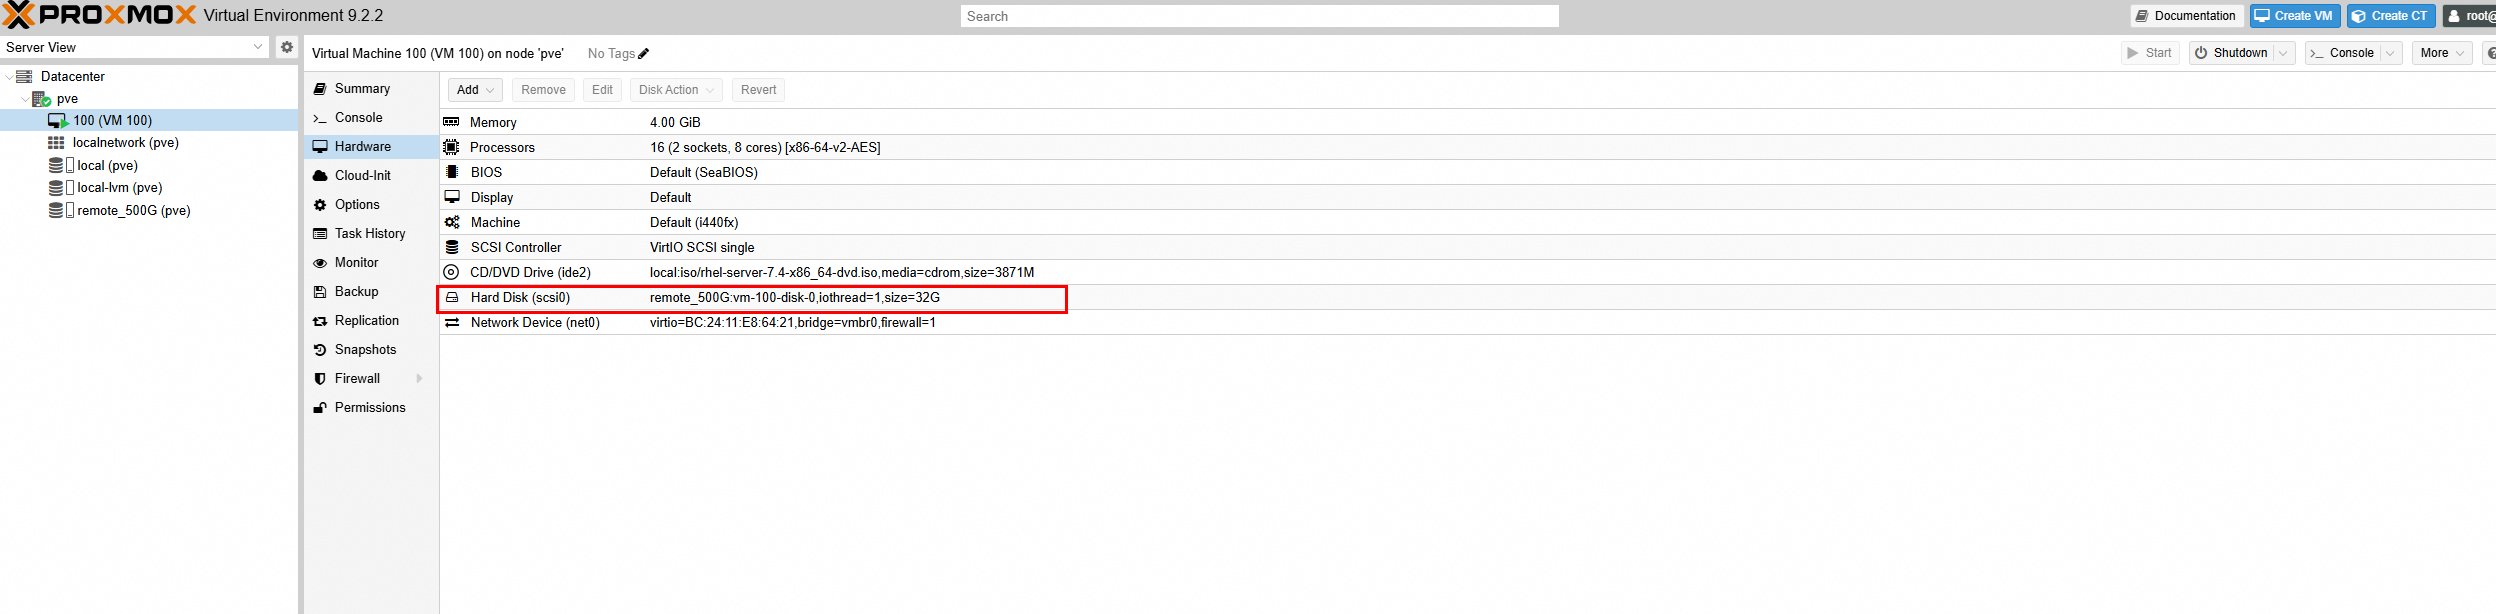
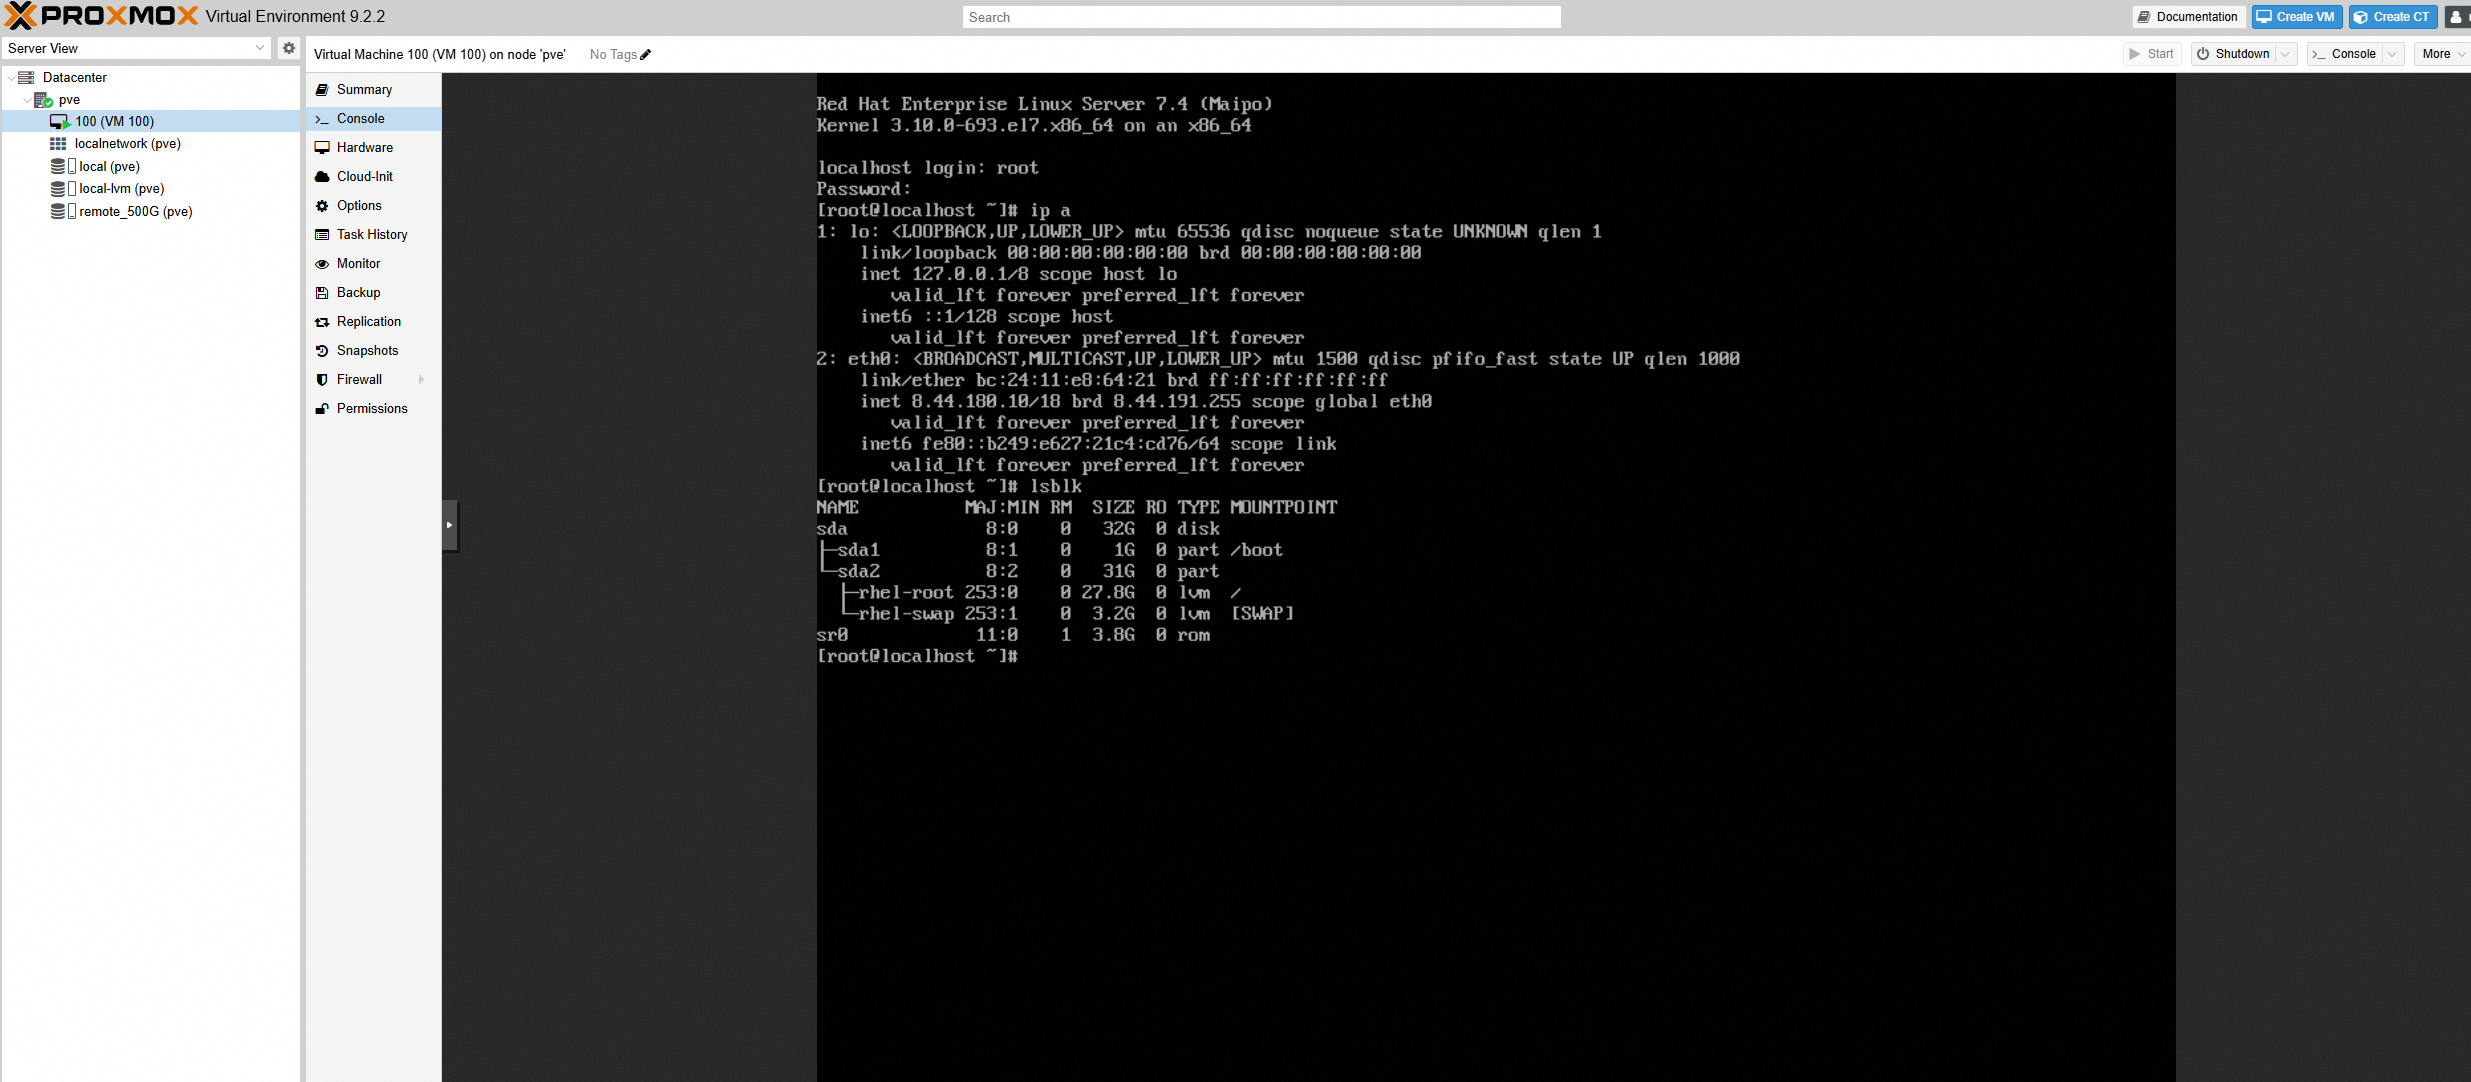
5.Install the operating system on the newly created virtual machine. 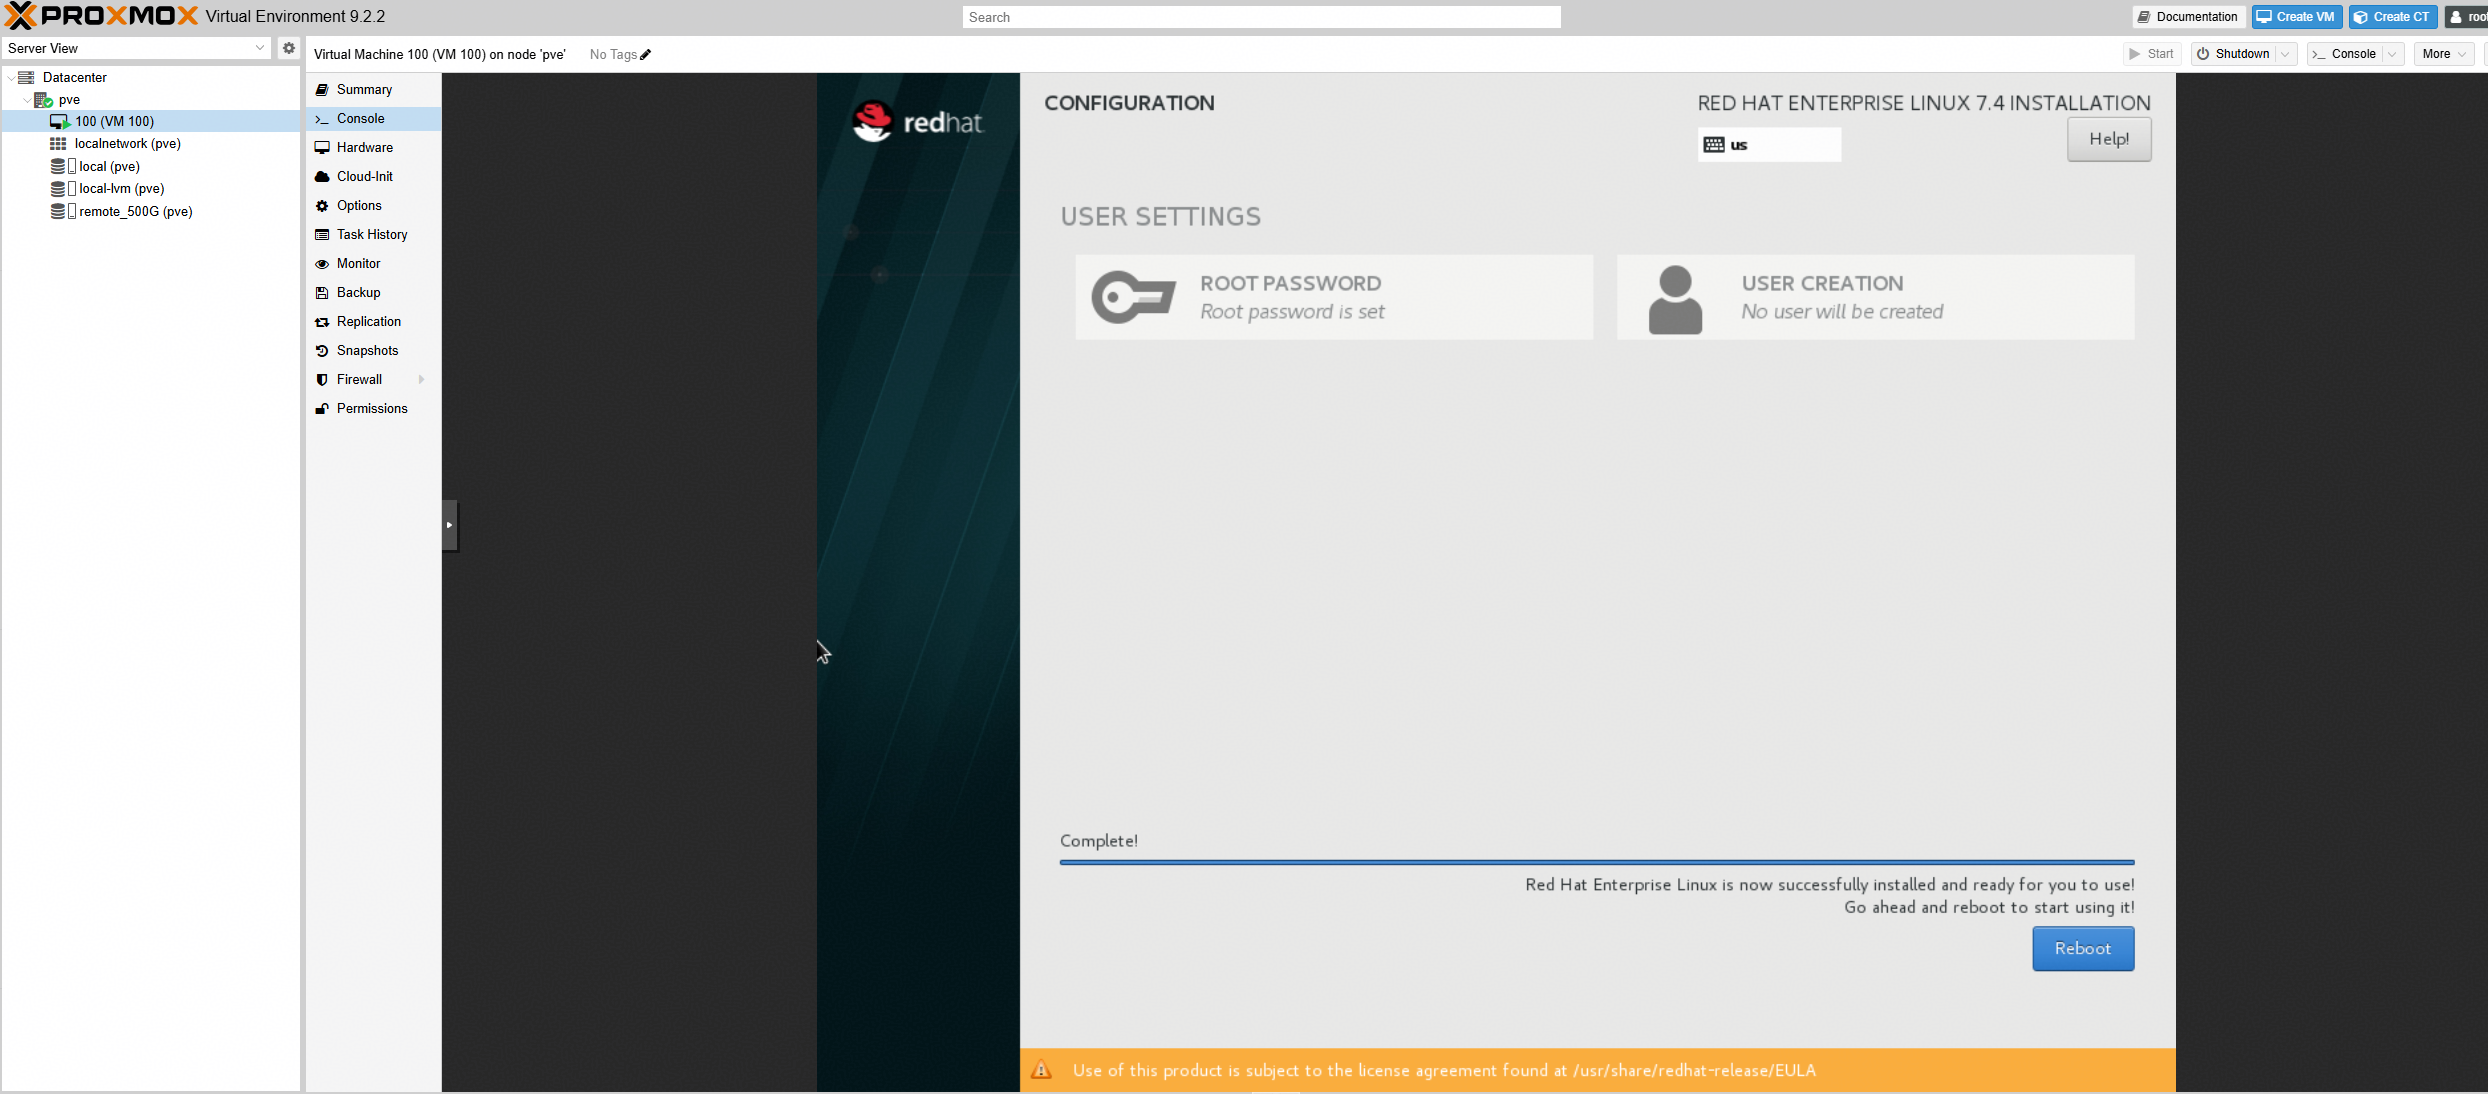
|
Test Conclusion | Passed |
3.4 LUN Read/Write Operations
Test Purpose | To Verify That the Virtual Machine is able to Perform Read/Write Operations on the LUN Mapped from Storage |
Network Diagram | Reference to Figure 1.1 |
Prerequisites | 1.The network has been correctly set up according to the corresponding scenario and the physical links are functioning properly. 2.The host system is operating normally. 3.The storage system is functioning properly. 4.Multipath has been properly installed and configured. 5.The LUN mapping is normal. 6.The system disk used by the test virtual machine is created on the datastore established on the mapped LUN. |
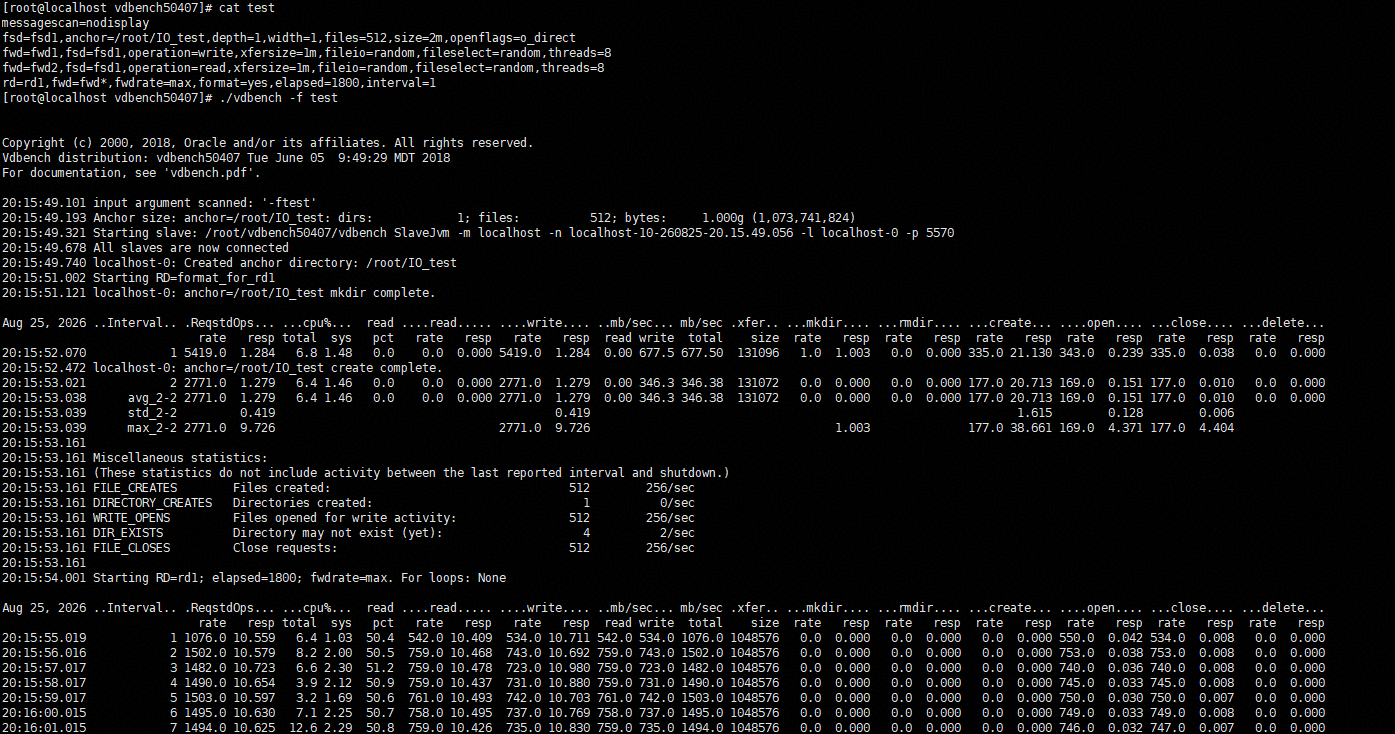
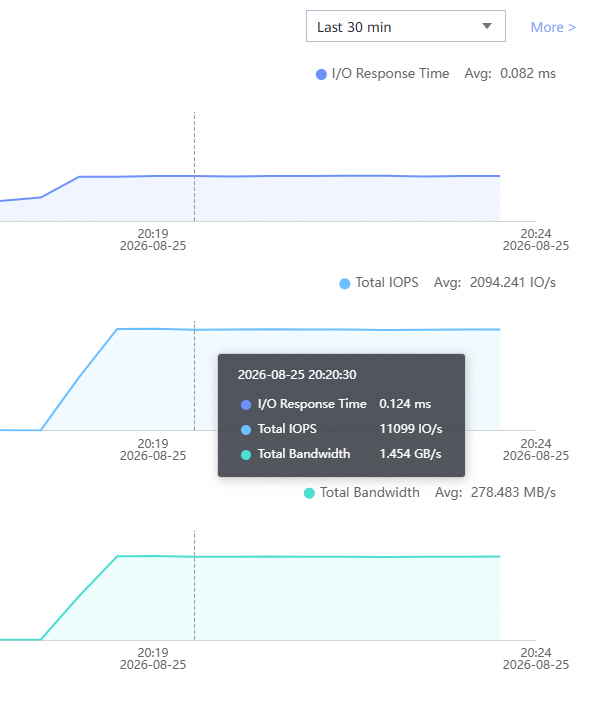
Test Procedures | 1.In the VM, make a new folder under the root directory and perform file system read/write operations using vdbench, observing the I/O performance. |
Expected Results | 1.In step 1, the VM is able to perform read/write operations on all four disks without issues. |
Test Results | 1.In the VM, make a new folder under the root directory and perform file system read/write operations using vdbench, observing the I/O performance. 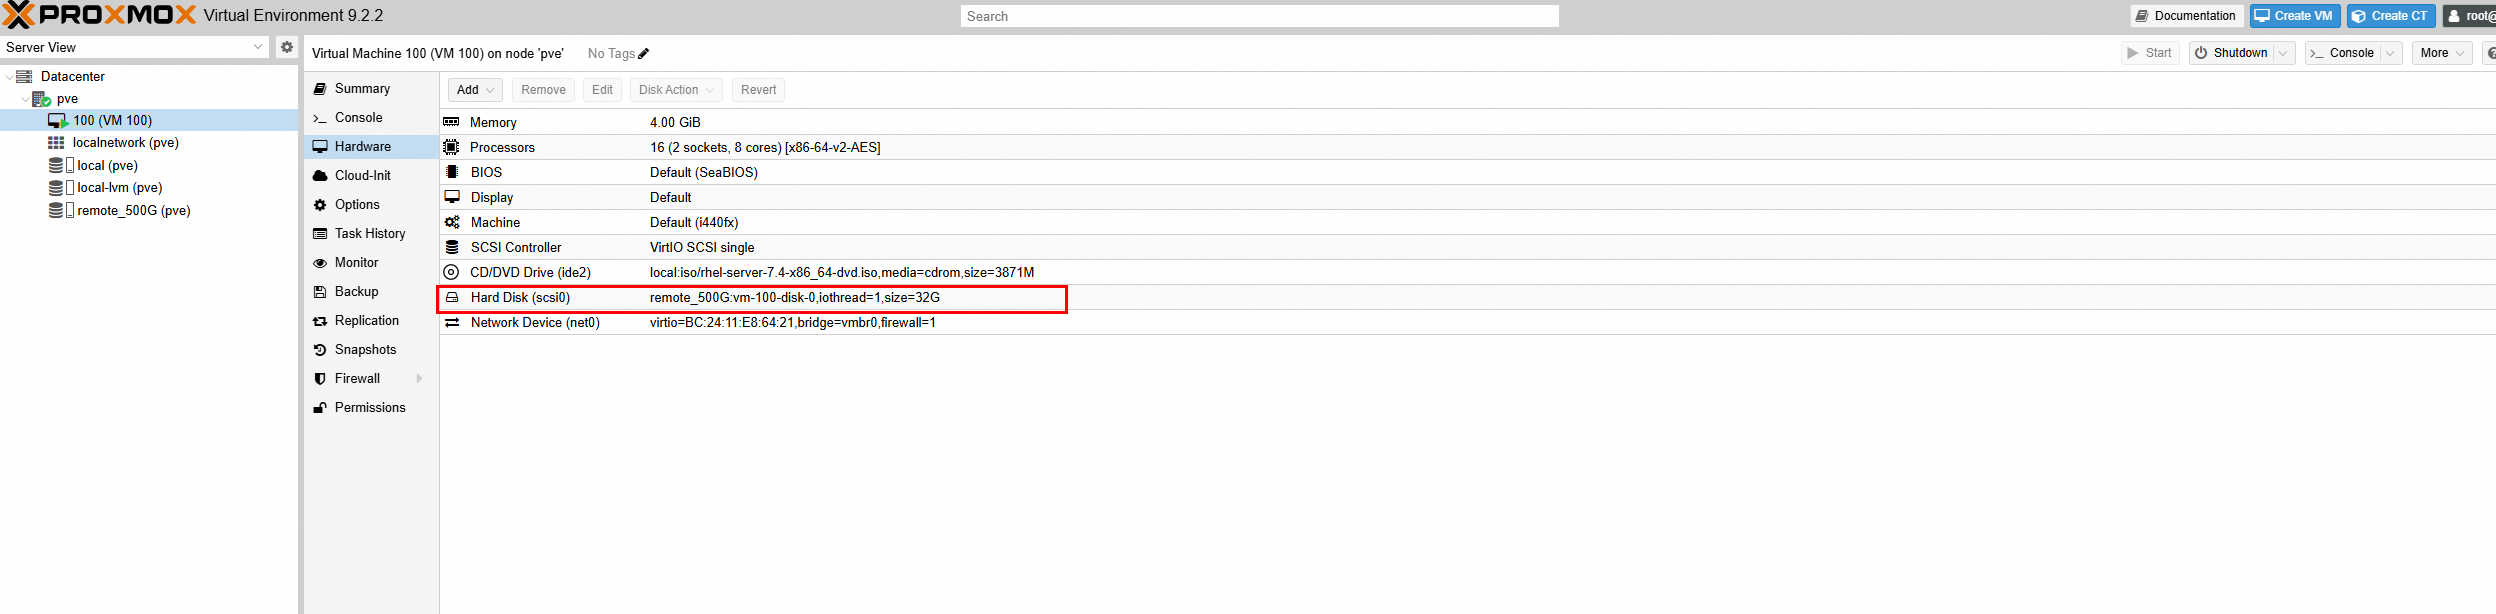
|
Test Conclusion | Passed |
3.5 Online Addition of Virtual Disks to Virtual Machine
Test Purpose | To Verify That Virtual Disks Could be Added to Virtual Machine Online |
Network Diagram | Reference to Figure 1.1 |
Prerequisites | 1.The physical connection is functioning properly. 2.The external storage and Proxmox VE systems are operating normally. 3.The port mapping is correct. 4.The system disk used by the test virtual machine is located on the Storage created from the mapped LUN. 5.The virtual machine has been created, and operating systems have been installed. 6.The external storage has been created and the LUN for testing has been mapped to the Proxmox VE host. |
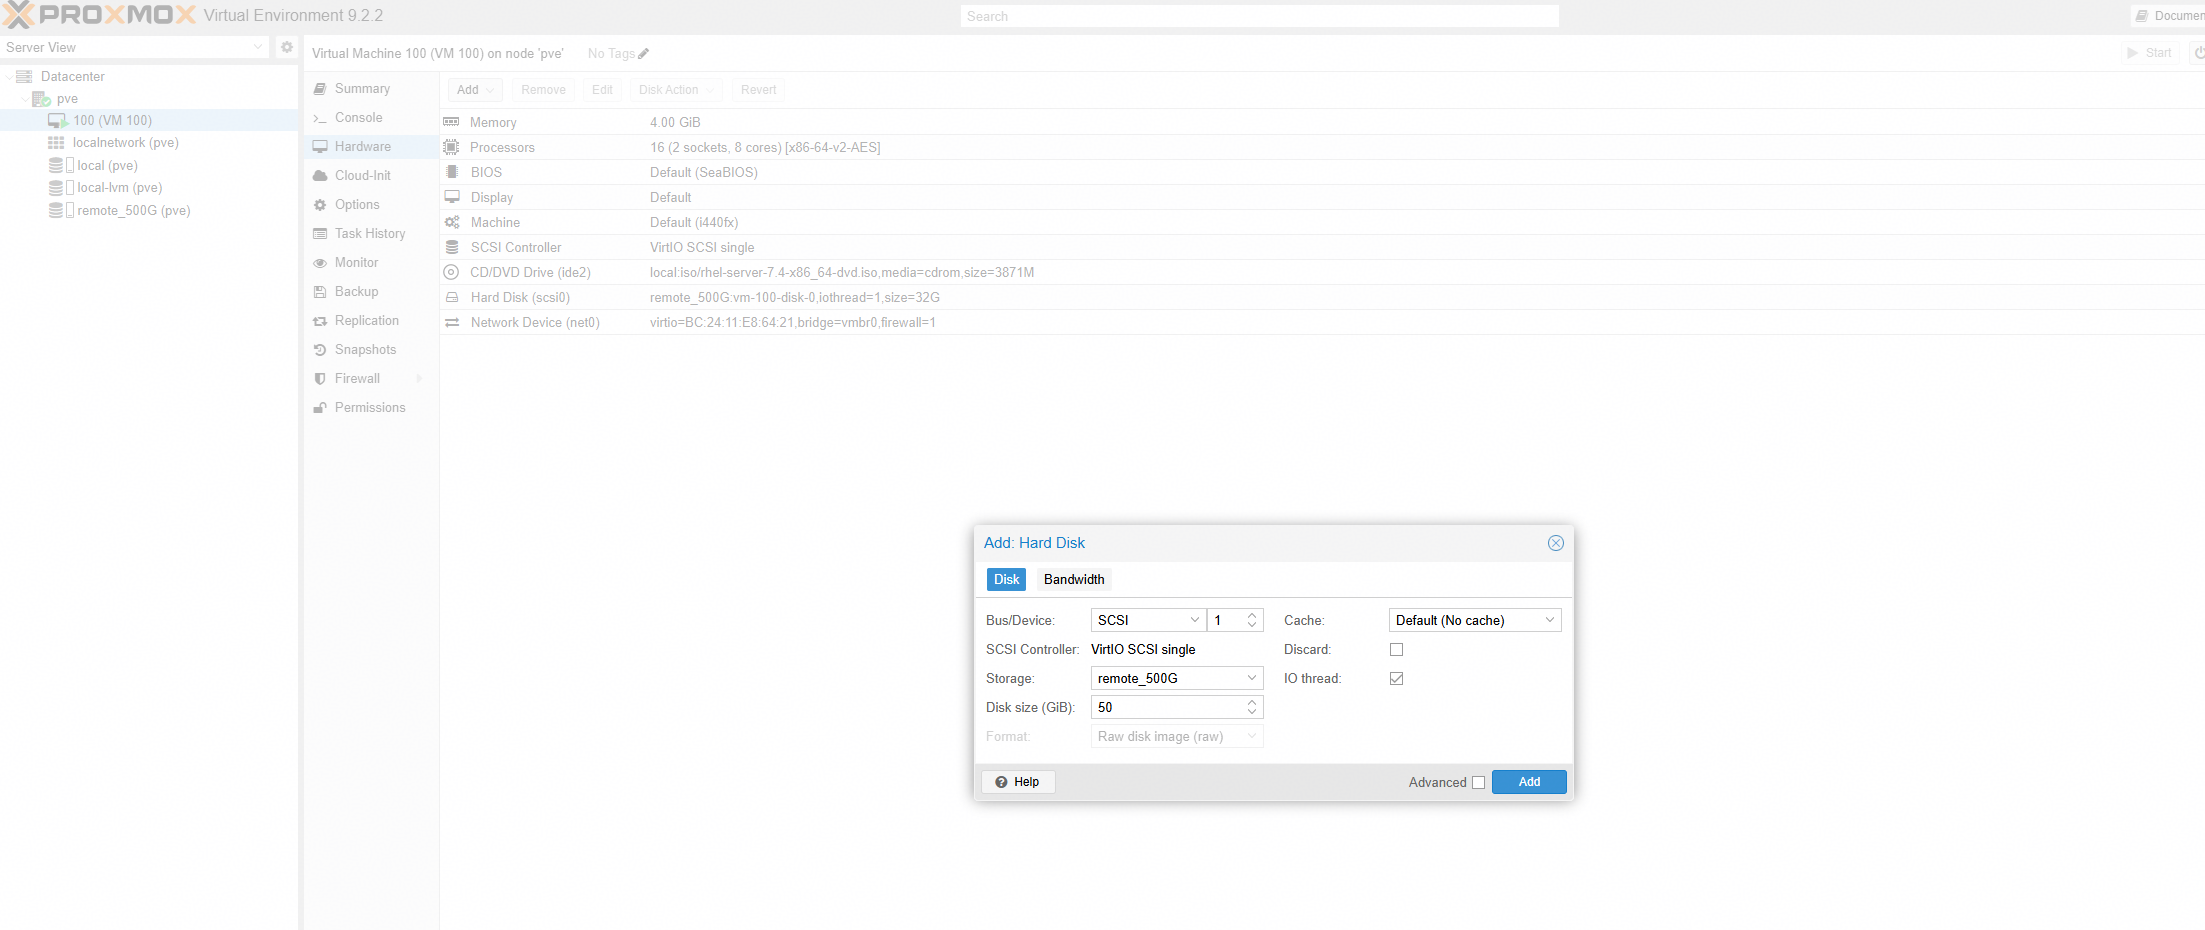
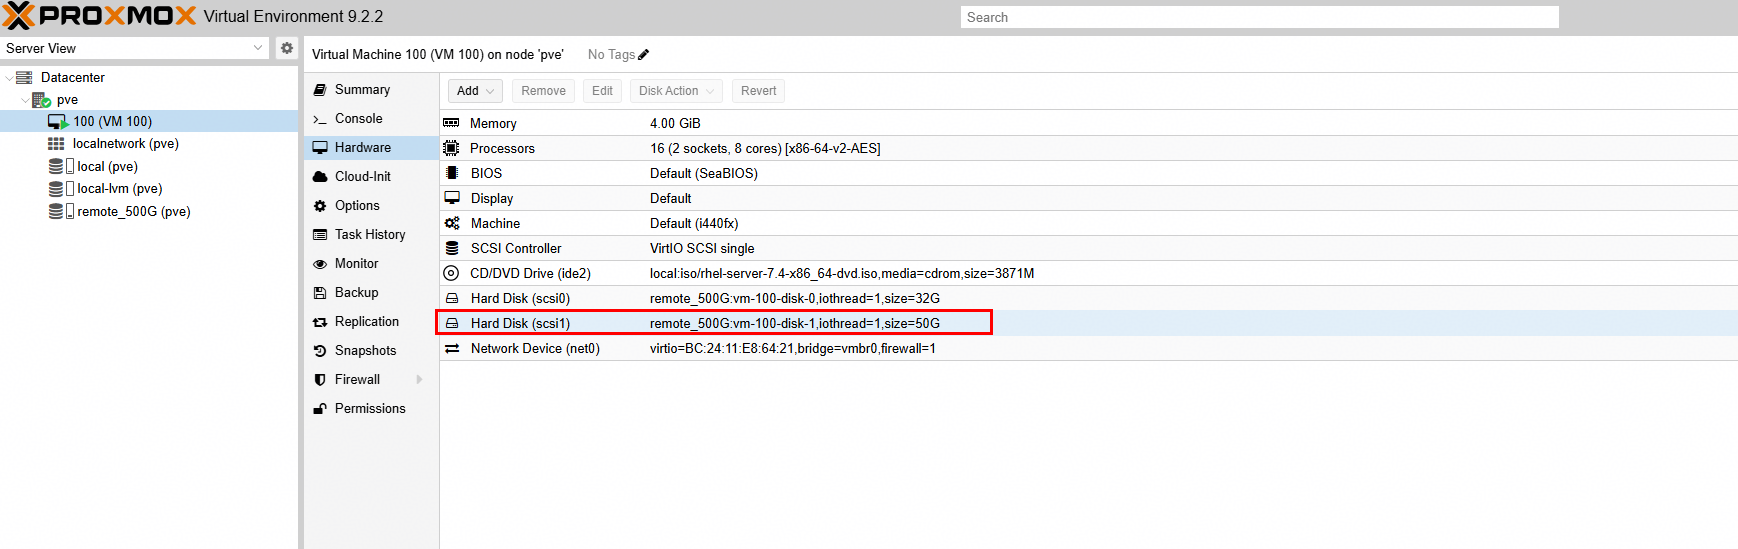
Test Procedures | 1.Log into the Proxmox VE host management interface and start the virtual machine. 2.Select the virtual machine to be tested, execute « Hardware » → « ADD » → choose the device type as « Hard Disk » → select the disk size, location and other parameters, then click « OK » to complete the creation of the disk. 3.Log into the virtual machine and use the device management tools to scan/view the disk devices. 4.Initialize and format the newly added virtual disk. |
Expected Results | 1.In step 3, the new disk added to the virtual machine is detected. 2.In step 4, the initialization and formatting of the virtual disk are completed successfully, with no system errors. |
Test Results | 2.Select the virtual machine to be tested, execute « Hardware » → « ADD » → choose the device type as « Hard Disk » → select the disk size, location and other parameters, then click « OK » to complete the creation of the disk. 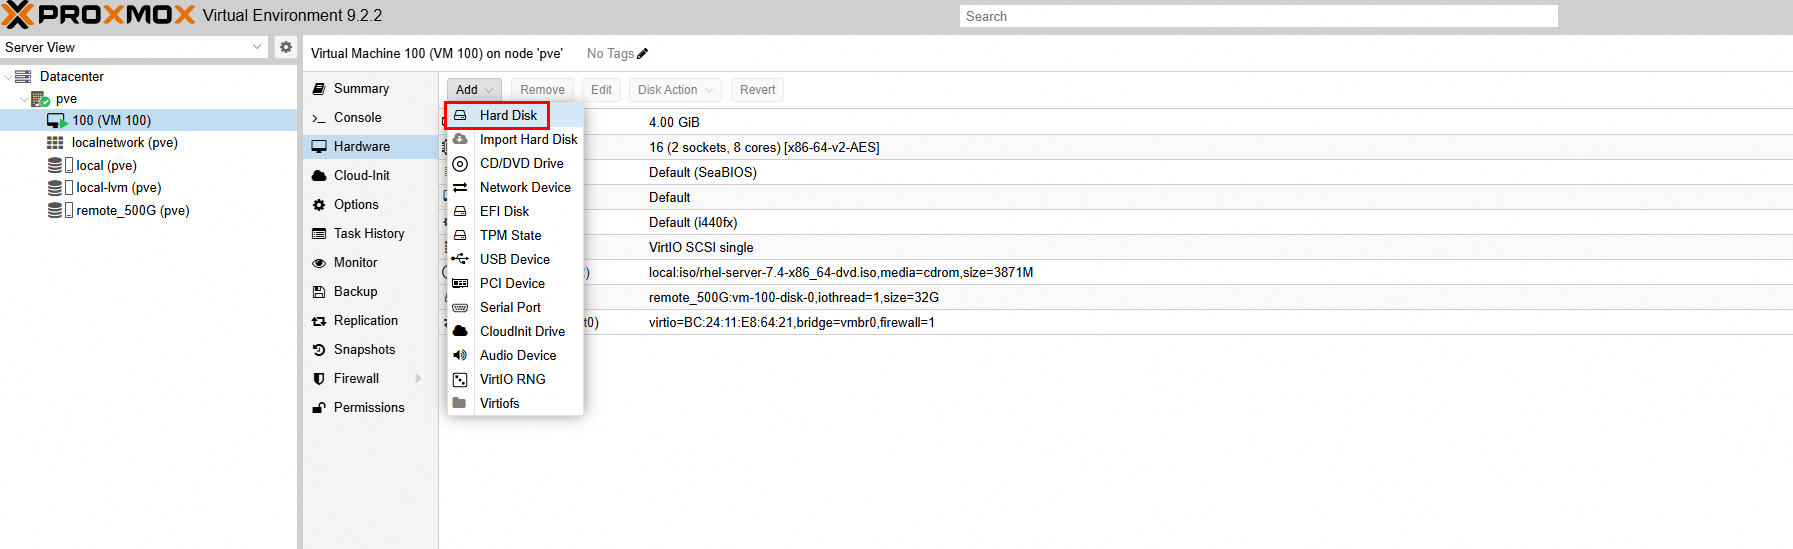
4.Initialize and format the newly added virtual disk. 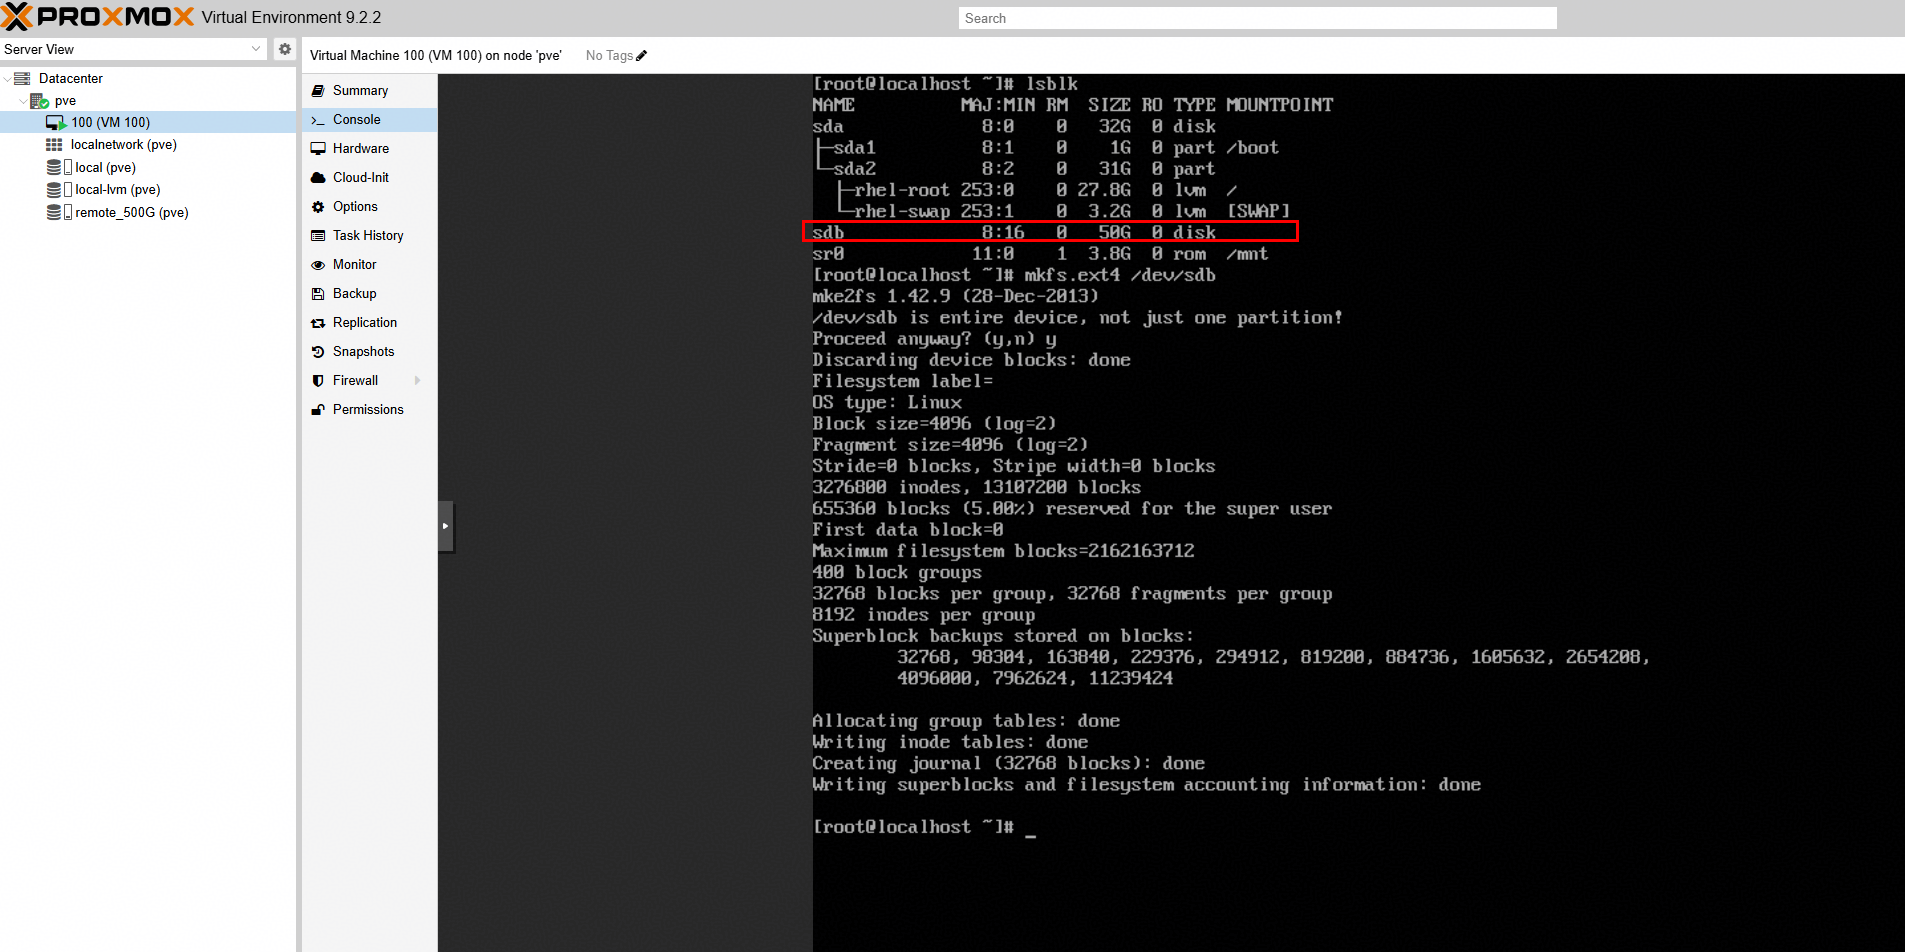
|
Test Conclusion | Passed |
3.6 LUN Expansion
Test Purpose | To Verify That the LUN Mapped to Host Could be Expanded |
Network Diagram | Reference to Figure 1.1 |
Prerequisites | 1.The network has been correctly set up according to the corresponding scenario and the physical links are functioning properly. 2.The host system is operating normally. 3.The storage system is functioning normally. 4.Multipath has been properly installed and configured. |
Test Procedures | 1.Log into the storage array management system and create a LUNs with size of 500GB. 2.Map the LUNs to the corresponding host or host group. 3.Log into the host, scan the mapped LUNs, and check whether the LUN mapping status, number, and capacity information are correct. Also, create a LVM Storage on the LUN with sizes of 500GB. 4. Log into the storage array management system and expand the LUN to 600GB. 5.Log into the host, scan the mapped LUNs, and check the LUN mapping status, number, and capacity information. Also, perform a full capacity expansion on the created Storage. |
Expected Results | 1.In step 3, the scanned LUN information is correct, and the Storage could be created successfully. 2.In step 4, the expansion of the LUNs in the storage array is successful. 3.In step 5, after scanning, the capacity of both LUNs is correctly updated, and the LVM Storage expands successfully. |
Test Results | 1.Log into the storage array management system and create a LUNs with size of 500GB. 2.Map the LUNs to the corresponding host or host group. 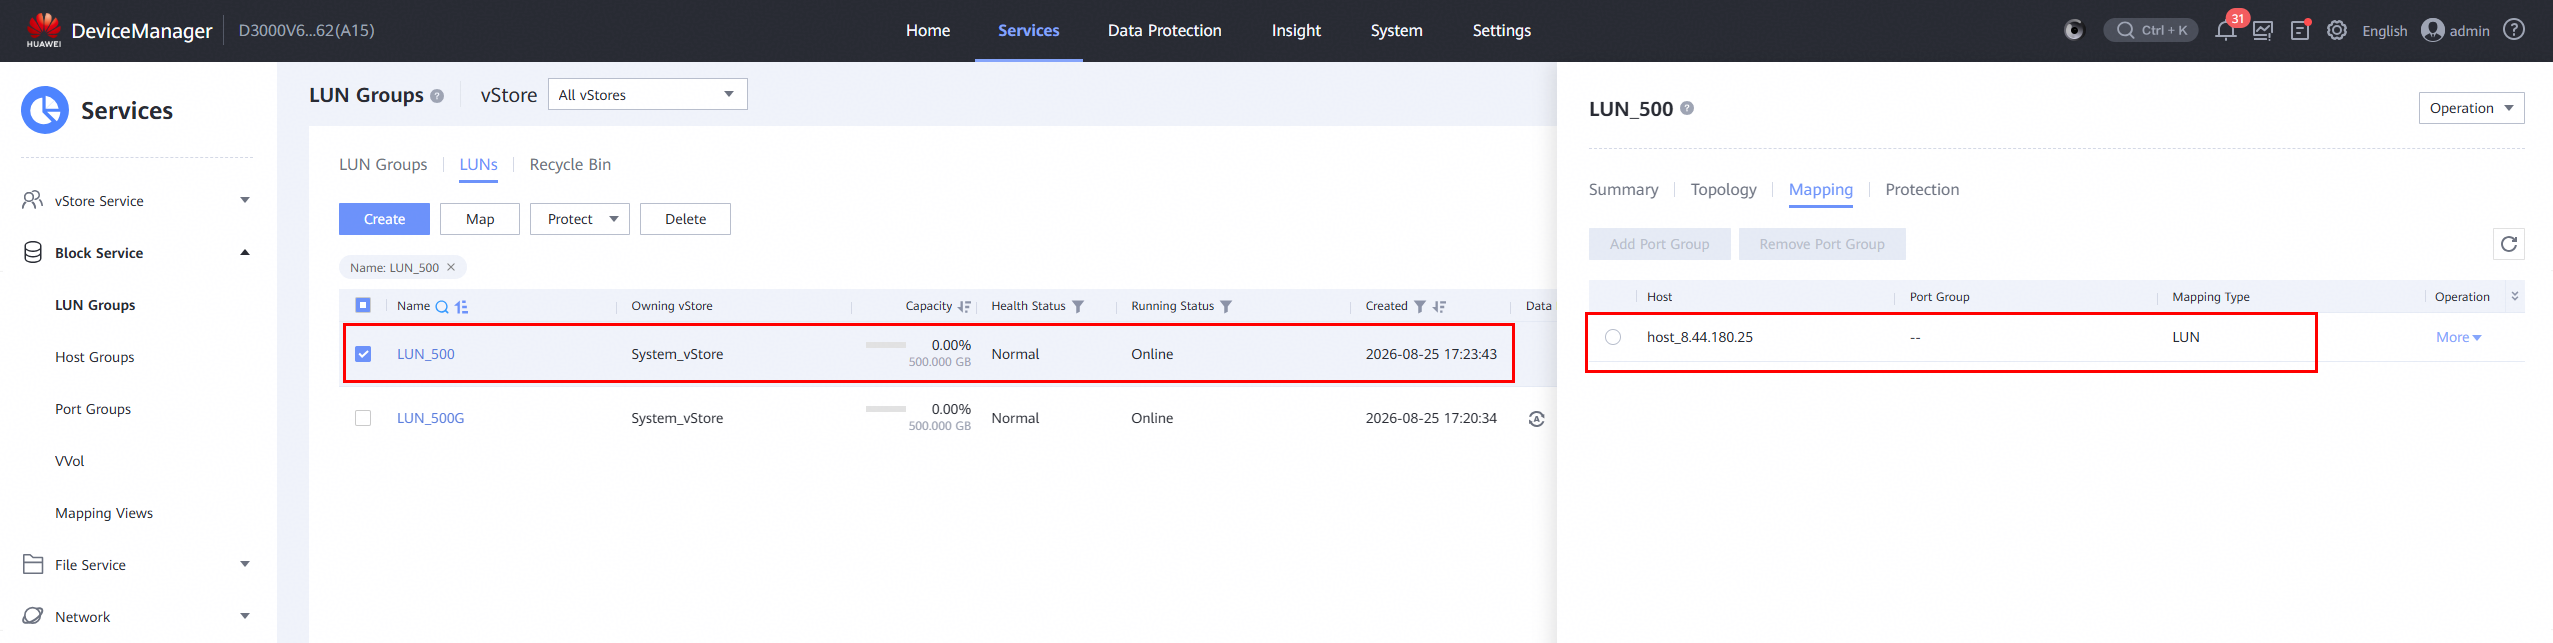
3.Log into the host, scan the mapped LUNs, and check whether the LUN mapping status, number, and capacity information are correct. Also, create a Storage on the LUN with sizes of 500GB. 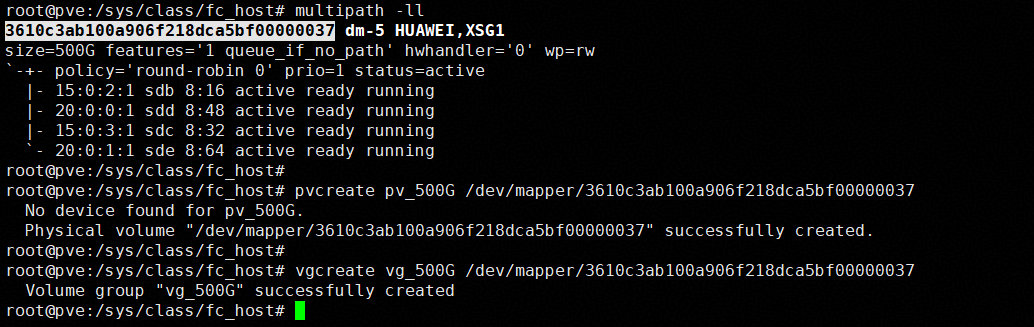
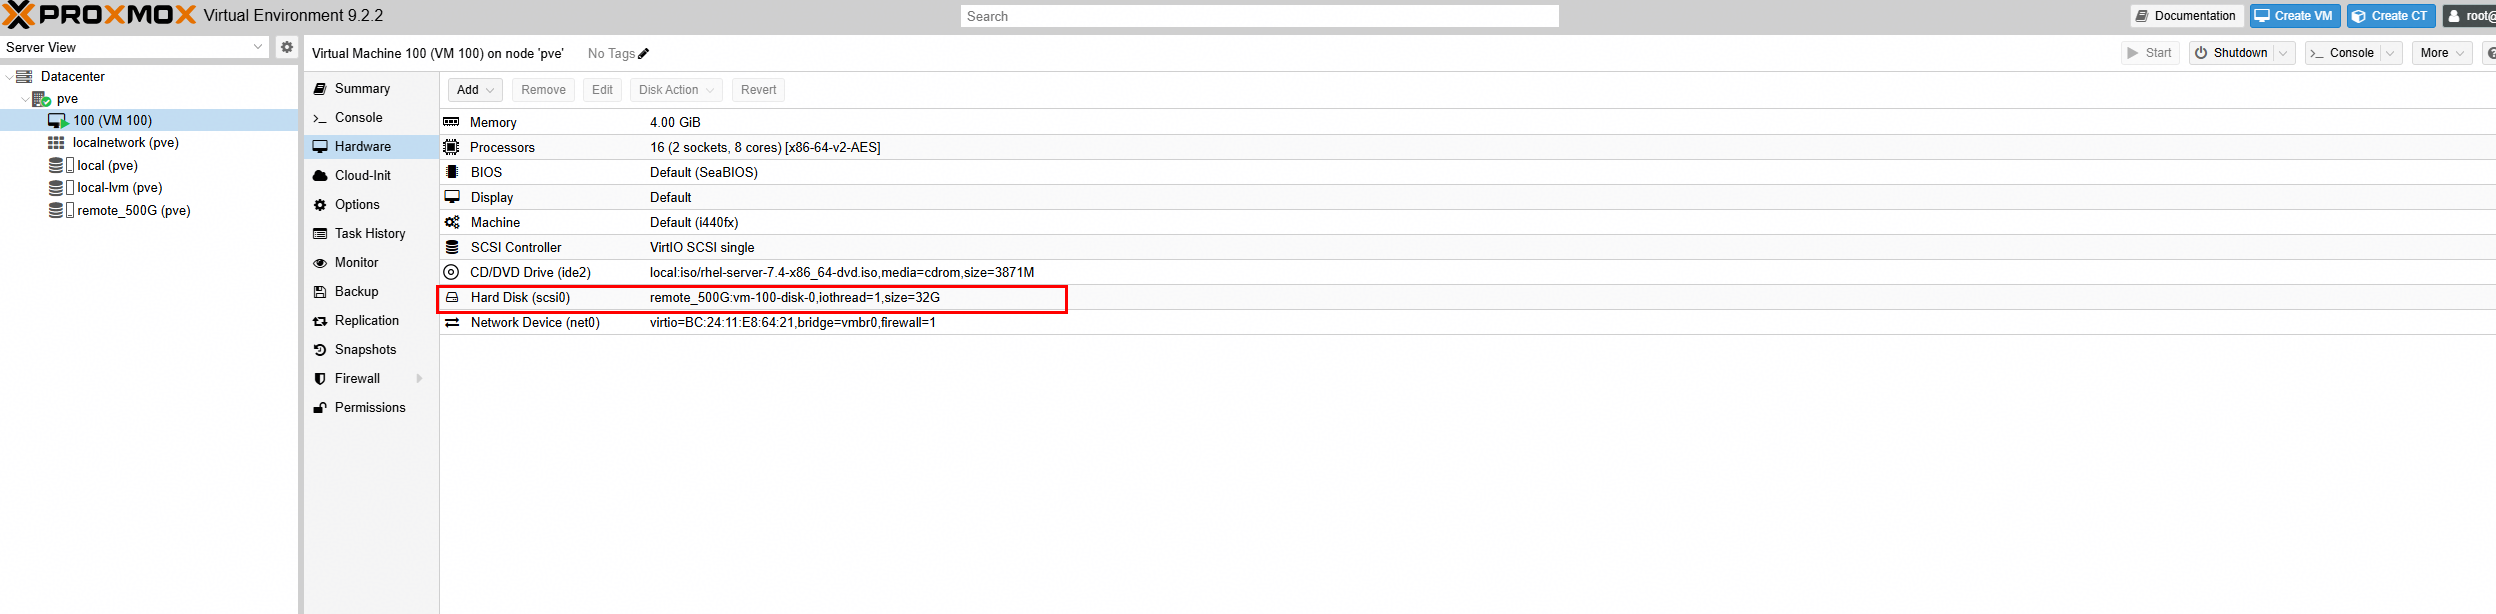
4.Log into the storage array management system and expand the LUN to 600GB. 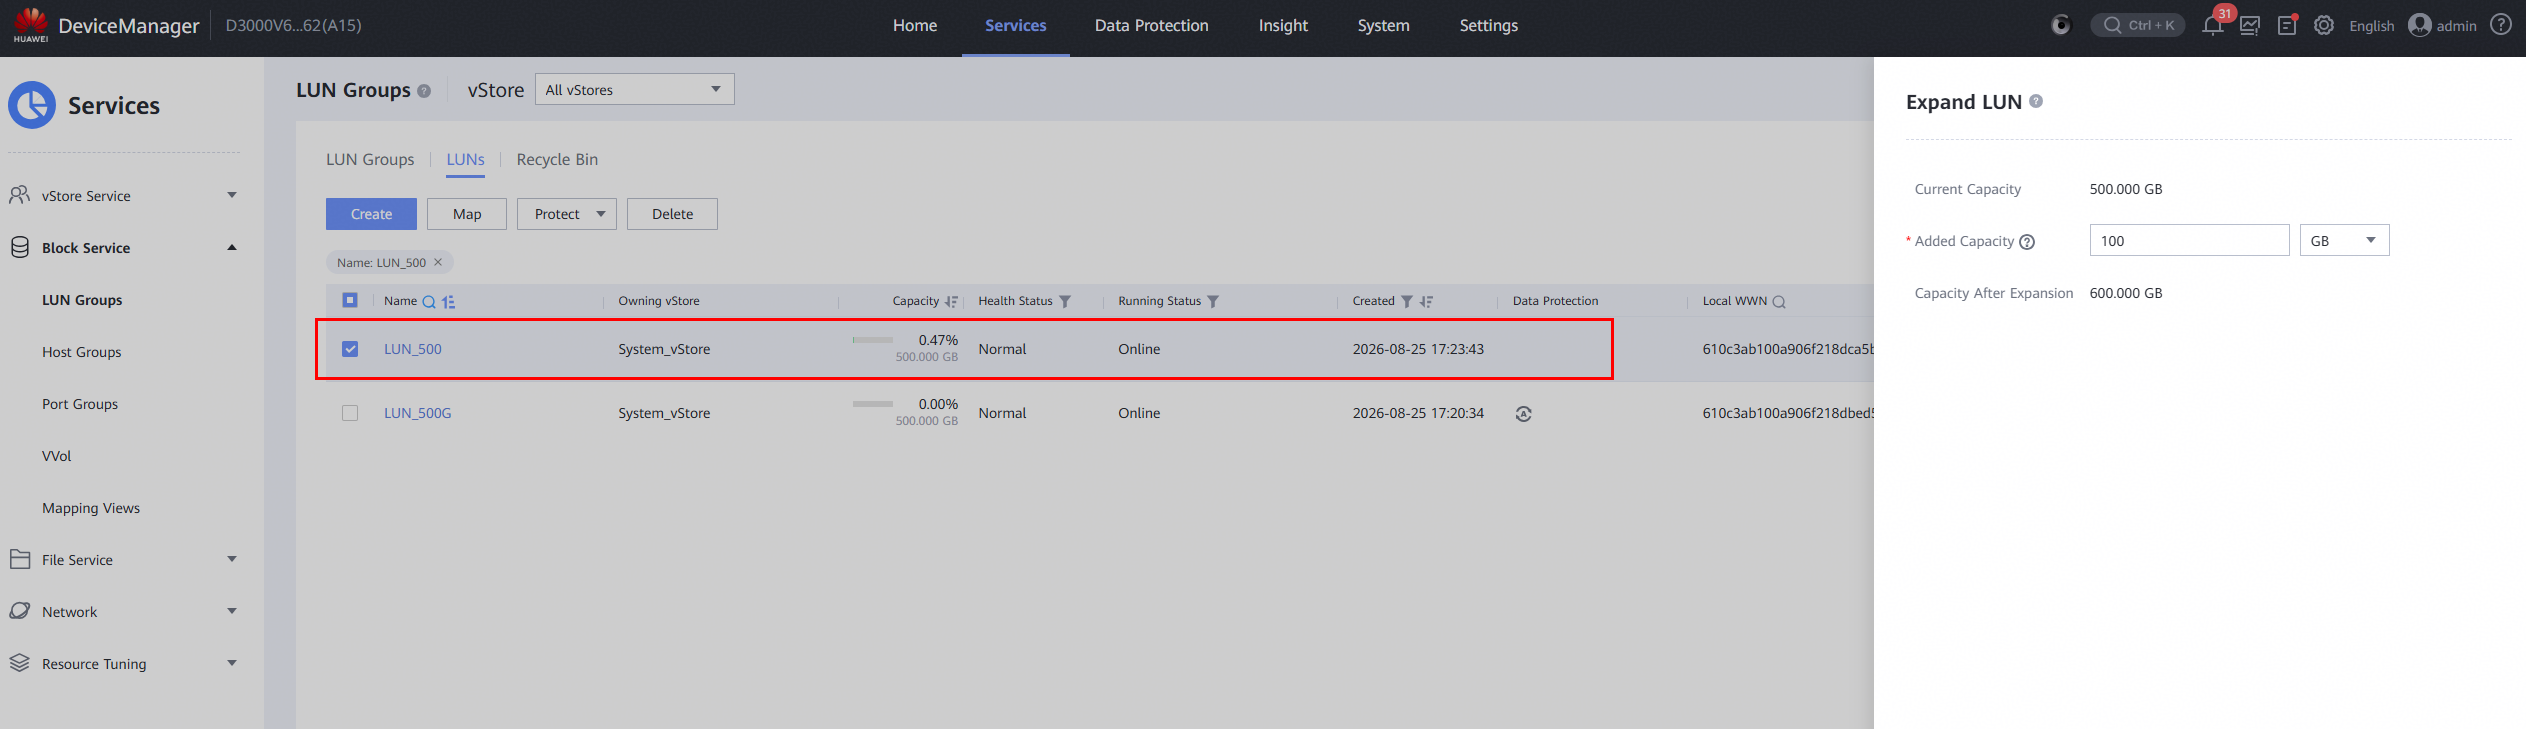
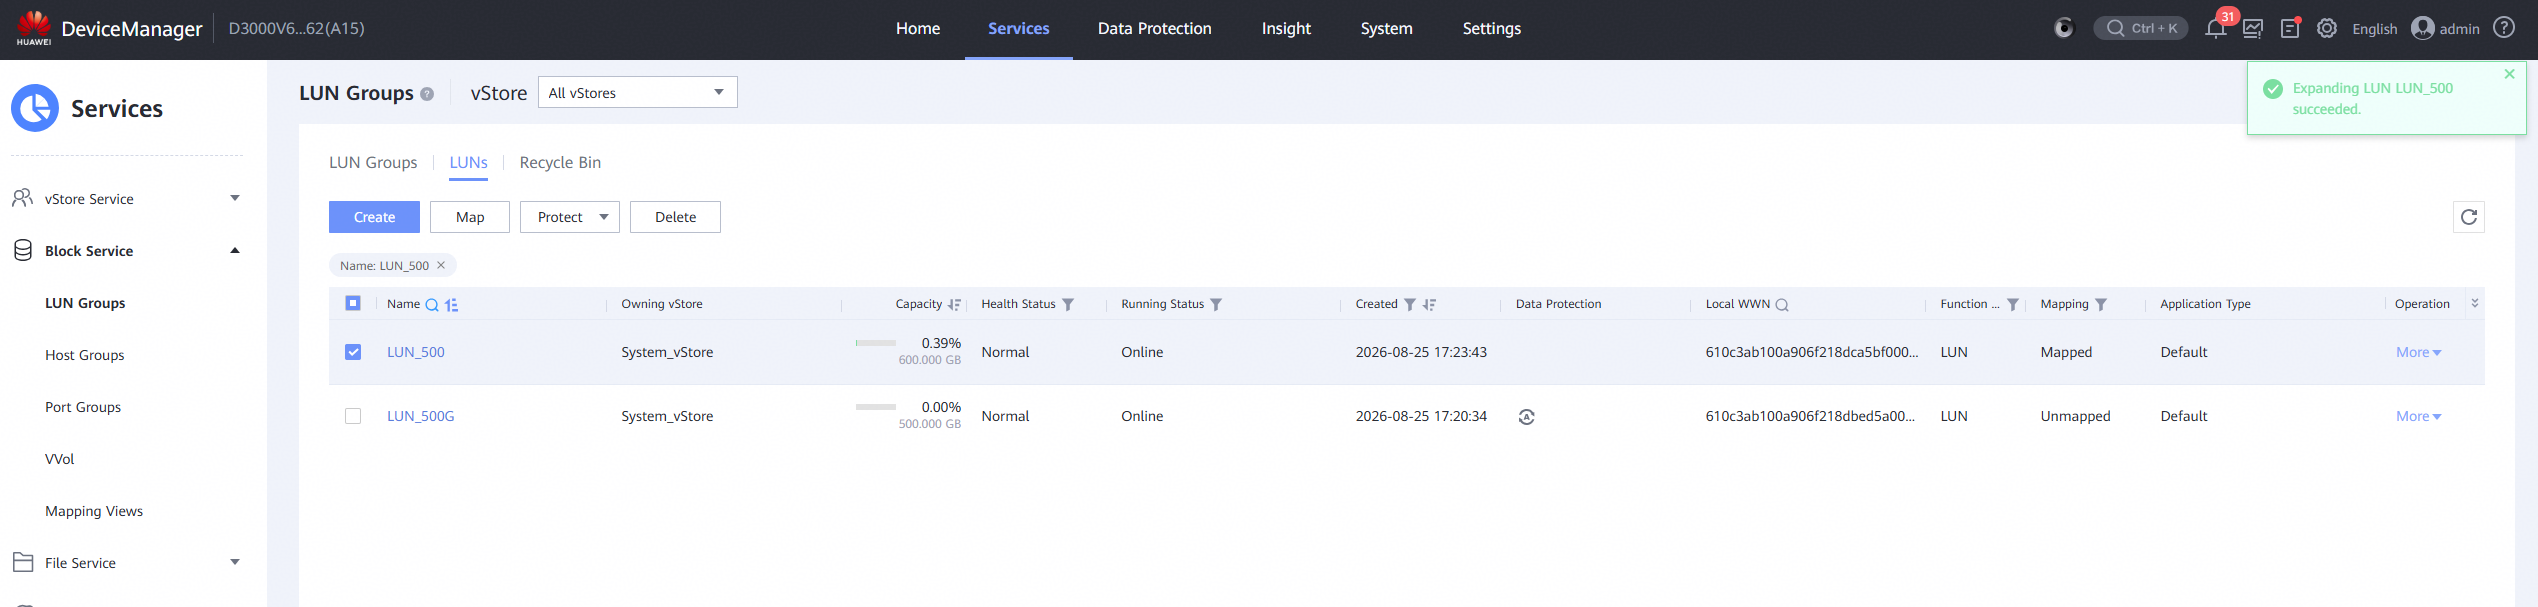
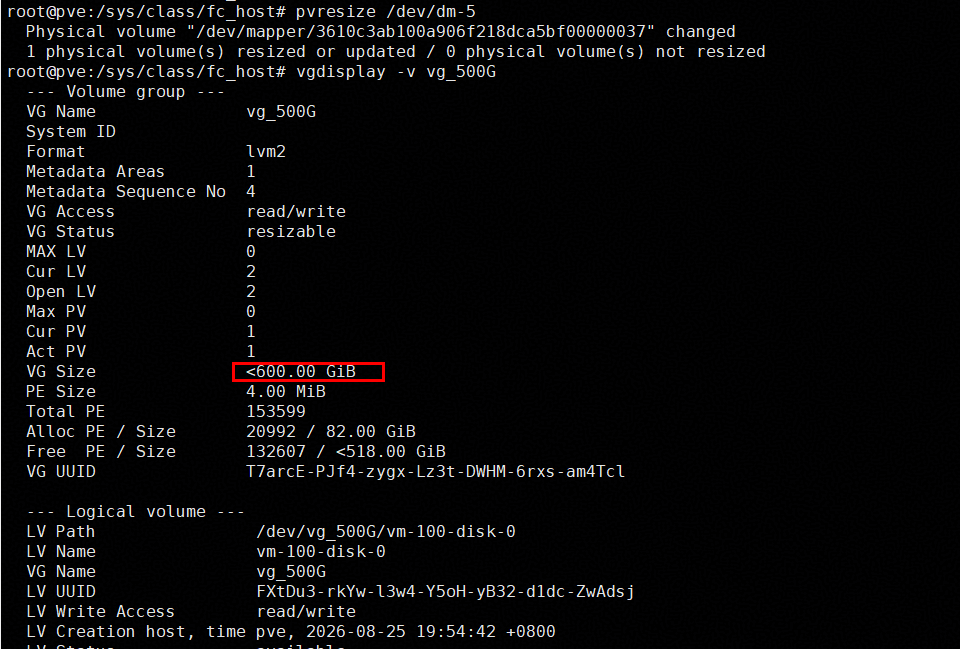
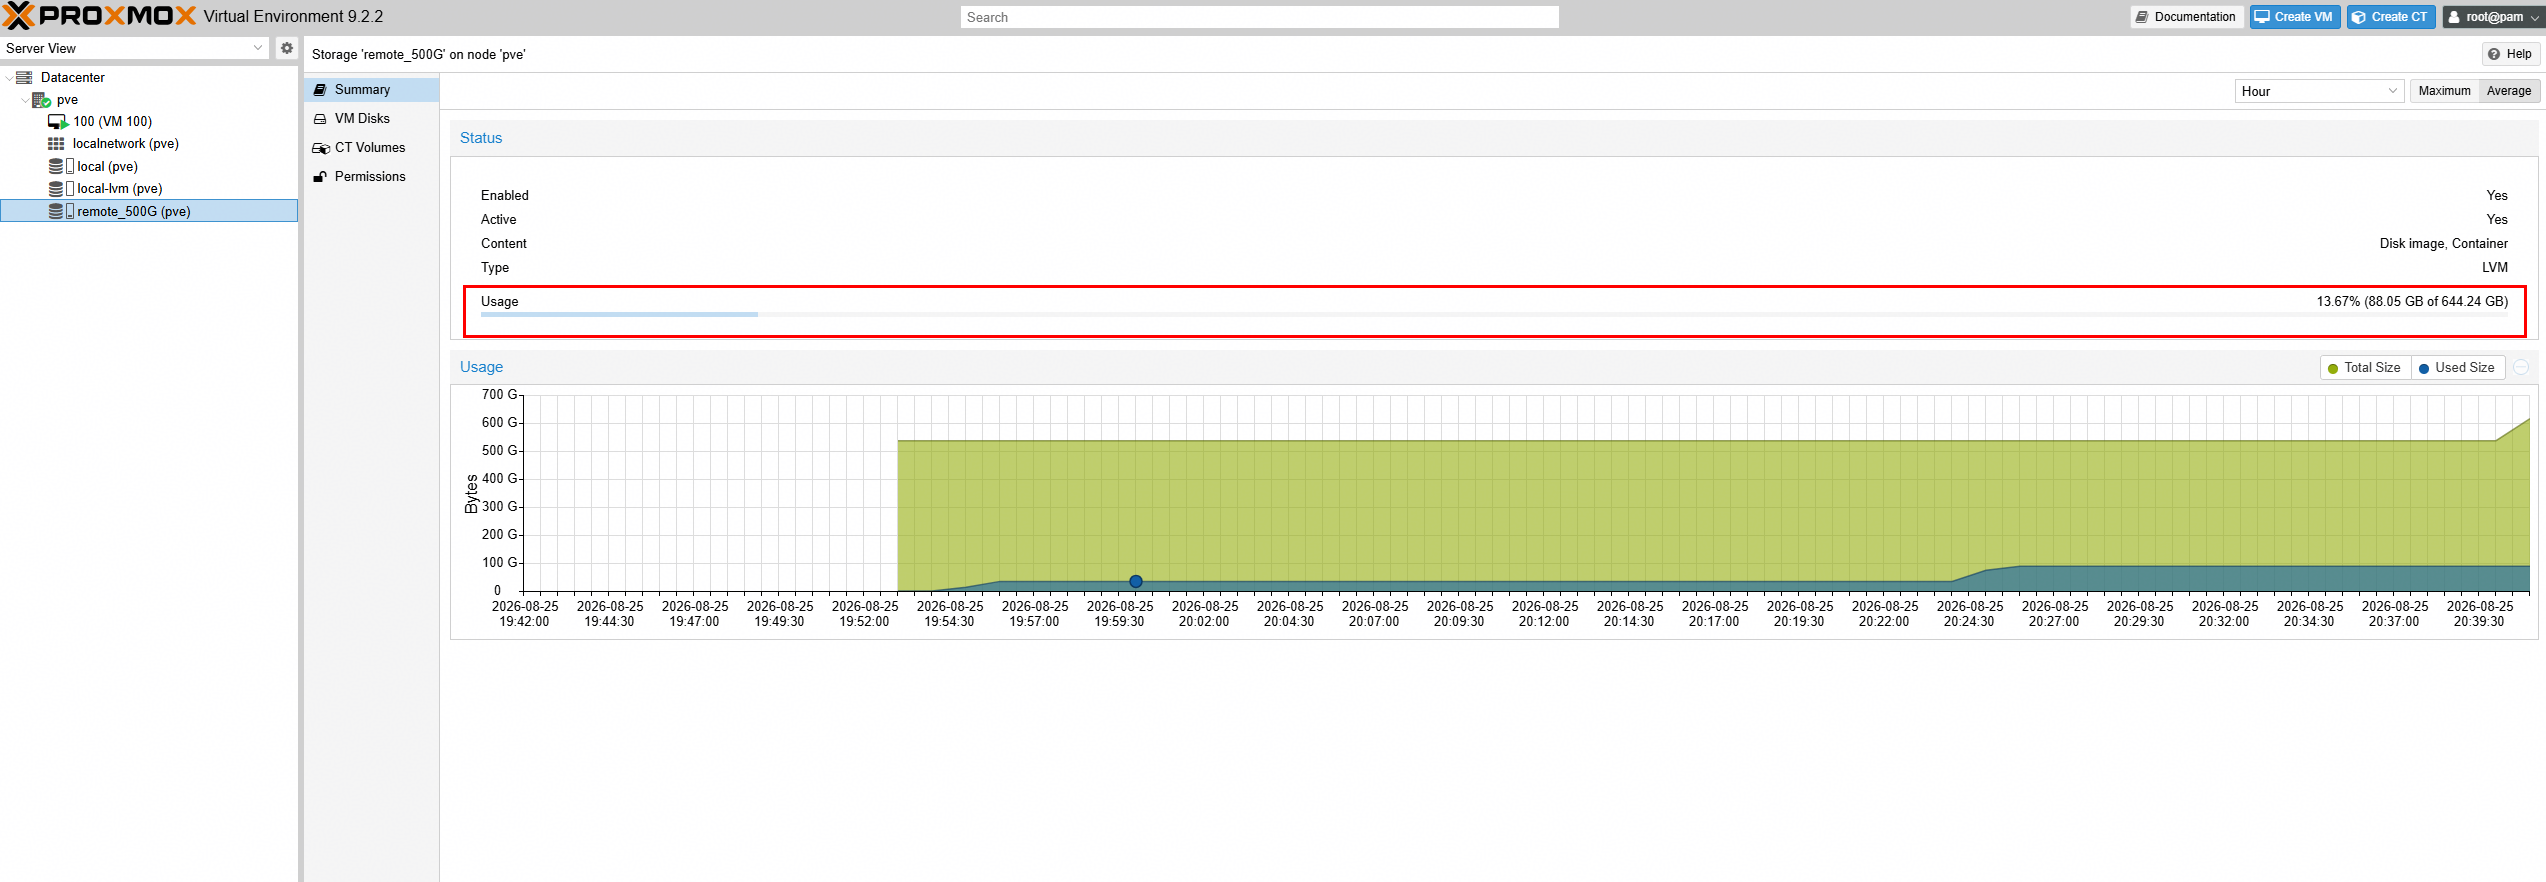
5.Log into the host, scan the mapped LUNs, and check the LUN mapping status, number, and capacity information. Also, perform a full capacity expansion on the created Storage. 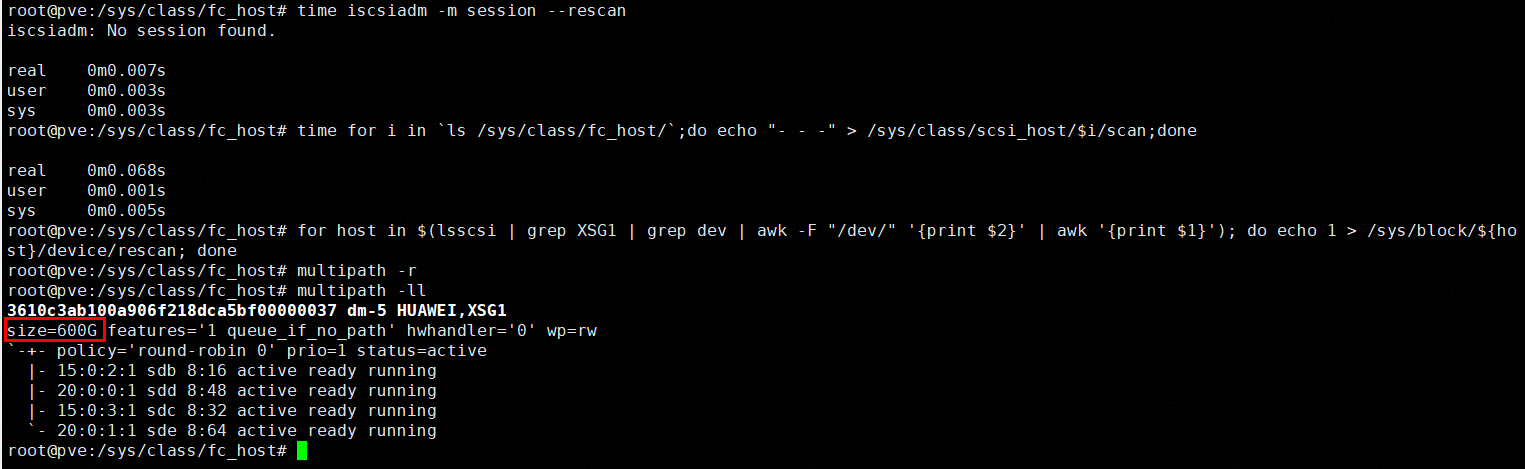
|
Test Conclusion | Passed |
3.7 Manual ThinLUN Space Reclamation
Test Purpose | To Verify That Manual Space Reclamation is Successfully |
Network Diagram | Reference to Figure 1.1 |
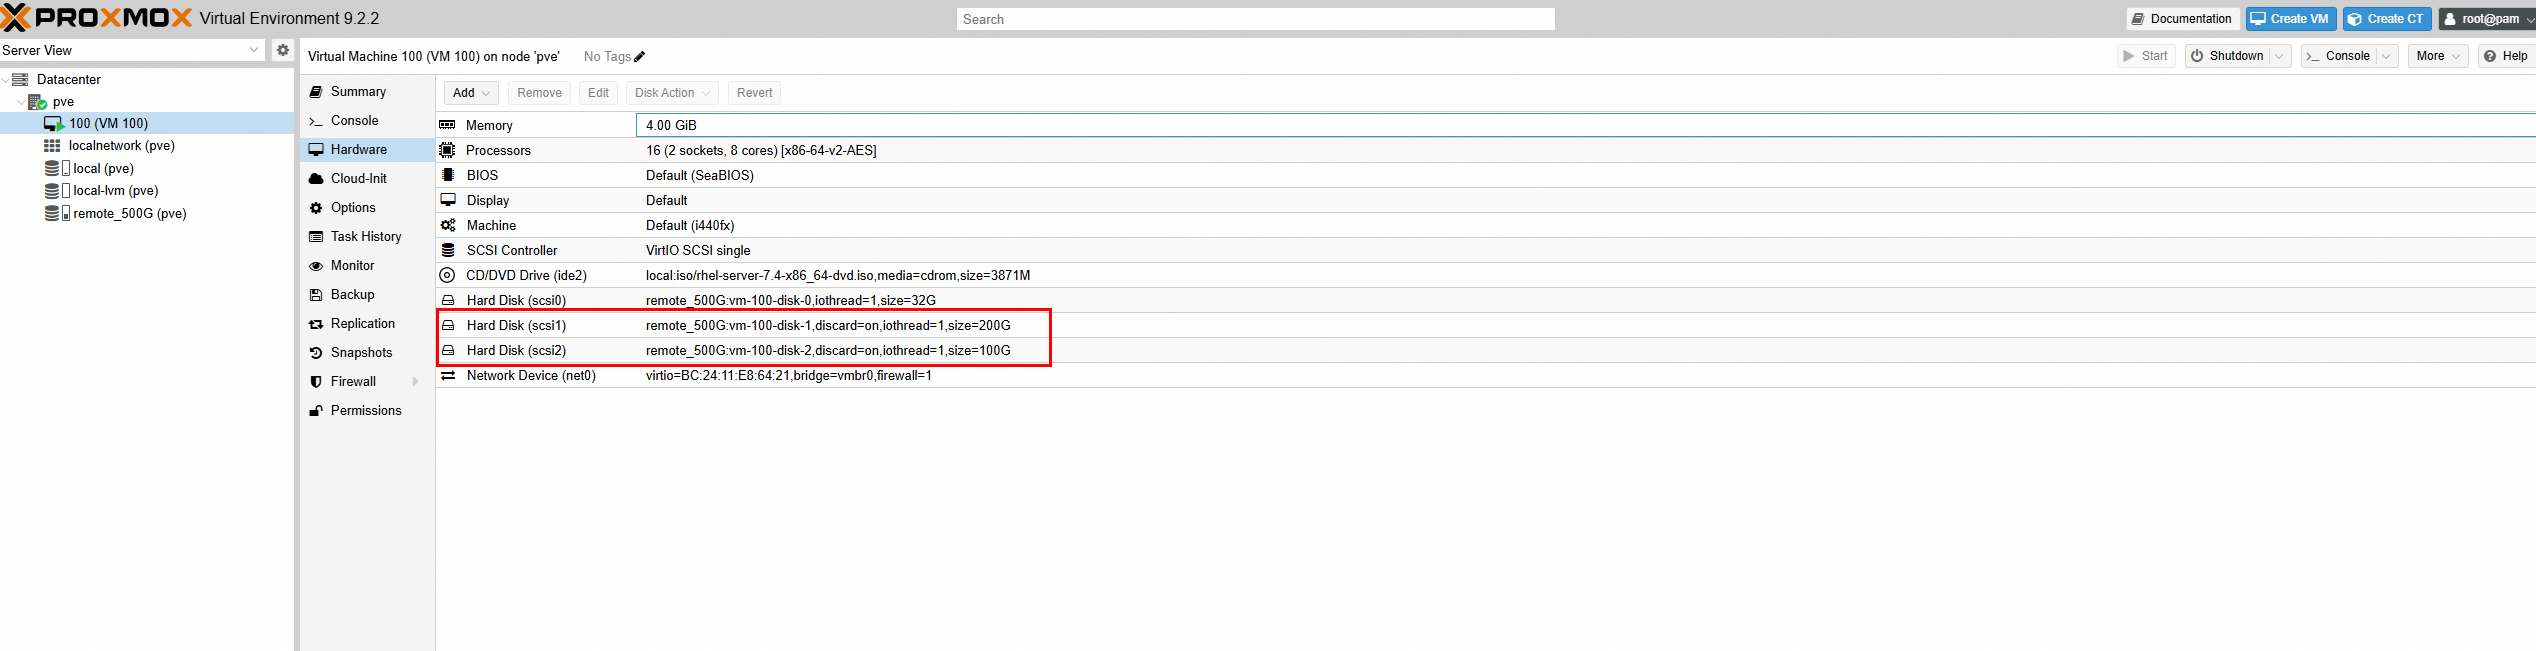
Prerequisites | 1.The network has been correctly set up according to the corresponding scenario and the physical links are functioning properly. 2.The host system is operating normally. 3.The storage system is functioning normally. 4.Multipath has been properly installed and configured. 5.Map a 500GB LUN from the storage to the host, use the LUN to create LVM Storage on the Proxmox VE, and create a VM. |
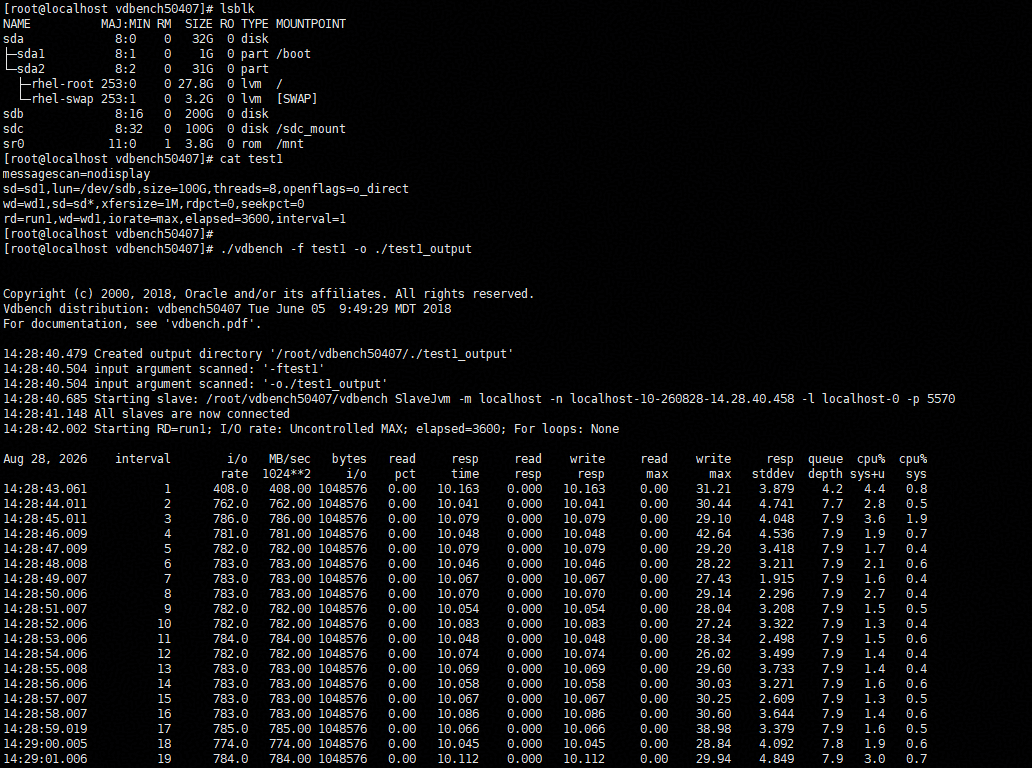
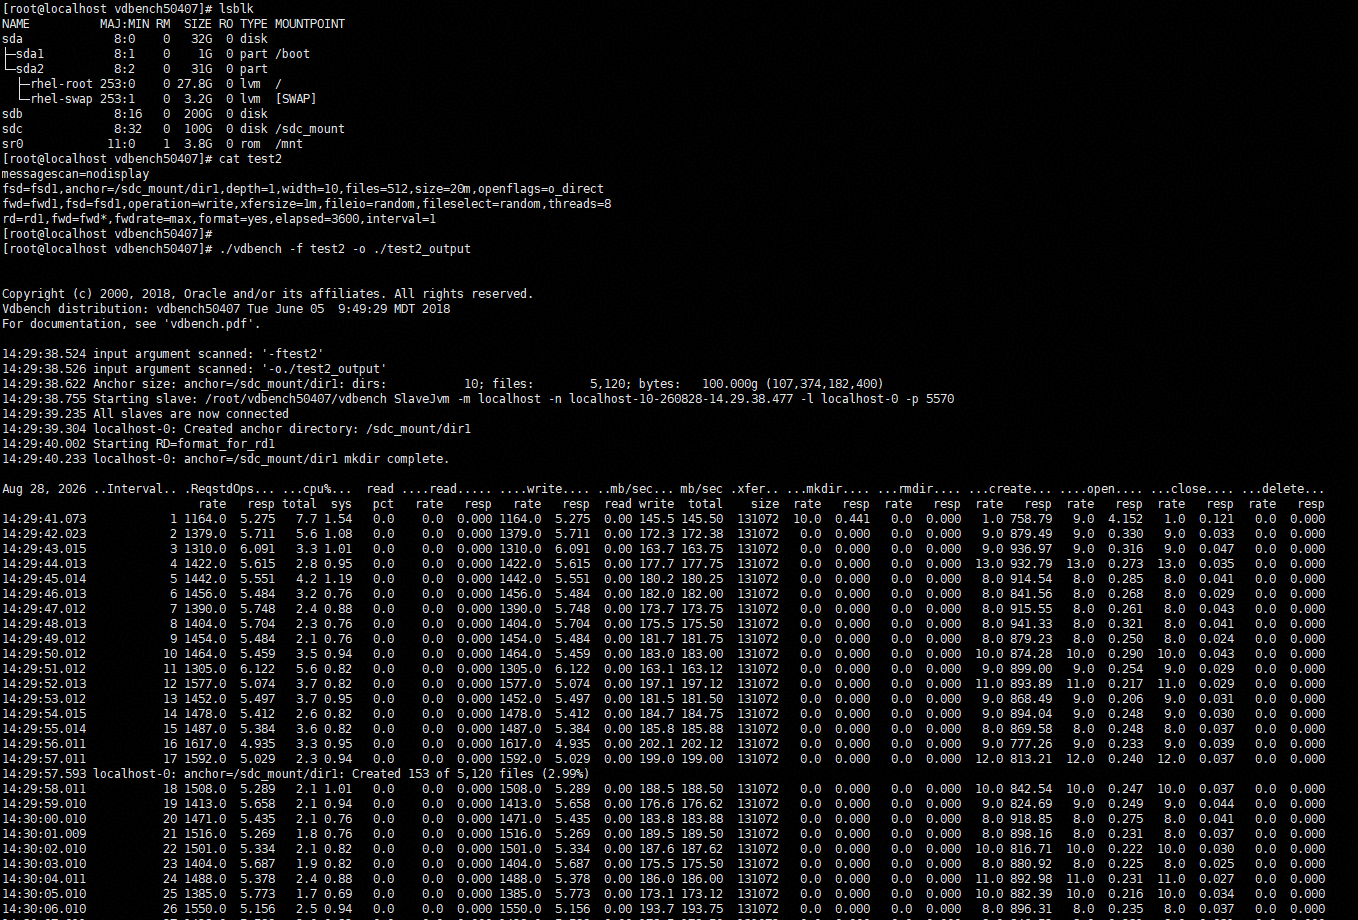
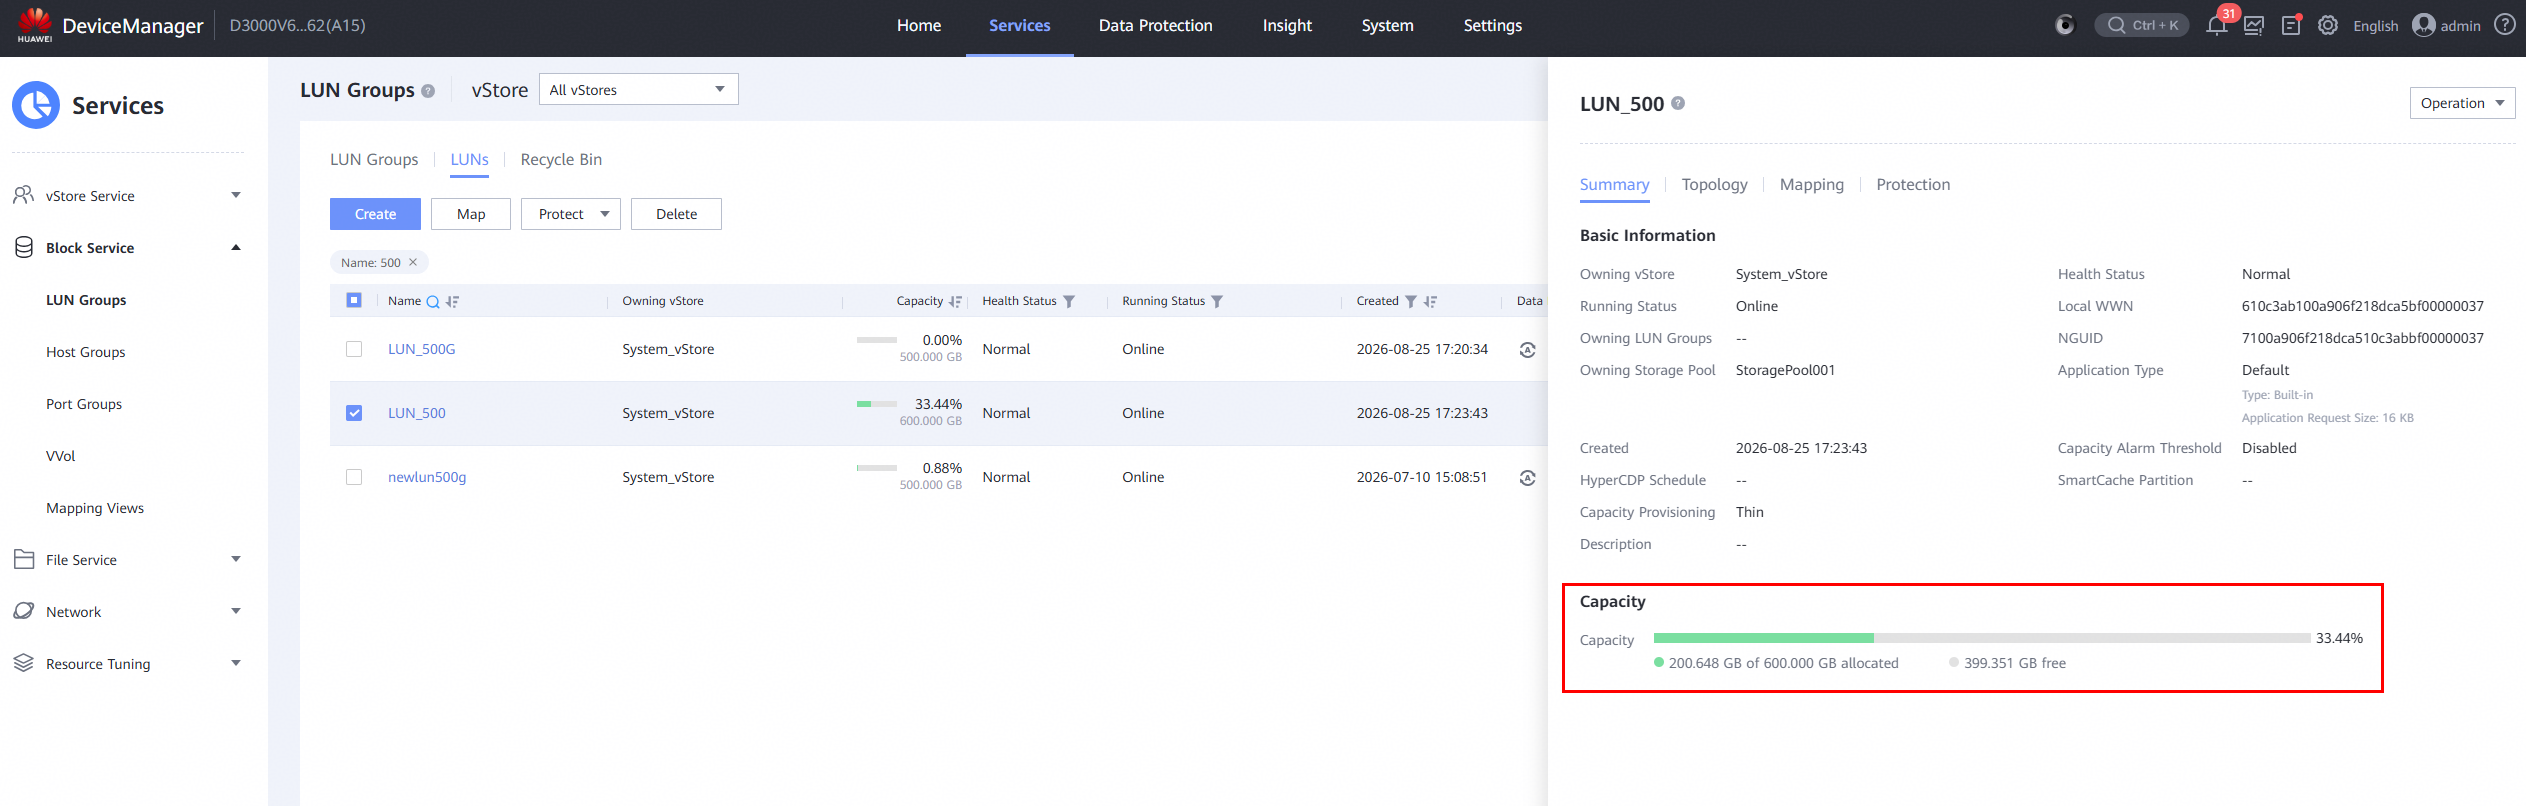
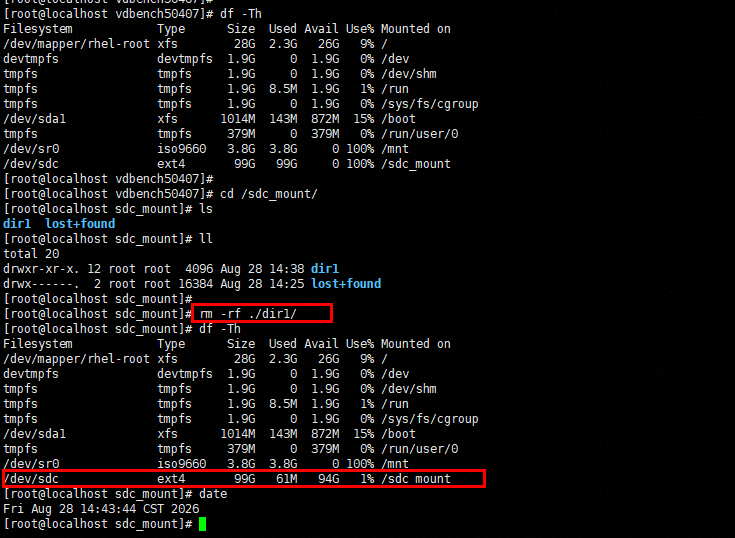
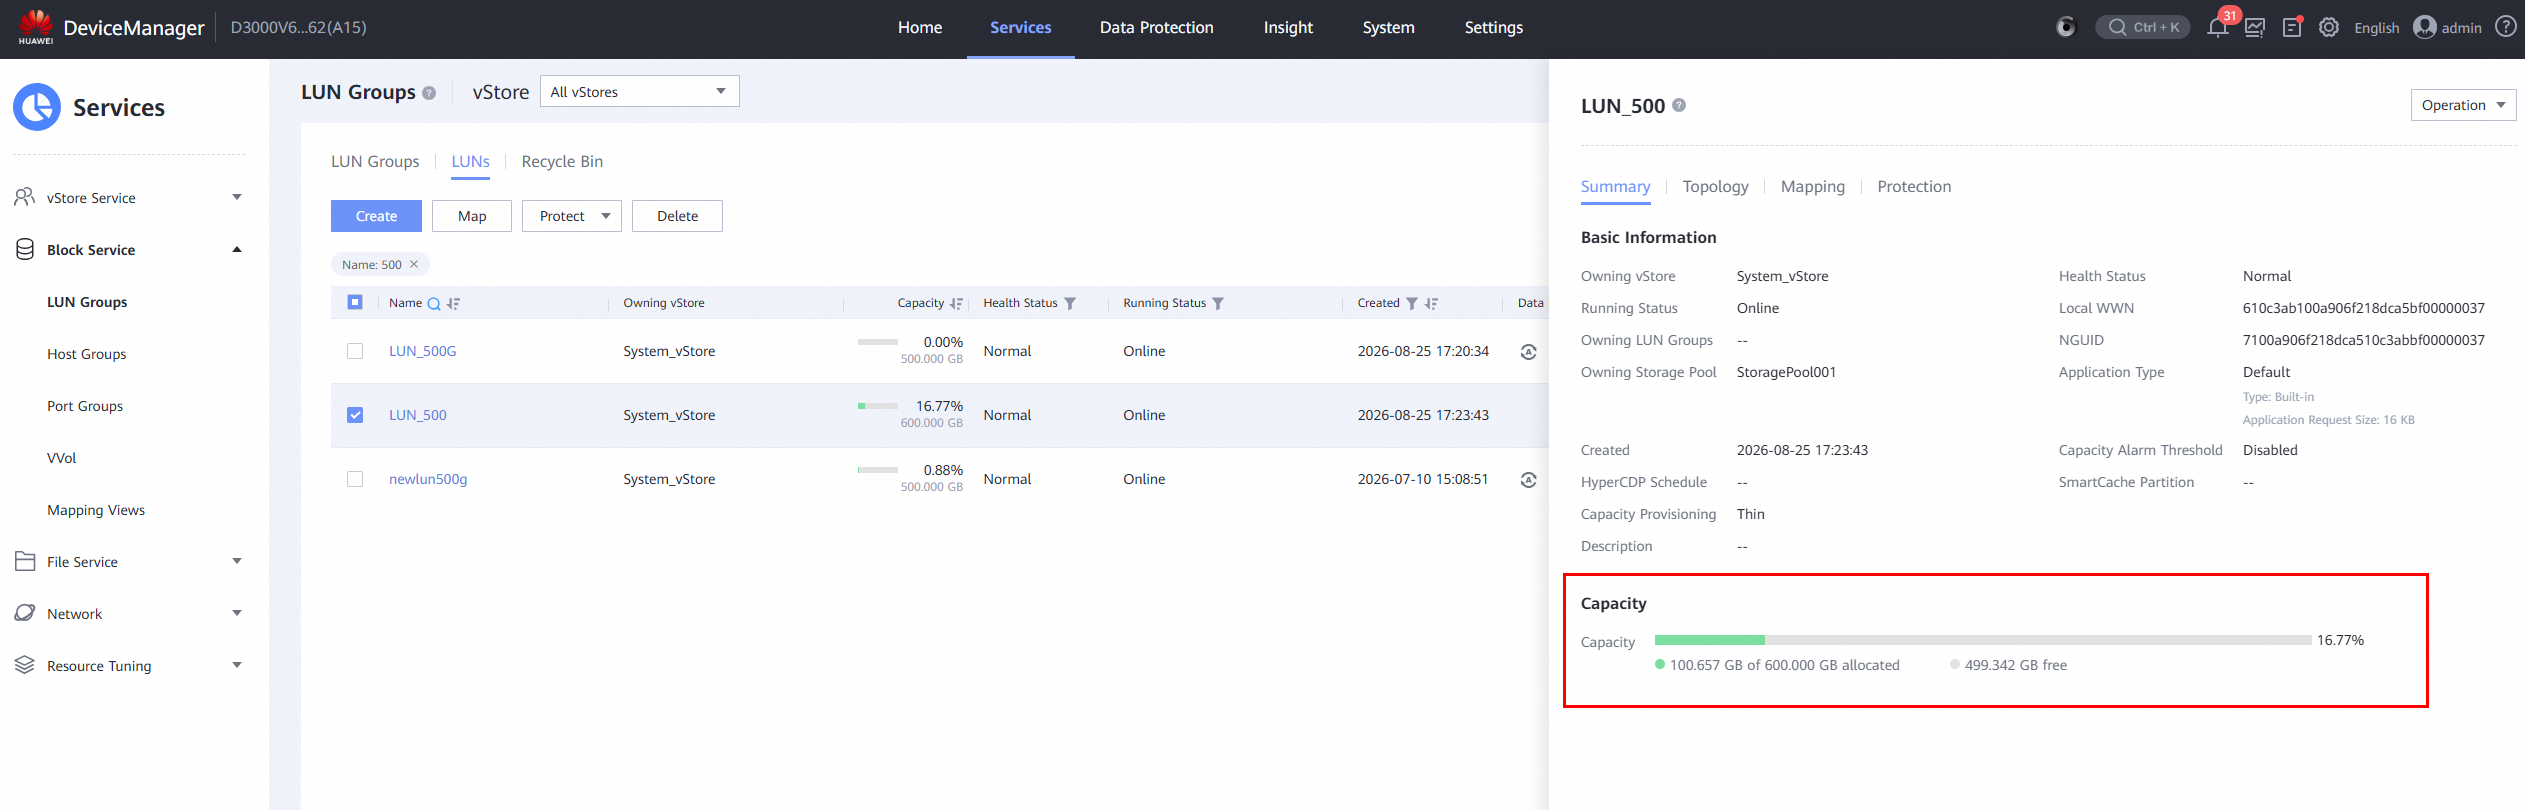
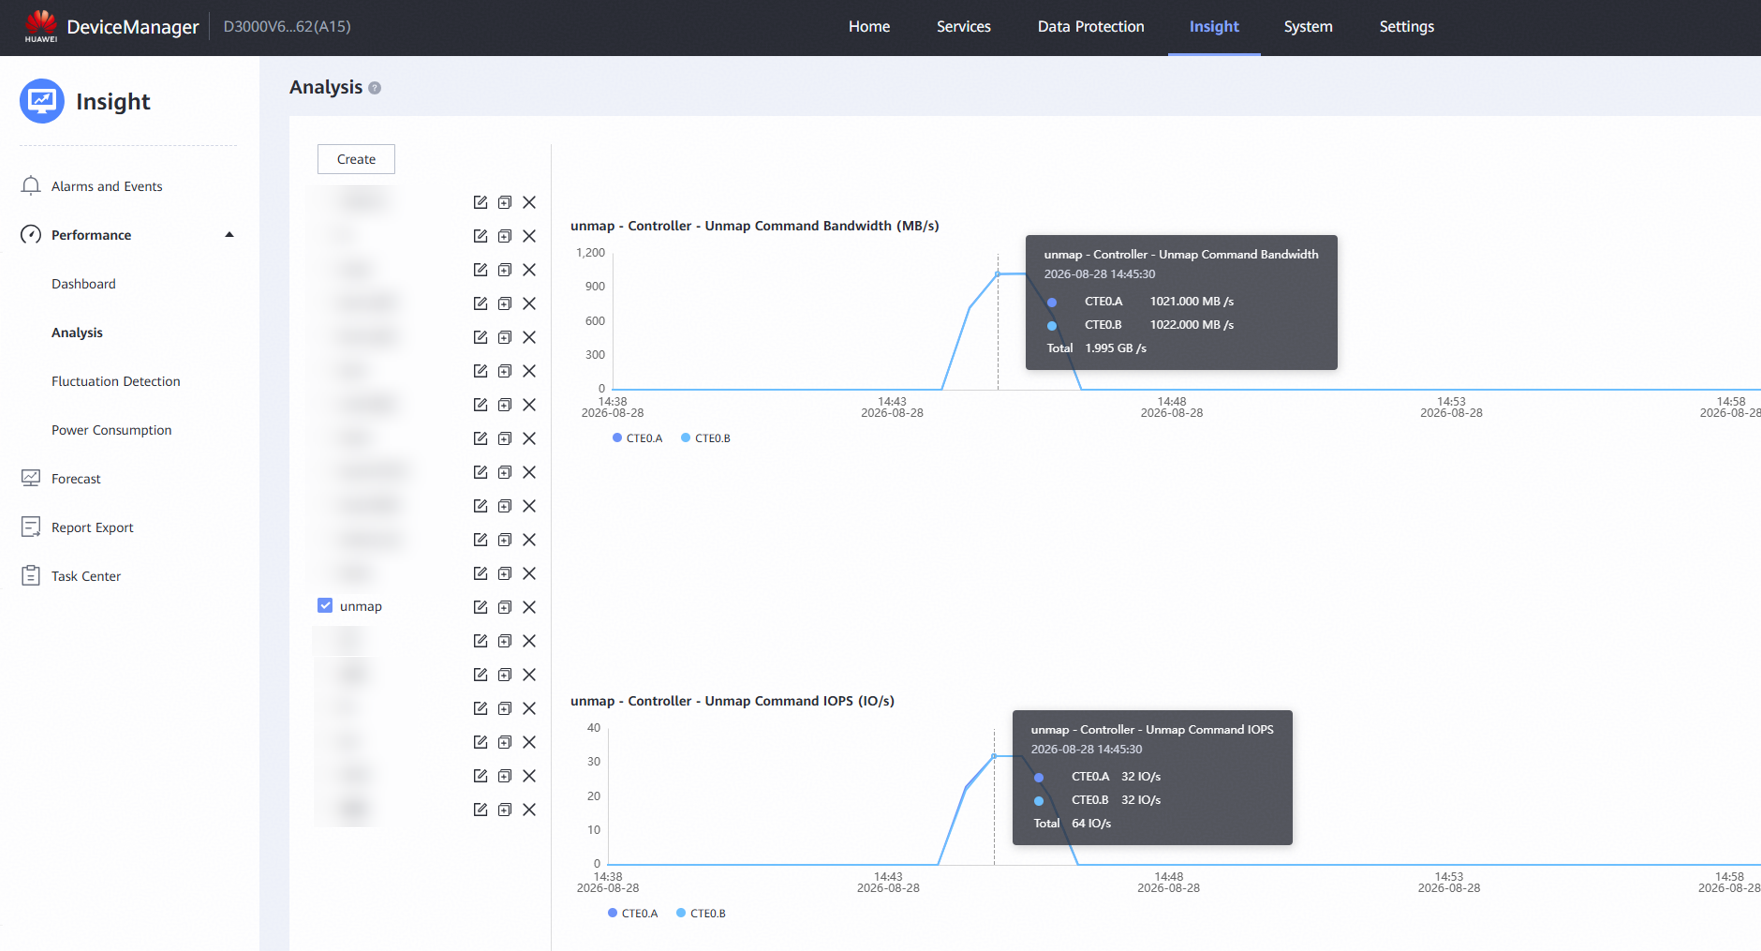
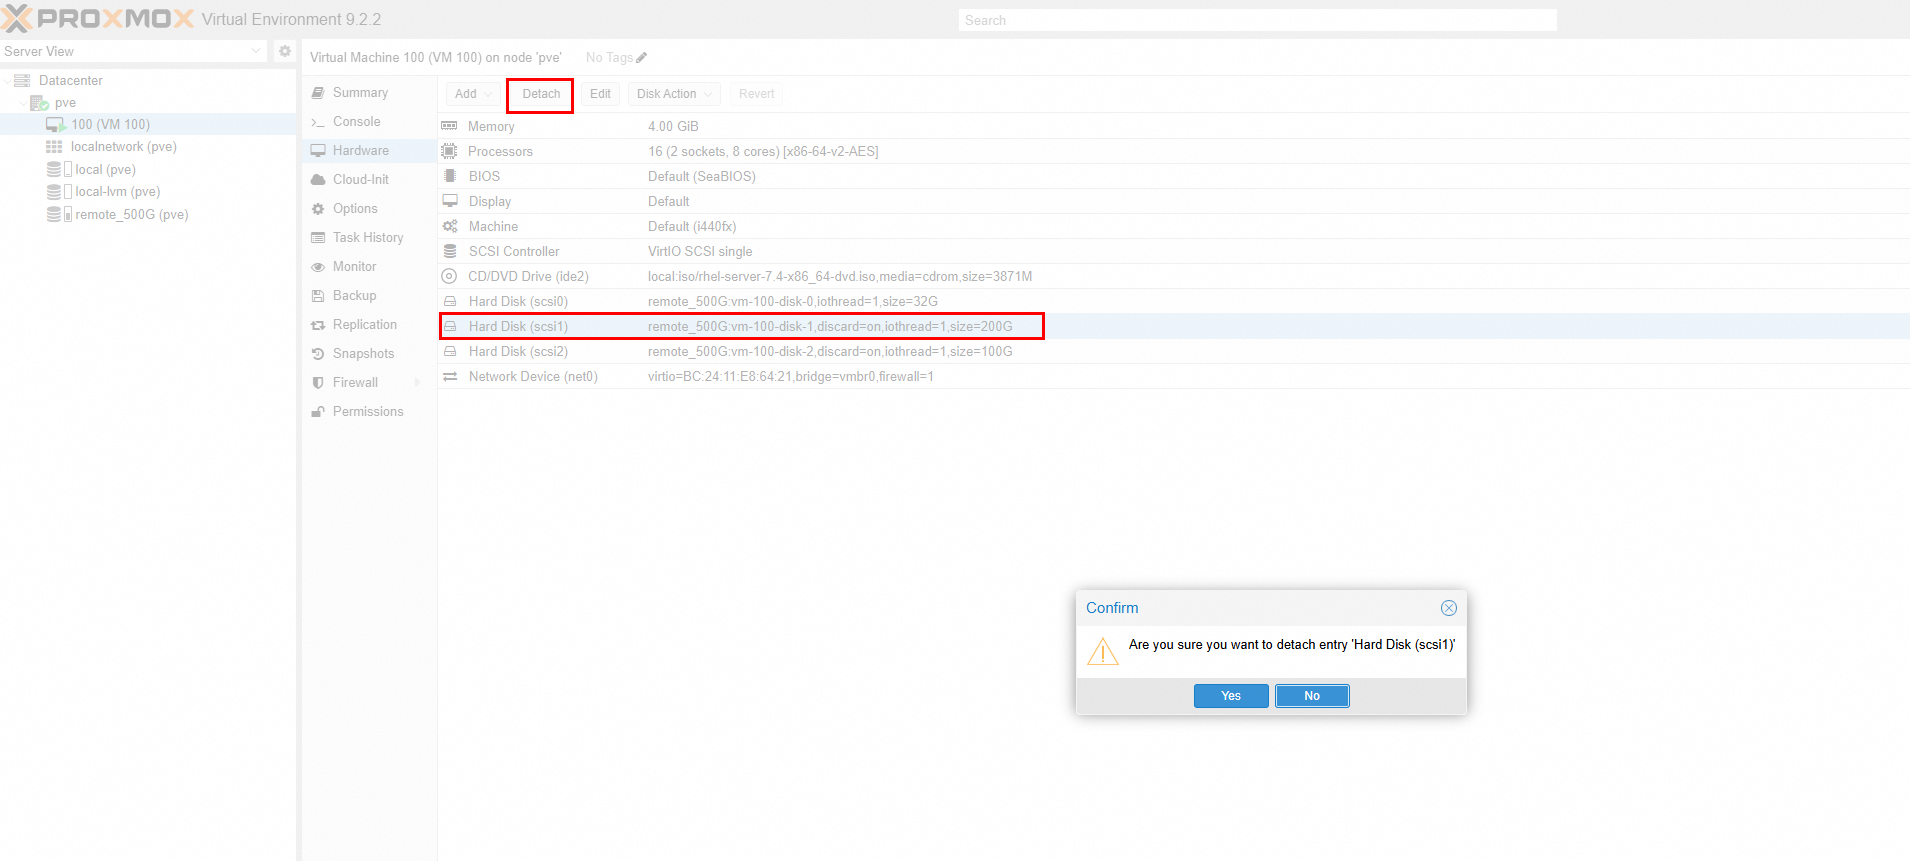
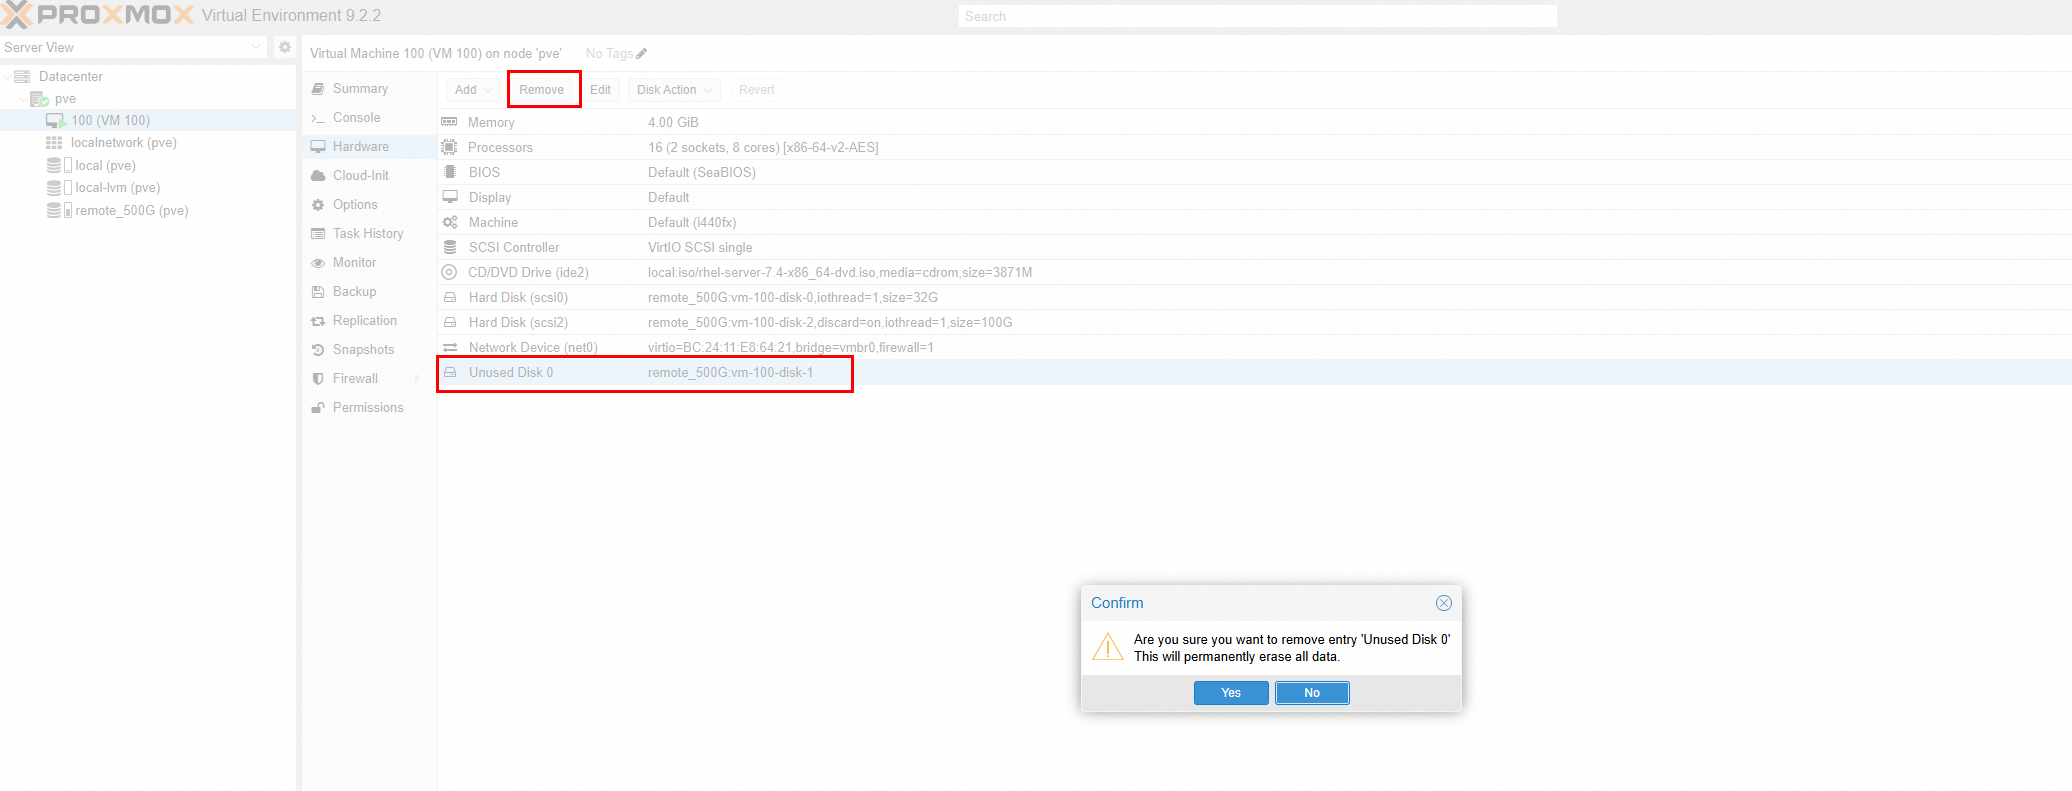
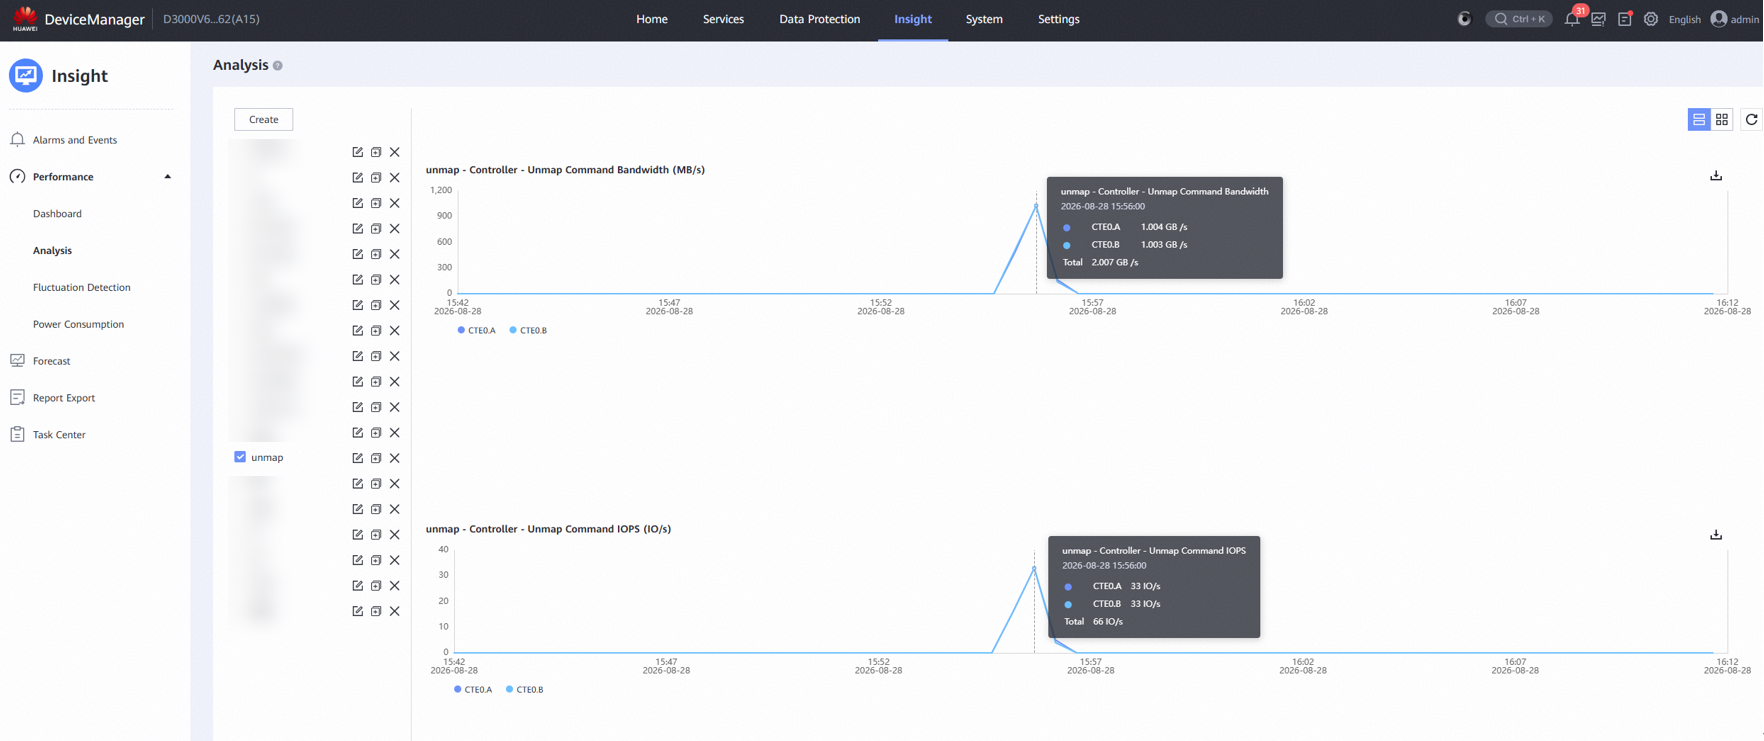
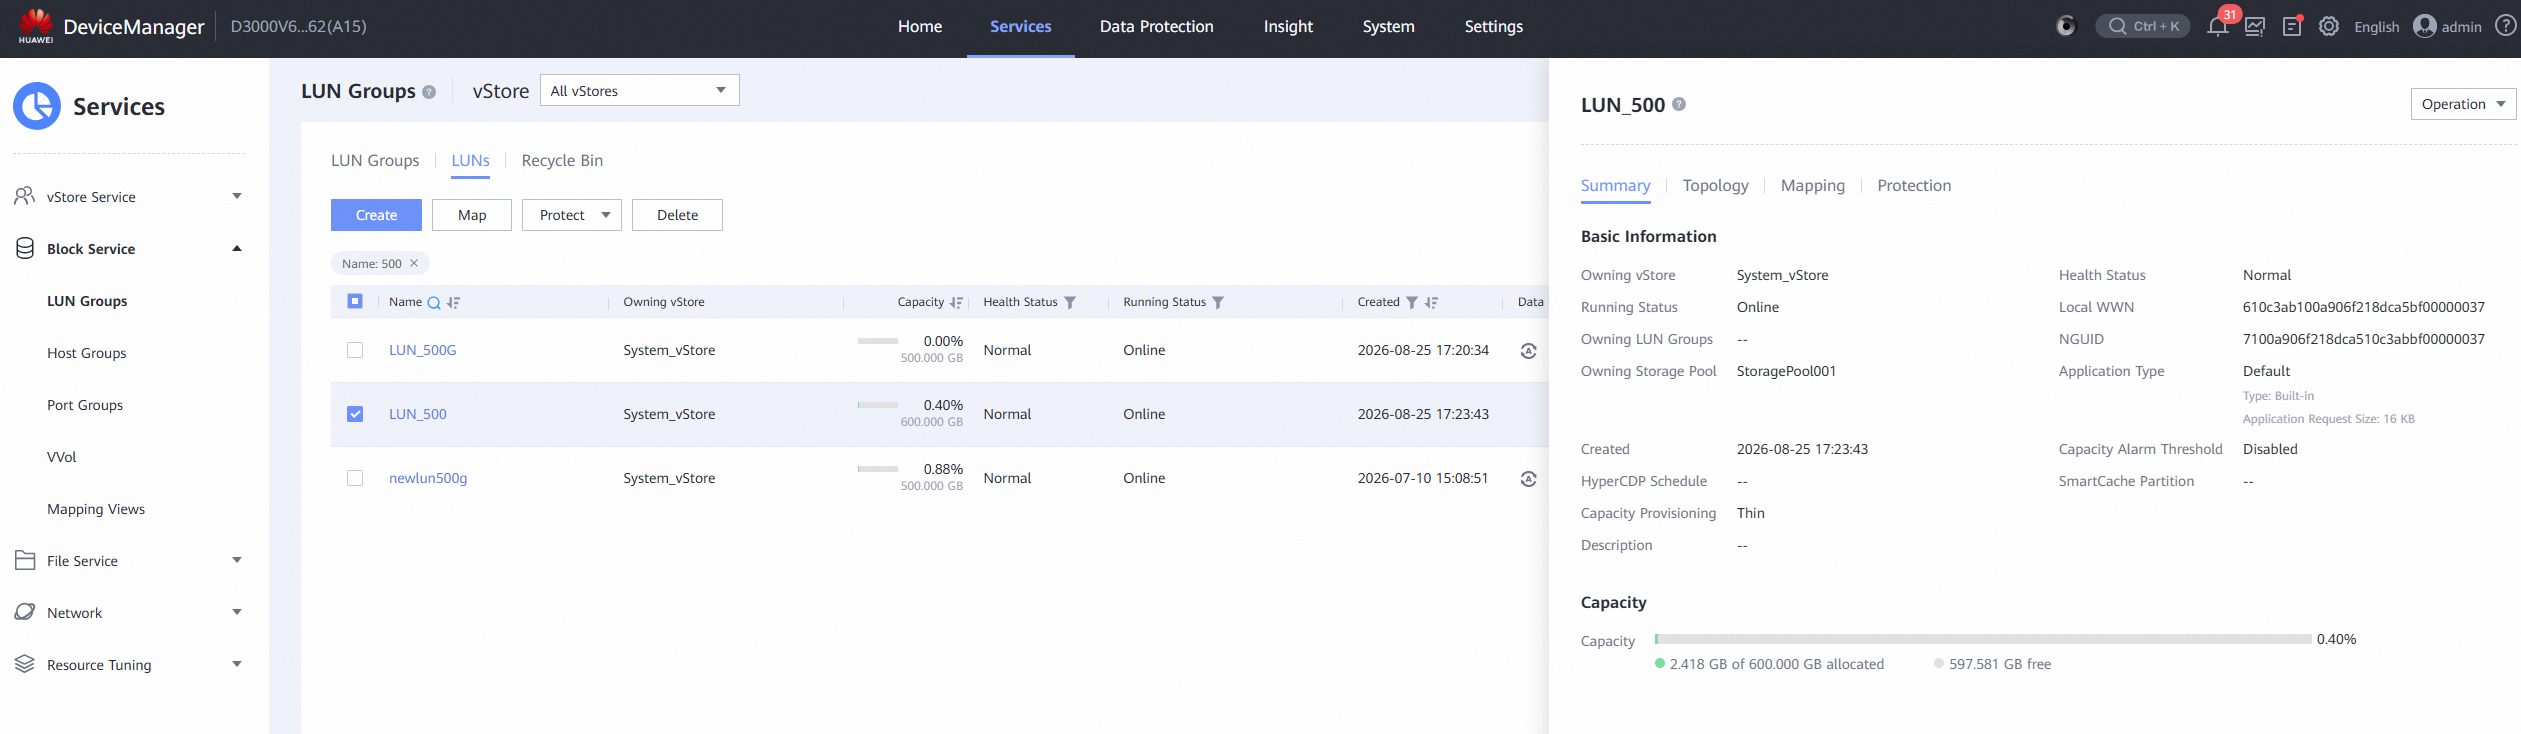
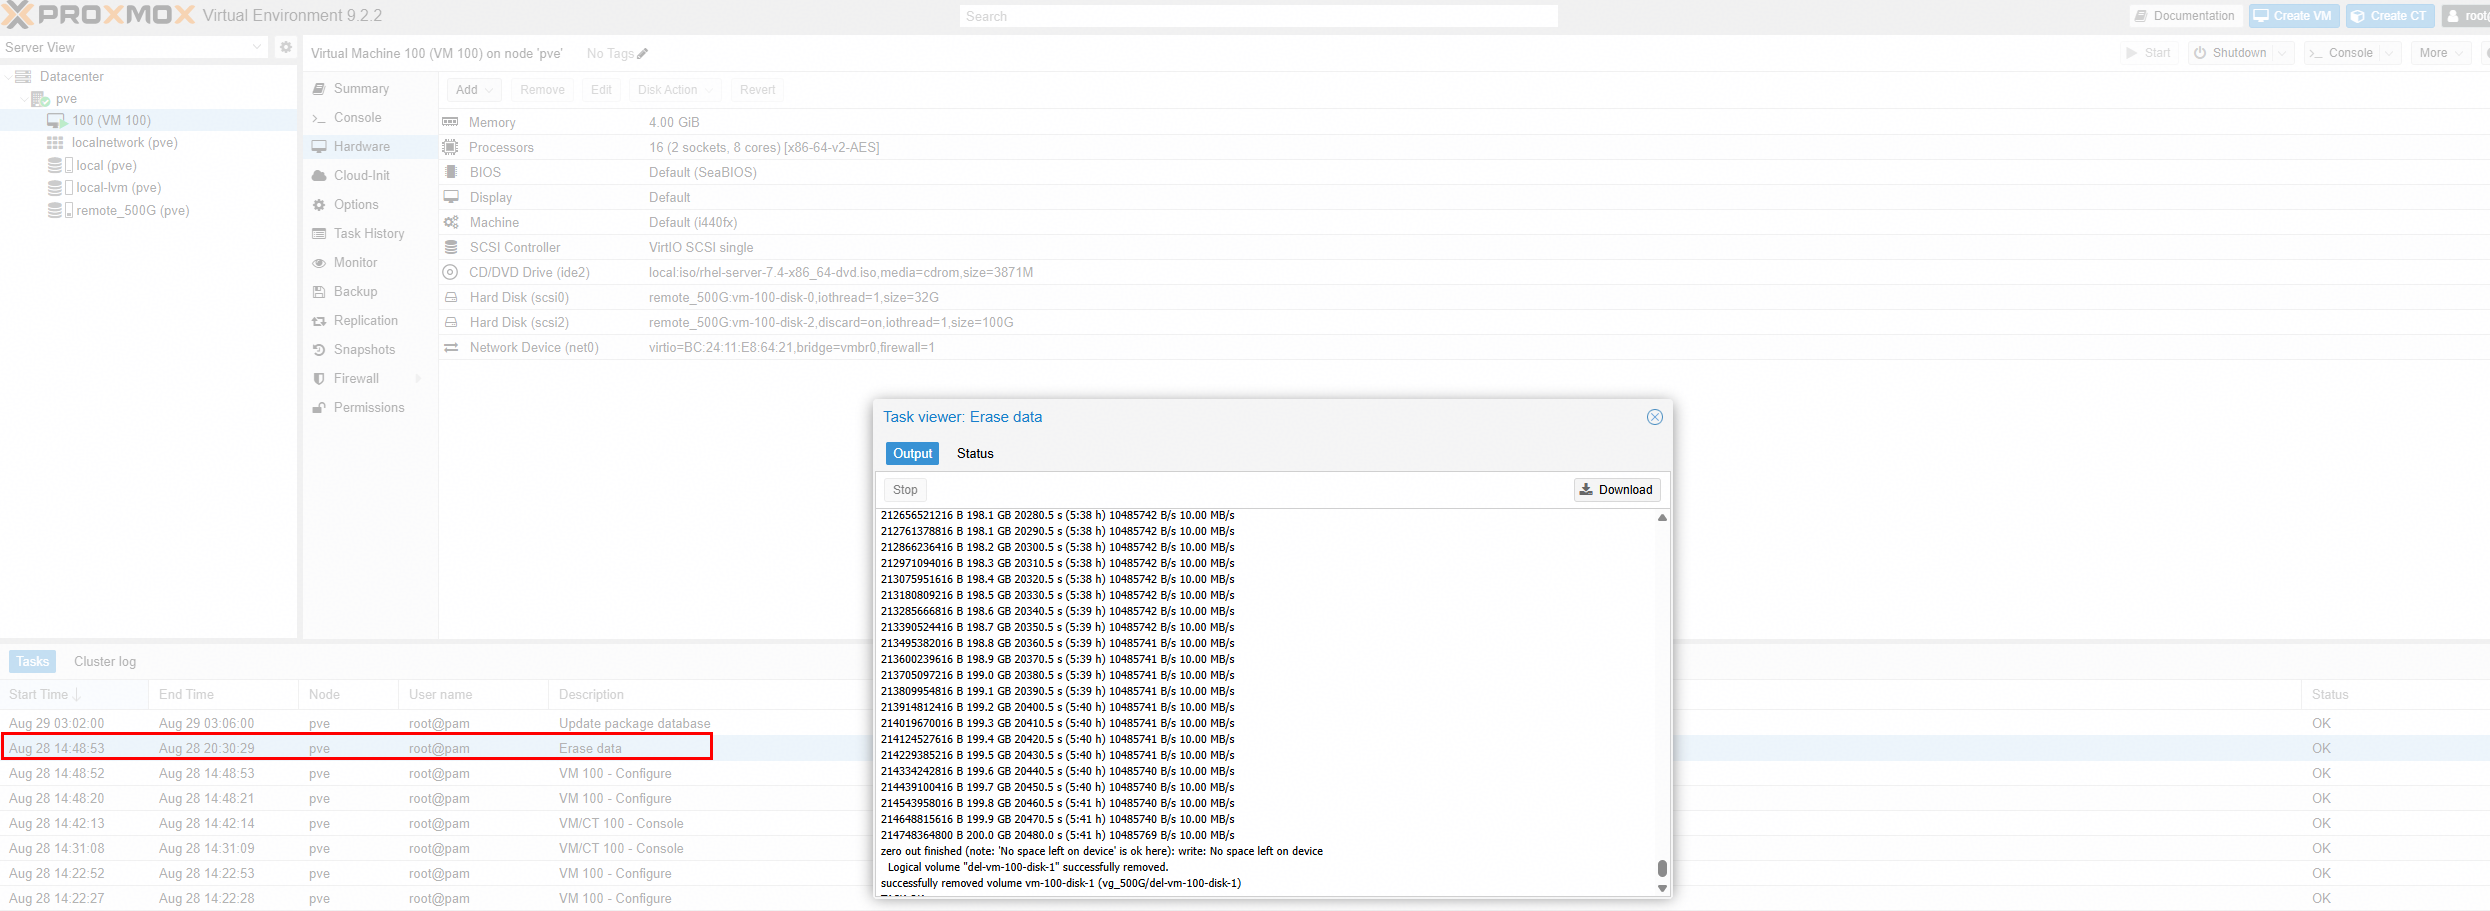
Test Procedures | 1. Create two virtual disk (disk format is not limited) from the LVM Storage and add it to the VM. 2. Perform file system read/write operations and raw disk read/write operations to the virtual disk in the VM. 3.Check the used space of the Thin LUN. 4.For the file system read/write, remove files on the VM, check the used space of the LUN, and monitor the unmap traffic. 5.For the raw disk read/write, remove device and data of the disk added to the VM. 6.Wait 10 to 30 minutes, check the used space of the Thin LUN, and monitor the unmap traffic. |
Expected Results | 1.In step 3, the used space is grown as expected. 2.In step 5 and step 6, complete space reclamation normally, the Thin LUN space is reduced, and unmap traffic can be monitored in performance monitoring. And background I/O is unaffected. |
Test Results | 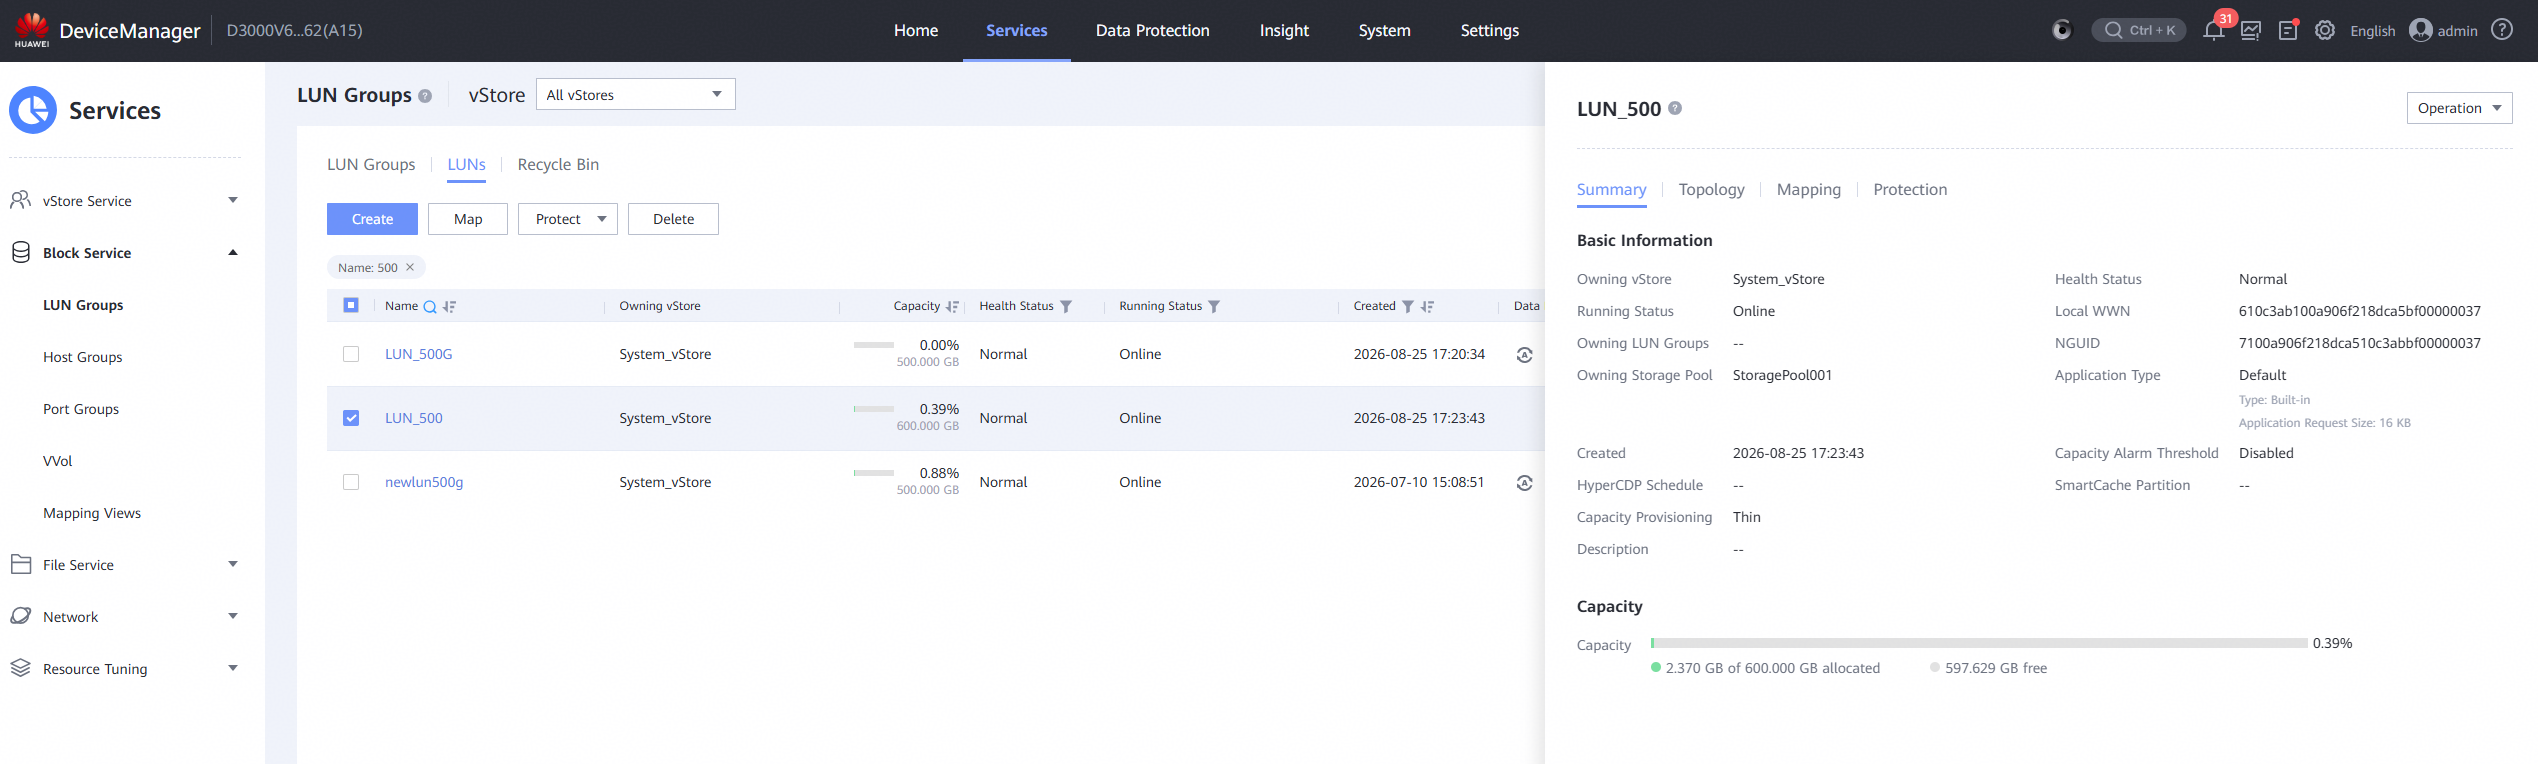
|
Test Conclusion | Passed |
3.8 iSCSI Connection and LUN Mapping
Test Purpose | To Verify That iSCSI Connection Could be Established and the Virtual Machine is able to Perform Read/Write Operations on the LUN Mapped from Storage |
Network Diagram | Reference to Figure 1.1 |
Prerequisites | 1.The network has been correctly set up according to the corresponding scenario and the physical links are functioning properly. 2.The host system is operating normally. 3.The Storage system is operating normally. |
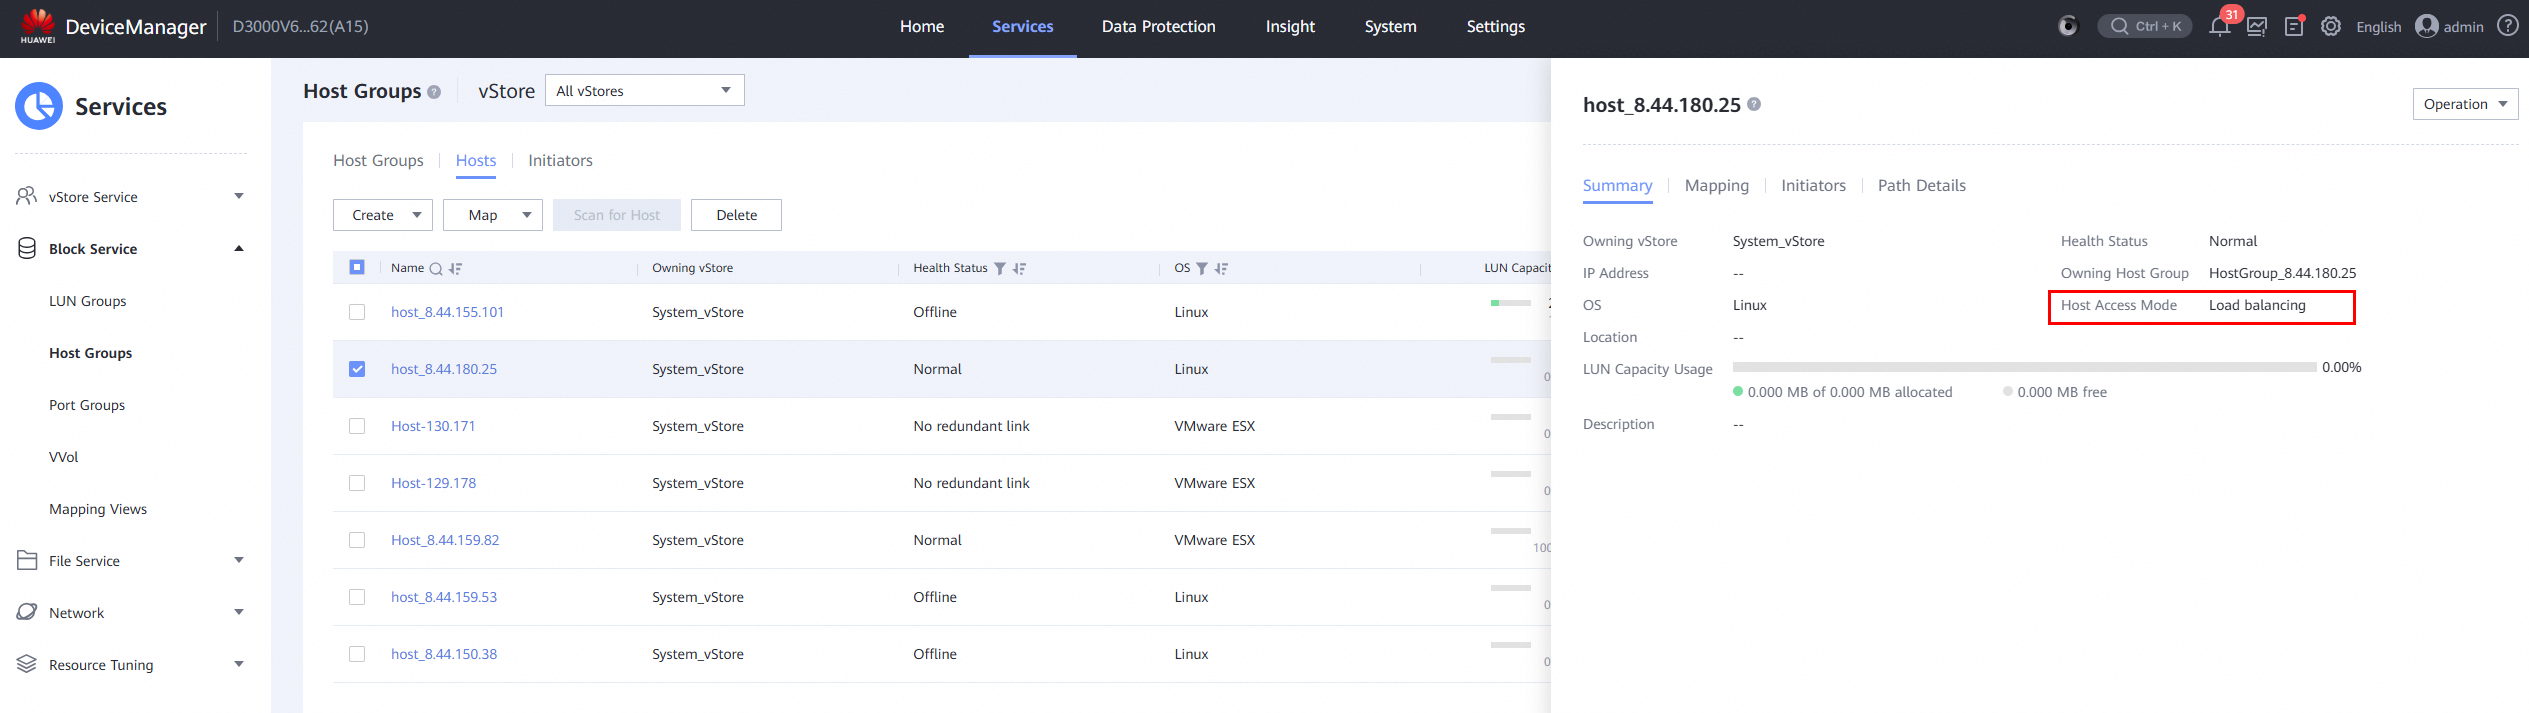
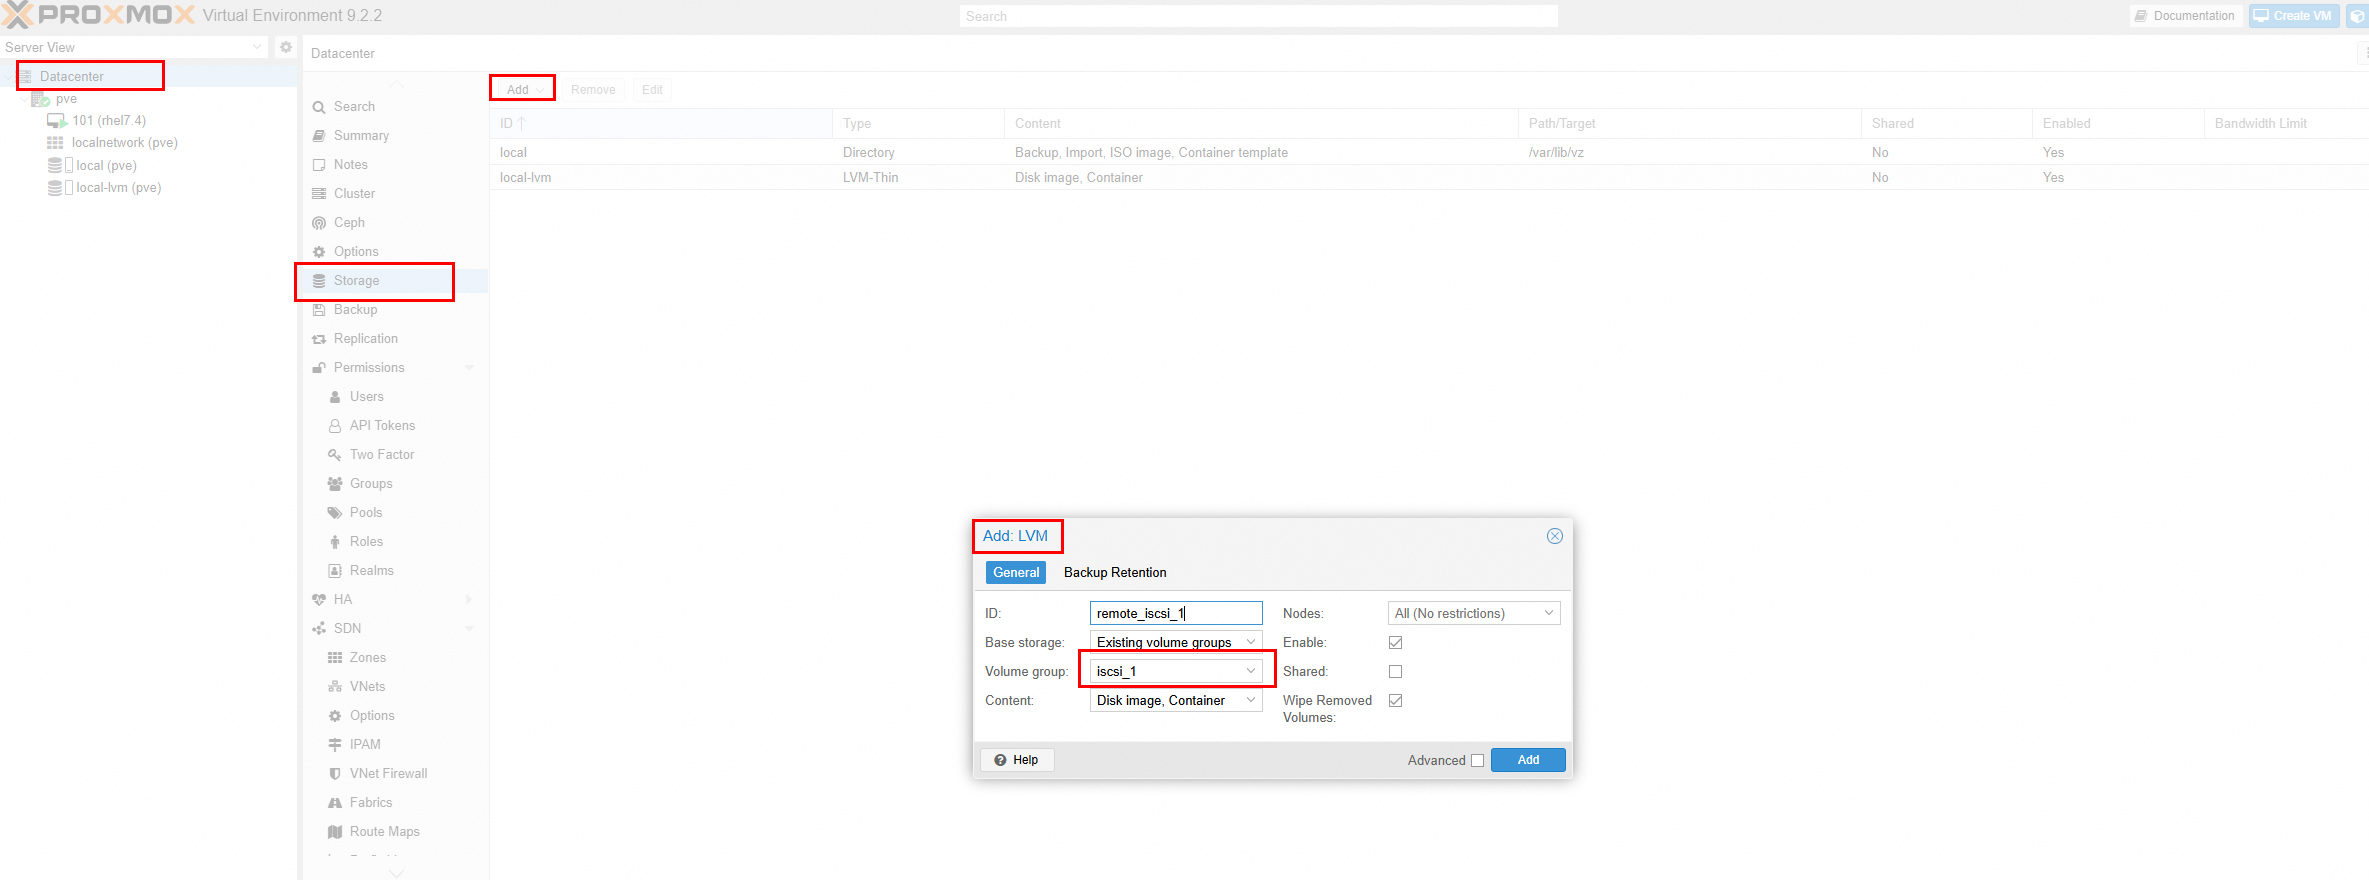
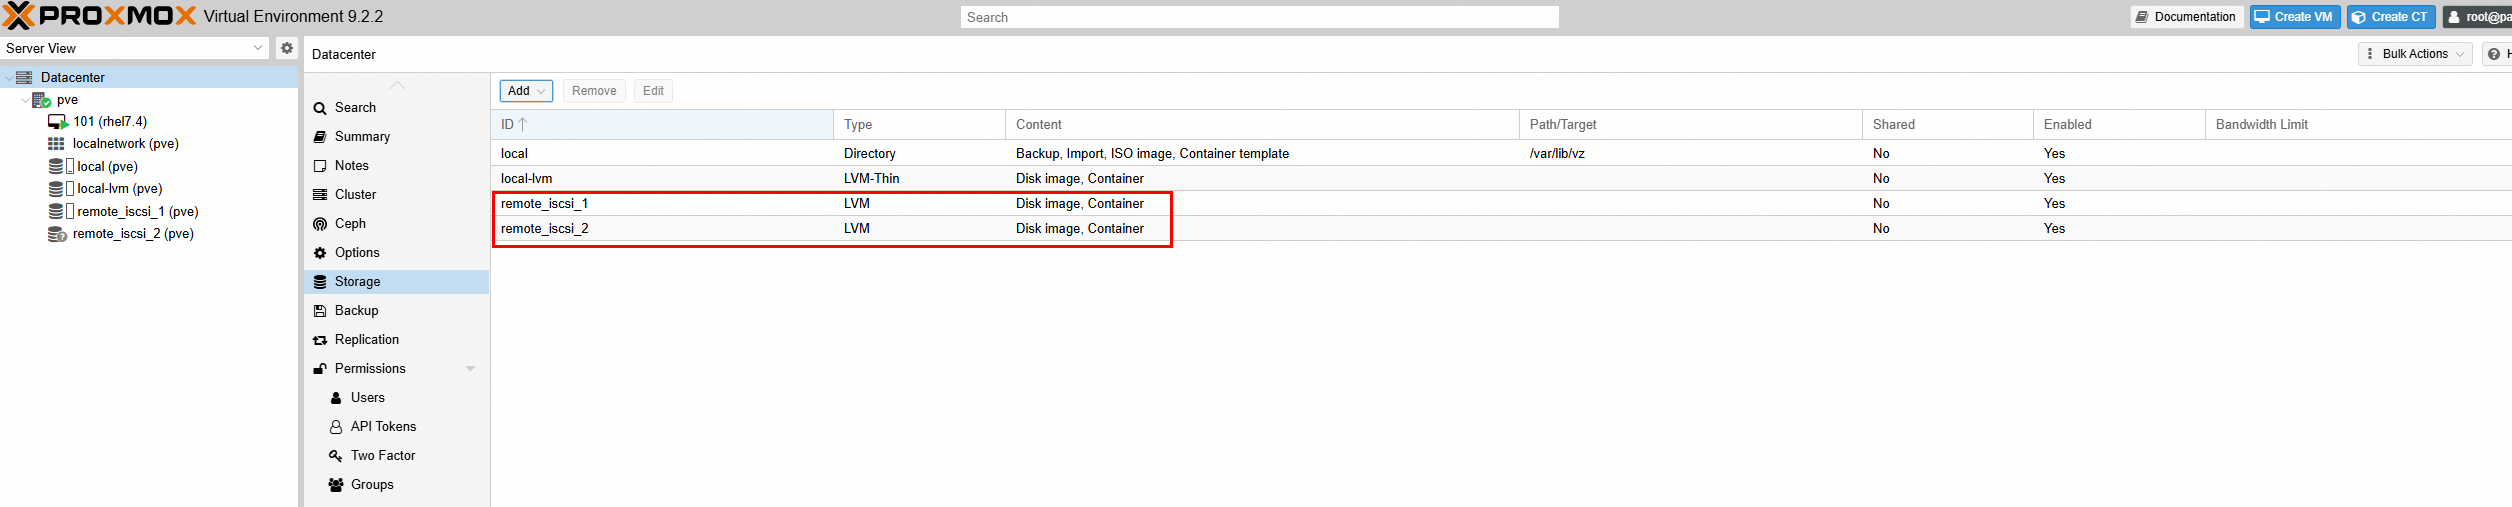
Test Procedures | 1.Establish iSCSI connections between the host and storage. 2.Log into the storage management system, add the host initiator to the corresponding host, and configure the host mode to load balancing. 3.Observe the initiator connection status. 4.Log into the storage management system, create the mappings, and add two 100GB LUNs to the host. 5. Log into Proxmox VE backend and scan the LUN and create Volume Group on the LUN. 6.Create LVM Storage on LUN A and LUN B, and add them to the VM as « Virtual Disks ». 7.In the VM, perform raw disk read/write operations on LUN A using vdbench, observe the I/O performance. On LUN B, create file systems and perform file system read/write operations using vdbench, observing the I/O performance. |
Expected Results | 1.In step 5, the host is able to detect the two mapped LUNs. 2.In step 7, the VM is able to perform read/write operations on all two disks without issues. |
Test Results | 1.Establish iSCSI connections between the host and storage. 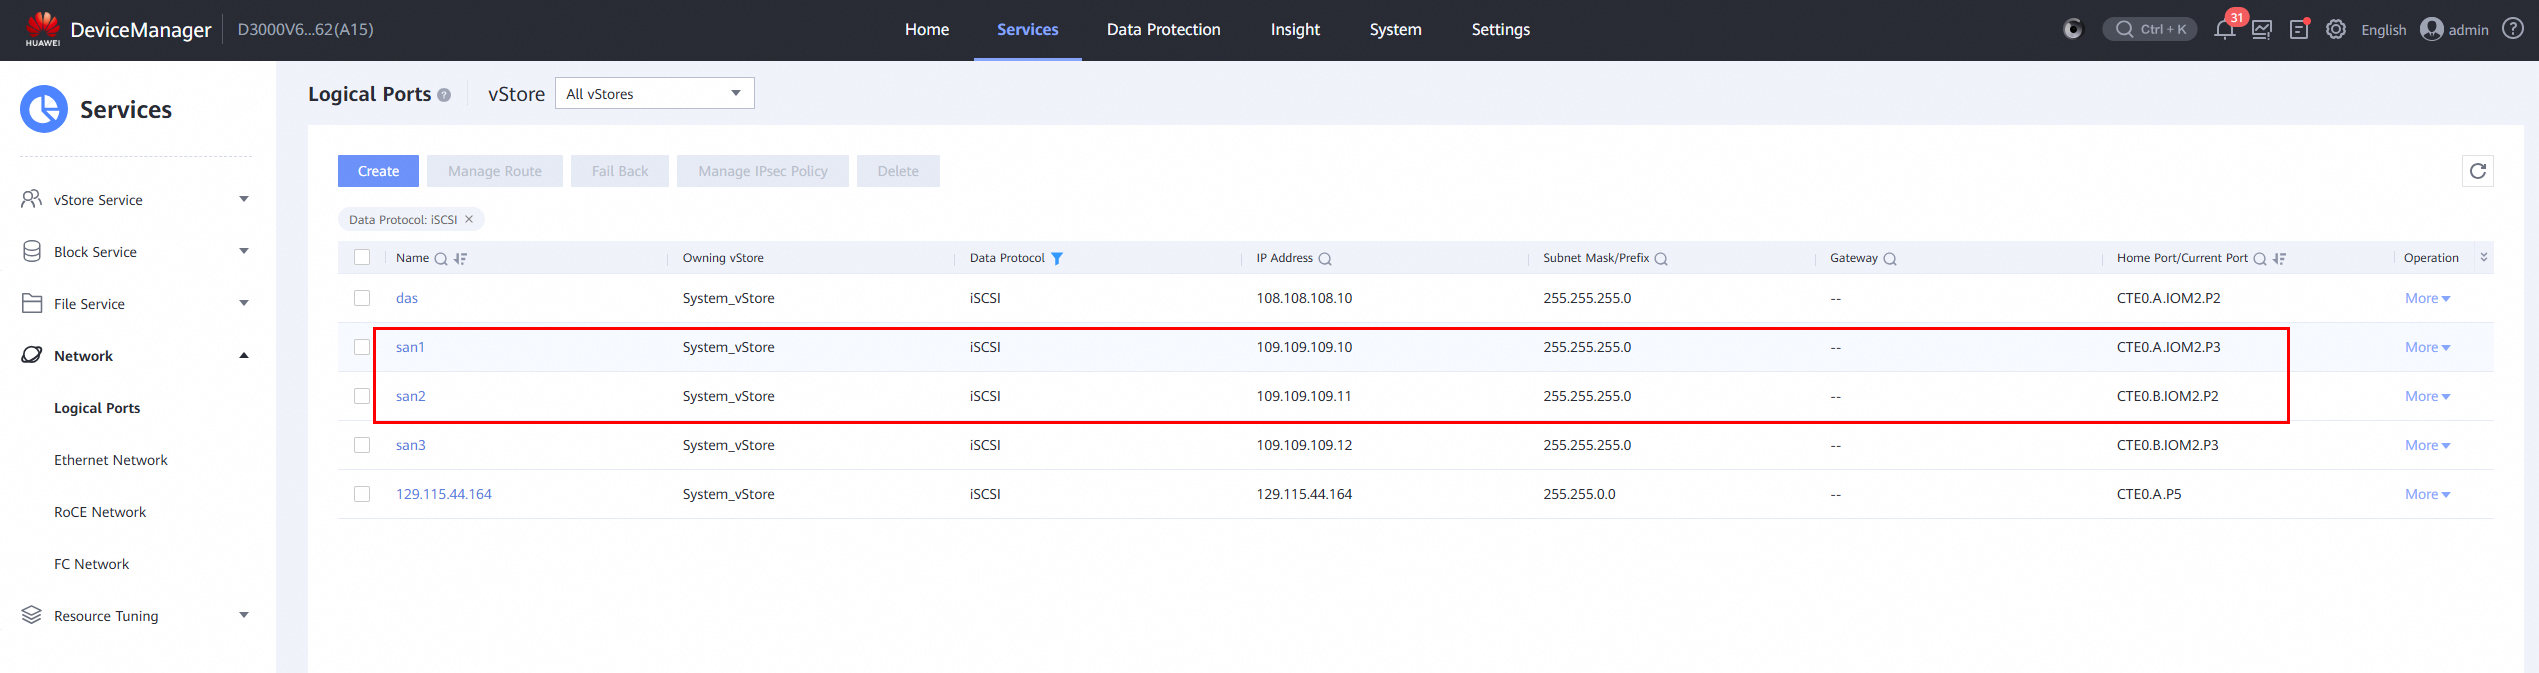
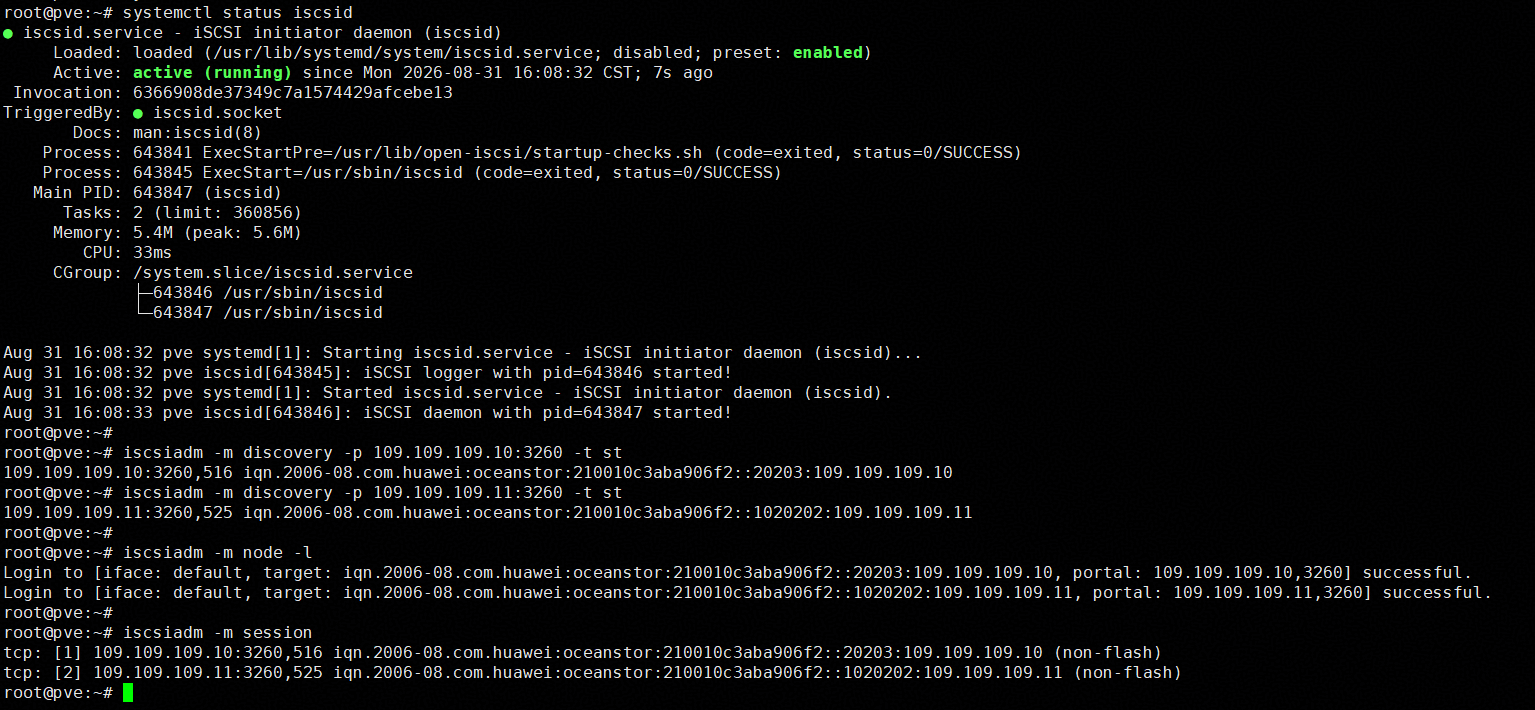
2.Log into the storage management system, add the host initiator to the corresponding host, and configure the host mode to load balancing. 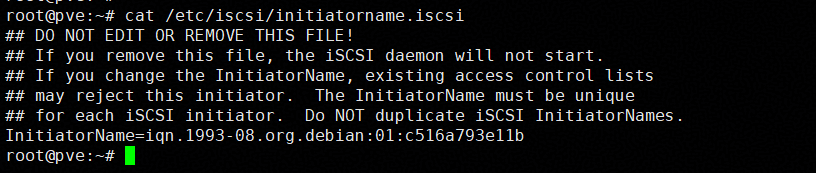
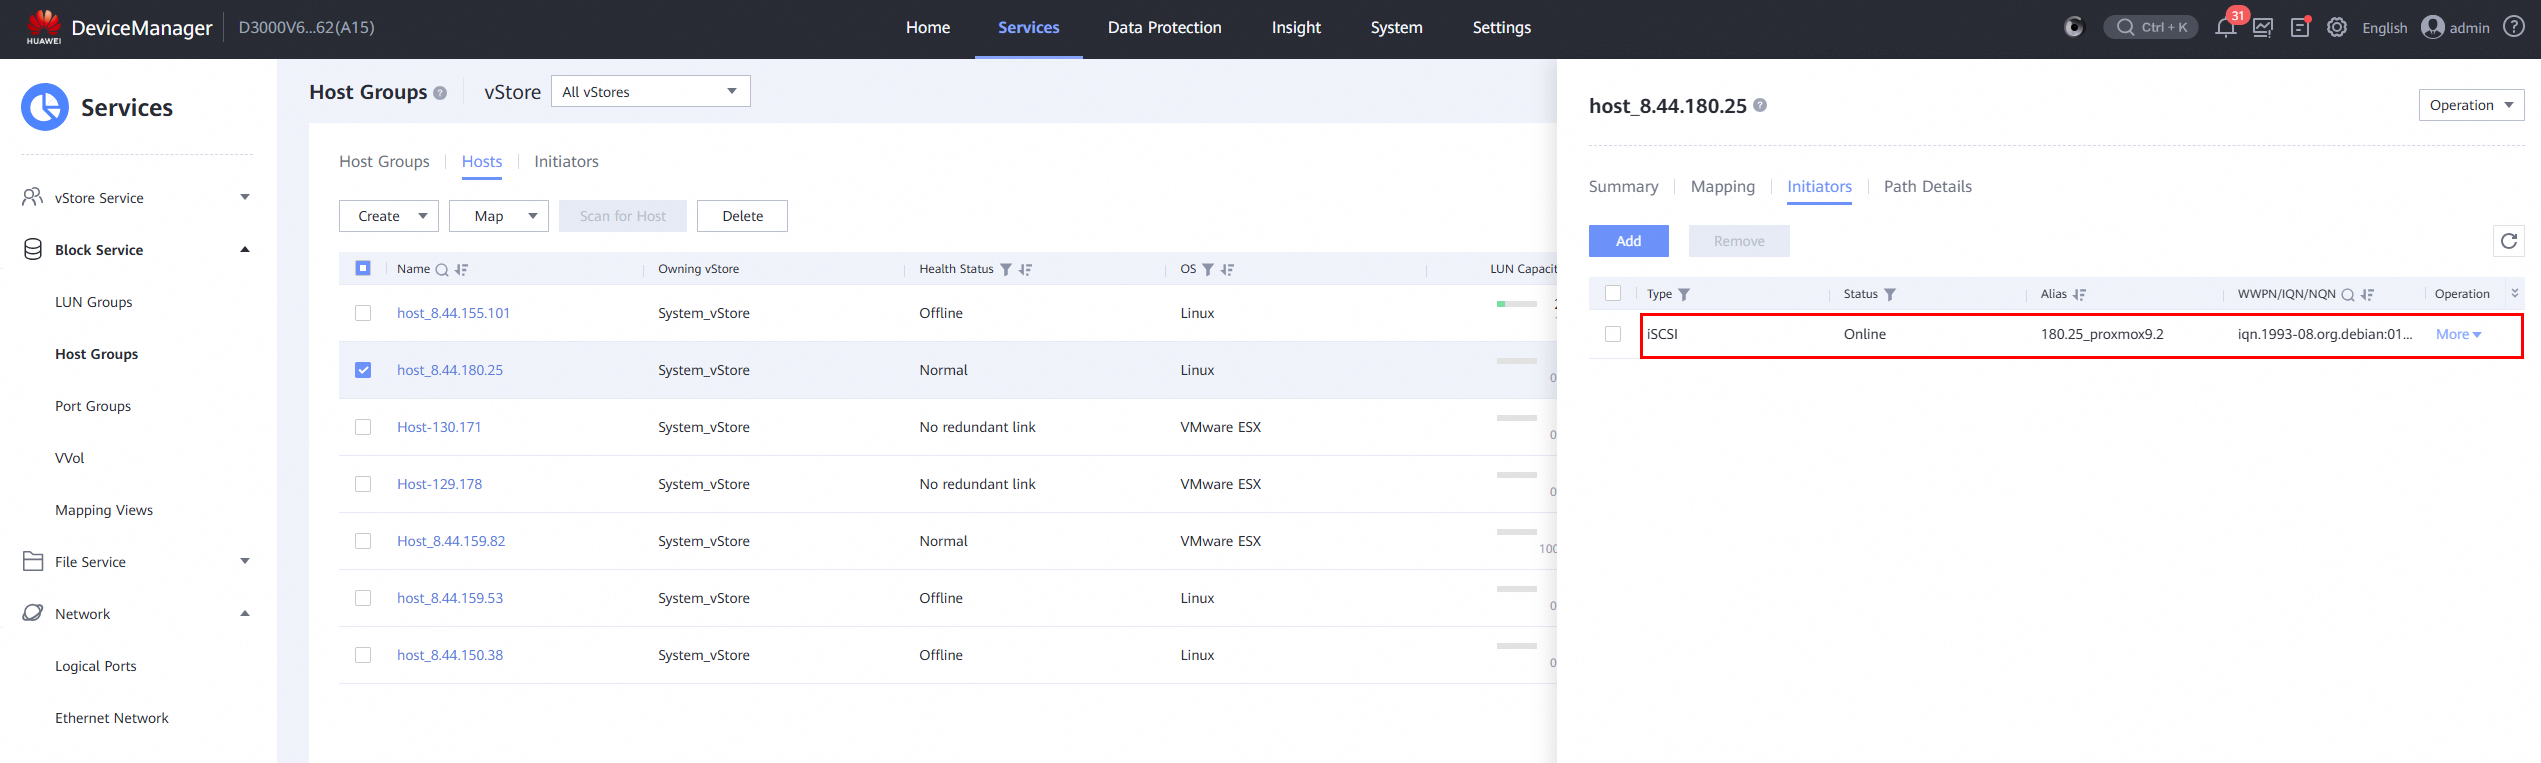
3.Observe the initiator connection status. 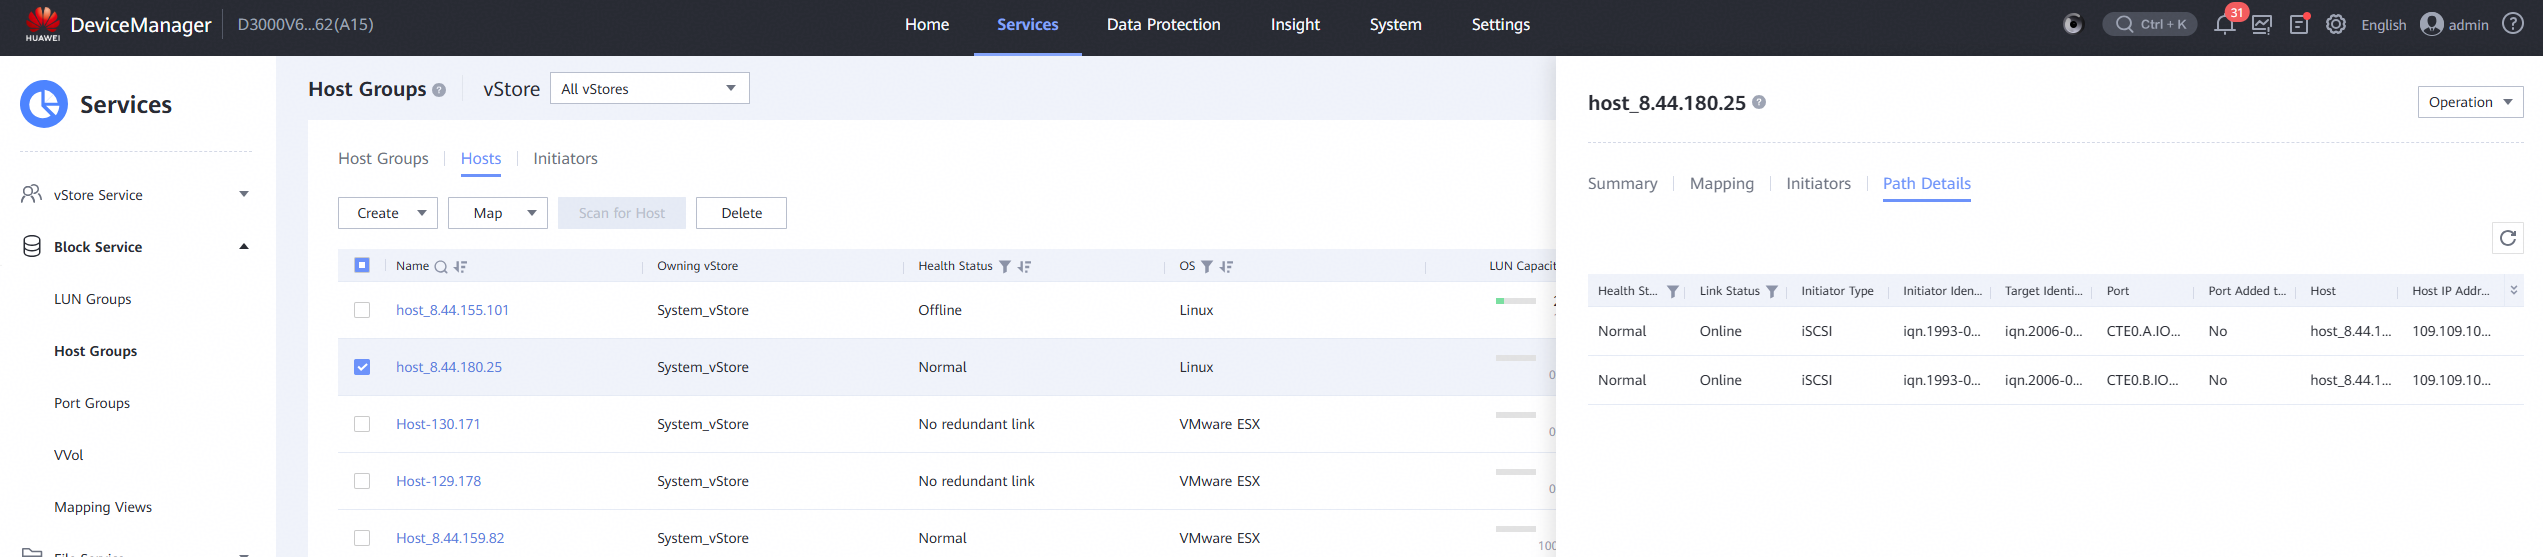
4.Log into the storage management system, create the mappings, and add two 100GB LUNs to the host. 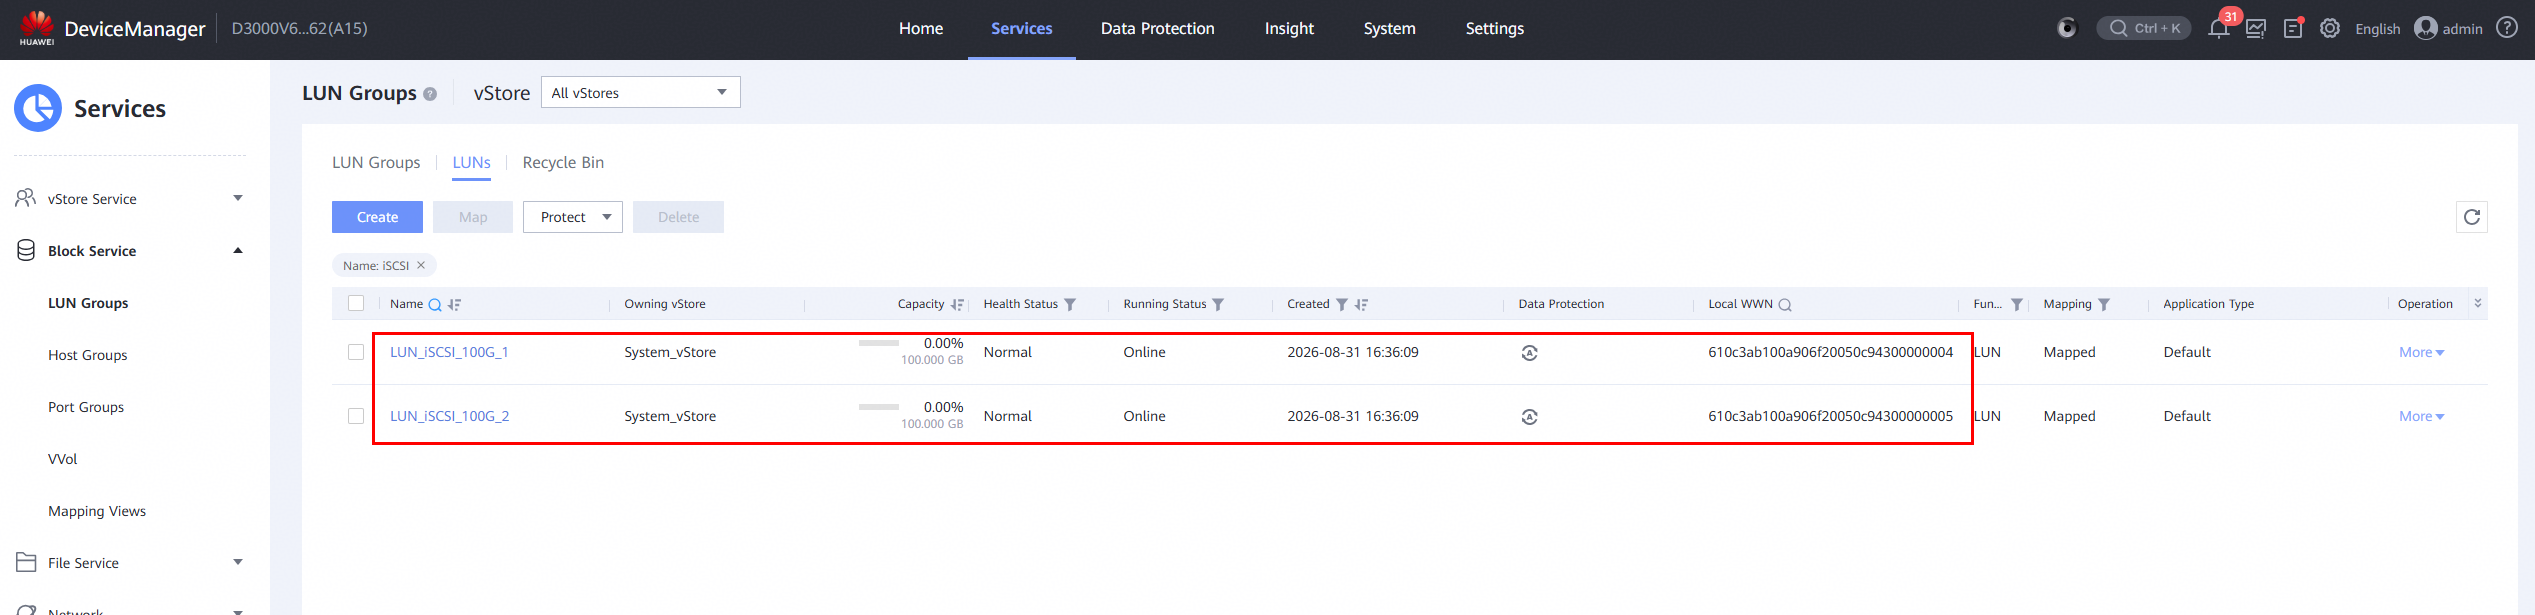
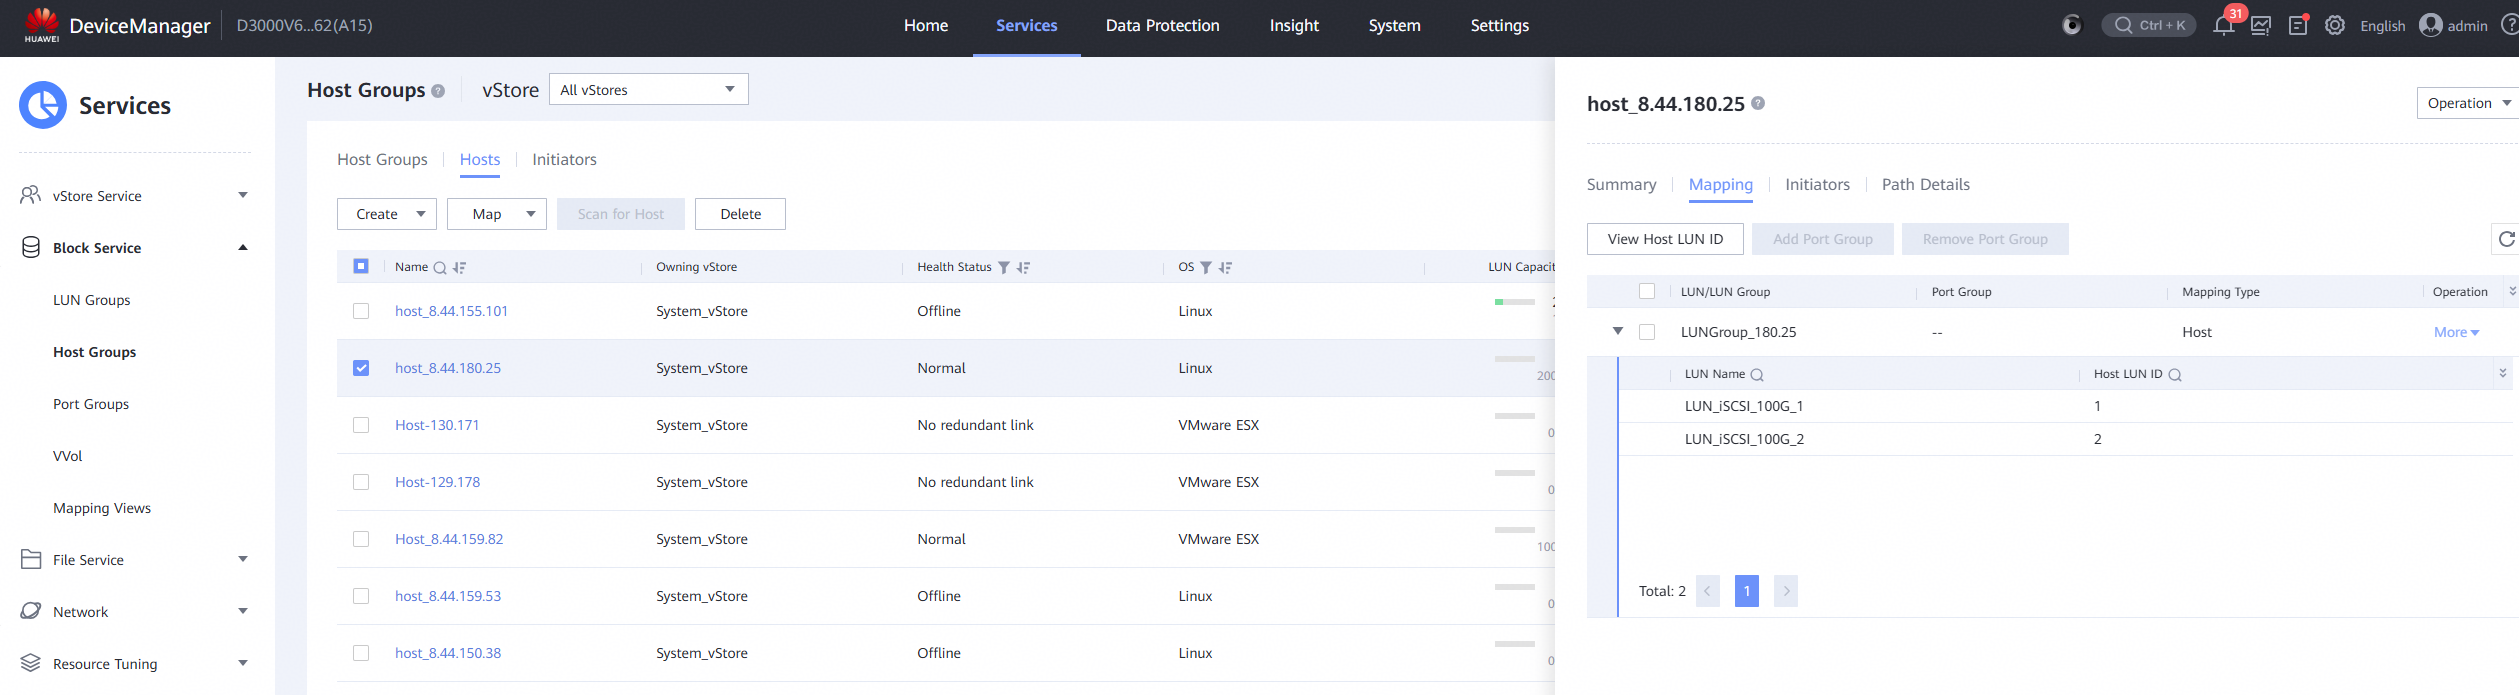
5. Log into Proxmox VE backend and scan the LUN and create Volume Group on the LUN. 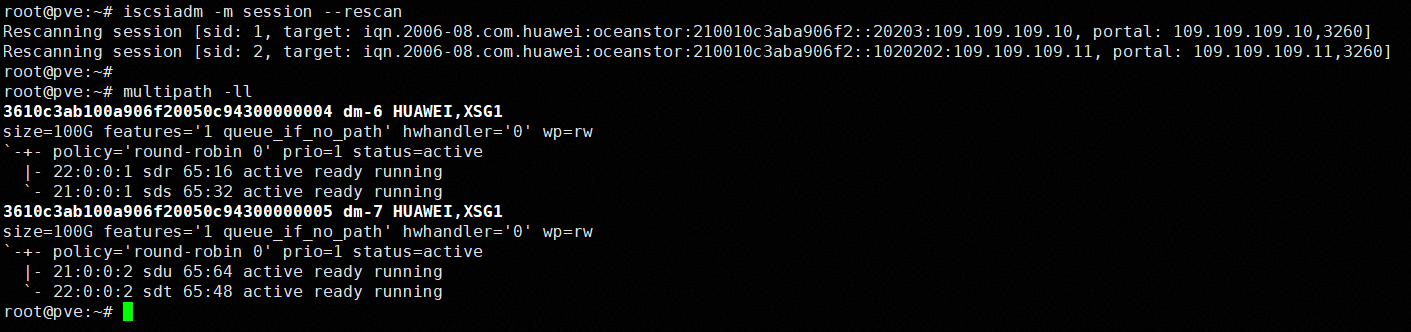
6.Create LVM Storage on LUN A and LUN B, and add them to the VM as « Virtual Disks ». 
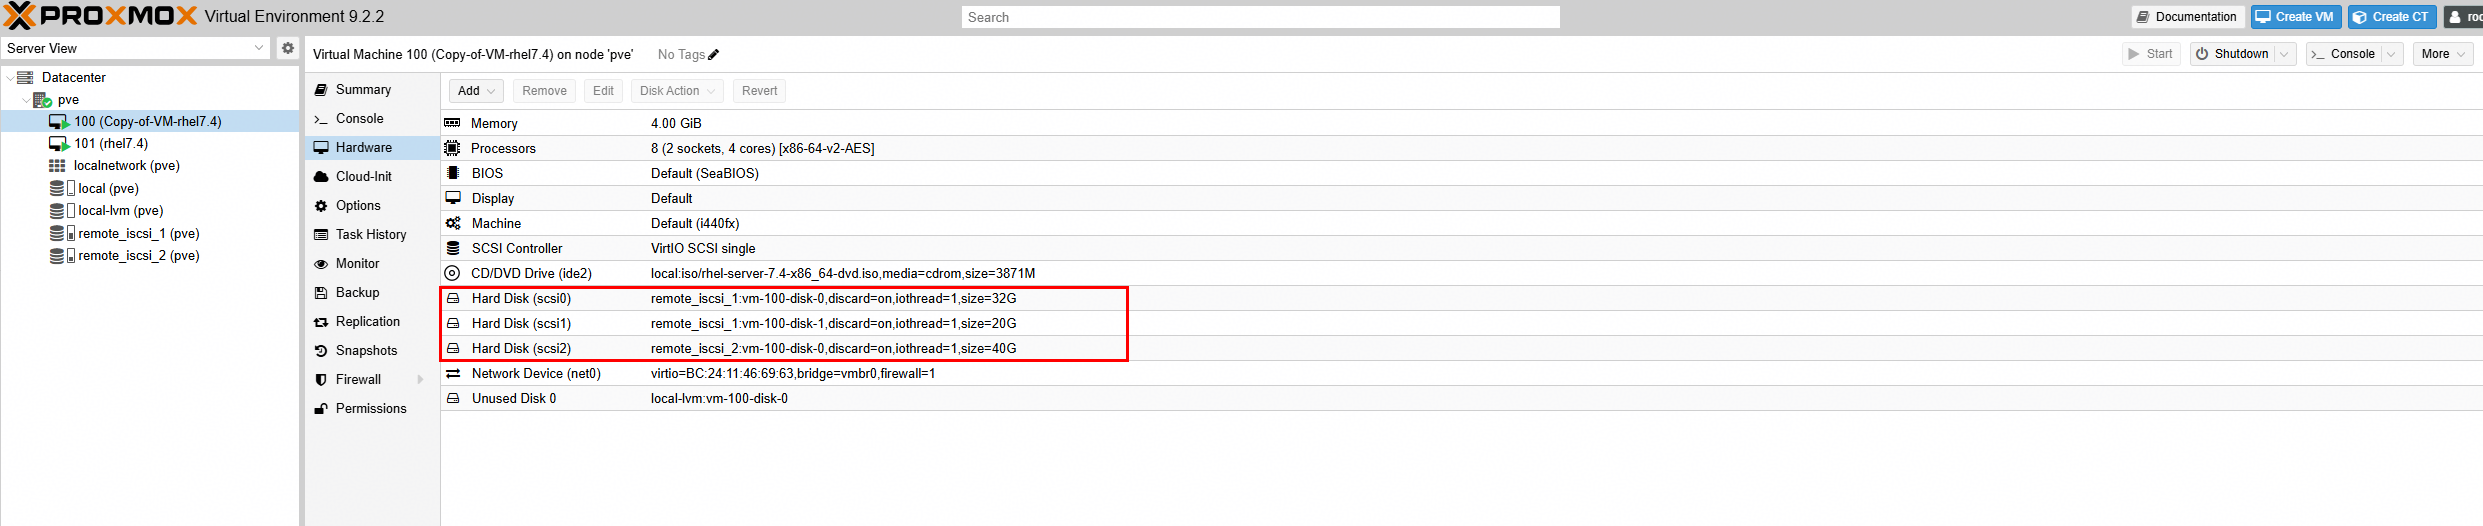
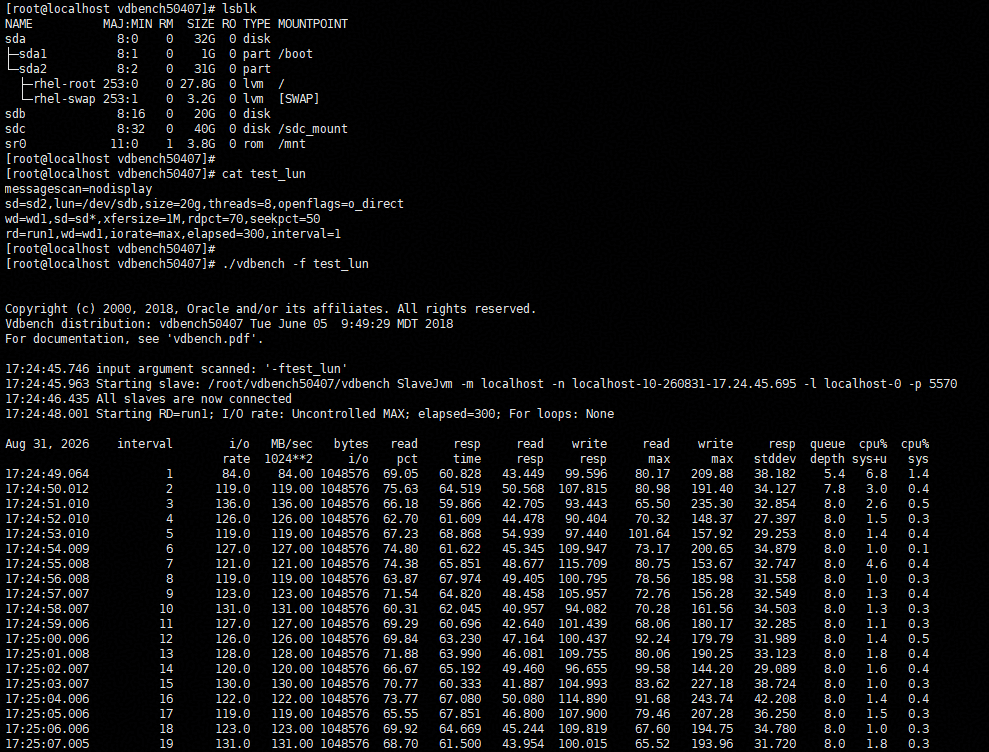
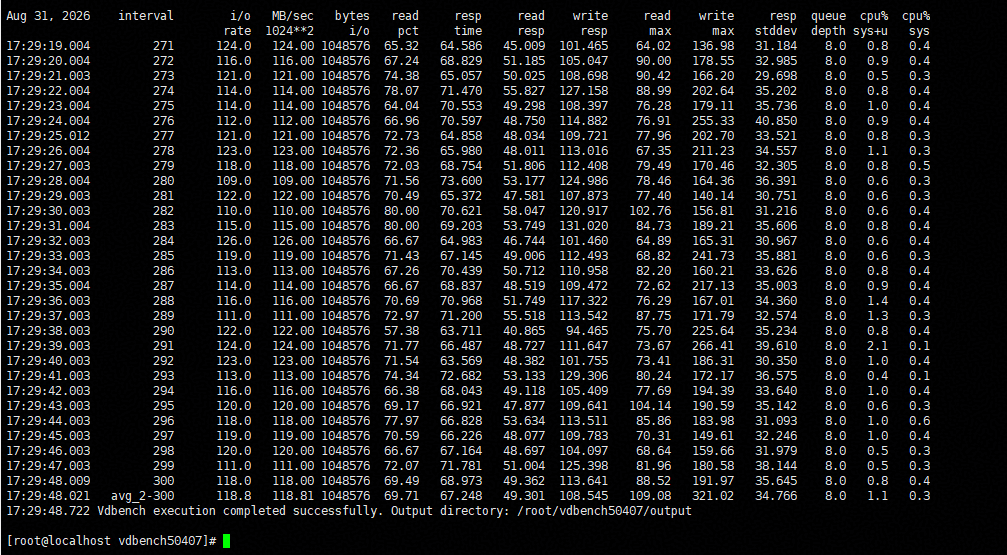
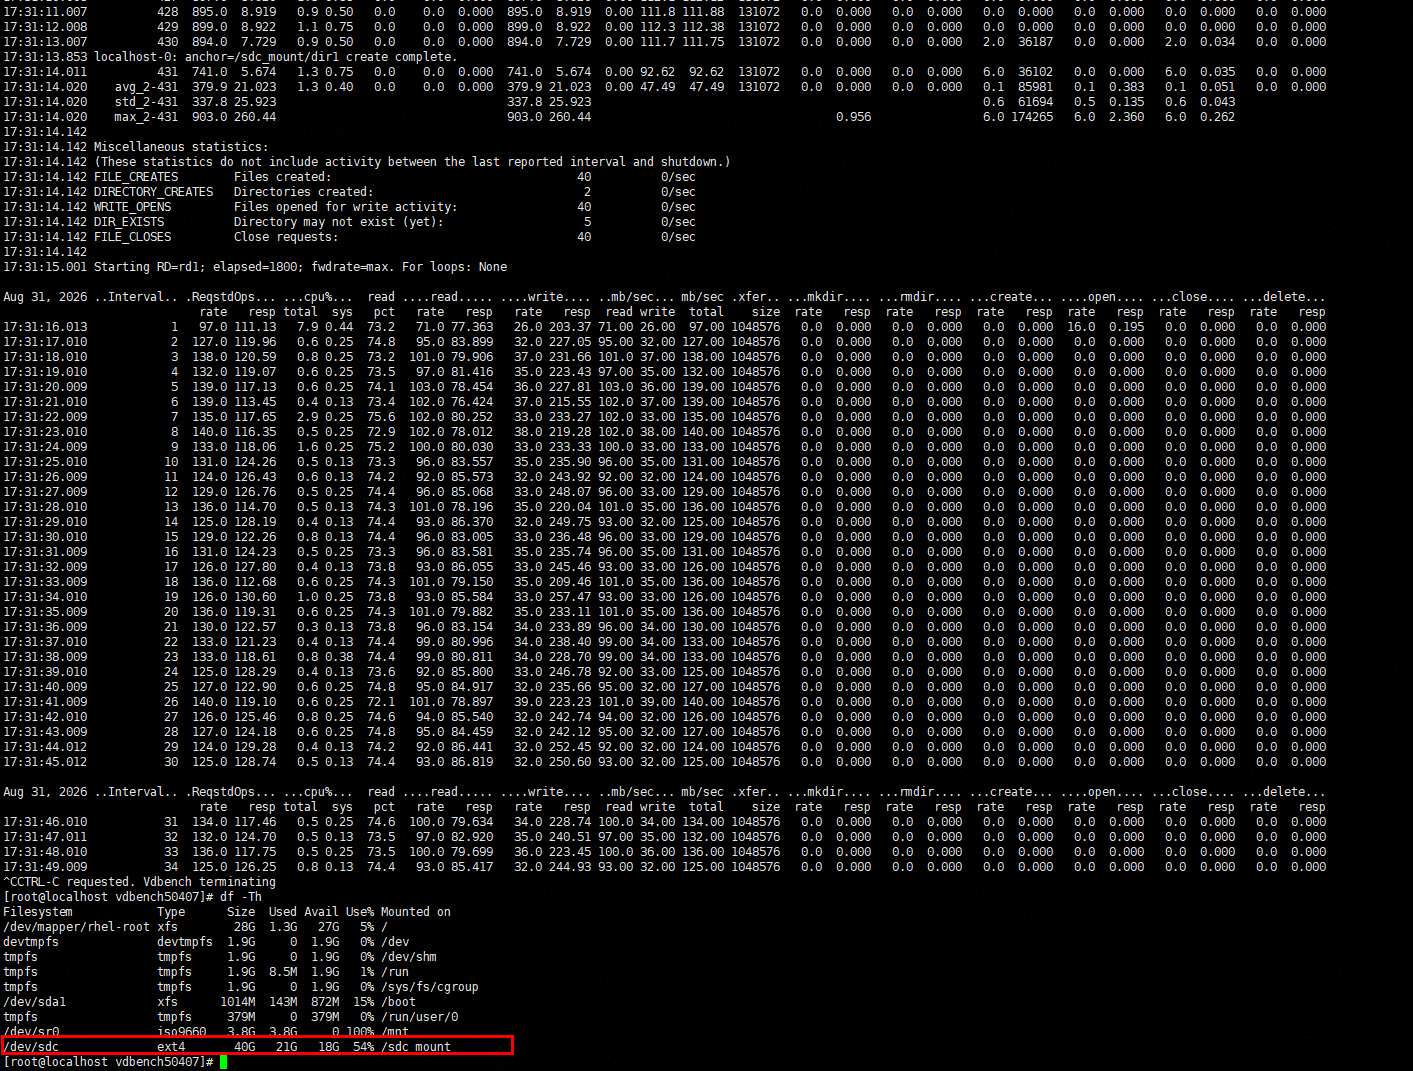
7.In the VM, perform raw disk read/write operations on LUN A using vdbench, observe the I/O performance. On LUN B, create file systems and perform file system read/write operations using vdbench, observing the I/O performance. 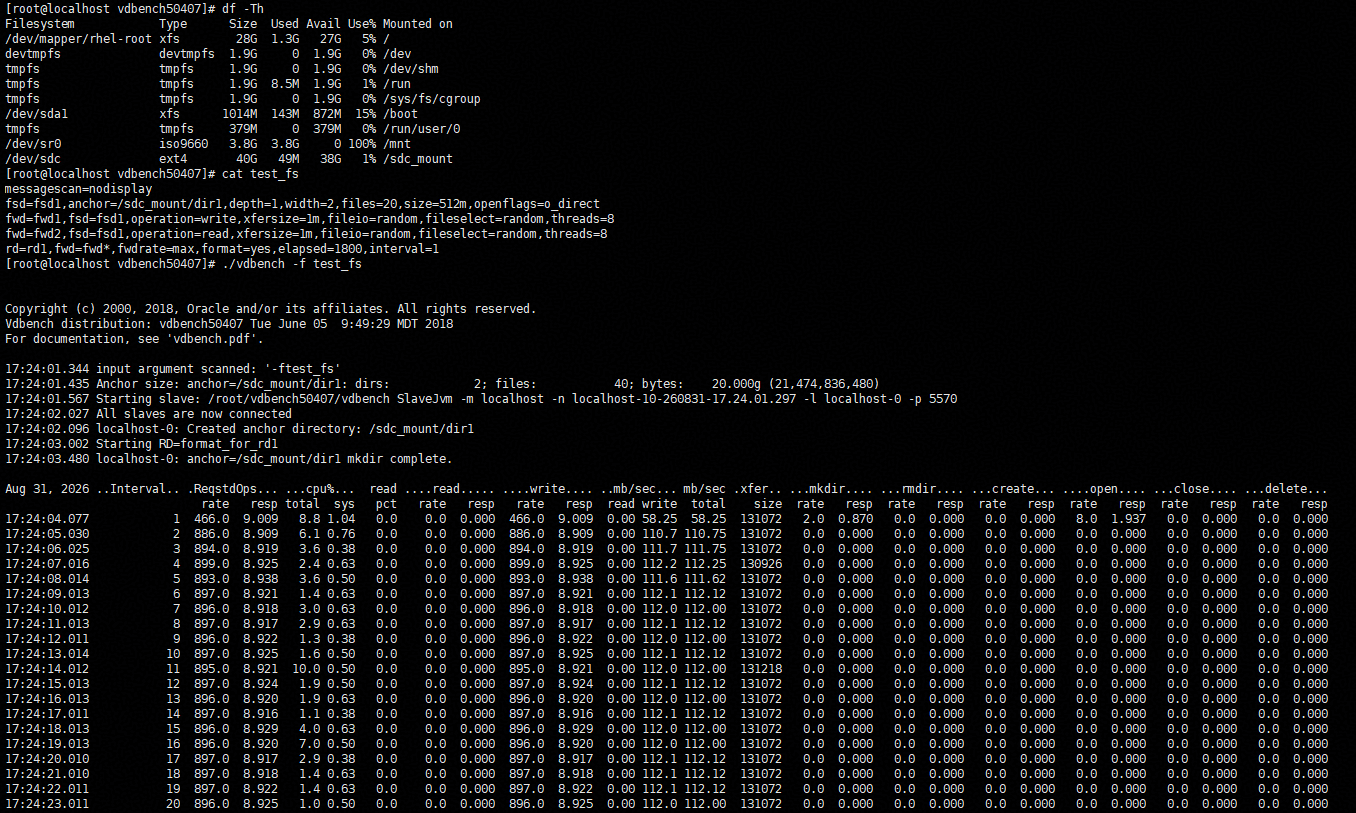
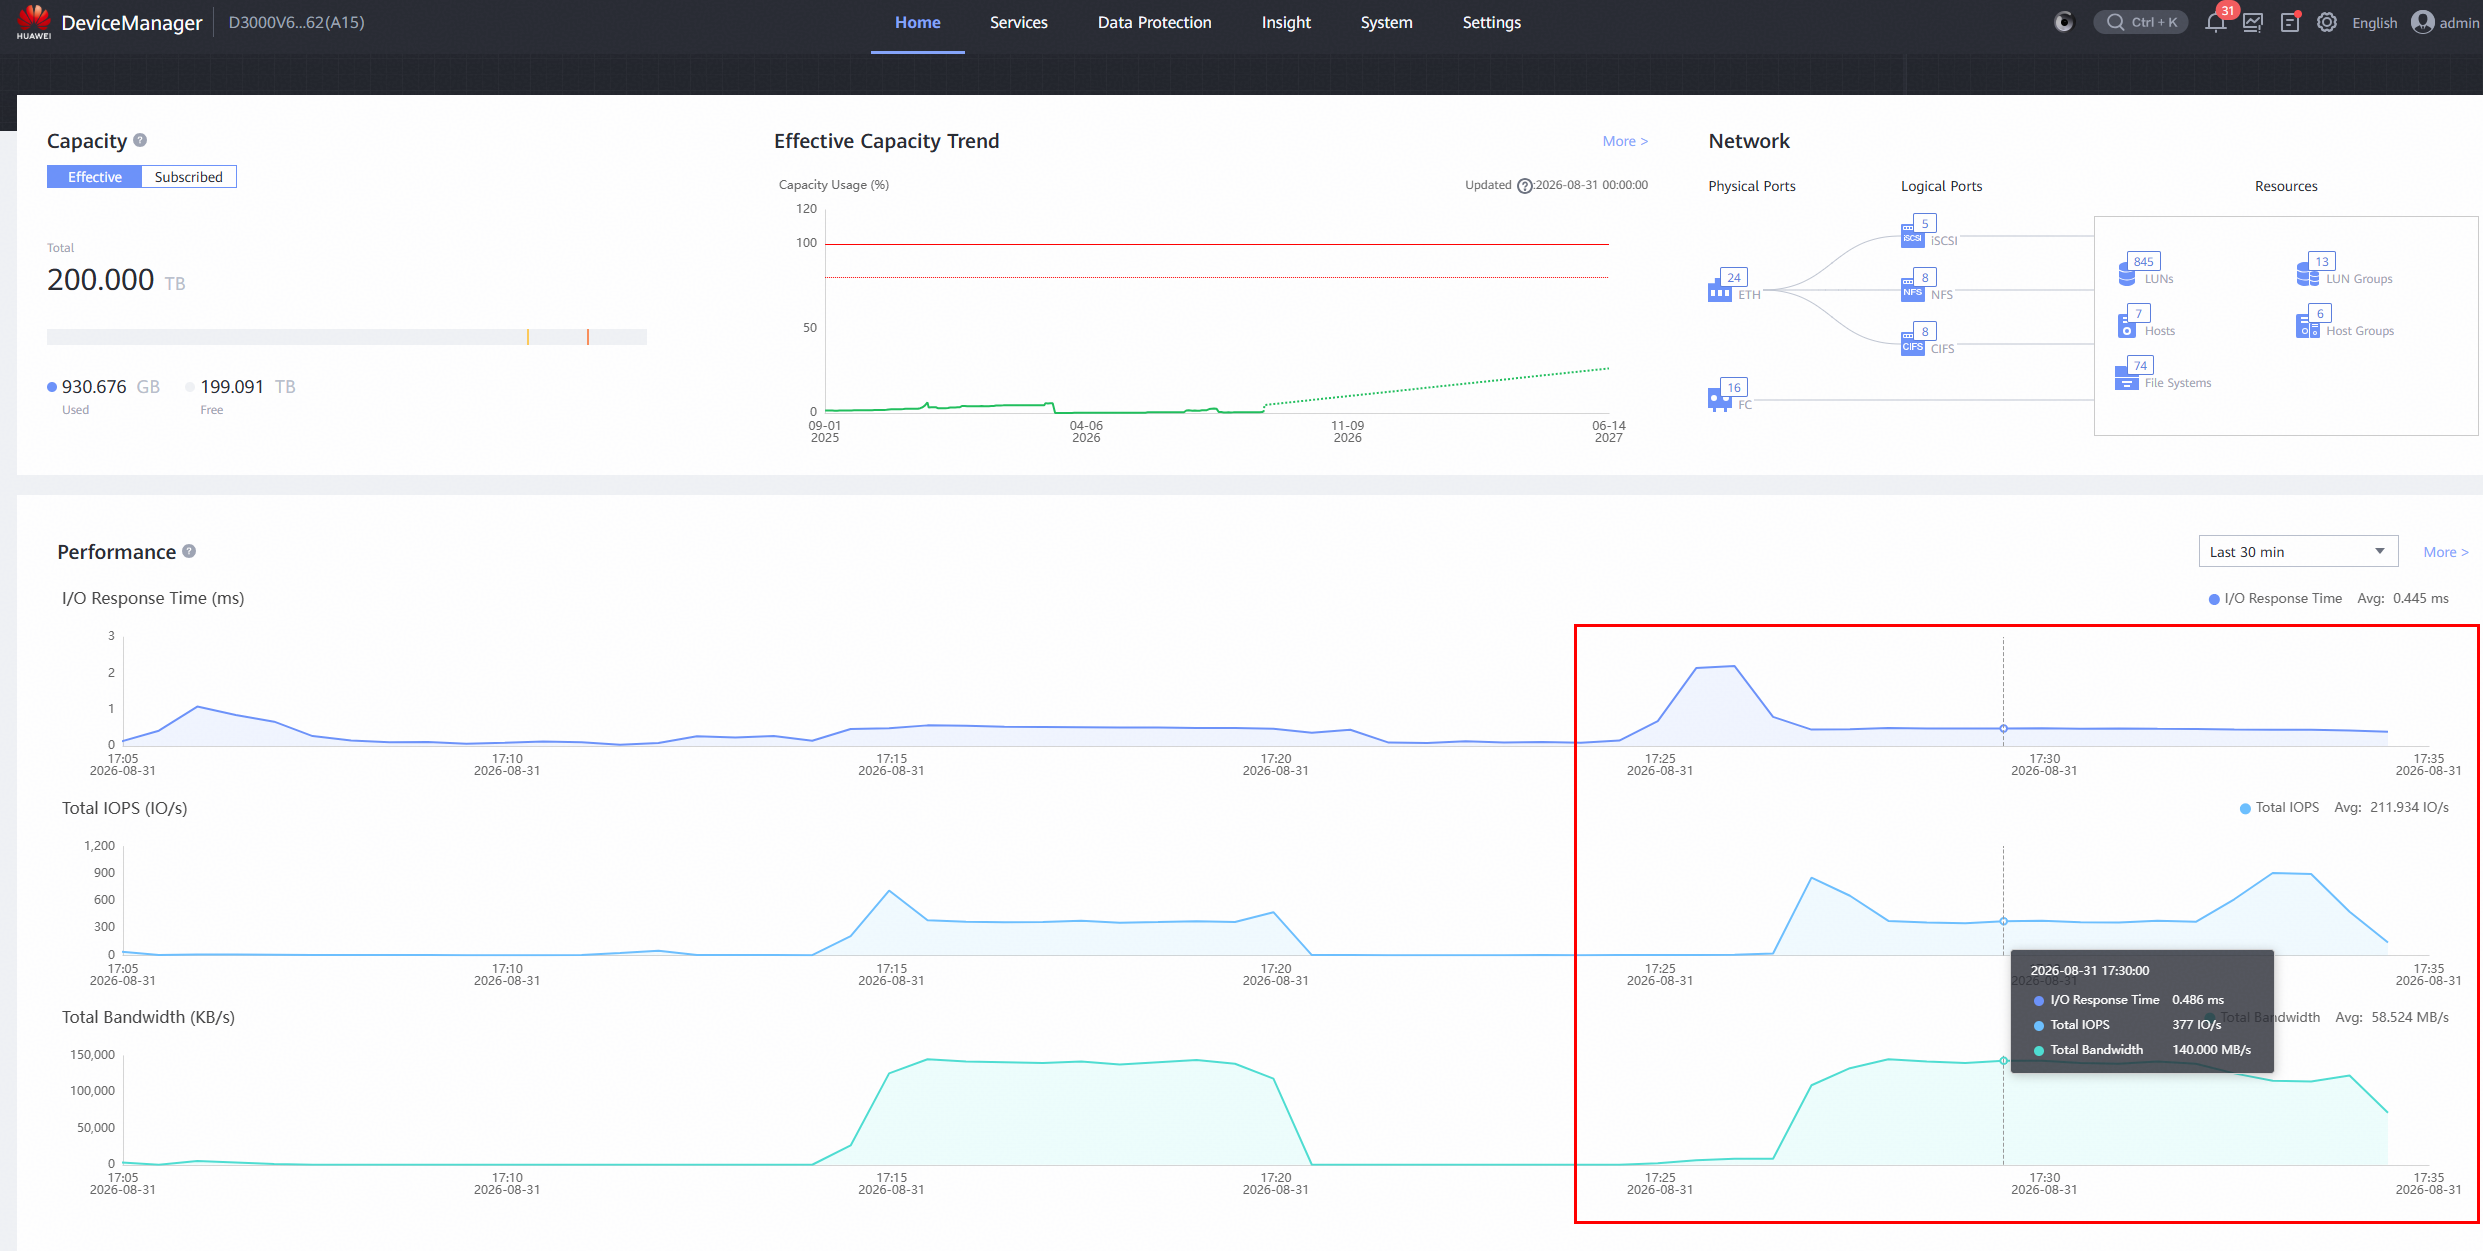
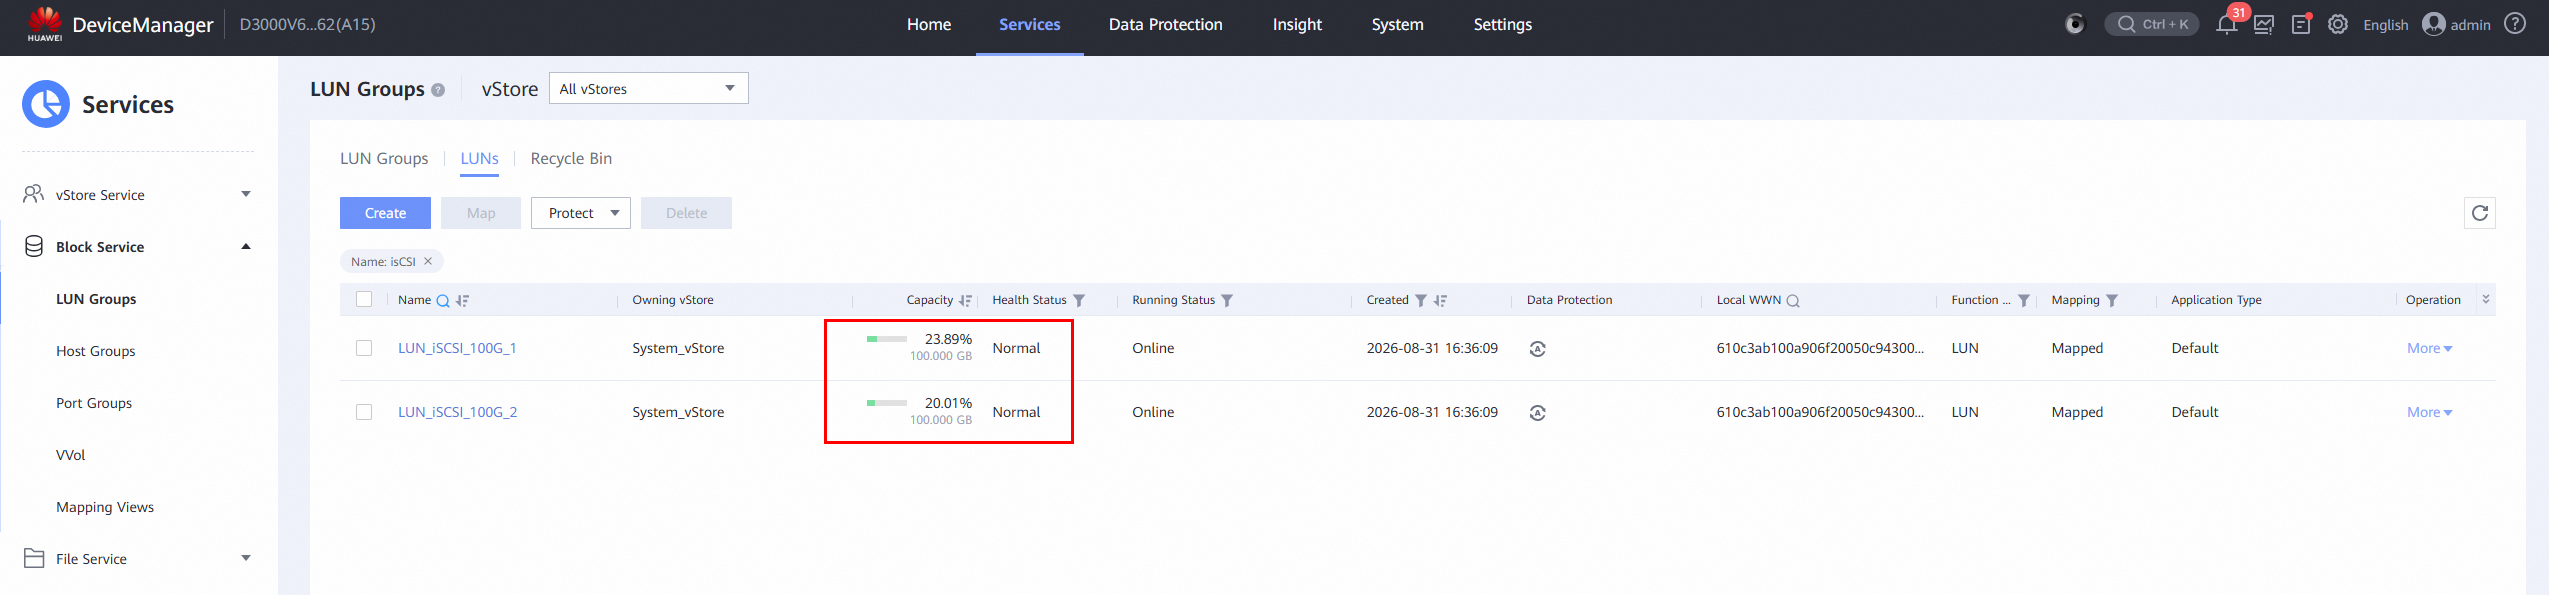
|
Test Conclusion | Passed |
4.Test Scenario 2: Reliability Test and Results
4.1 Storage Interface Card Failure and Recovery
Test Purpose | To Verify That Business is Normal in the Interface Card Failure Scenario |
Network Diagram | Reference to Figure 1.1 |
Prerequisites | 1.The network is correctly configured according to the network diagram, and the physical links are normal. 2.Host system is functioning properly. 3.Storage system is functioning properly. 4.Multipath is correctly installed and configured. 5.LUN mapping is correct. 6.The storage HyperMetro is configured correctly. |
Test Procedures | 1.Log into the storage management system and create mappings, adding two 200GB HyperMetro LUNs to the host. 2. Log into Proxmox VE backend scan the LUNs and create Volume Group on the LUNs. 3.Create LVM Storage on LUN A and LUN B, and add them to the VM as « Virtual Disks »; 4.In the VM, perform raw disk read/write operations on LUN A using vdbench, and observe the I/O performance. In the VM, create file systems on LUN B, and perform file system read/write operations using vdbench, observing the I/O performance. 5.Unplug the interface card of Controller A and observe the I/O performance. 6.Reinsert the interface card and observe the I/O performance. |
Expected Results | 1.In step 2, the host is able to scan and detect the two mapped LUNs. 2.In step 4, I/O read/write operations are normal. 3.In step 5, I/O is uninterrupted, the reset time is within the specification range, and I/O is balanced across all remaining paths of the LUN. 4.In step 6, there is no reset, the faulted path status recovers to normal, and I/O resumes balanced across all paths of the LUN. |
Test Results | 1.Log into the storage management system and create mappings, adding two 200GB HyperMetro LUNs to the host. 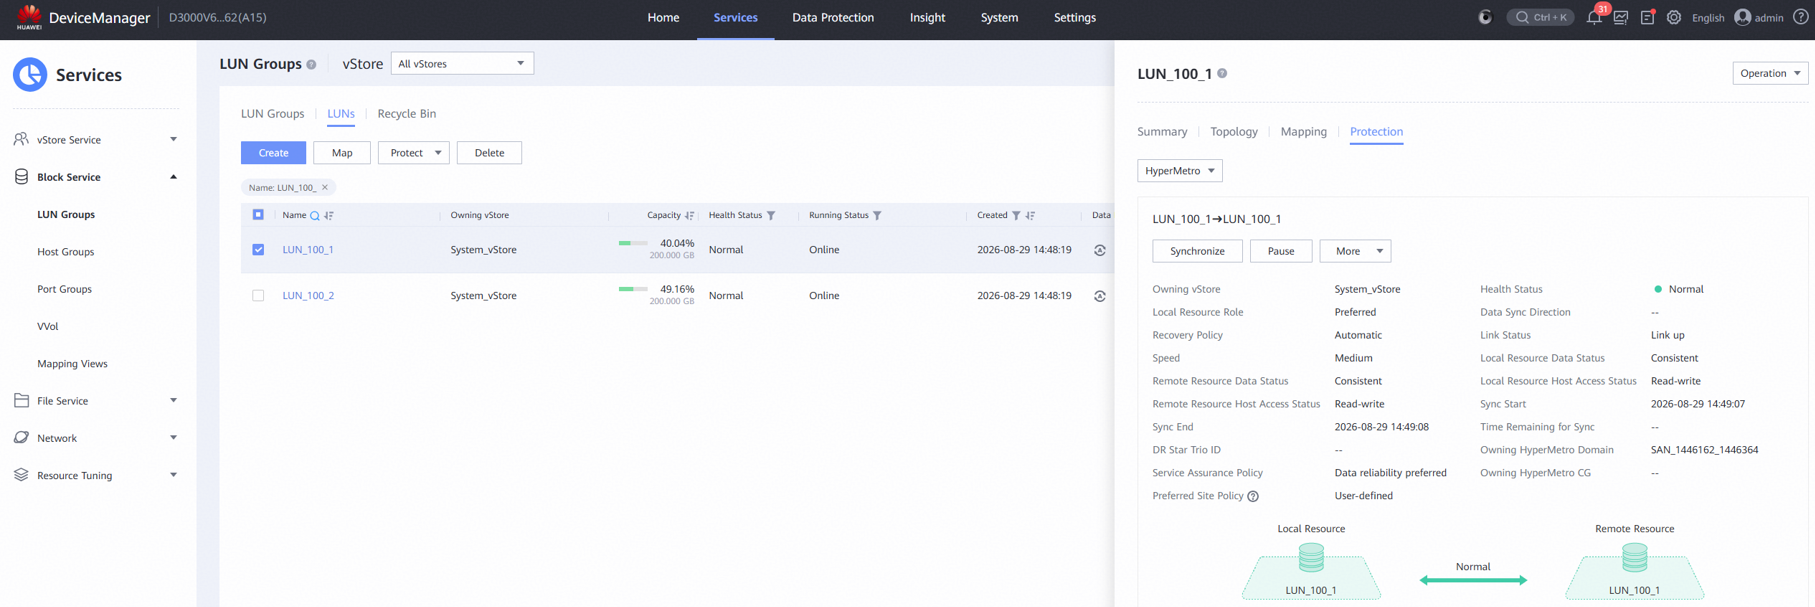
2. Log into Proxmox VE backend scan the LUNs and create Volume Group on the LUNs. 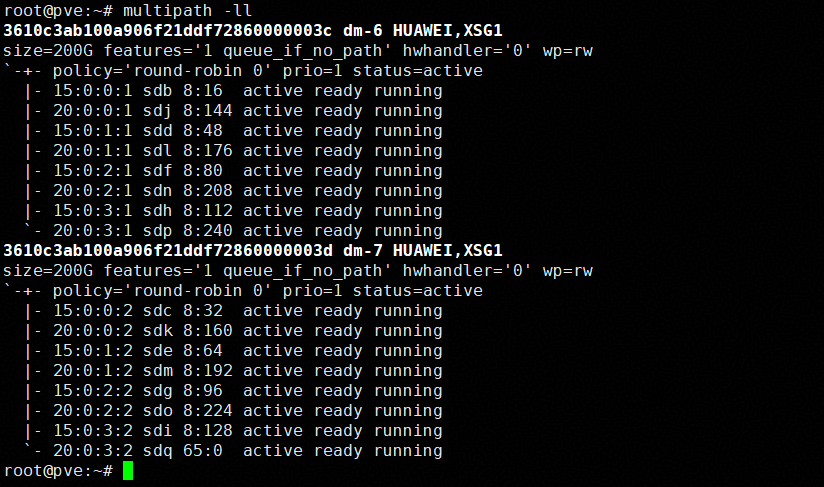
3.Create LVM Storage on LUN A and LUN B, and add them to the VM as « Virtual Disks »; 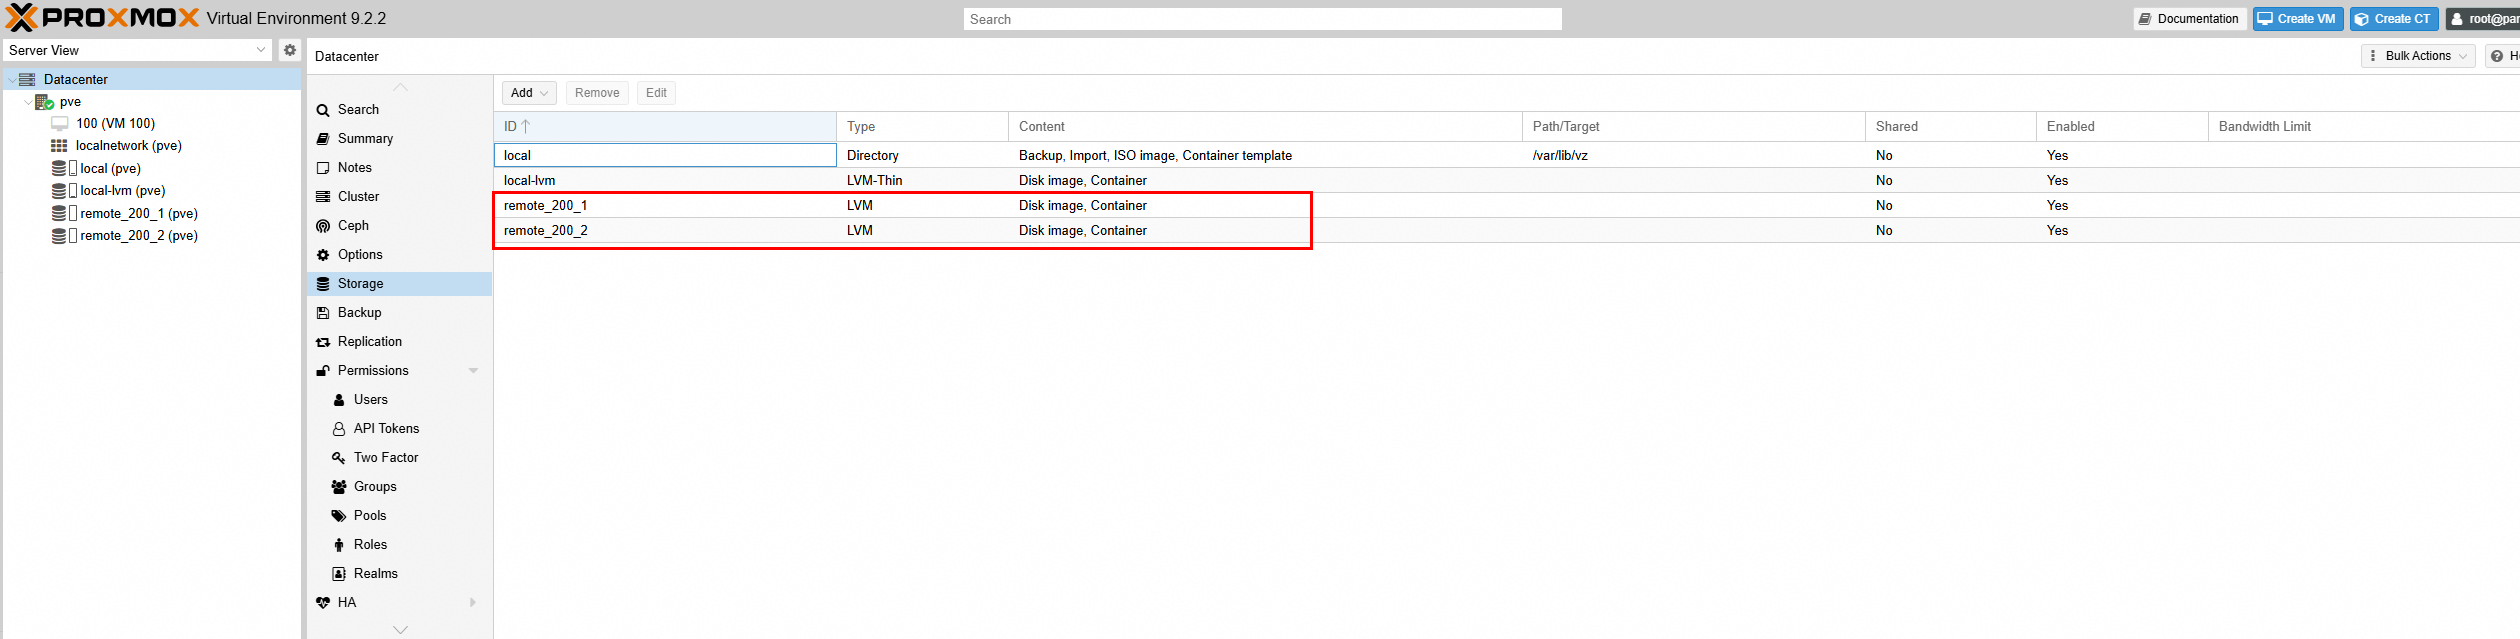
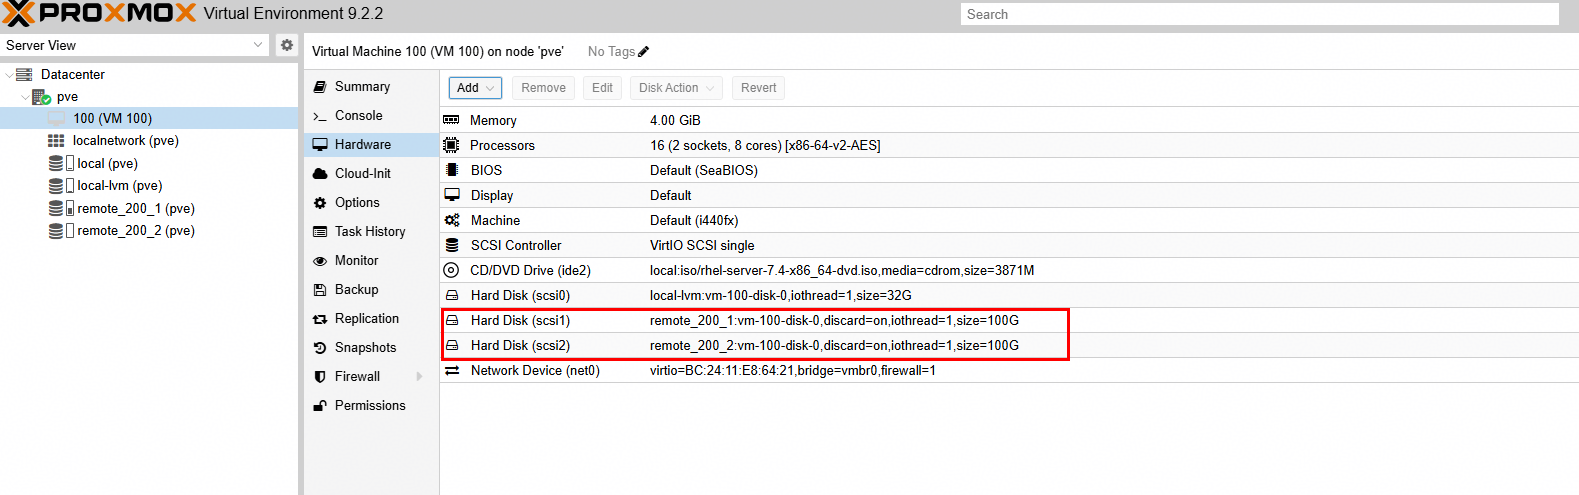
4.In the VM, perform raw disk read/write operations on LUN A using vdbench, and observe the I/O performance. In the VM, create file systems on LUN B, and perform file system read/write operations using vdbench, observing the I/O performance. 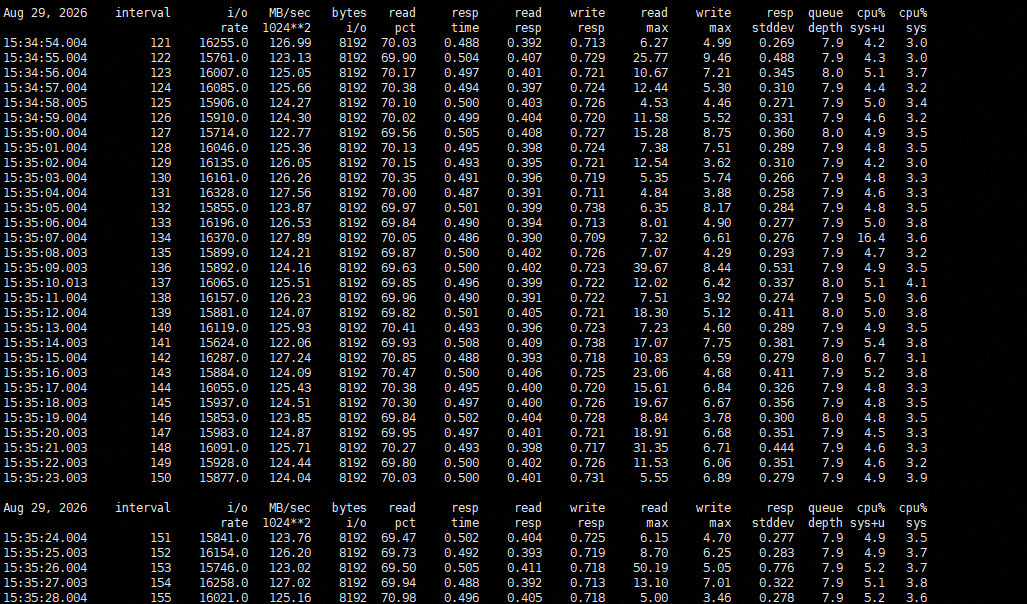
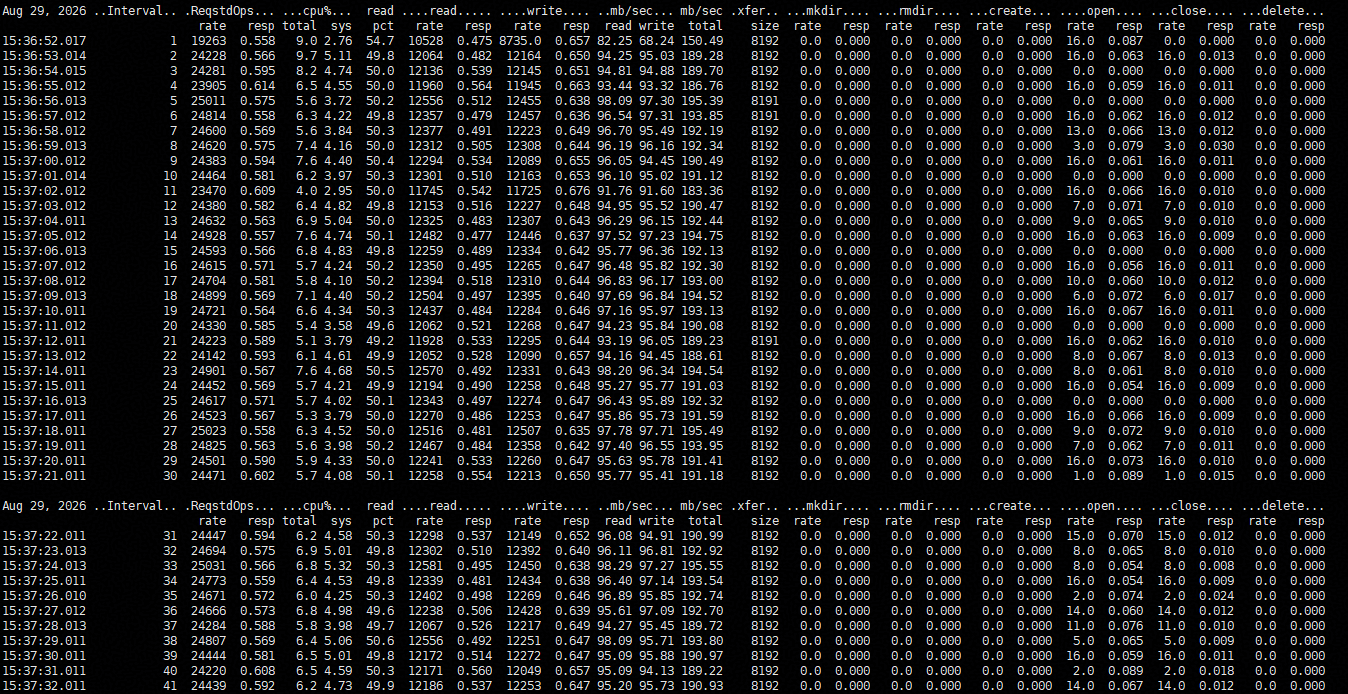
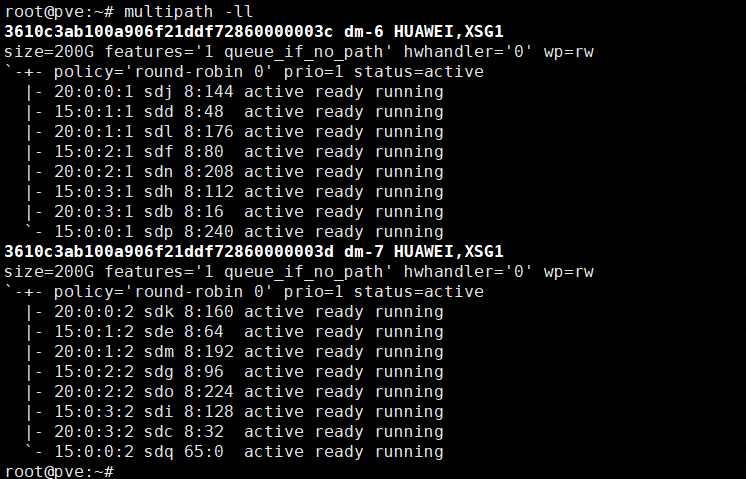
5.Unplug the interface card of Controller A and observe the I/O performance. 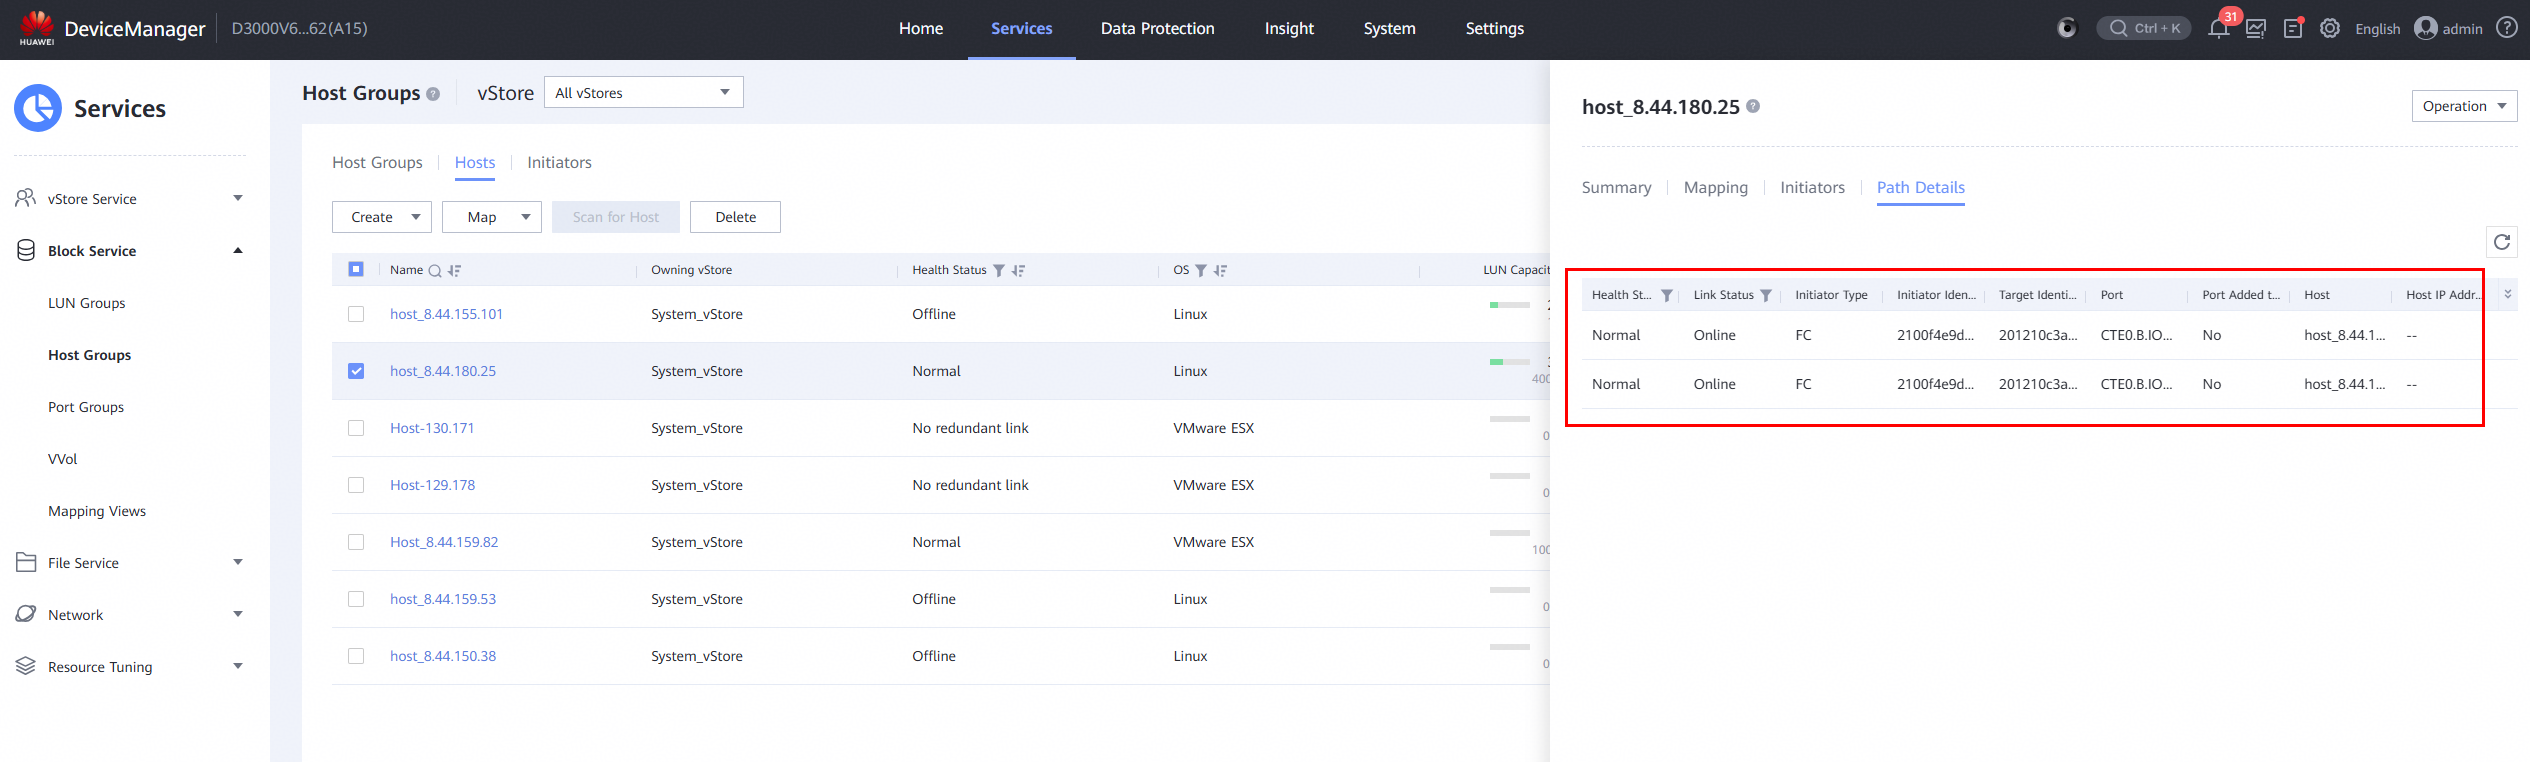
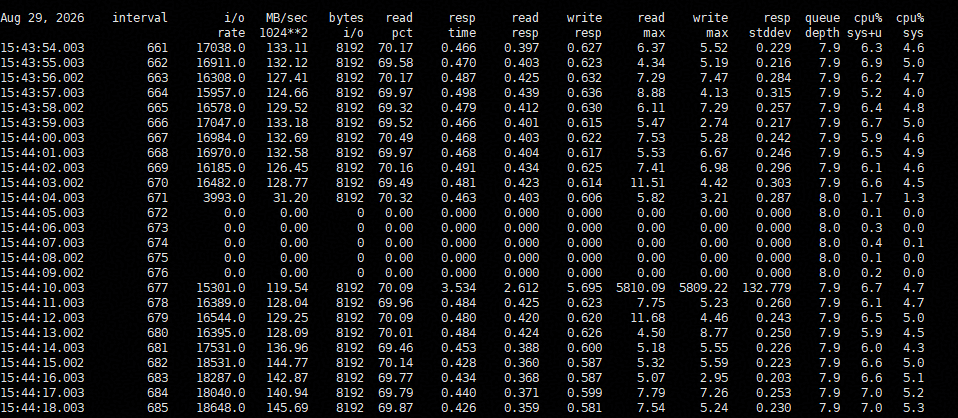
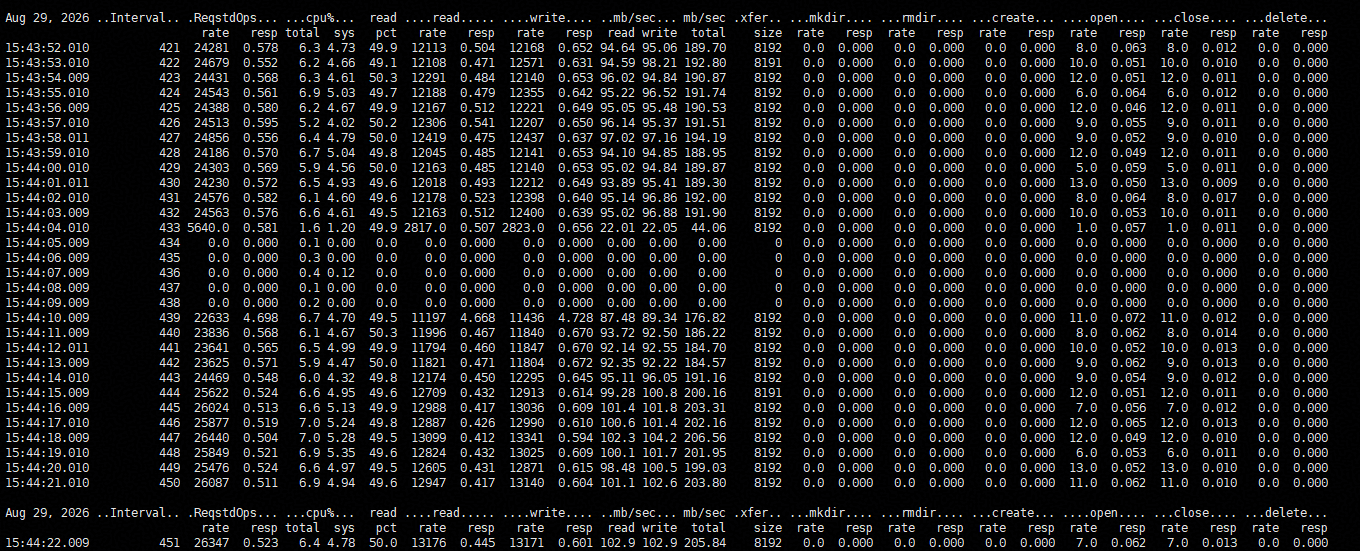
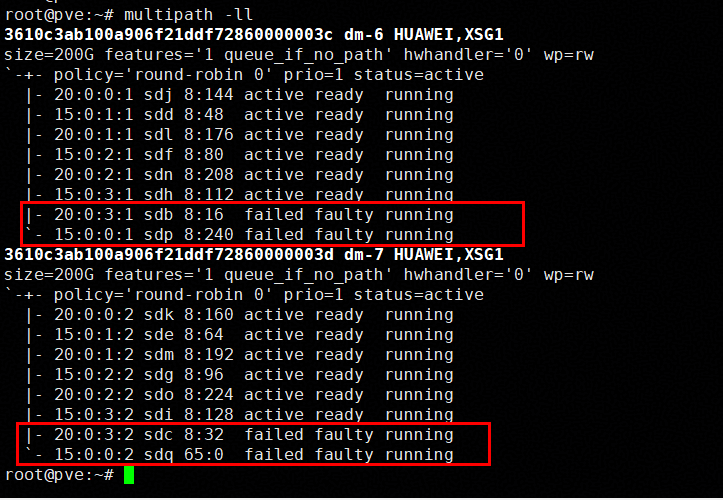
6.Reinsert the interface card and observe the I/O performance. 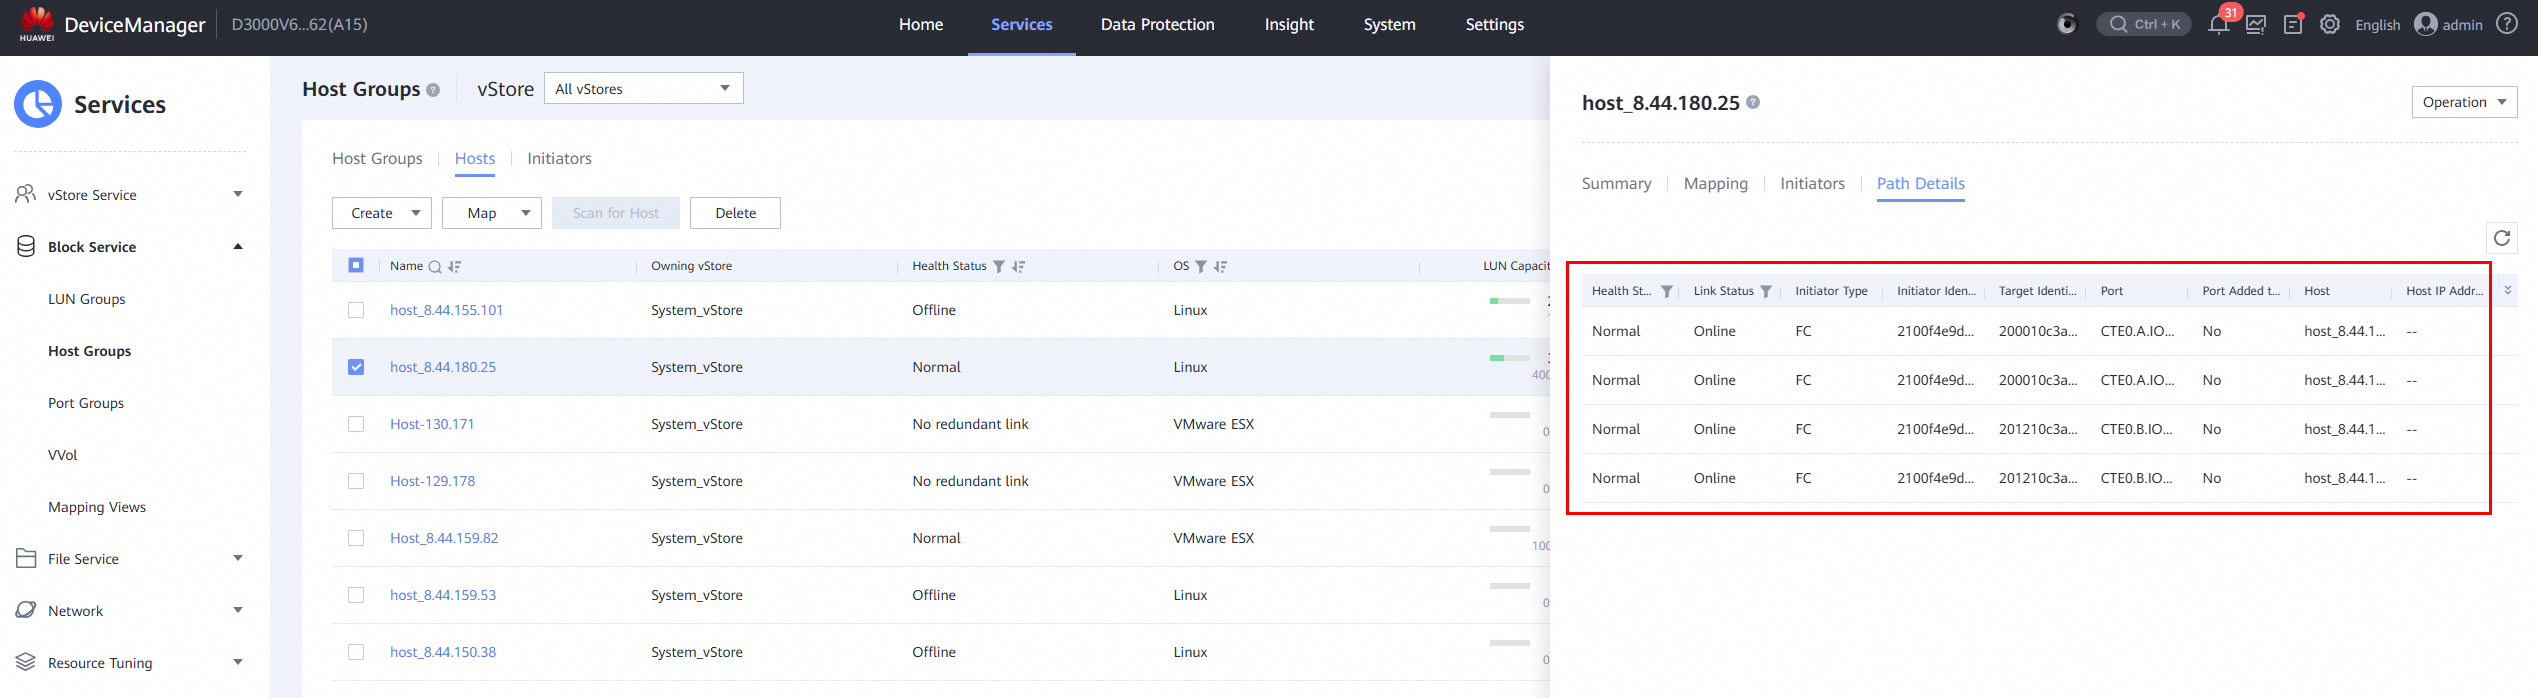
|
Test Conclusion | Passed |
4.2 Single Controller Failure and Recovery
Test Purpose | To Verify That Business is Normal in the Controller Failure Scenario |
Network Diagram | Reference to Figure 1.1 |
Prerequisites | 1.The network has been correctly set up according to the corresponding scenario, and the physical connections are functioning properly. 2.The host system is operating normally. 3.The storage system is functioning normally. 4.Multipath has been properly installed and configured. 5.LUN mapping is normal. 6.The storage HyperMetro is configured correctly. |
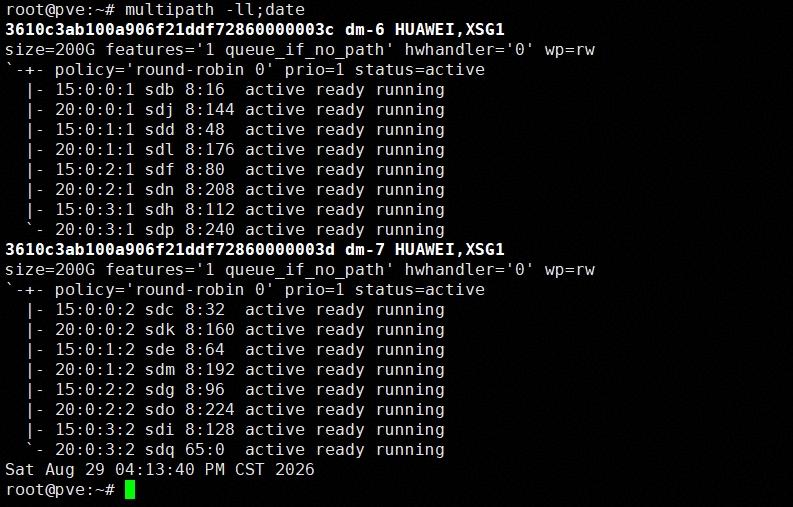
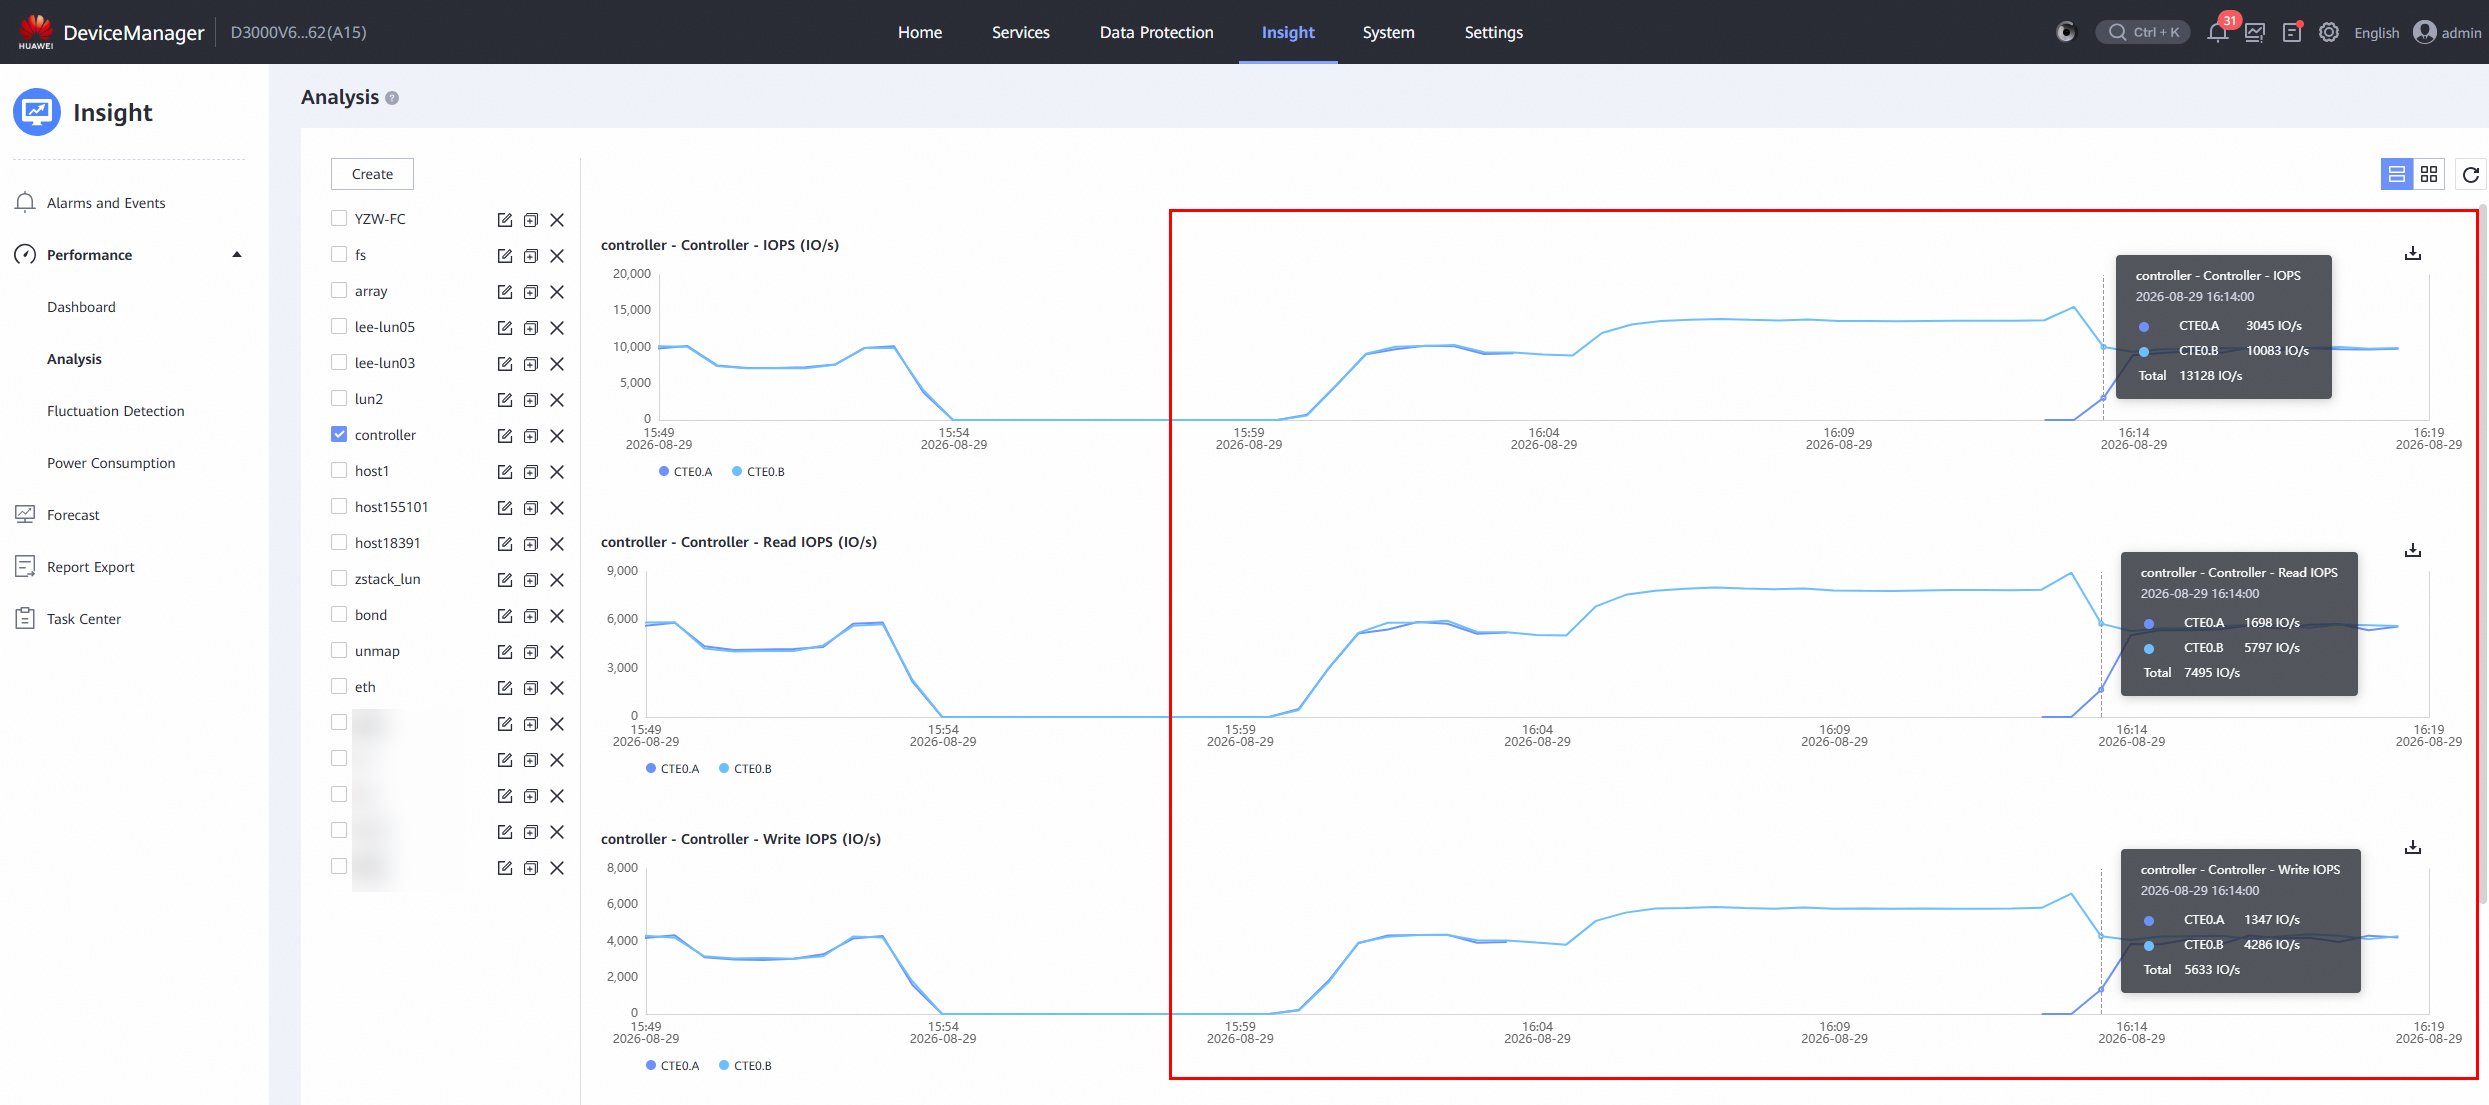
Test Procedures | 1.Log into the storage management system and create mappings, adding two 200GB HyperMetro LUNs to the host. 2. Log into Proxmox VE backend scan the LUNs and create Volume Group on the LUNs. 3.Create LVM Storage on LUN A and LUN B, and add them to the VM as « Virtual Disks »; 4.In the VM, perform raw disk read/write operations on LUN A using vdbench, and observe the I/O performance. In the VM, create file systems on LUN B, and perform file system read/write operations using vdbench, observing the I/O performance. 5. Unplug the controller A observe the I/O performance. 6. Reinsert the the controller. Wait for Controller A to recover and observe the I/O performance. |
Expected Results | 1.In step 2, the host is able to scan and detect the four mapped LUNs. 2.In step 4, I/O read/write operations are normal. 3.In step 5, I/O is uninterrupted, the reset time is within the specification range, and I/O is balanced across all remaining paths of the LUN. 4.In step 6, there is no reset, the faulted path status recovers to normal, and I/O resumes balanced across all paths of the LUN. |
Test Results | 1.Log into the storage management system and create mappings, adding two 200GB HyperMetro LUNs to the host. 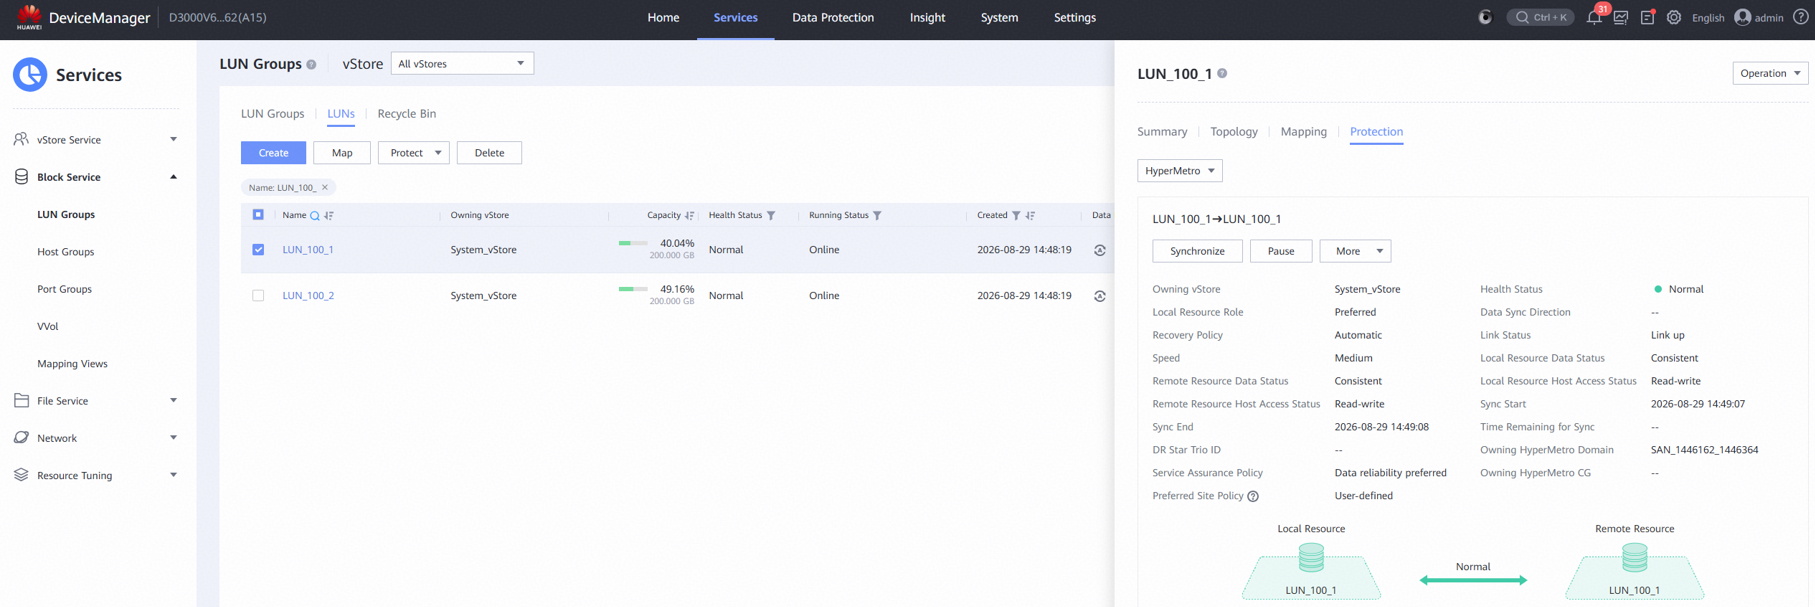
3.Create LVM Storage on LUN A and LUN B, and add them to the VM as « Virtual Disks »; 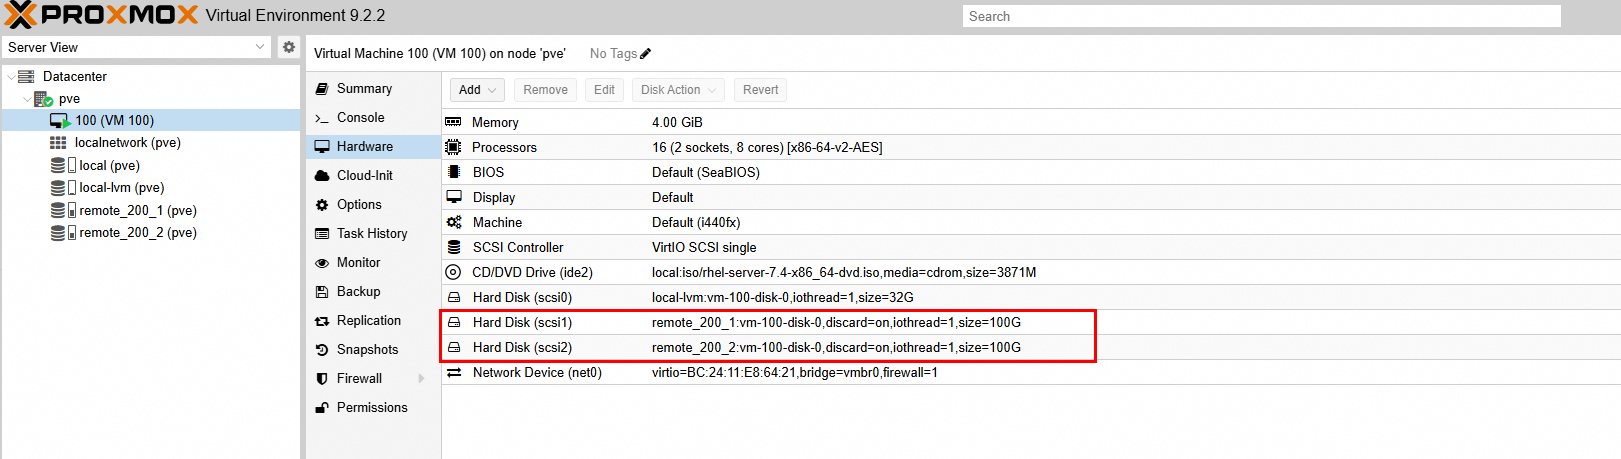
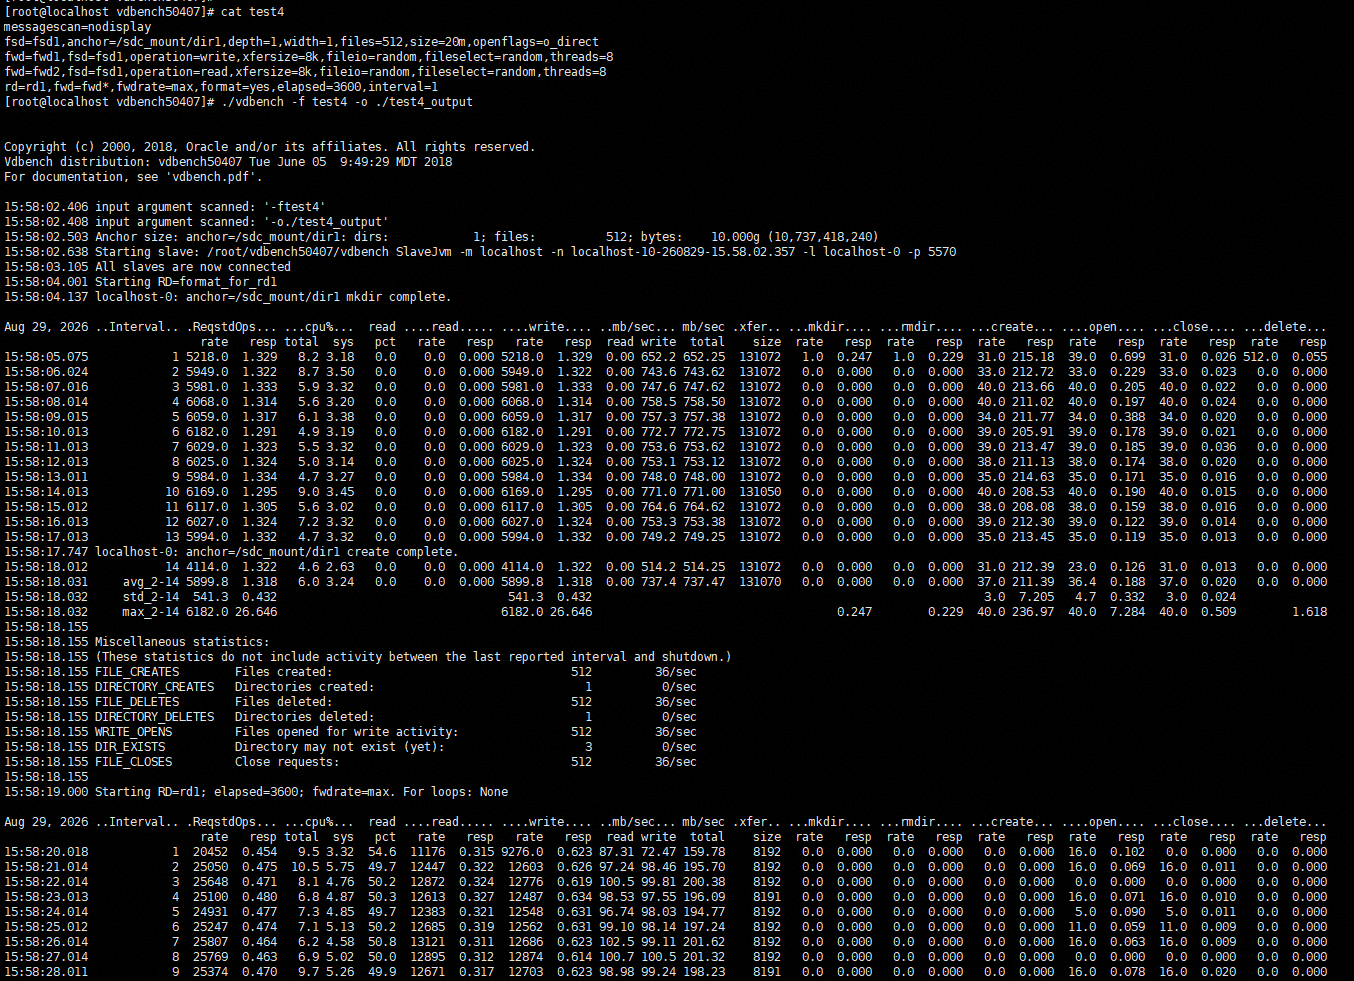
4.In the VM, perform raw disk read/write operations on LUN A using vdbench, and observe the I/O performance. In the VM, create file systems on LUN B, and perform file system read/write operations using vdbench, observing the I/O performance. 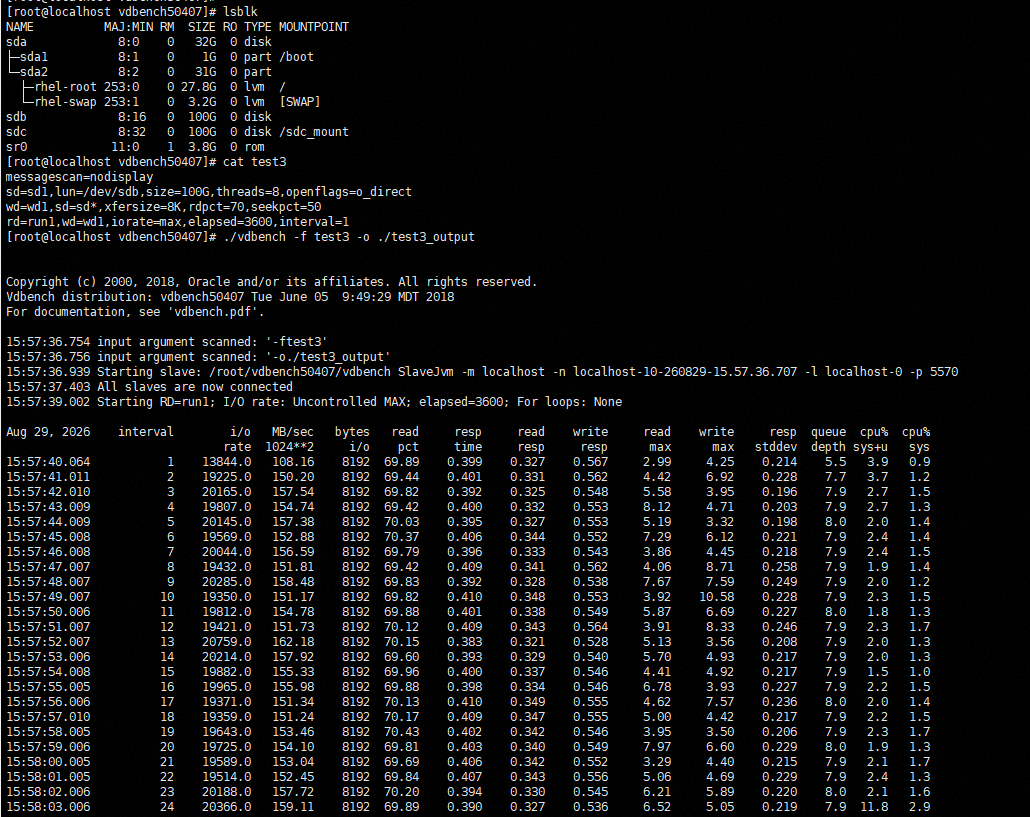
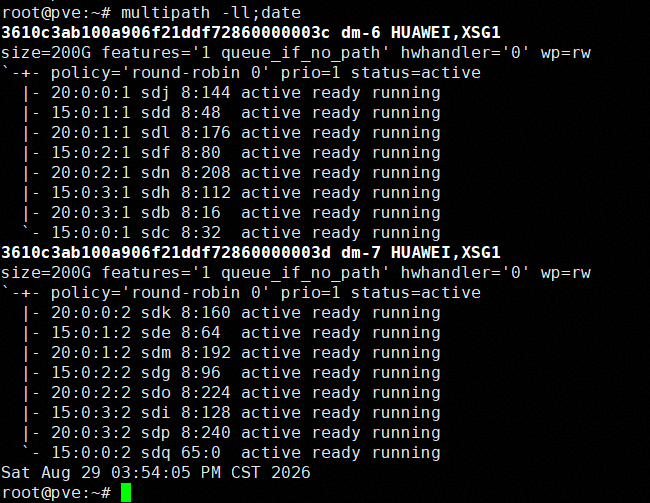
5. Unplug the controller A observe the I/O performance. 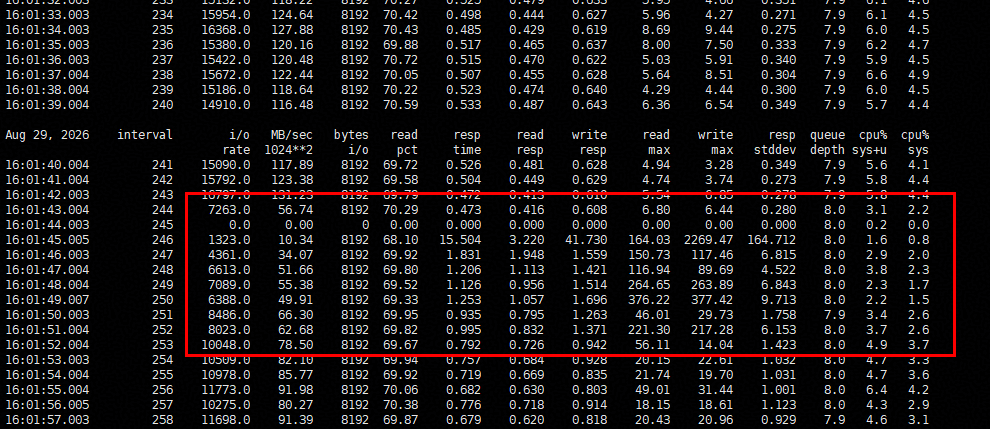
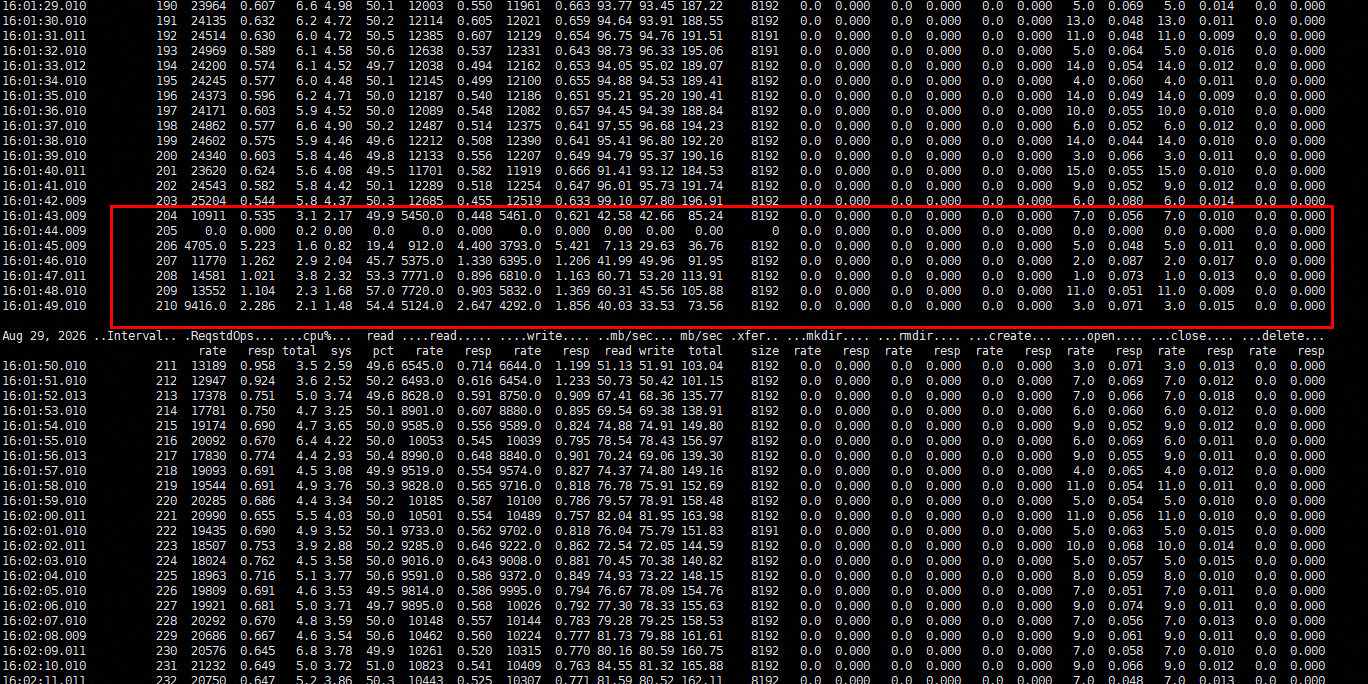
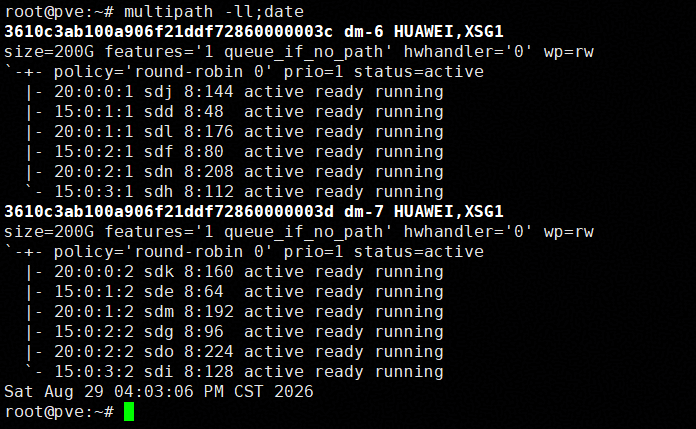
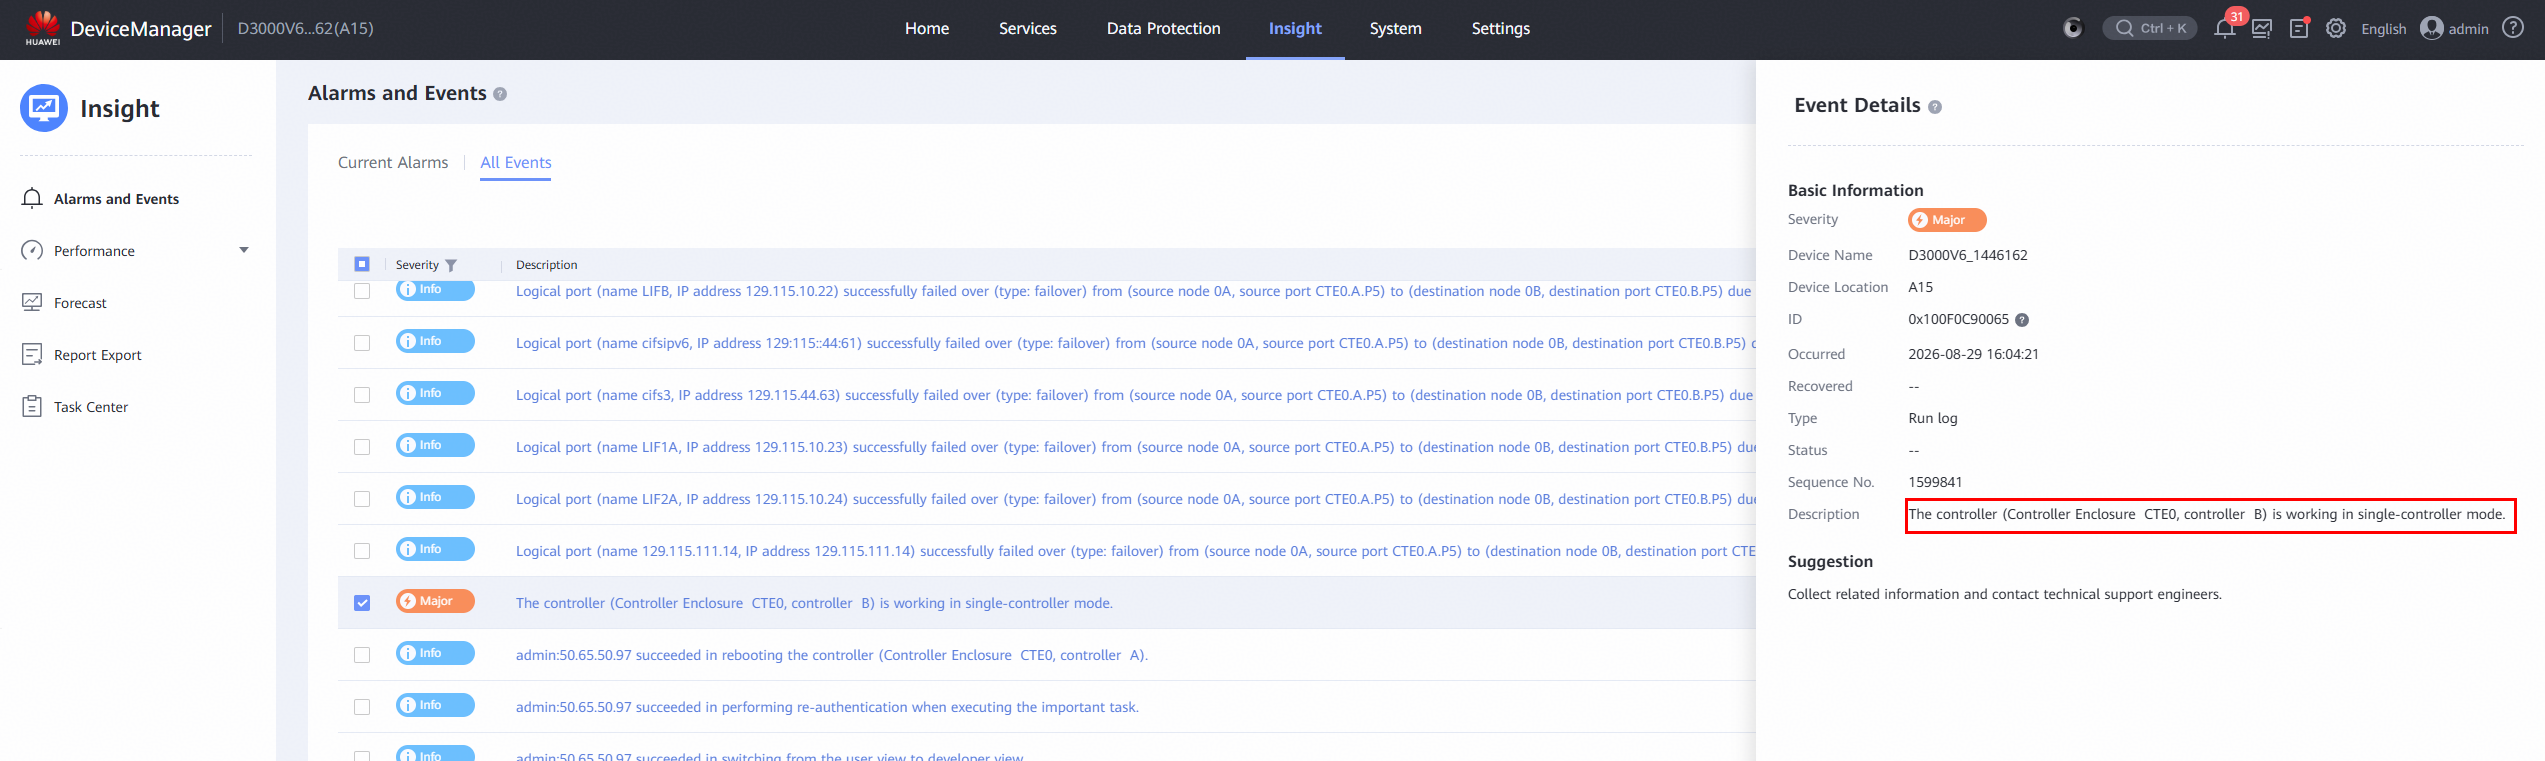
6. Reinsert the the controller. Wait for Controller A to recover and observe the I/O performance. 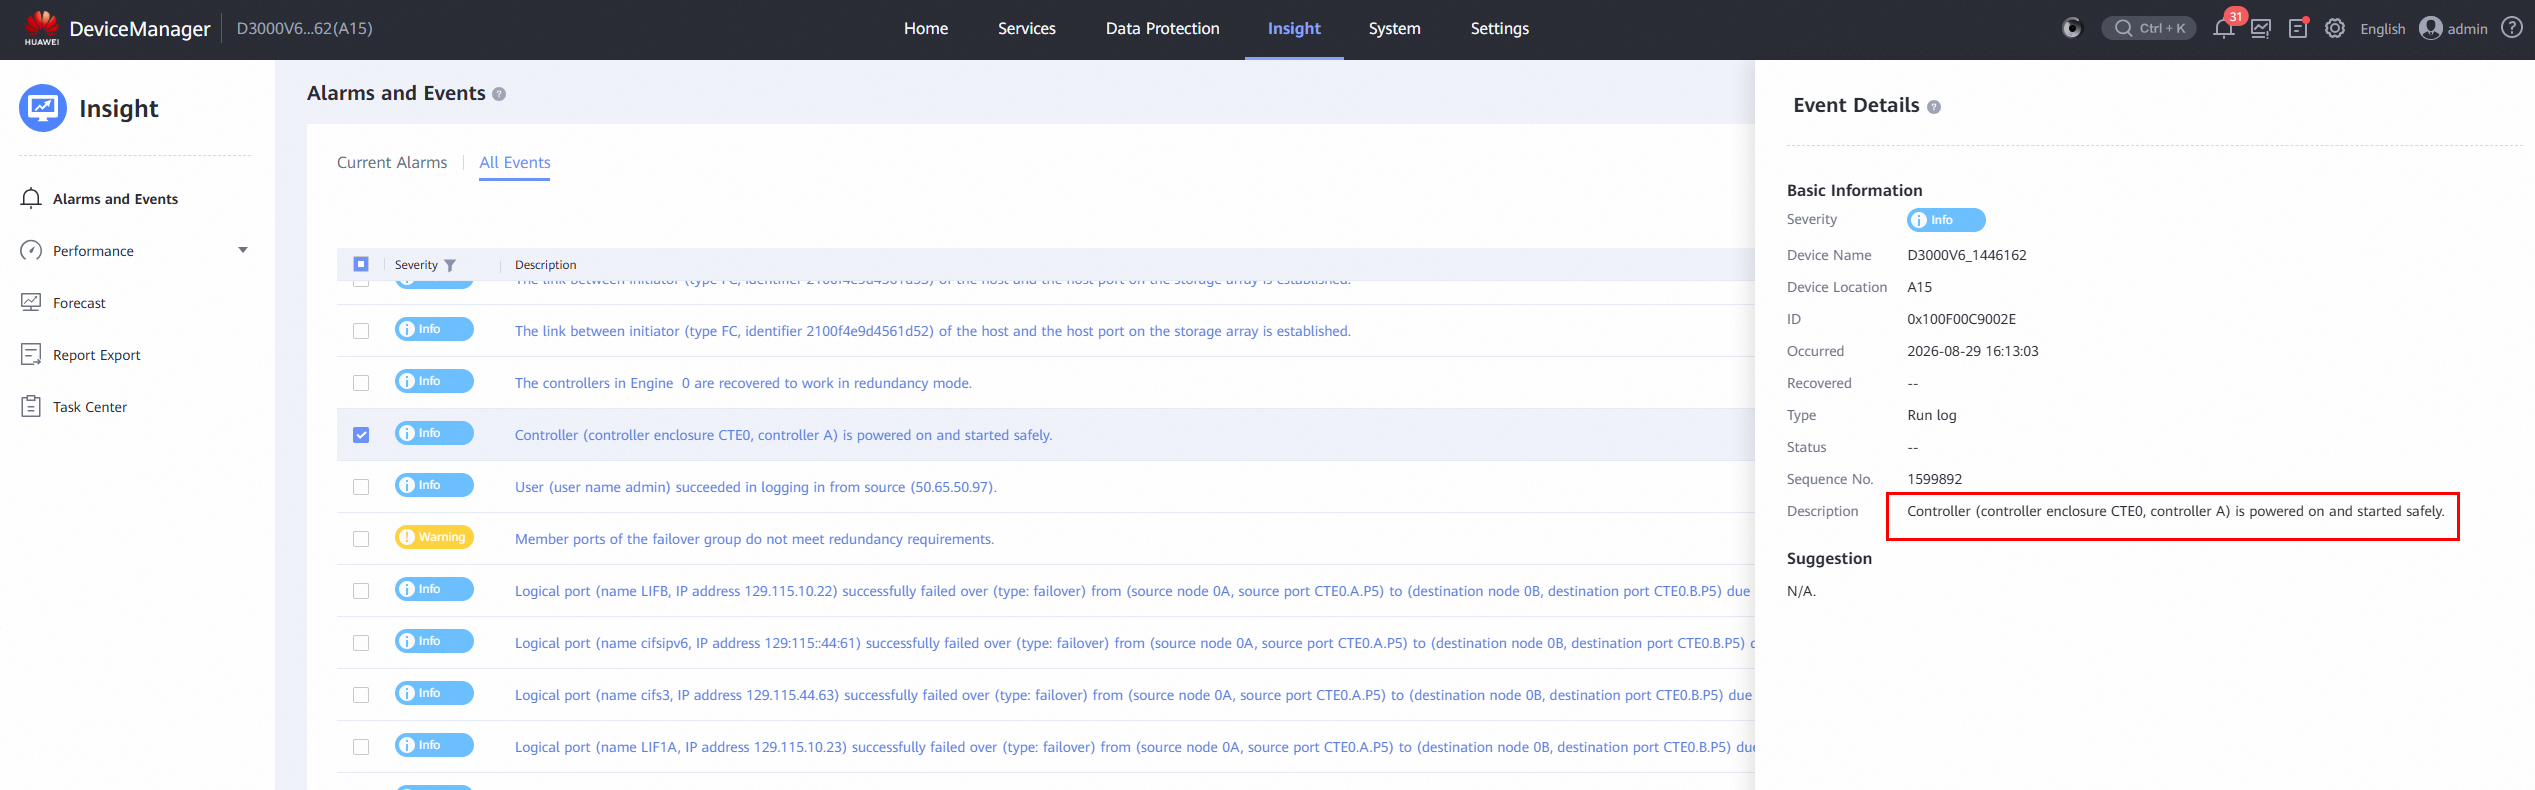
|
Test Conclusion | Passed |
4.3 Storage Replication Link Failure and Recovery
Test Purpose | To Verify That Business is Normal in the Storage Replication Link Failure Scenario |
Network Diagram | Reference to Figure 1.1 |
Prerequisites | 1.The network is correctly configured according to the network diagram, and the physical links are normal. 2.Host system is functioning properly. 3.Storage system is functioning properly. 4.Multipath is correctly installed and configured. 5.LUN mapping is correct. 6.The storage HyperMetro is configured correctly. |
Test Procedures | 1.Log into the storage management system and create mappings, adding two 200GB HyperMetro LUNs to the host. 2. Log into Proxmox VE backend scan the LUNs and create Volume Group on the LUNs. 3.Create LVM Storage on LUN A and LUN B, and add them to the VM as « Virtual Disks »; 4.In the VM, perform raw disk read/write operations on LUN A using vdbench, and observe the I/O performance. In the VM, create file systems on LUN B, and perform file system read/write operations using vdbench, observing the I/O performance. 5.Set the preferred site of the HyperMetro pairs to storage 1, then Unplug all cables of replication links between the storages and observe the I/O performance. 6.Plug back the cables back in, then wait for the HyperMetro pairs synchronization to complete and observe the I/O performance. 7.Set the preferred site of the HyperMetro pairs to storage 2, then Unplug all cables of replication links between the storages and observe the I/O performance. 8. Plug back the cables back in, then wait for the HyperMetro pairs synchronization to complete and observe the I/O performance. |
Expected Results | 1.In step 2, the host is able to scan and detect the four mapped LUNs. 2.In step 4, I/O read/write operations are normal. 3.In step 5, I/O is uninterrupted, the reset time is within the specification range, and I/O is balanced across all remaining paths of the LUN. 4.In step 6, there is no reset, the faulted path status recovers to normal, and I/O resumes balanced across all paths of the LUN. 5.In step 7, I/O is uninterrupted, the reset time is within the specification range, and I/O is balanced across all remaining paths of the LUN. 6.In step 8, there is no reset, the faulted path status recovers to normal, and I/O resumes balanced across all paths of the LUN. |
Test Results | 1.Log into the storage management system and create mappings, adding two 200GB HyperMetro LUNs to the host. 2. Log into Proxmox VE backend scan the LUNs and create Volume Group on the LUNs. 3.Create LVM Storage on LUN A and LUN B, and add them to the VM as « Virtual Disks »; 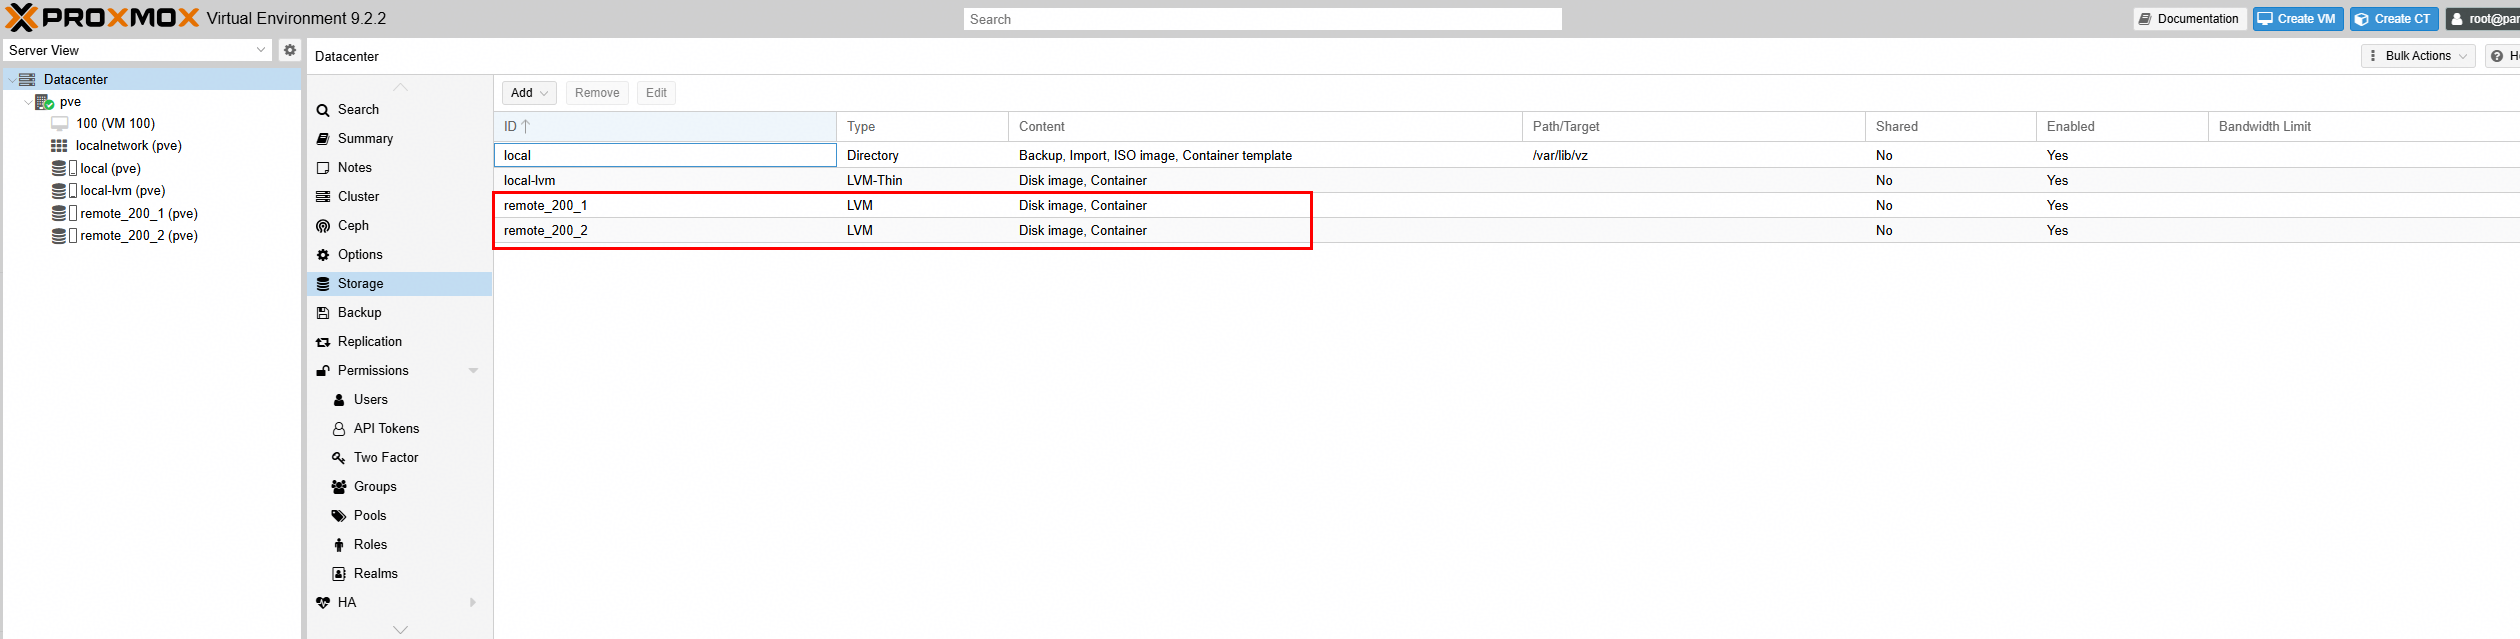
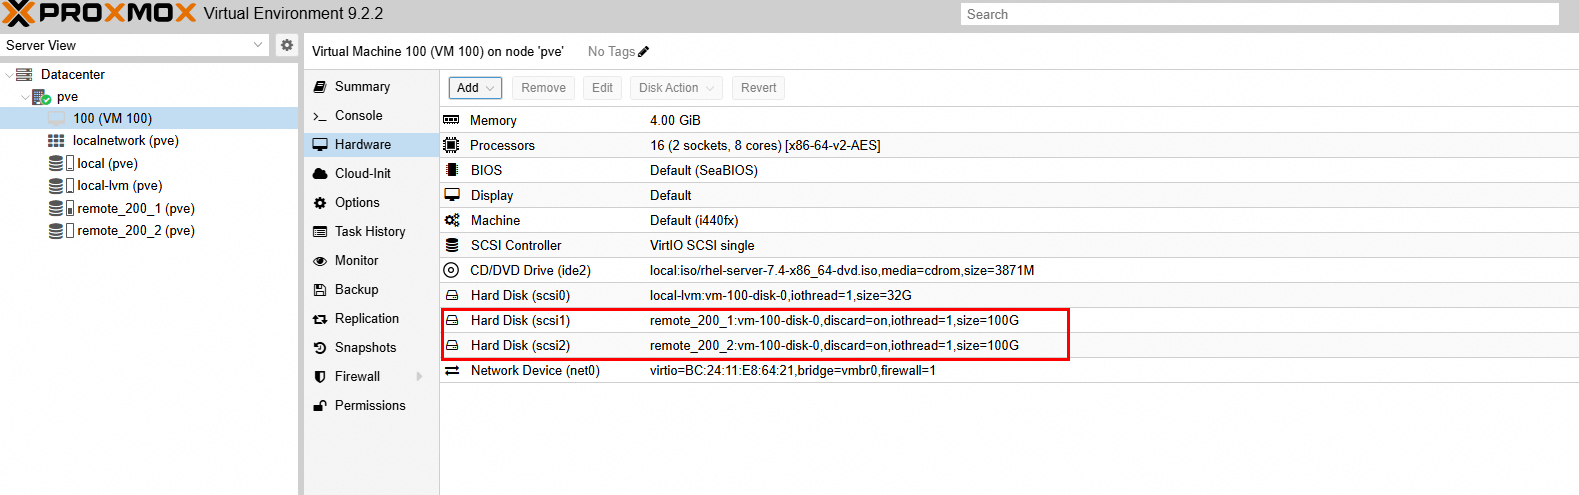
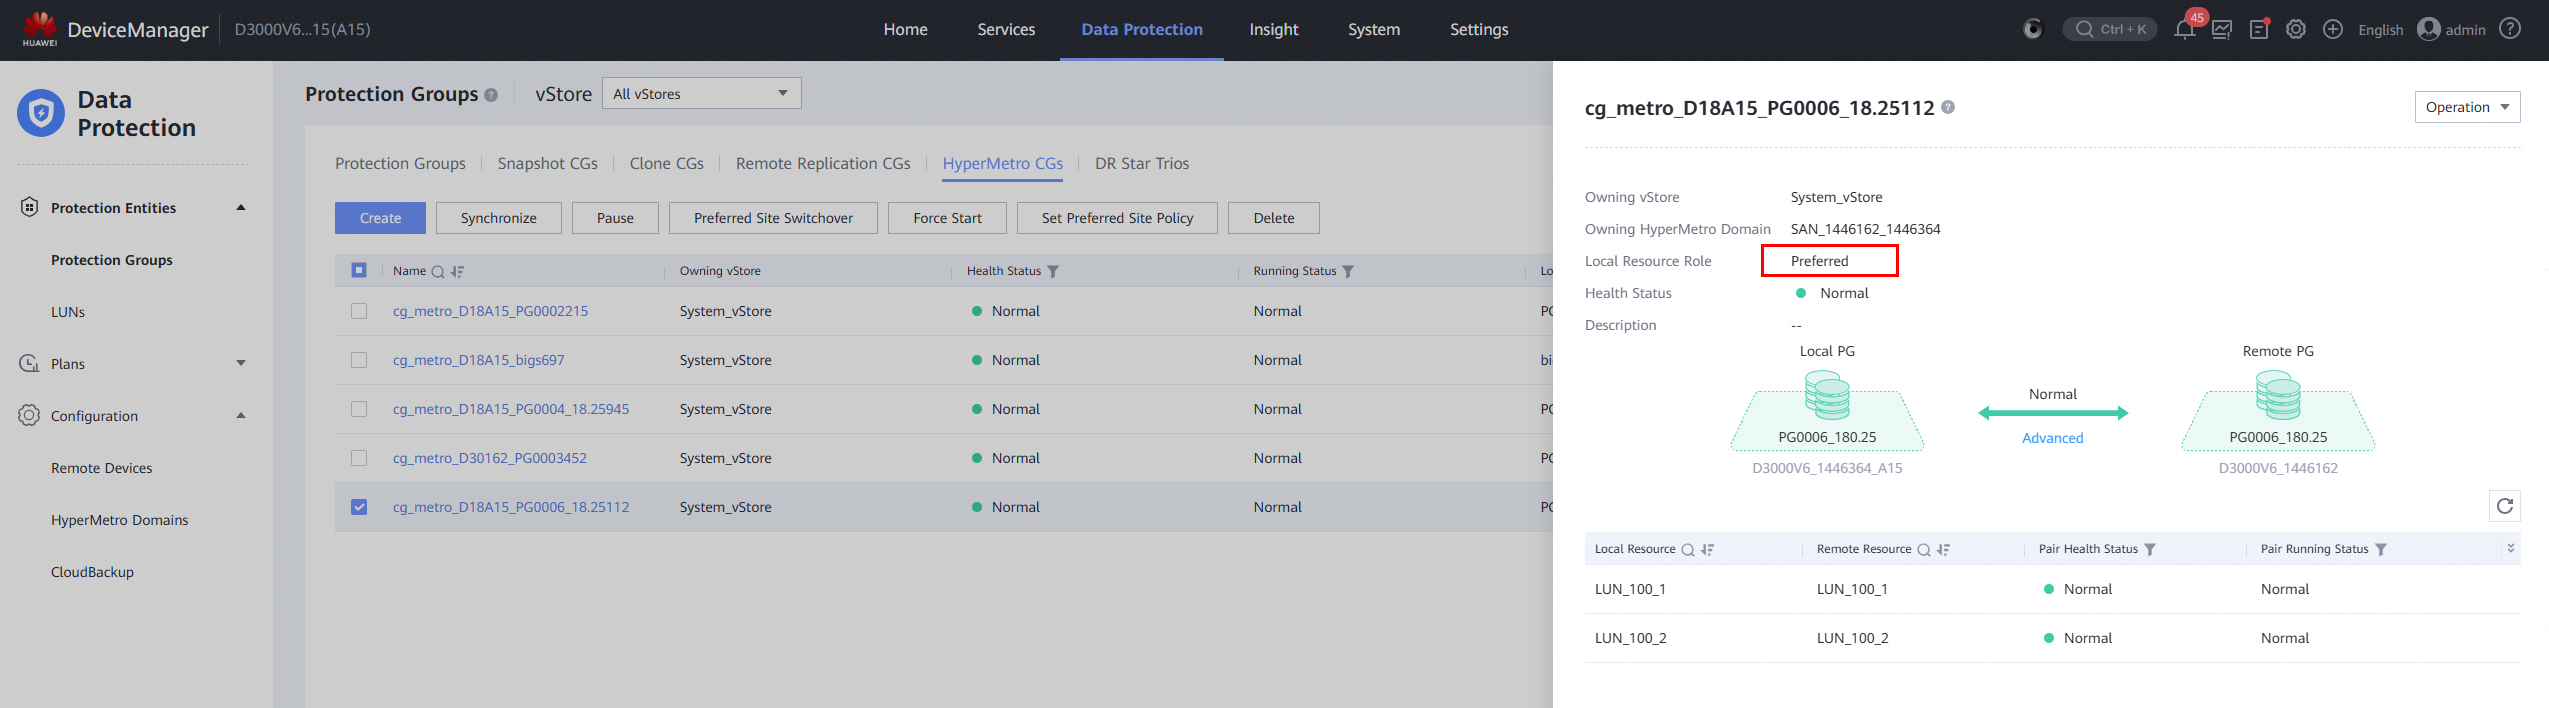
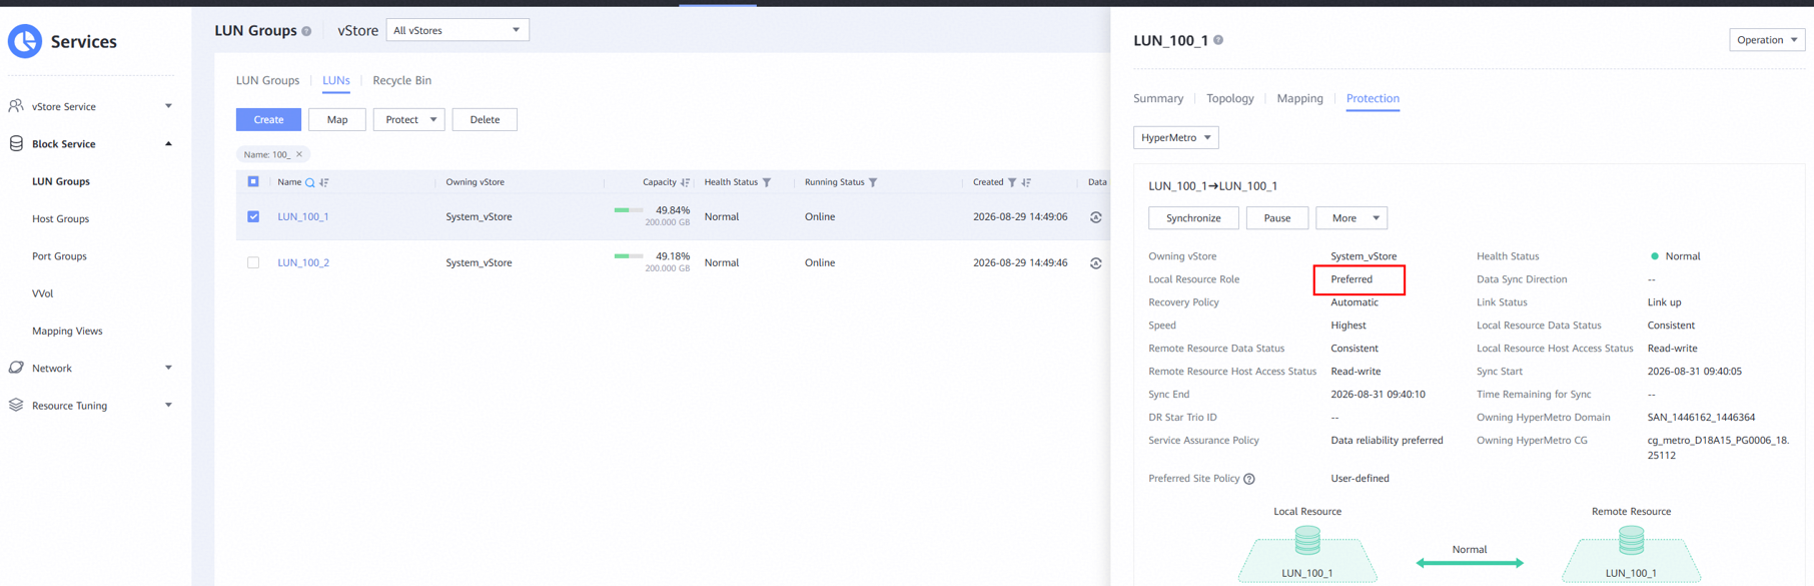
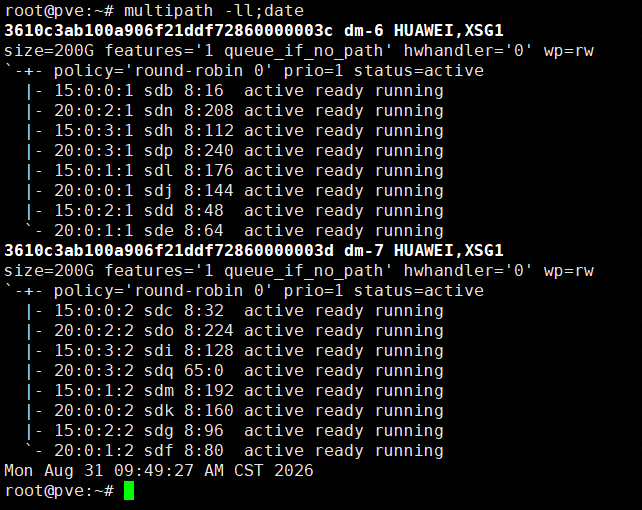
4.In the VM, perform raw disk read/write operations on LUN A using vdbench, and observe the I/O performance. In the VM, create file systems on LUN B, and perform file system read/write operations using vdbench, observing the I/O performance. 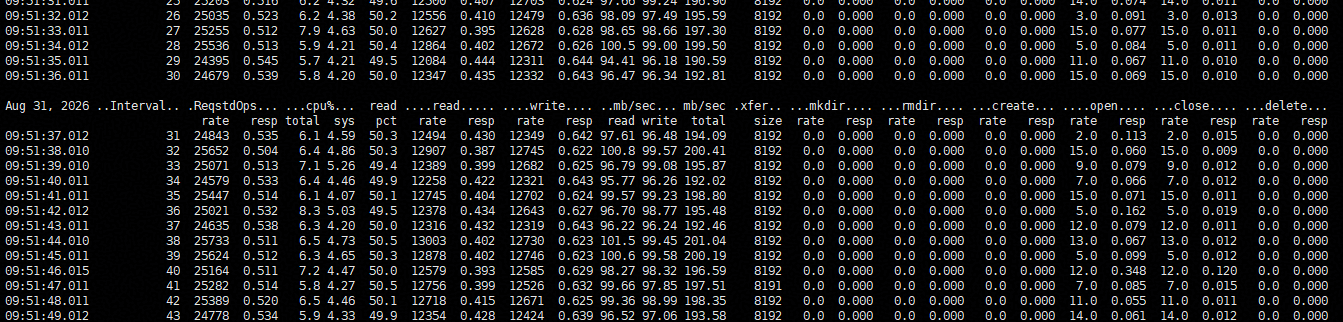
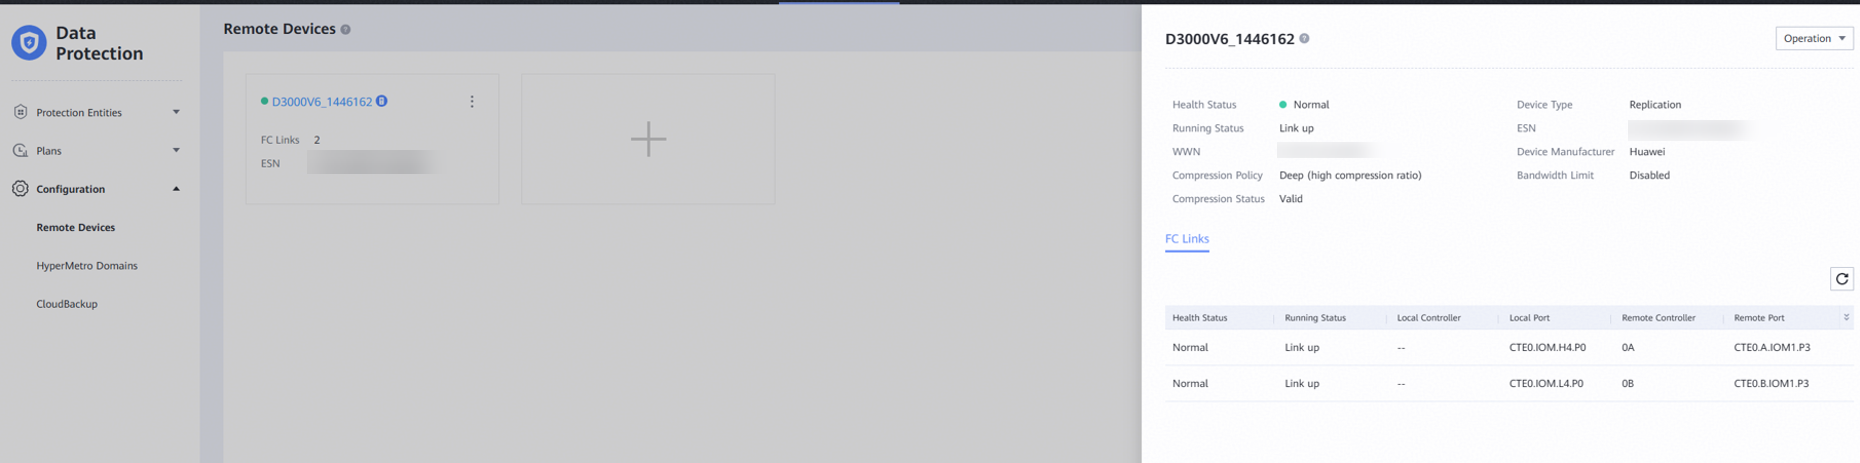
5.Set the preferred site of the HyperMetro pairs to storage 1, then Unplug all cables of replication links between the storages and observe the I/O performance. 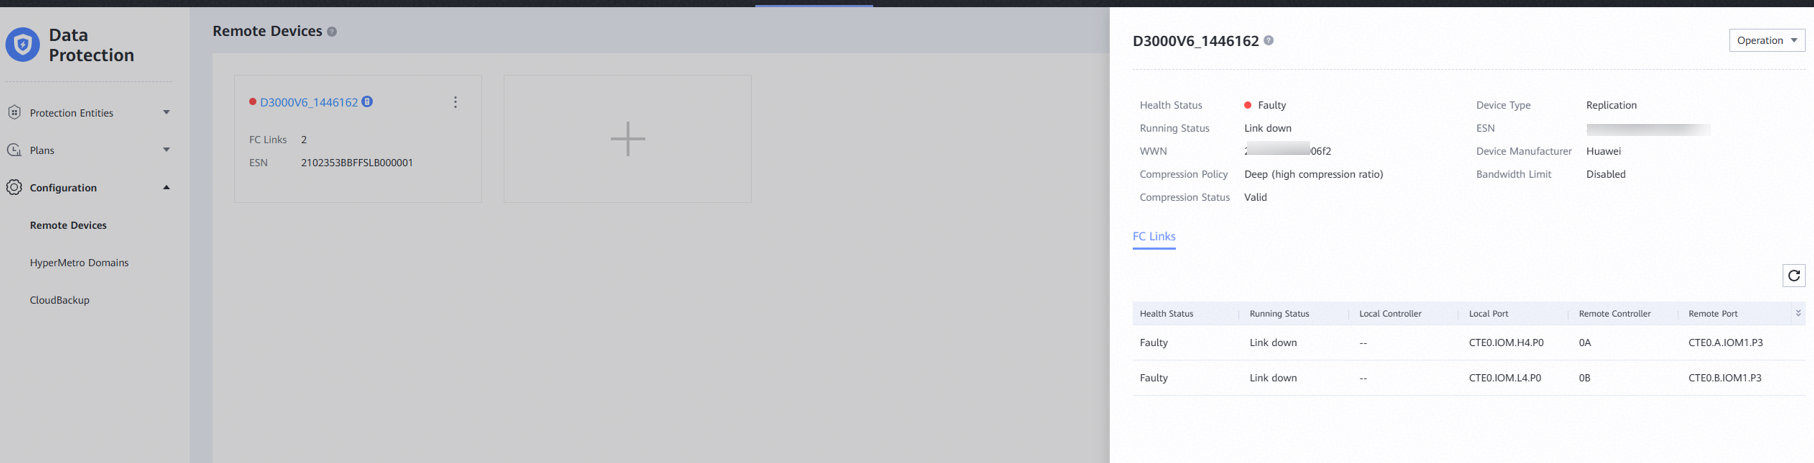
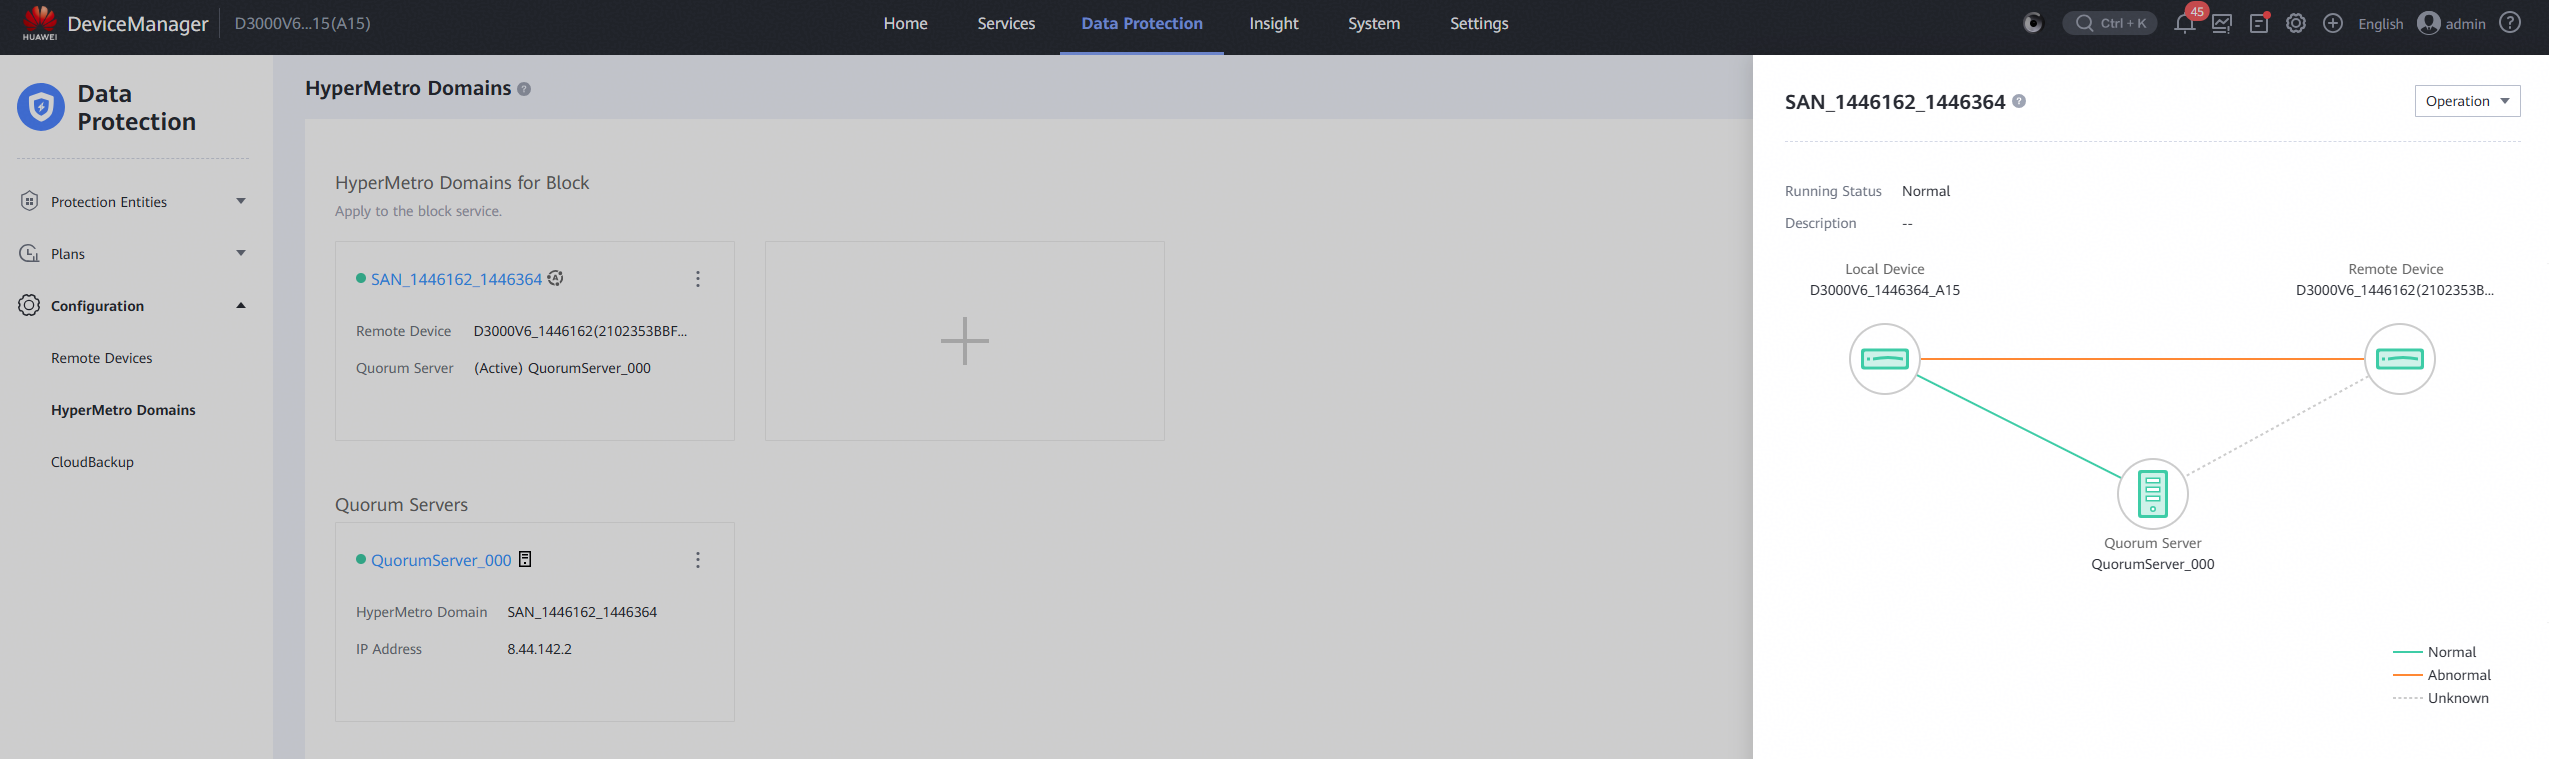
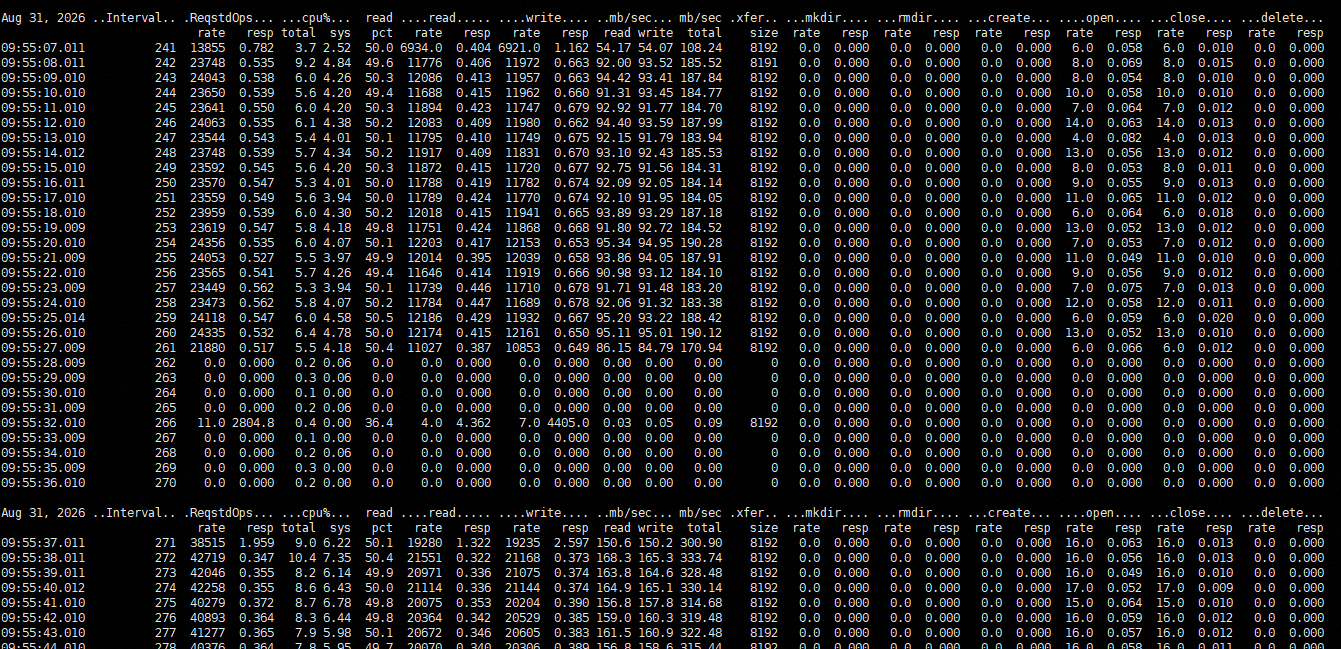
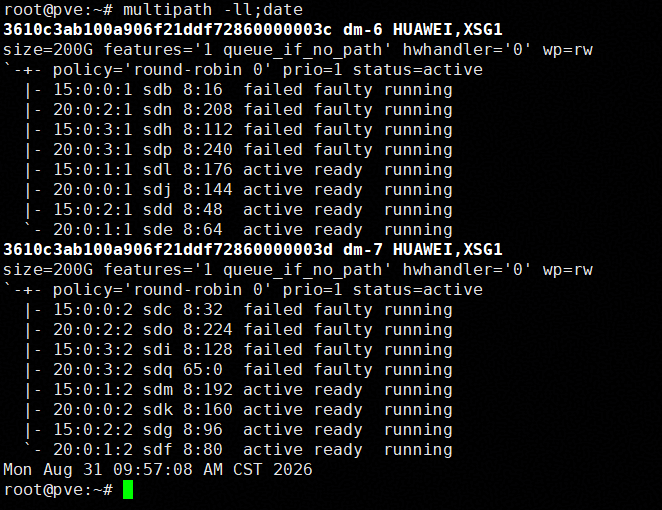
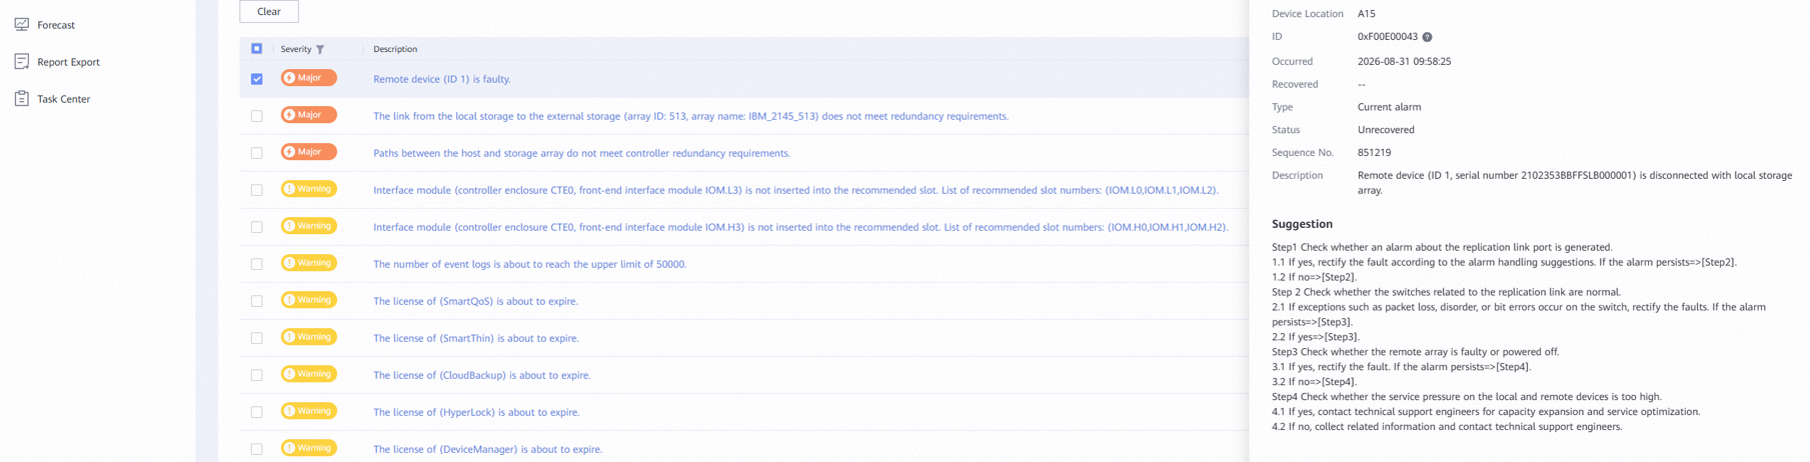
6.Plug back the cables back in, then wait for the HyperMetro pairs synchronization to complete and observe the I/O performance. 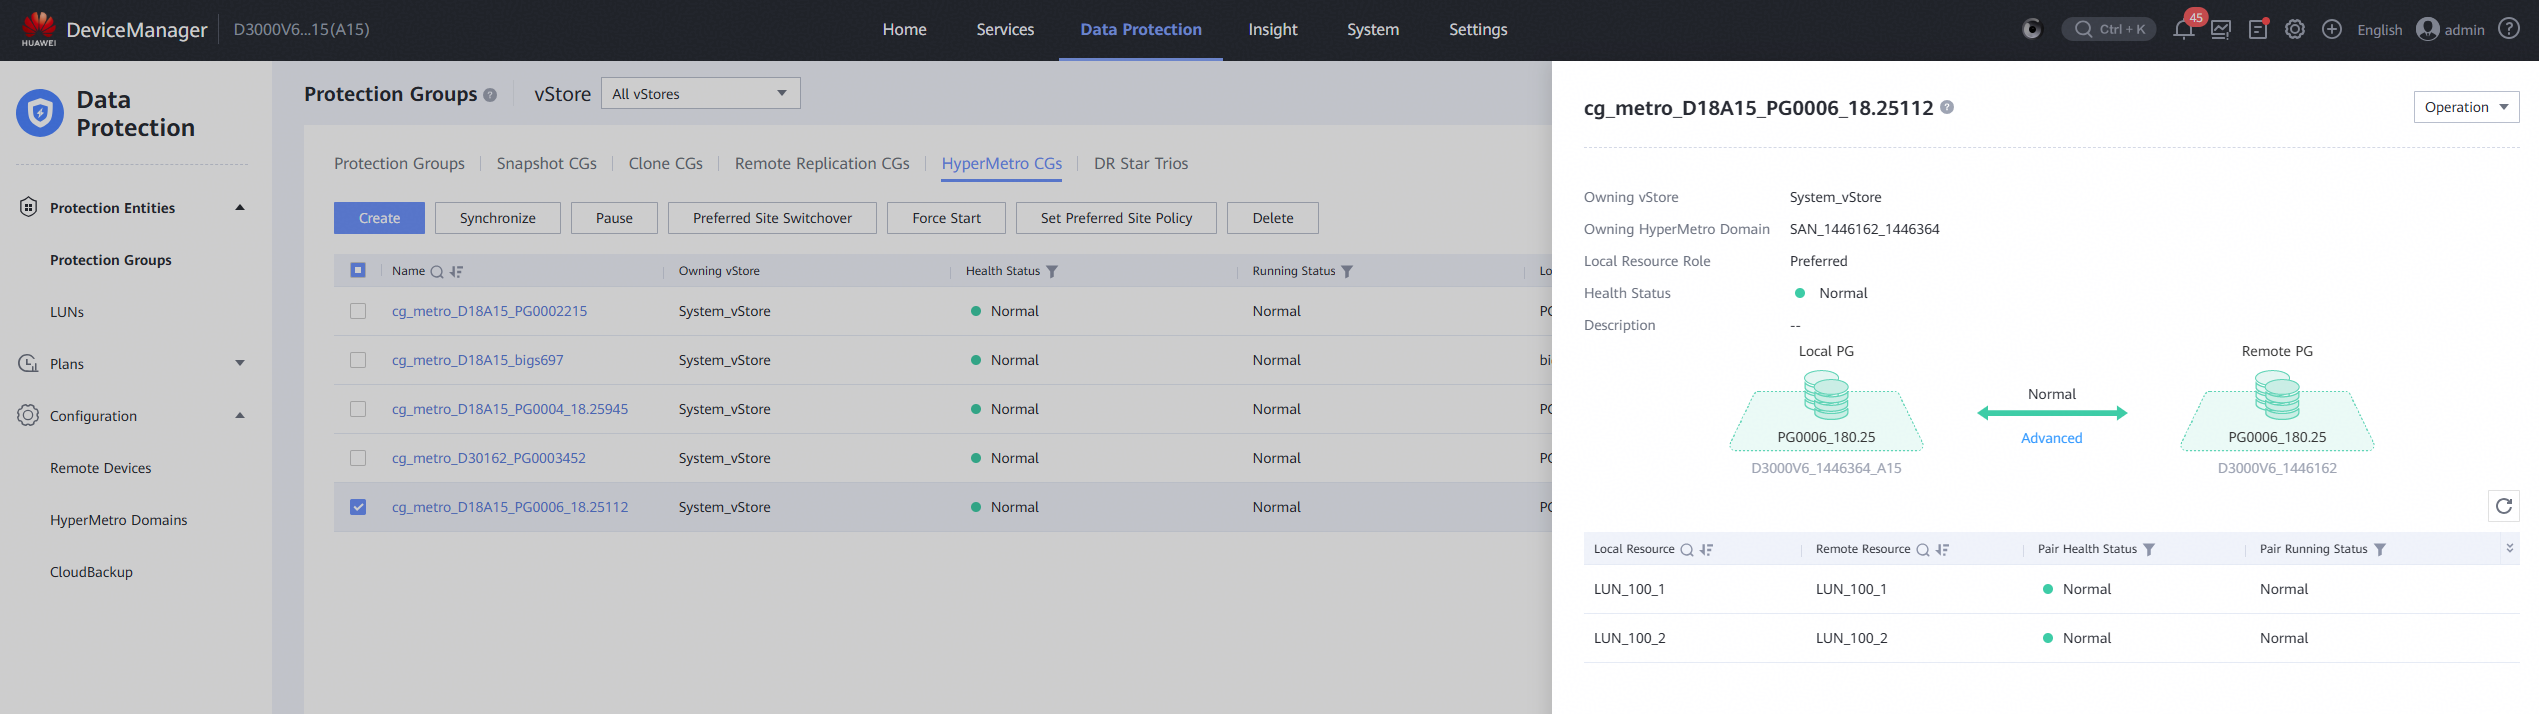
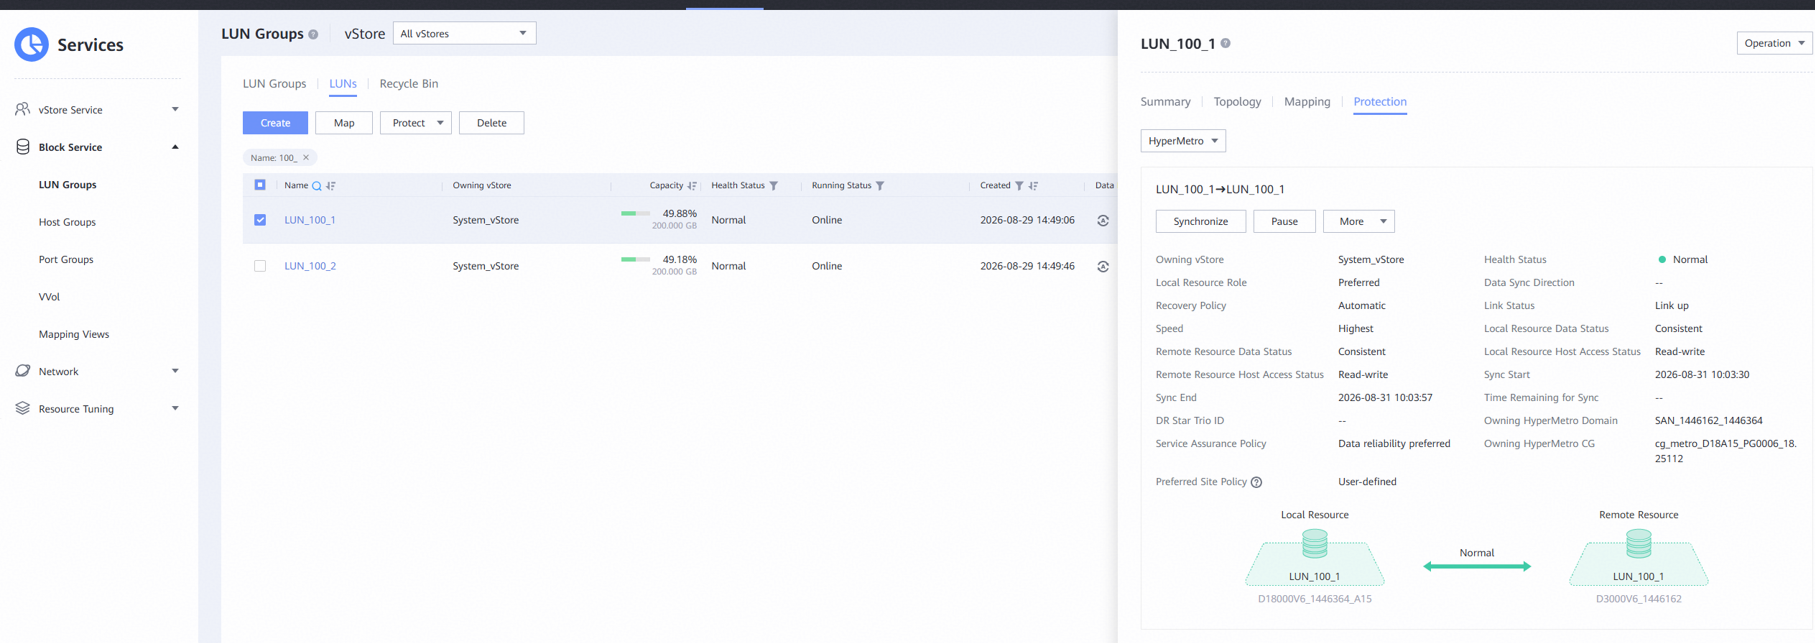
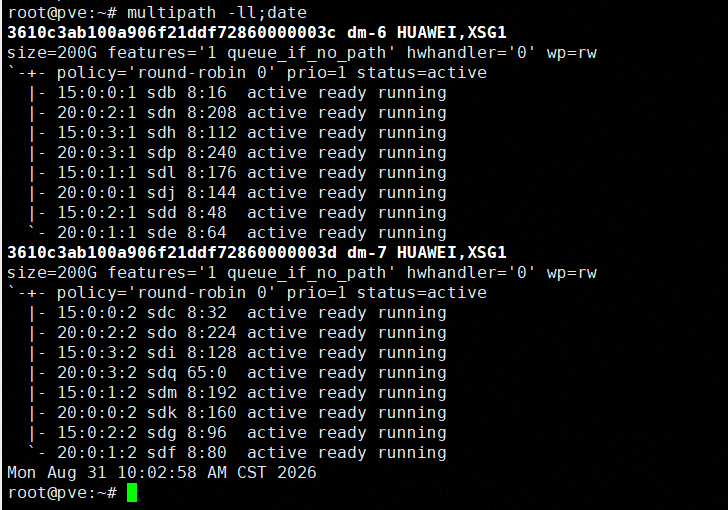
7.Set the preferred site of the HyperMetro pairs to storage 2, then Unplug all cables of replication links between the storages and observe the I/O performance. 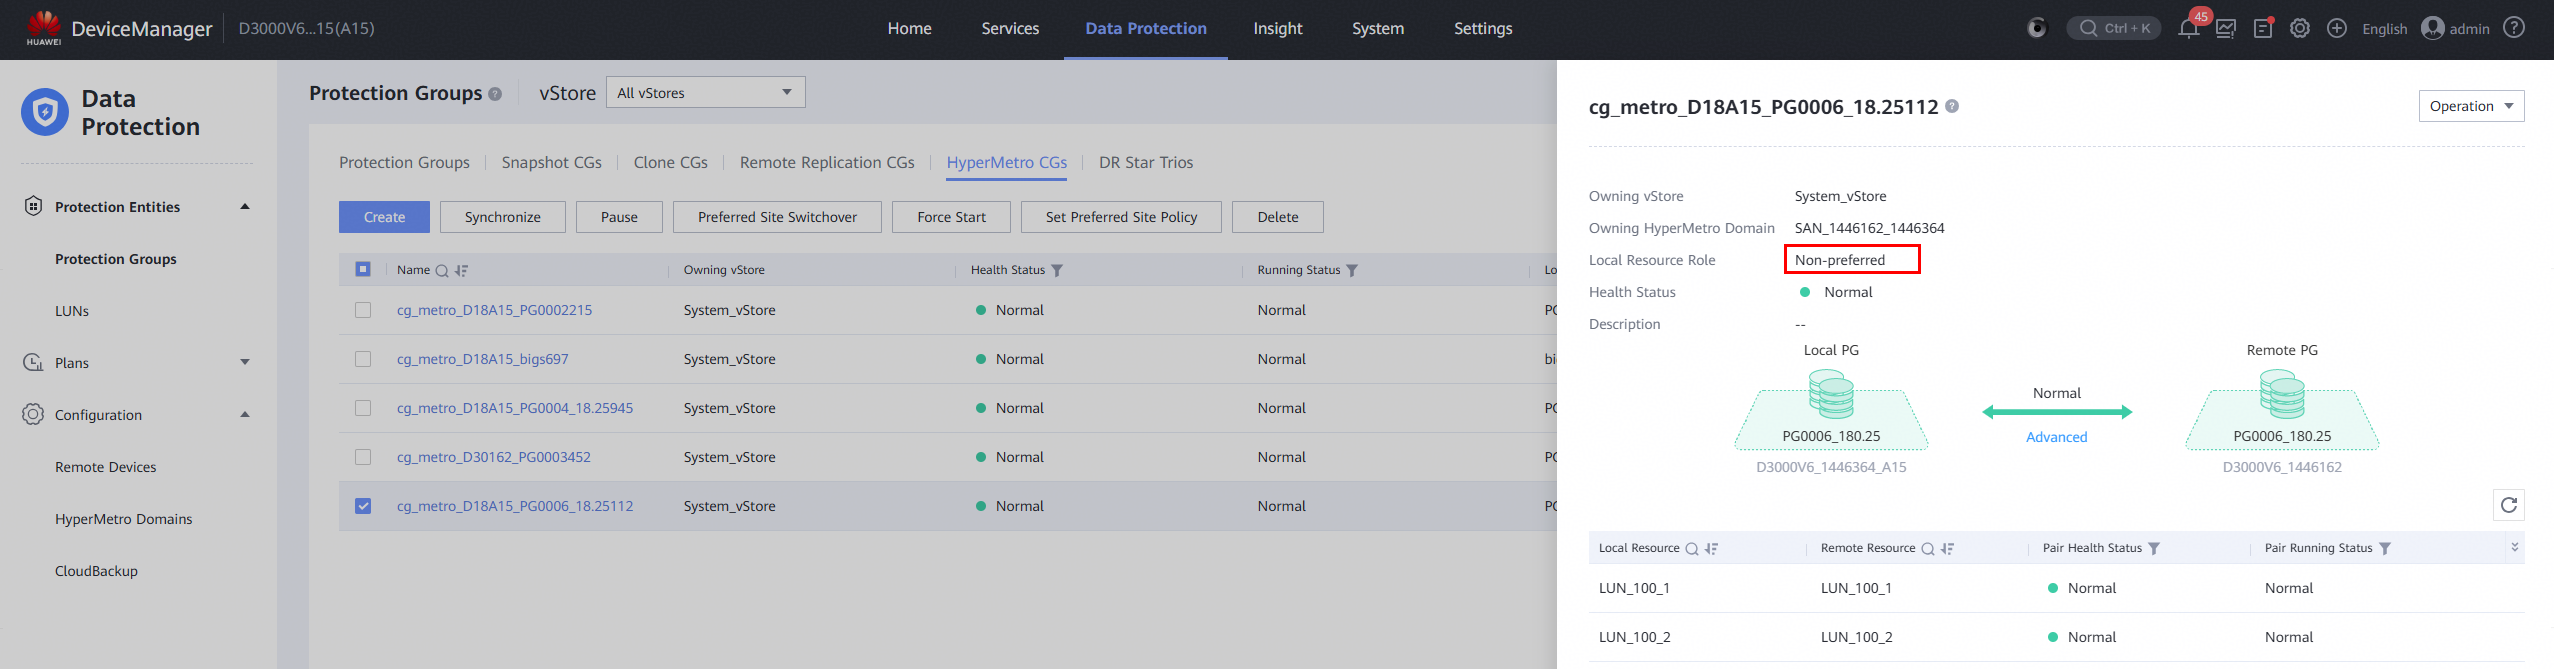
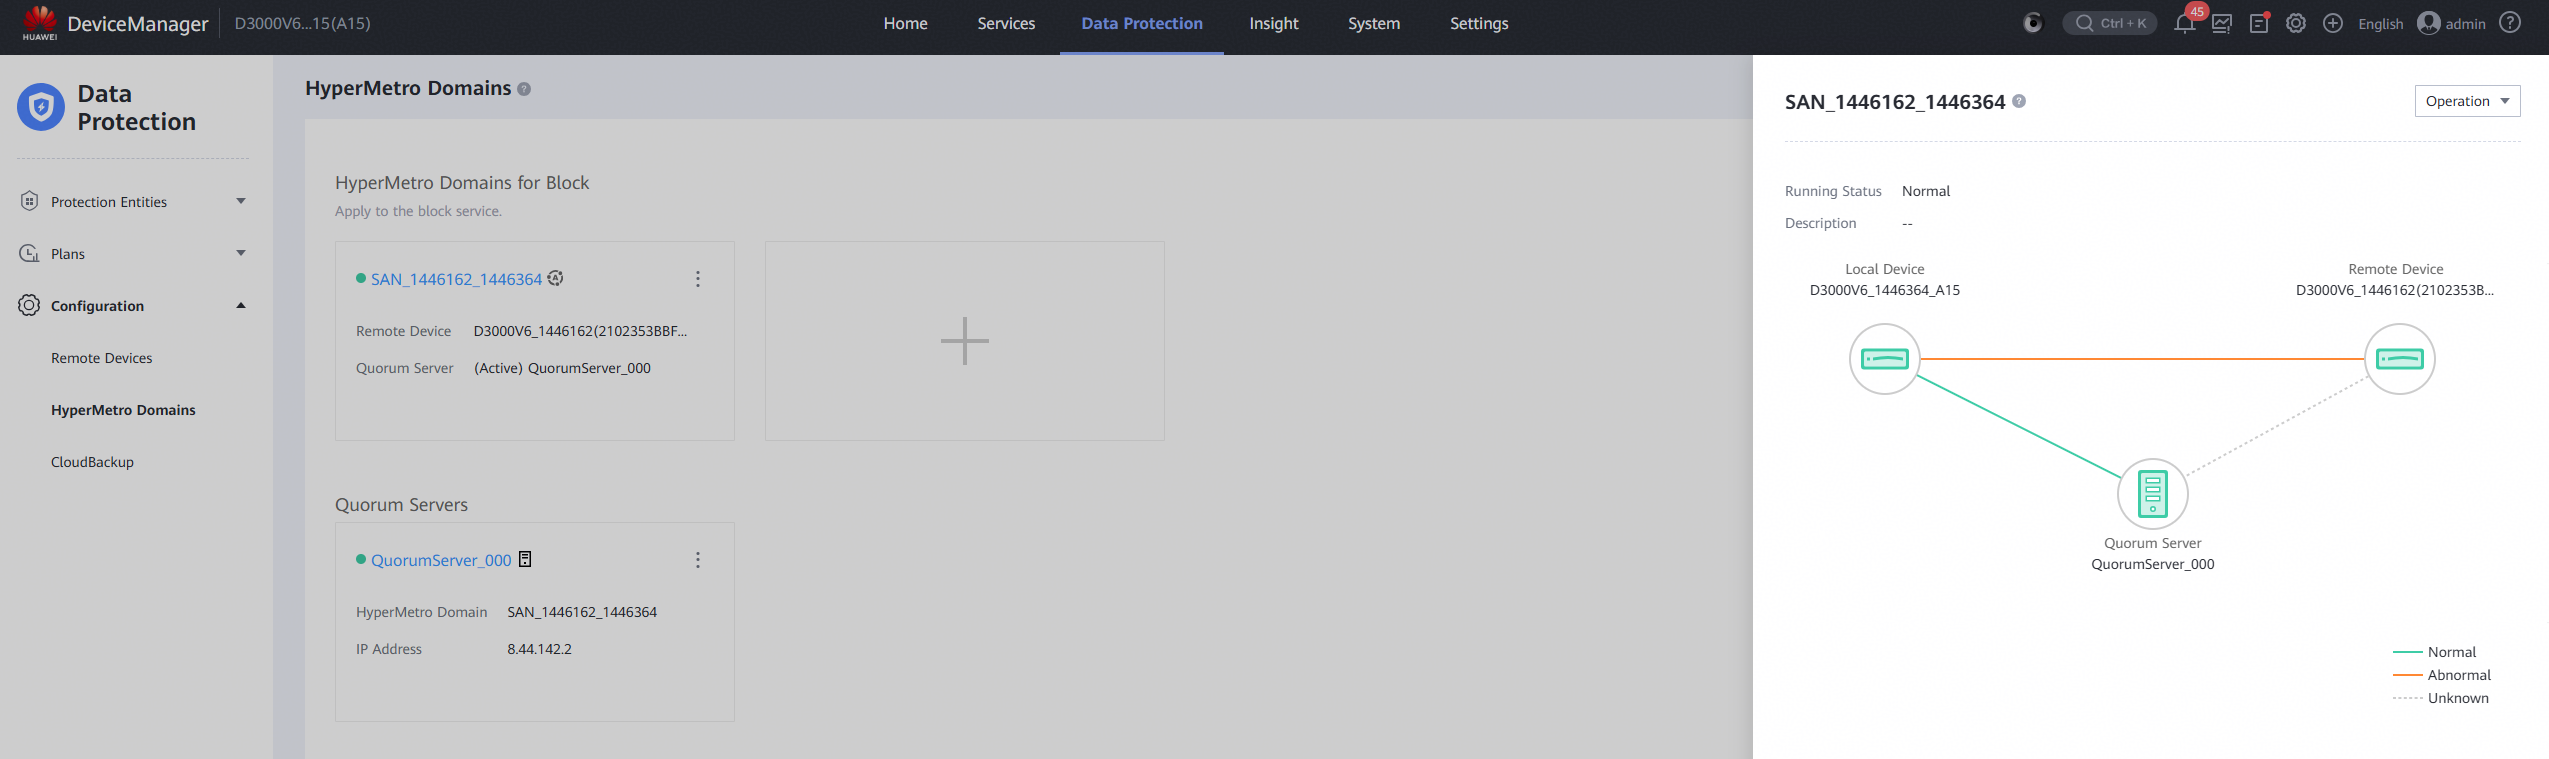
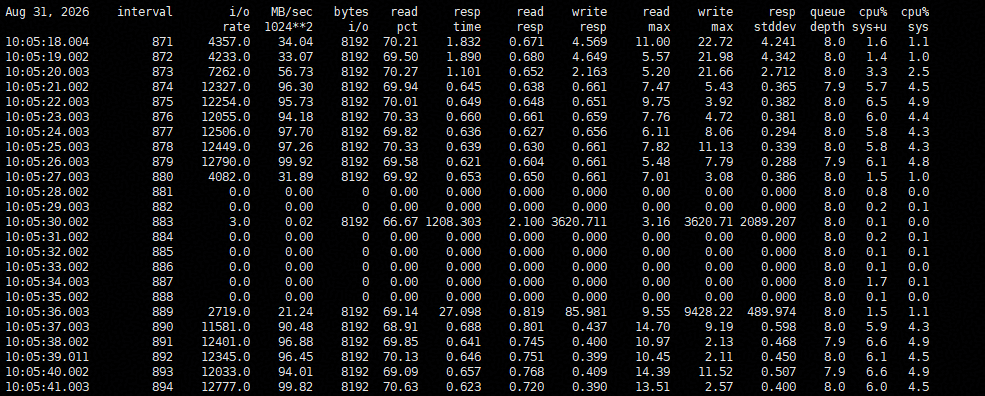
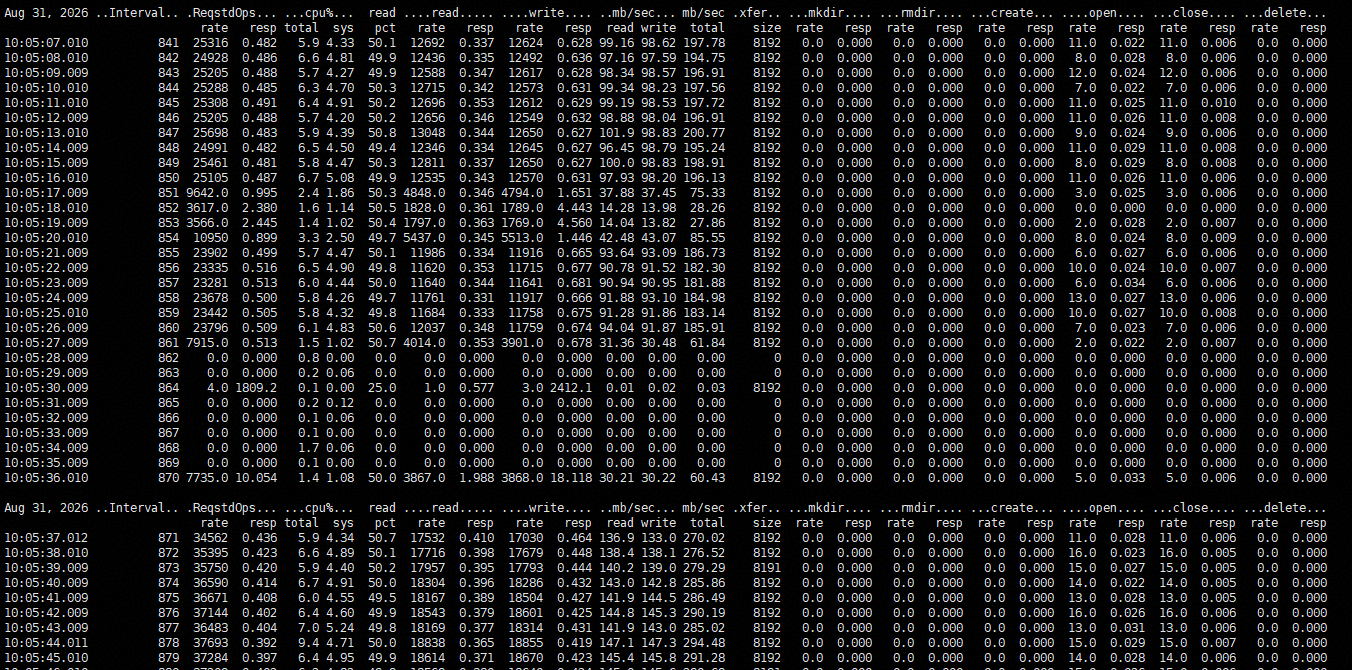
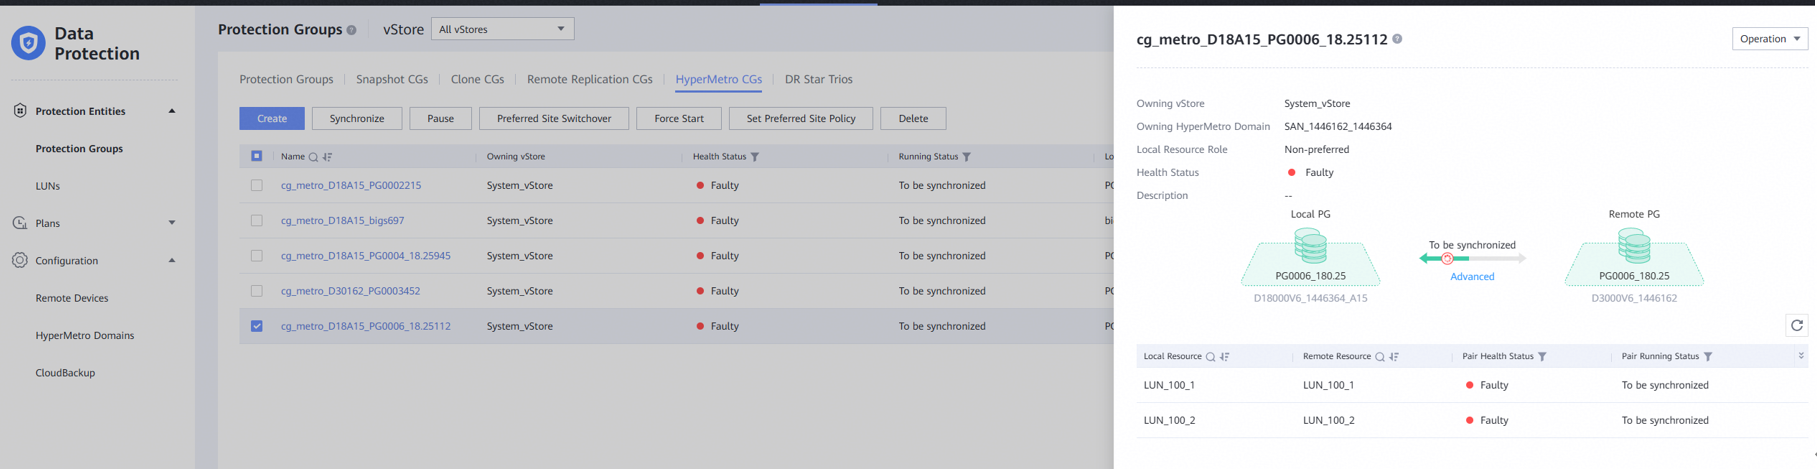
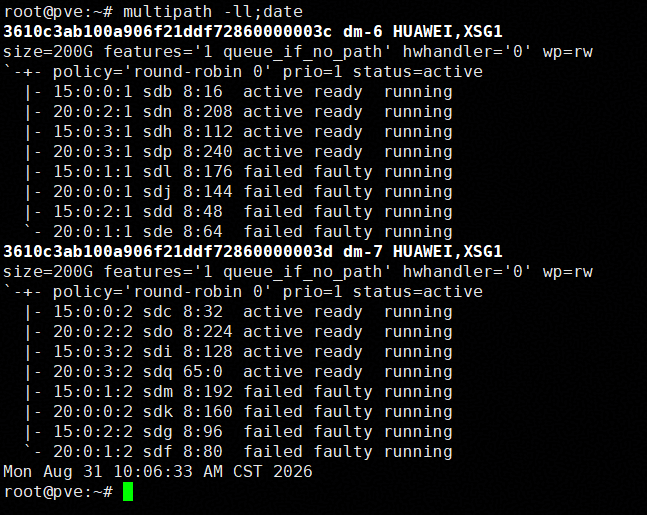
8. Plug back the cables back in, then wait for the HyperMetro pairs synchronization to complete and observe the I/O performance. 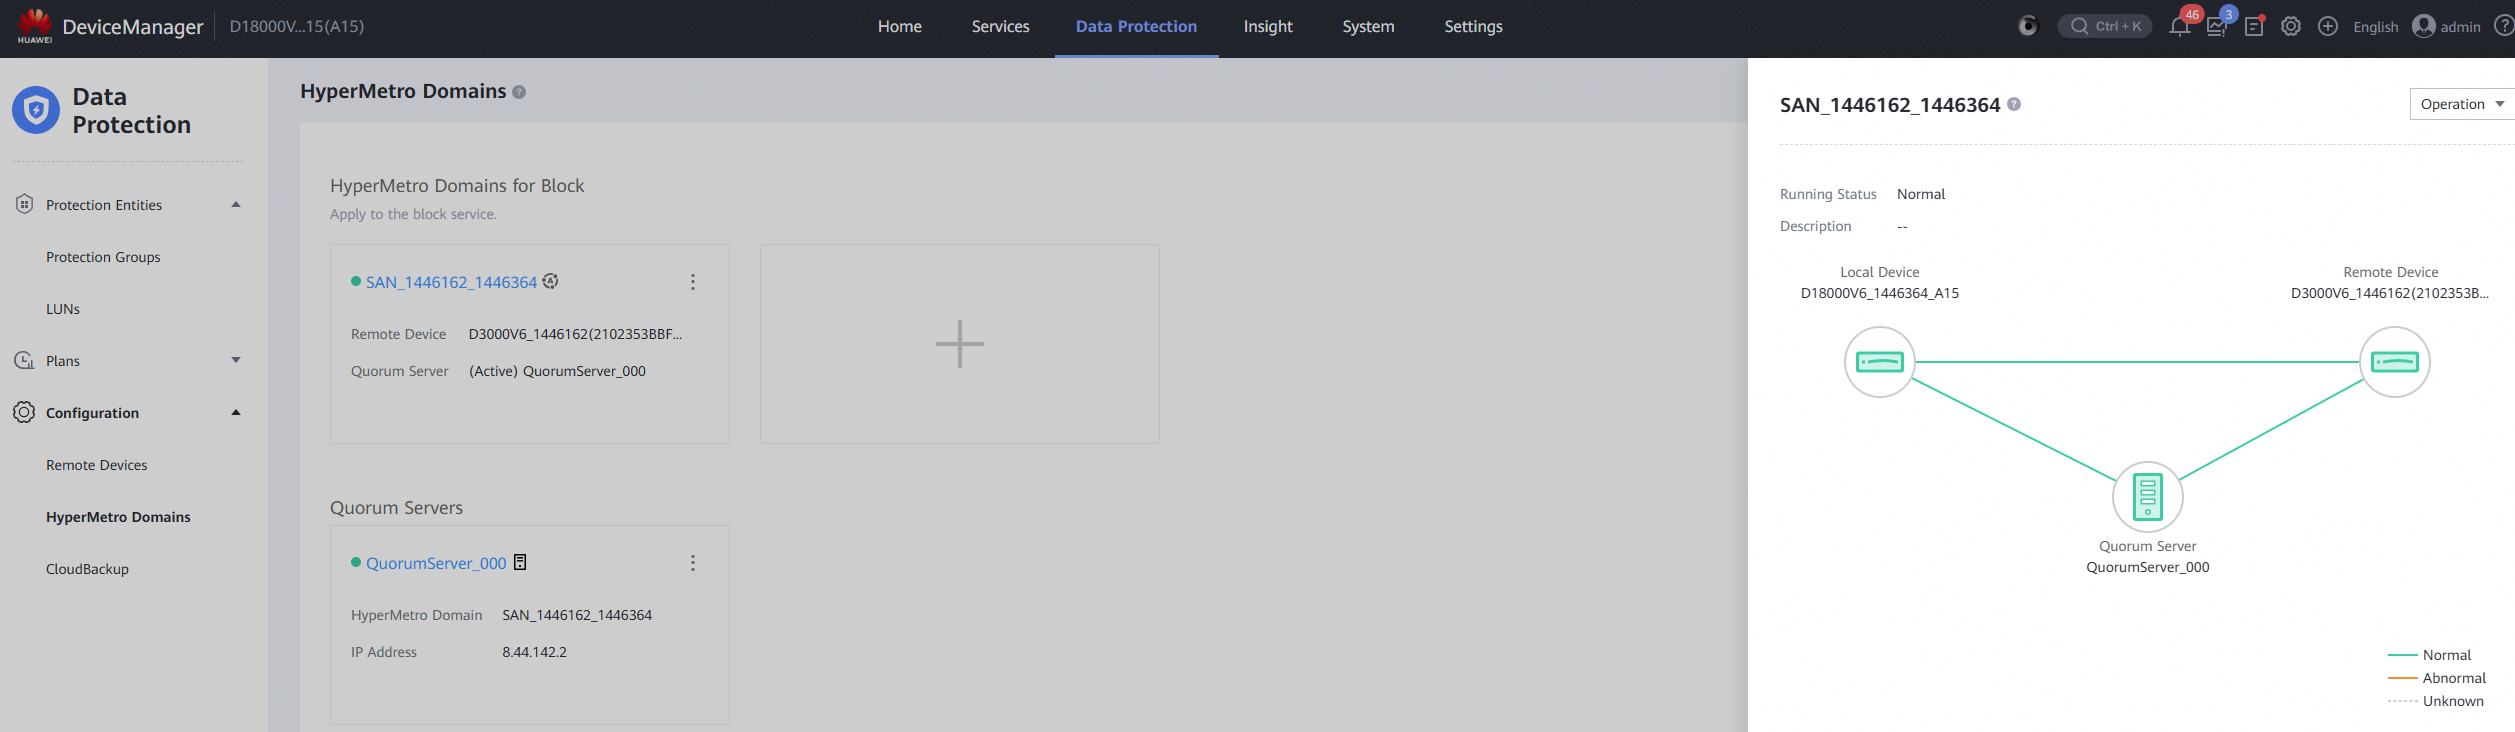
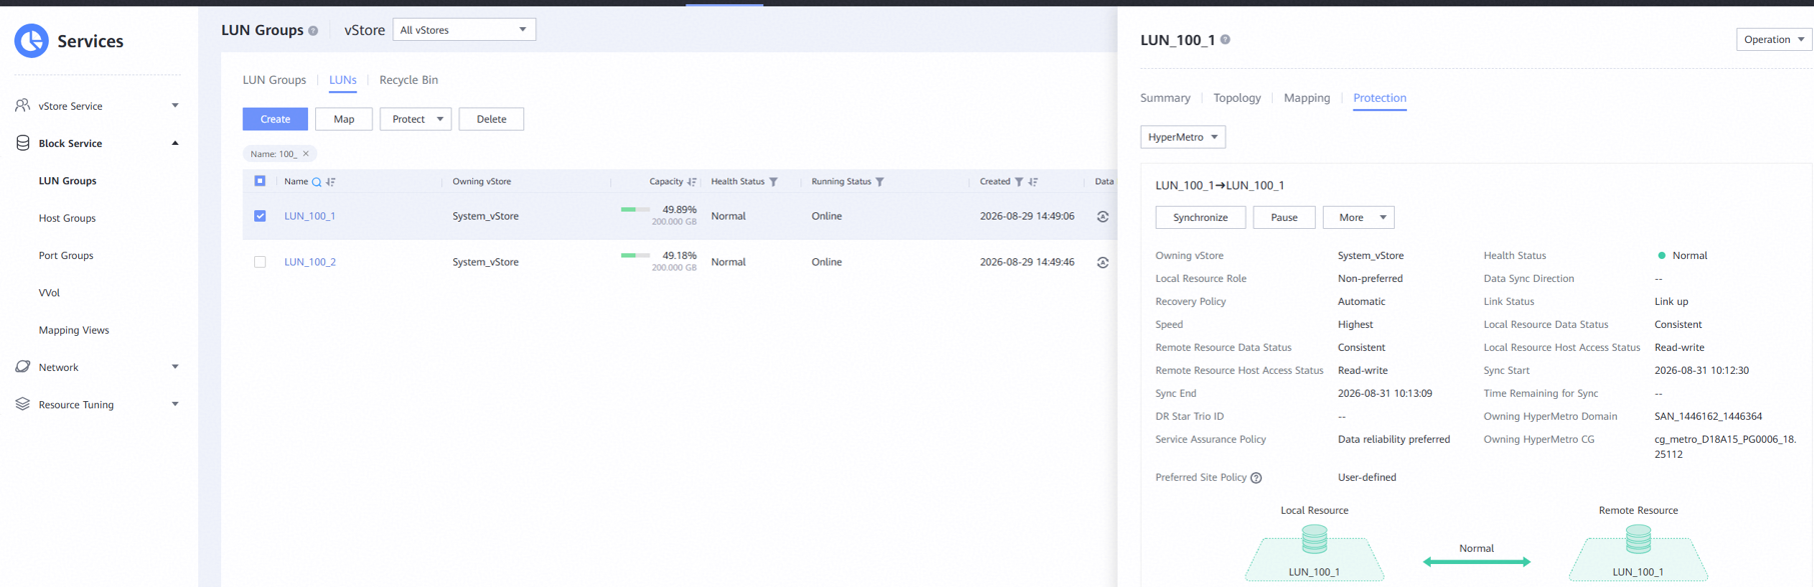
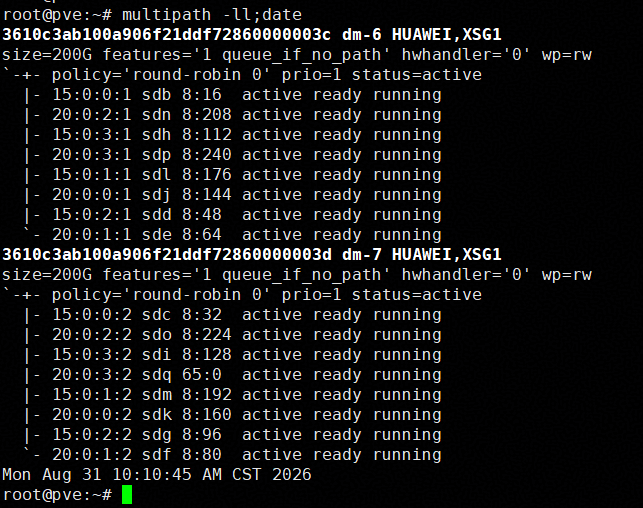
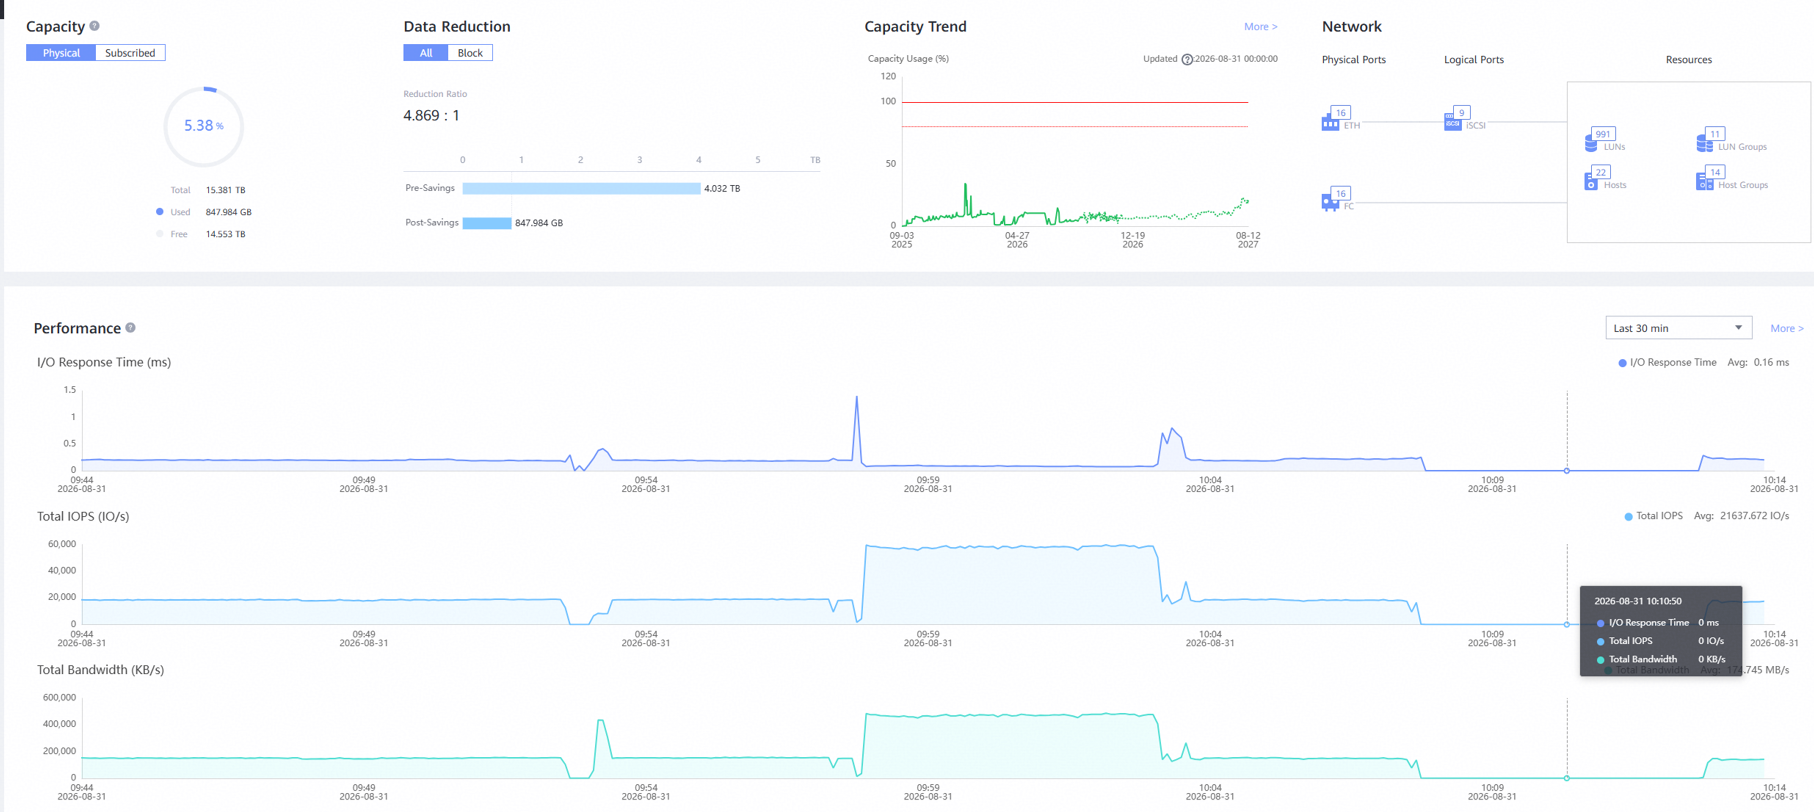
|
Test Conclusion | Passed |
4.4 Storage HyperMetro Pair Pause and Synchronize
Test Purpose | To Verify That Business is Normal in the Storage HyperMetro Pairs Pause and Synchronize Scenario |
Network Diagram | Reference to Figure 1.1 |
Prerequisites | 1.The network is correctly configured according to the network diagram, and the physical links are normal. 2.Host system is functioning properly. 3.Storage system is functioning properly. 4.Multipath is correctly installed and configured. 5.LUN mapping is correct. 6.The storage HyperMetro is configured correctly. |
Test Procedures | 1.Log into the storage management system and create mappings, adding two 200GB HyperMetro LUNs to the host. 2. Log into Proxmox VE backend scan the LUNs and create Volume Group on the LUNs. 3.Create LVM Storage on LUN A and LUN B, and add them to the VM as « Virtual Disks »; 4.In the VM, perform raw disk read/write operations on LUN A using vdbench, and observe the I/O performance. In the VM, create file systems on LUN B, and perform file system read/write operations using vdbench, observing the I/O performance. 5.Pause the preferred site of HyperMetro pairs and observe the I/O performance. 6.Synchronize HyperMetro pairs and observe the I/O performance. 7.Pause the non-preferred site of HyperMetro pairs and observe the I/O performance. 8.Synchronize HyperMetro pairs and observe the I/O performance. |
Expected Results | 1.In step 2, the host is able to scan and detect the four mapped LUNs. 2.In step 4, I/O read/write operations are normal. 3.In step 5, I/O is uninterrupted, the reset time is within the specification range, and I/O is balanced across all remaining paths of the LUN. 4.In step 6, there is no reset, the faulted path status recovers to normal, and I/O resumes balanced across all paths of the LUN. 5.In step 7, I/O is uninterrupted, the reset time is within the specification range, and I/O is balanced across all remaining paths of the LUN. 6.In step 8, there is no reset, the faulted path status recovers to normal, and I/O resumes balanced across all paths of the LUN. |
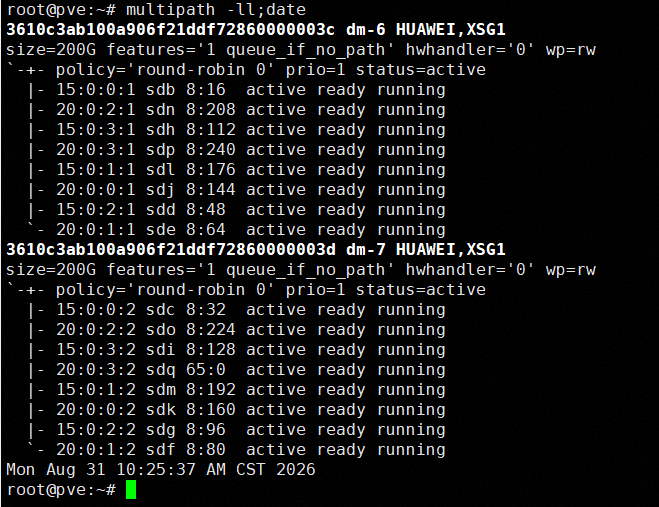
Test Results | 1.Log into the storage management system and create mappings, adding two 200GB HyperMetro LUNs to the host. 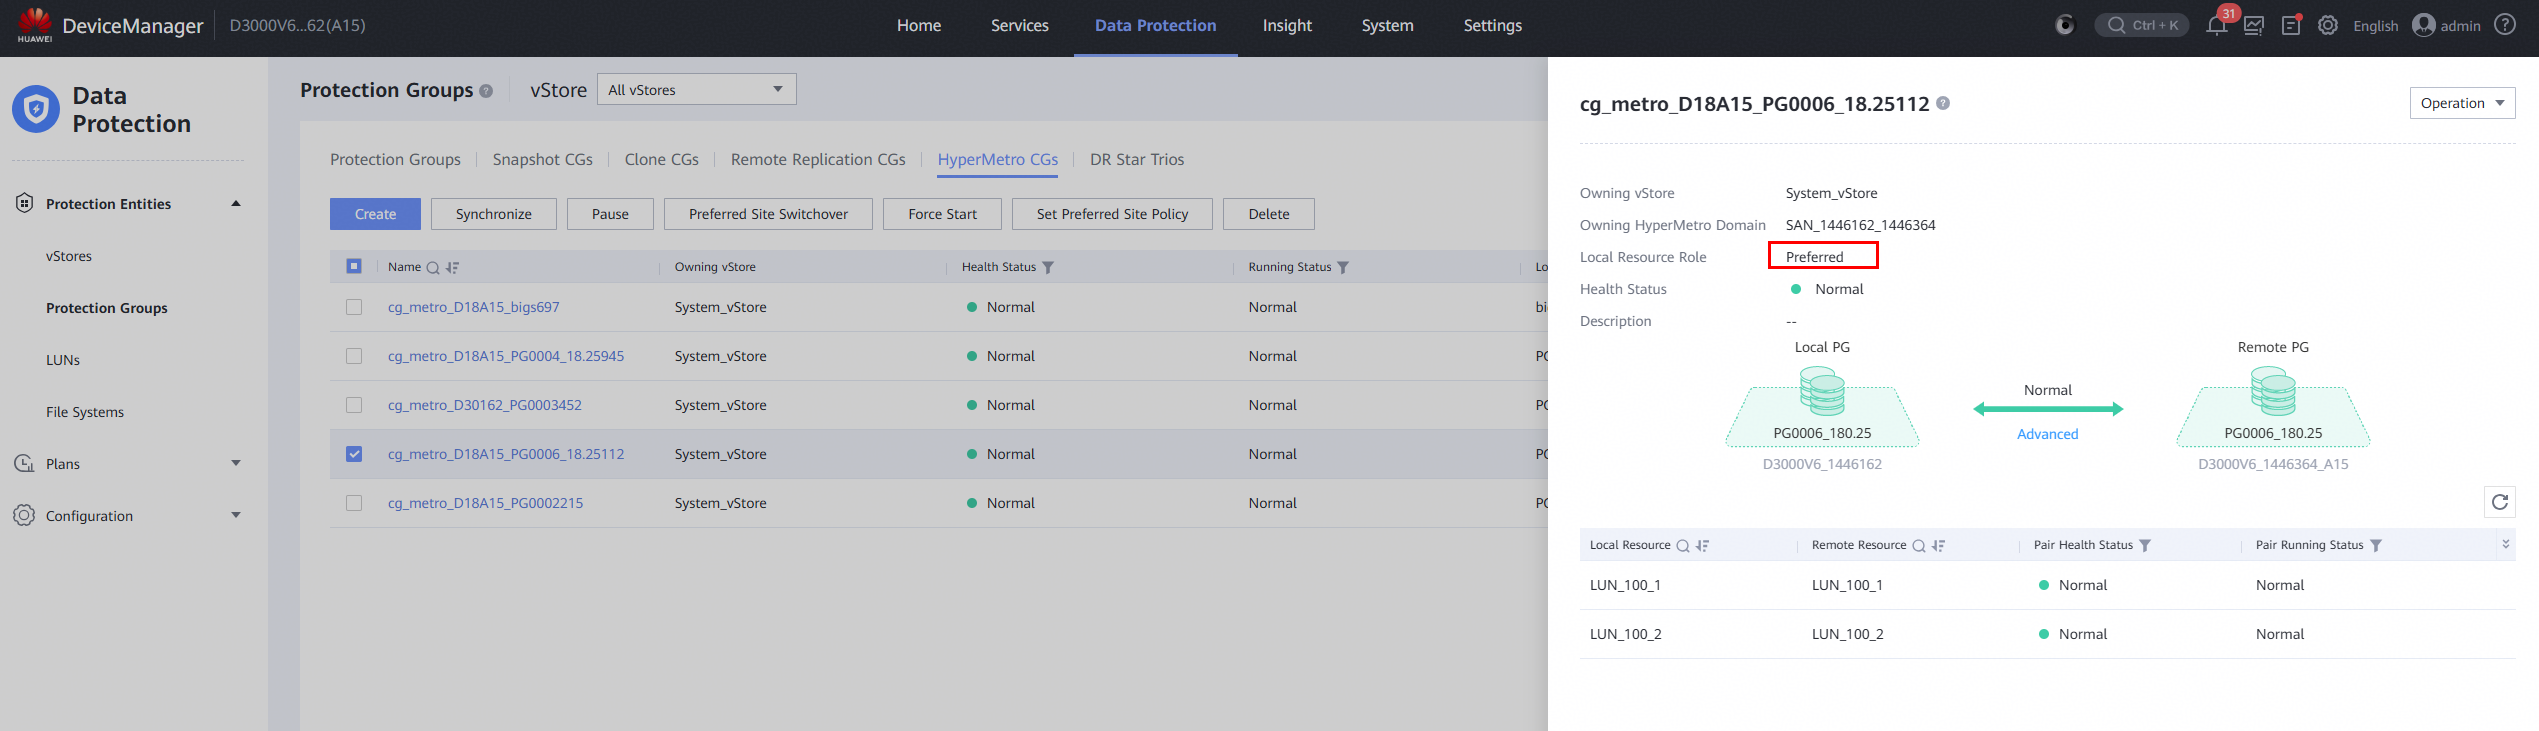
2. Log into Proxmox VE backend scan the LUNs and create Volume Group on the LUNs. 3.Create LVM Storage on LUN A and LUN B, and add them to the VM as « Virtual Disks »; 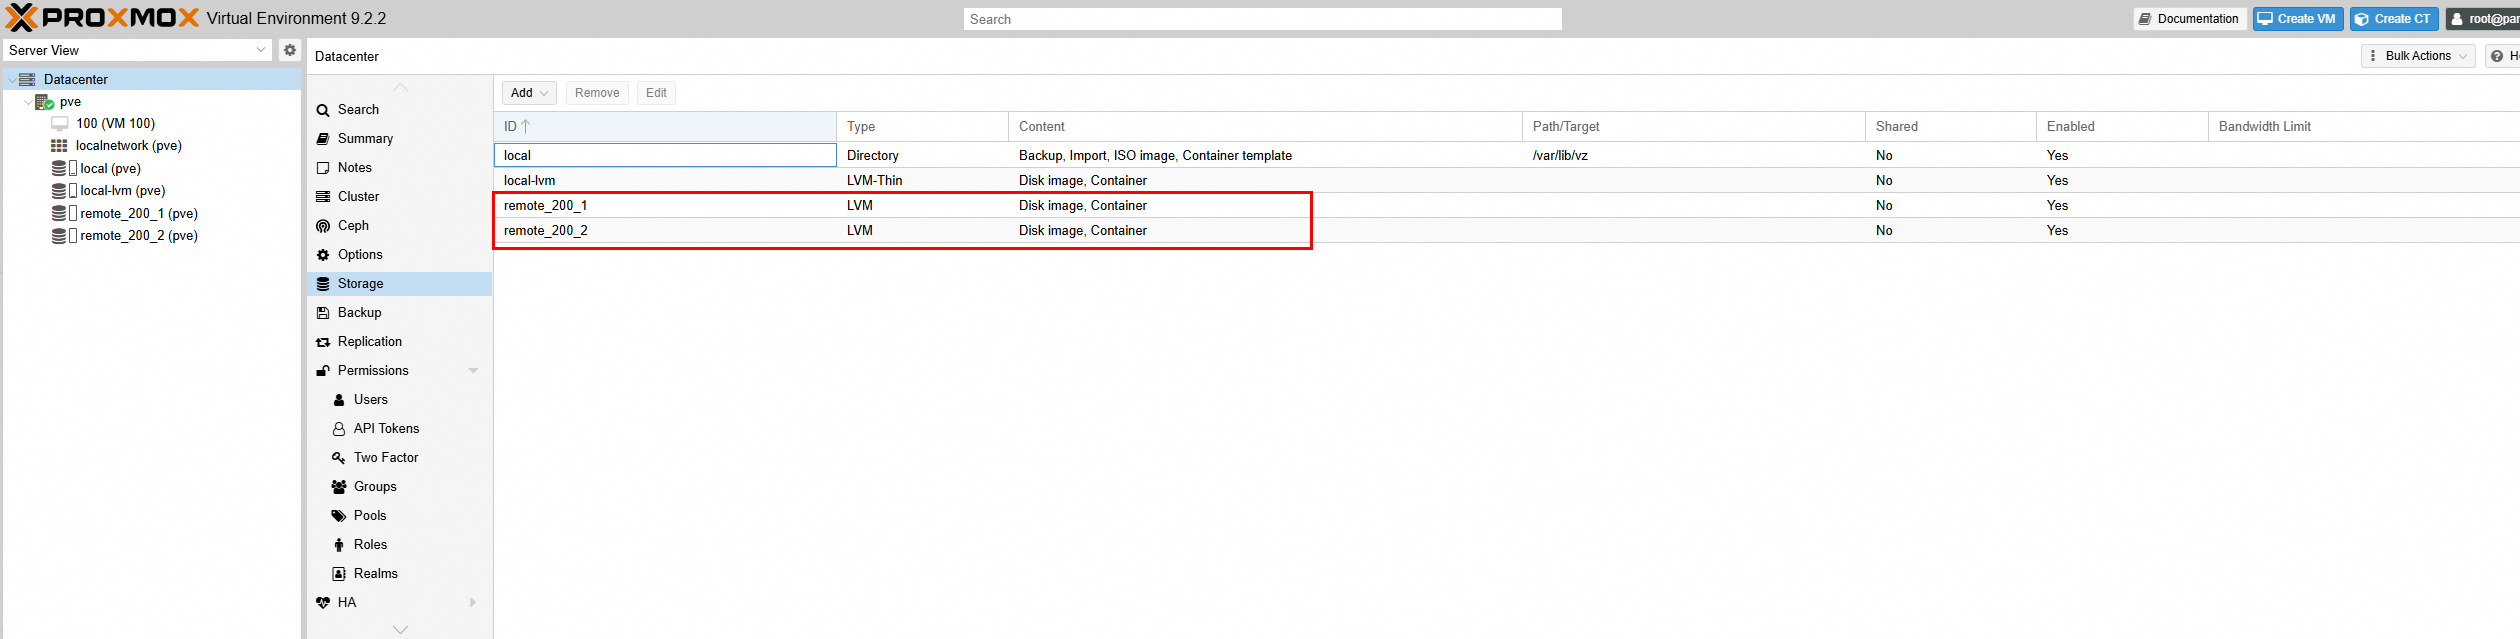
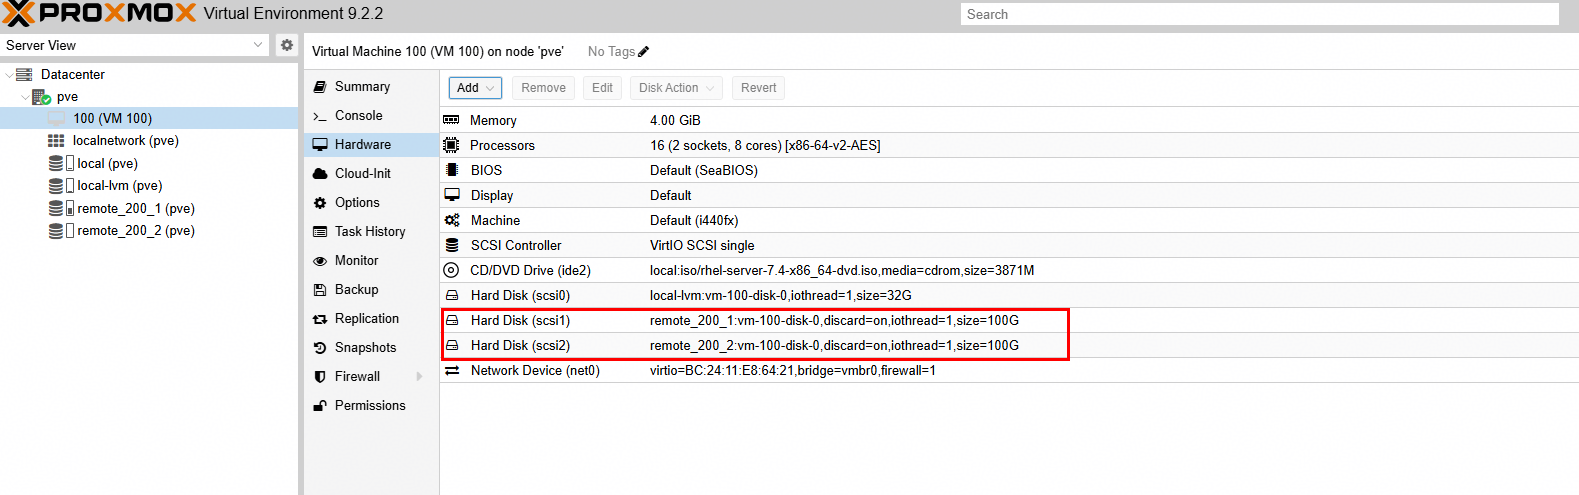
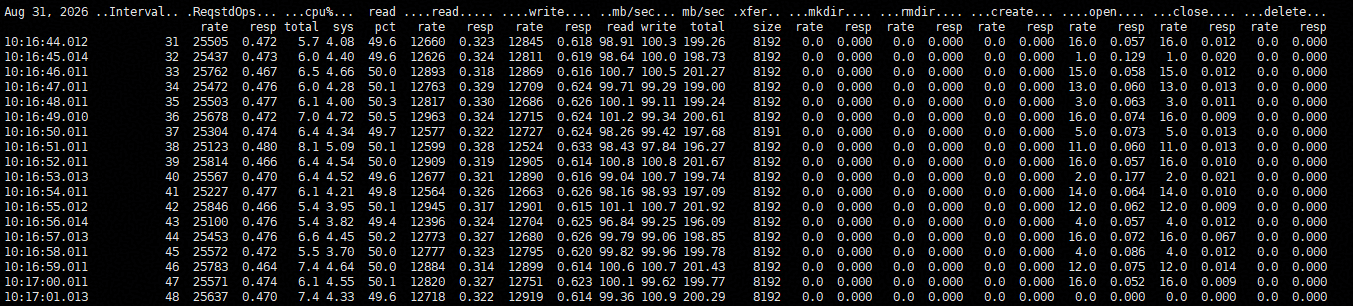
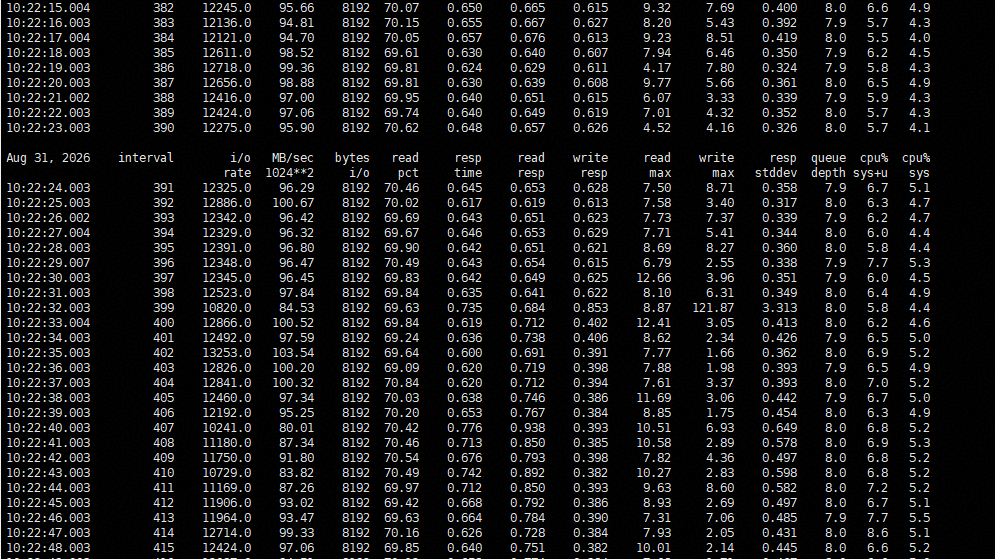
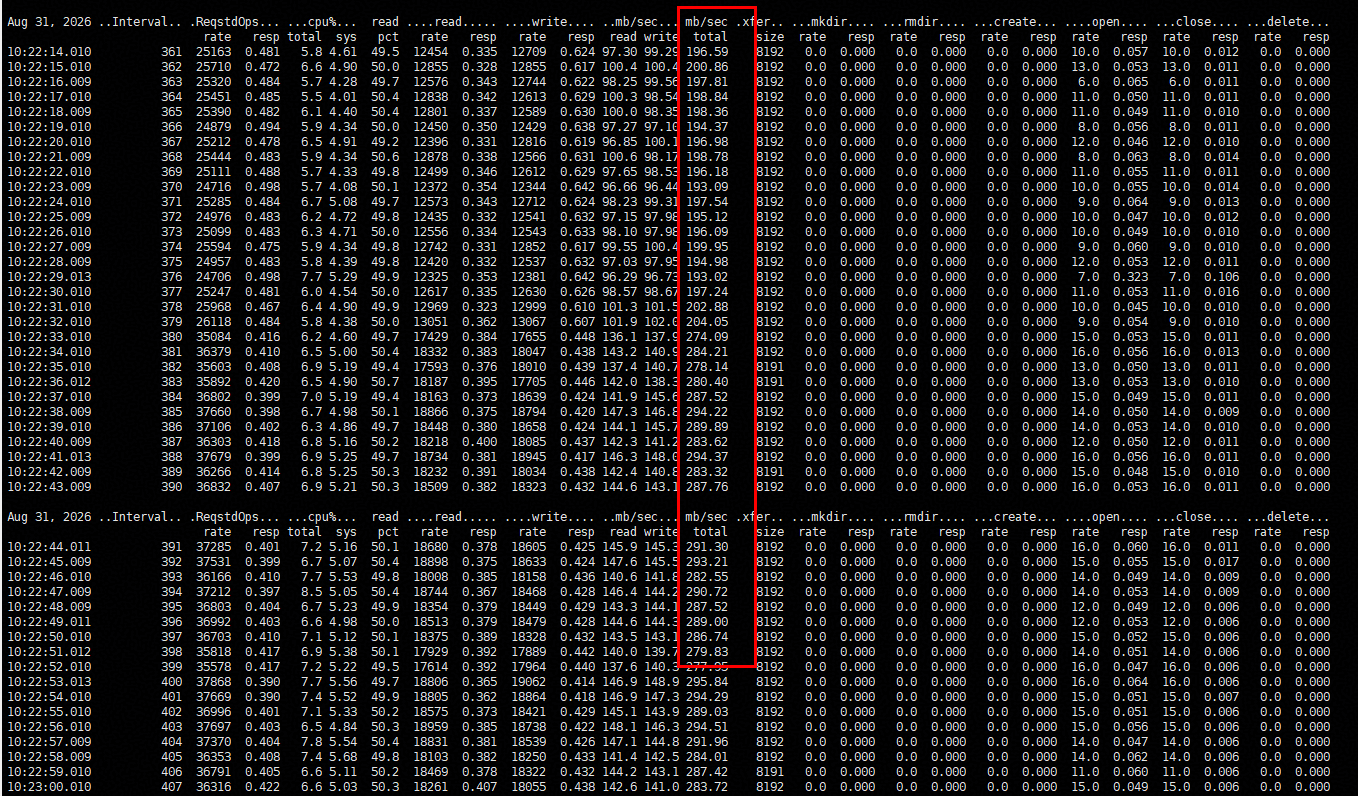
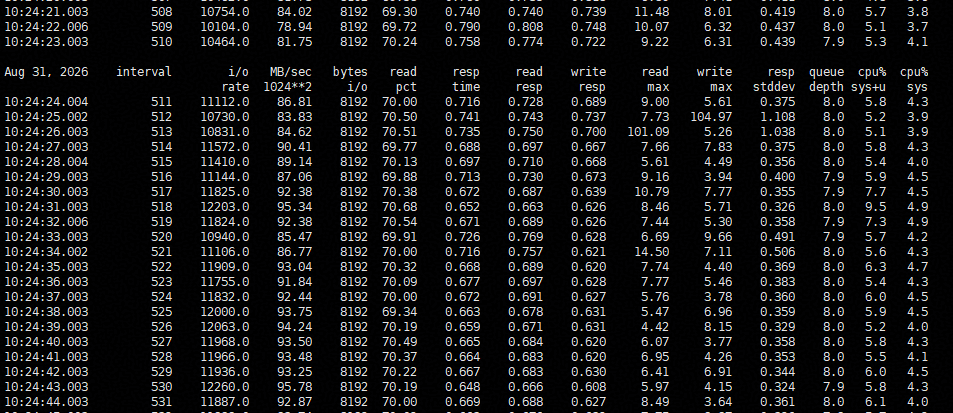
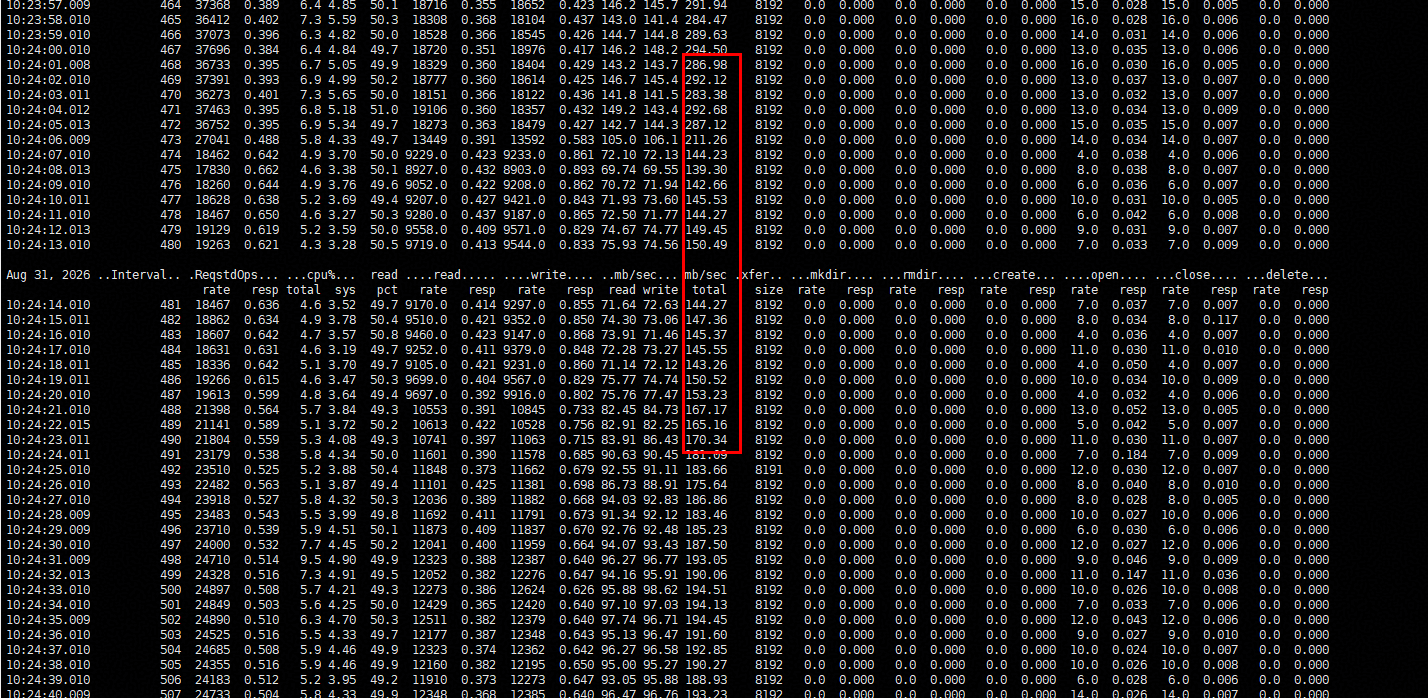
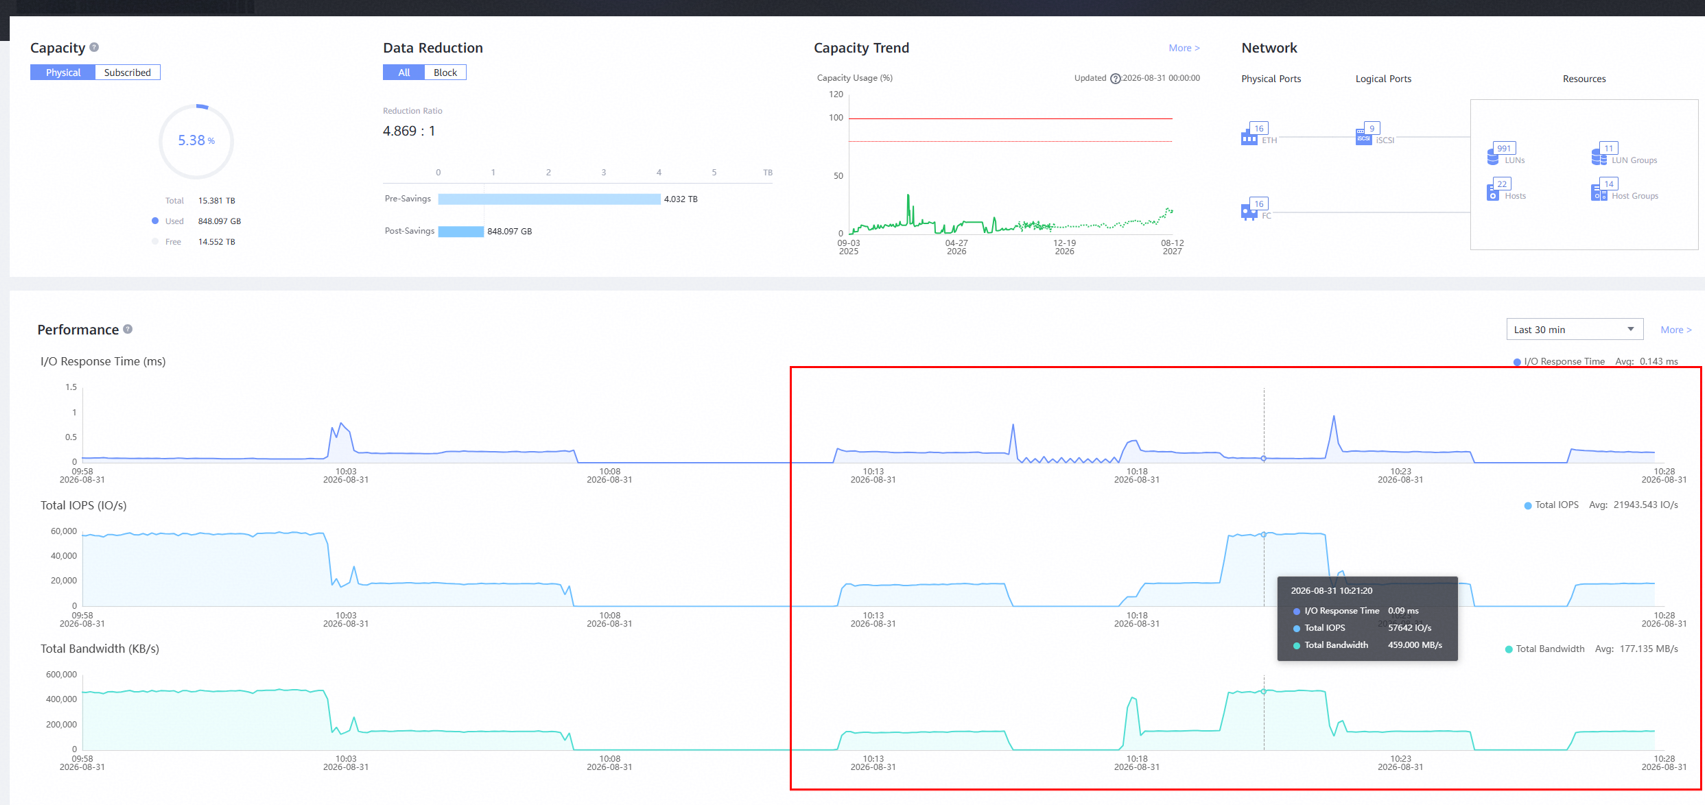
4.In the VM, perform raw disk read/write operations on LUN A using vdbench, and observe the I/O performance. In the VM, create file systems on LUN B, and perform file system read/write operations using vdbench, observing the I/O performance. 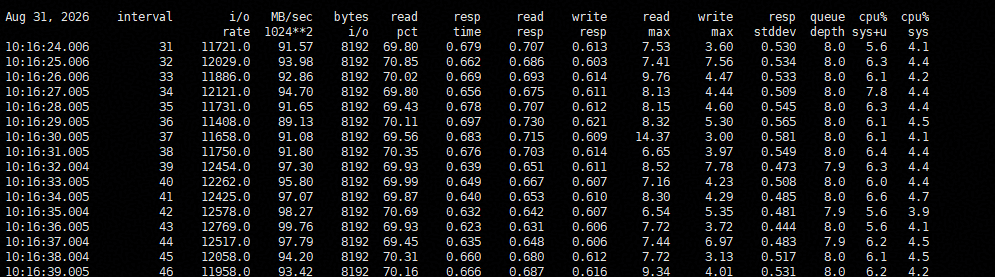
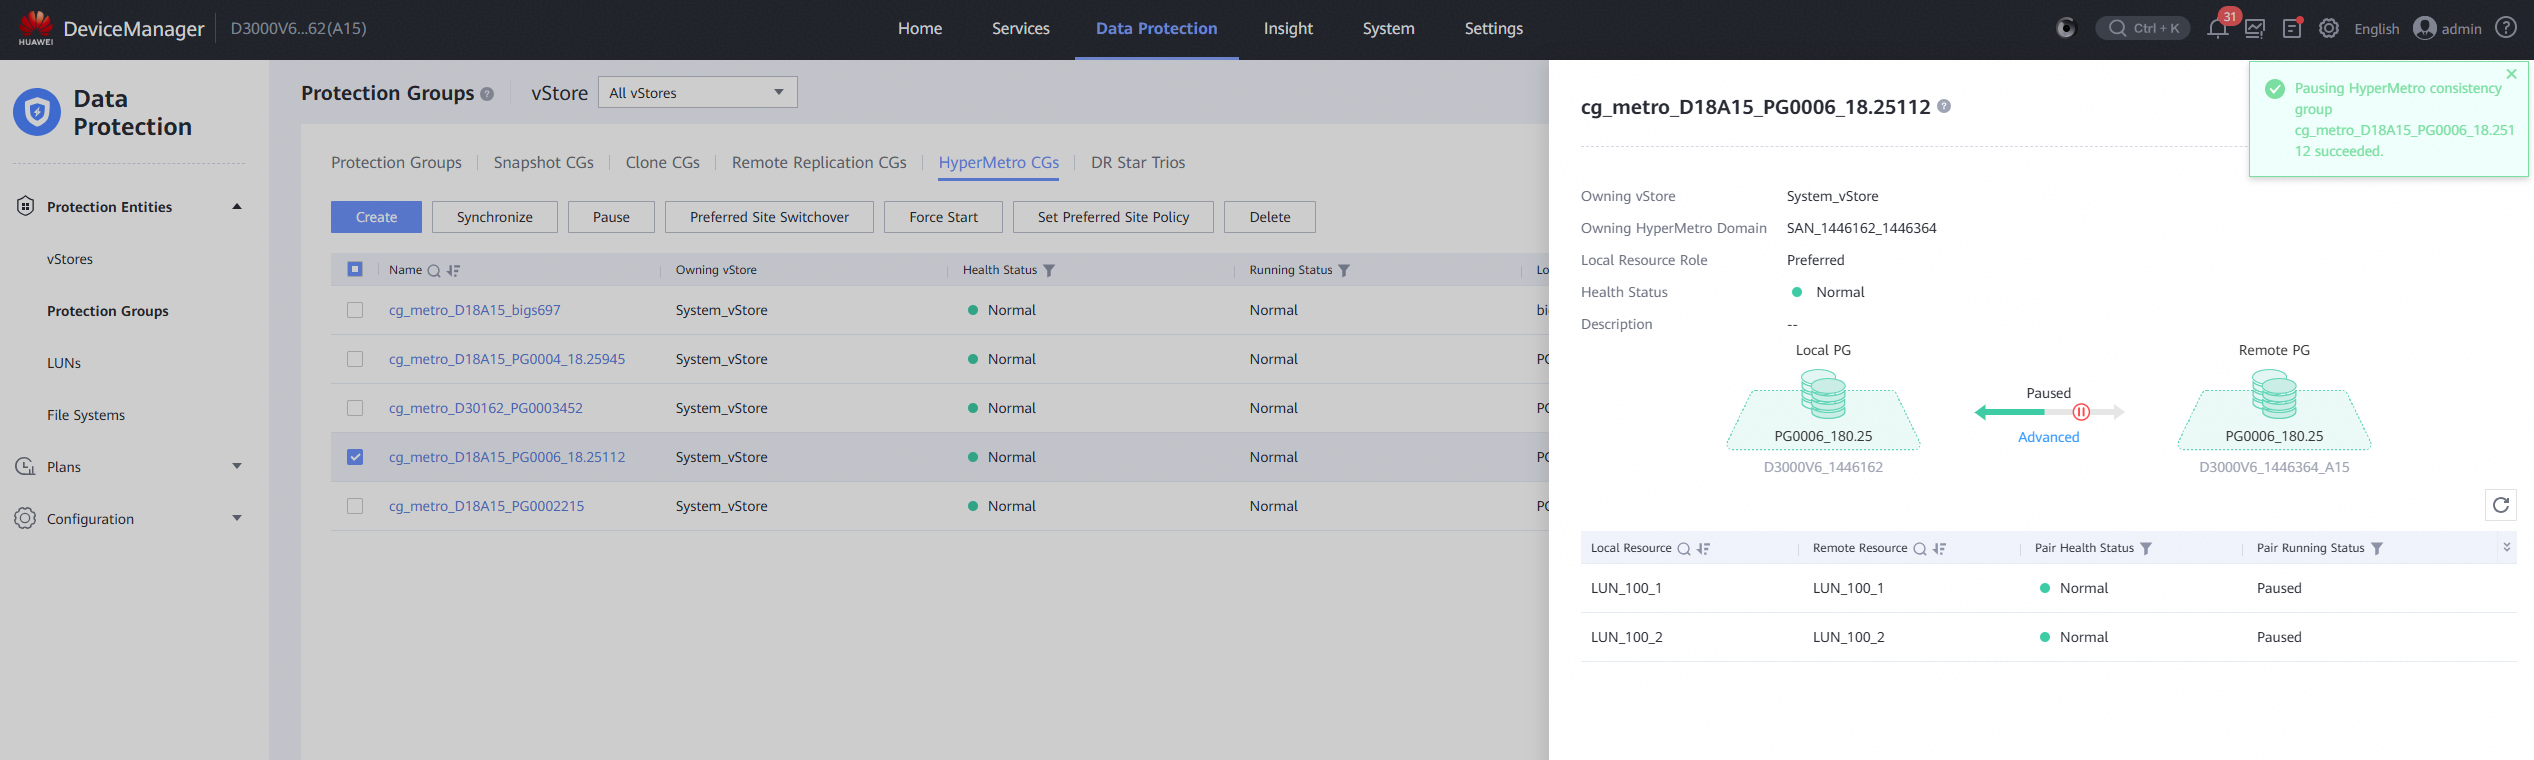
5.Pause the preferred site of HyperMetro pairs and observe the I/O performance. 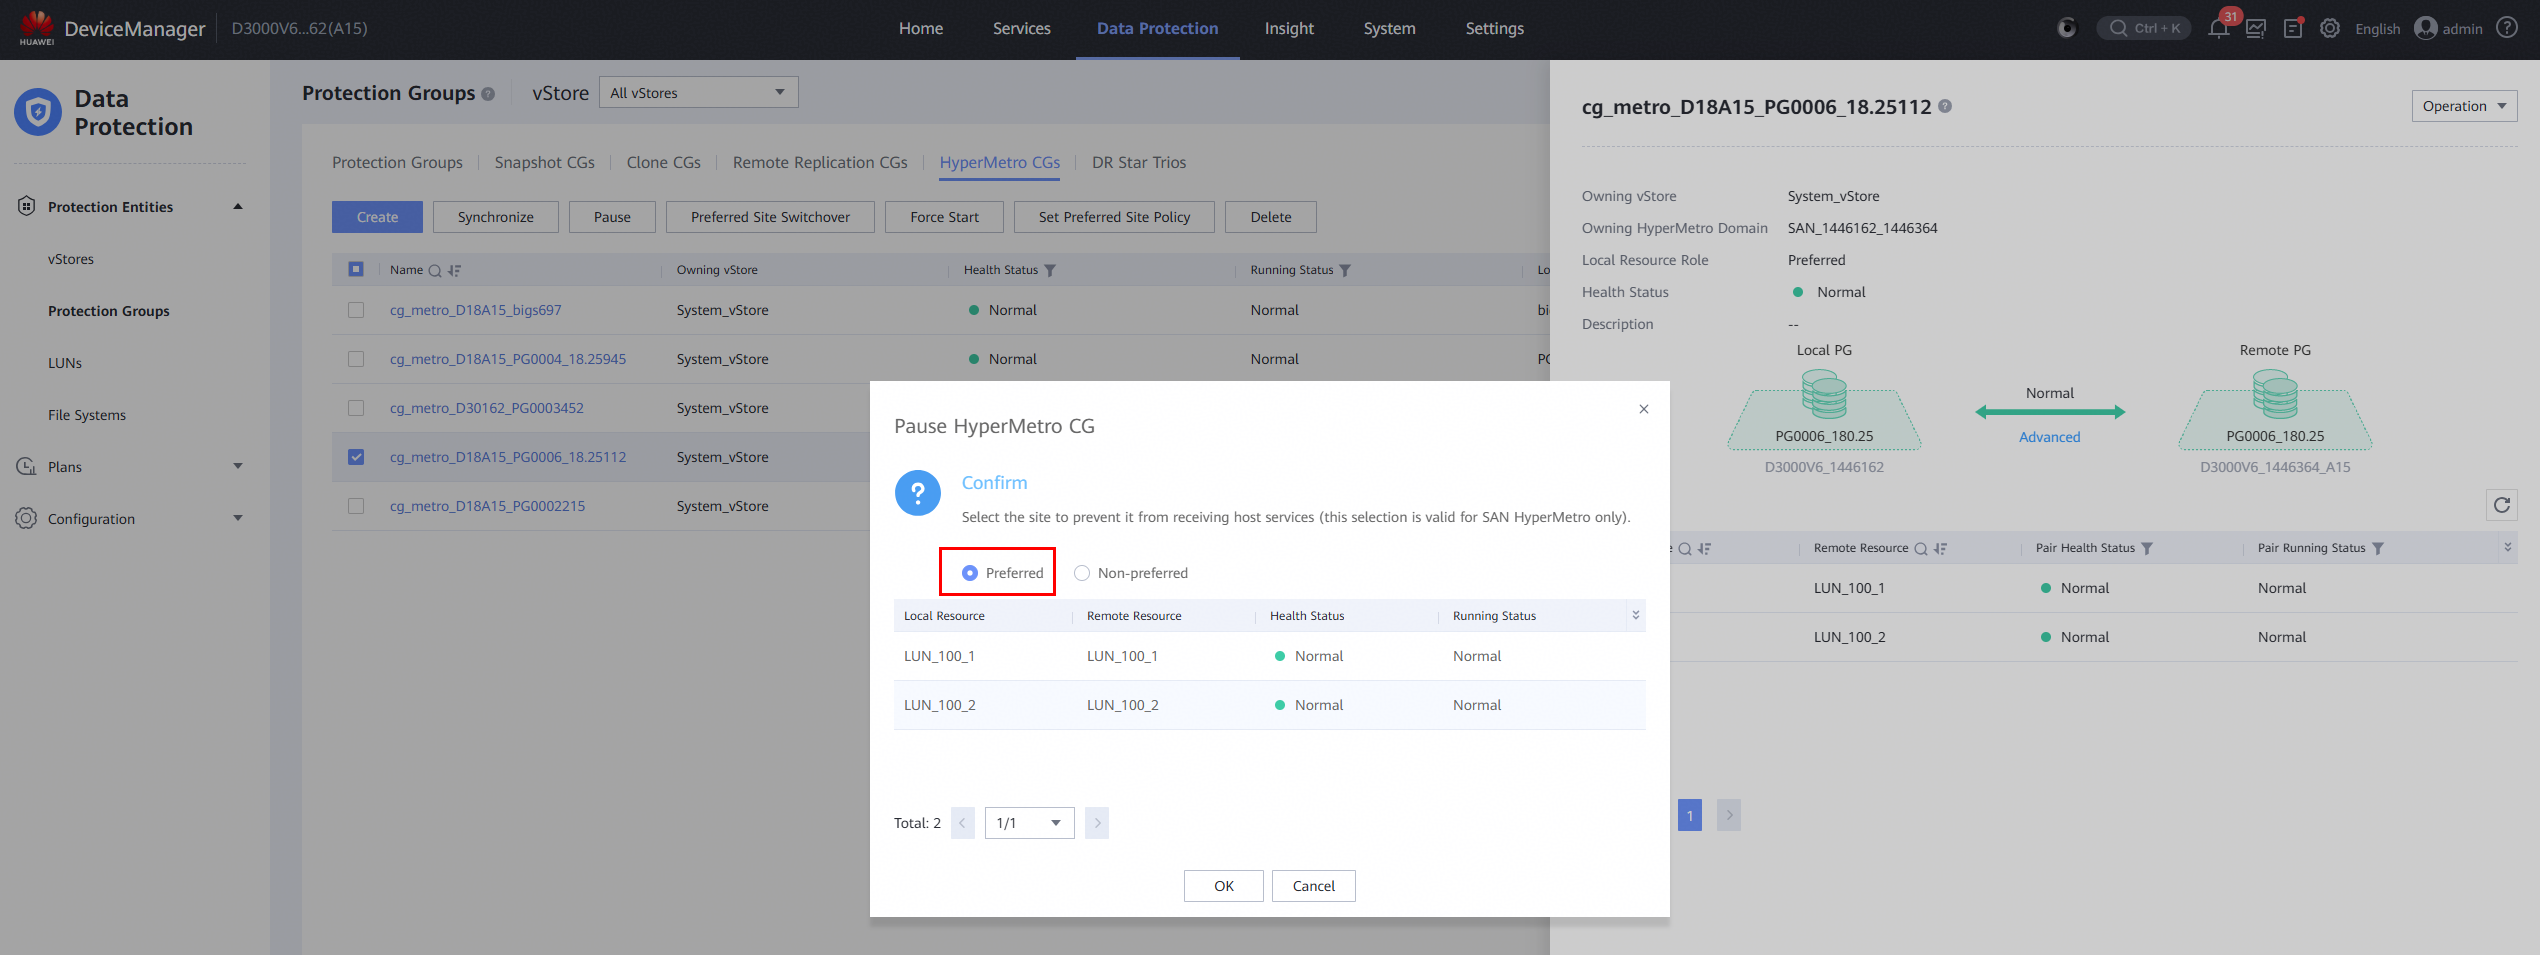
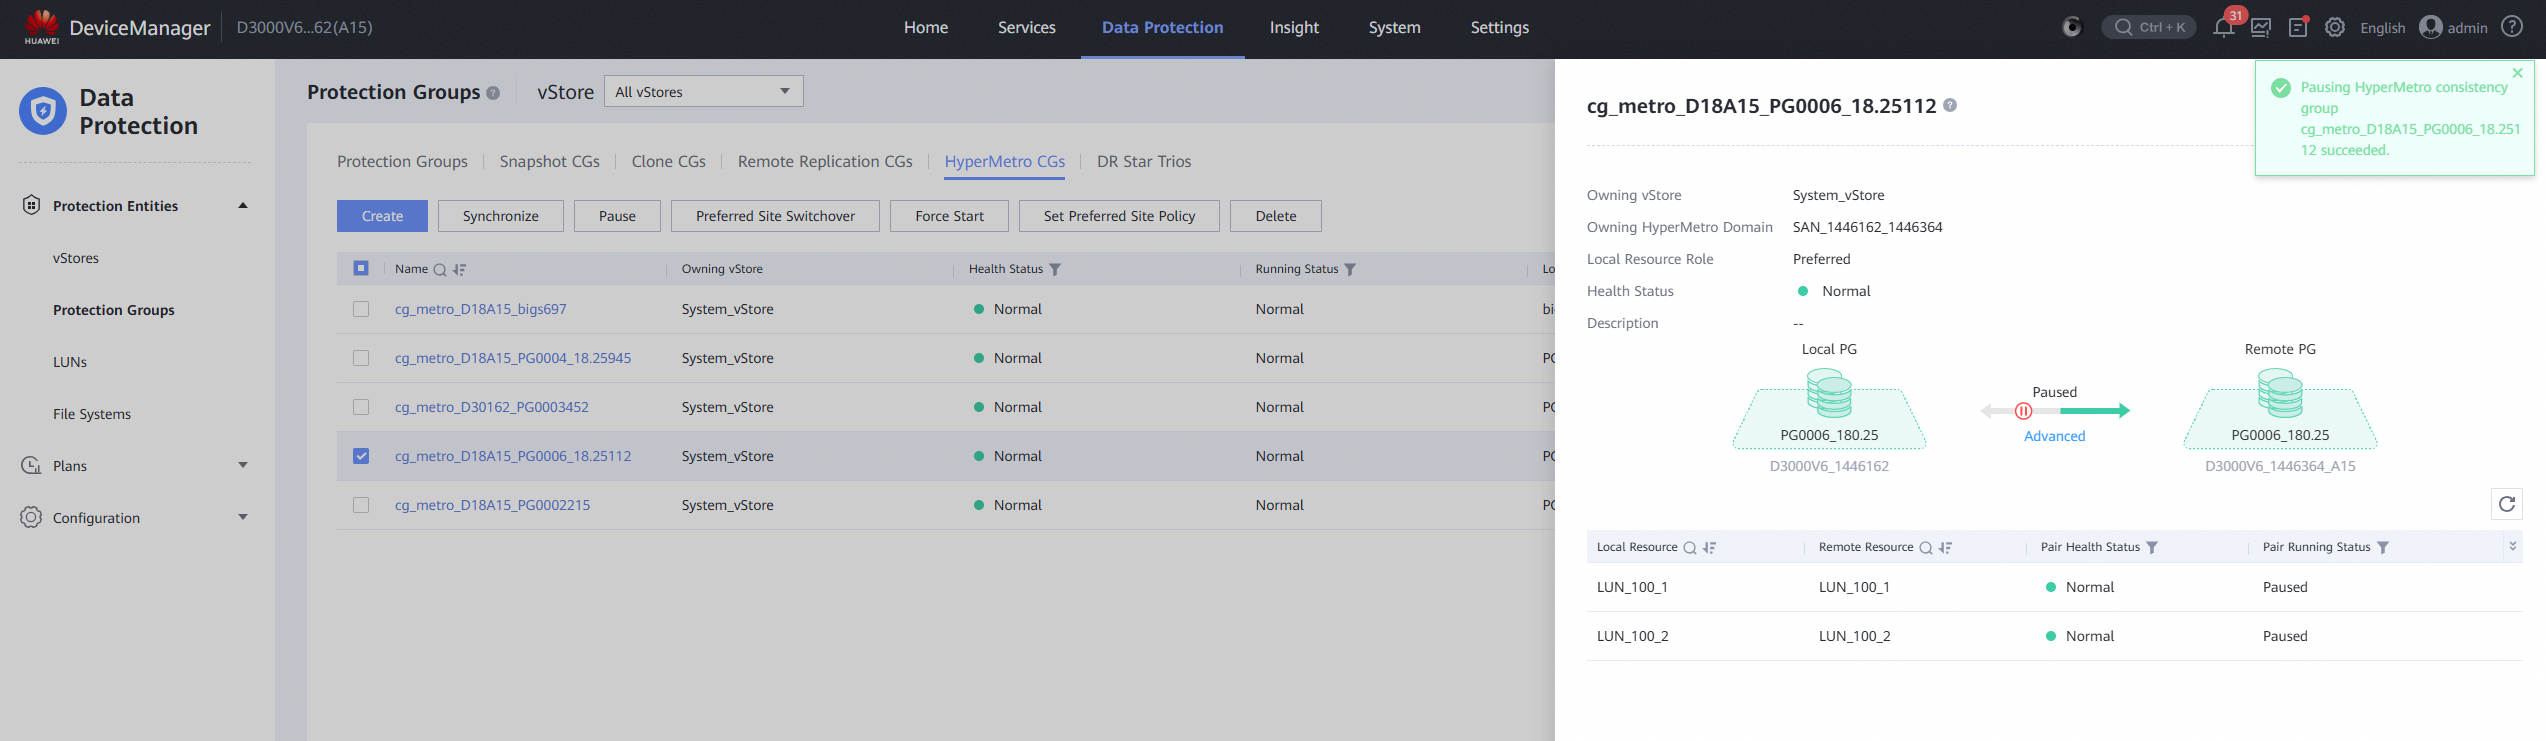
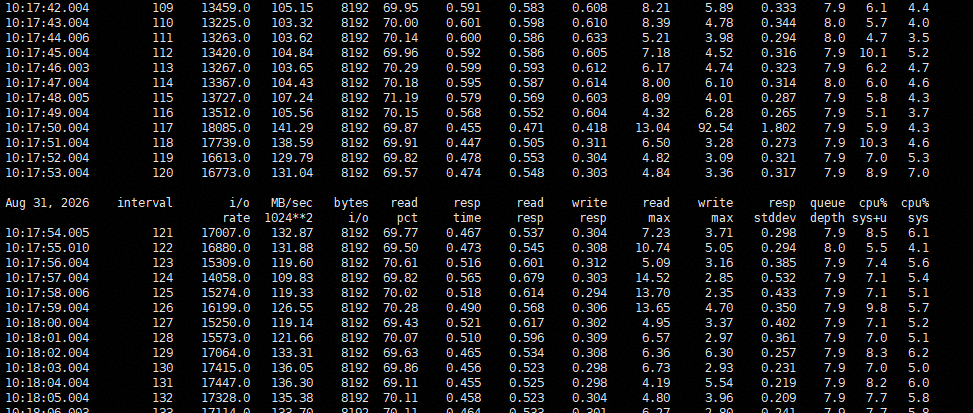
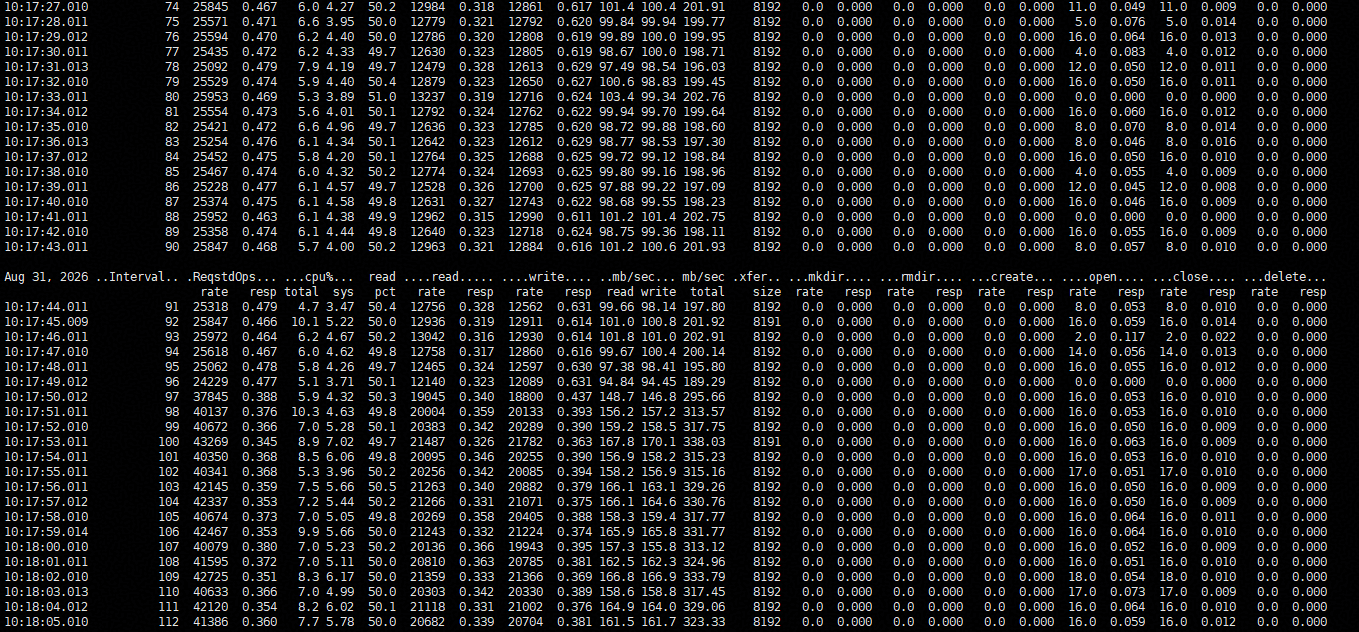
6.Synchronize HyperMetro pairs and observe the I/O performance. 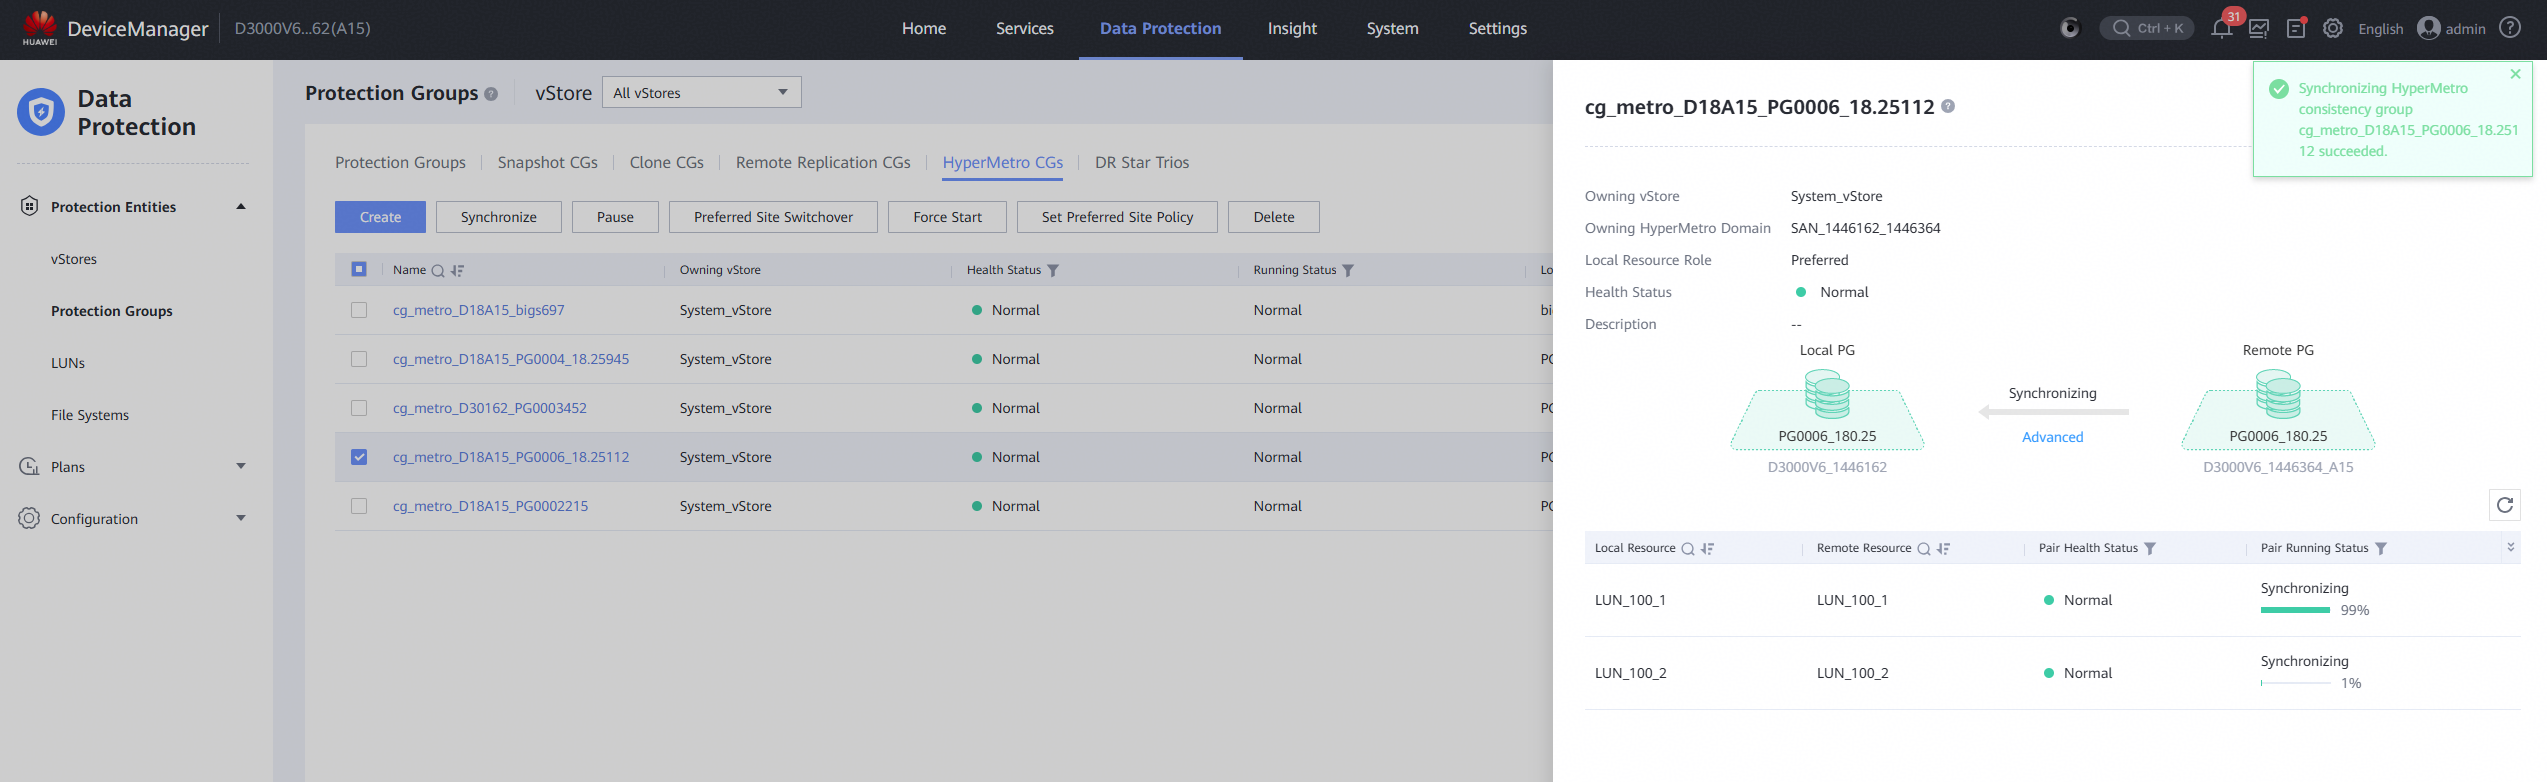
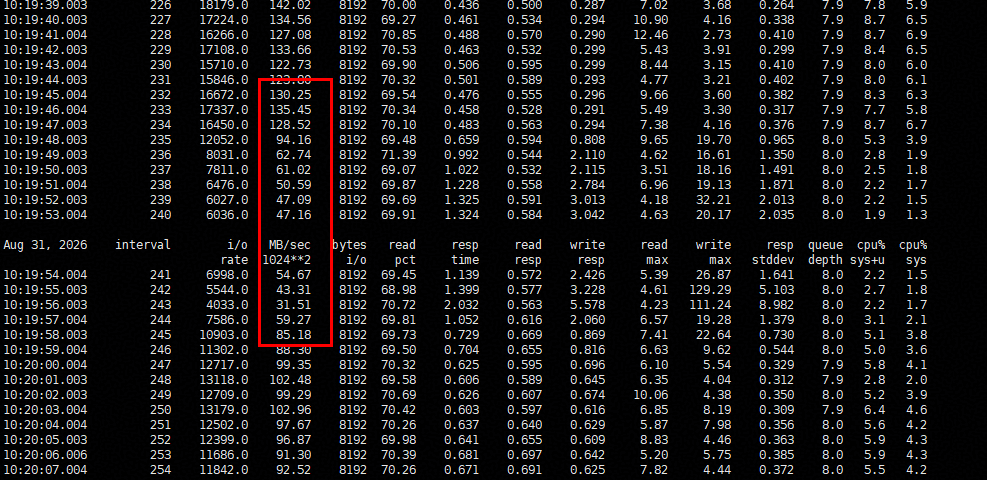
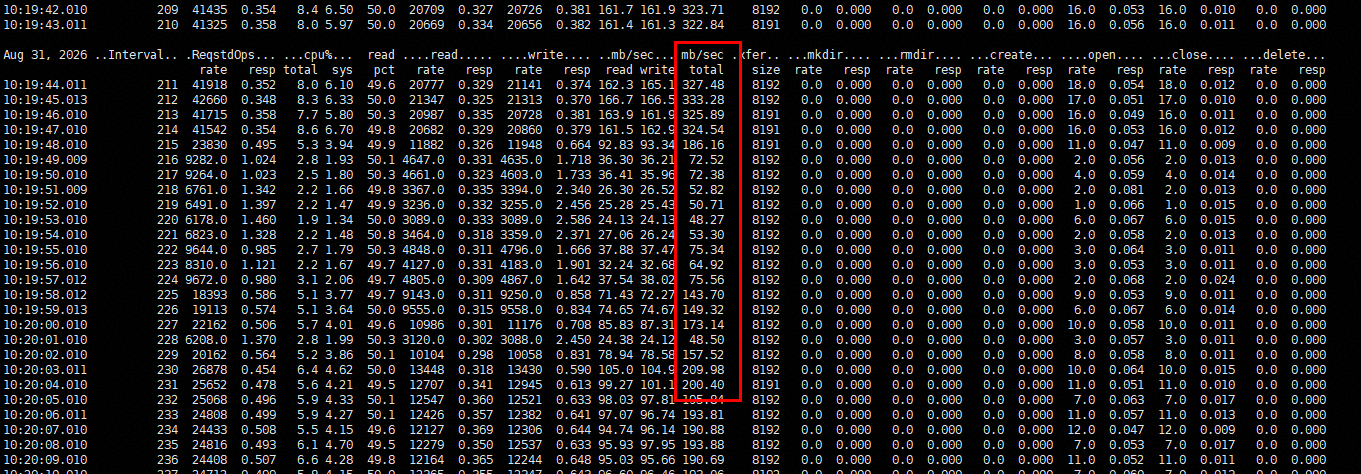
7.Pause the non-preferred site of HyperMetro pairs and observe the I/O performance. 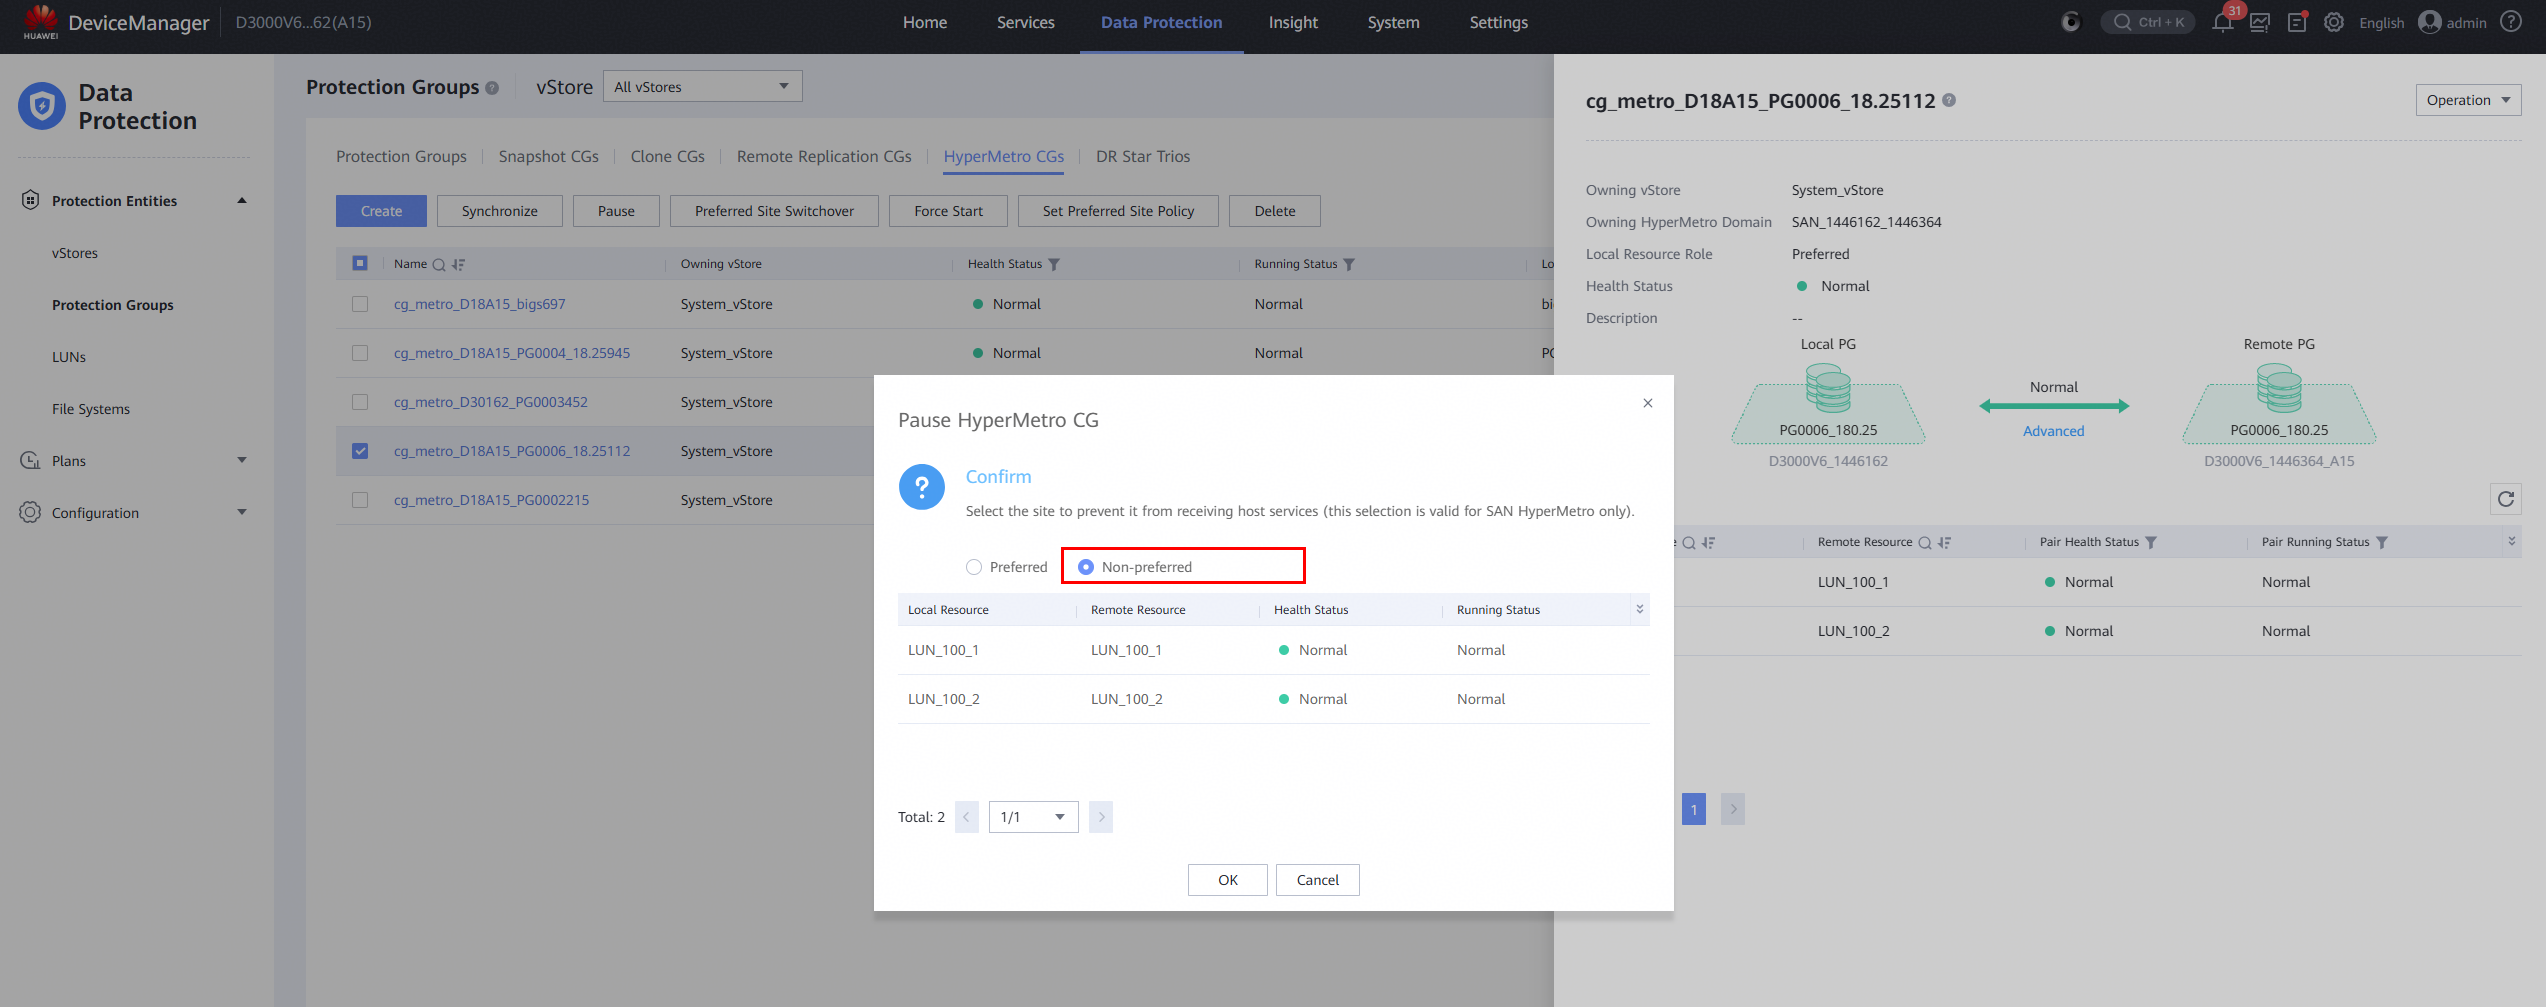
8.Synchronize HyperMetro pairs and observe the I/O performance. 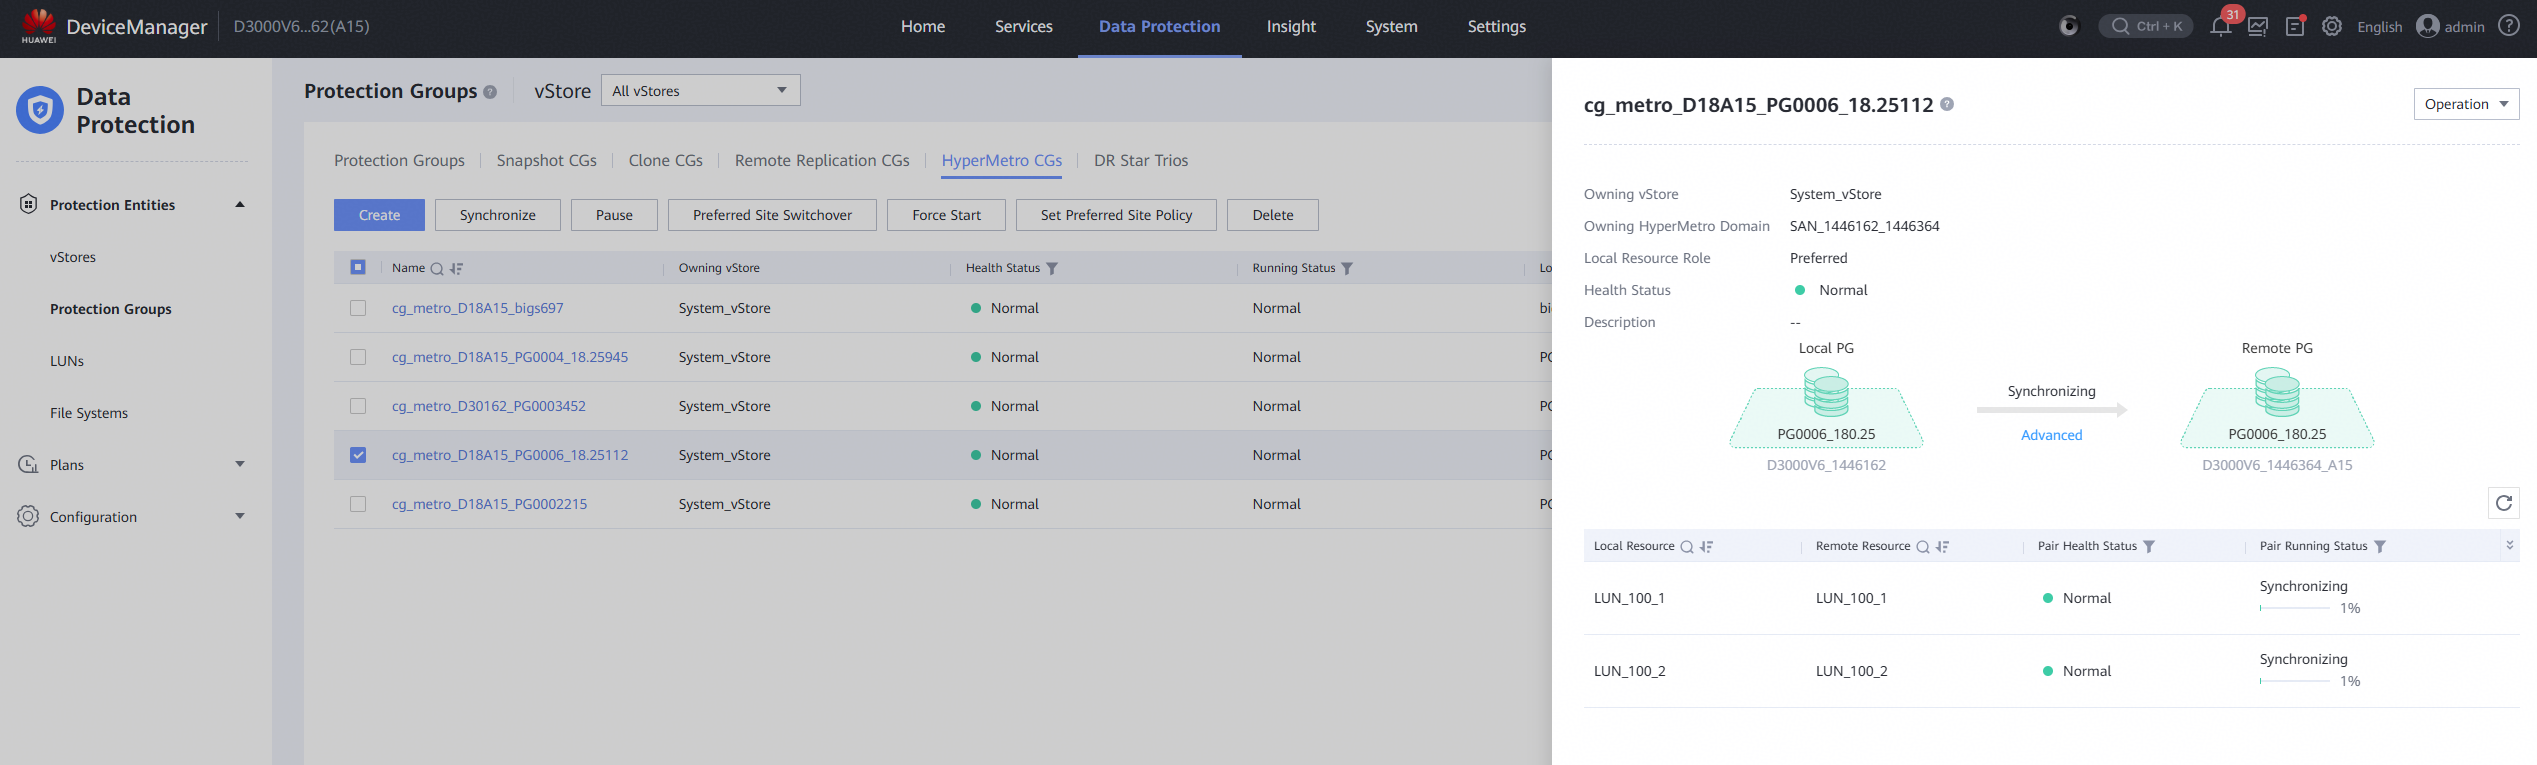
|
Test Conclusion | Passed |
4.5 One Sit of HyperMetro Storages Abnormal Power Off and Recovery
Test Purpose | To Verify That Business is Normal in the One Sit of HyperMetro Storages Abnormal Power Off Scenario |
Network Diagram | Reference to Figure 1.1 |
Prerequisites | 1.The network is correctly configured according to the network diagram, and the physical links are normal. 2.Host system is functioning properly. 3.Storage system is functioning properly. 4.Multipath is correctly installed and configured. 5.LUN mapping is correct. 6.The storage HyperMetro is configured correctly. |
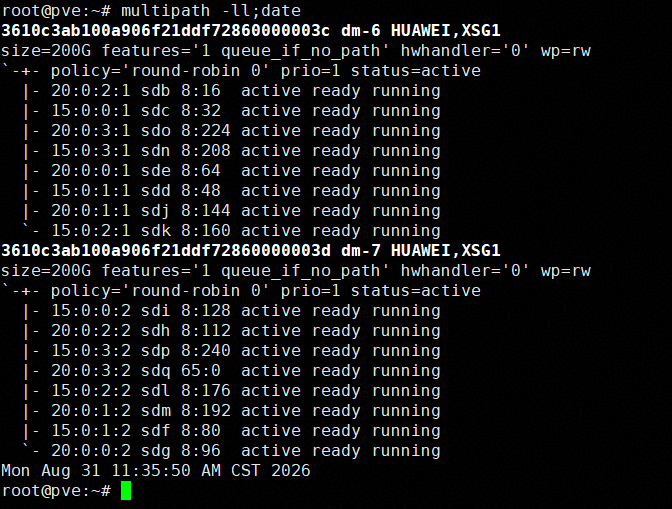
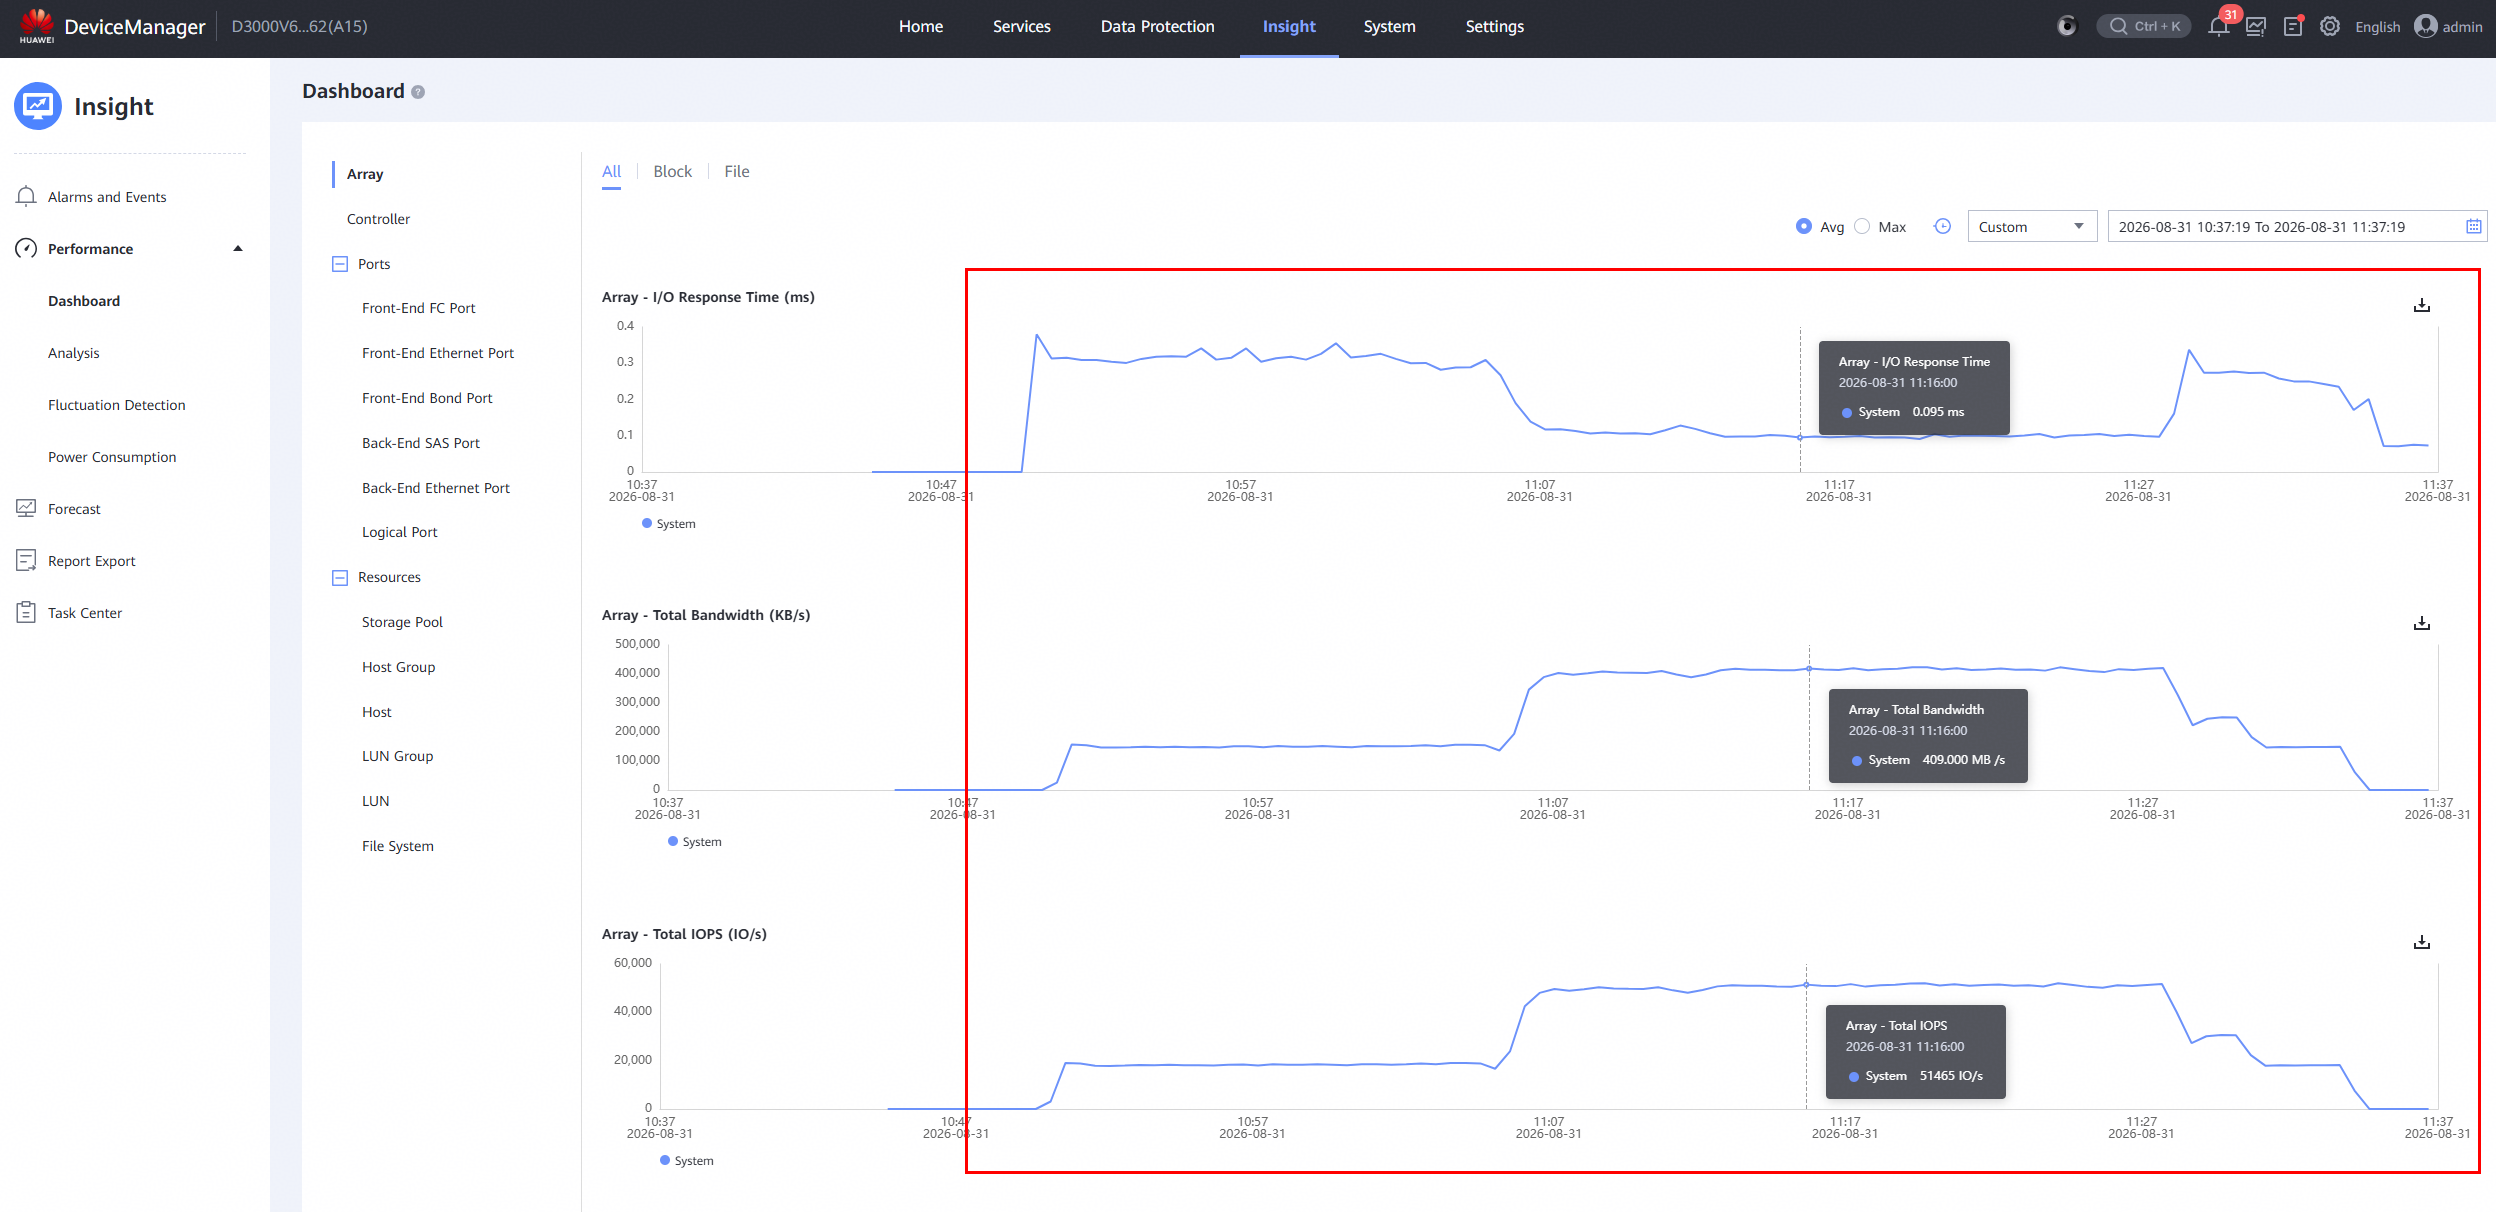
Test Procedures | 1.Log into the storage management system and create mappings, adding two 200GB HyperMetro LUNs to the host. 2. Log into Proxmox VE backend scan the LUNs and create Volume Group on the LUNs. 3.Create LVM Storage on LUN A and LUN B, and add them to the VM as « Virtual Disks »; 4.In the VM, perform raw disk read/write operations on LUN A using vdbench, and observe the I/O performance. In the VM, create file systems on LUN B, and perform file system read/write operations using vdbench, observing the I/O performance. 5.Reboot the preferred site, then observe the I/O performance. 6.Remove the power supply of the non-preferred site, then wait for the BBU to discharge and observe the I/O performance. 7.Power on the storage and observe the I/O performance. |
Expected Results | 1.In step 2, the host is able to scan and detect the four mapped LUNs. 2.In step 4, I/O read/write operations are normal. 3.In step 5, I/O is uninterrupted, the reset time is within the specification range, and I/O is balanced across all remaining paths of the LUN. The faulted path status recovers to normal, and I/O resumes balanced across all paths of the LUN. 4.In step 6, I/O is uninterrupted, the reset time is within the specification range, and I/O is balanced across all remaining paths of the LUN. 6.In step 7, there is no reset, the faulted path status recovers to normal, and I/O resumes balanced across all paths of the LUN. |
Test Results | 1.Log into the storage management system and create mappings, adding two 200GB HyperMetro LUNs to the host. 2. Log into Proxmox VE backend scan the LUNs and create Volume Group on the LUNs. 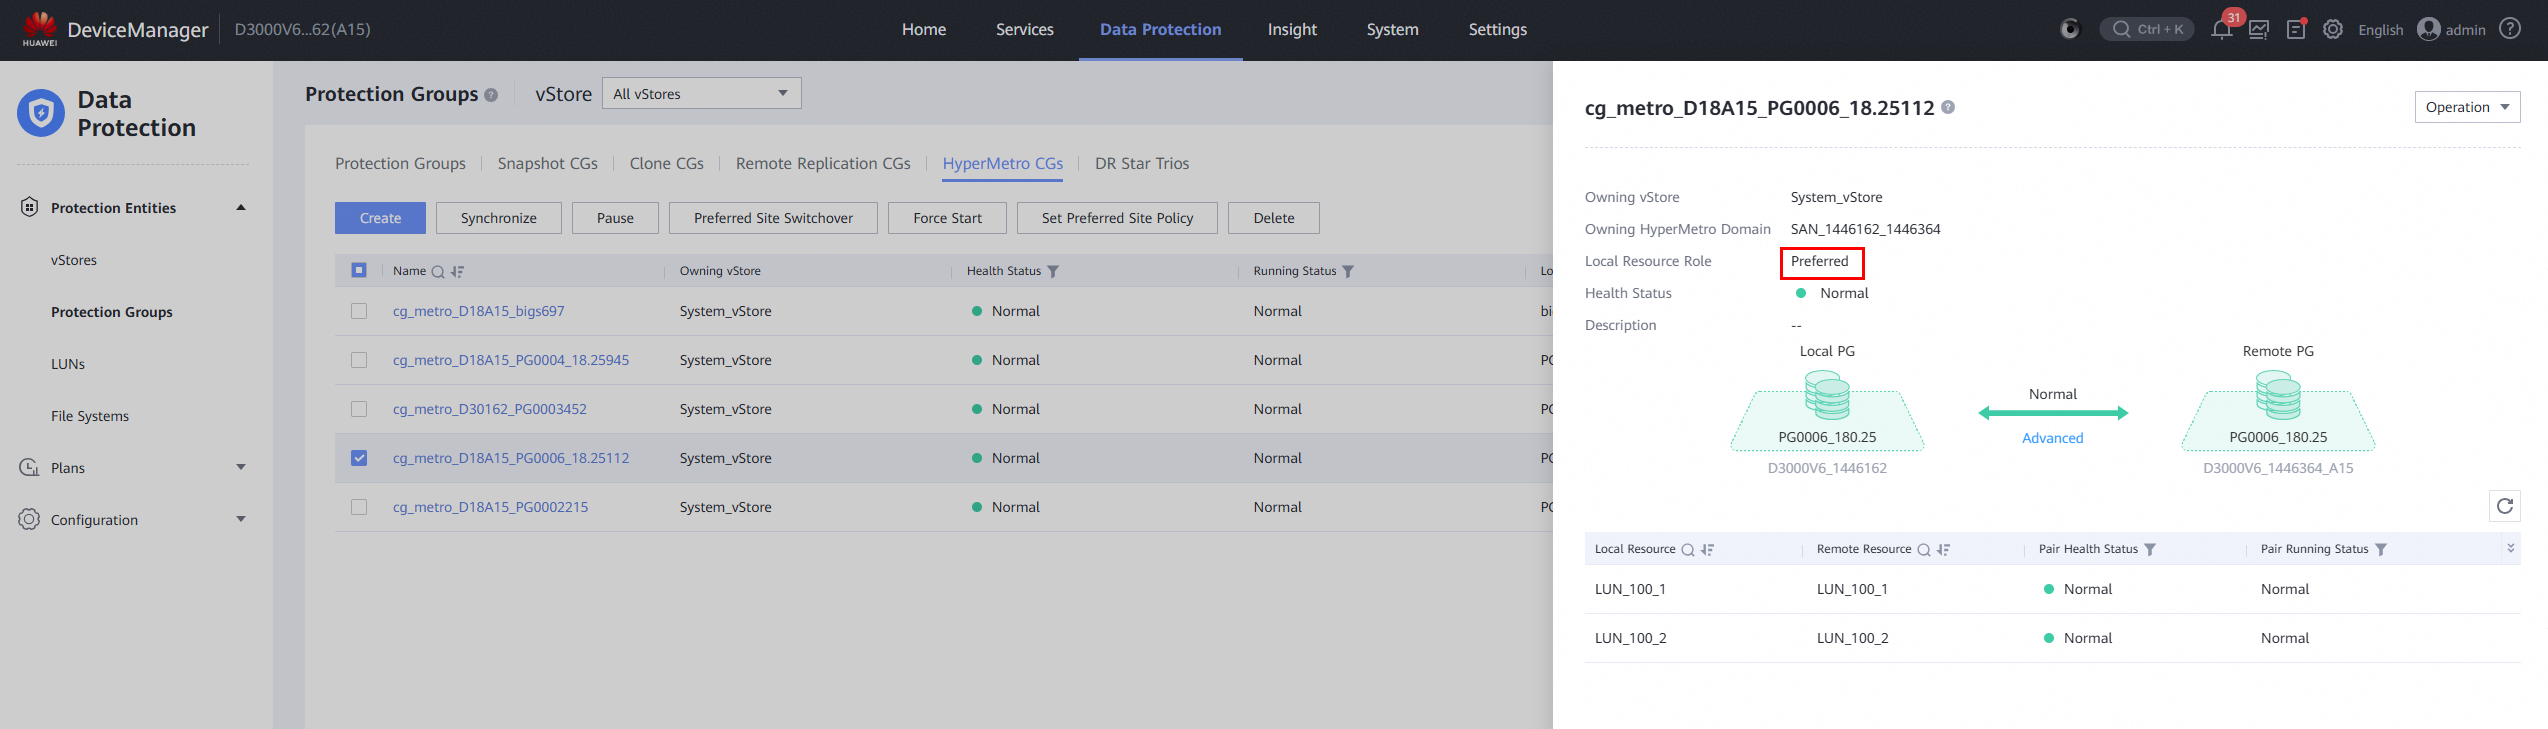
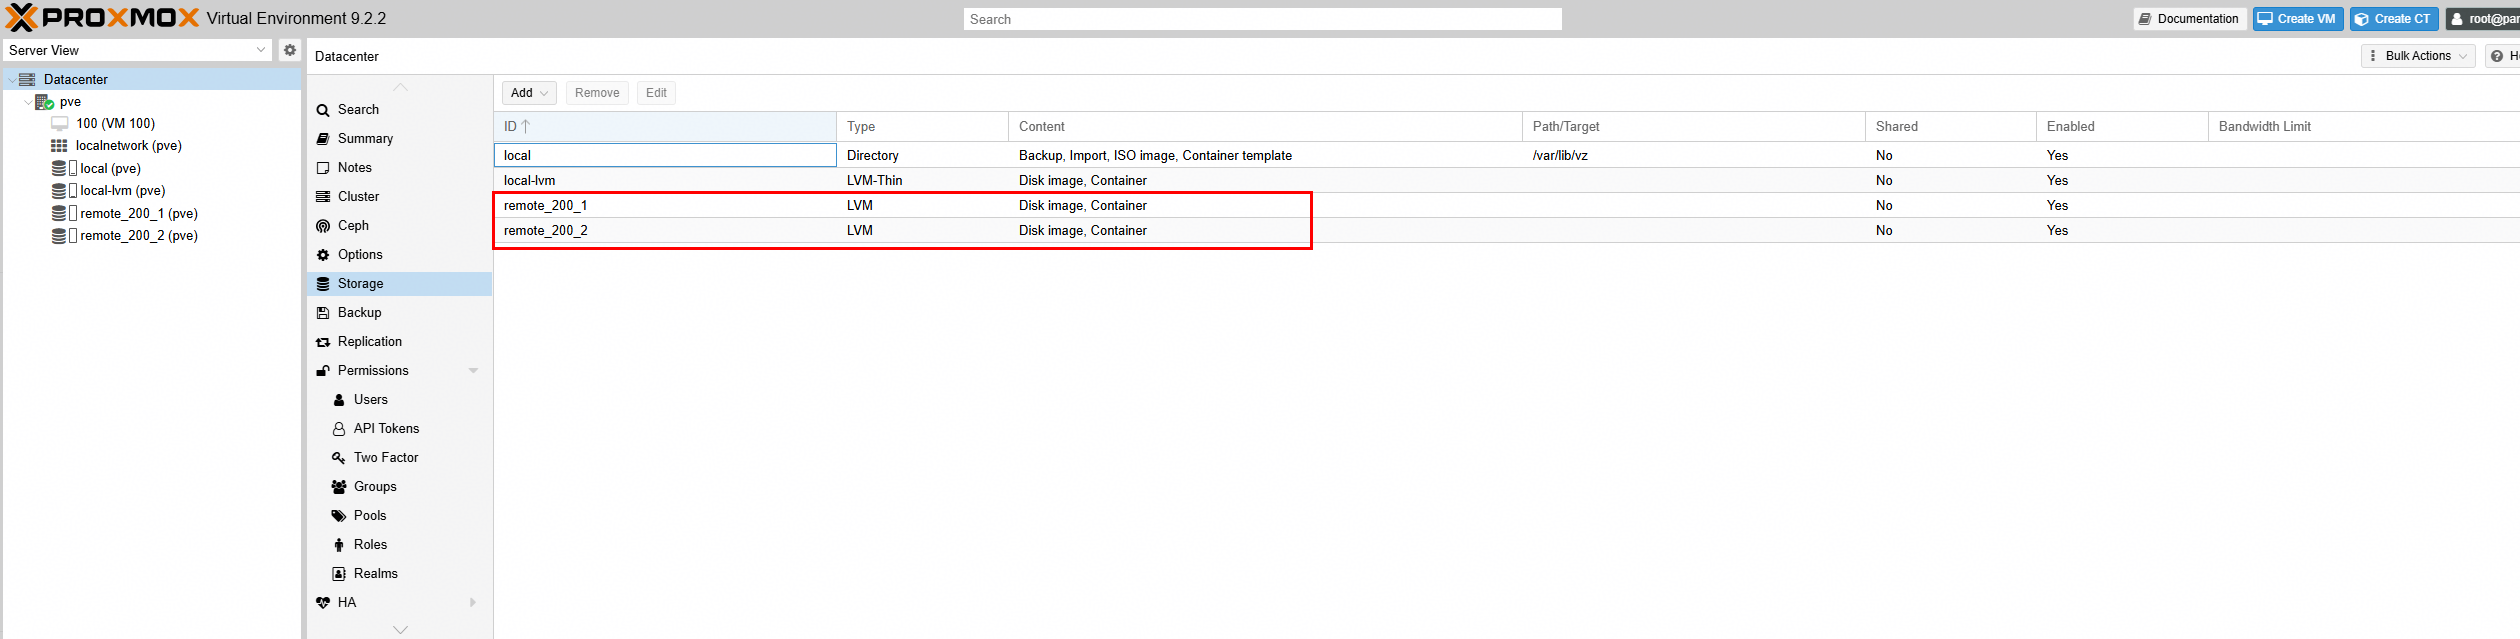
3.Create LVM Storage on LUN A and LUN B, and add them to the VM as « Virtual Disks »; 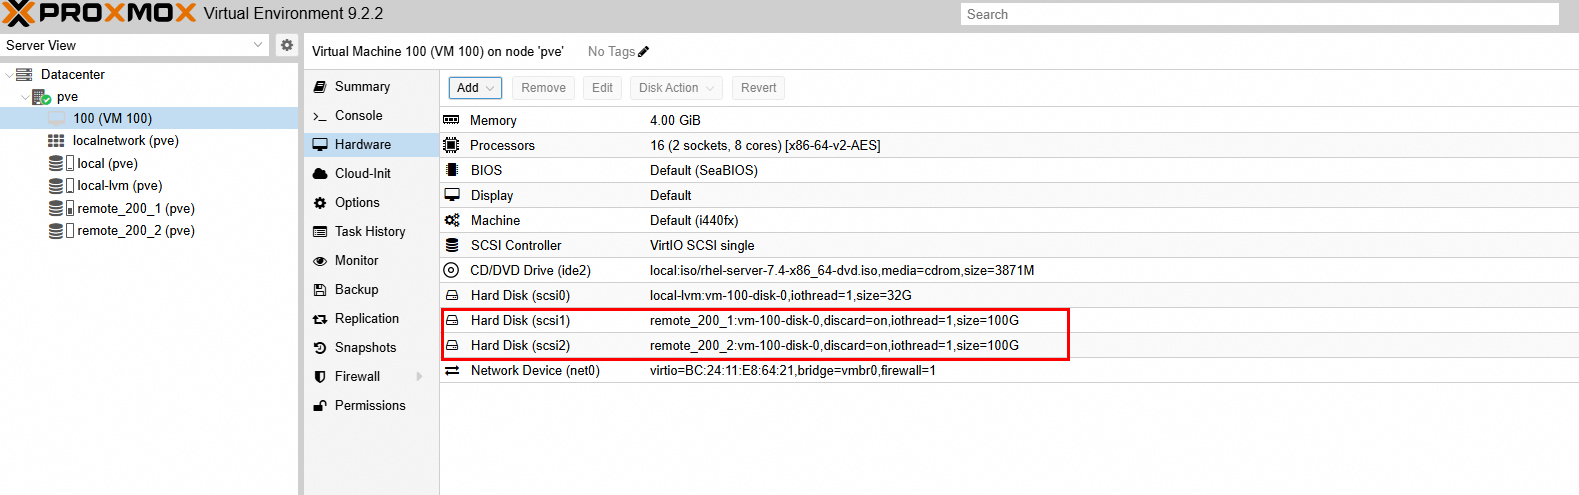
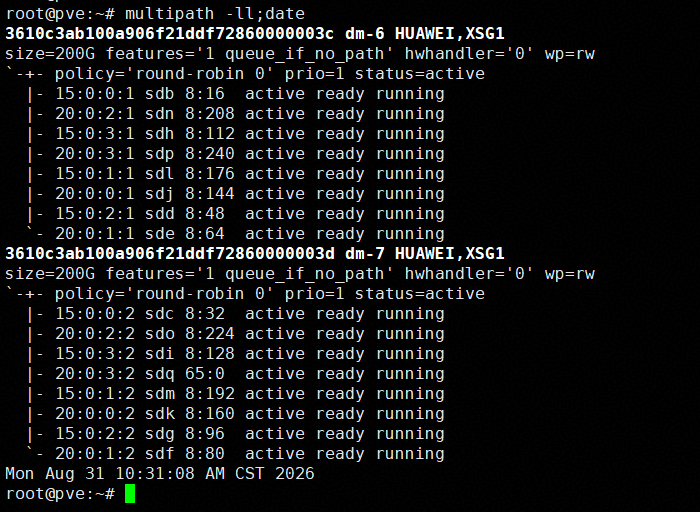
4.In the VM, perform raw disk read/write operations on LUN A using vdbench, and observe the I/O performance. In the VM, create file systems on LUN B, and perform file system read/write operations using vdbench, observing the I/O performance. 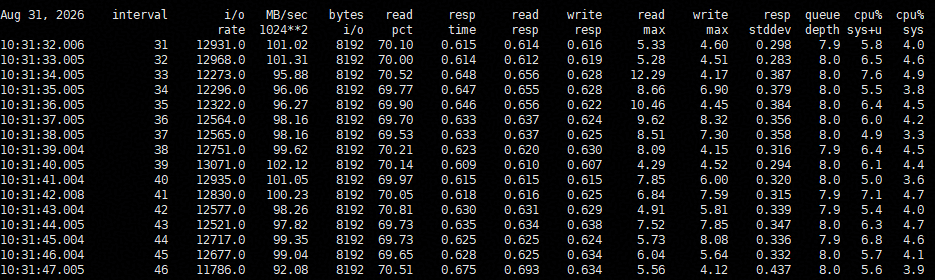
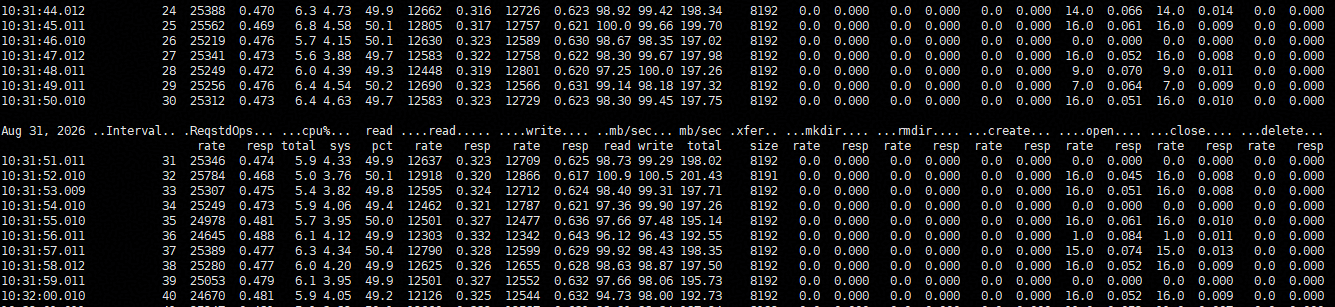
5.Reboot the preferred site, then observe the I/O performance. 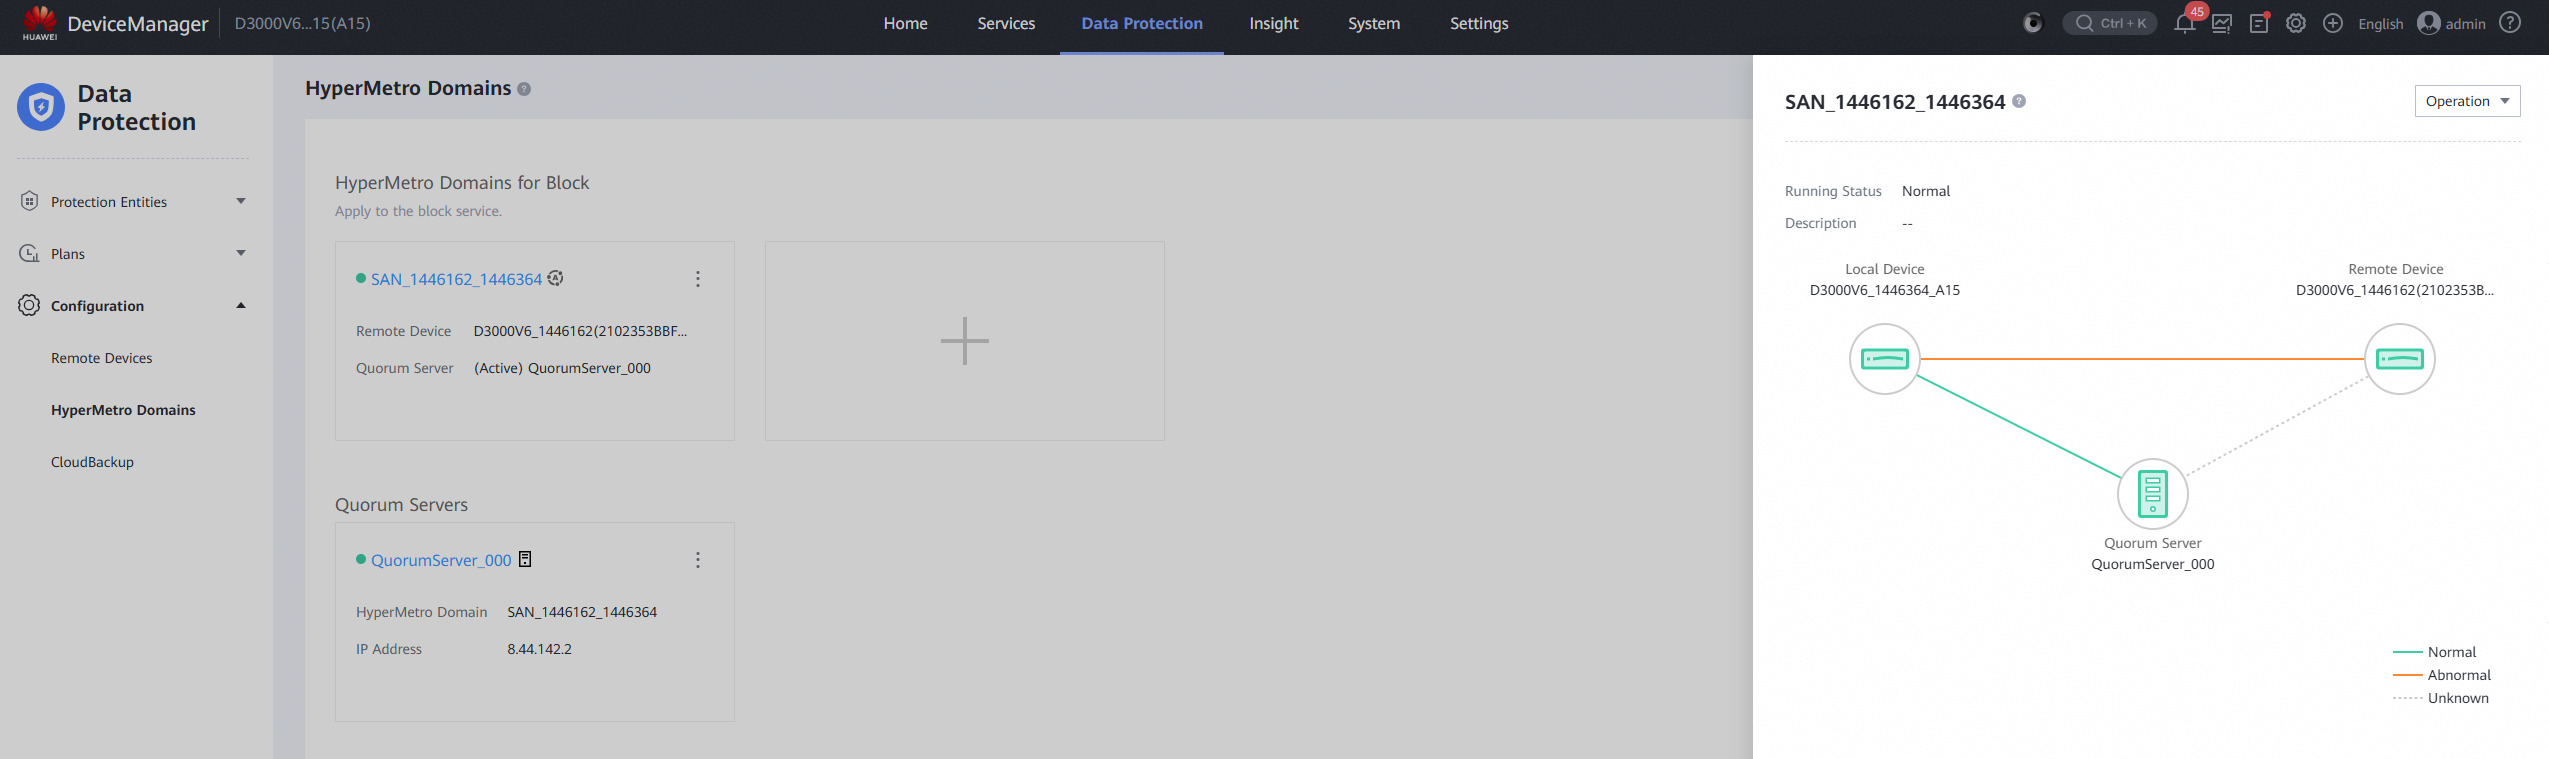
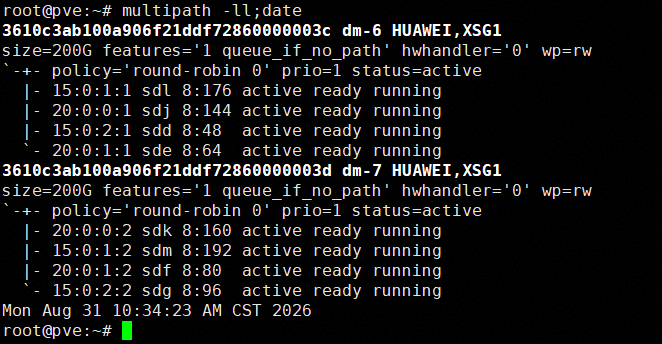
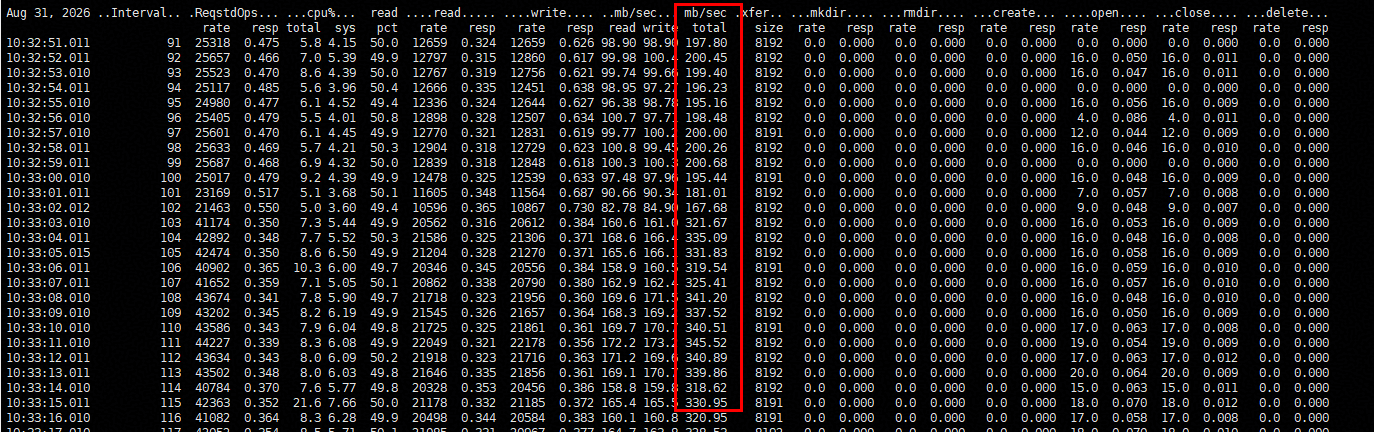
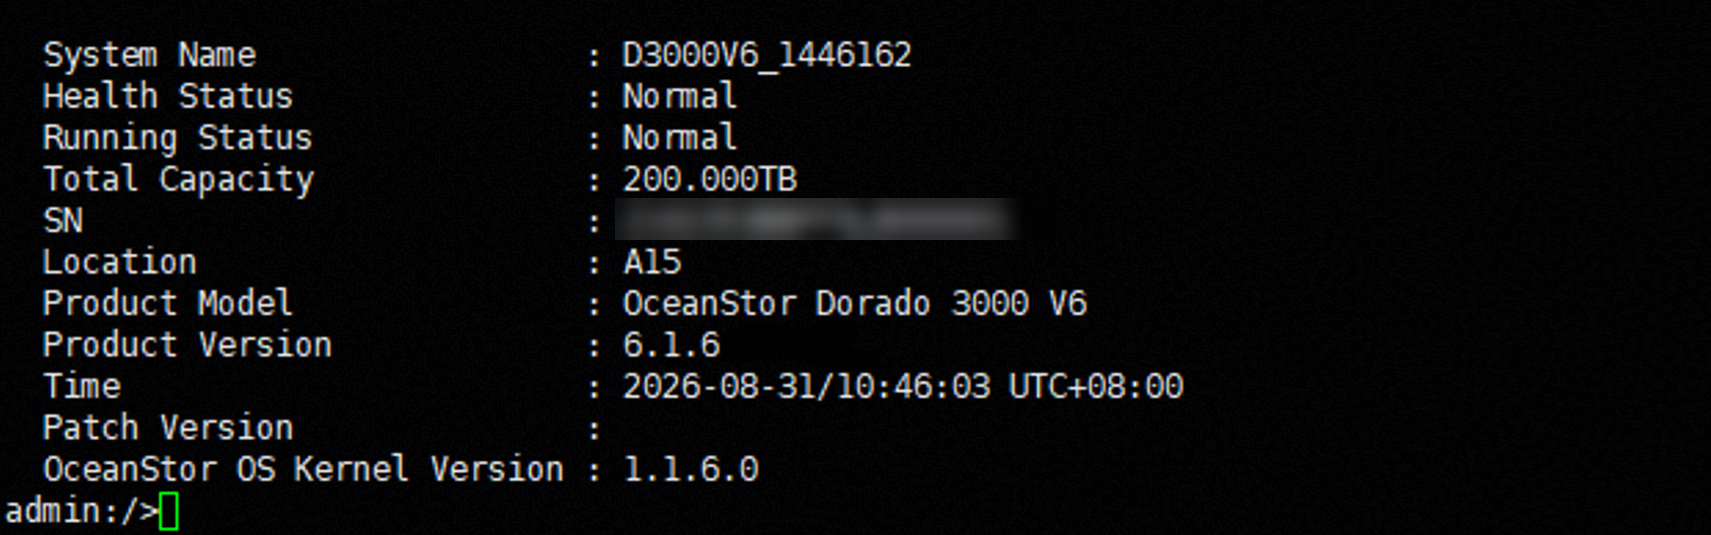
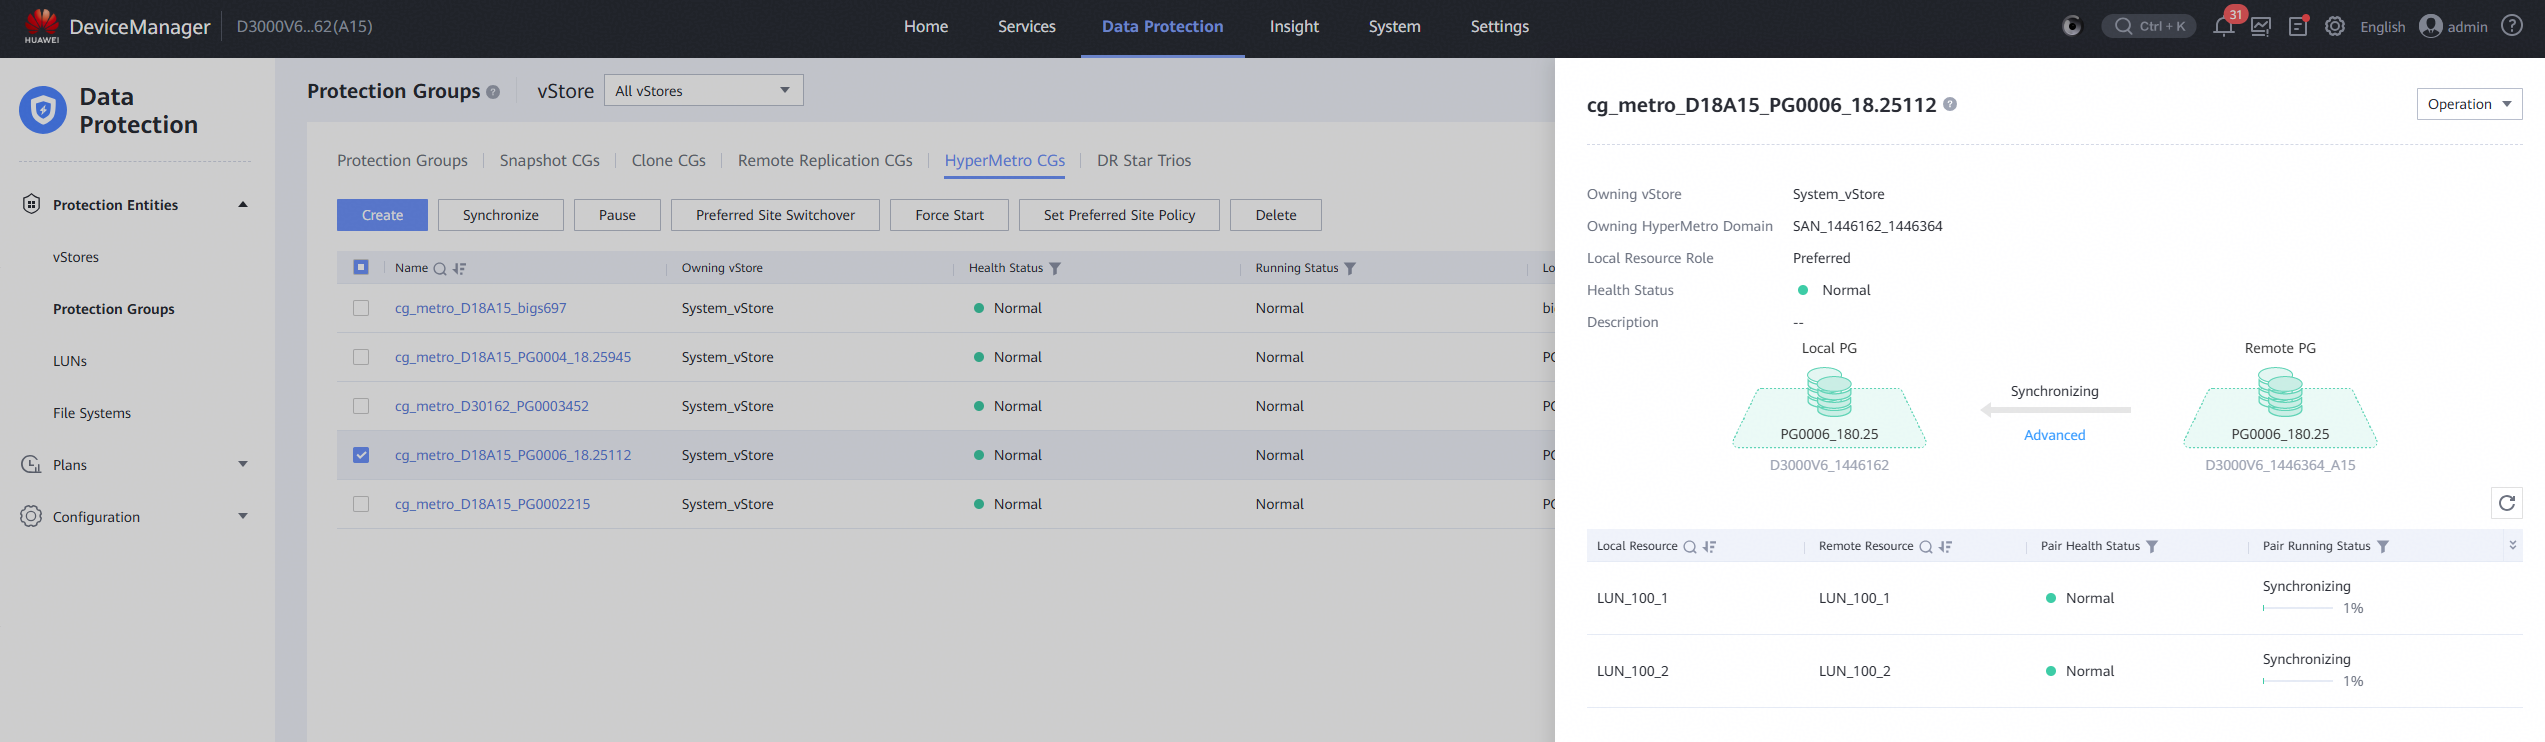
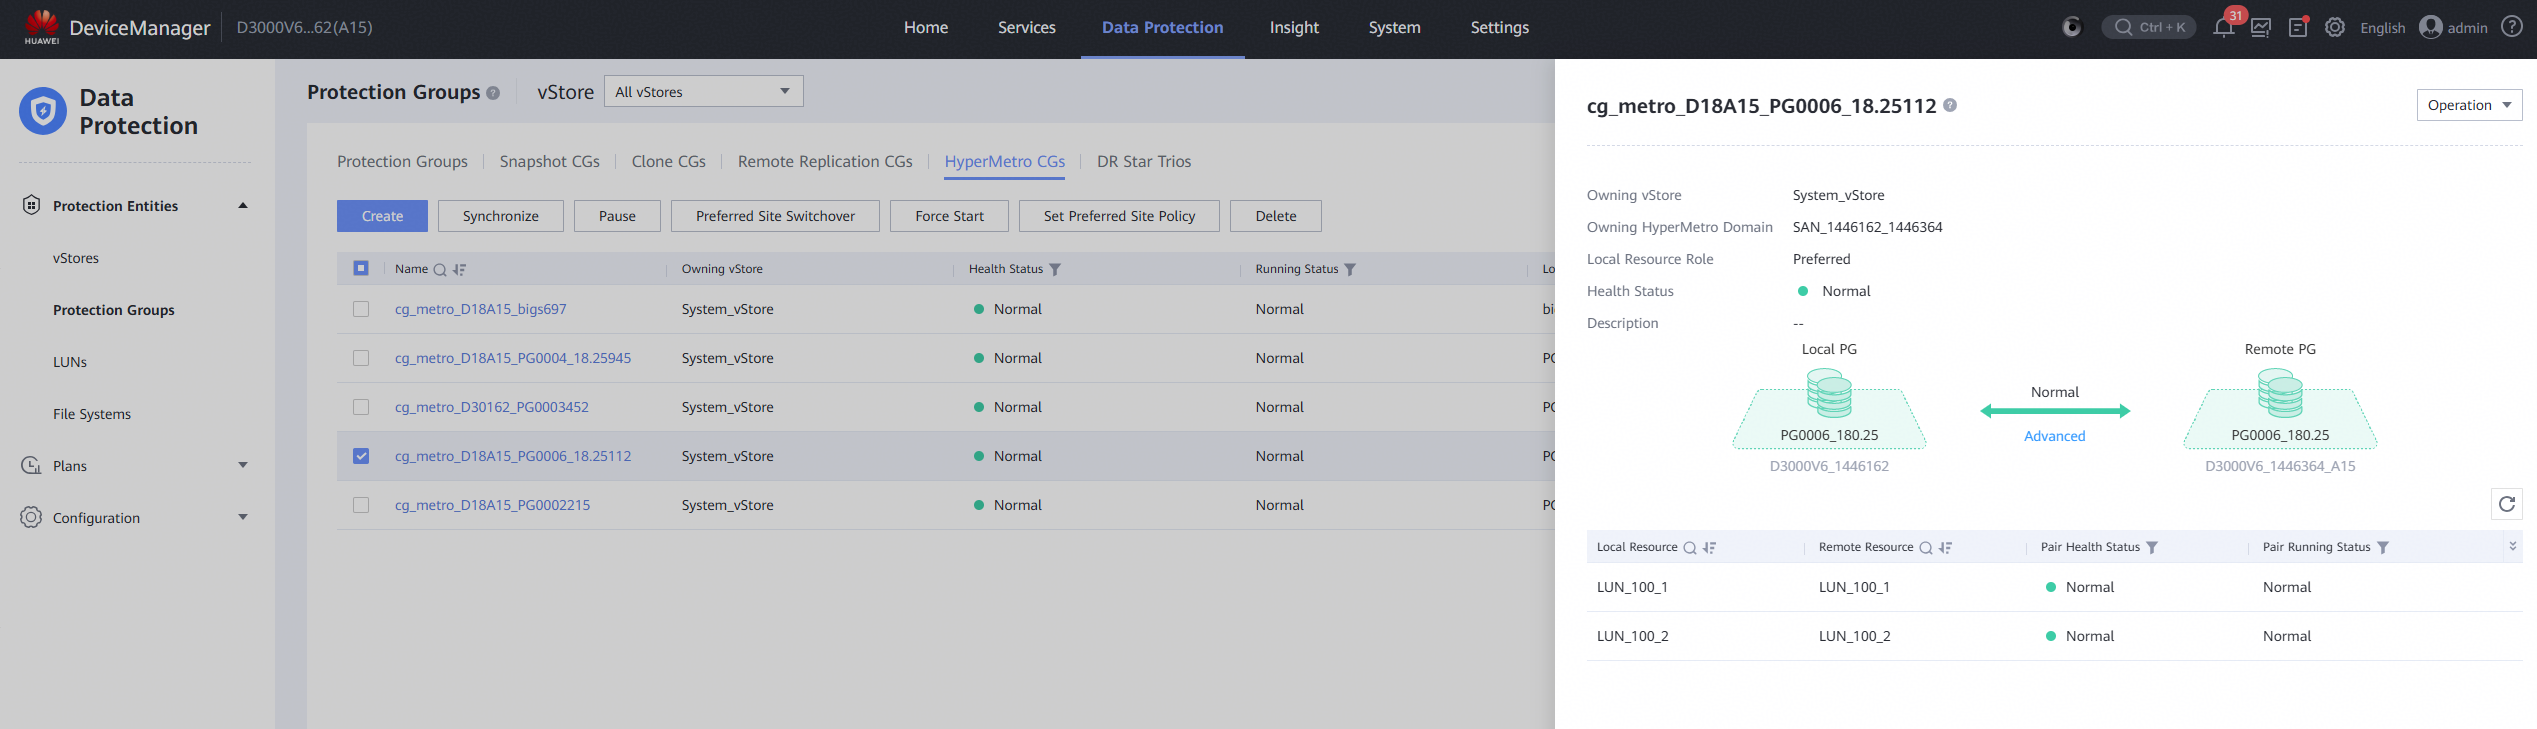
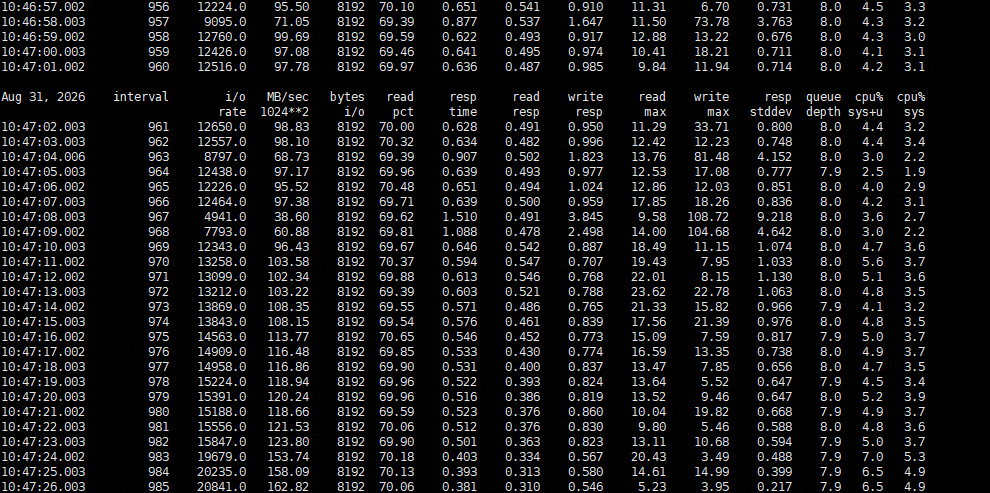
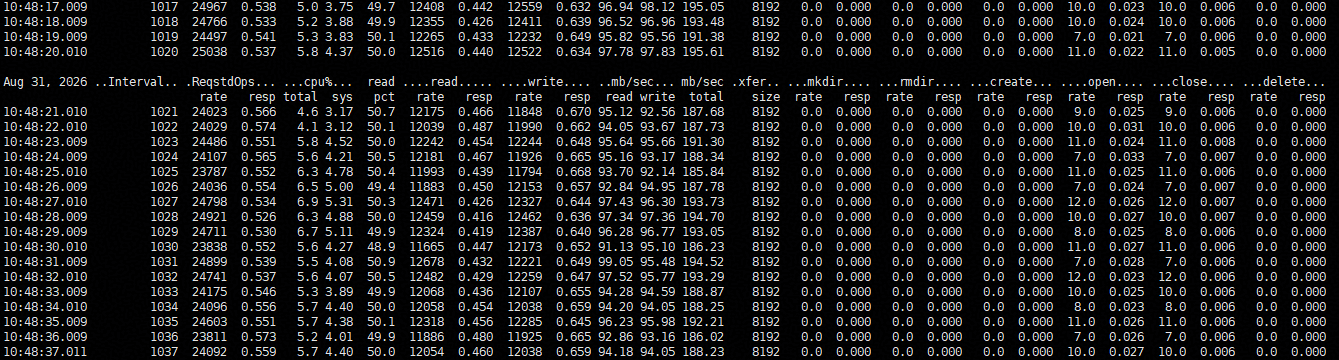
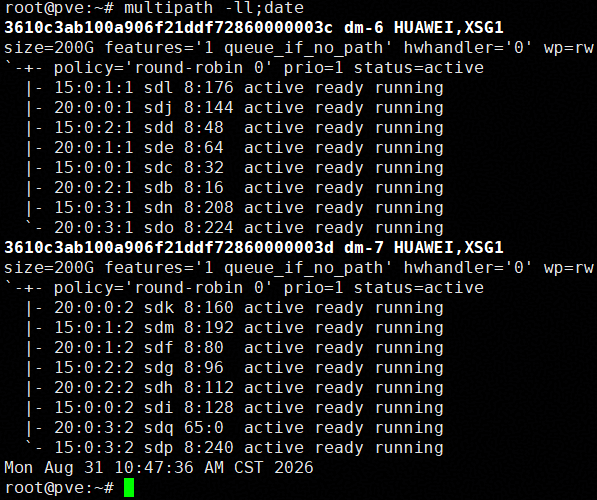
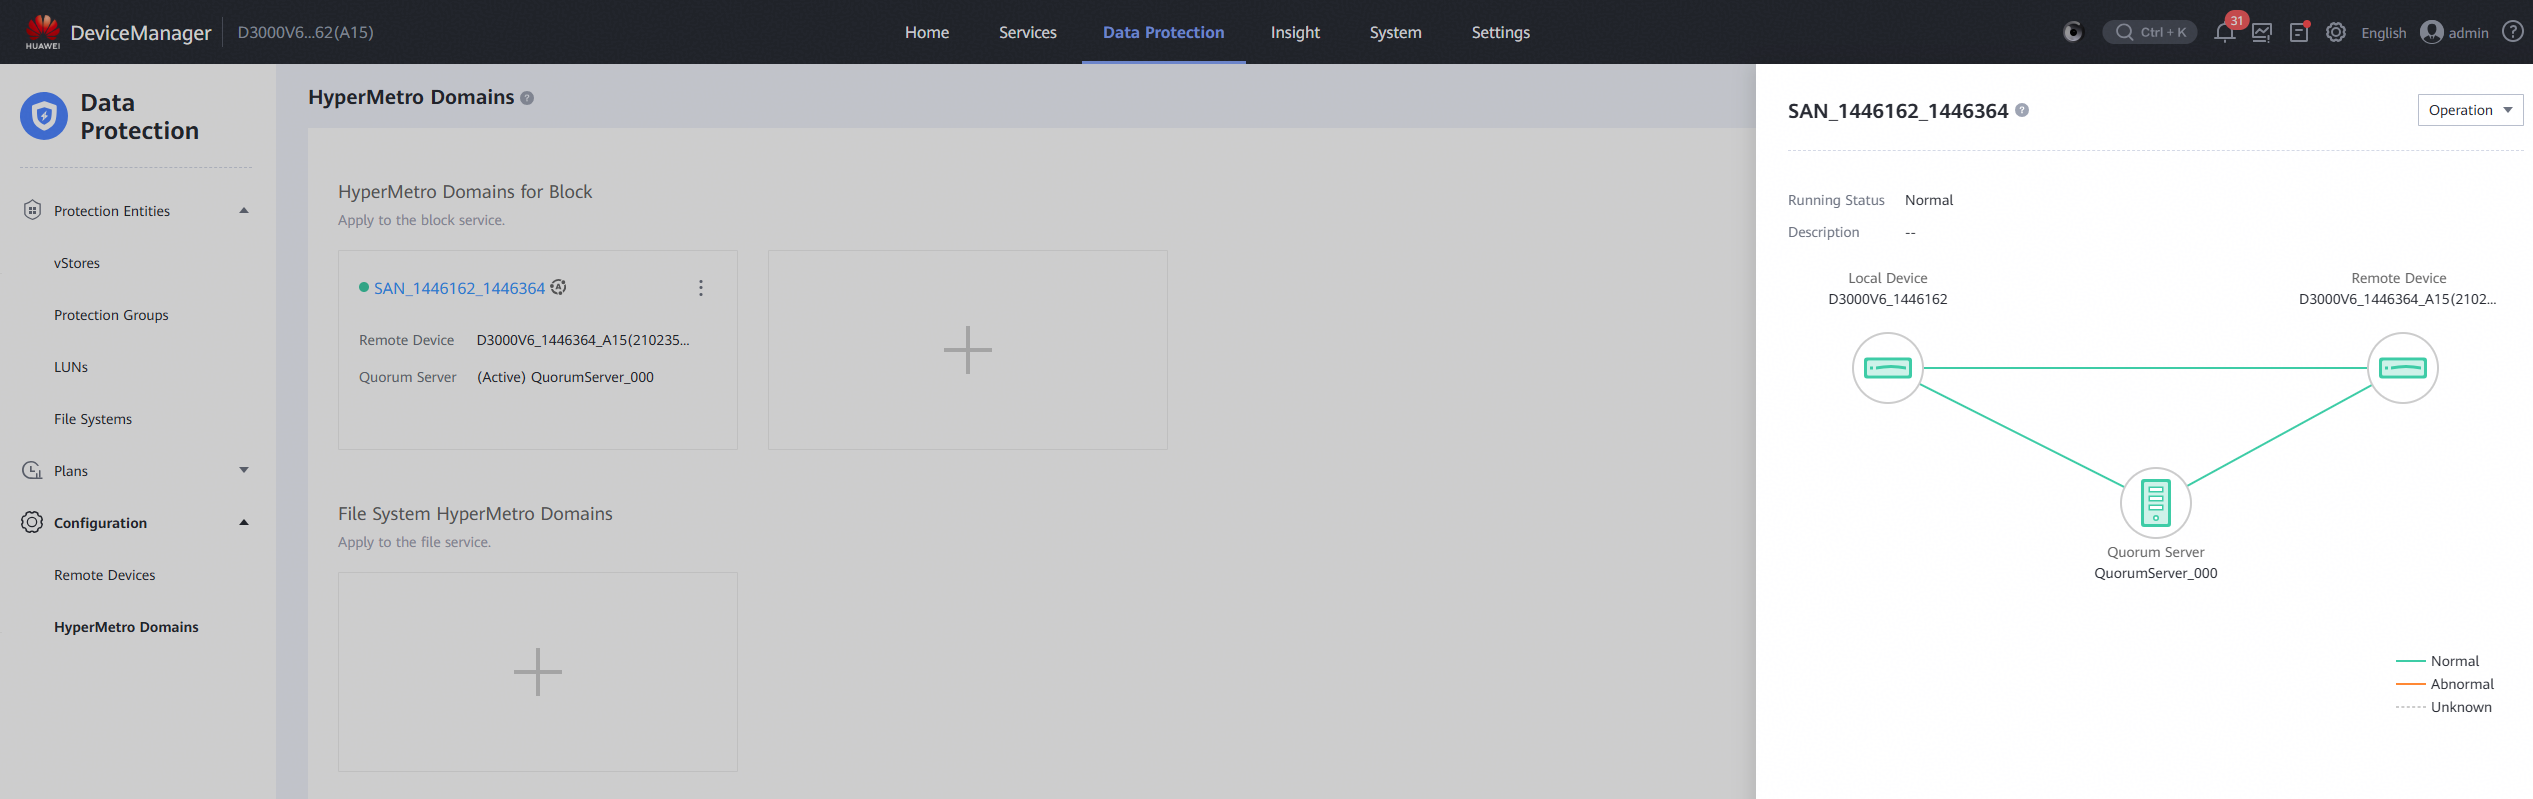
6.Remove the power supply of the non-preferred site, then wait for the BBU to discharge and observe the I/O performance. 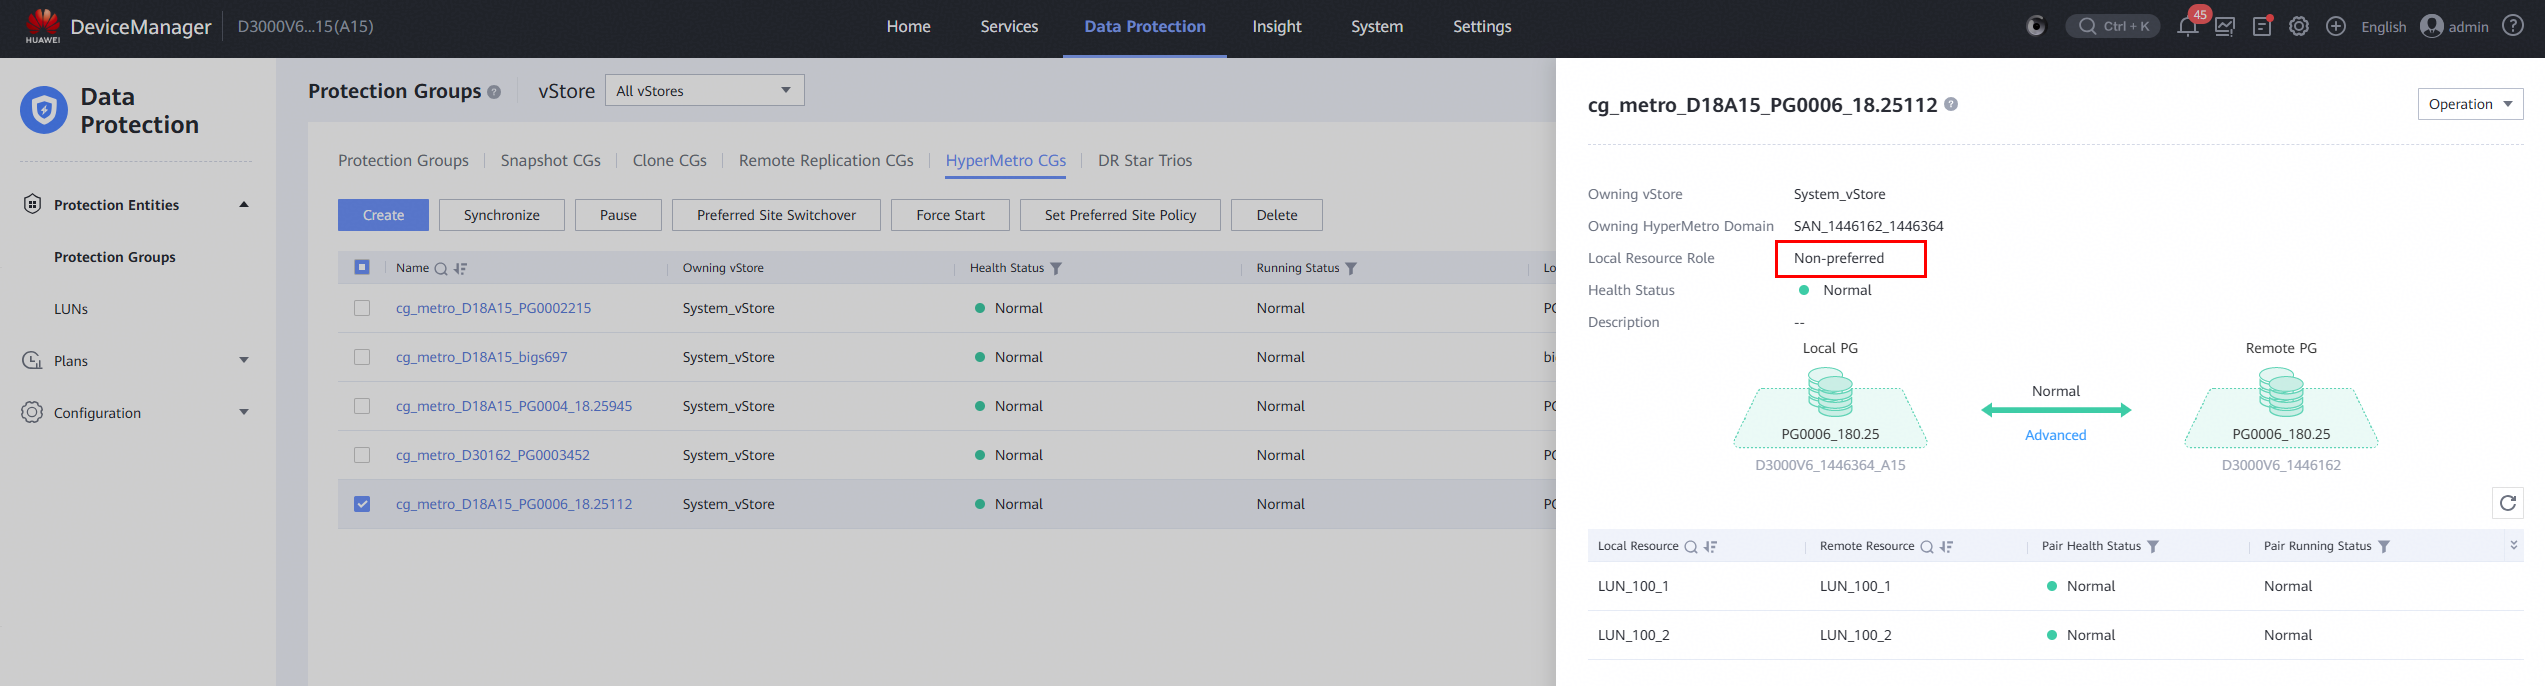
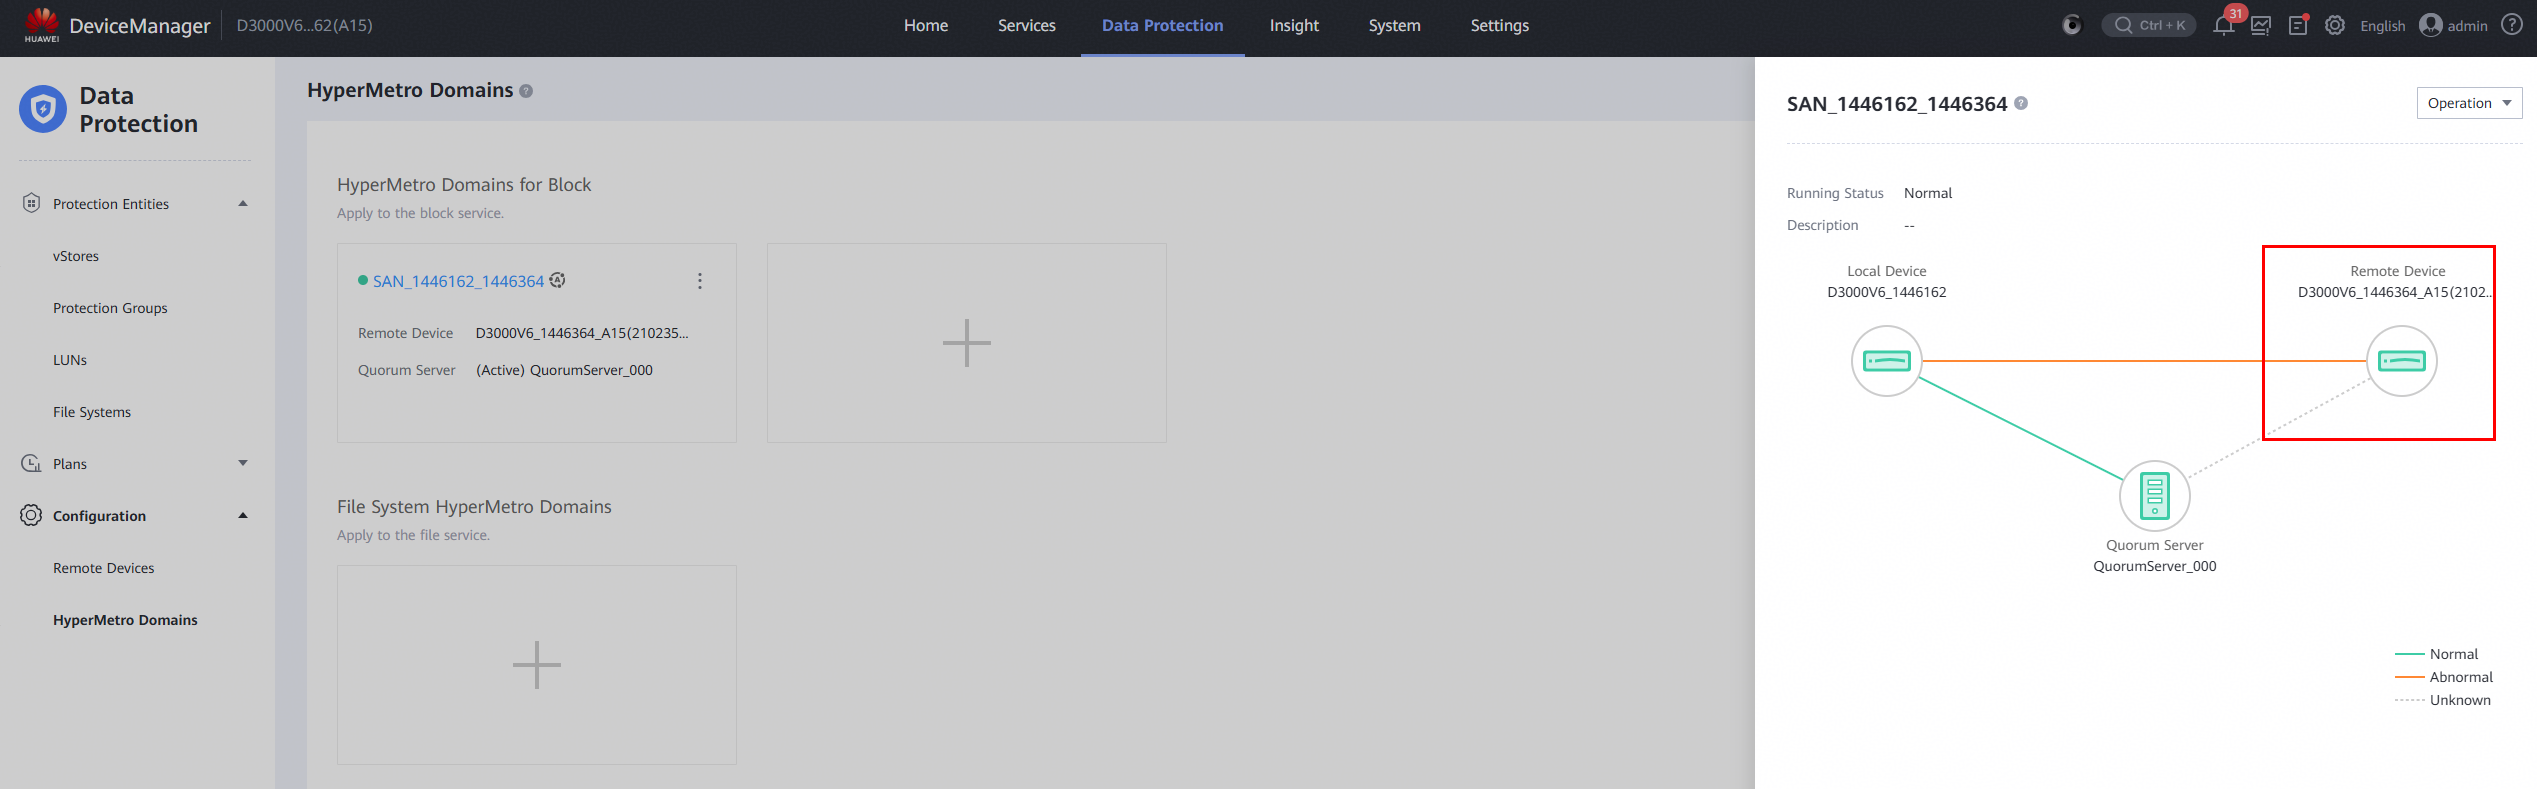
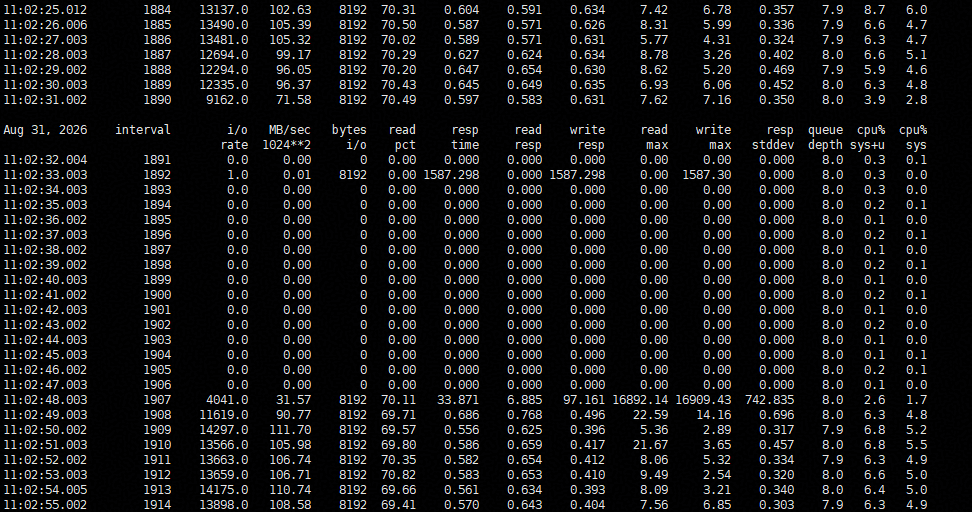
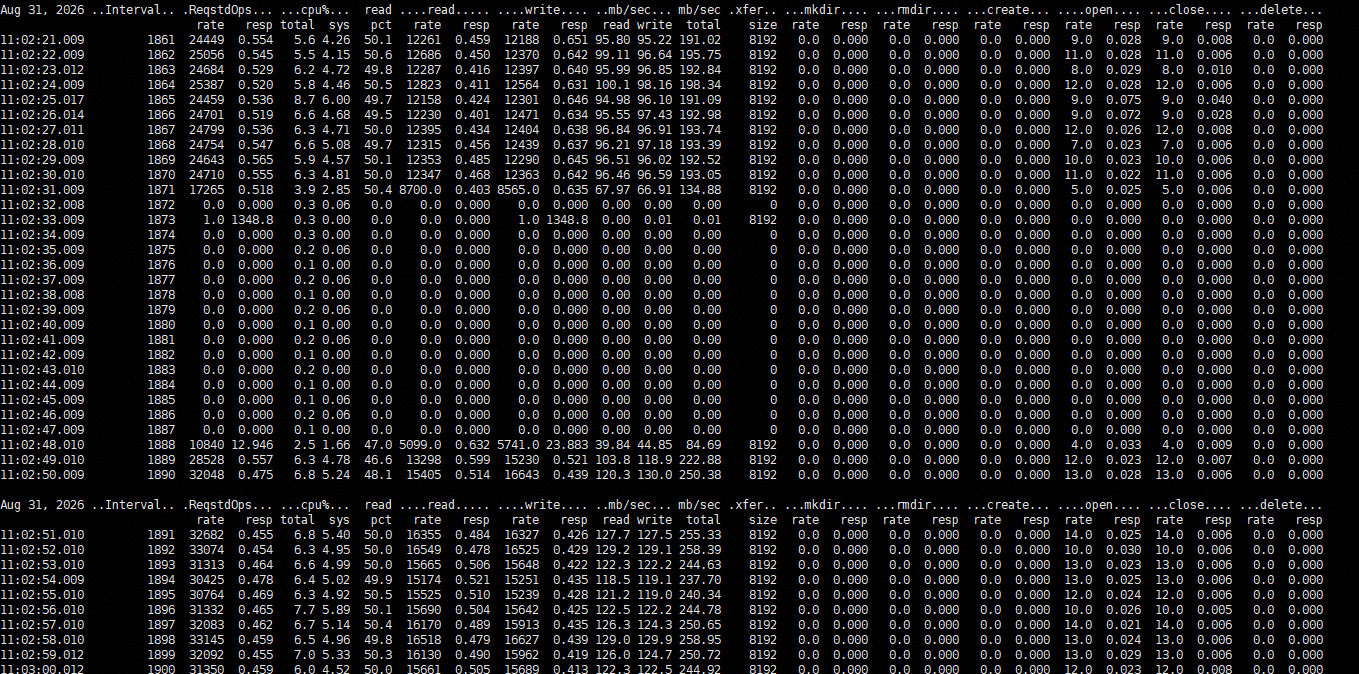
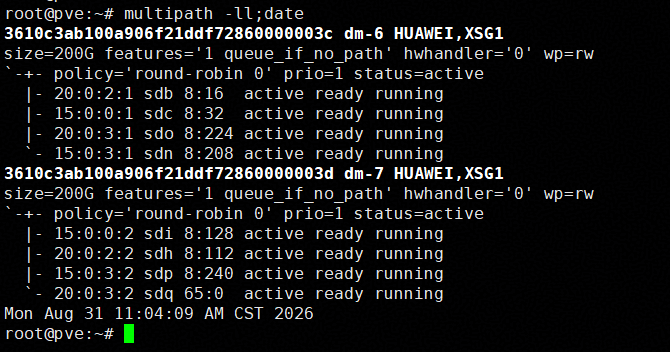
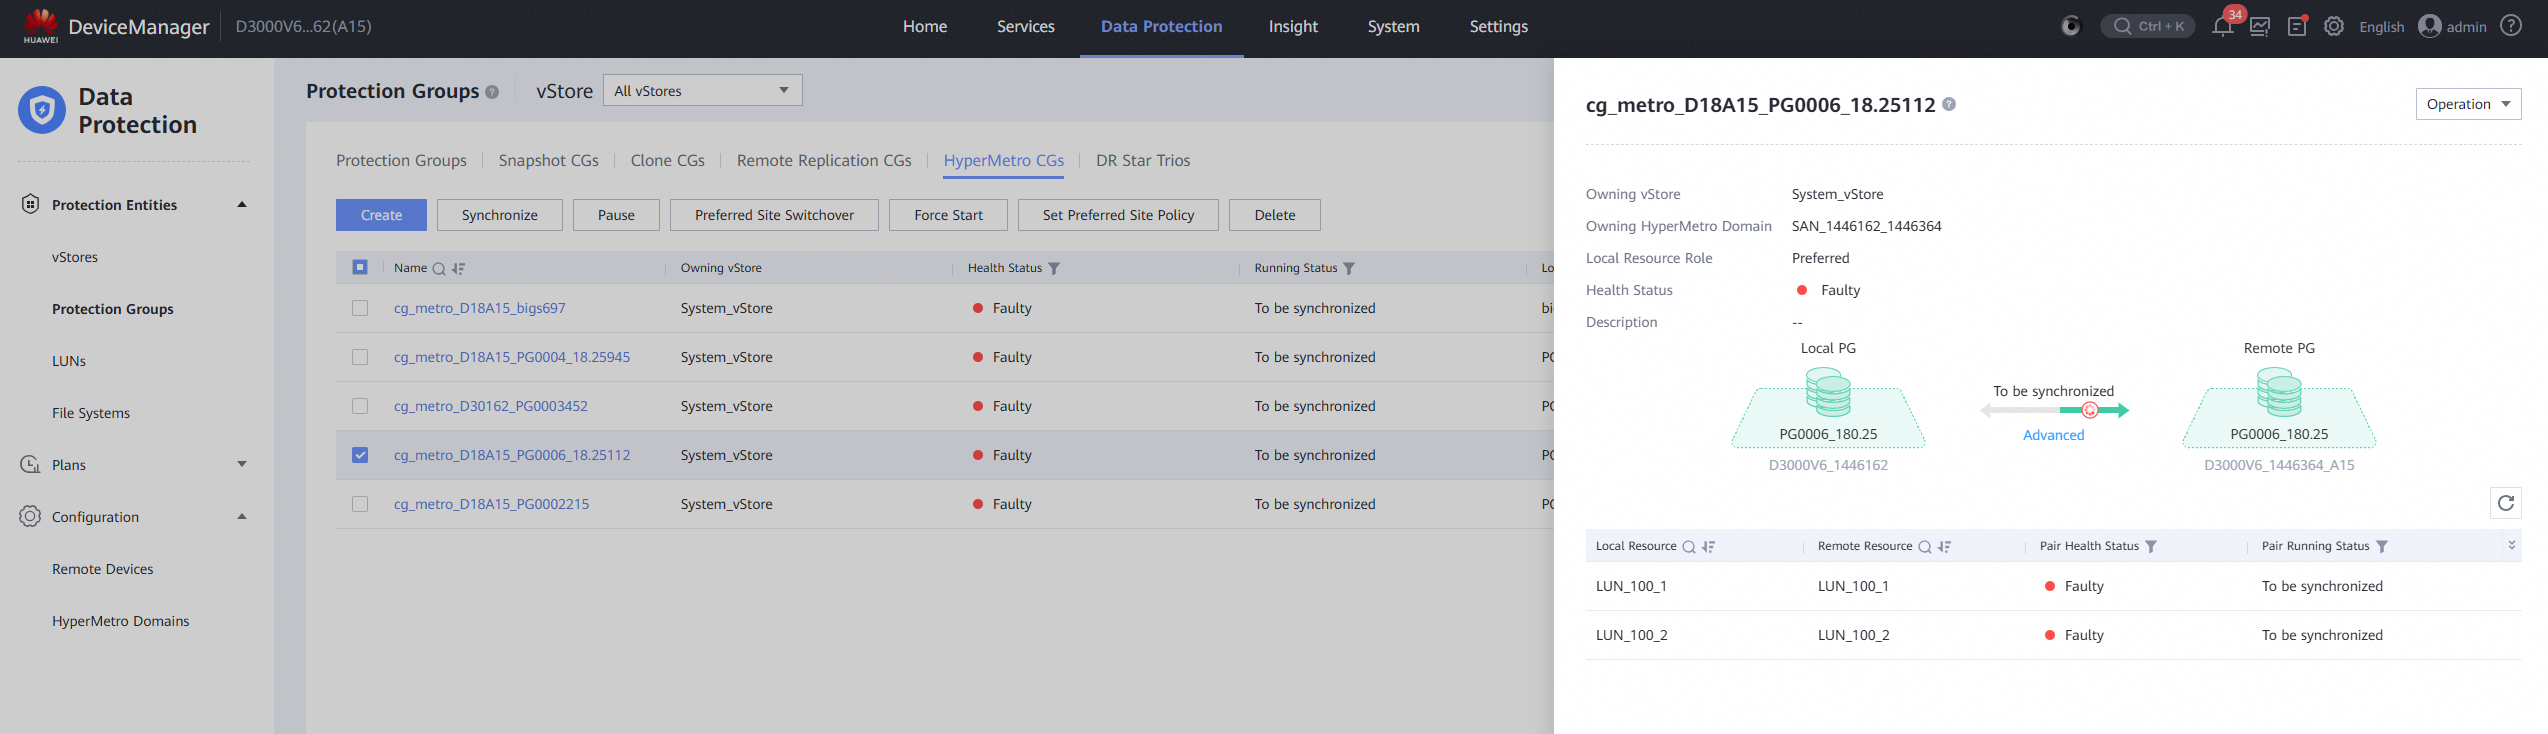
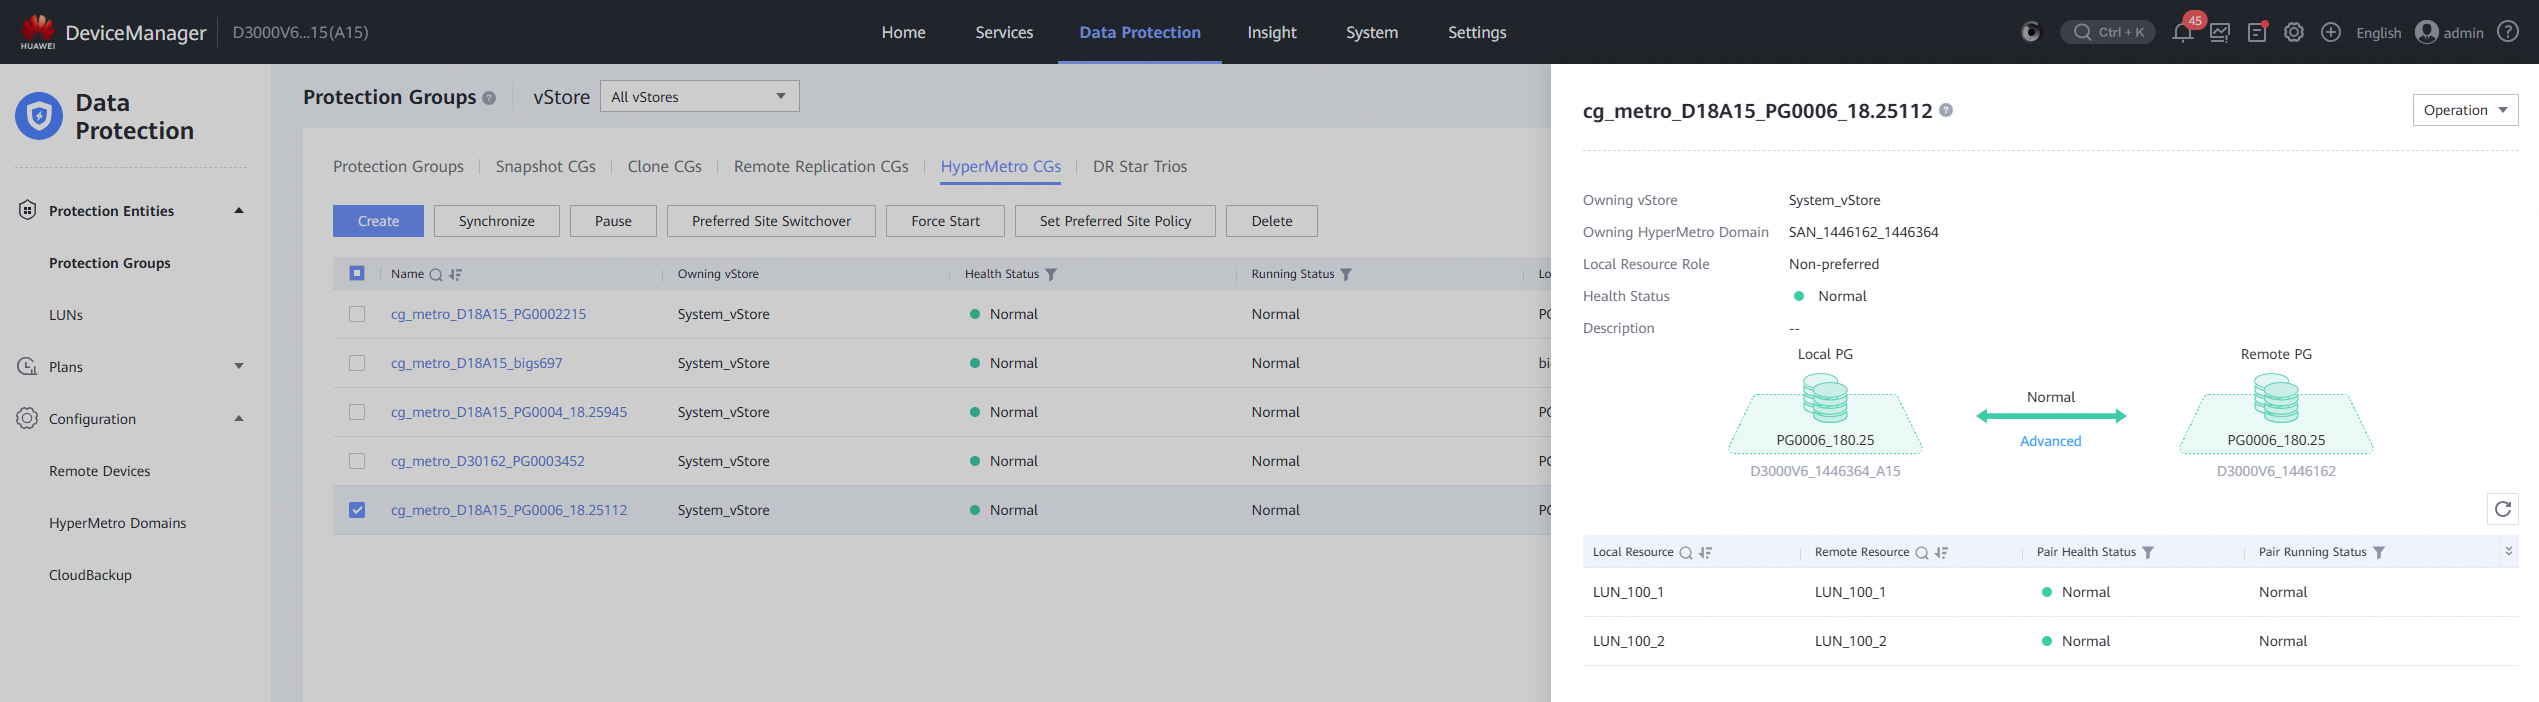
7.Power on the storage and observe the I/O performance. 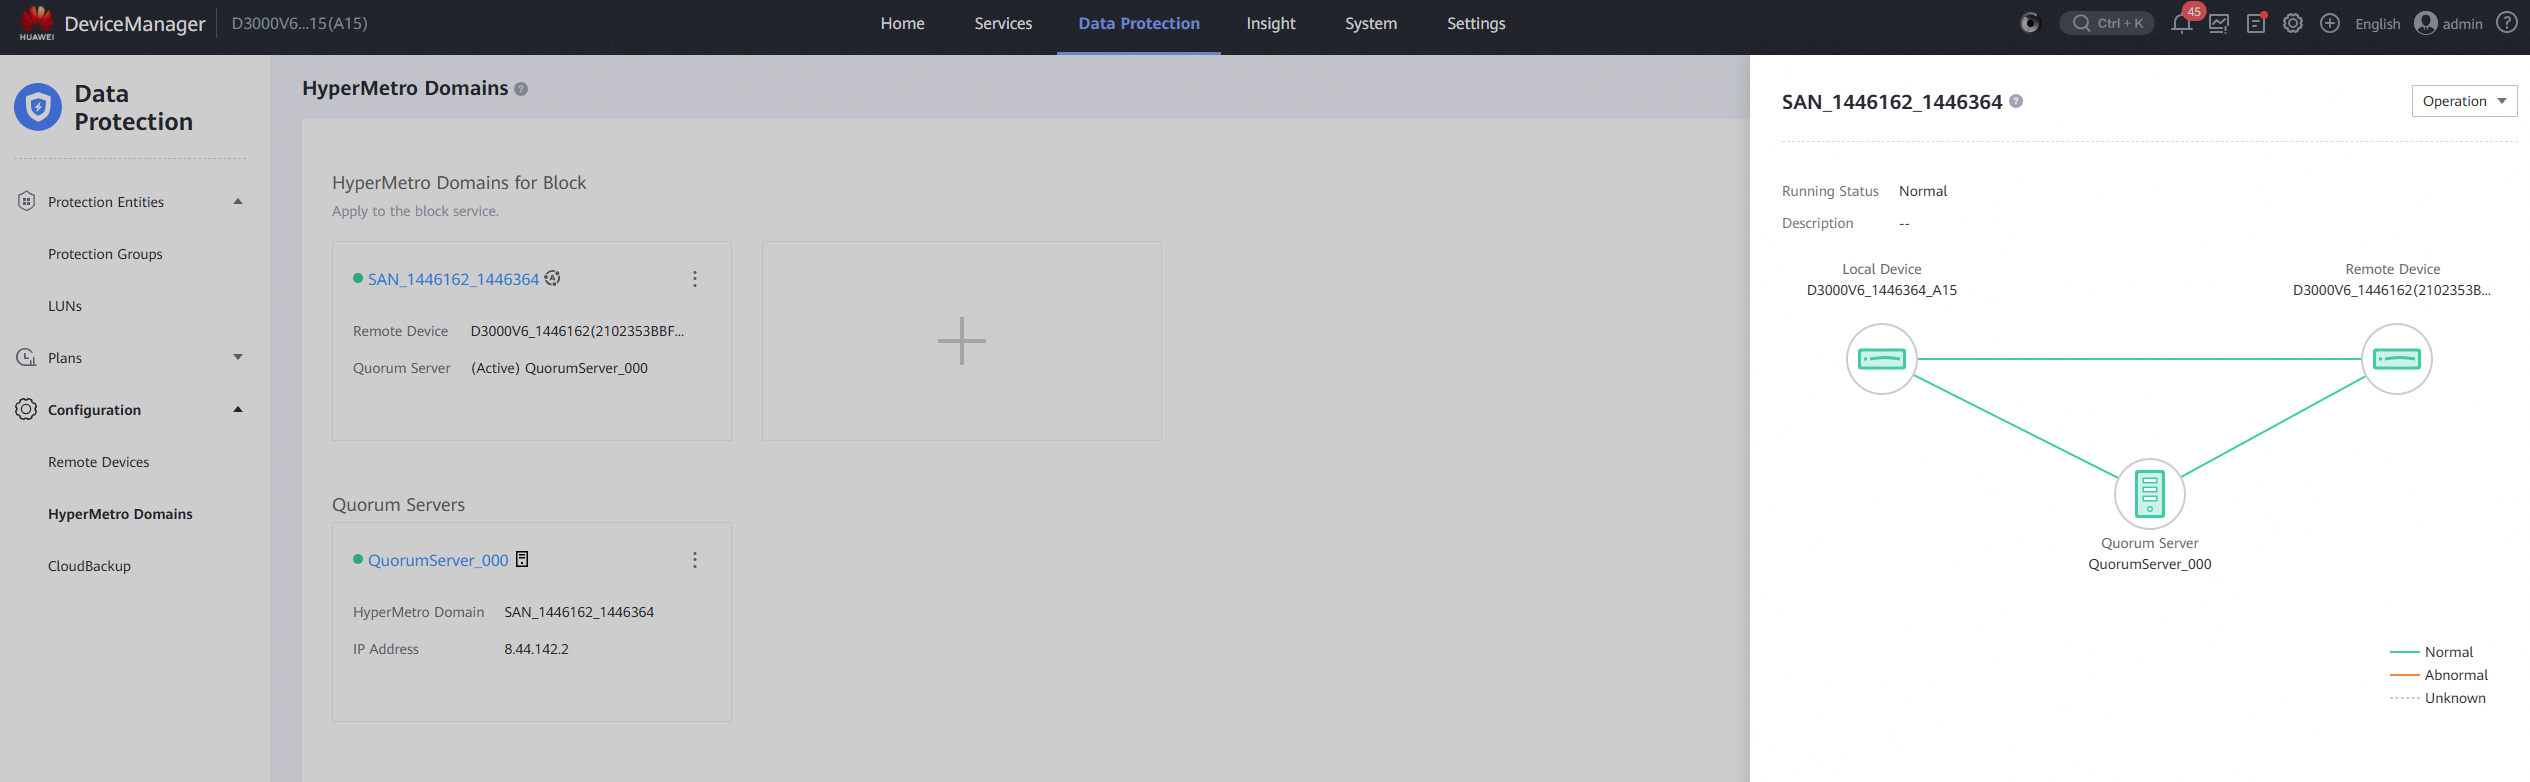
|
Test Conclusion | Passed |
5.Test Scenario 3: Performance and Stability Test and Results
4.1 File System Mixed Read/Write Test
Test Purpose | To Verify That Read and Write Performance Meets Standards |
Network Diagram | Reference to Figure 1.1 |
Prerequisites | 1.The network has been correctly set up according to the networking diagram, and the physical links are functioning properly. 2.LUN mapping is functioning correctly. 3.Multipath is correctly installed and configured. 4.JAVA is correctly installed. 5.Vdbench is correctly installed. |
Test Procedures | 1.Log in to the storage management system, create mappings, and add four 100GB LUNs to the host. 2.Perform a LUN scan on the host. For half of the scanned LUNs, create datastores and add them to the VM as « Virtual Disks. » For the other half, add the LUNs to the VM as « RDM Disks. » In the VM, perform vdbench file system read/write operations on the scanned LUNs. 3.Run the Vdbench test using the command: ./vdbench -f parmfile. |
Expected Results | 1.The read/write operations should proceed without any issues. The relevant performance data (such as bandwidth, IOPS, latency, etc.) should meet the product’s performance standards. |
Test Results | 1.Create the file system and mount it. 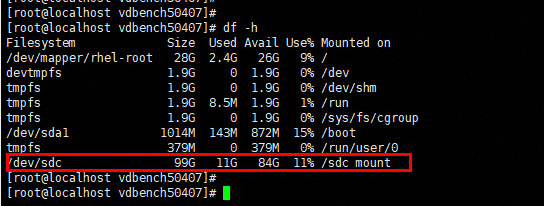
2.Edit the read/write script. 
3.Run the vdbench test. 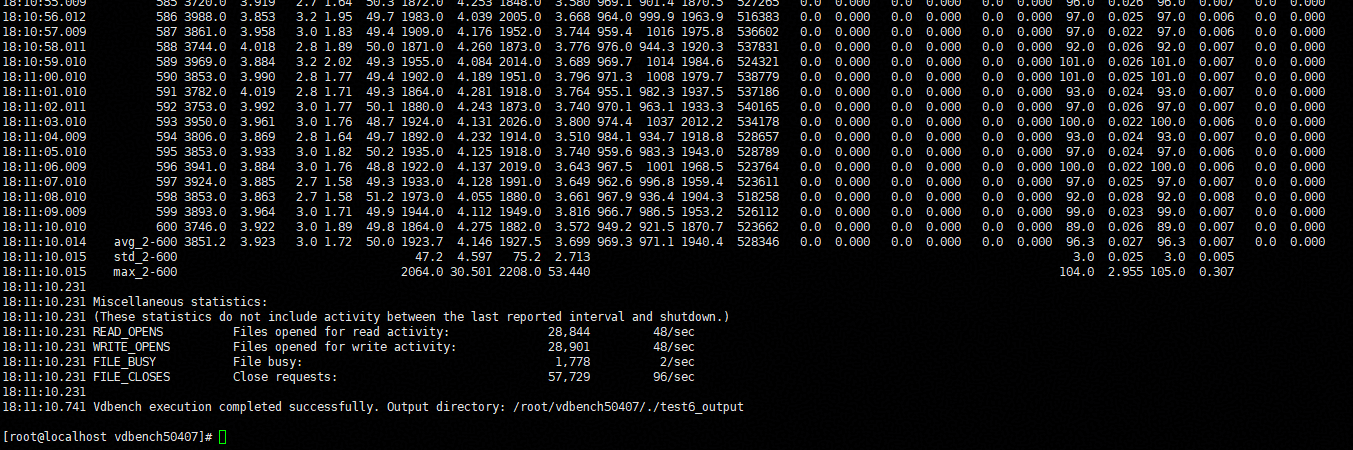
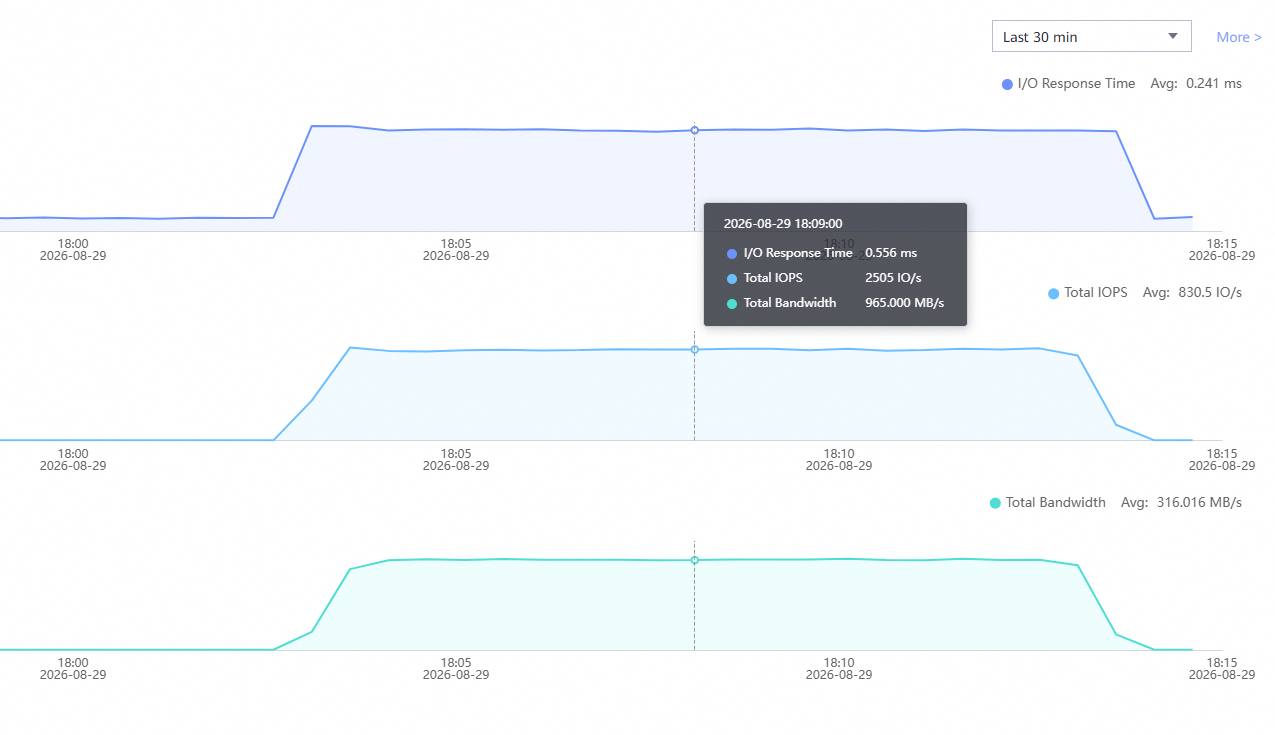
|
Test Conclusion | Passed |
4.1 Raw Disk Mixed Read/Write Test
Test Purpose | To Verify That Read and Write Performance Meets Standards |
Network Diagram | Reference to Figure 1.1 |
Prerequisites | 1.The network has been correctly set up according to the networking diagram, and the physical links are functioning properly. 2.LUN mapping is functioning correctly. 3.Multipath is correctly installed and configured. 4.JAVA is correctly installed. 5.Vdbench is correctly installed. |
Test Procedures | 1.Log in to the storage management system, create mappings, and add two 100GB LUNs to the host. 2.Perform a LUN scan on the host. For half of the scanned LUNs, create datastores and add them to the VM as « Virtual Disks. » For the other half, add the LUNs to the VM as « RDM Disks. » In the VM, perform vdbench raw disk read/write operations on the scanned LUNs. 3.Run the Vdbench test using the command: ./vdbench -f parmfile. |
Expected Results | 1.The read/write operations should proceed without any issues. The relevant performance data (such as bandwidth, IOPS, latency, etc.) should meet the product’s performance standards. |
Test Results | 1.Edit the read/write script. 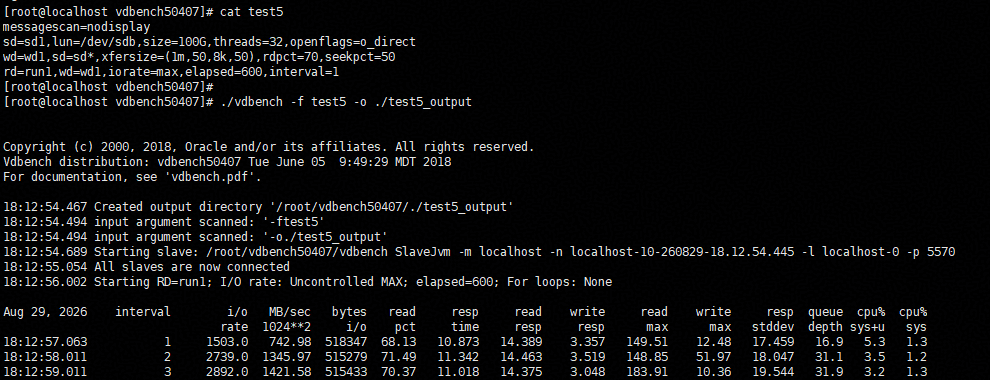
2.Run the vdbench test. 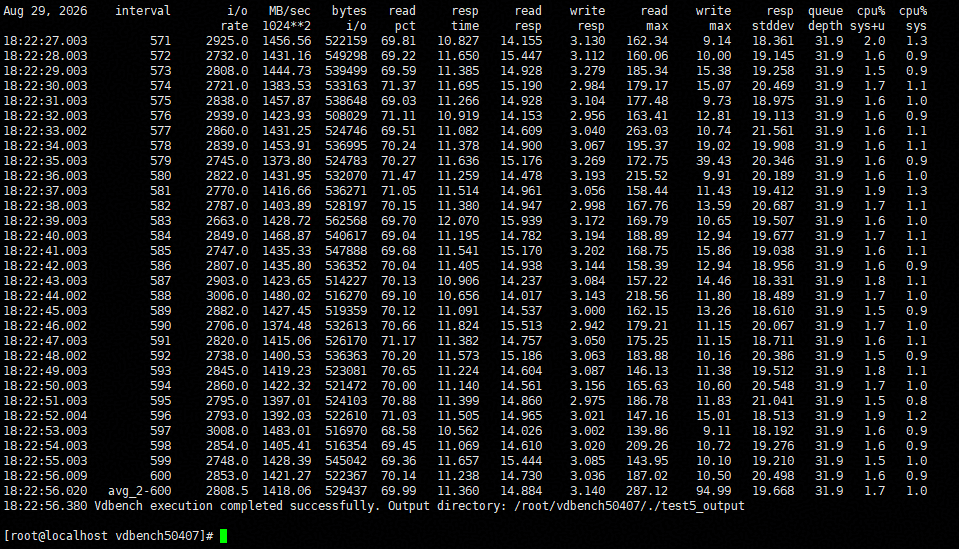
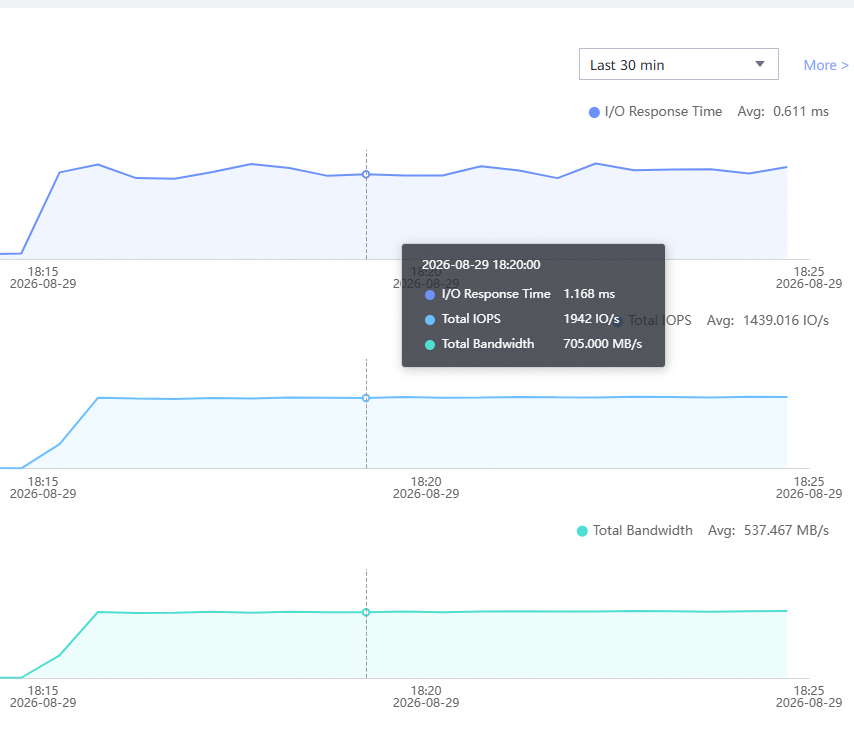
|
Test Conclusion | Passed |
6. Reference
6.1 Proxmox VE Administration Guide
https://pve.proxmox.com/pve-docs
6.2 Huawei OceanStor Dorado All-Flash Storage User Guide
https://support.huawei.com/hedex/hdx.do?docid=EDOC1100489522&id=dorado_5000_031
https://support.huawei.com/hedex/hdx.do?docid=EDOC1100489522&id=dorado_5000_041
