Huawei OceanStor Pacific Storage and Veritas NetBackupInteroperability Test Report
Interoperability Test Report

Axians Global All Rights Reserved
Executive Summary
Axians Global (“Axians”) assessed the interoperability of Veritas NetBackup software with Huawei OceanStor Pacific Storage. The goal of the assessment is to validate that Veritas NetBackup is interoperable with Huawei OceanStor Pacific Storage.
In the assessment, Axians has determined that Veritas NetBackup software backup and restore jobs will function with Huawei OceanStor Pacific Storage for the following scenarios:
Test Scenario | Storage Involved | Protocol(s) Tested | Result |
Backup Target -Object | OceanStor Pacific Storage | S3 | Passed |
In this document, you will find details on the above test cases and the captured output. The procedures conducted in the tests are referenced from standard online documentation from Veritas NetBackup and Huawei.
1. Environment Configuration
1.1 Networking diagram
Figure 1.1 Huawei OceanStor Pacific Storage Function Compatibility Test Networking
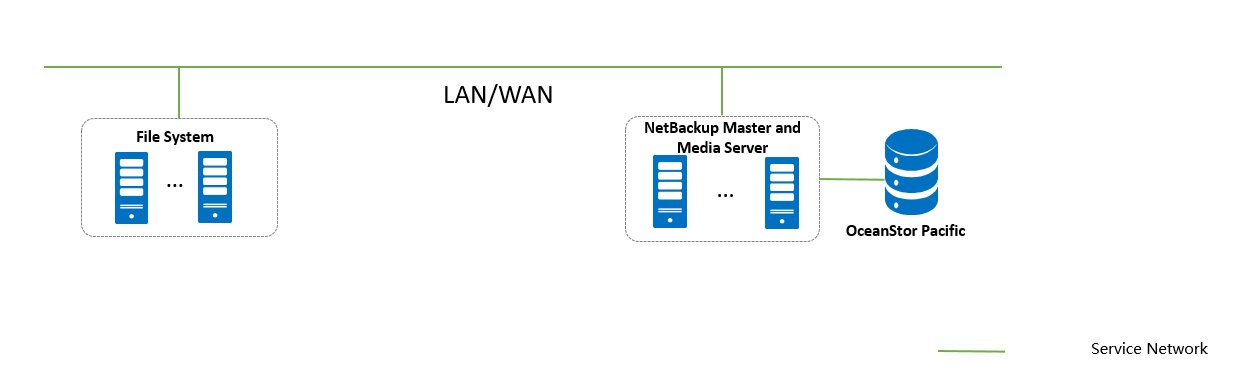
Note: This networking diagram is for reference only. For details about the connections between Huawei OceanStor Pacific Storage nodes and application servers, between nodes, see the Huawei OceanStor Pacific Storage product documentation.
Networking description:
- Deployment at the production end:
1) Deploy one ESXi physical host, install the VMware VM software, create VMs, and install windows operating system.
2) The management network and service network are connected to the Veritas NetBackup software and Huawei OceanStor Pacific Scale-Out Storage through switches
- Deploy the Veritas NetBackup software on Windows VM server.
- All storage devices connect to the Veritas NetBackup through 10g Ethernet.
1.2 Hardware and Software Configuration
1.2.1 Storage Configuration
Table 1-1 Huawei storage configuration table
Name | Model | Version | Quantity |
Storage | Huawei OceanStor Pacific Scale-Out Storage (Hereinafter referred to as “Pacific” as well) | 8.2 | 1 |
1.2.2 Matching Hardware Configuration
Table 1-2 Hardware Configuration
Name | description | Usage | Quantity |
VMWare ESXi | x86 server
| VMWare VM Backup and Restoration | 1 |
Ethernet switch | Huawei 6855 10GE Network Switch | Ethernet switches for management networking and service networking. | 2 |
Veritas NetBackup Master server
|
| Deploys backup software to schedule backup tasks and transfer backup data. | 1 |
Veritas NetBackup Media server (Hereinafter referred to as “NBU server” as well) |
| Deploys backup software to schedule backup tasks and transfer backup data. | 1 |
1.2.3 Test Software and Tools
Table 1-3 Test Software and Tool List
Software Name | description | Version | Quantity |
VMWare ESXi | VMware virtualization platform | 7 | 1 |
Veritas NetBackup | Veritas NetBackup Software | 10.4 | 1 |
Operation System | Install the Windows Hosts | Windows Server 2016(master server) | 1 |
Operation System | Install the Linux Hosts | RHEL 8.8(media server) | 1 |
2. Test Preparation
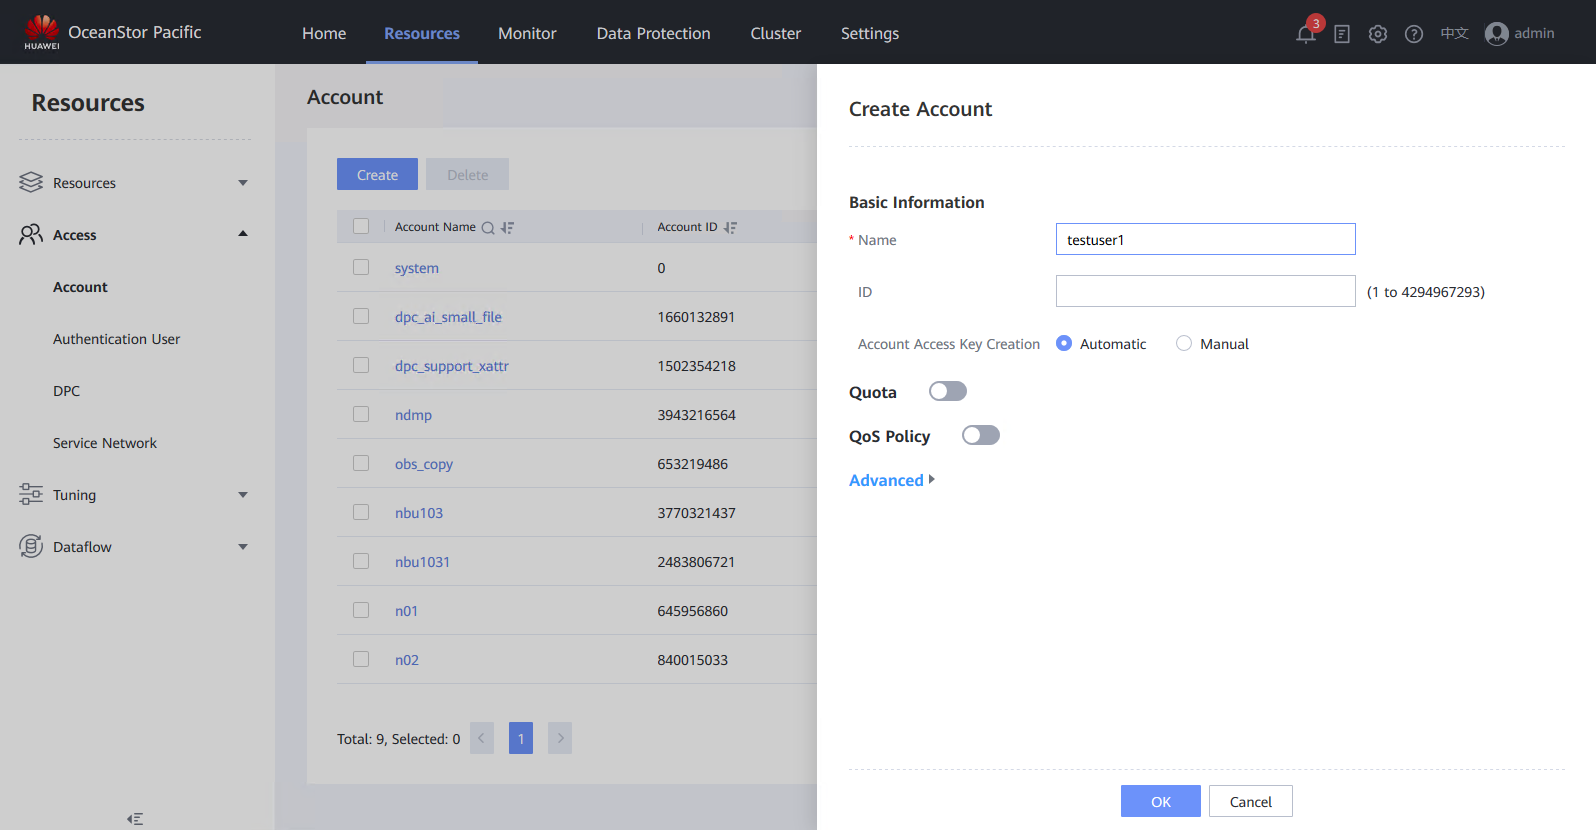
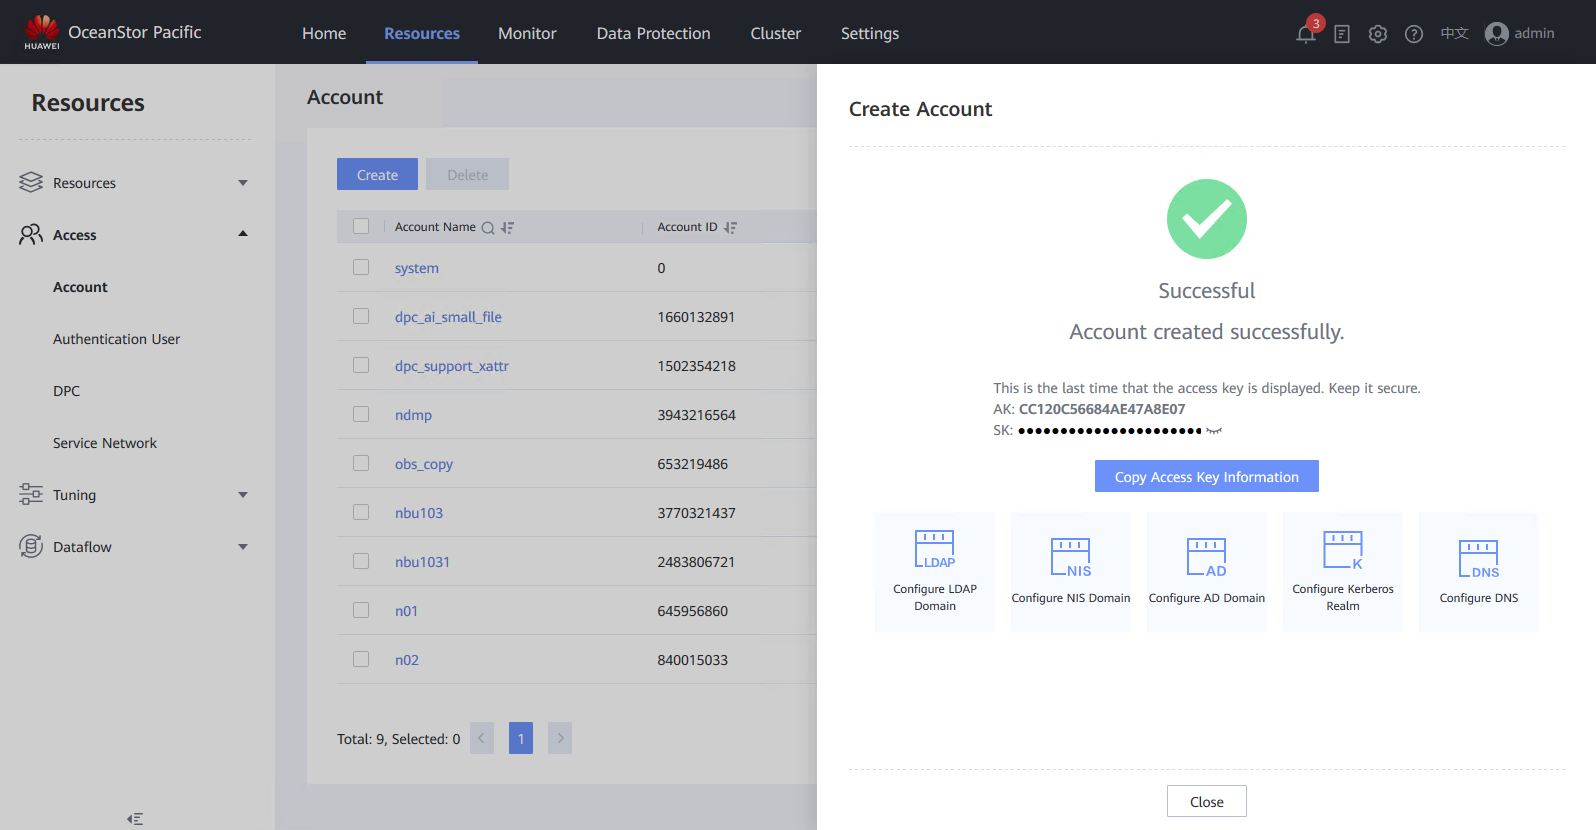
2.1 Create the Account and save the AK&SK on the storage device
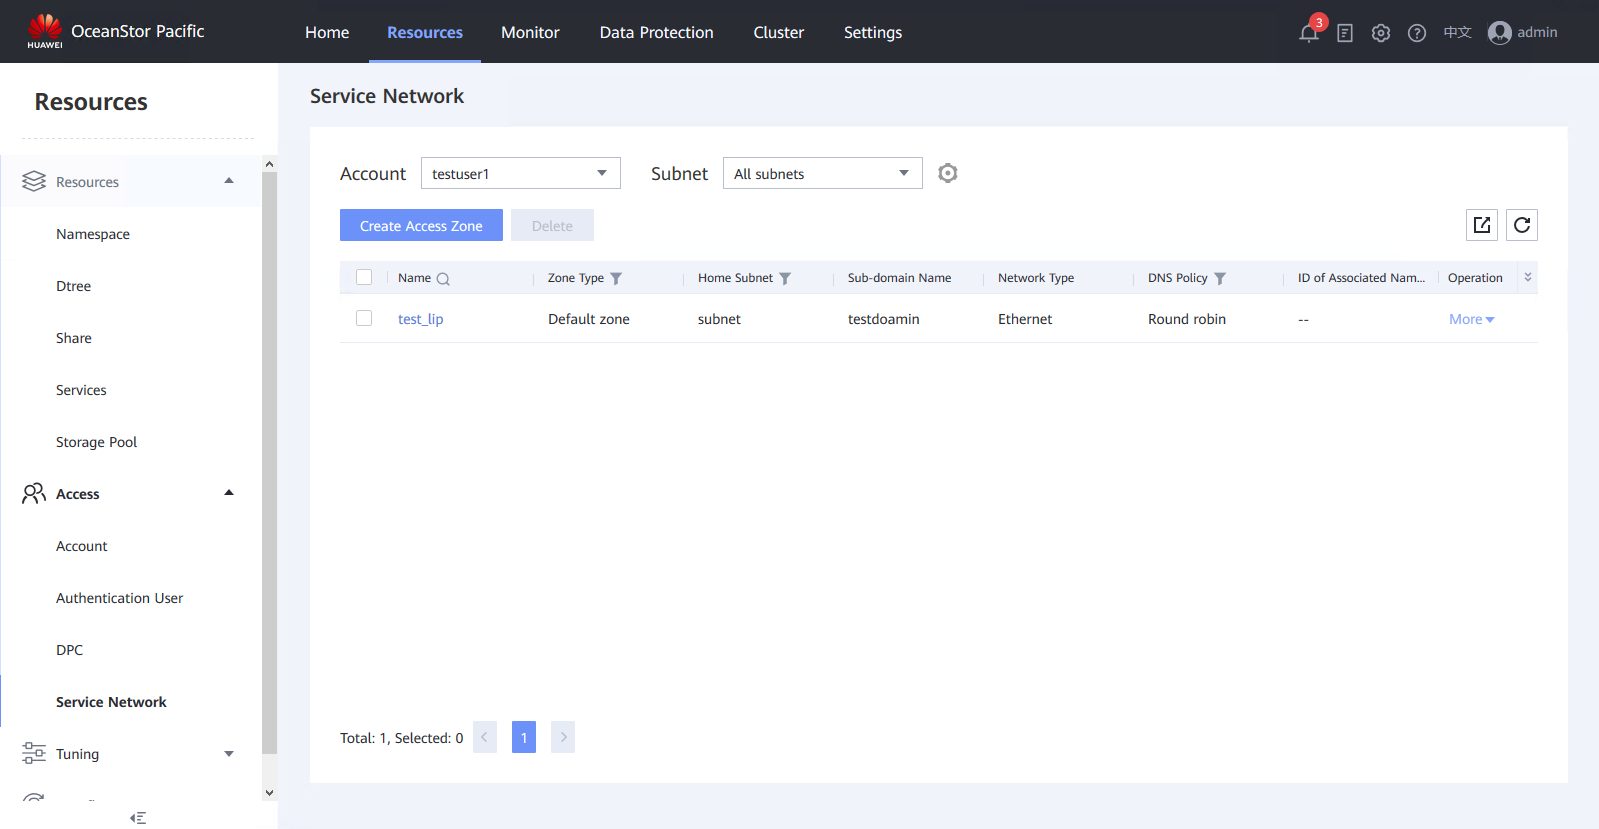
2.2 Create the Service Network on the storage device
2.3 Create the Namespace on the storage device
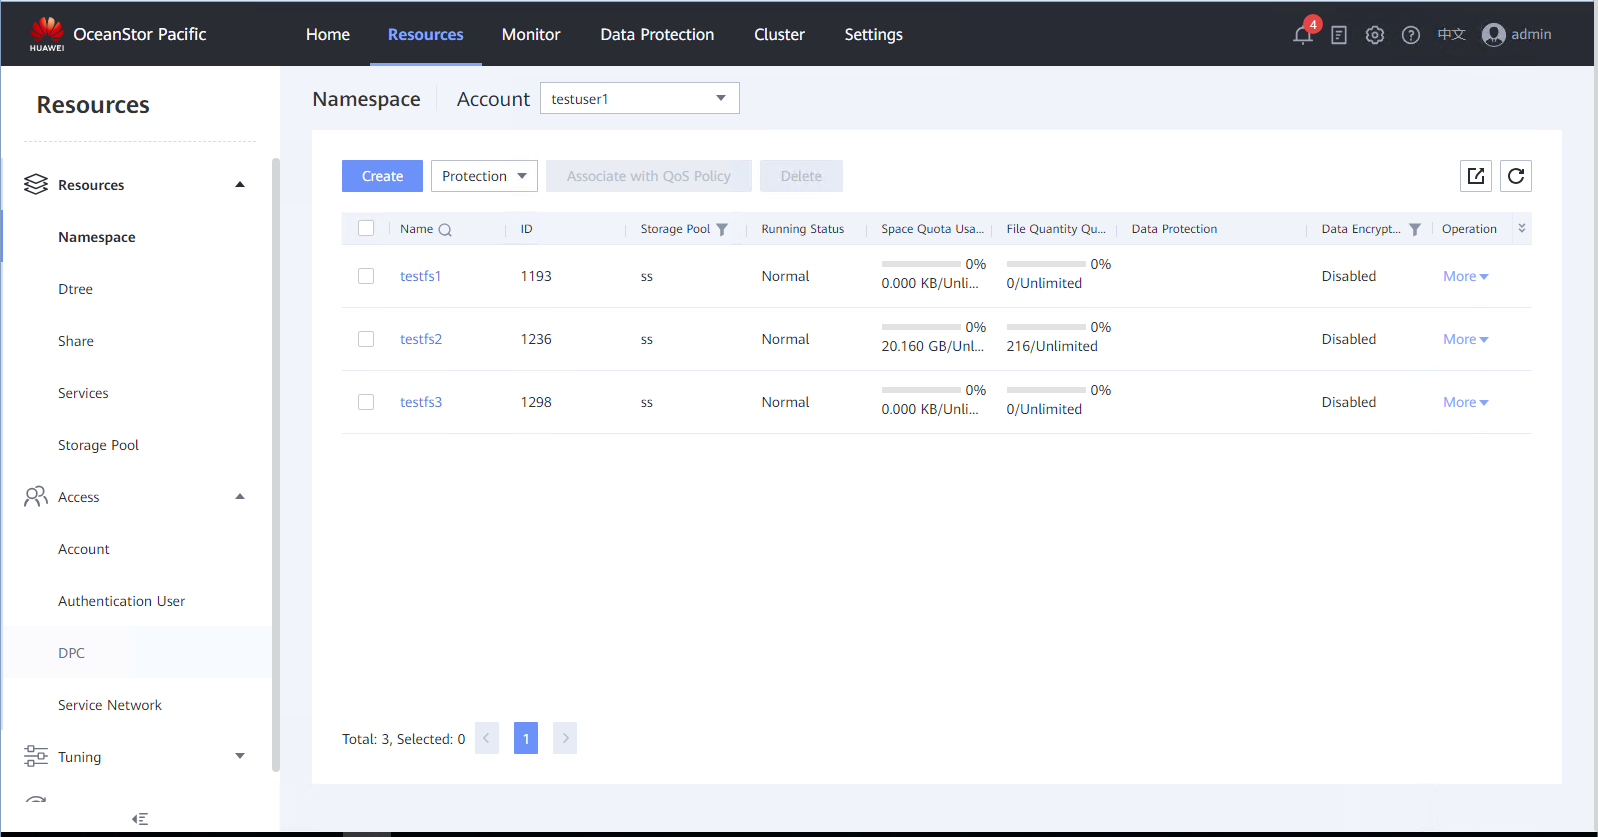
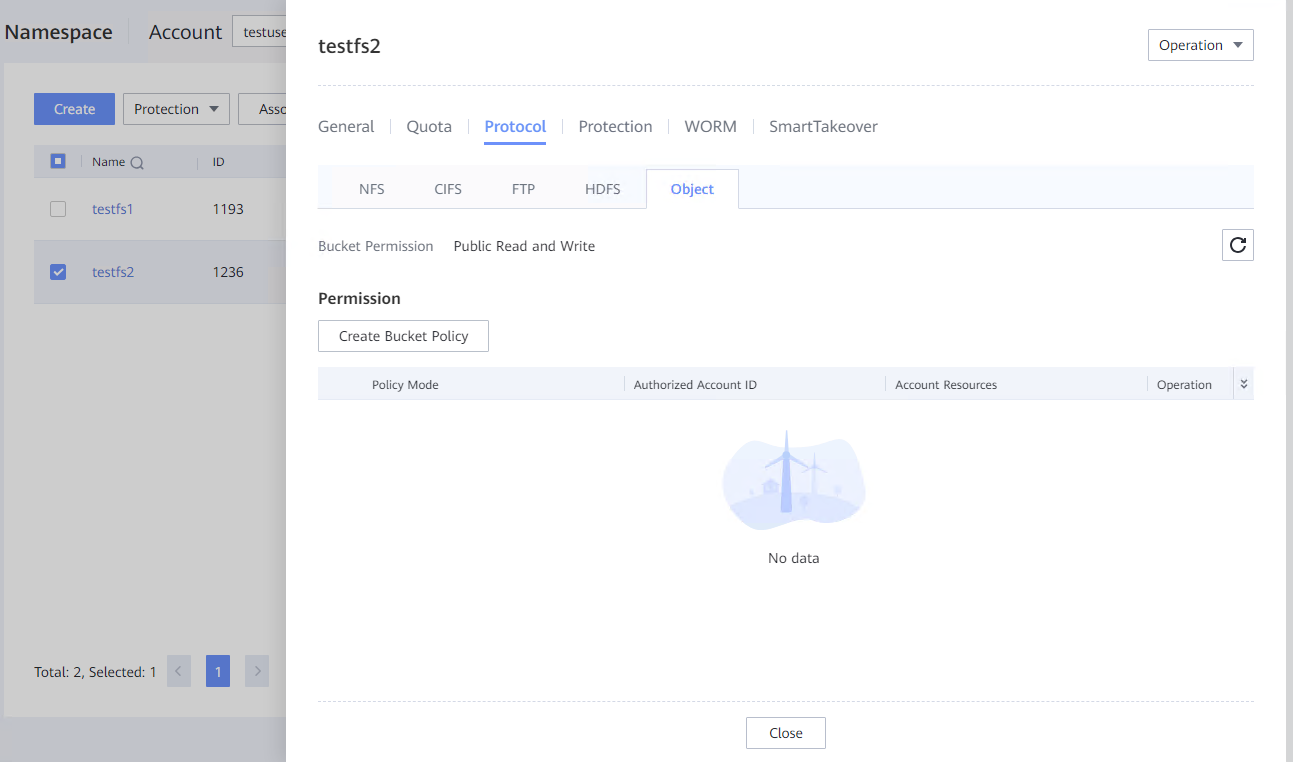
2.4 Create the Bucket on the storage device
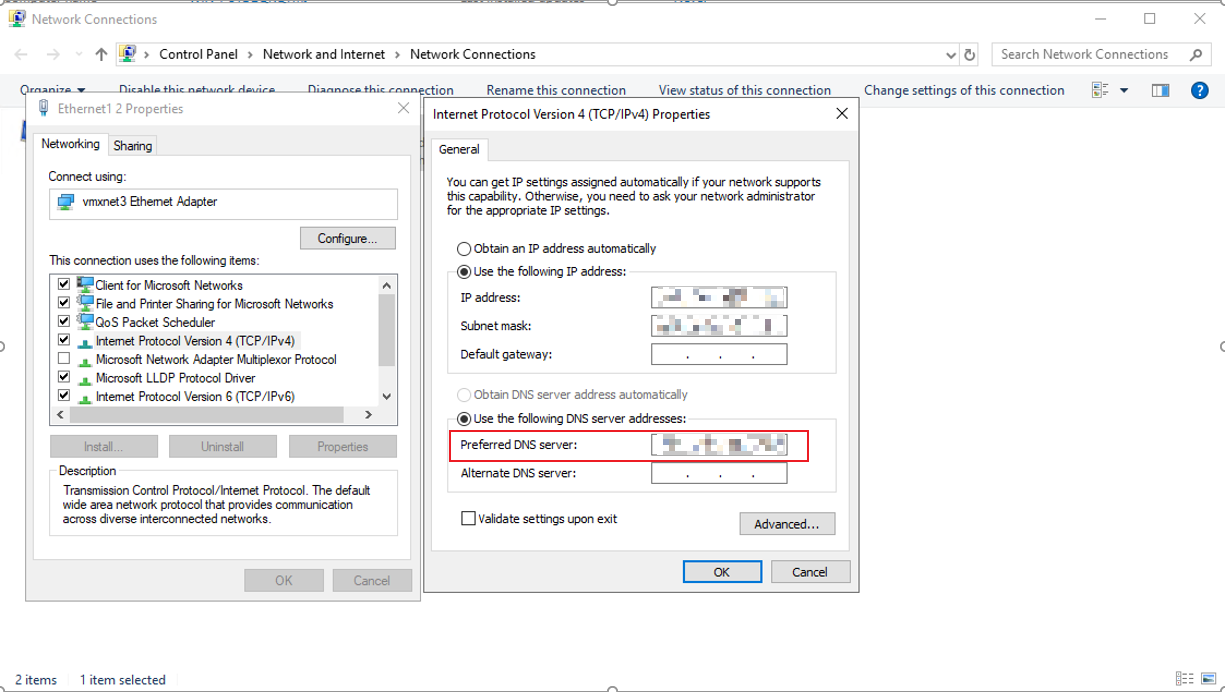
2.5 Configure the DNS on the NBU server
Query the IP Address of Object DNS Service in Subnet on the storage device.
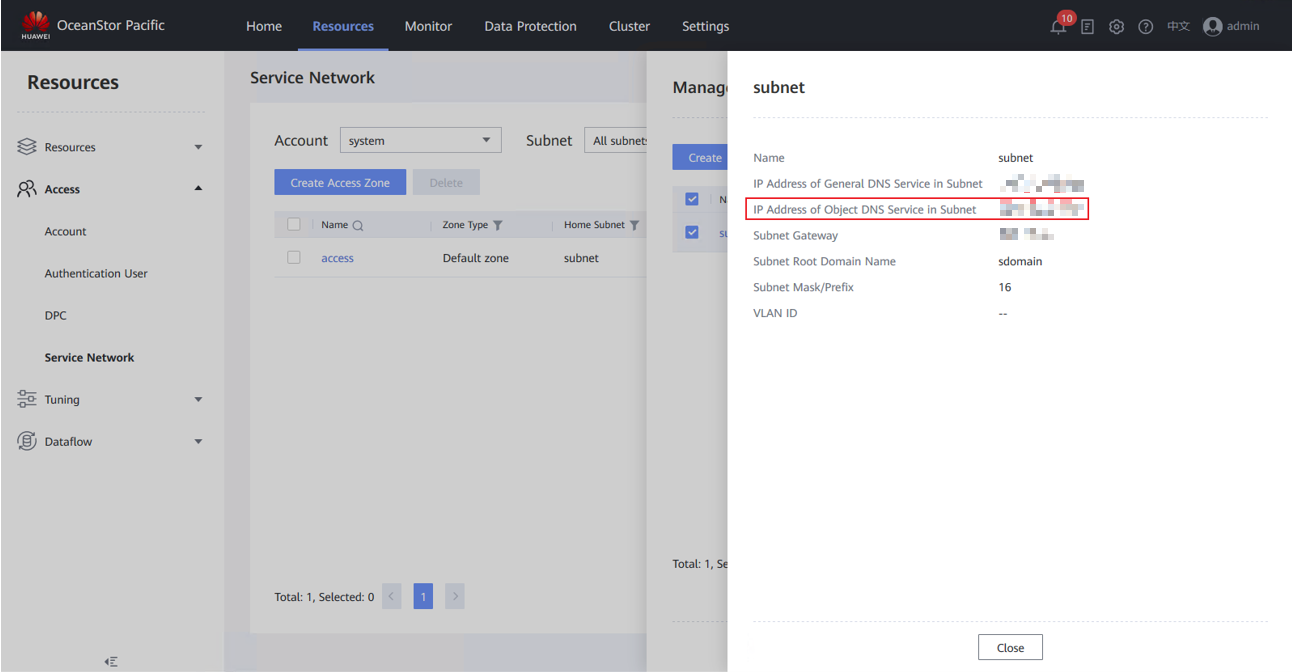
Configure DNS on Windows and Linux Hosts.

3. OceanStor Pacific Storage interconnection with Veritas NetBackup through S3 backup media.
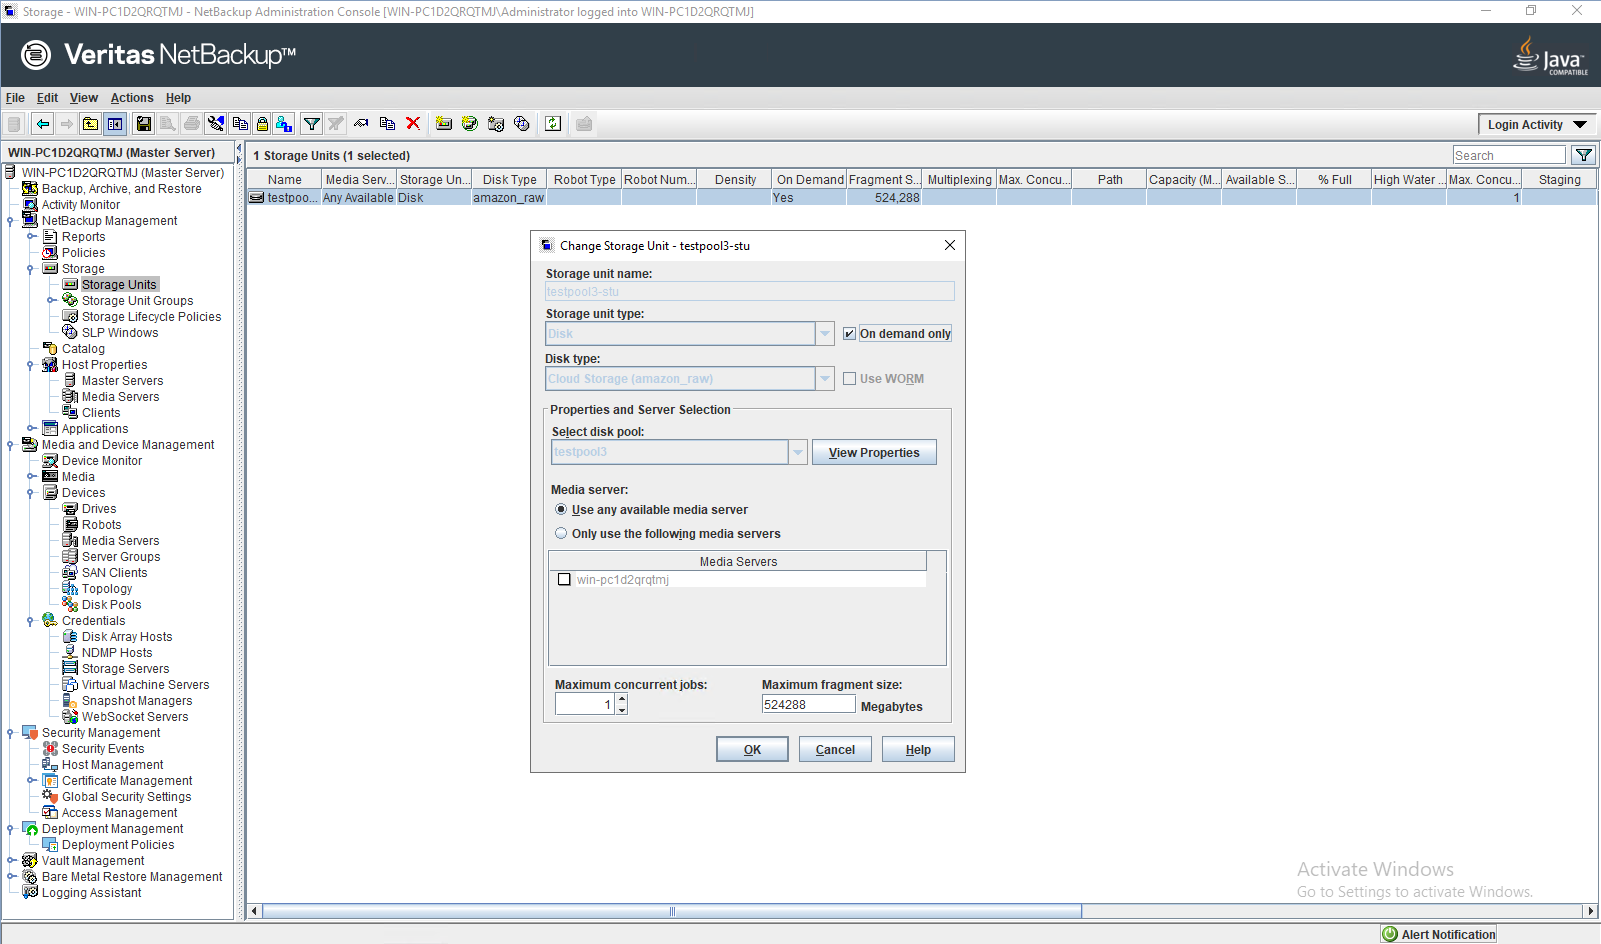
3.1 Add the bucket as S3 target storage through HTTP protocol
Test Purpose | To verify that the bucket can be added to the NBU server as S3 target storage through HTTP protocol. |
Test Networking | Huawei OceanStor Pacific Storage Function Compatibility Test Networking |
Prerequisites |
|
Test Procedure |
|
Expected Result |
|
Test Result | In step 1, the cloud storage server is configured successfully.   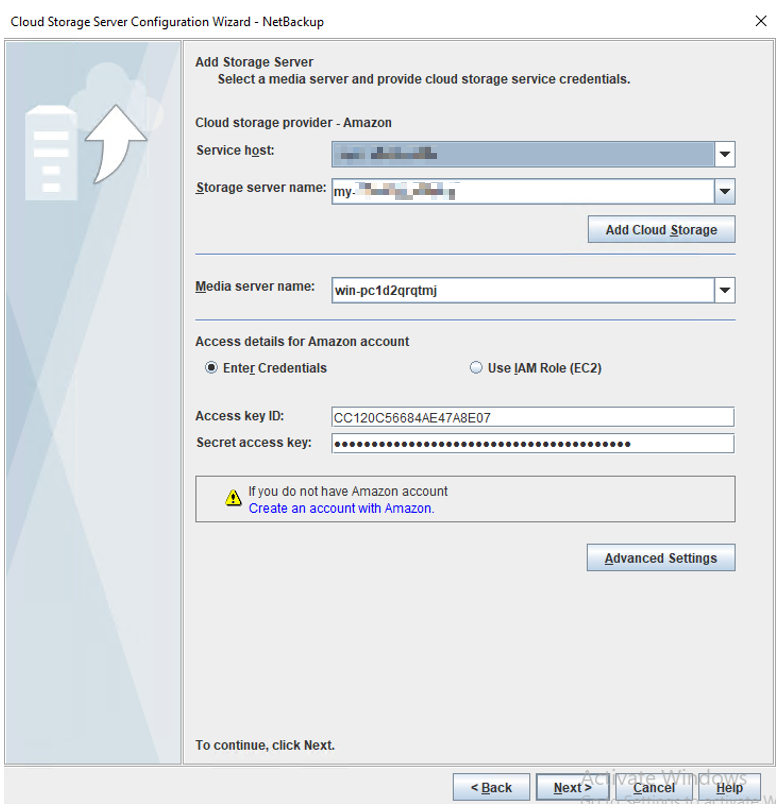 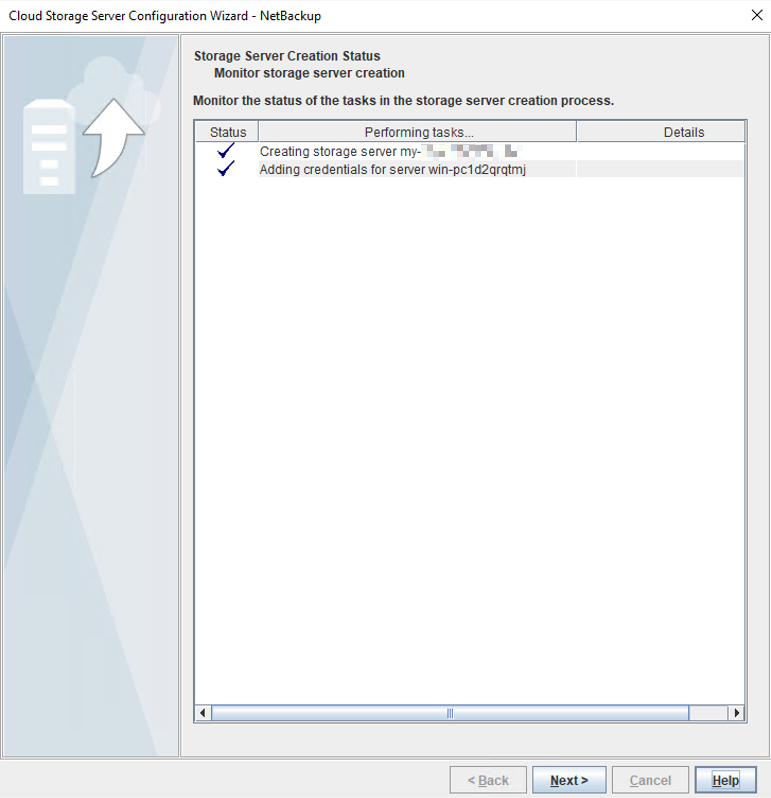 2. In step 2, the disk pool is configured successfully. 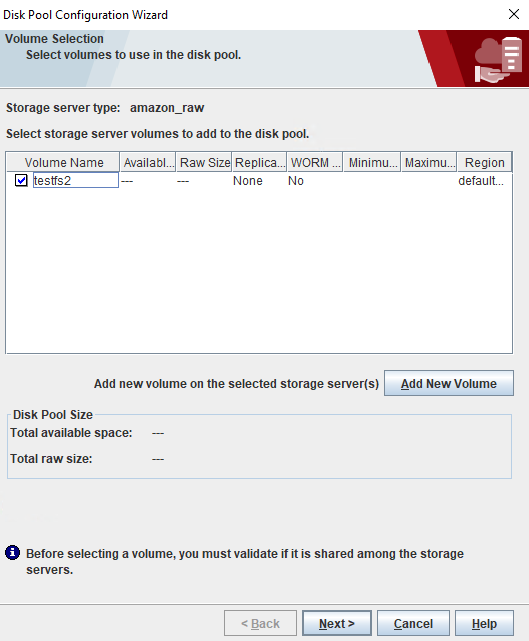  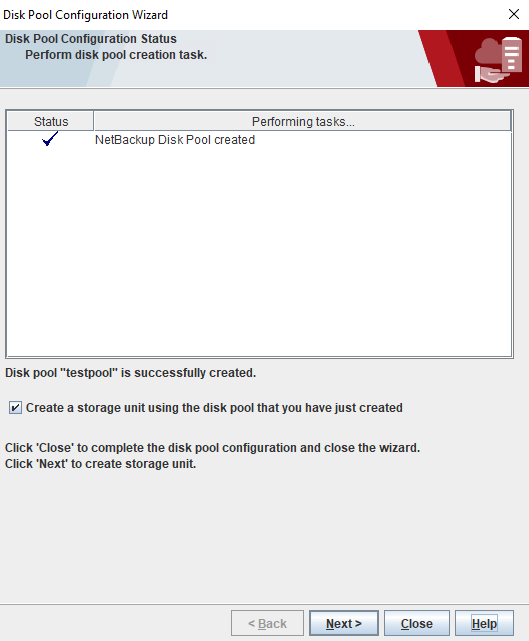 3. In step 3, the storage unit is configured successfully.  
    |
Test Conclusion | Passed |
3.2 Full Backup and Recovery
Test Purpose | To Verify that the NBU server full backup and recovery is working |
Test Networking | Huawei OceanStor Pacific Storage Function Compatibility Test Networking |
Prerequisites |
|
Test Procedure |
|
Expected Result |
|
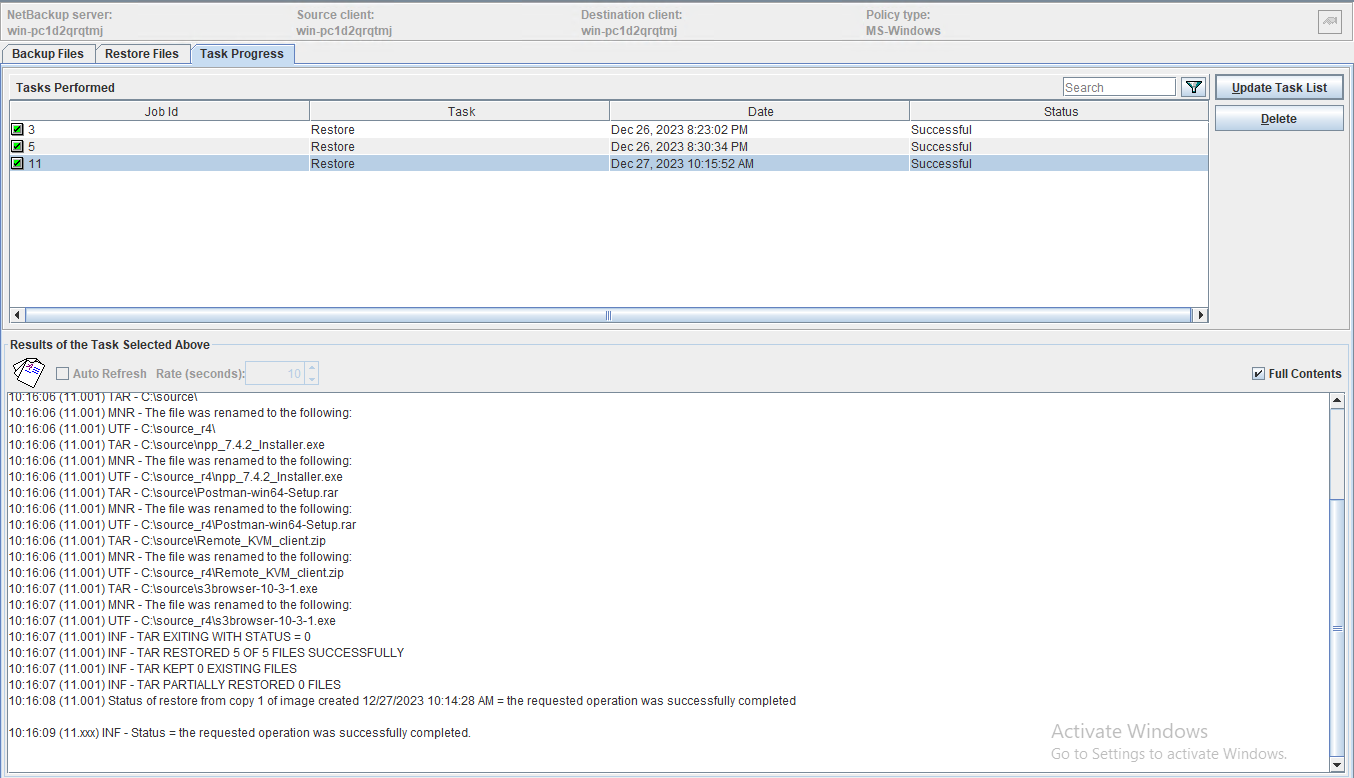
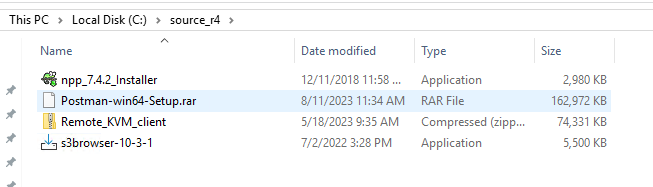
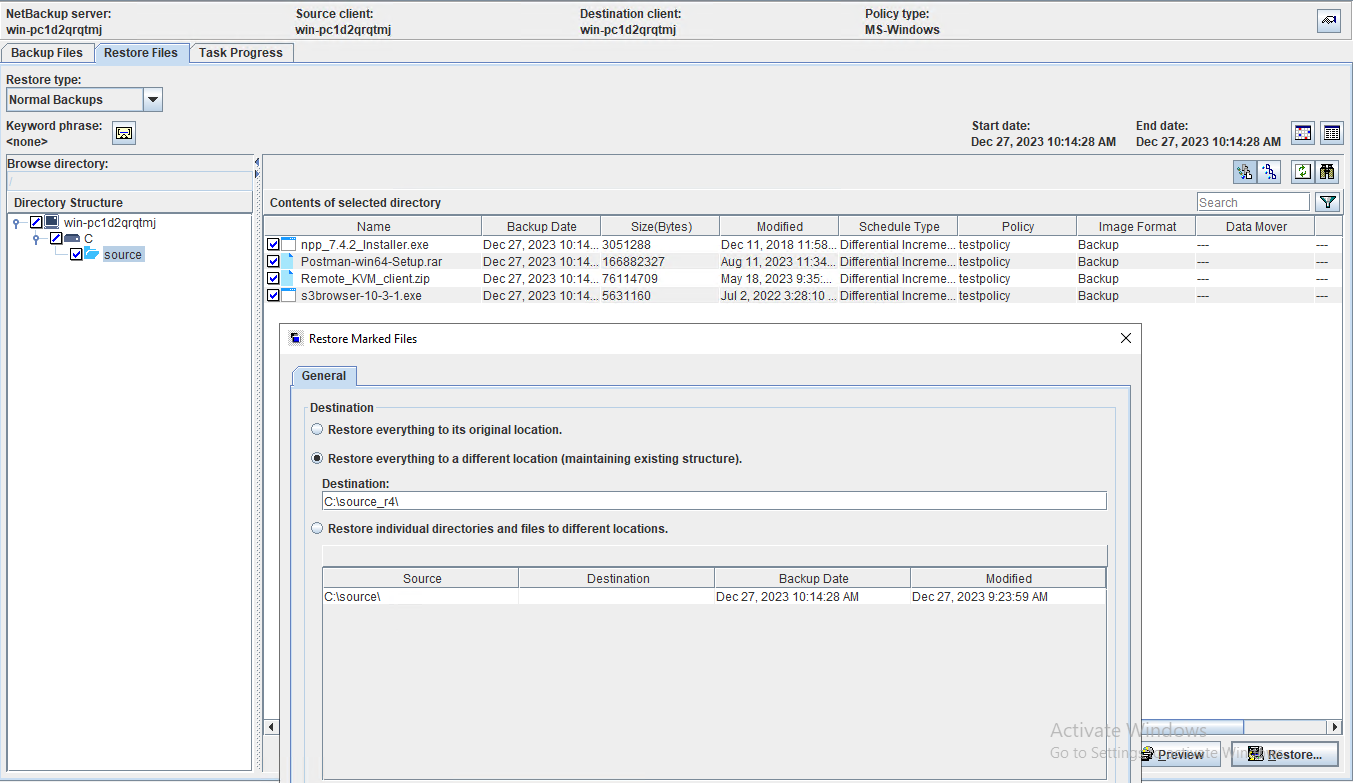
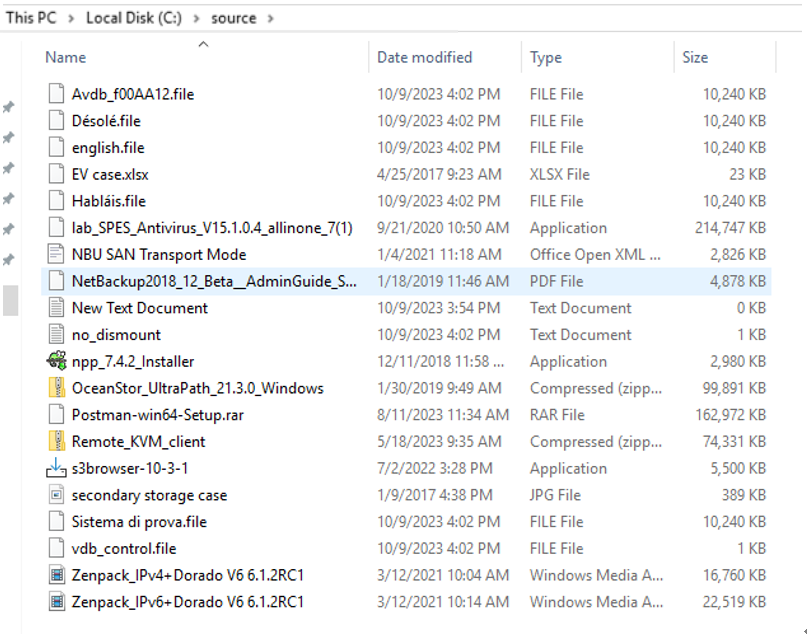
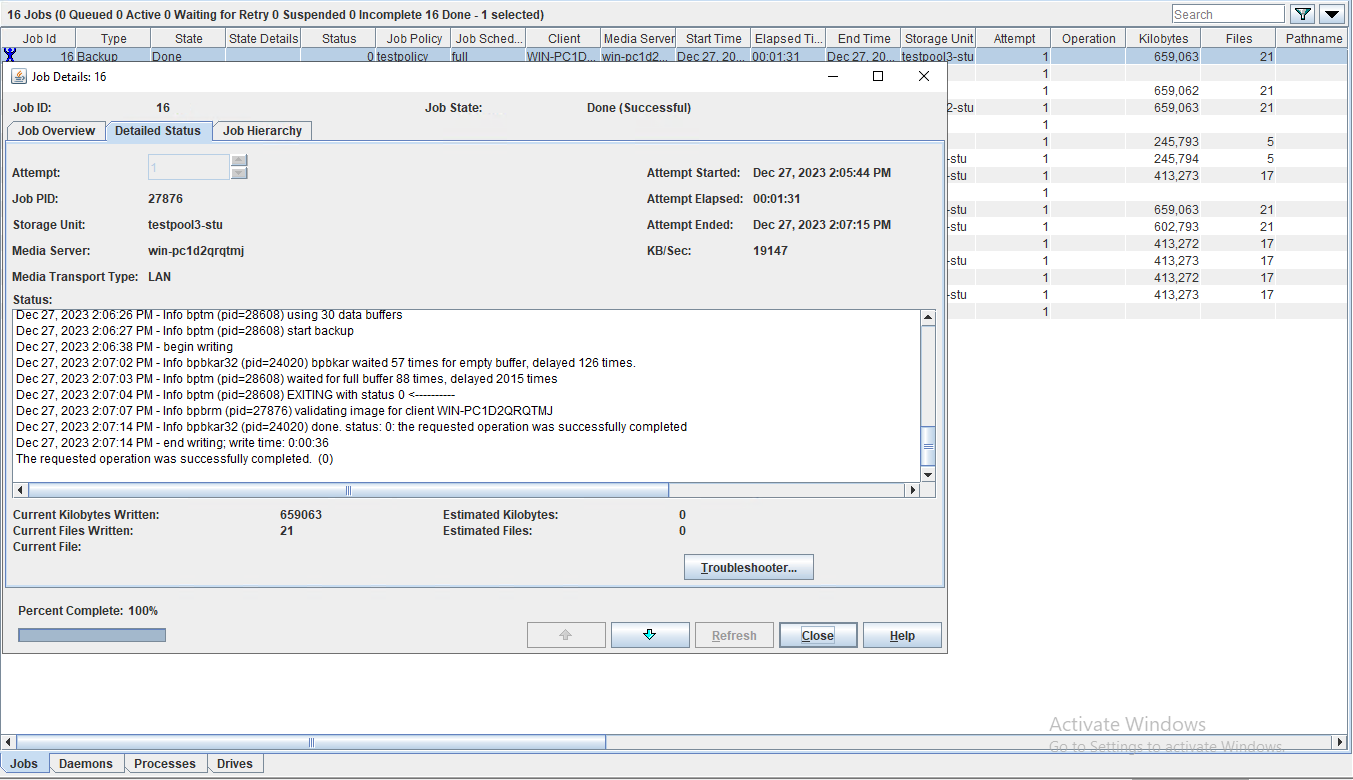
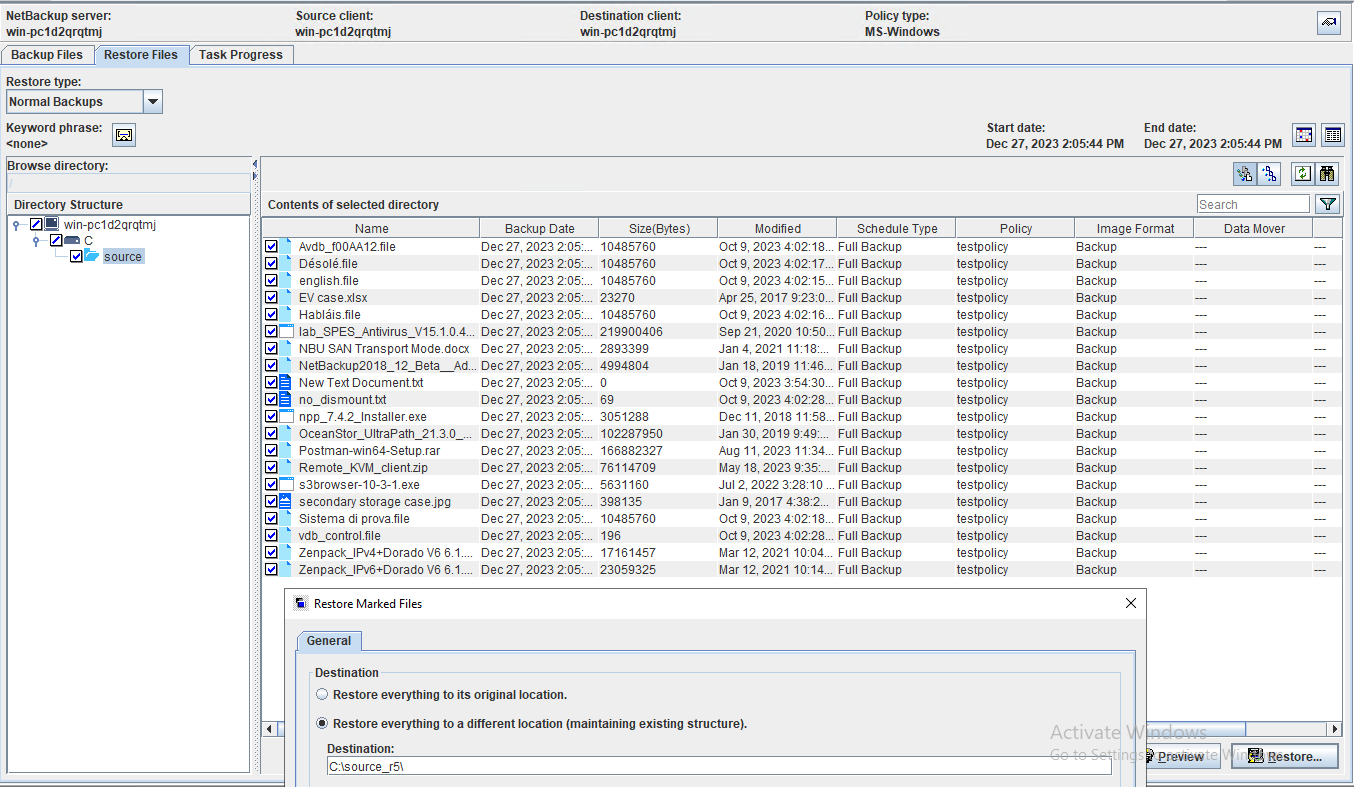
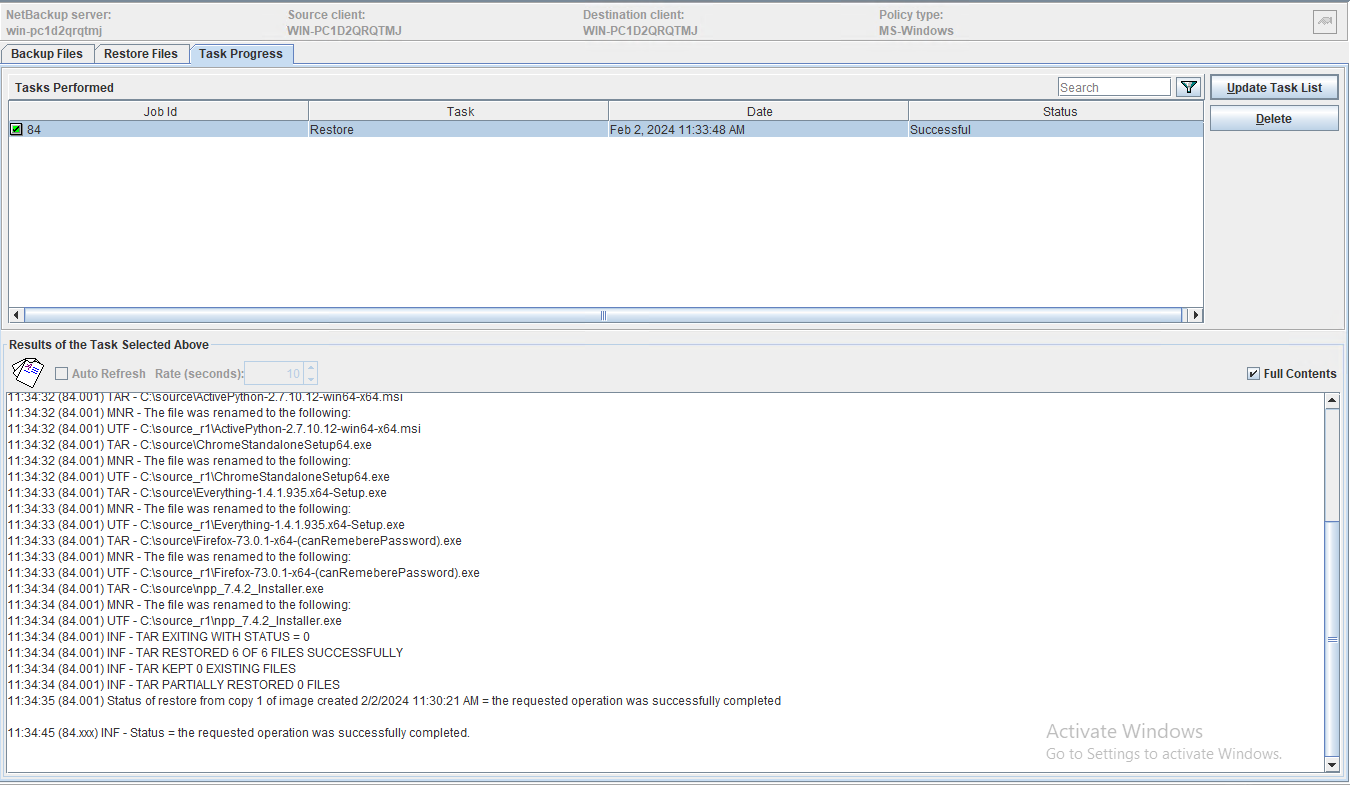
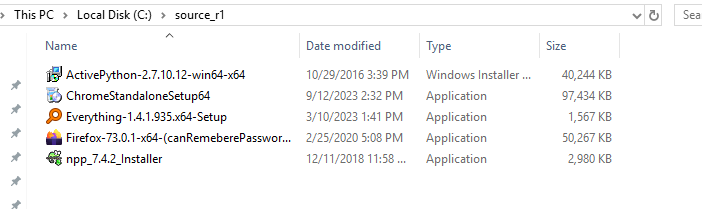
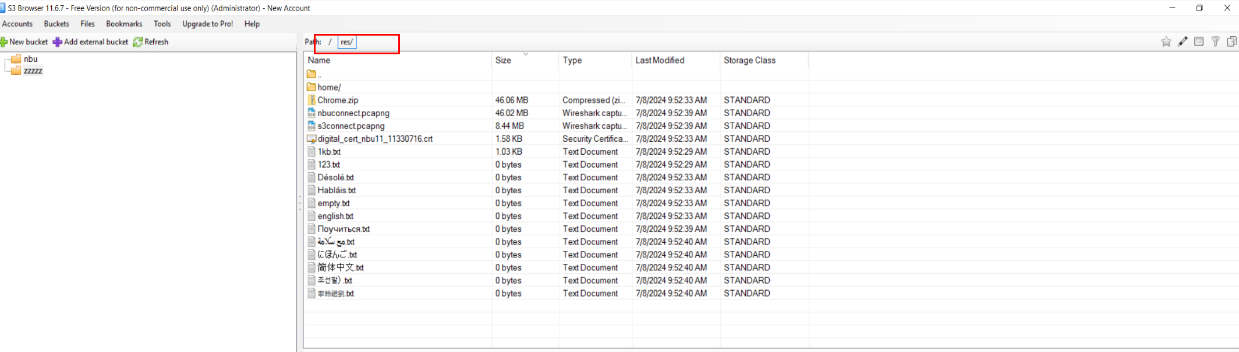
Test Result | Prerequisites Pre1 Prepare some large files and small files as backup source. 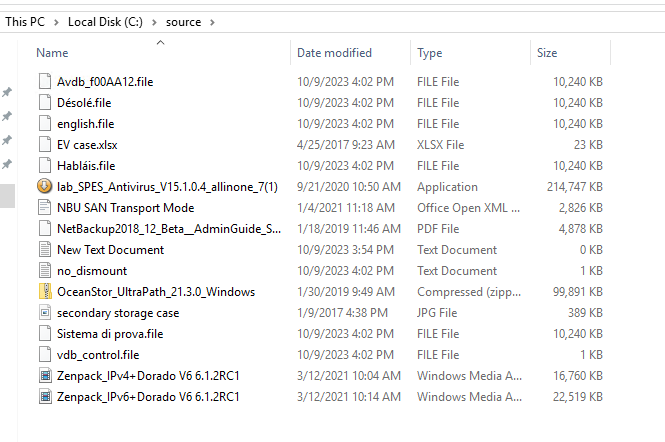 Test Result In Step1, right-click the backup policy and start full backup job.  2. In Step2, check that the state of backup job is done. The backup job finishes successfully. 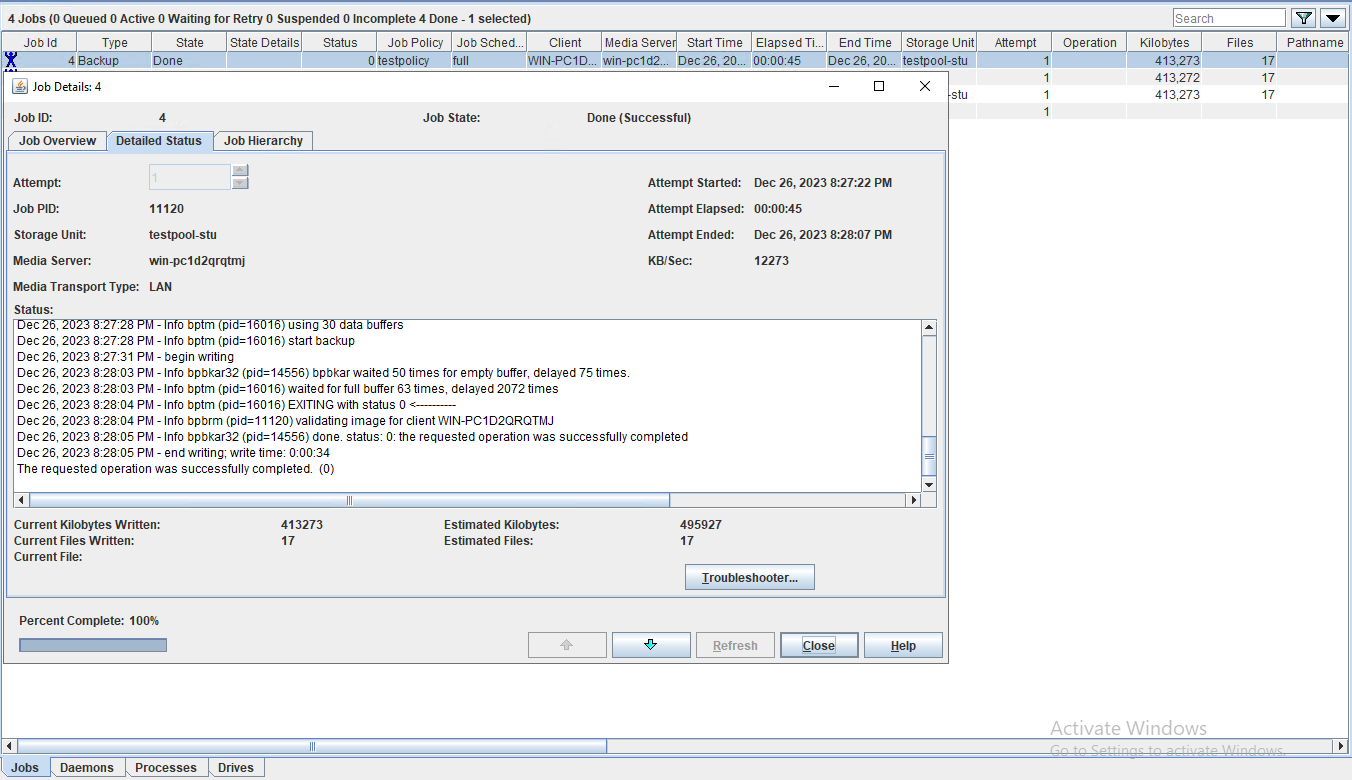 3. In Step3, Enter the recover page and start the recovery job, restoring files to another place. 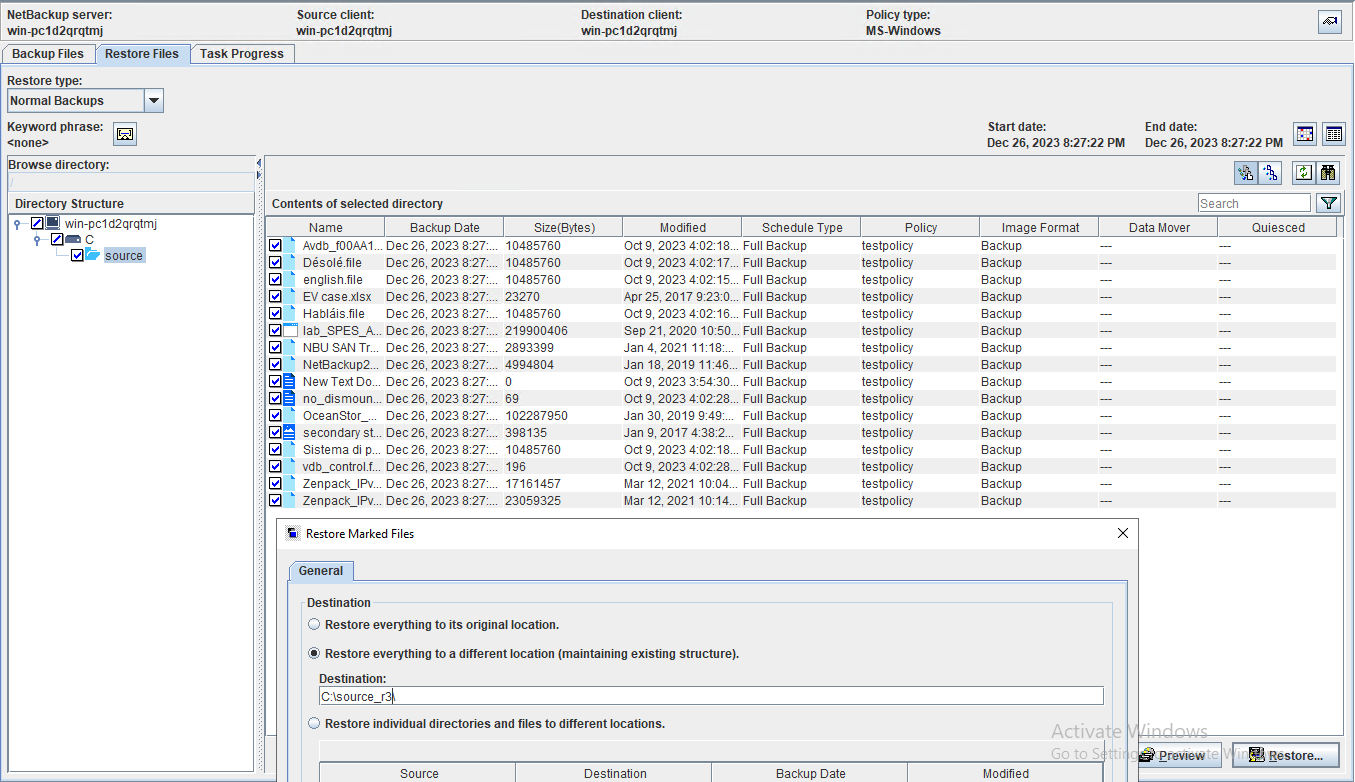 4. In Step4, check that the state of restore job is successful, and restored files are the same as the original files. 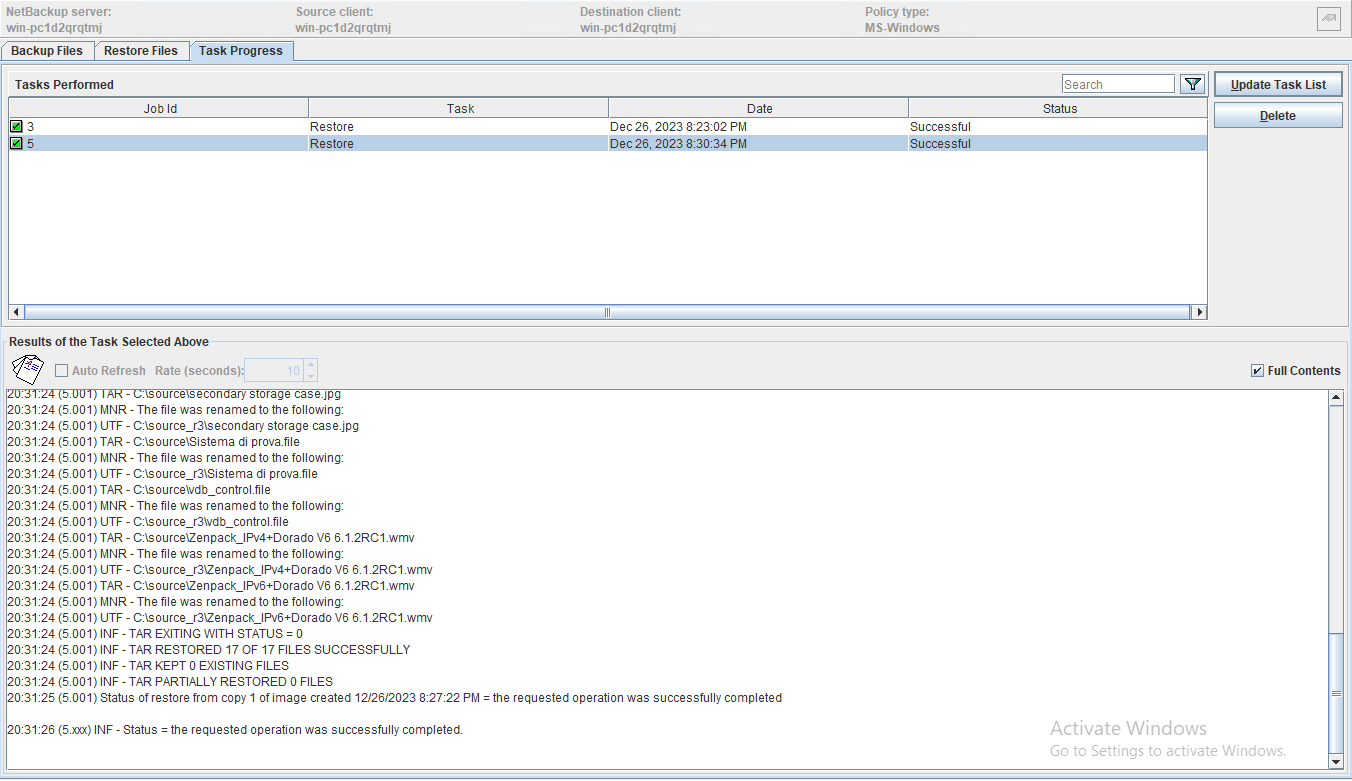 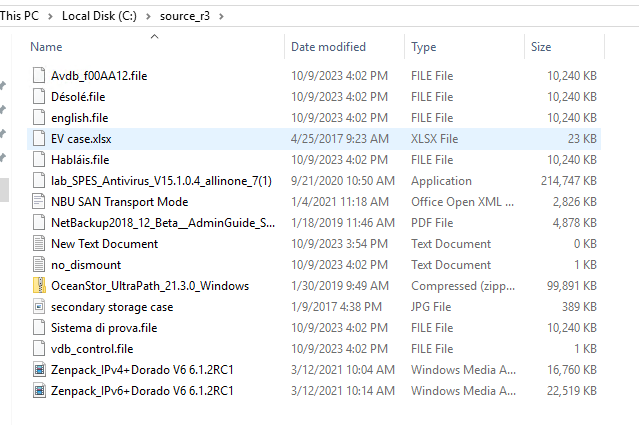 |
Test Conclusion | Passed |
3.3 Incremental Backup and Recovery
Test Purpose | To Verify that the NBU server incremental backup and recovery is working |
Test Networking | Huawei OceanStor Pacific Storage Function Compatibility Test Networking |
Prerequisites |
|
Test Procedure |
|
Expected Result |
|
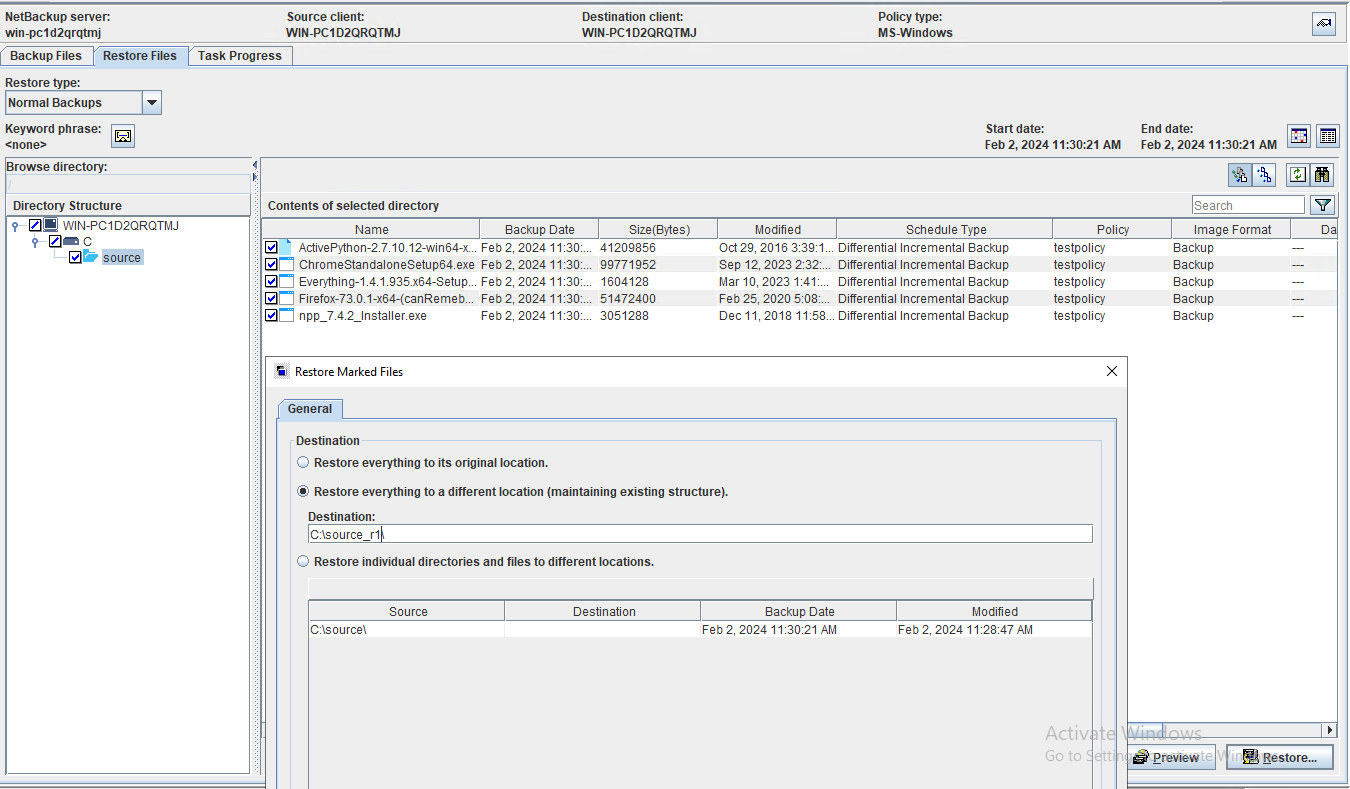
Test Result | Prerequisites Pre1 Add some large files and small files as backup source. 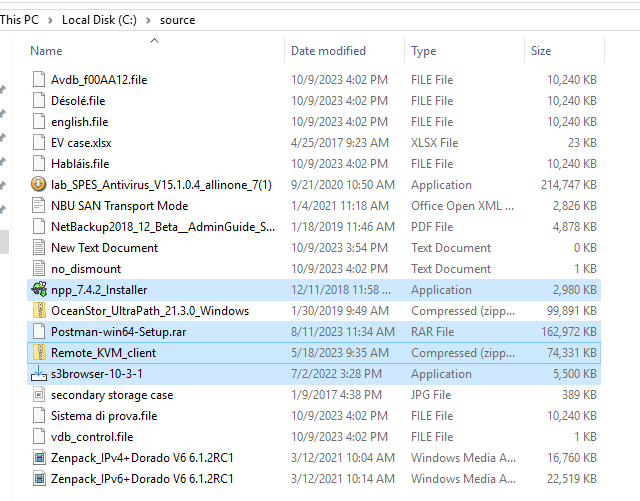 Test Result In Step1, right-click the backup policy and start incremental backup job.  2. In Step2, check that the state of backup job is done. The backup job finishes successfully. 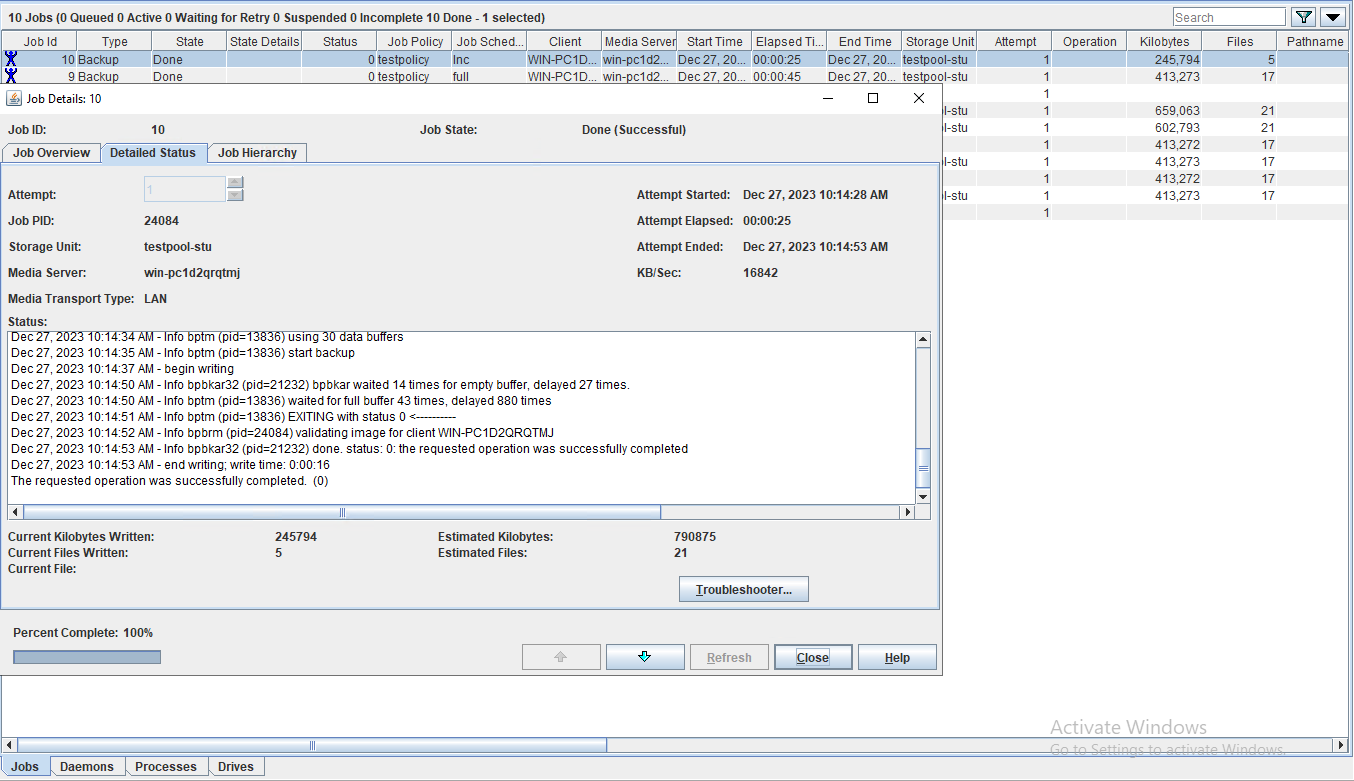 3. In Step3, Enter the recover page and start the recovery job, restoring files to another place.
  |
Test Conclusion | Passed |
3.4 Add the bucket as S3 target storage through HTTPS protocol
Test Purpose | To verify that the bucket can be added to the NBU server as S3 target storage through HTTPS protocol. |
Test Networking | Huawei OceanStor Pacific Storage Function Compatibility Test Networking |
Prerequisites |
|
Test Procedure |
|
Expected Result |
|
Test Result | Prerequisites Pre1 Write the complete certificate chain file to the cacert.pem file on NBU server. 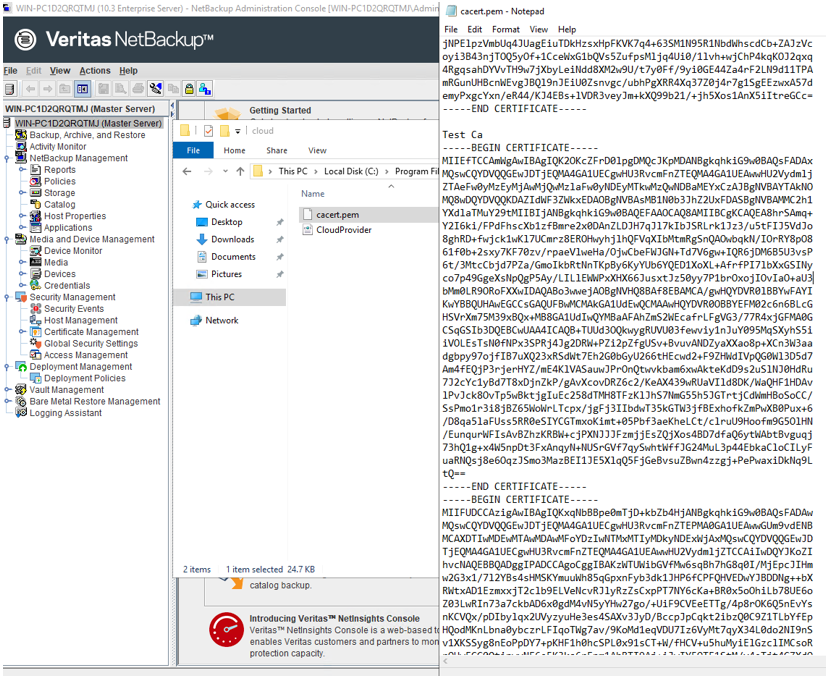 Test Result In step 1, the cloud storage server is configured successfully. 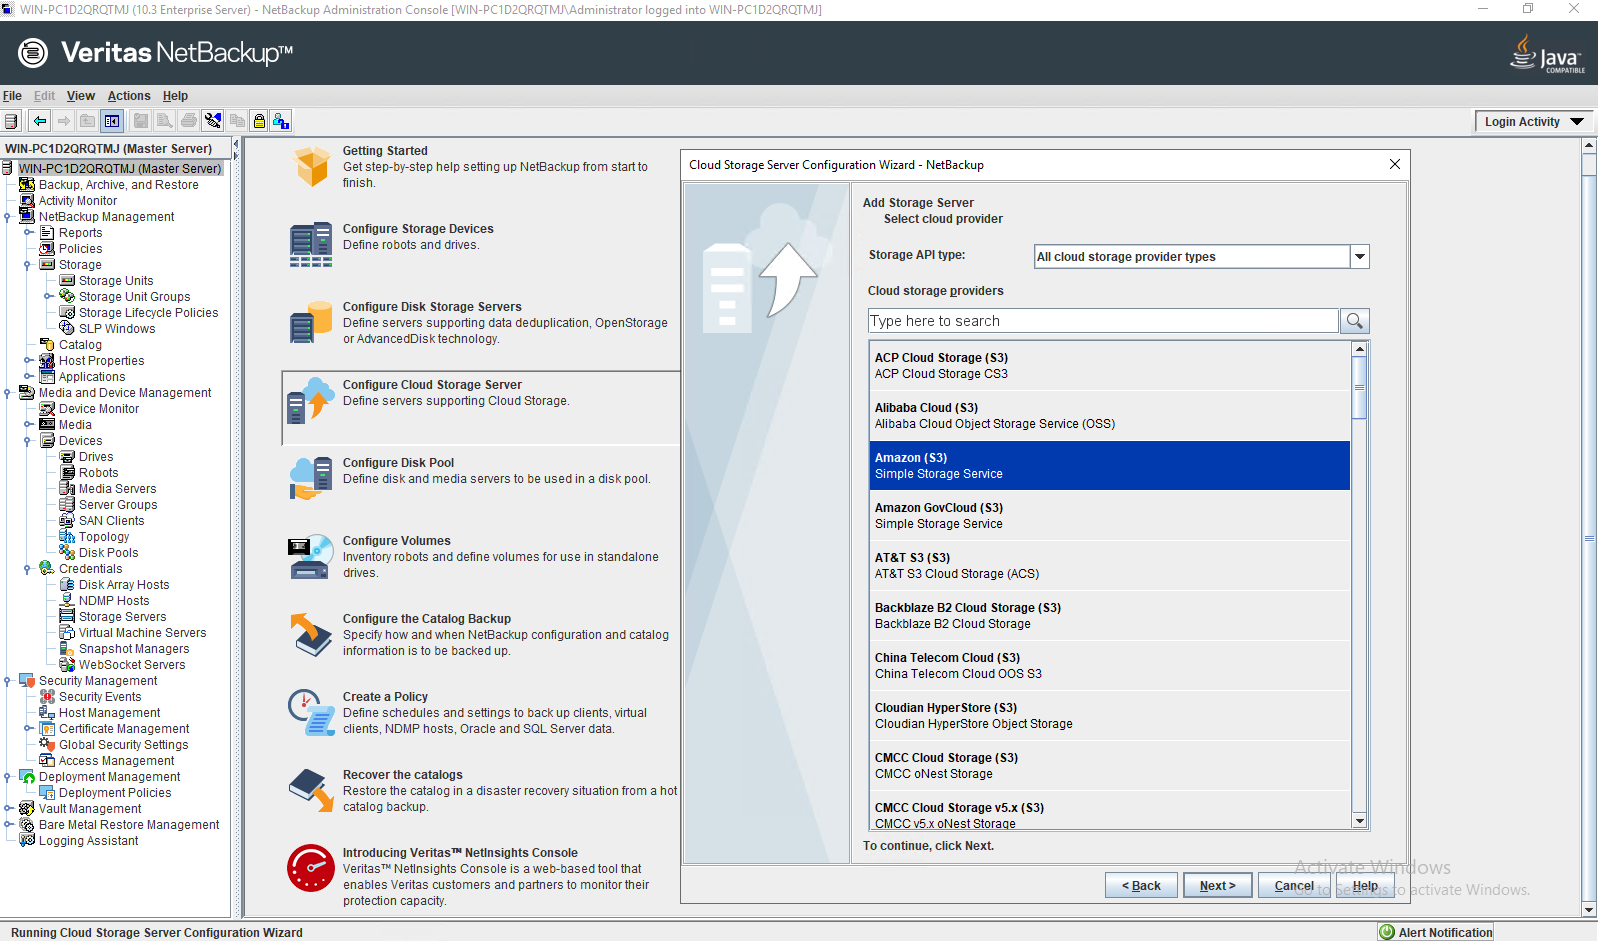 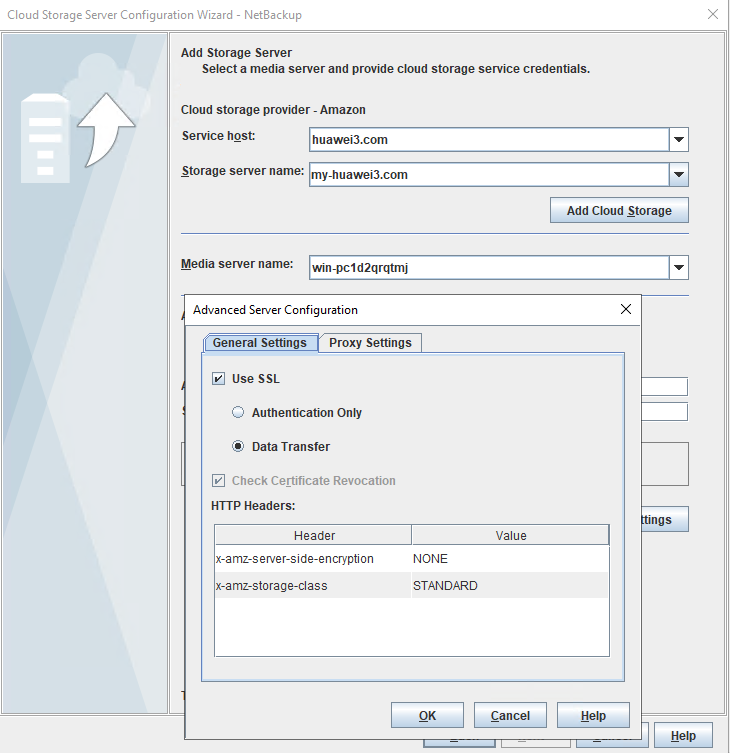 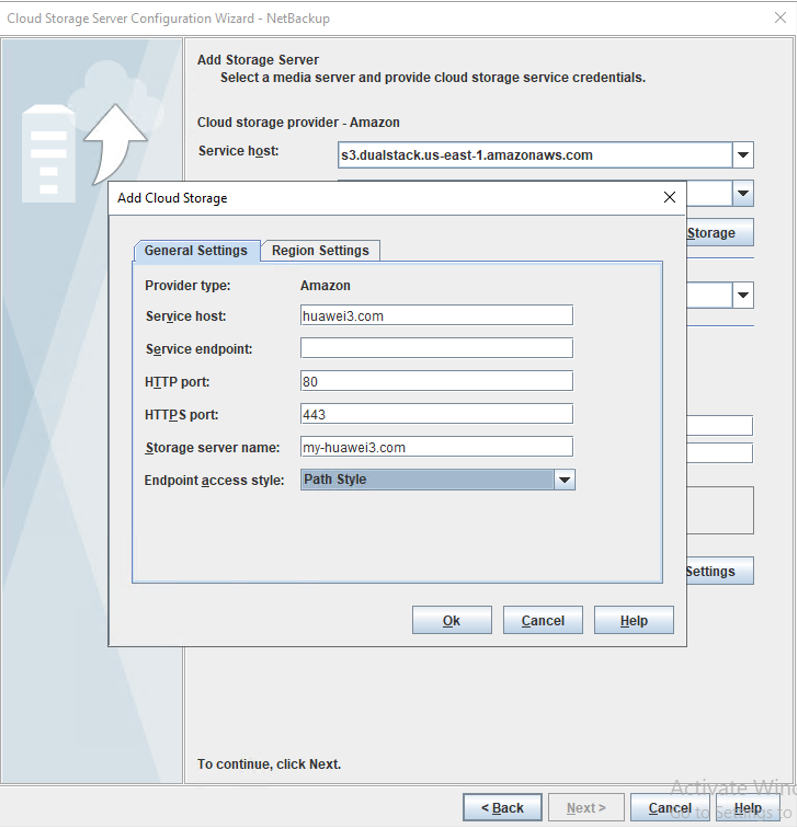 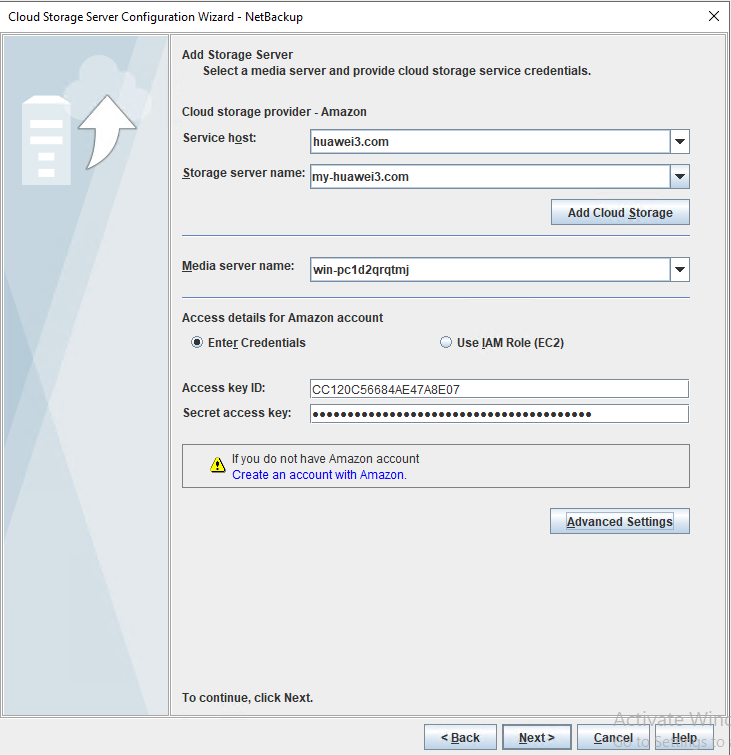 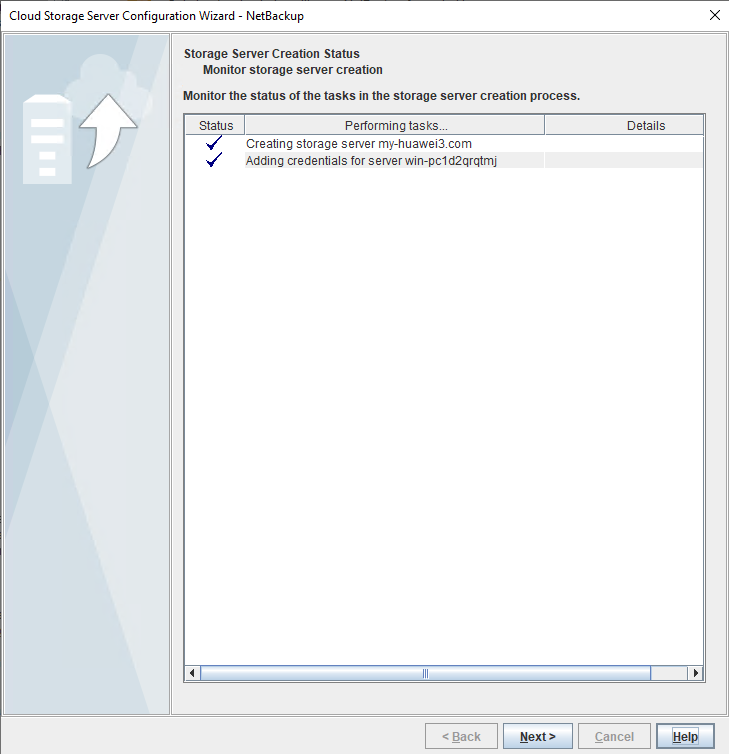
 2. In step 4, the backup policy is configured successfully. 2. In step 4, the backup policy is configured successfully.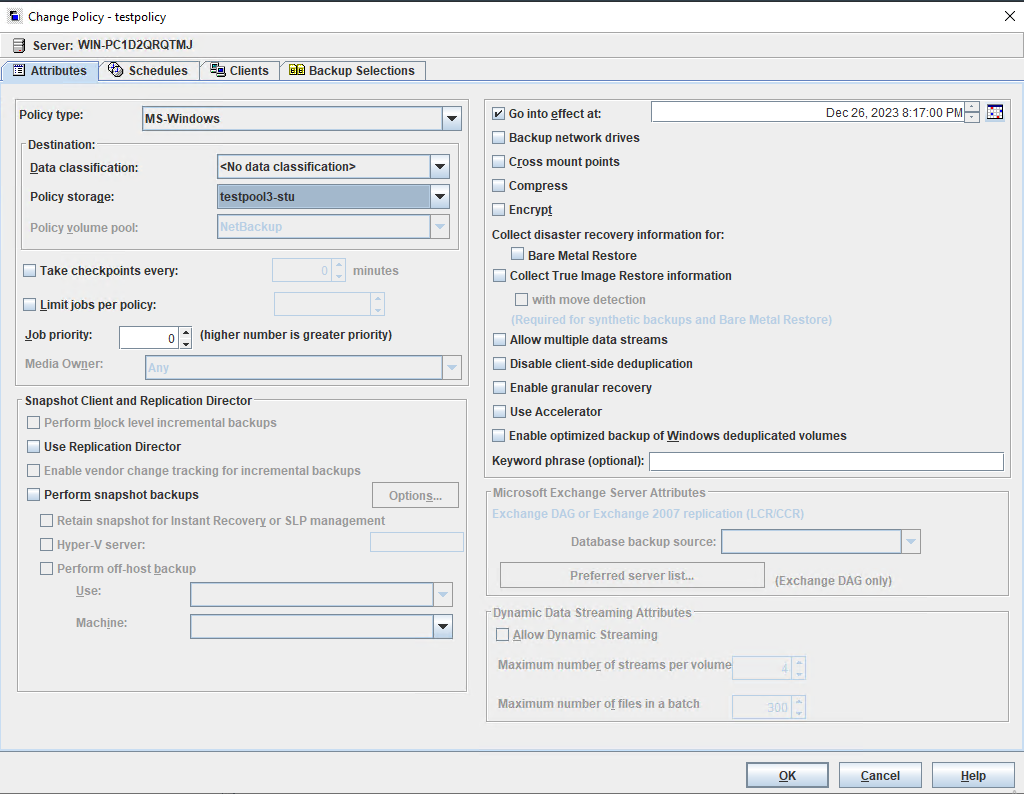 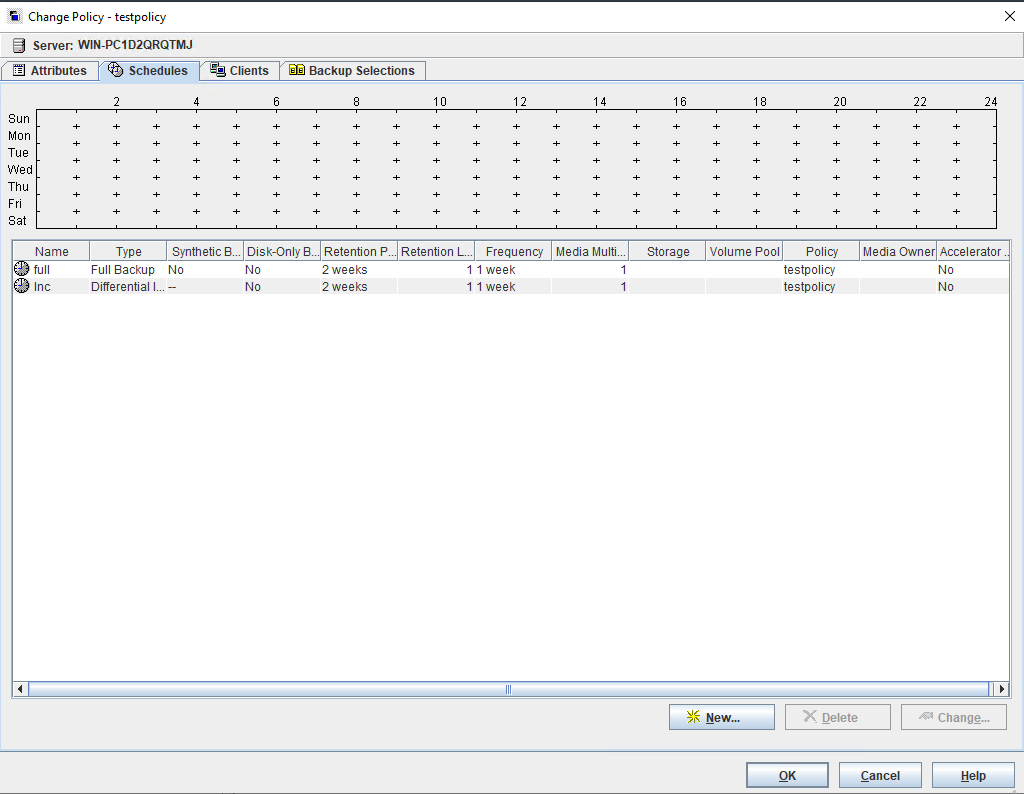 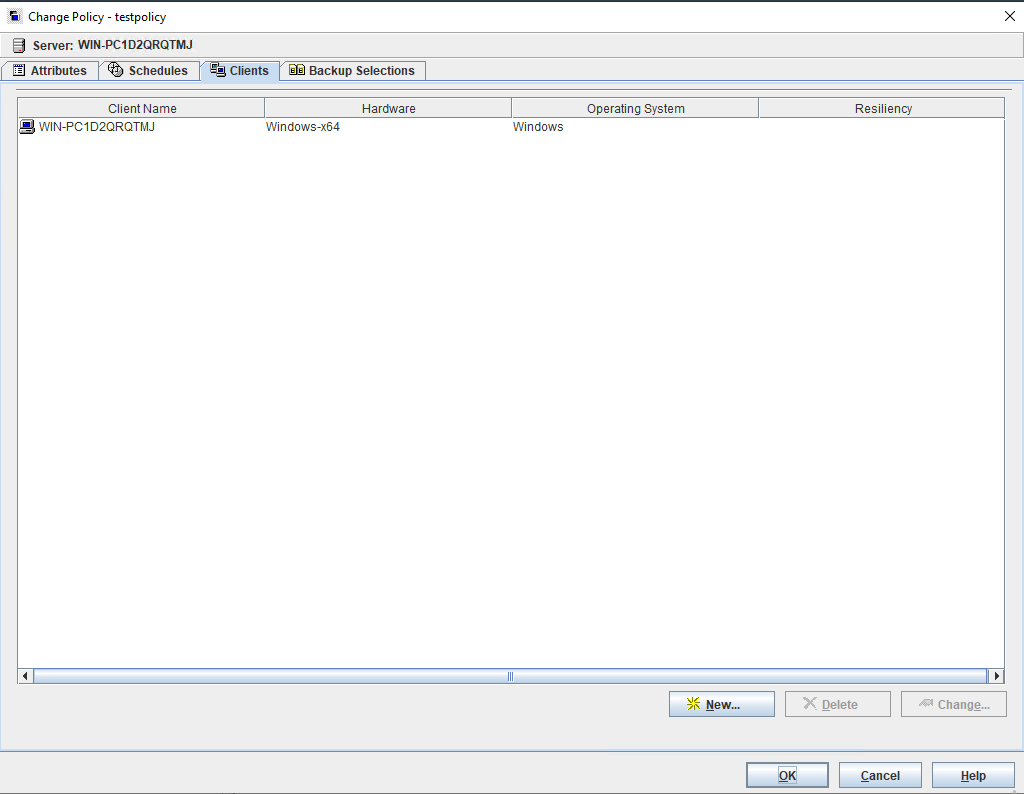 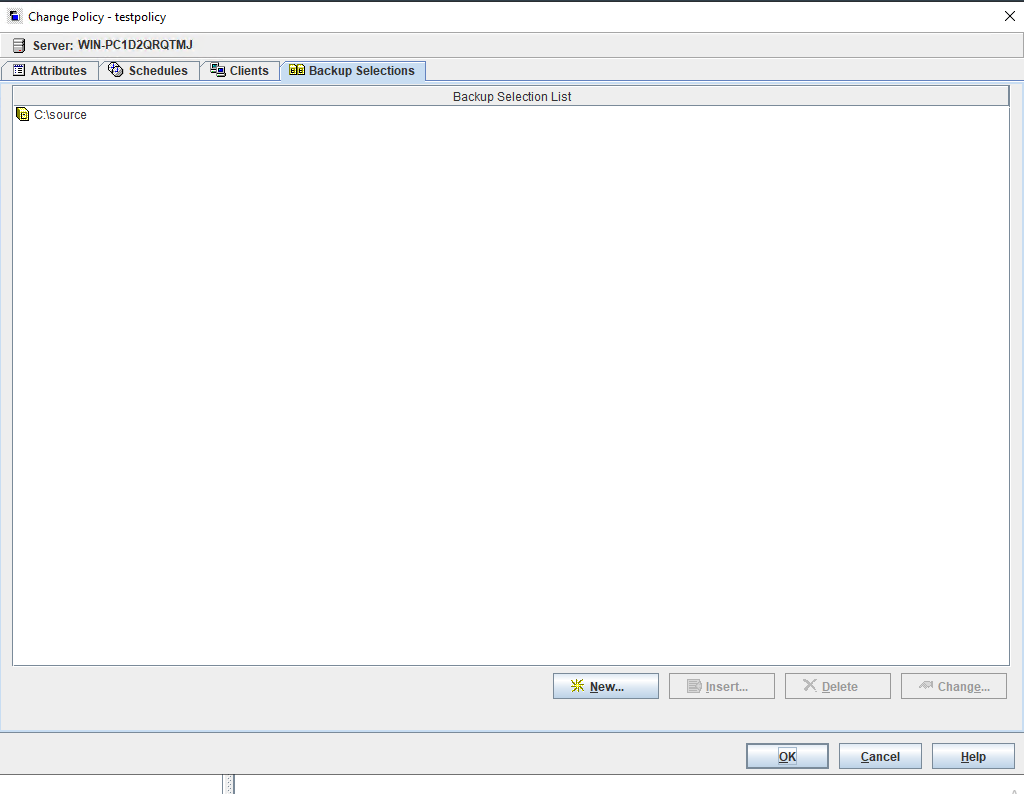 |
Test Conclusion | Passed |
3.5 Full Backup and Recovery
Test Purpose | To Verify that the NBU server full backup and recovery is working |
Test Networking | Huawei OceanStor Pacific Storage Function Compatibility Test Networking |
Prerequisites |
|
Test Procedure |
|
Expected Result |
|
Test Result | Prerequisites Pre1 Prepare some large files and small files as backup source. 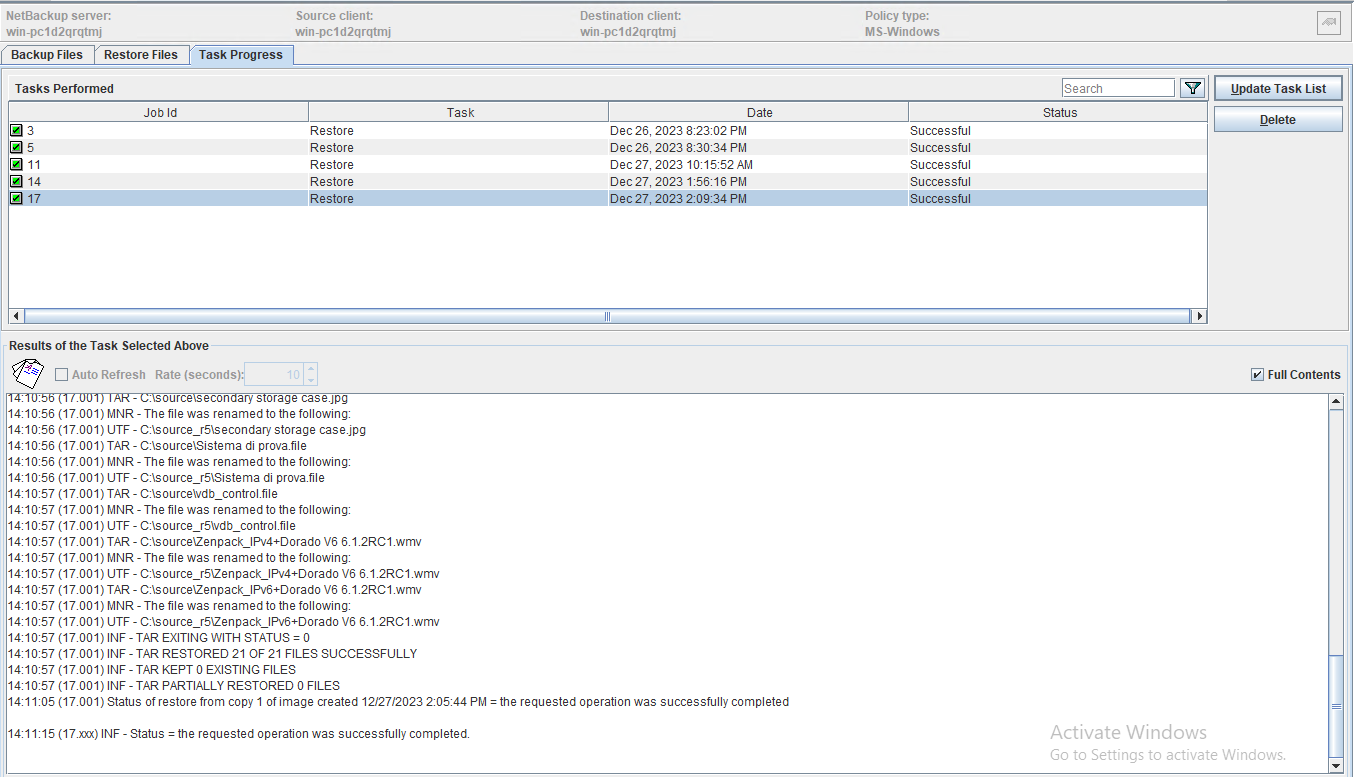  |
Test Conclusion | Passed |
 Test Result
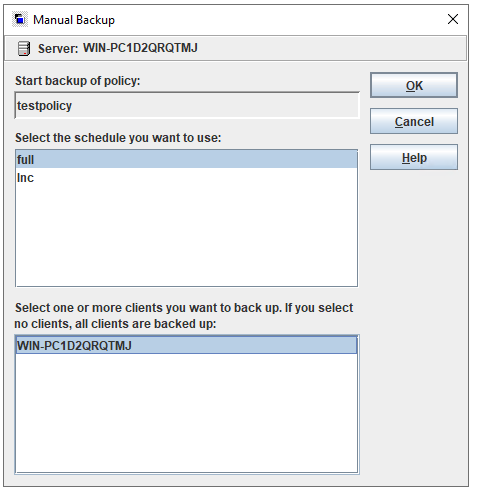
 3.
3. 
3.6 Incremental Backup and Recovery
Test Purpose | To Verify that the NBU server incremental backup and recovery is working |
Test Networking | Huawei OceanStor Pacific Storage Function Compatibility Test Networking |
Prerequisites |
|
Test Procedure |
|
Expected Result |
|
Test Result | Prerequisites Pre1 Add some large files and small files as backup source. 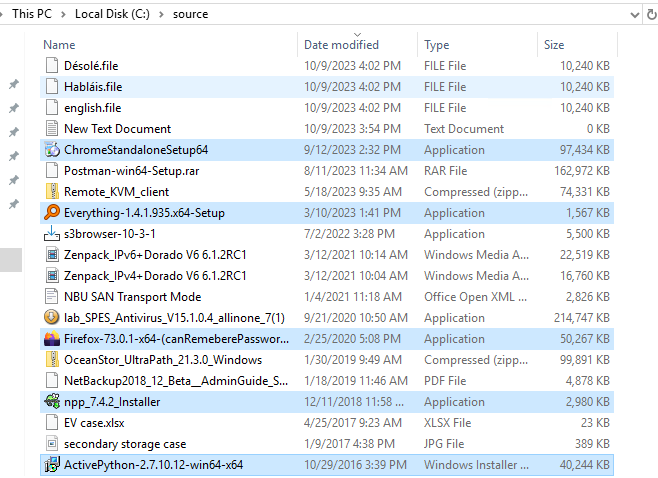 Test Result
 2. In Step2, check that the state of backup job is done. The backup job finishes successfully. 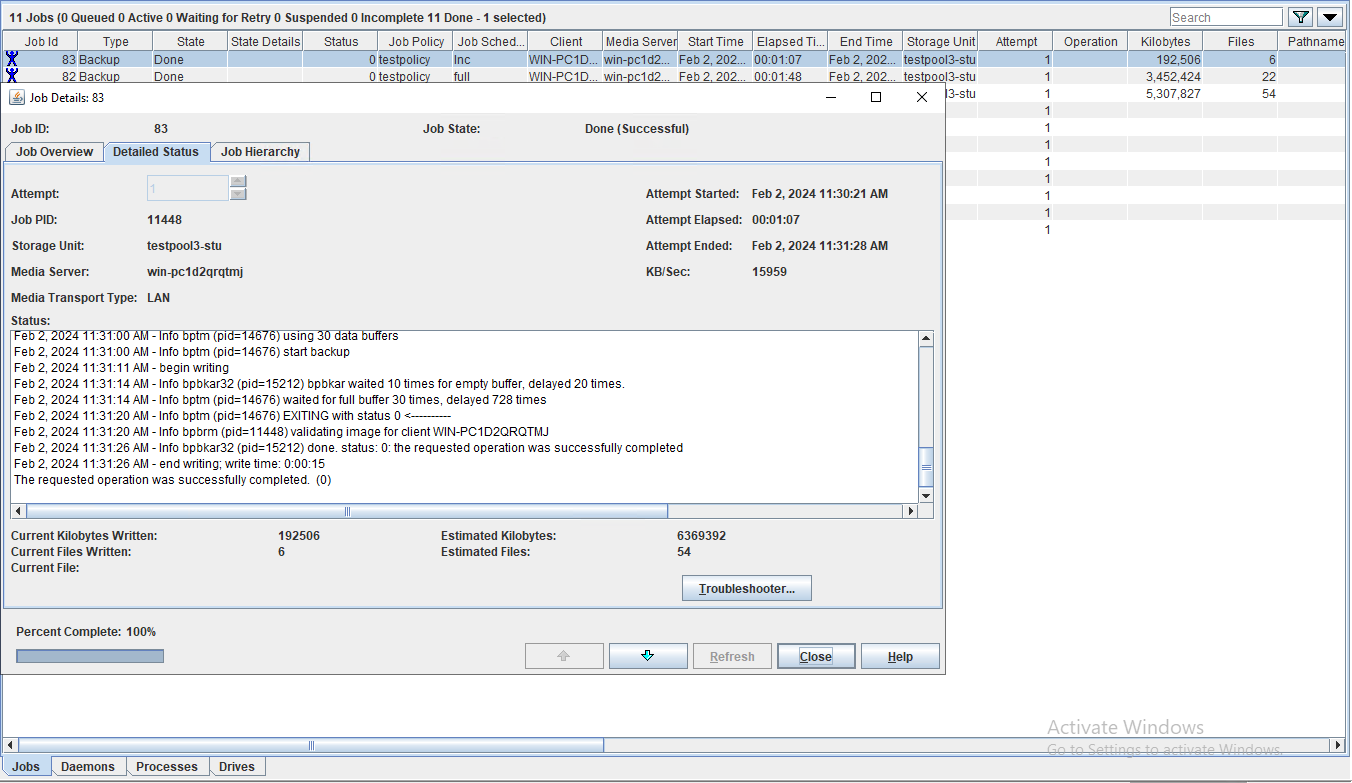 3. In Step3, Enter the recover page and start the recovery job, restoring files to another place. 4. In Step4, check that the state of restore job is successful, and restored files are the same as the original files. |
Test Conclusion | Passed |
4. OceanStor Pacific Storage interconnects with Veritas NetBackup through the S3 backup source.
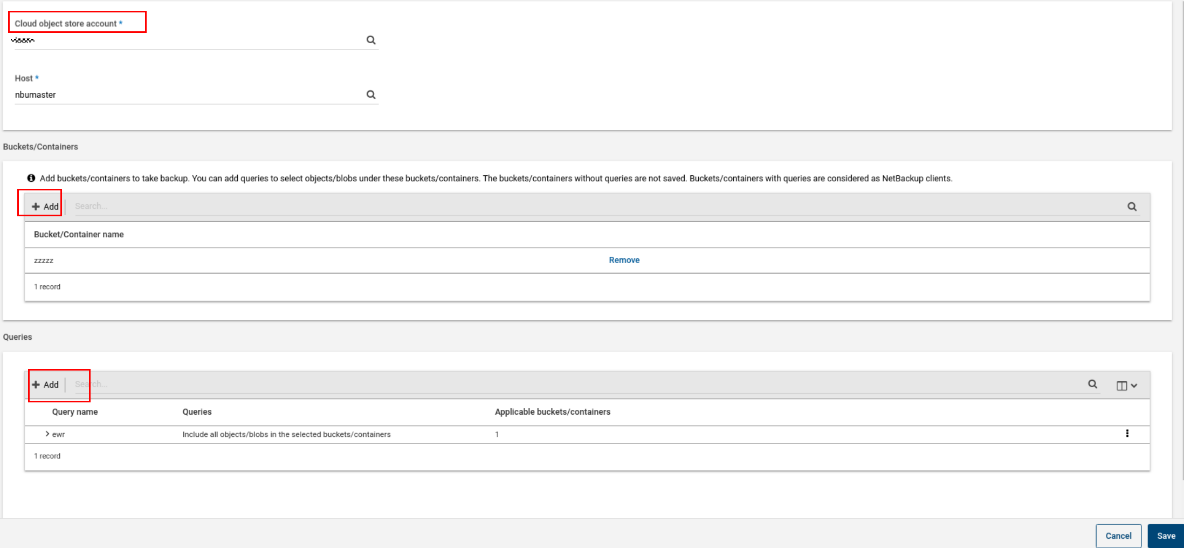
4.1 Adding a Bucket as an S3 Backup Source over HTTP
Test Purpose | To test that the NetBackup server supports adding a bucket as the S3 backup source through the HTTP protocol. |
Test Networking | Huawei OceanStor Pacific Storage Function Compatibility Test Networking |
Prerequisites |
|
Test Procedure |
|
Expected Result |
|
Test Result | In step 1, the cloud storage server is configured successfully. 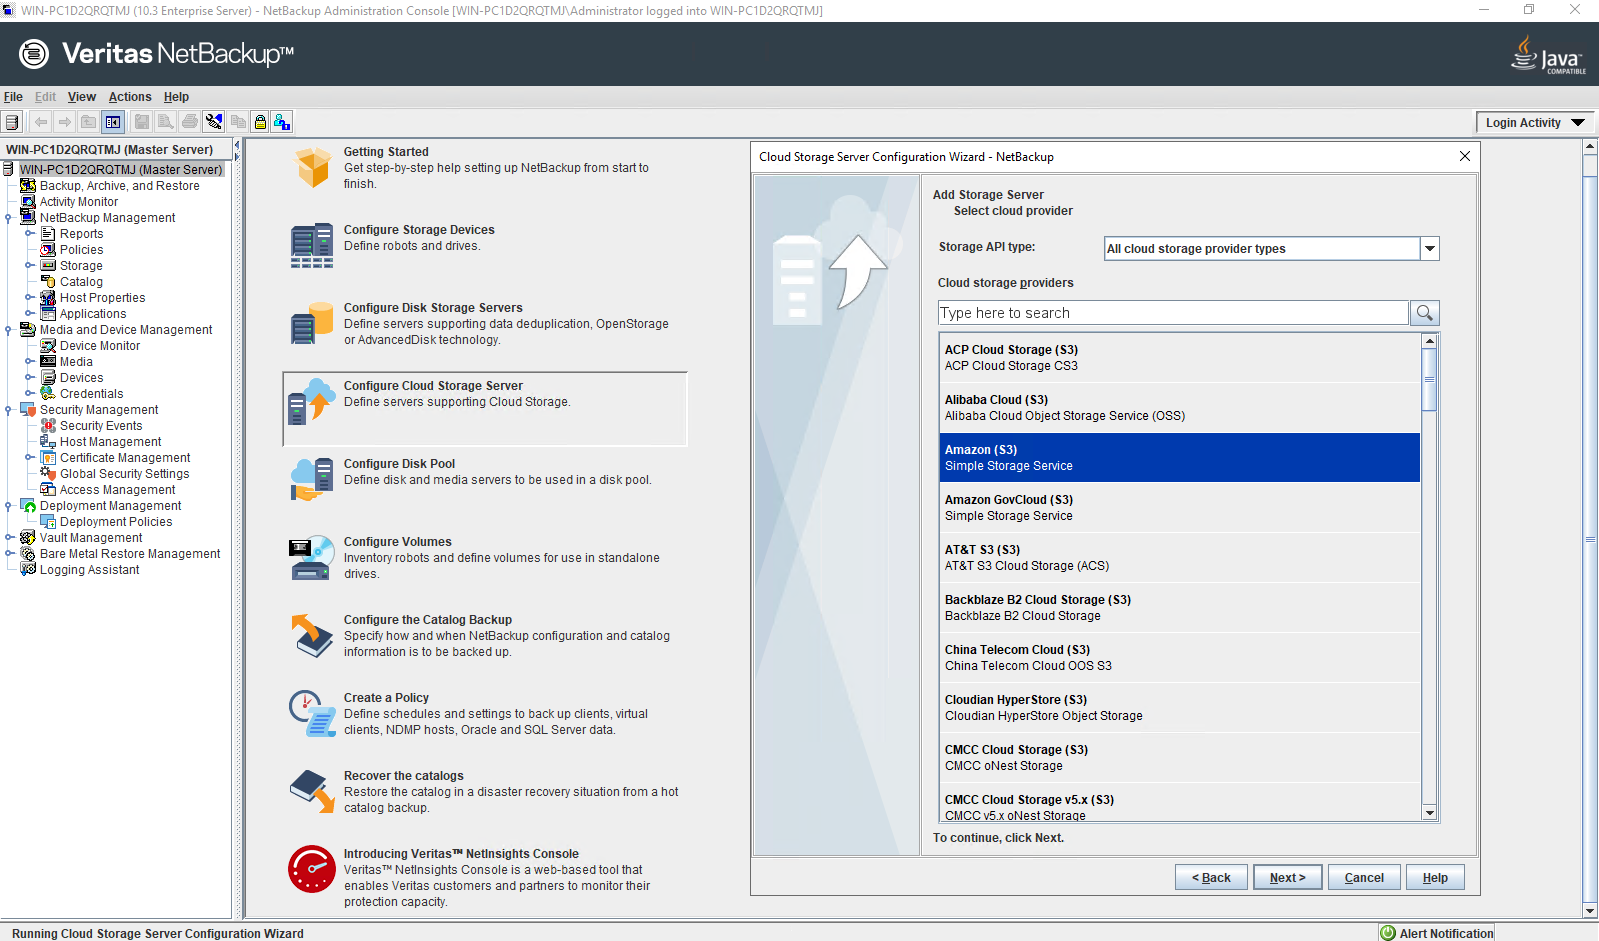 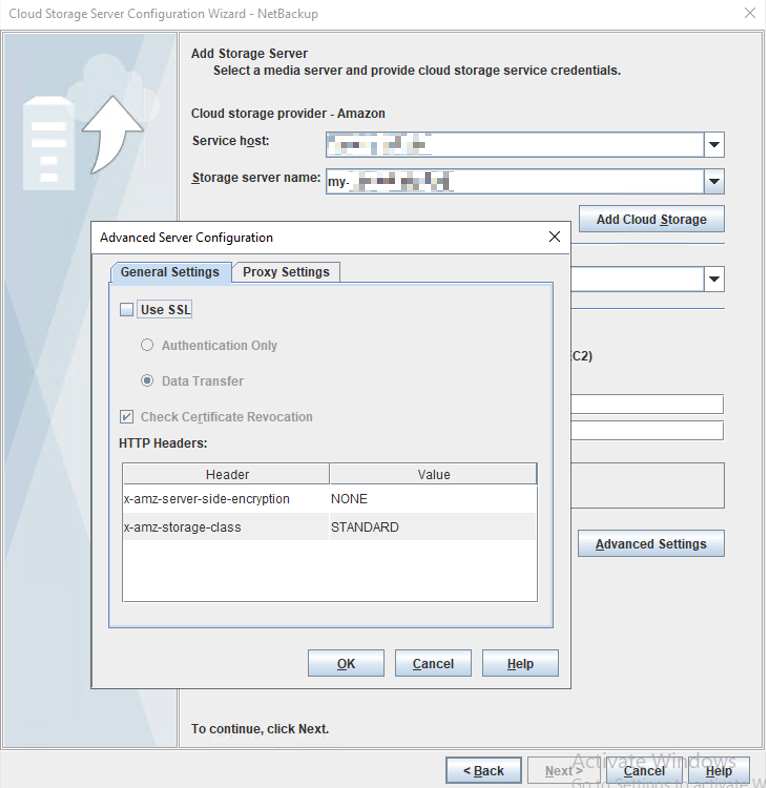   2. In step 2, the disk pool is configured successfully. 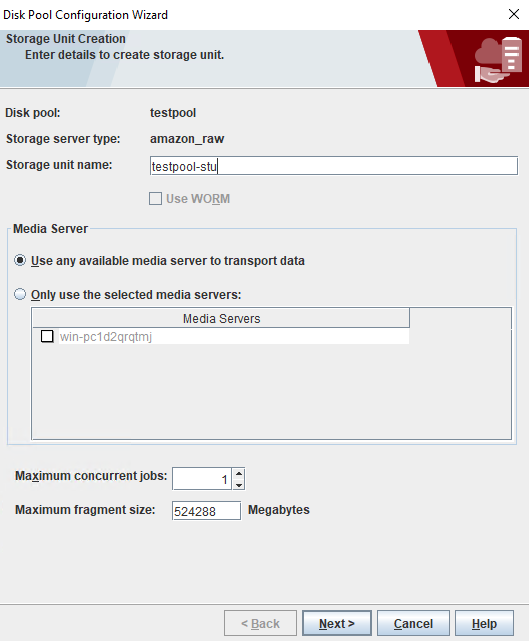 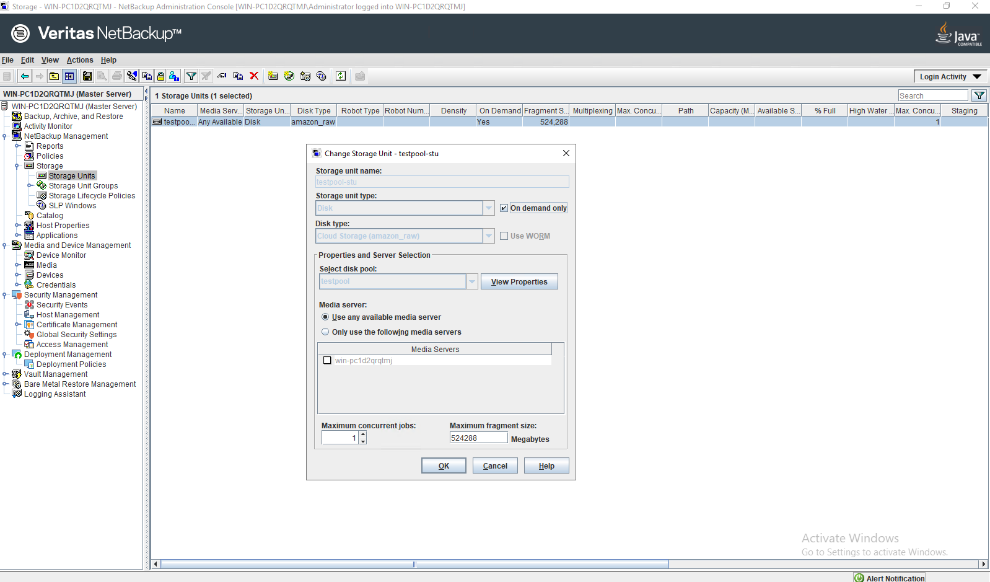 In step 4, the cloud object store is created successfully. 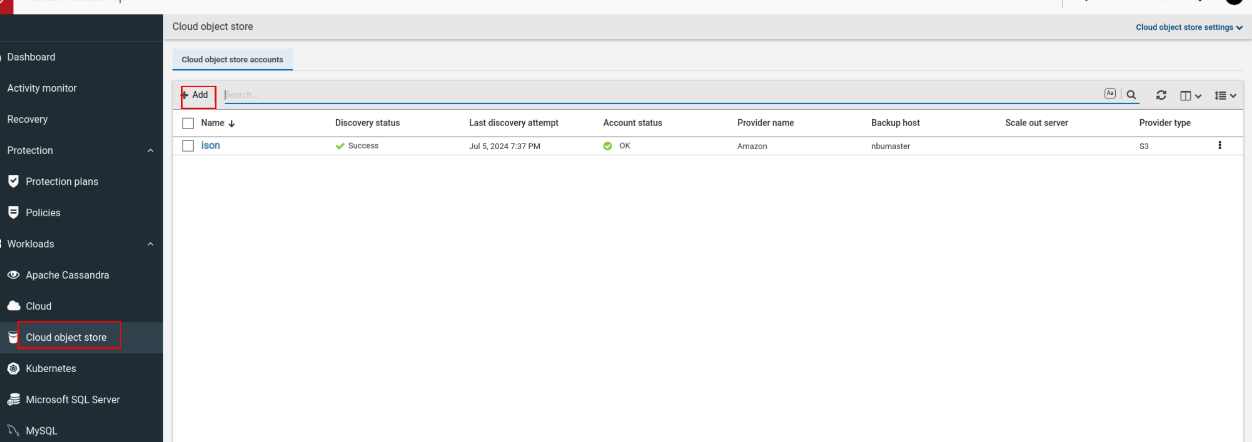 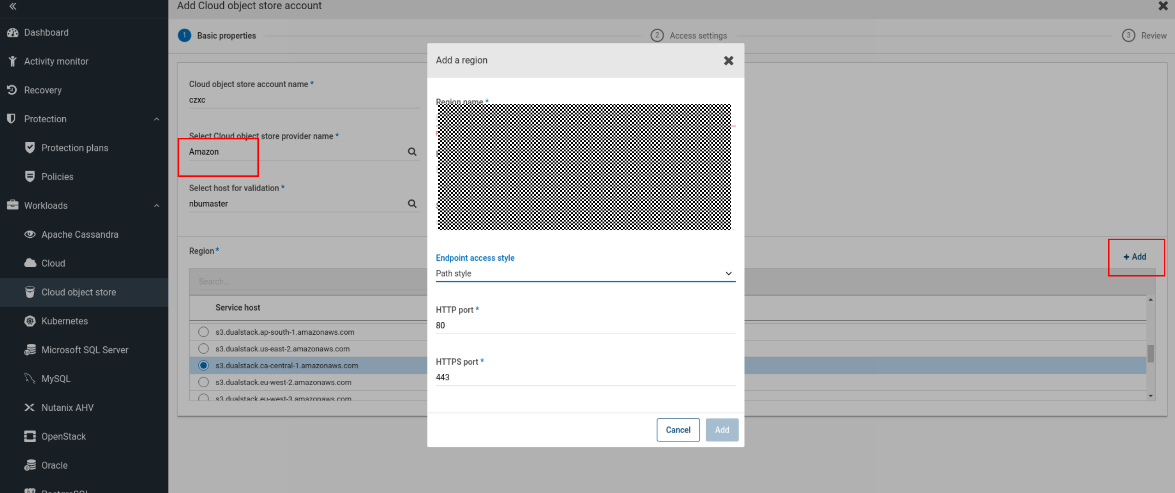 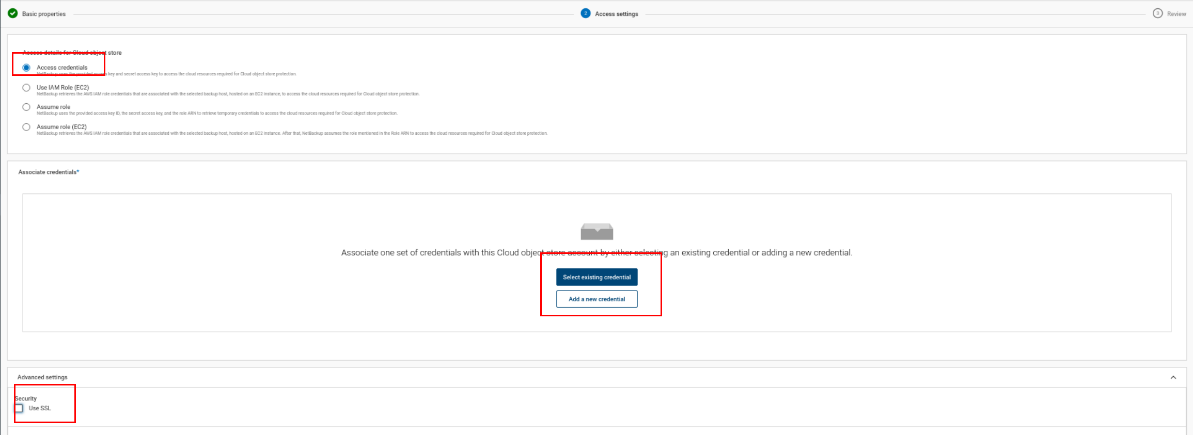  In step 5, the backup policy is configured successfully. 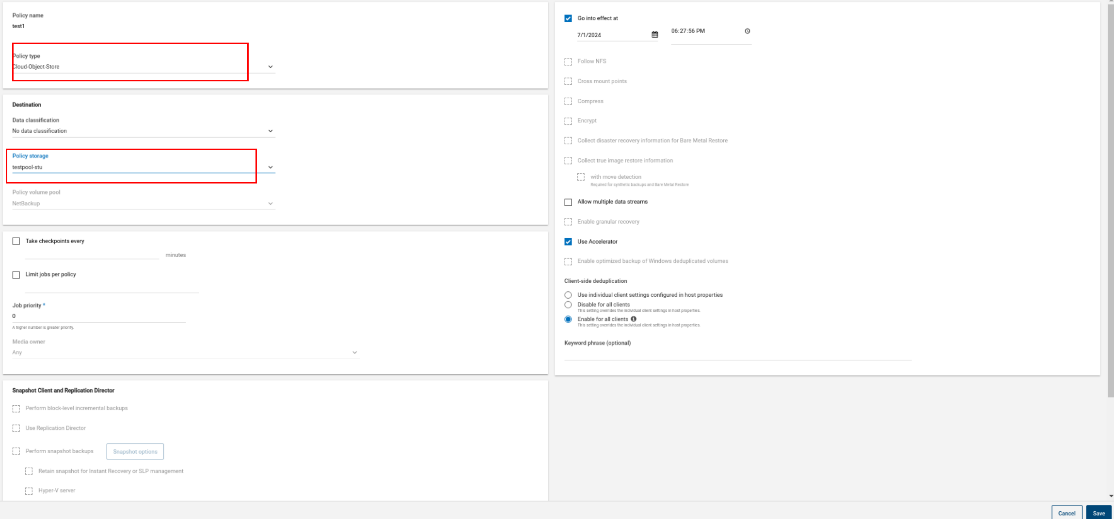
  |


4.2 Full Backup and Recovery
Test Purpose | To Verify that full backup and restore works properly with an NBU server when S3 bucket is the backup source |
Test Networking | Huawei OceanStor Pacific Storage Function Compatibility Test Networking |
Prerequisites |
|
Test Procedure |
|
Expected Result |
|
Test Result | Prerequisites Pre1 Prepare some large files and small files as backup source. 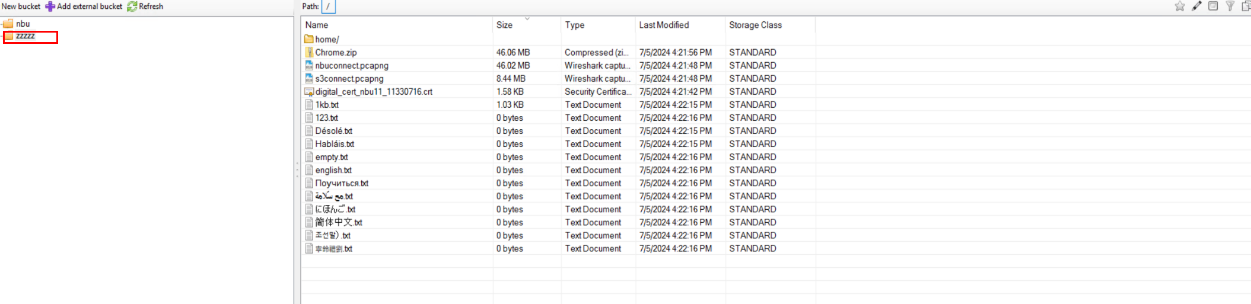 Test Result In Step1, right-click the backup policy and start full backup job. 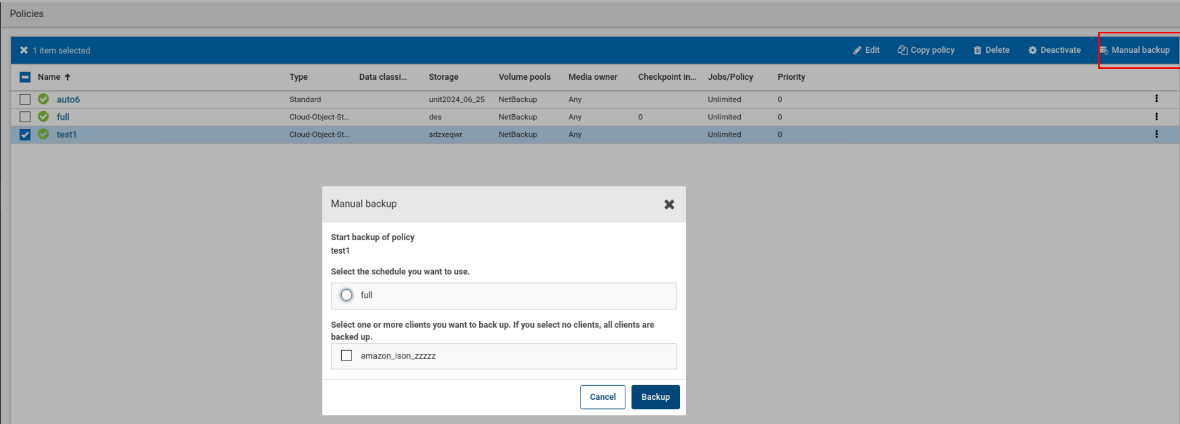 2. In Step2, check that the state of backup job is done. The backup job finishes successfully. 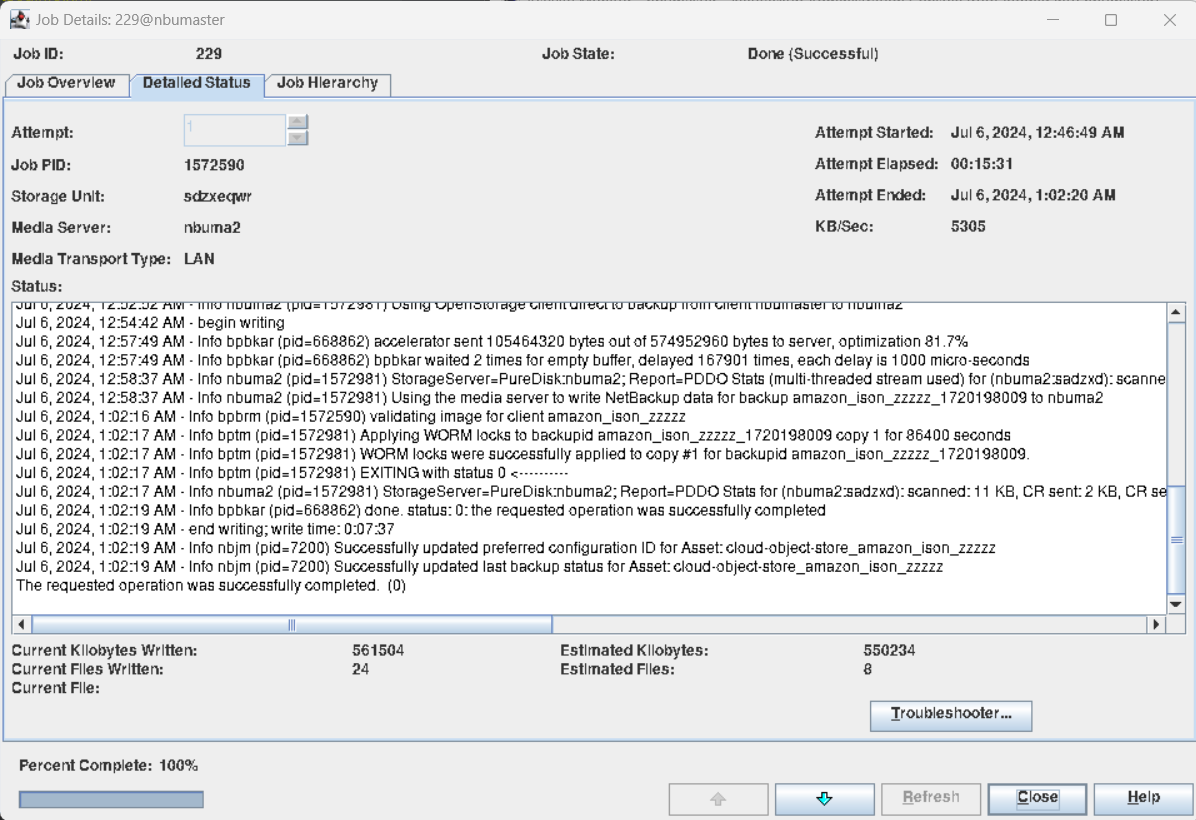 3. In Step3, Enter the recover page and start the recovery job, restoring files to another place. 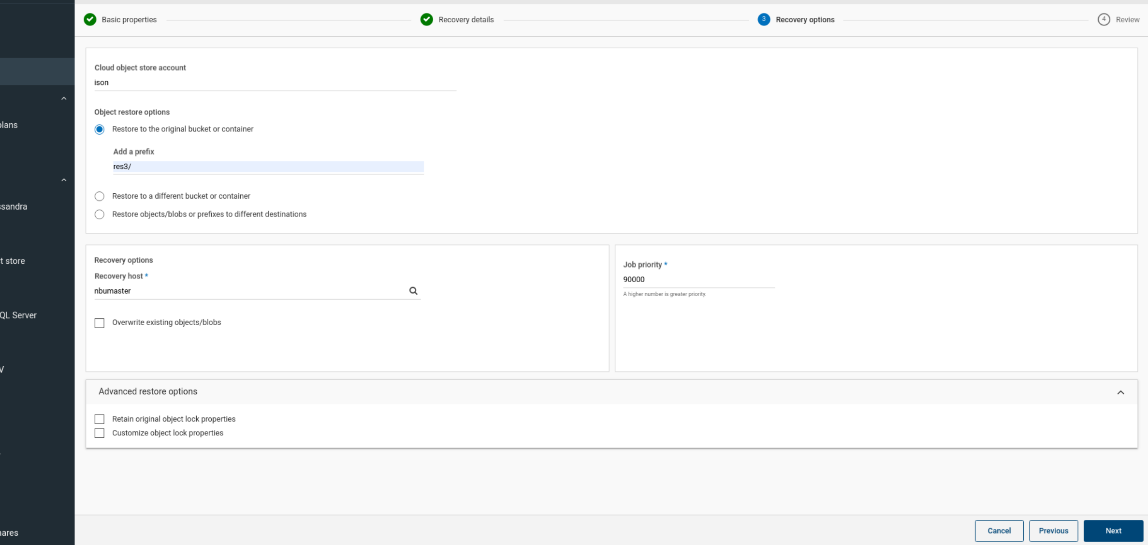 4. In Step4, check that the state of restore job is successful, and restored files are the same as the original files. 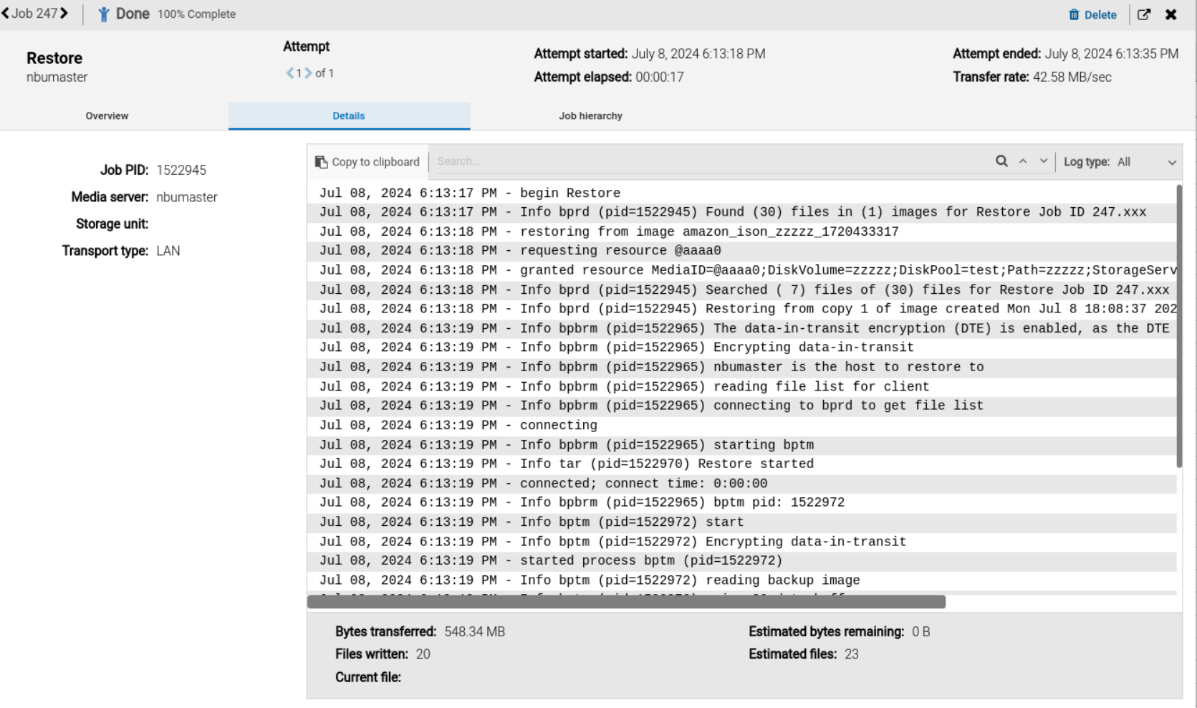
|
Test Conclusion | Passed |
5. The Pacifc connects to the NBU through the MSDP to enable the WORM function.
5.1 Adding and Configuring MSDP
Test Purpose | To verify that the MSDP function of the NBU is complete and available. |
Test Networking | Huawei OceanStor Pacific Storage Function Compatibility Test Networking |
Prerequisites | 1. Deployment of storage device, Master server, Media server and networking have been completed. 2. The storage device is running properly. 3. Namespace and object bucket have been created on the storage device. 4. The media server has been installed and connected to the master server |
Test Procedure | 1. Login VERITAS NetBackup Console from browser 2. Choose Storage > Disk storage > Add to add a storage server. 3. On the displayed page, choose Disk storage servers > Media Server Deduplication Pool to local or cloud storage (MSDP, MSDP Cloud). 4. Select media server. (You are not advised to select the primary server, as unexpected problems may occur.) 5. Enter the user-defined account and password. (This account is used only for MSDP.) 6. Enter the MSDP path in the storage path text box. (You can also click Browse to select the directory. Ensure that the selected directory has sufficient space.) 7. (Optional) Whether to enable encryption. KMS encryption options need to be configured additionally. 8. Click Save and wait until the creation is complete. |
Expected Result | 1. In step 1, login NBU web console success. 2. In step 3, the server is loaded and the media server is selected. 3. In step 8, the MSDP storage pool is successfully created. |
Test Results | 1. Login VERITAS NetBackup Console from browser. 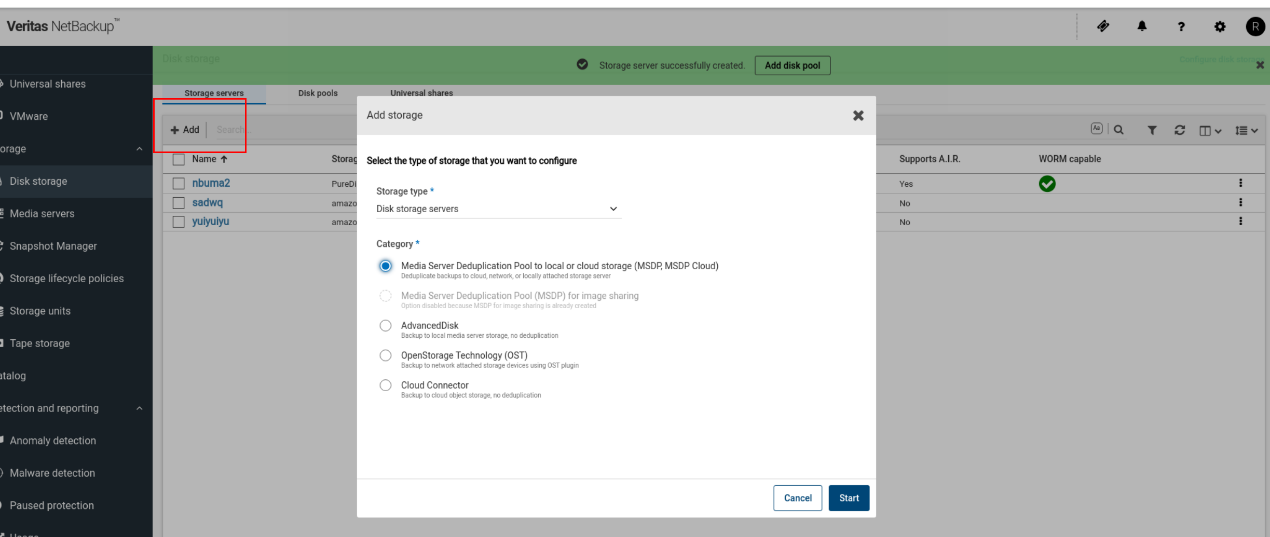 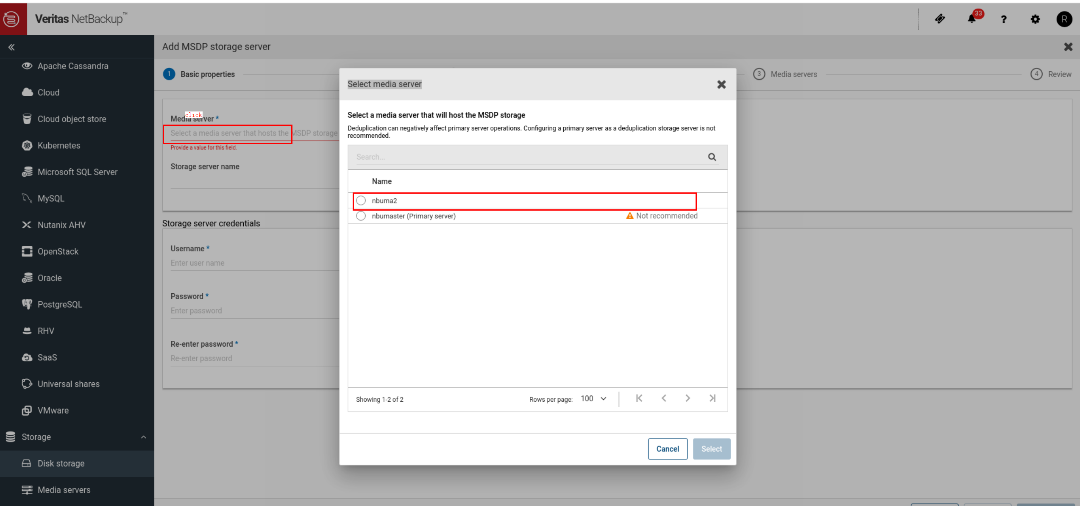 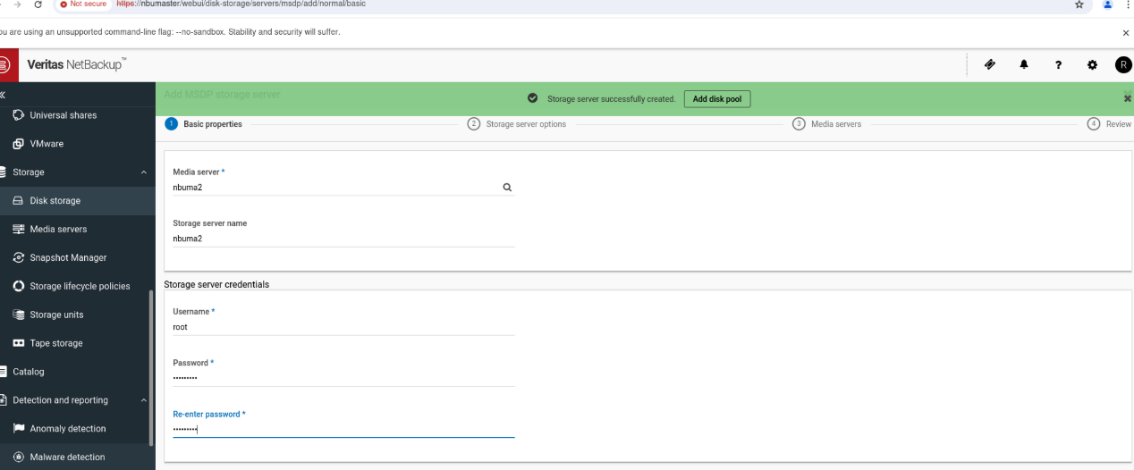 6. Enter the MSDP path in the storage path text box. (You can also click Browse to select the directory. Ensure that the selected directory has sufficient space.) 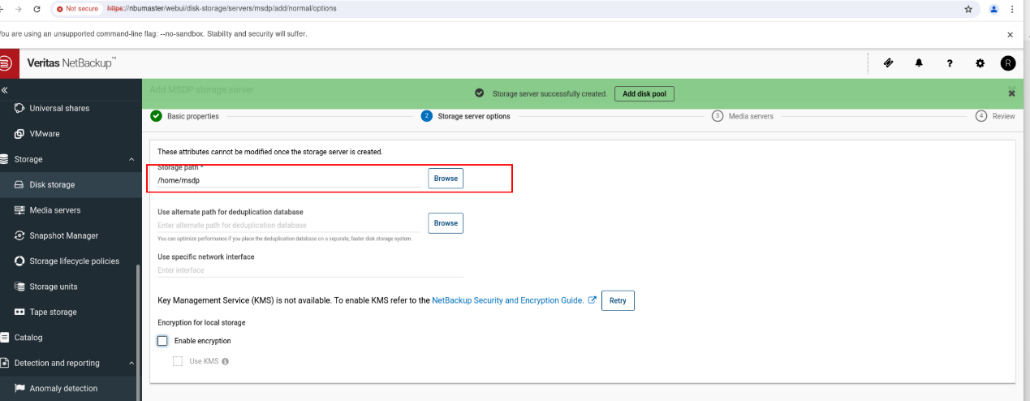 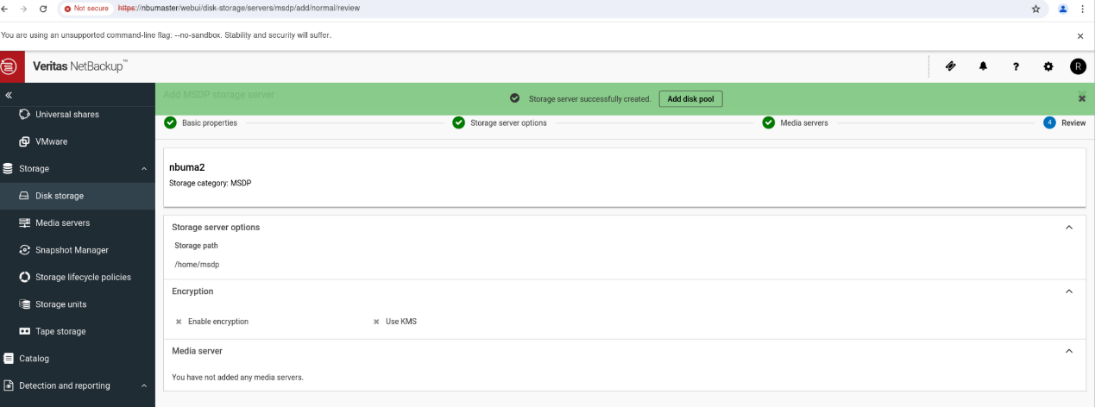 |
Test Conclusion | Passed |
 2. Choose Storage > Disk storage > Add to add a storage server.
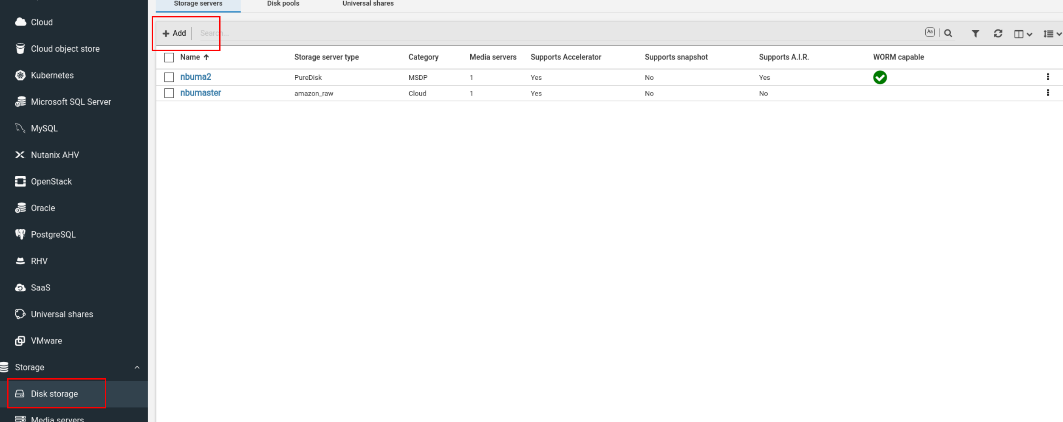
5.2 Configuring Storage Pools and Volumes
Test Purpose | To verify that the MSDP is available |
Test Networking | Huawei OceanStor Pacific Storage Function Compatibility Test Networking |
Prerequisites | 1. Deployment of storage device, Master server, Media server and networking have been completed. 2. The storage device is running properly. 3. Namespace and object bucket have been created on the storage device. 4. The media server has been installed and connected to the master server. 5. The MSDP has created success in section 4.1 |
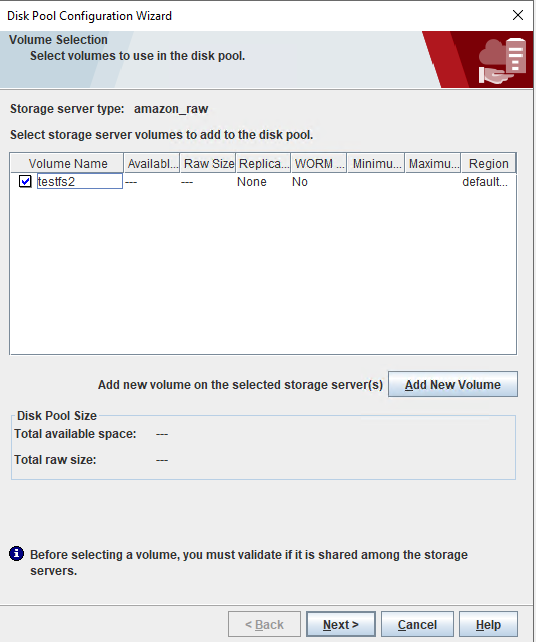
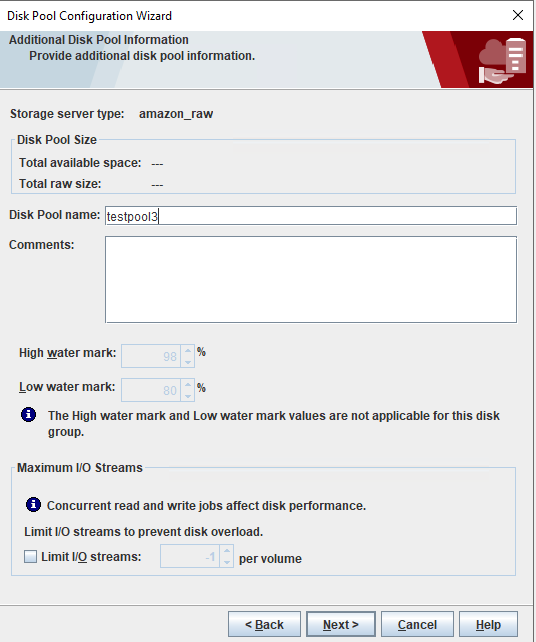
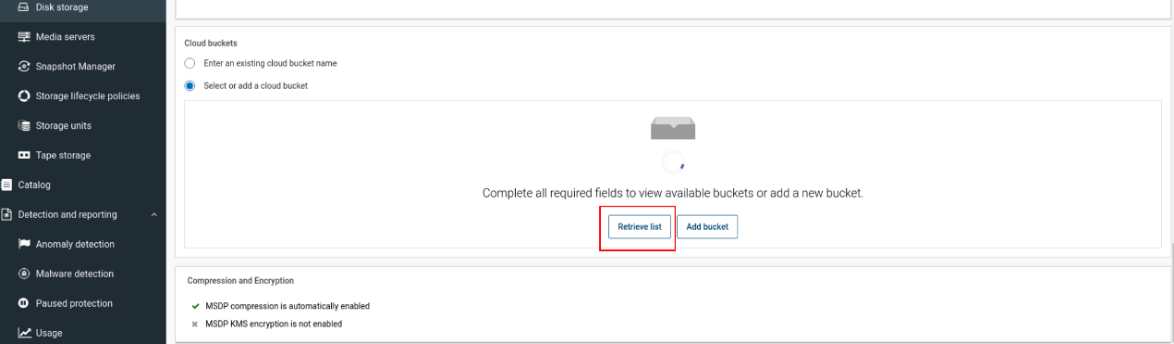
Test Procedure | 1.Choose Disk storage > Disk pool > Add to add a storage pool. 2. Click Change and select the storage server. 3. Enter the disk pool name. 4. Select add volume under volume. 5. Enter the volume name. 6. Select Amazon Agreement 7. Choose Region > Add. 8. Enter the region name, choose Endpoint access style > Path style, and click Add. 9. Choose access credentials > add a new credential (for the first use), enter the credential name, AK, and s, click Next, and click Save. 10. Select use object lock under WORM and configure the basic information about the WORM. The configured time is the time range for locking the WORM lock. (If this option is selected, only buckets with WORM enabled on the Pacific and not configured in policy mode will be obtained when the bucket list is obtained.) 11. (Optional) Disabling the Security > Use ssl window without configuring the certificate 12. Choose Cloud buckets > select or add a cloud bucket. 13. Select retrieve list (to obtain existing buckets) and add a new bucket. 14. (Optional) Configuring Replication 15. On the Review page, confirm the information and click Finish. 16. Wait until the creation is complete. |
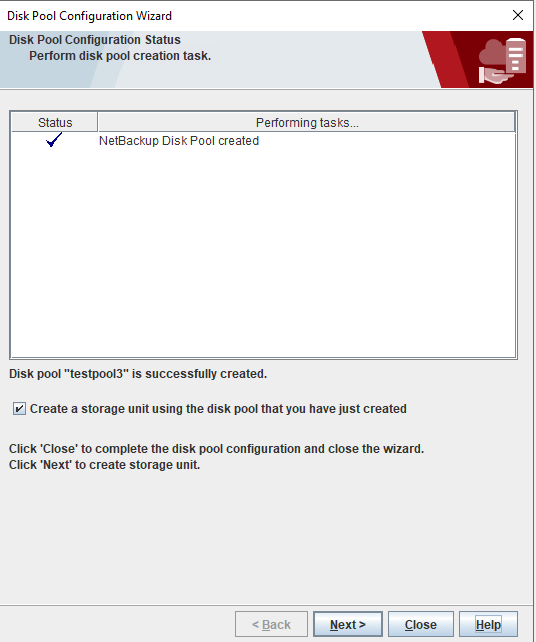
Expected Result | 1. In step 10, the list of buckets that meet the requirements is successfully obtained. 2. In step 16, success to create storage pool and volumes. |
Test Results |
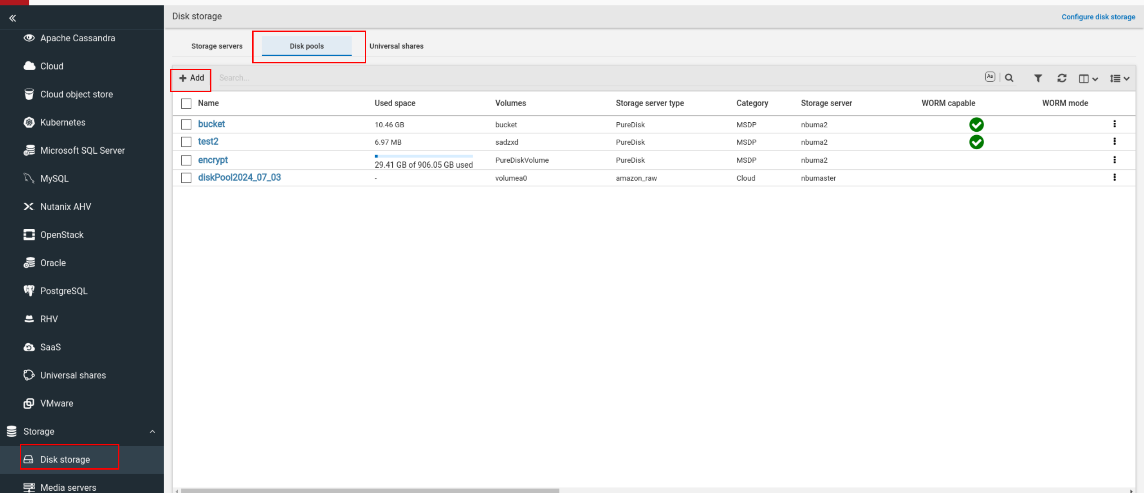 2.Click Change and select the storage server. 2.Click Change and select the storage server.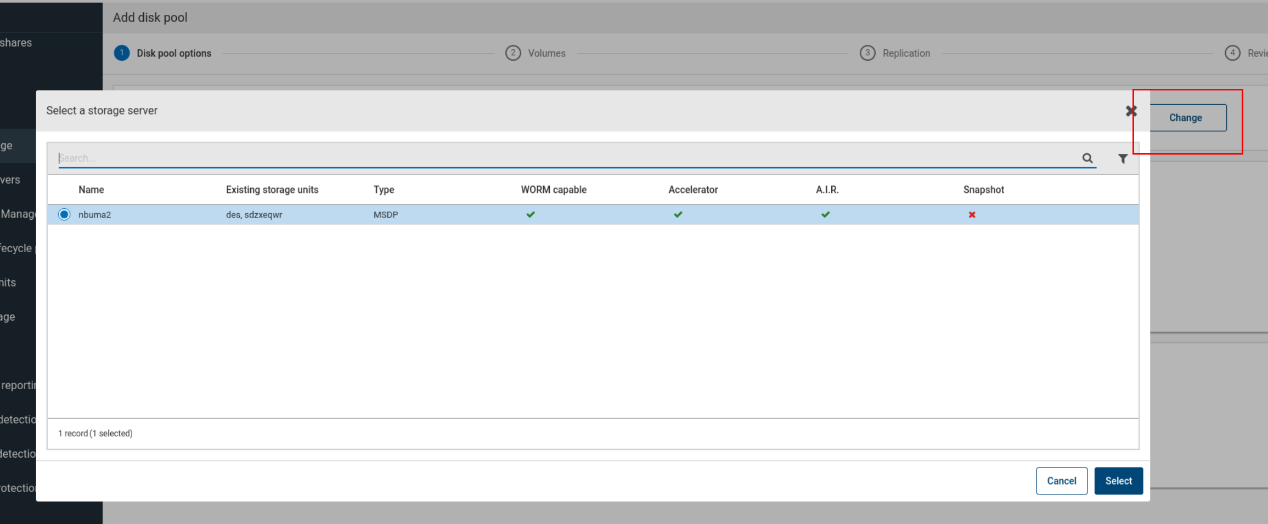 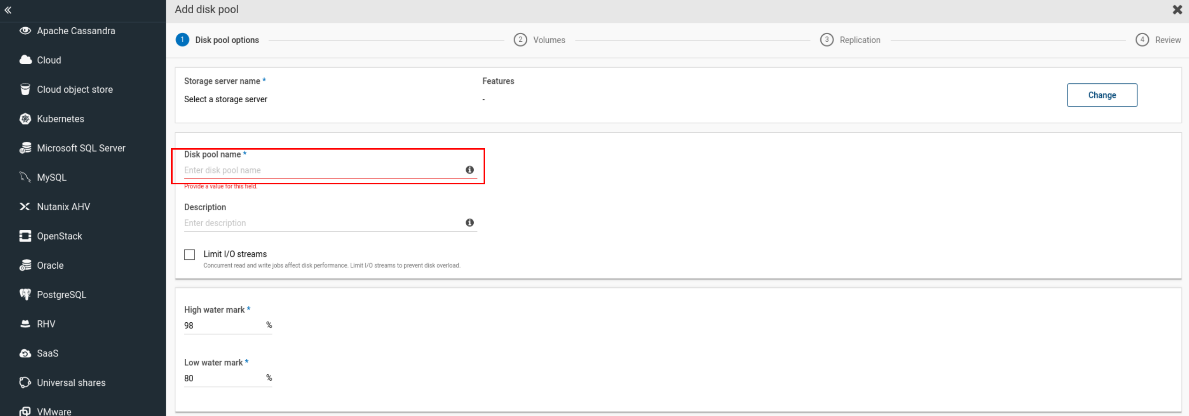 4. Select add volume under volume. 5. Enter the volume name. 6. Select Amazon Agreement 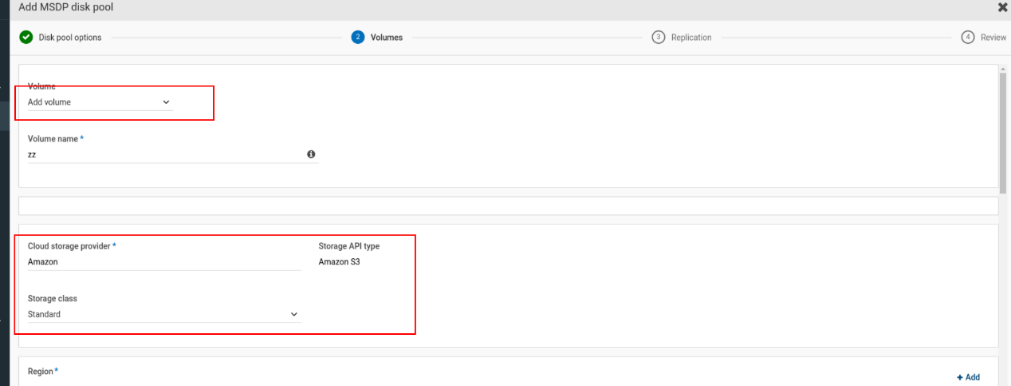 8. Choose Region > Add. 9. Enter the region name, choose Endpoint access style > Path style, and click Add 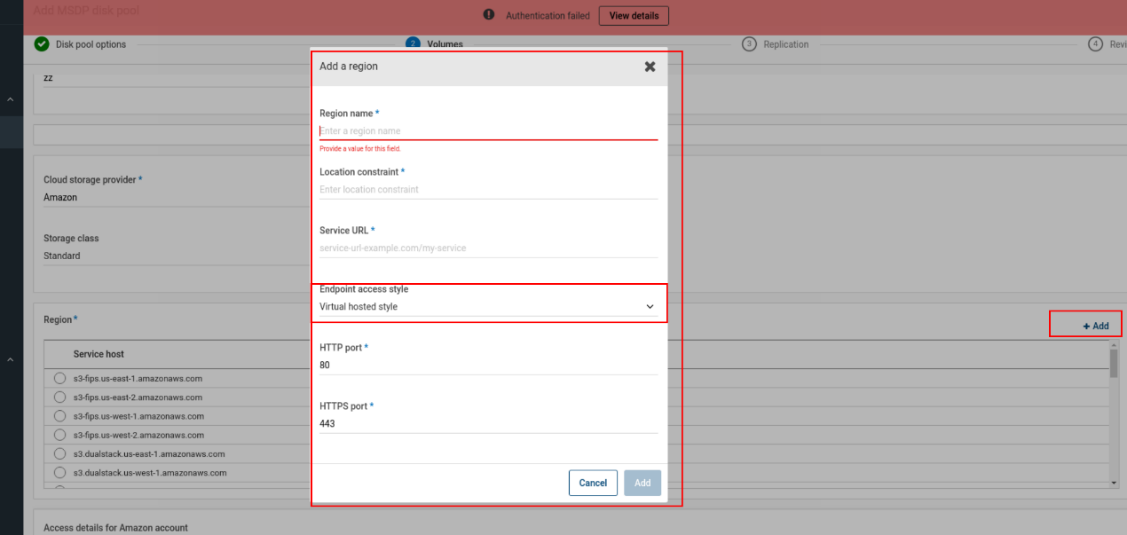 10. Choose access credentials > add a new credential (for the first use), enter the credential name, AK, and s, click Next, and click Save. 10. Choose access credentials > add a new credential (for the first use), enter the credential name, AK, and s, click Next, and click Save.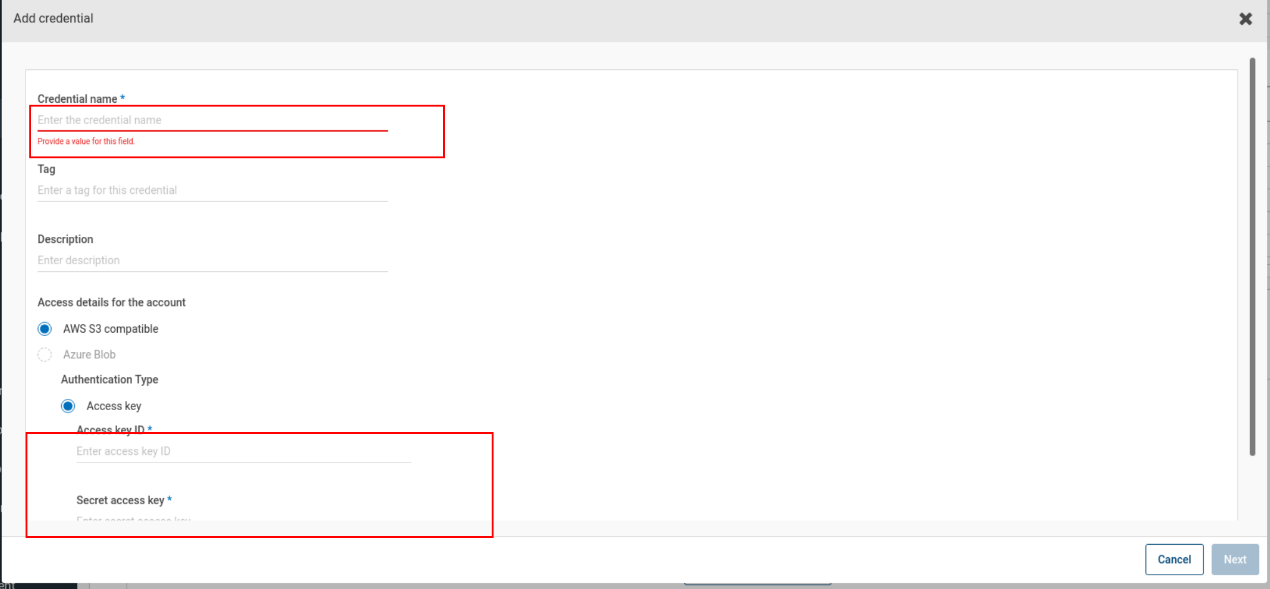 11. Select use object lock under WORM and configure the basic information about the WORM. The configured time is the time range for locking the WORM lock. (If this option is selected, only buckets with WORM enabled on the Pacific and not configured in policy mode will be obtained when the bucket list is obtained.) 12. (Optional) Disabling the Security > Use SSL, whether not configure the certificate 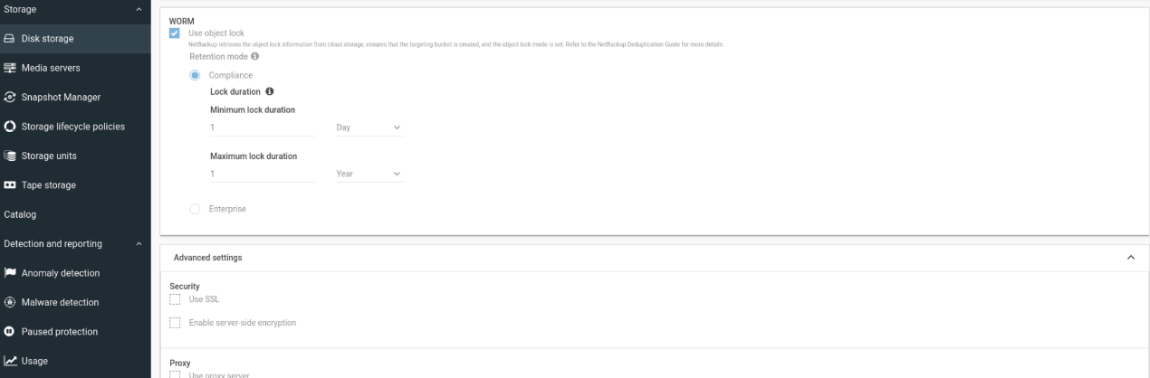
 15. (Optional) Configuring Replication 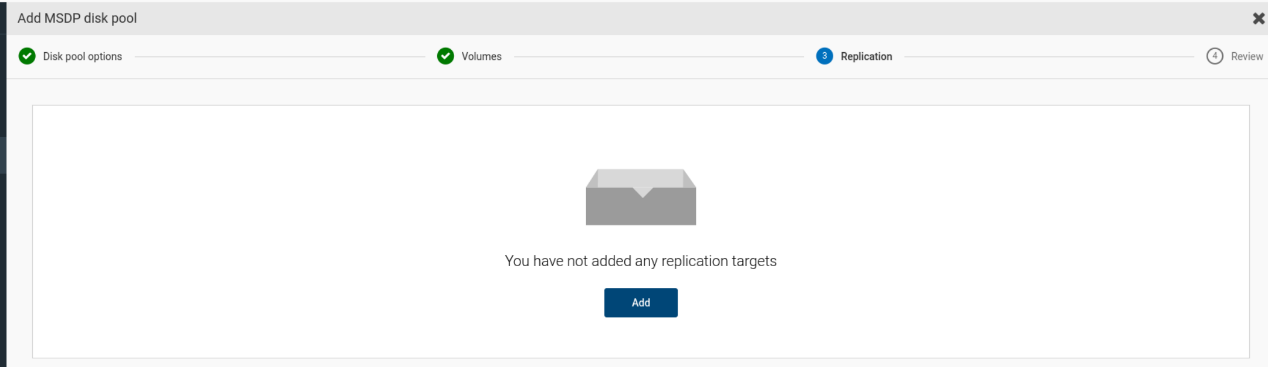 17. Wait until the creation is complete. 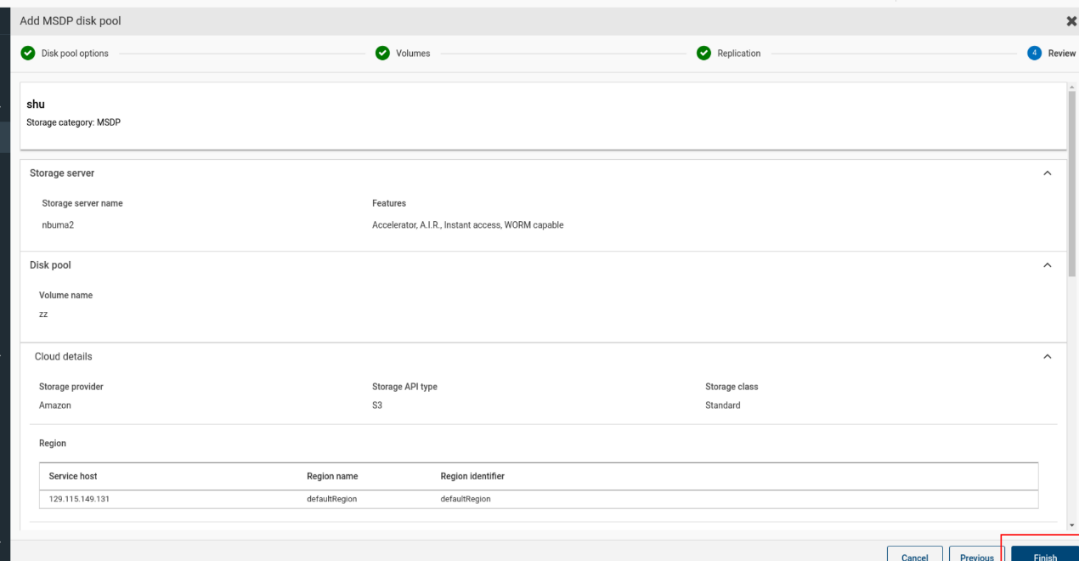 |
Test Conclusion | Passed |
5.3 Configuring a Storage Unit
Test Purpose | To verify that storage pool and volumes is available |
Test Networking | Huawei OceanStor Pacific Storage Function Compatibility Test Networking |
Prerequisites | 1. Deployment of storage device, Master server, Media server and networking have been completed. 2. The storage device is running properly. 3. Namespace and object bucket have been created on the storage device. 4. The media server has been installed and connected to the master server. 5. The MSDP has created success in section 4.1 6. The storage pool and volumes has created success in section 4.2 |
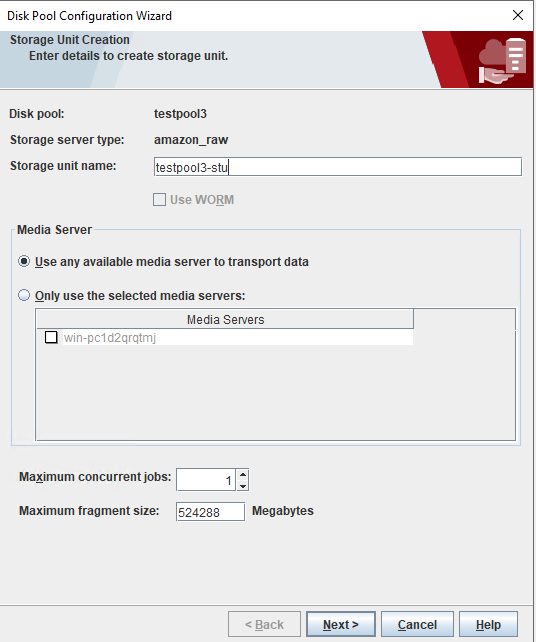
Test Procedure | 1. Choose Storage Units > Add to add a storage unit. 2. Select disk storage server > Media Server Deduplication Pool to local or cloud storage (MSDP, MSDP Cloud) in the pop-up window. 3. Enter the name and click Next. 4. Select disk pool, select Enable WORM, and click Next. (Enable WORM indicates that the WORM function is enabled.) 5. (Optional) Add additional media servers and click Next. 6. Confirm the configuration information and click Finish. |
Expected Result | 1. In step 4, succeed to select storage pool which was created in section 4.2 2. In step 6, succeed to create the unit. |
Test Results | 1. Choose Storage Units > Add to add a storage unit. 2. Select disk storage server > Media Server Deduplication Pool to local or cloud storage (MSDP, MSDP Cloud) in the pop-up window. 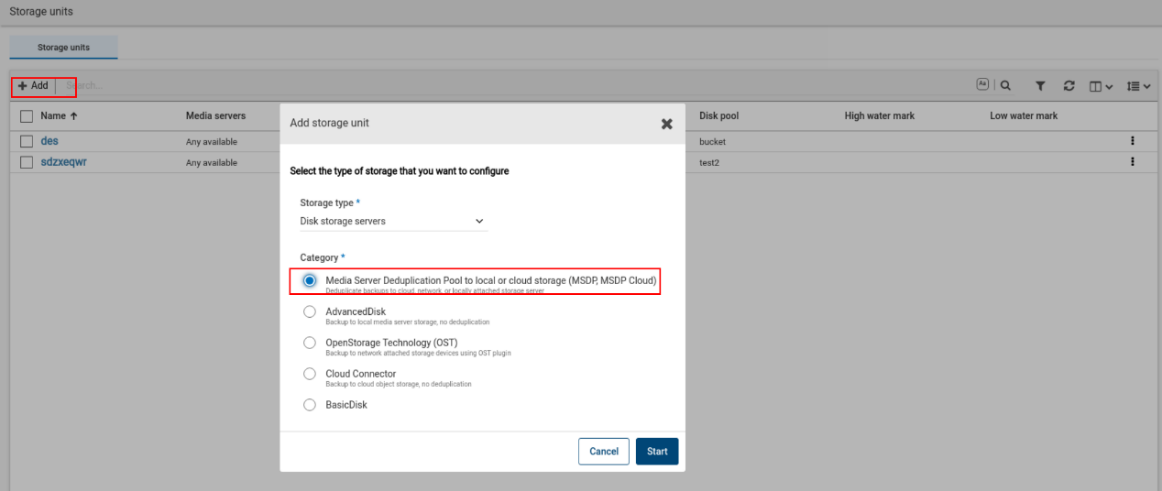 3. Enter the name and click Next. 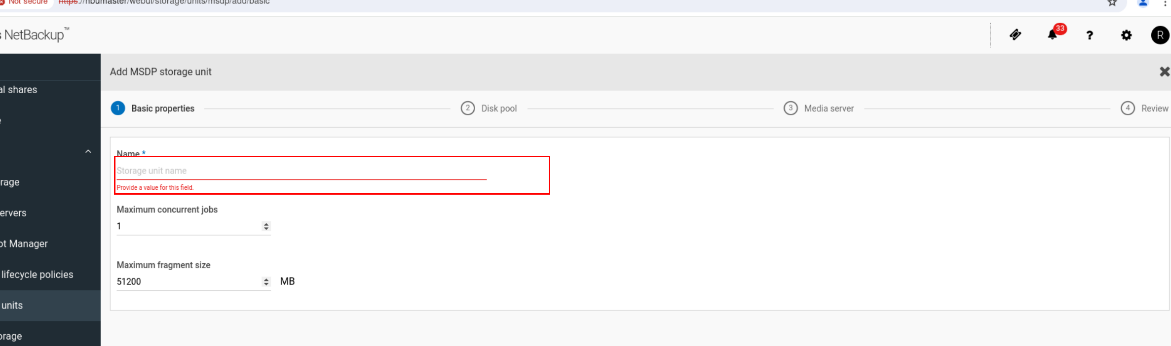 4. Select disk pool, select Enable WORM, and click Next. (Enable WORM indicates that the WORM function is enabled.) 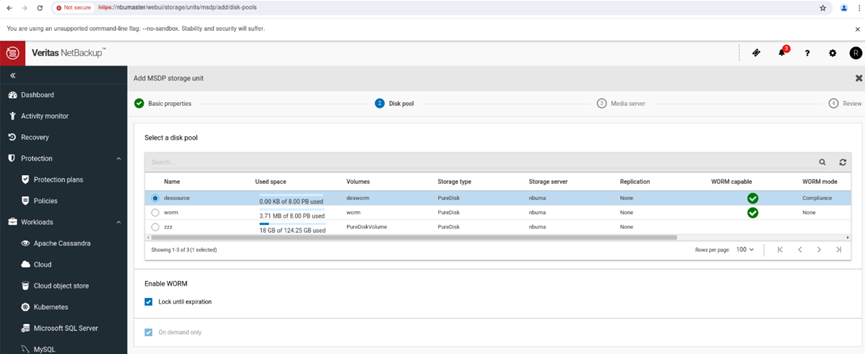 5. (Optional) Add additional media servers and click Next 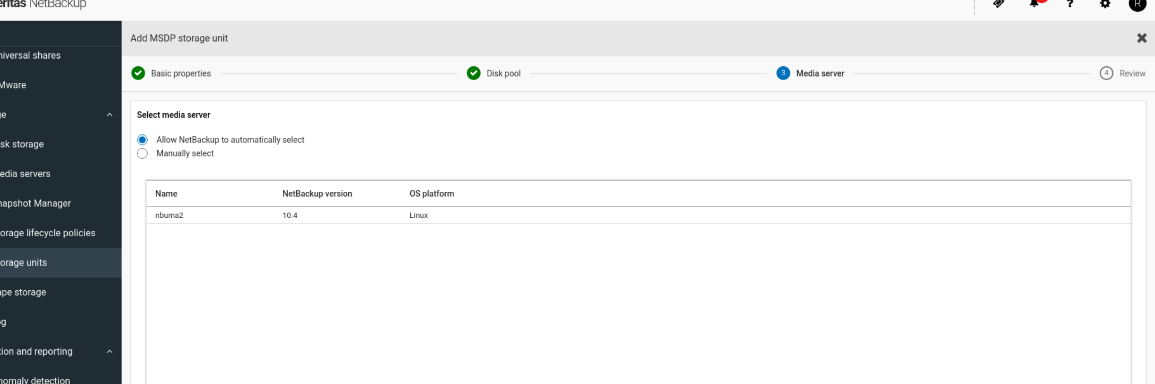 6. Confirm the configuration information and click Save. 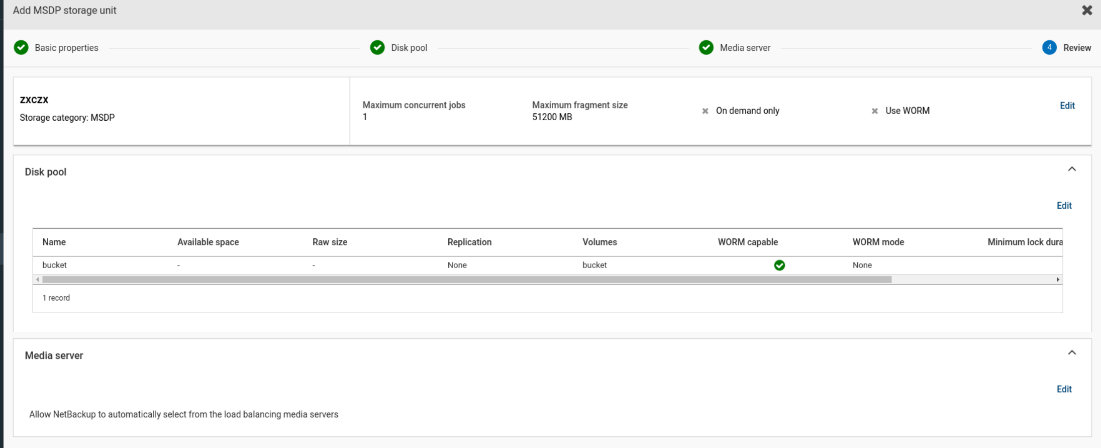 |
Test Conclusion | Passed |
5.4 Configuring the Policy
Test Purpose | To verify that the MSDP unit is available |
Test Networking | Huawei OceanStor Pacific Storage Function Compatibility Test Networking |
Prerequisites | 1. Deployment of storage device, Master server, Media server and networking have been completed. 2. The storage device is running properly. 3. Namespace and object bucket have been created on the storage device. 4. the storage unit has created success in selection 4.3 |
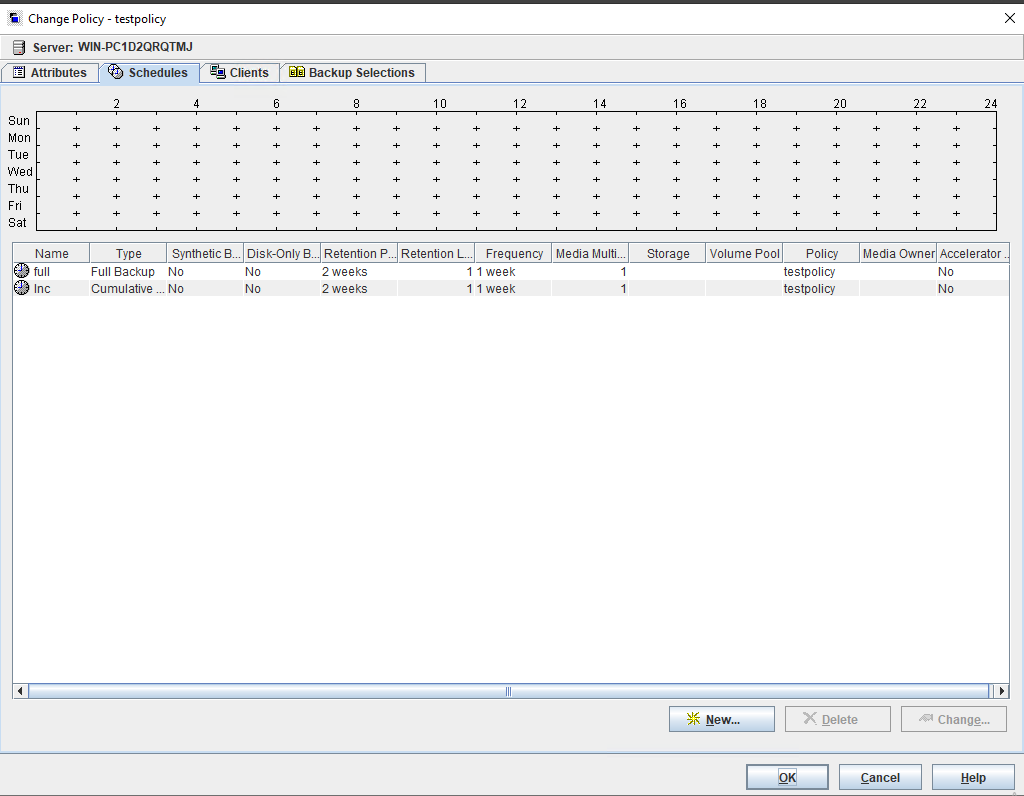
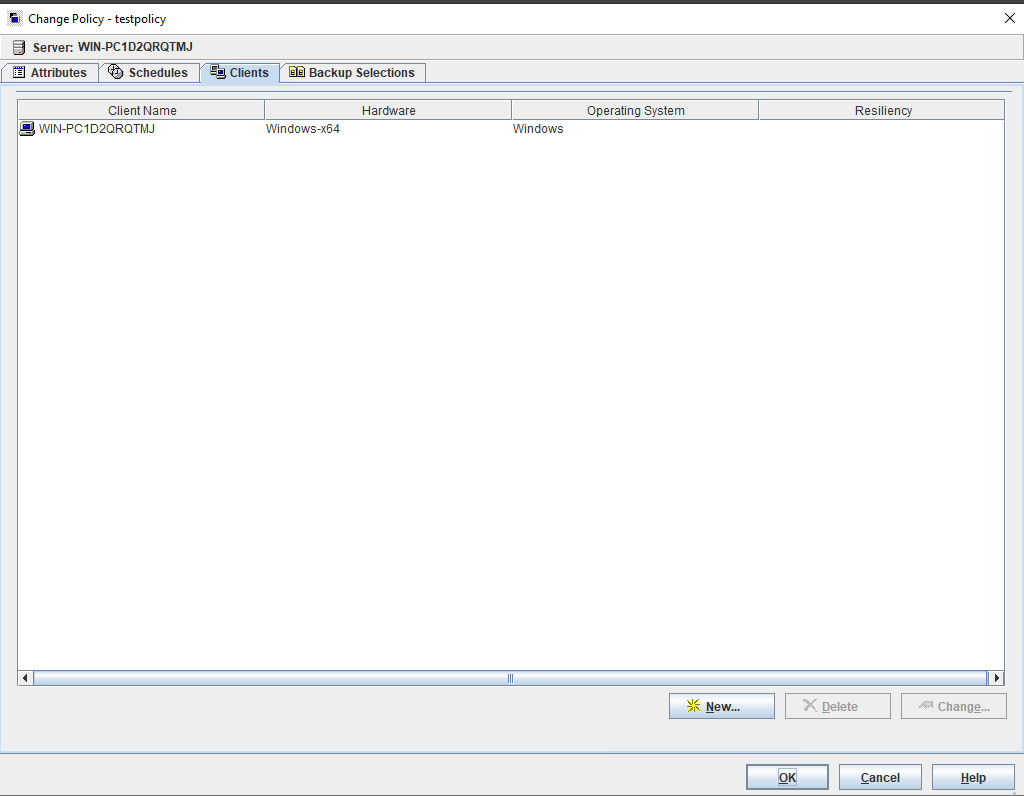
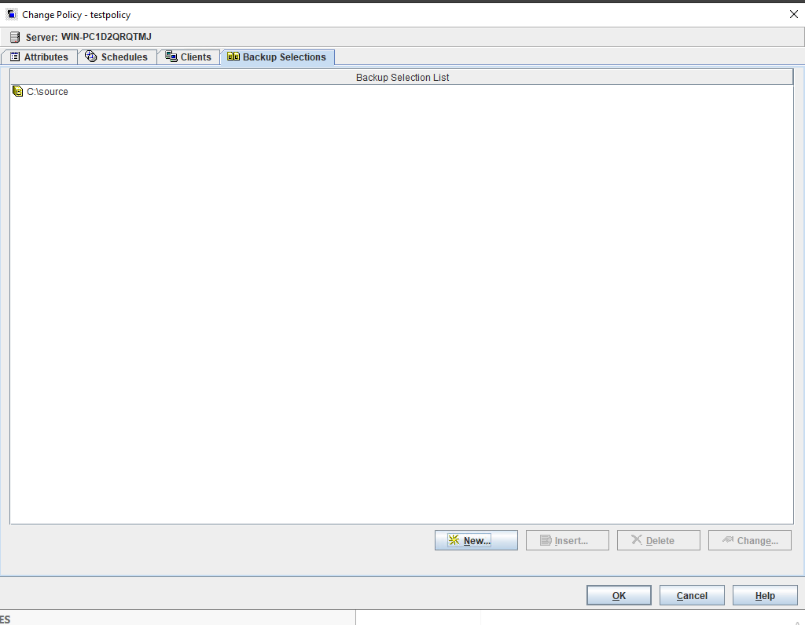
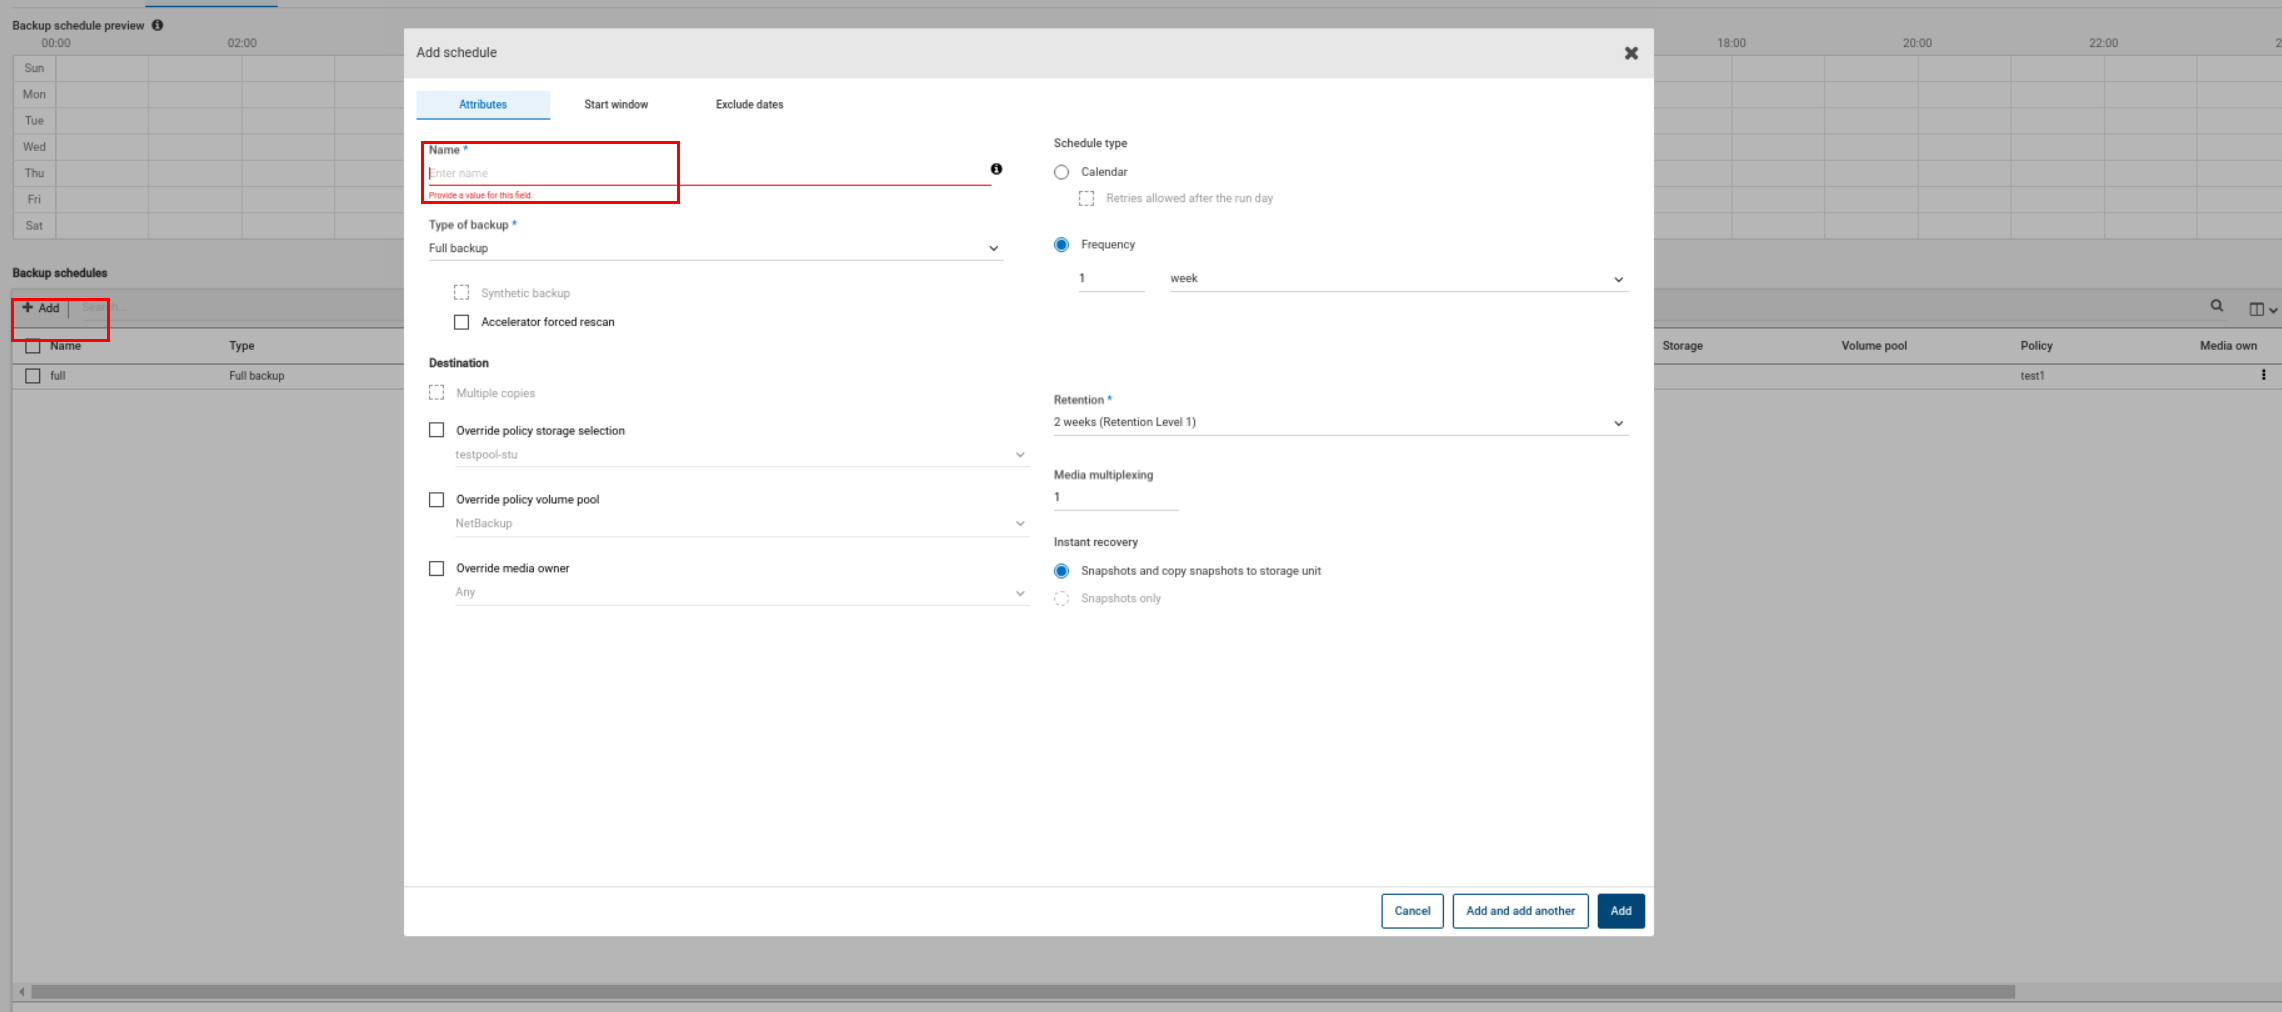
Test Procedure | 1. Choose Policy > Add. 2. Enter the policy name, and set policy type, policy storage, and other configuration items as required. 3. Select Schedule and click Add. 4. Enter the name, set type of backup, and set the retention period. (Note that the lockout time must be within the time range set during MSDP configuration and cannot be modified once it is configured.) 5. Select the client and click Add. 6. Enter the client name, select the client operating system, and select Detect client operating system. 7. Select backup selections and click Add. 8. Selecting a backup file 9. Click Create. |
Expected Result | 1. In step 6, succeed to connect to the client and browser files of the client. 2. In step 9, create policy success |
Test Results | 1. Choose Policy > Add. 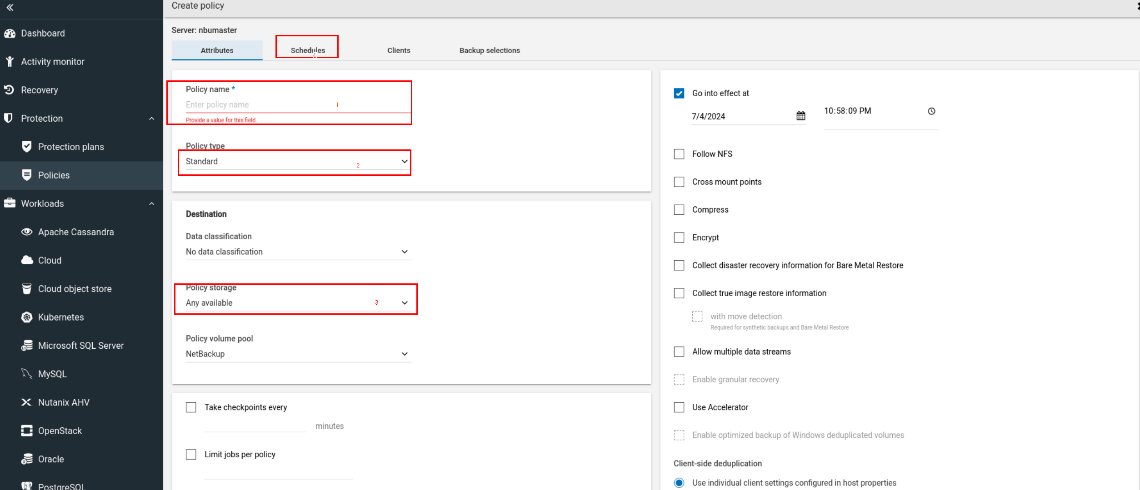 4. Enter the name, set type of backup, and set the retention period. (Note that the lockout time must be within the time range set during MSDP configuration and cannot be modified once it is configured.)  6.Enter the client name, select the client operating system, and select Detect client operating system.. 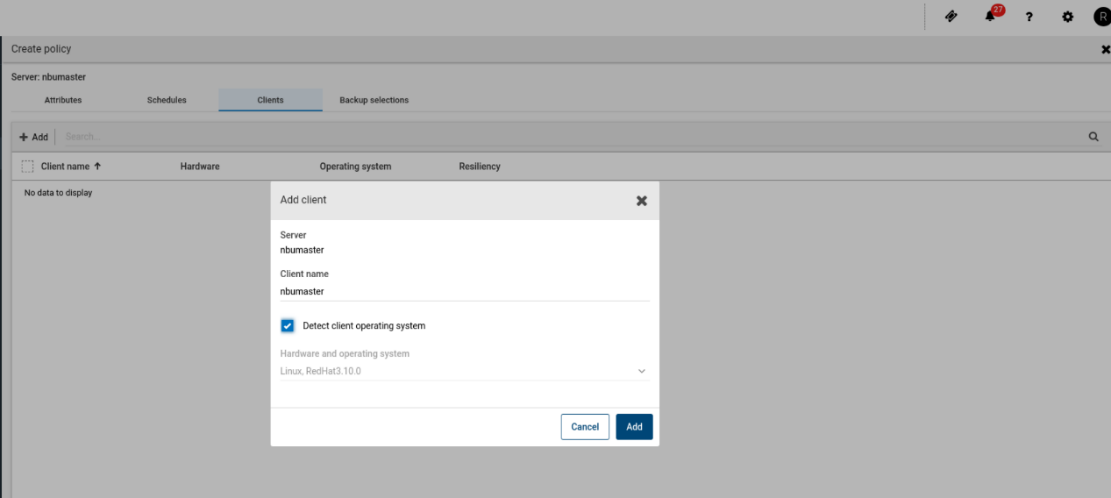 7. Select backup selections and click Add. 8. Selecting a backup file 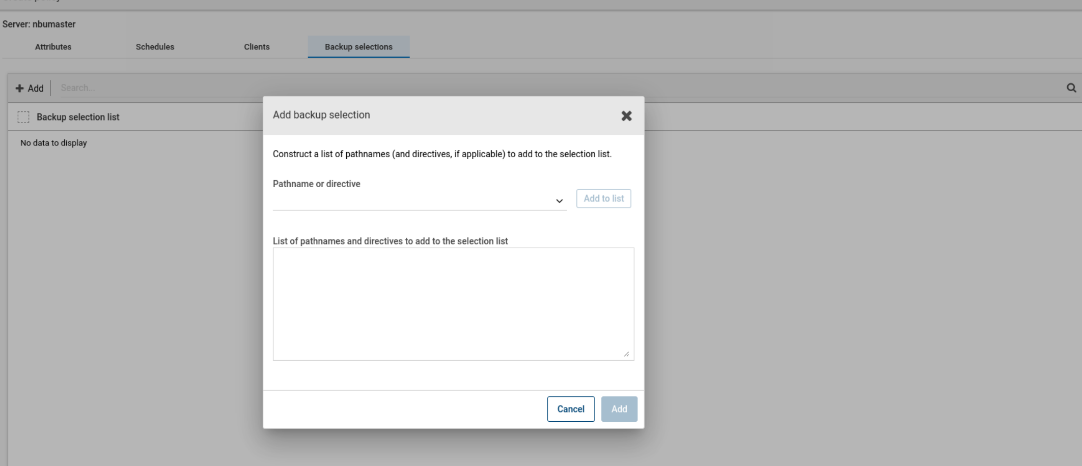 9.Click Create. |
Test Conclusion | Passed |
 2. Enter the policy name, and set policy type, policy storage, and other configuration items as required.
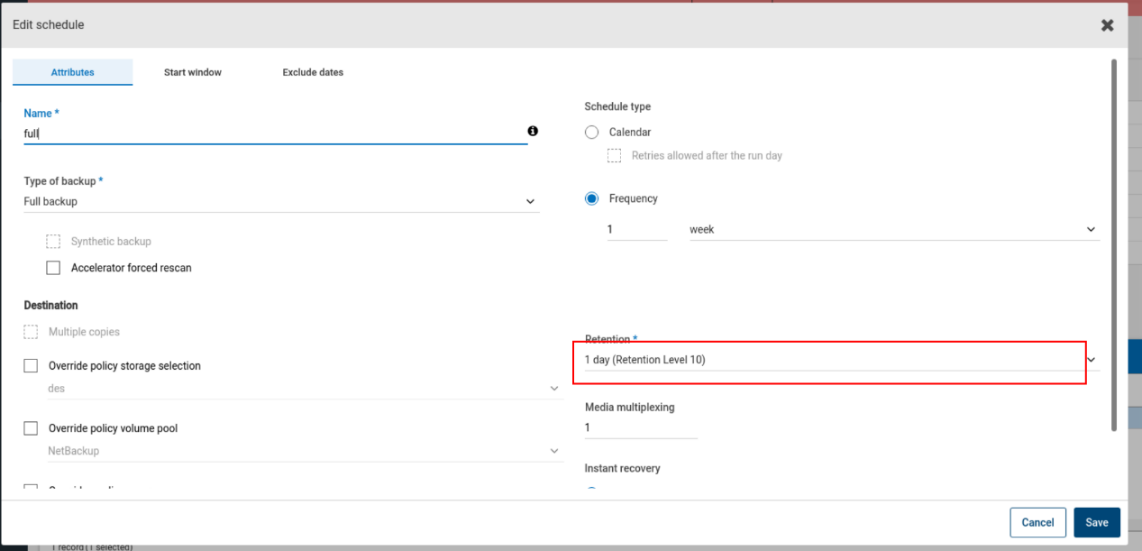
5.5 Full Backup and Recovery
Test Purpose | To verify that the NetBackup can start the WORM through the MSDP and the full backup is working. |
Test Networking | Huawei OceanStor Pacific Storage Function Compatibility Test Networking |
Prerequisites | 1. Deployment of storage device, Master server, Media server and networking have been completed. 2. The storage device is running properly. 3. Namespace and object bucket have been created on the storage device. 4. Prepare some large files and small files. 5. The backup policy has been created in section 4.4. |
Test Procedure | 1. Select a backup policy and click Manual Backup. 2. Once the backup job is finished, check the status of full backup job. 3. Check whether the WORM takes effect. 4. Try to delete the backup file. 5. Enter the recover page and start the recovery job, restoring files to another place. 6. Once the recovery job finished, check the status of the job and data consistency. |
Expected Result | 1. In step 2, the full backup job finishes successfully. 2. In step 3, worm takes effect normally 3. In step 4, delete the backup file failed 4. In step 6, the recovery job finishes successfully, and restored files are the same as the original files. |
Test Results | Prerequisites Pre1 Prepare some large files and small files as backup source. 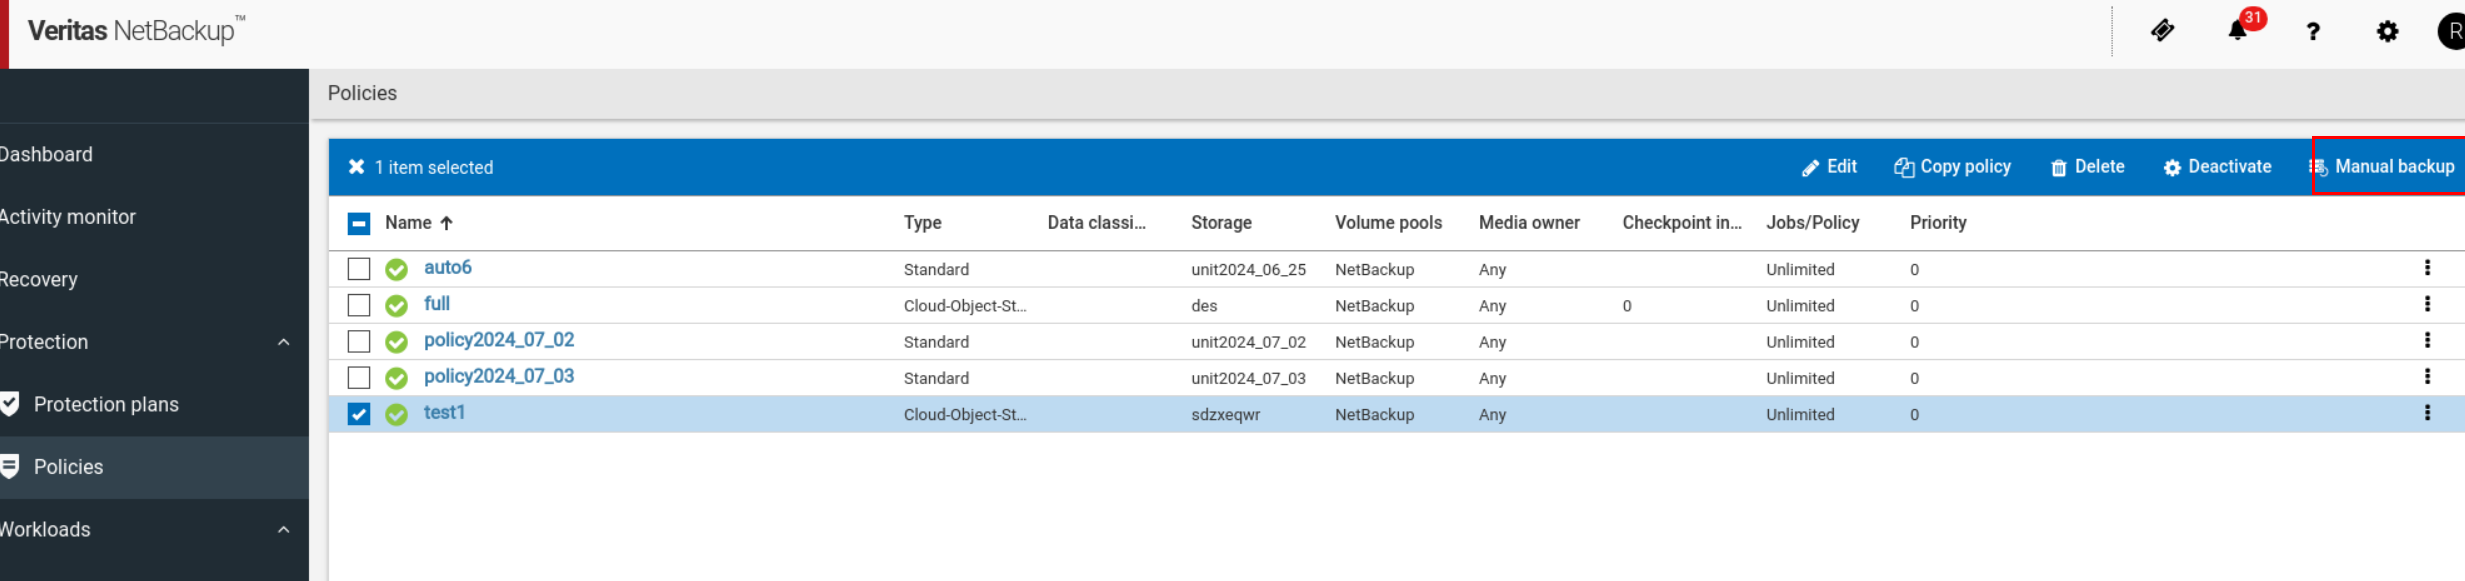 2. Check that the state of backup job is done. The backup job finishes successfully. 2. Check that the state of backup job is done. The backup job finishes successfully.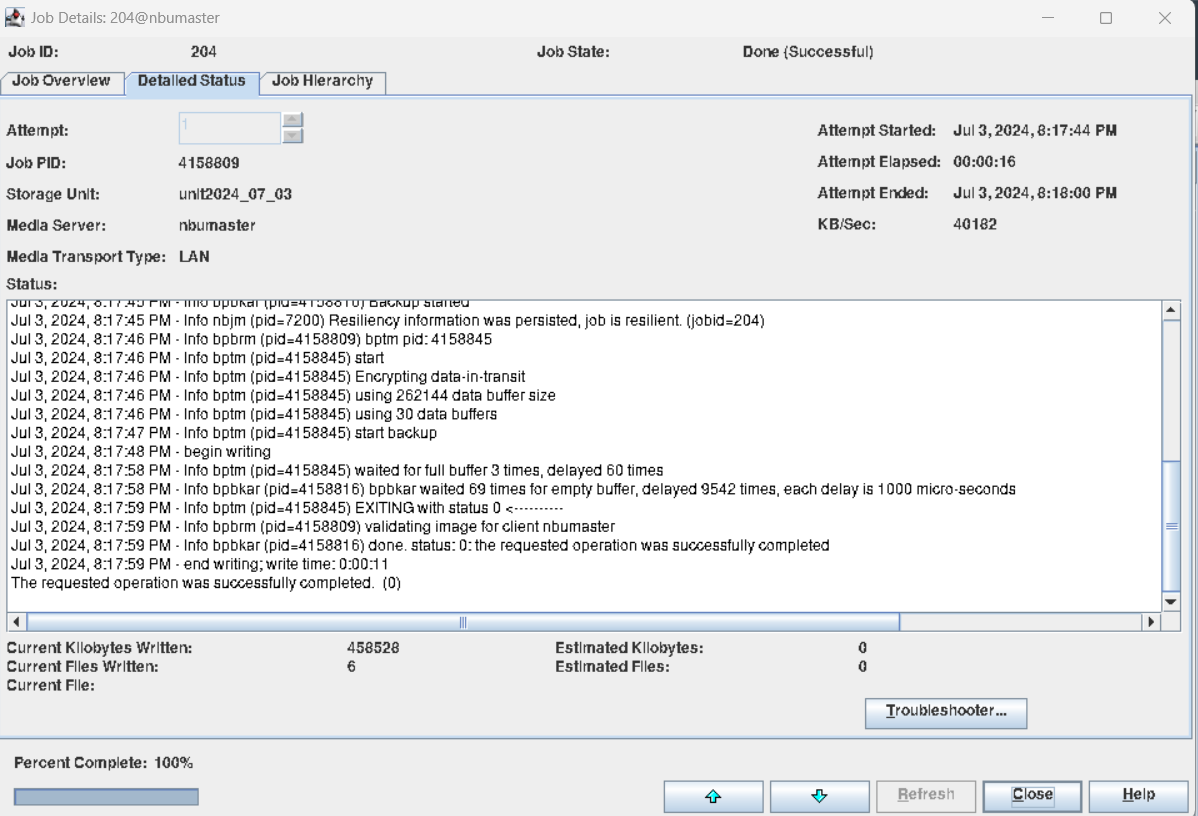 3. Check whether the WORM takes effect. 3. Check whether the WORM takes effect.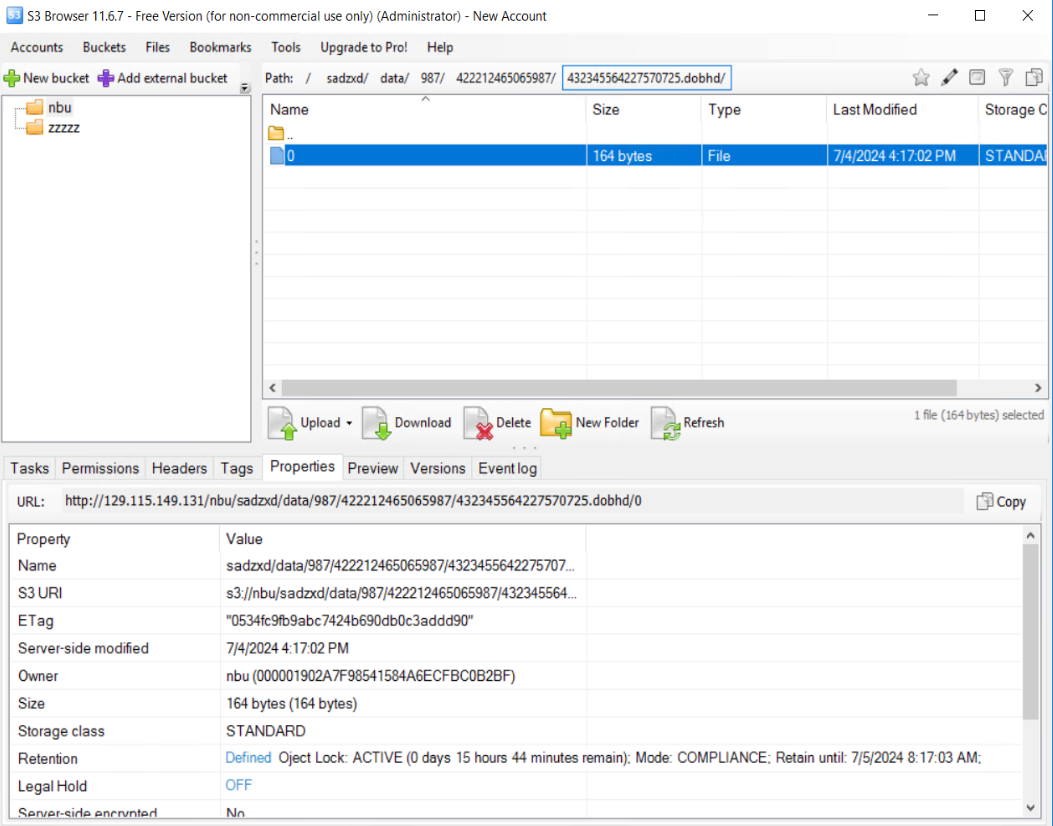 4. Try to delete the backup file 4. Try to delete the backup file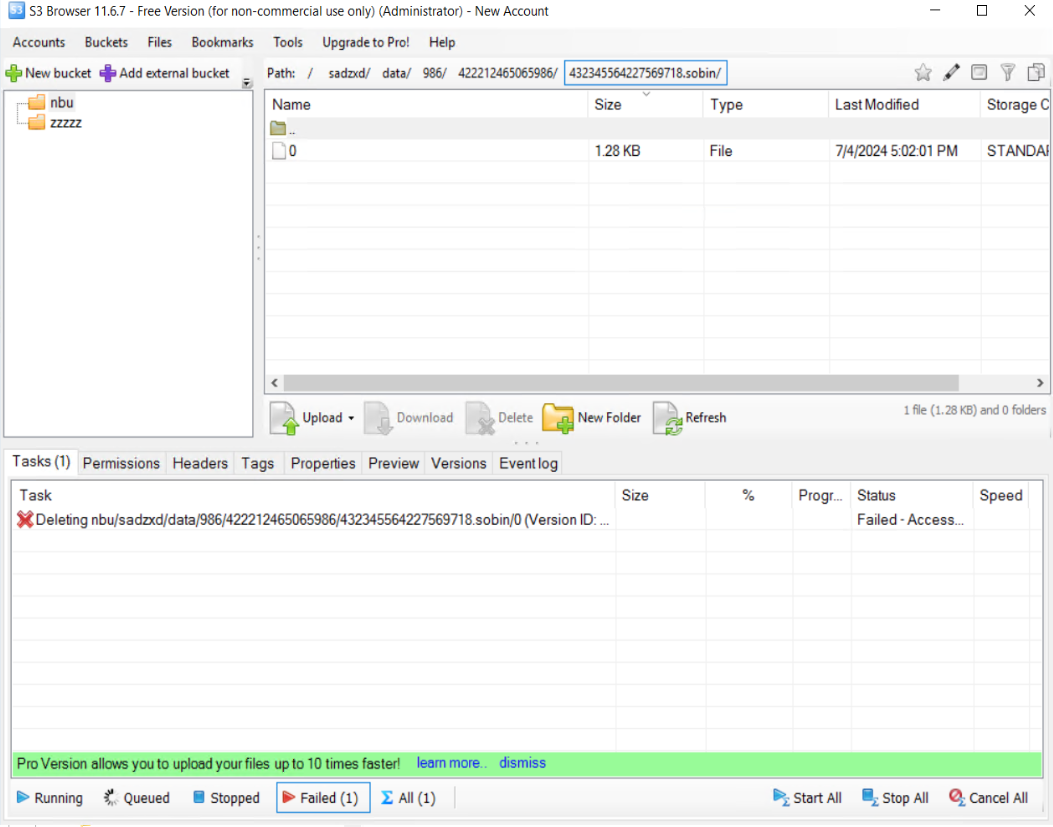 5. Enter the recover page and start the recovery job, restoring files to another place. 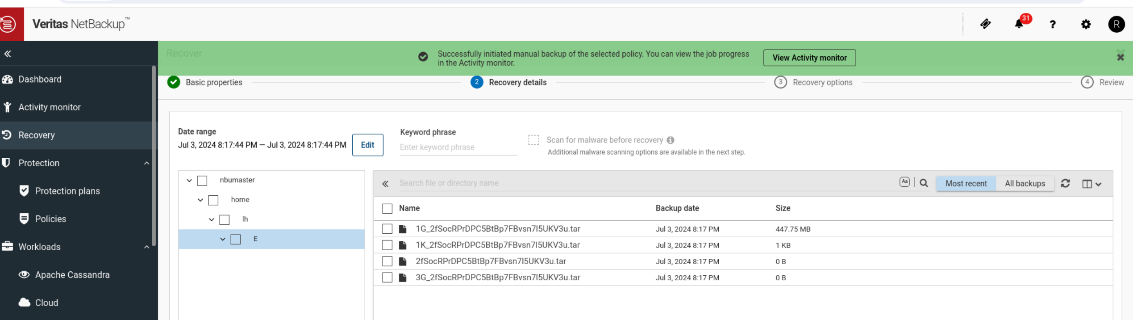 6. Once the recovery job finished, check the status of the job and data consistency.. 6. Once the recovery job finished, check the status of the job and data consistency..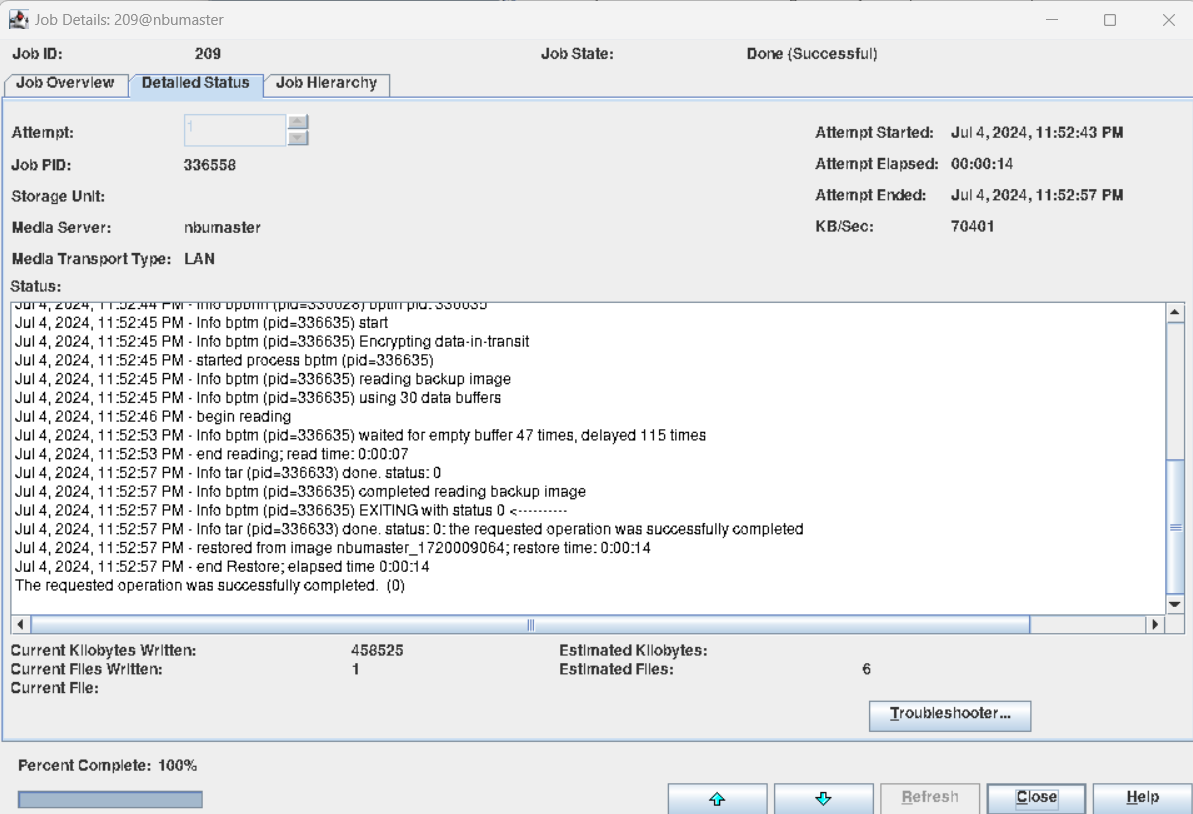 |
Test Conclusion | Passed |
 Test Result
6. Reference
6.1 Veritas NetBackup™ Administrator’s Guide, Volume I
https://www.veritas.com/content/support/en_US/doc/18716246-158973241-0/v27655789-158973241
6.2 Huawei OceanStor Pacific Series Product Documentation
https://support.huawei.com/hedex/hdx.do?docid=DOC1101187689&id=object_config_00184
6.3 Huawei OceanStor Pacific Series Product Documentation
https://www.veritas.com/content/support/en_US/doc/25074086-163525529-0/v26653261-163525529