OceanProtect V200R001C10 Backup Storage Solution Best Practice (Integration with NetBackup)
Interoperability Test Report

Axians Global
All Rights Reserved
Purpose
This document describes the best practices for backing up VMware VMs by using OceanProtect X8000, NetBackup 10.3, and the OpenStorage Technology (OST) plug-in.
Intended Audience
This document is intended for:
- Marketing engineers
- Technical support engineers
Change History
Issue | Date | Description |
|---|---|---|
02 | 2026-04-30 | This issue is the second official release. |
01 | 2025-10-22 | This issue is the first official release. |
1. Overview
This document describes the best practice for backing up VMware VMs by using OceanProtect X8000, NetBackup 10.3, and the OpenStorage Technology (OST) plug-in.
2.Product Overview
2.1 OceanProtect Backup Storage
2.1 OceanProtect Backup Storage
Service Positioning
As the amount, types, and growth rate of data change exponentially, enterprises face increasing data loss risks due to human errors, viruses, natural disasters, and Cyber resilience threats. Therefore, data protection becomes increasingly important.
OceanProtect backup storage features rapid backup, rapid restoration, efficient reduction, and solid resilience. It implements efficient backup and restoration with the TCO greatly reduced. It is widely used in government, finance, carrier, healthcare, and manufacturing industries. In addition, it offers easy management and convenient local/remote maintenance, significantly saving device management and maintenance costs.
OceanProtect backup storage is available in solid-state drive (SSD) and hard disk drive (HDD) forms.
- SSD form: The system supports only SSDs, where service data and metadata are stored.
- HDD form: The system supports both HDDs and SSDs. Service data is stored in the storage pool composed of HDDs, while SSDs store system metadata only. SSD performance advantages accelerate metadata access and improve read/write performance.
Product Highlights
With the active-active high-reliability architecture and full-process acceleration, OceanProtect backup storage features rapid backup, rapid restoration, efficient reduction, and solid resilience.
- Rapid backup and restoration
- Full-process acceleration is implemented. The front-end network protocol offload technology reduces the CPU pressure, and the back-end CPU multi-core parallel scheduling is implemented. Dedicated cores are used through grouping and task partitioning, efficiently improving the processing capability of nodes.
- Based on backup service characteristics, multiple sequential data flows are aggregated for read and write to significantly improve the bandwidth performance. Source deduplication reduces the amount of data to be transmitted over the network and shortens the backup duration.
- The system provides high IOPS performance and can work with mainstream backup software. Backup image data can be accessed immediately, implementing fast utilization of backup data.
- Efficient reduction
- Precise segmentation of backup data flows, aggregation and preprocessing of backup data, and multi-layer inline variable-length deduplication improve logical capacity and reduce TCO.
- Data flow features can be identified. Compression after combination, high-performance predictive encoding, and byte-level compaction are used to improve the data reduction ratio.
- Source deduplication and deduplicated replication help reduce network bandwidth costs.
- Solid resilience
- The active-active hardware architecture is adopted. Therefore, if one controller is faulty, running backup jobs can be switched over to the other controller within seconds without service interruption.
- Multiple technologies, such as protocol encryption, replication link encryption, array encryption, secure snapshot, and WORM, are used to ensure the security and availability of copies.
2.2 NetBackup
NetBackup provides data protection and disaster recovery solutions. With NetBackup, you can back up and restore applications such as VMs, file systems, and databases. For details, see the official documentation of NetBackup.
2.3 OST
NetBackup OST provides NetBackup 6.5 and later versions with common interfaces for third-party storage. NetBackup treats OST-enabled devices as disks and enables functions such as intelligent capacity management, Media Server load balancing, reporting, and lifecycle policies. In addition, NetBackup provides optimized replication.
3. Solution Overview
3.1 Introduction
Based on OceanProtect X8000, this solution integrates the NetBackup 10.3 backup software and the source deduplication (SourceDedupe) feature through the HyperProtect OST plug-in to implement VMware VM backup.
SourceDedupe
- DataTurbo is a file system sharing protocol that supports SourceDedupe and SourceCompression.
- SourceDedupe is a technology that identifies and removes duplicate data at the source by comparing the data to be transmitted with that in the backup target.
- SourceCompression is a technology that uses a lossless compression algorithm to reduce the bandwidth used for transmitting data to a backup storage.
- DataTurbo software supports SourceDedupe and SourceCompression. Deploying DataTurbo on clients can help reduce required transmission bandwidth, save storage resources, and improve backup performance.
3.2 Solution Architecture
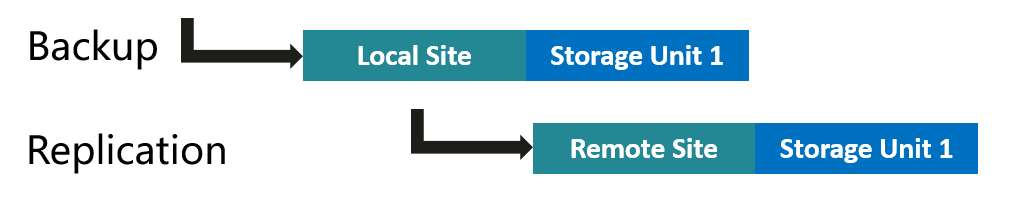
Based on OceanProtect X8000, this solution employs the NetBackup 10.3 backup software and SourceDedupe feature, and Media Server, Master Server, and networks are deployed to back up VMware VMs to the local OceanProtect X8000. For this solution, replication links are established between the local and remote ends to enable the optimized remote replication function to replicate copies to the remote end.
Figure 3-1 Architecture of the VMware VM backup solution using OceanProtect X8000 and NetBackup 10.3
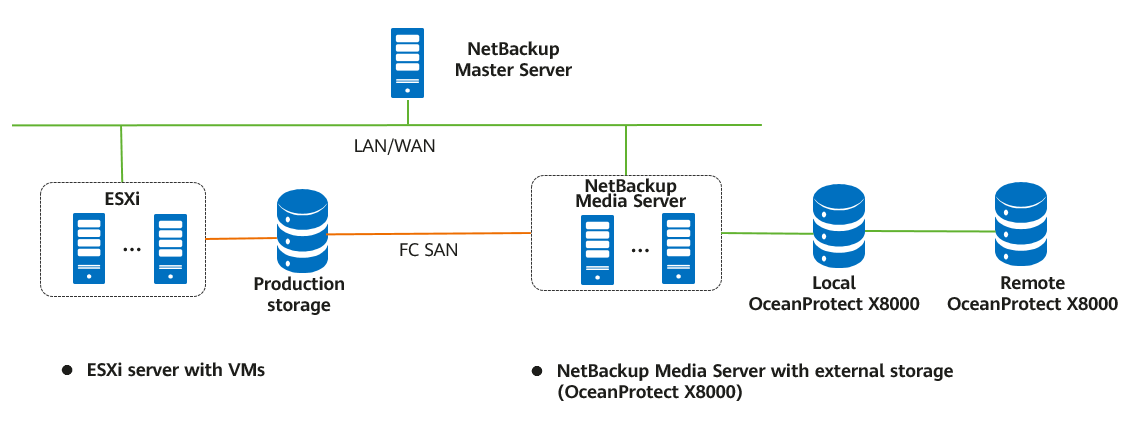
The functions of each component shown in Figure 3-1 are as follows:
- ESXi host: It is used for creating and managing VMs.
- NetBackup Master Server: It executes backup policies and starts backup and restoration.
- NetBackup Media Server: In this example, data is backed up in SAN mode. The NetBackup Media Server is connected to the production storage through a Fibre Channel switch. The DataTurbo software and OST plug-ins are installed on this server.
- Local OceanProtect X8000: It functions as a backup storage device, where file systems are created and then mounted using the DataTurbo protocol to NetBackup as storage units (STUs), to save NetBackup backup copies.
- Remote OceanProtect X8000: The local OceanProtect X8000 is connected to the remote OceanProtect X8000 through replication links. After a file system remote replication pair is created, copies can be replicated from the local end to the remote end.
3.3 Constraints
- If the backup software integrates with the OceanProtect Backup Storage through the DataTurbo protocol, a DataTurbo administrator can be created only under the default vStore System_vStore. For this reason, this solution does not apply to multi-vStore scenarios.
- OST optimized replication uses the storage file-level replication function. In the current version, the replication rate is limited to 100 MB/s by default. To change this limit, contact technical support to obtain the required command.
OST Constraints
- When restoring data, ensure that no remote replication job is in progress. Otherwise, data restoration fails.
- You are advised to set the replication period and backup period to different time. After all backup jobs are complete, enable the replication policy.
- The plug-in checks the copy replication status before copy import. The copy is imported only after the replication is complete. Synchronization during the import will cause a copy import failure, but the copy will be imported again in the next import period.
- When source deduplication is used, a single media server can connect to only one OceanProtect Backup Storage device. In addition, the software version of the backup storage must be 1.2.RC2 or later. For details about how to establish source deduplication links, see « Establishing a Network Link » in the OceanProtect Backup Storage 1.6.0-1.7.0 & V200R001 SourceDedupe User Guide. During intra-domain replication, one media server needs to connect to multiple OceanProtect Backup Storage devices. Therefore, source deduplication cannot be used for intra-domain replication.
- DataTurbo 1.7.0 and later versions support connection to a maximum of four backup storage devices.
- For details about service concurrency settings recommended for OST+DataTurbo, see « Installation » in the OceanProtect Backup Storage 1.6.0-1.7.0 & V200R001 SourceDedupe User Guide. If the number of concurrent services exceeds the setting corresponding to the level configured during DataTurbo installation, backup may fail or performance may deteriorate.
- For intra-domain and inter-domain replication, a maximum of one-to-four or four-to-one replication is supported in one-to-many or many-to-one scenarios respectively. During inter-domain replication, a file system can be connected to only one media server at a time.
- If Air Gap replication links are disconnected during replication, the system retries for 15 minutes to improve reliability. If these links are still disconnected after the retry, the replication job will fail.
- File system dtrees cannot be mounted.
- The intra- and inter-domain replication functions apply only to file systems of system vStores.
- The performance of backup acceleration is limited by the available resources of media servers. You are advised to set the maximum number of concurrent jobs of destination storage units used for backup acceleration to 50 and adjust the number based on the actual environment to optimize performance.
- The constraints on intra- and inter-domain replication specifications are as follows. If the specifications are exceeded, replication jobs may fail.
- A maximum of 16 on-demand copy configuration items (source end + target end) can be created for each file system.
- A maximum of 1,024 copy jobs can be created for a single file system. A maximum of 1,024 copy jobs can be created for a storage system.
- The S3 protocol is not supported for intra- and inter-domain replication.
- Backup acceleration supports only the DataTurbo protocol.
4. Planning and Configuration
4.2 Network Planning for Different OceanProtect Models
4.3 Backup Capacity and Performance Planning
4.4 OceanProtect Configuration Planning
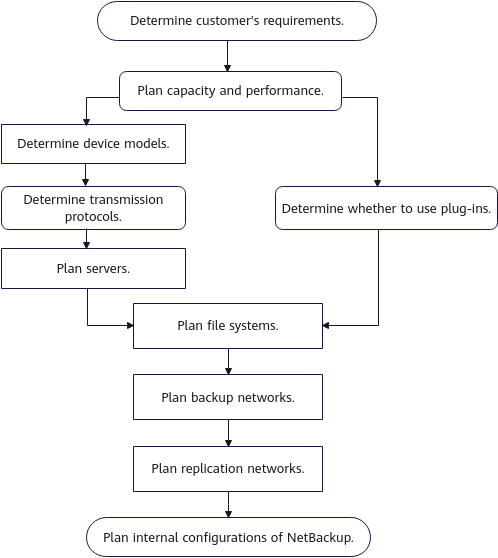
4.1 Planning Process
Select the models of OceanProtect Backup Storage devices and determine the transmission protocols and number of backup media servers required for the entire network based on the customer’s capacity and performance requirements. Determine whether to use the OST plug-in based on the required backup software features. Then, plan the file systems, backup networks, and replication networks based on the number of servers, transmission protocols, and used features to complete the planning process.
Planning process for integrating the OceanProtect with NetBackup
4.2 Network Planning for Different OceanProtect Models
A customer can select OceanProtect X3000, OceanProtect X6000, OceanProtect X8000, OceanProtect X9000, or OceanProtect E8000 to meet their backup capacity and performance requirements. For details about the capabilities of different device models, see the product disclosure and solution disclosure. The network configuration principles for all models comply with the principles described in 4.5 NetBackup Planning.

OceanProtect E8000 is the same as other models in upper-layer service networking, differing only in controller expansion networking. For details about how to add controllers for OceanProtect E8000, see « Adding Controllers (OceanProtect E8000) » in the OceanProtect Backup Storage 1.6.0-1.7.0 and V200R001 Capacity Expansion Guide.
4.3 Backup Capacity and Performance Planning
Generally, the capacity of an OceanProtect Backup Storage system is planned based on the customer’s backup data capacity and retention period.
Before planning and designing a backup solution, survey the customer’s production system and plan the backup system according to the following procedure.
- Create a backup policy.
Survey the service systems to be backed up, and create a proper backup policy for each service system based on service requirements. For example, full and incremental backups can be performed weekly and daily respectively, and the backup data can be retained for one month.
Table 4-1 provides a typical backup policy.
Table 4-1 Typical backup policies
No. | Backup Object | Incremental Backup Frequency | Incremental Backup Copy Retention Period (Day) | Number of Incremental Backup Copies | Full Backup Frequency | Full Backup Copy Retention Period (Day) | Number of Full Backup Copies |
|---|---|---|---|---|---|---|---|
1 | VM | Daily | 90 | 87 | Monthly | 90 | 4 |
2 | File | Daily | 90 | 77 | Weekly | 90 | 14 |
3 | Daily | 365 | 353 | Monthly | 365 | 13 | |
4 | Database | Daily | 90 | 77 | Weekly | 90 | 14 |
- Calculate the backup capacity.
Survey the production capacity of each service system to be backed up and the data change rate (such as daily and annual change rates). Then, send the survey information to Huawei technical support engineers to obtain the deduplication ratio and post-deduplication capacity.
Table 4-2 provides typical examples of calculating the backup capacity.
Table 4-2 Calculating the backup capacity
No. | Site | Backup Object | Initial Capacity (GB) | Capacity Growth Rate | Three-Year Capacity Before Deduplication (GB) | Data Deduplication Ratio | Three-Year Capacity After Deduplication (GB) |
|---|---|---|---|---|---|---|---|
1 | Data center | VM | 5,000 | 1% per month | 32,177 | 5:1 | 6,435 |
2 | File | 2,500 | 2% per month | 81,206 | 5:1 | 16,241 | |
3 | 1,000 | 2% per month | 33,199 | 8:1 | 4,150 | ||
4 | Database | 5,000 | 1% per month | 112,042 | 3:1 | 37,347 | |
5 | Total: | 13,500 | 258,624 | 64,175 | |||
6 | Remote site 1 | VM | 2,500 | 1% per month | 16,089 | 5:1 | 3,218 |
7 | File | 1,250 | 2% per month | 40,603 | 5:1 | 8,121 | |
8 | Total: | 3,750 | 56,692 | 11,339 | |||
9 | Remote site 2 | VM | 5,000 | 1% per month | 32,177 | 5:1 | 6,435 |
10 | File | 3,000 | 2% per month | 97,447 | 5:1 | 19,489 | |
11 | Total: | 8,000 | 129,624 | 25,924 | |||
12 | Total (all sites): | 25,250 | 444,940 | 101438 | |||
- Calculate the backup performance and bandwidth.
You are advised to perform the first full backup after the backup system is delivered for the first time. You need to plan a backup time window for the first full backup. A daily backup time window needs to be planned for periodic or incremental backup based on the backup policy required by the customer. Generally, it is recommended that the periodic full backup of each application system be performed in off-peak hours. The full and incremental backup jobs of each application system should be executed within a period based on the backup policies.
Table 4-3 provides typical examples of calculating the backup performance and bandwidth.
Table 4-3 Examples of calculating the backup performance and bandwidth
No. | Site | Backup Object | Data Volume of Daily Full Backup After Three Years (GB) | Backup Time Window (Hour) | Backup Bandwidth (MB/s) |
|---|---|---|---|---|---|
1 | Data center | VM | 7,154 | 4 | 509 |
2 | File | 5,100 | 2 | 725 | |
3 | 2,040 | 1 | 580 | ||
4 | Database | 7,154 | 5 | 407 | |
5 | Remote site 1 | VM | 3,577 | 2 | 509 |
6 | File | 2,550 | 2 | 363 | |
7 | Remote site 2 | VM | 7,154 | 4 | 509 |
8 | File | 6,120 | 3 | 580 |
- Determine the number of media servers based on the software recommendation. The following is for reference only.
In an actual project, select a proper type and number of media servers based on the front-end or back-end capacity. If the OceanProtect integrates with NetBackup regardless of bottlenecks on the backup networks:
- The maximum logical backup bandwidth can reach 2.5 GB/s when the DataTurbo plug-in is used for transmission and the server hardware configuration is 2 × Intel Xeon Silver 4214R CPUs (12 cores) and 4 × 32 GB RAM.
- OceanProtect X8000 supports a maximum of 20 GB/s logical receiver (RX) bandwidth.
- In ideal cases, the backup performance of a single server can be linearly increased until the maximum RX bandwidth of the selected OceanProtect Backup Storage model is reached.
- Create a replication policy.
If backup copy replication is required for DR, a replication policy must be created. You need to plan the execution time window of replication jobs.
Table 4-4 provides typical replication policy examples.
Table 4-4 Replication policy examples
No. | Source Site | Target Site | Replication Type | Replication Trigger Type | Replication Time Window |
|---|---|---|---|---|---|
1 | Remote site 1 | Data center | Backup storage-based replication | Trigger by time, automatic copy | 07:00 to 11:00 |
2 | Remote site 2 | Data center | Backup storage-based replication | Trigger by time, automatic copy | 07:00 to 11:00 |
3 | Data center | Remote site 2 | Backup storage-based replication | Trigger by time, automatic copy | 11:00 to 21:00 |
- Calculate the replication performance and bandwidth.
Determine the replication time window based on customer’s requirements. Calculate the replication performance requirements based on the volume of data to be replicated.
Maximum volume of data to be replicated at each site per day = ∑(Full backup data volume of all applications/Deduplication ratio)
Table 4-5 provides typical examples of calculating the replication bandwidth.
Table 4-5 Typical examples of calculating the replication bandwidth
No. | Source Site | Target Site | Daily Replication Data Volume (GB) | Replication Time Window (Hour) | Replication Bandwidth (MB/s) |
|---|---|---|---|---|---|
1 | Remote site 1 | Data center | 1,225 | 2 | 174 |
2 | Remote site 2 | Data center | 2,655 | 4 | 189 |
3 | Data center | Remote site 2 | 5,090 | 9 | 161 |
4.4 OceanProtect Configuration Planning
Planning Storage Resources
- Disk type planning: The storage system supports the creation of storage pools using SSDs and HDDs. Table 4-6 describes the disk type planning.
Storage Form | OceanProtect X8000 (all-flash) | OceanProtect X8000 (HDD) |
Disk Type | All disks in a storage pool are SSDs. | A storage pool consists of SSDs and HDDs. |
Disk Quantity |
|
|
- Storage capacity planning: The capacity of OceanProtect X8000 is planned based on the customer’s backup data capacity and retention period.
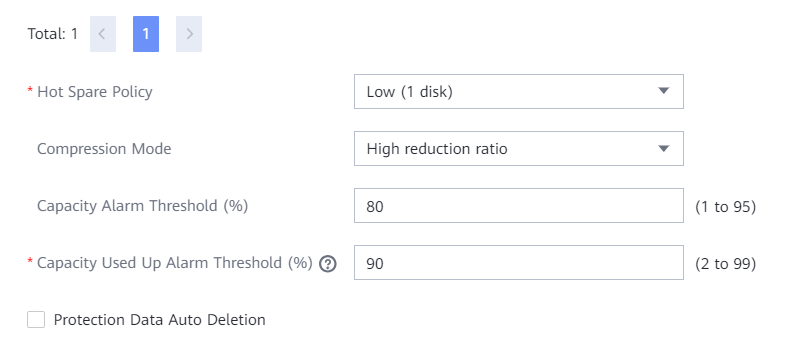
- Compression mode planning: The storage pool supports two compression modes: high reduction ratio (default) and high performance.
With regard to the compression ratio, the high reduction ratio mode outperforms the high performance mode.
Planning File Systems
- File system planning: Table 4-7 describes the key parameters that are used for file system planning.
Table 4-7 File system planning
Parameter | Description |
|---|---|
Capacity | The capacity of a file system is planned based on actual services. |
Quantity | See the description in 4.5 NetBackup Planning. |
Application type |
|

When integrating the NetBackup backup software, ensure that the number of file systems in use is greater than or equal to the number of controllers to maximize the storage array performance.
- File system sharing: OceanProtect X8000 provides CIFS, NFS, and DataTurbo shares. In this solution, the SourceDedupe feature is used. Therefore, DataTurbo shares are selected for file system sharing. Currently, DataTurbo shares support TCP or Fibre Channel networks. You can visit OceanProtect Compatibility Query to query the operating system and backup software versions supported by DataTurbo clients.
Planning TCP Networks When Source Deduplication Is Used
- Planning physical ports
- Quantity planning: After SourceDedupe is enabled, plan the required physical bandwidth based on the number of backup hosts. Planning 2 × 10GE optical fibres for each backup host can meet the bandwidth requirements. For example, if there are four backup hosts, plan eight physical ports for the back-end OceanProtect X8000.
- Configuration planning: OceanProtect X8000 is a dual-controller device. To ensure reliability, the planned NICs must be evenly distributed to controllers A and B.
- Planning logical ports
- Quantity planning: Logical ports are created for running NAS services. You are advised to configure at least one logical port for each physical port.
- Configuration planning: OceanProtect X8000 consists of controllers A and B. You are advised to use two 10GE optical fibers to connect a backup host to the logical ports of the controller where the file system to be used resides.
4.5 NetBackup Planning
As described in 3.2 Solution Architecture, the OceanProtect Backup Storage only stores backup data in the entire backup system. It does not participate in the control and scheduling of backup and restoration services. The services are concentrated on the read and write interactions of the NetBackup Media Server host. Therefore, you need to plan the entire backup system based on the NetBackup official documentation to ensure that the performance meets the expectation.
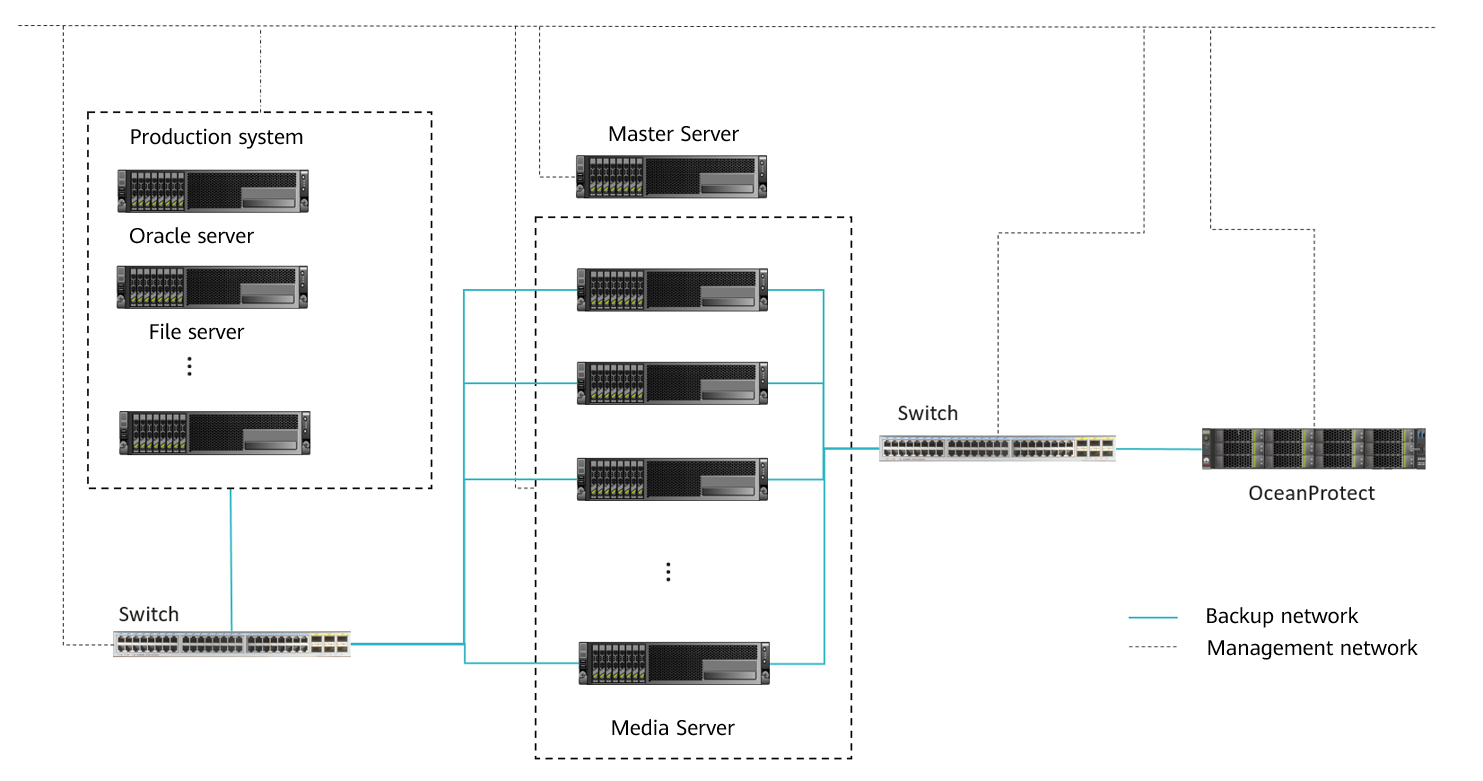
In most non-virtualization backup services, the backup agent is deployed on the production host and sends data to the Media Server. The backup agent can be deployed as required.
Figure 4-2 Networking diagram in non-virtualization backup scenarios
In common VMware backup scenarios, there are three transmission modes. The backup host reads production data, and the Media Server transmits backup copy data to the OceanProtect Backup Storage. Perform deployment based on service requirements. The transmission mode does not affect the interaction between the backup system and the OceanProtect.
NBD mode: This mode can be used for any infrastructure configuration. The only requirement is that the backup host must be connected to the ESXi production host network. However, the data transmission speed on the LAN is slow and the application scenario is rare. Therefore, you are advised to use the same host for the backup host and Media Server.
Figure 4-3 Networking diagram of VMware virtualization backup in NBD mode
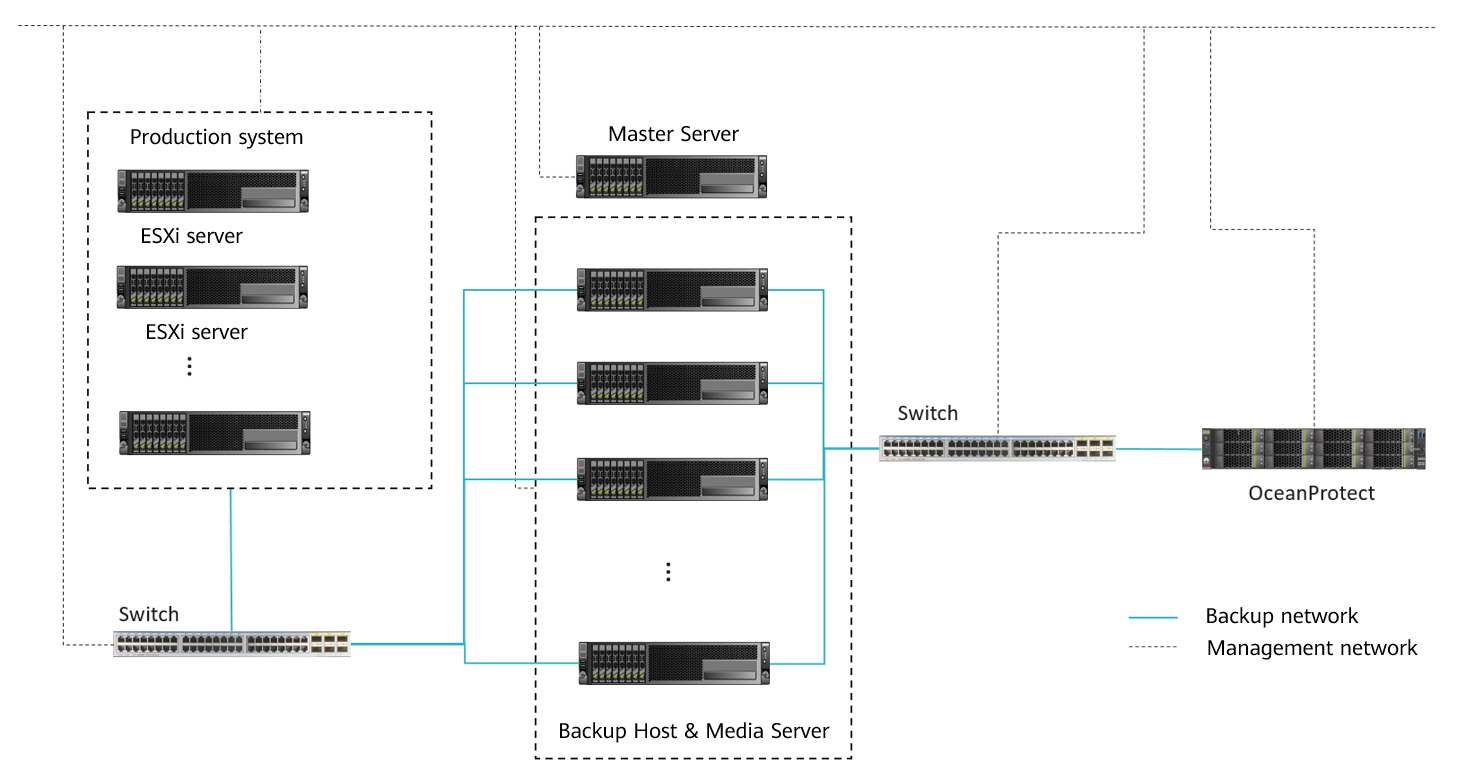
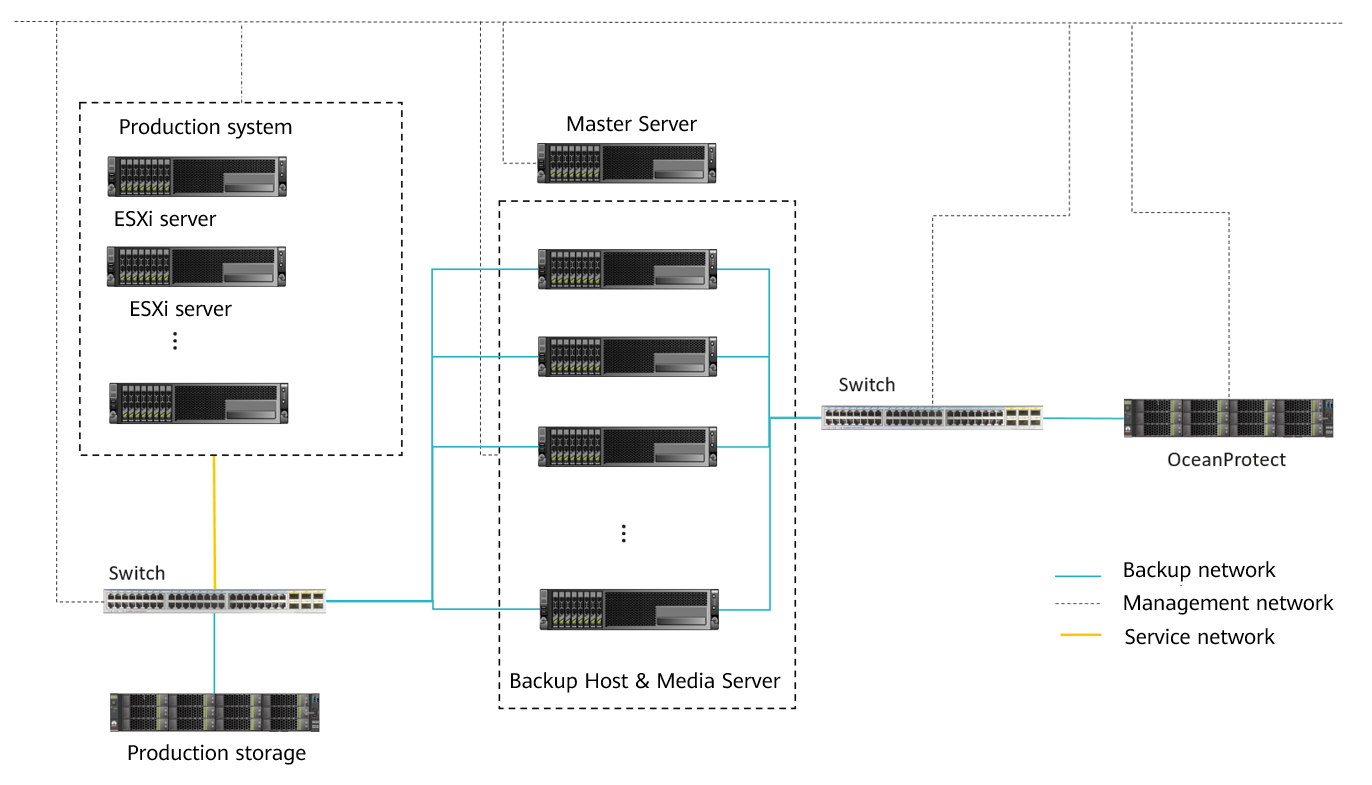
SAN mode: In this mode, NetBackup reads data from or writes data to the storage system where the VM data or backup data resides. It is recommended that a physical machine be used as both the backup host and Media Server. The host must be able to directly read the storage of the production system.
Figure 4-4 Networking diagram of VMware virtualization backup in SAN mode
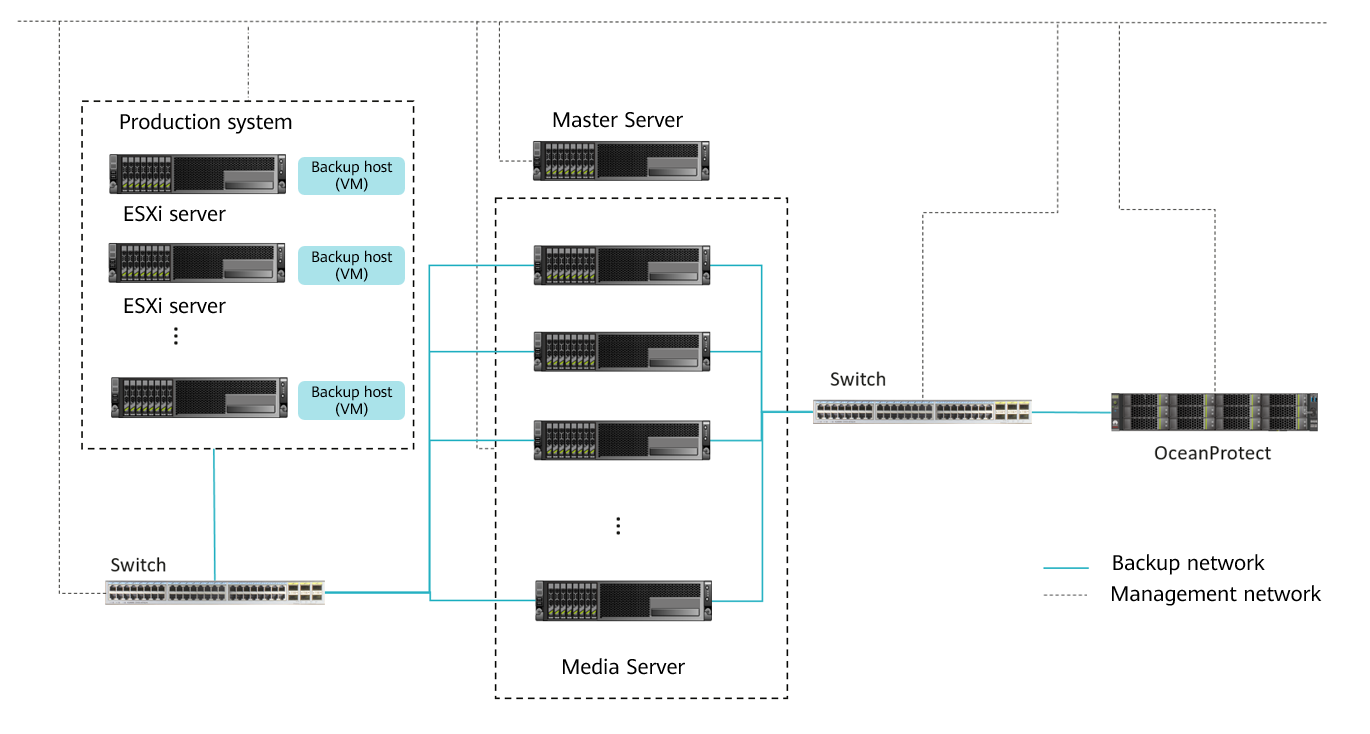
Hot-Add mode: This mode is second only to the SAN mode in terms of efficiency, but its performance is better than that of the NBD mode. If the role of a backup host needs to be assigned to virtual hosts, the virtual device mode is recommended.
Figure 4-5 Networking diagram of VMware virtualization backup in Hot-Add mode
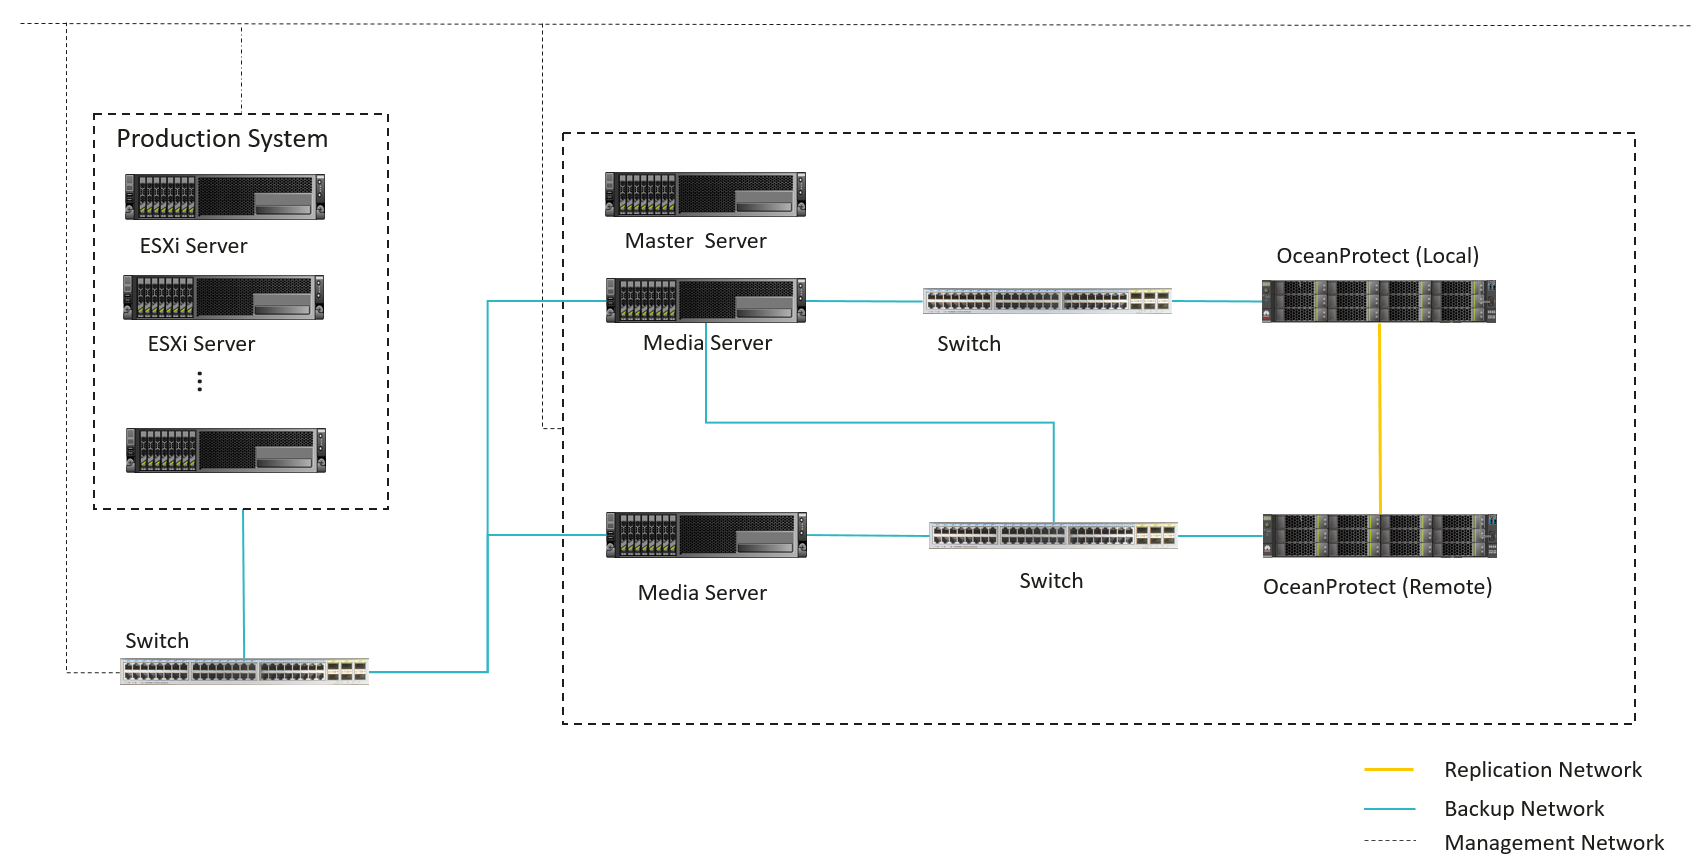
Intra-domain replication: Two sets of OceanProtect Backup Storage are managed in the same NetBackup domain and one Media Server is required to connect to the primary and secondary devices over the service network. Currently, the DataTurbo plug-in does not allow one host to connect to two sets of OceanProtect Backup Storage at the same time. Therefore, in this scenario, only one storage device can use DataTurbo to connect to the primary Media Server. Other storage devices need to use NFS/CIFS to connect to the primary Media Server.
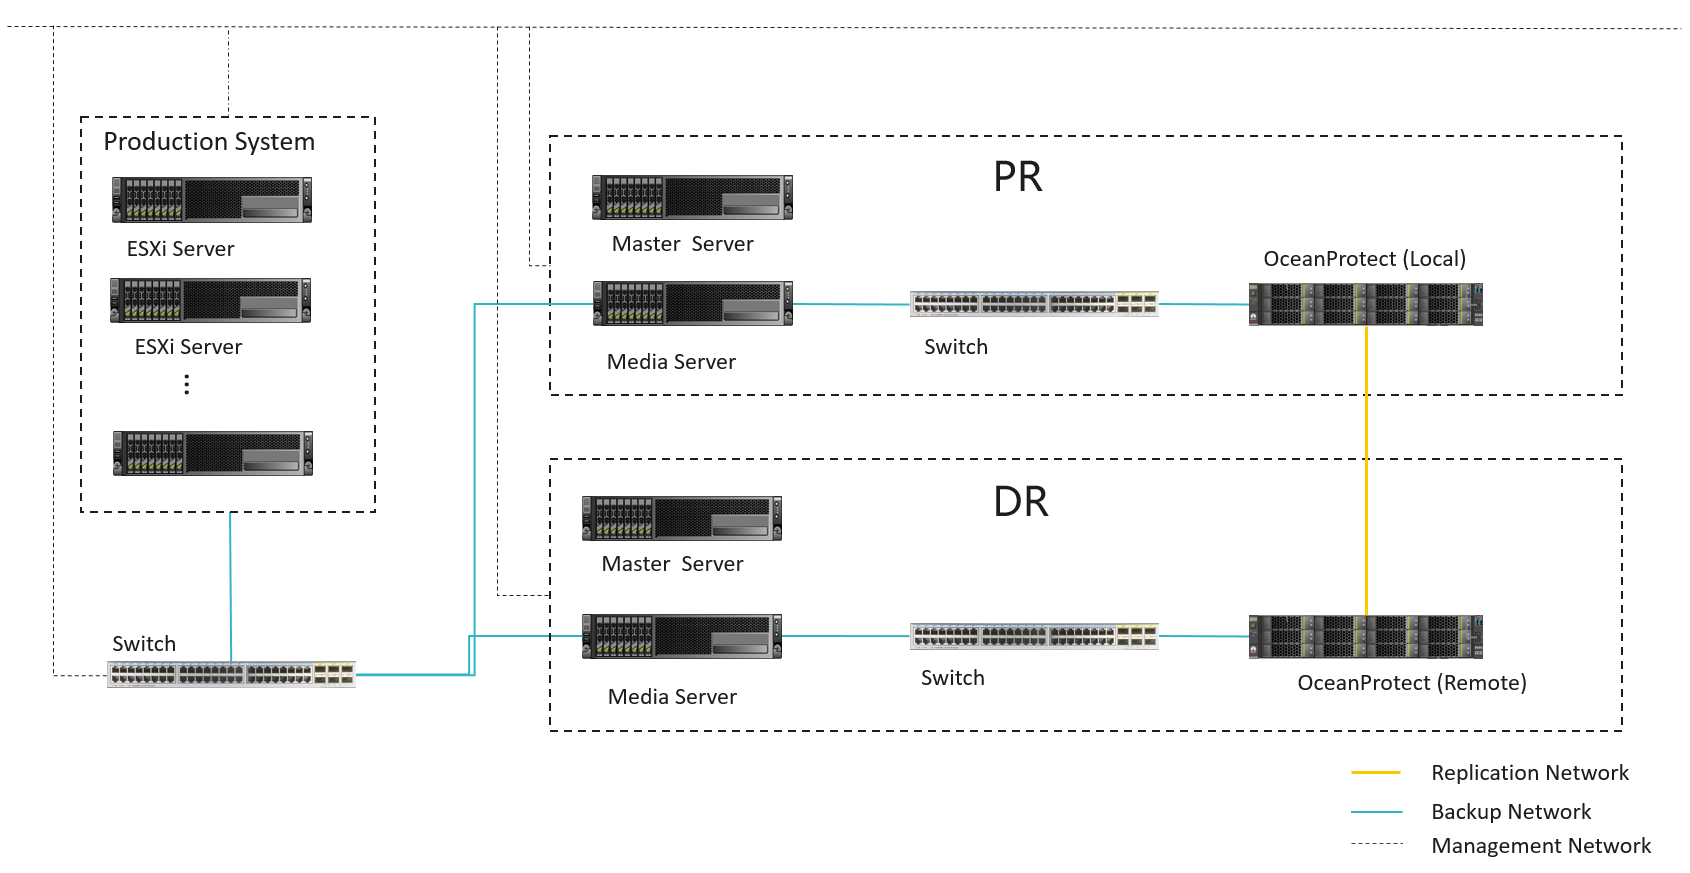
Inter-domain replication: Two sets of OceanProtect Backup Storage are managed in different NetBackup domains. After a copy of the primary storage is replicated to the secondary storage, the NetBackup software of the secondary storage imports the copy.

In this section, the Media Server part in the figures is simplified to facilitate understanding. In the multi-Media Server scenario, the same planning principles are used. For details about the internal configuration of the software, see the HyperProtect Backup Storage OST Plug-in User Guide.
Planning NetBackup Media Servers
This solution adopts the SourceDedupe feature and uses the DataTurbo protocol for integration with OceanProtect X8000. The NetBackup 10.3 backup software and DataTurbo software as well as HyperProtect OST plug-in need to be deployed on Media Servers.
- Server requirements: The backup capability of each Media Server depends on the server type. For details about the bandwidth capability of each server type, see the related NetBackup documentation.
Plan the number of servers based on the required backup network bandwidth. For details about DataTurbo’s requirements on servers, see « Preparing the Environment, Software Package, and Tools » in the OceanProtect Backup Storage 1.6.0-1.7.0 & V200R001 SourceDedupe User Guide.
- OS requirements: The DataTurbo software must be deployed on the Media Server and meet the compatibility requirements. You can use the OceanProtect Compatibility Query tool to query the compatibility requirements.
- OST plug-in requirements: HyperProtect must be deployed on the Media Server and meet the compatibility requirements. You can obtain the software resources and query related information by referring to « Preparing the Environment » in the HyperProtect Backup Storage OST Plug-in User Guide at https://files.opengood.cc/#.
- NIC requirements: The Media Server is connected to both the production system and backup storage devices. Both the front-end and back-end NICs must meet the backup bandwidth requirements to avoid bottlenecks.
- Front-end network: It is used to establish connections with the production environment. Therefore, the backup capability requirement of each Media Server must be met to prevent the front-end network configuration from becoming a bottleneck. In this solution, the capability of a single Media Server is evaluated as 4 GB/s, and the front-end network requires 4 x 16 Gbit/s optical fibres, which can be adjusted based on the Media Server capability in actual tests.
- Back-end TCP network: This solution uses the SourceDedupe feature. Therefore, the back-end network of the Media Server does not need to be configured as the same as the front-end network. You are advised to configure two 10GE optical fibres to connect the ports of the controller where the file system to be used resides for each Media Server.
- Back-end Fibre Channel network: This solution uses the SourceDedupe feature. Therefore, the back-end network of the Media Server does not need to be configured as the same as the front-end network. You are advised to configure two 16 Gbit/s optical fibres to connect the ports of the controller where the file system to be used resides for each Media Server.
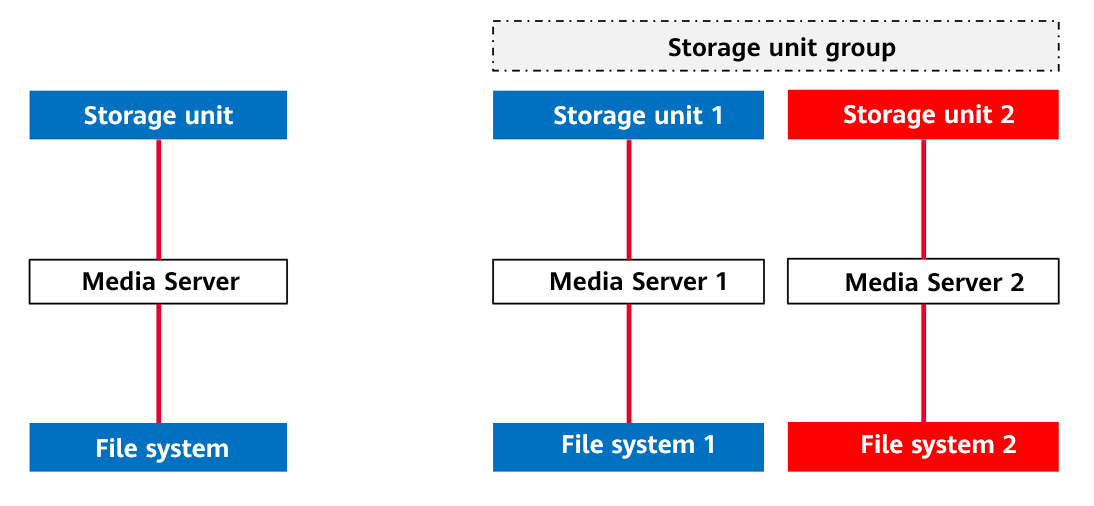
- STU planning: The file systems created by OceanProtect X8000 are mounted to NetBackup Media Servers. This solution uses the DataTurbo protocol for mounting. You are advised to mount the file systems based on the following principles:
- To ensure backup performance and reliability, you are advised to create a file system for each NetBackup Media Server on OceanProtect X8000 and create an independent storage unit for each mount point.
- OceanProtect X8000 is a dual-controller device that consists of controllers A and B. Therefore, when the DataTurbo protocol is used to establish connections, you are advised to connect the NetBackup Media Servers to both controllers.
- The following figure shows the planning when storage units of the Basic Disk type are used in single- and dual-Media Server scenarios.
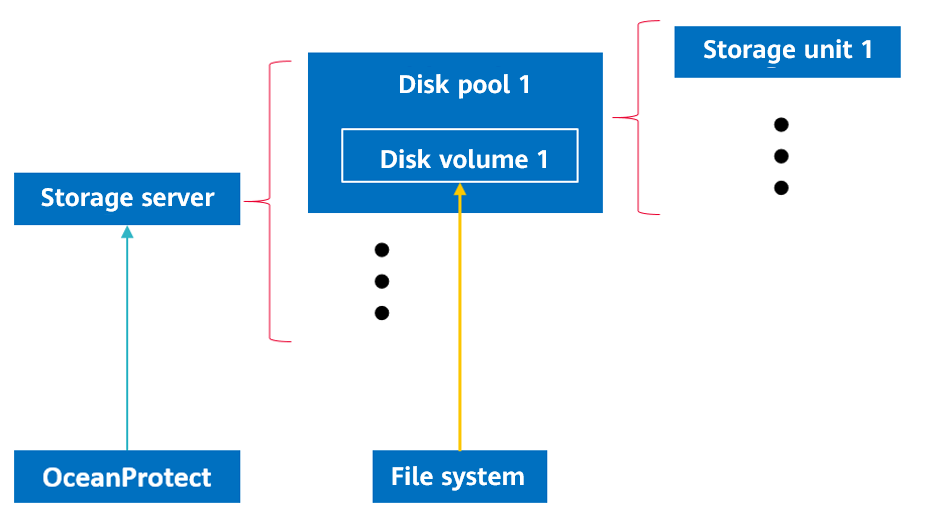
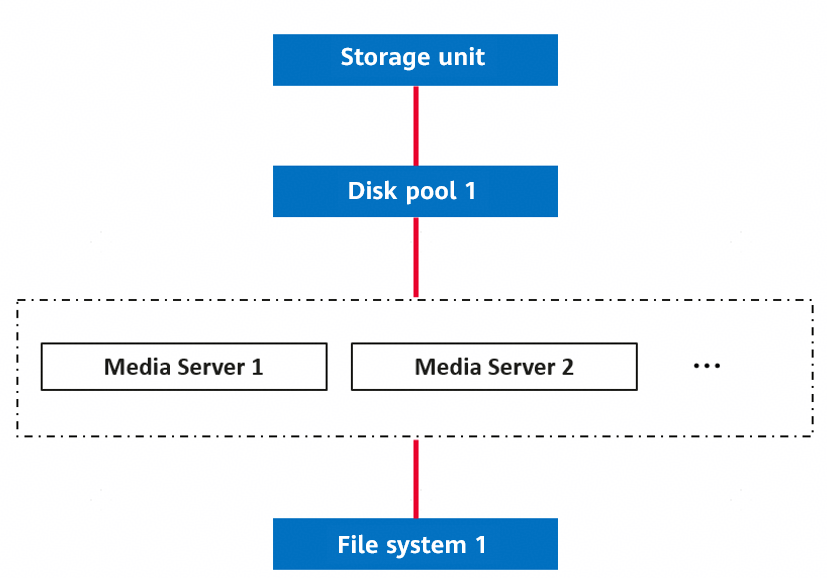
- When OST storage units are used, you need to register the OST storage information in the NetBackup software. One set of OceanProtect Backup Storage corresponds to a storage server in the NetBackup, and one file system corresponds to a disk volume in a disk pool of the storage server. (Currently, multiple disk volumes cannot be added to a disk pool to use the NetBackup accelerated backup and replication functions. Only one disk volume can be configured in a disk pool.) Multiple storage units can be created in the disk pool.
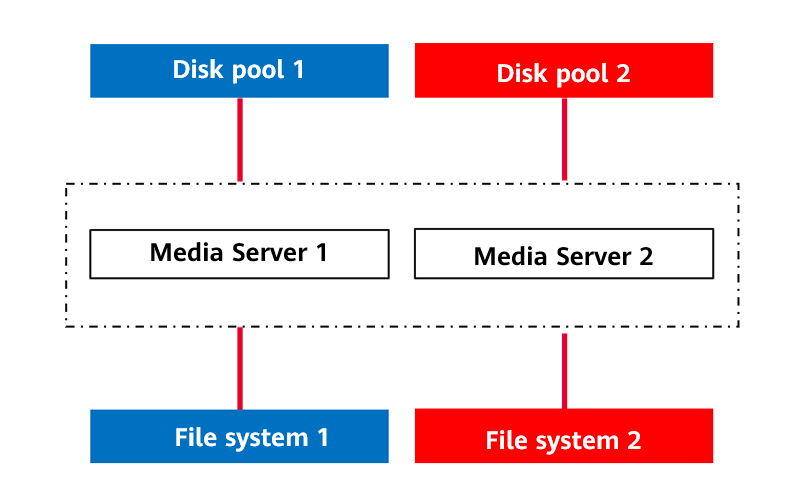
- In the OST scenario, multiple Media Servers can be used to connect to the target storage at the same time.
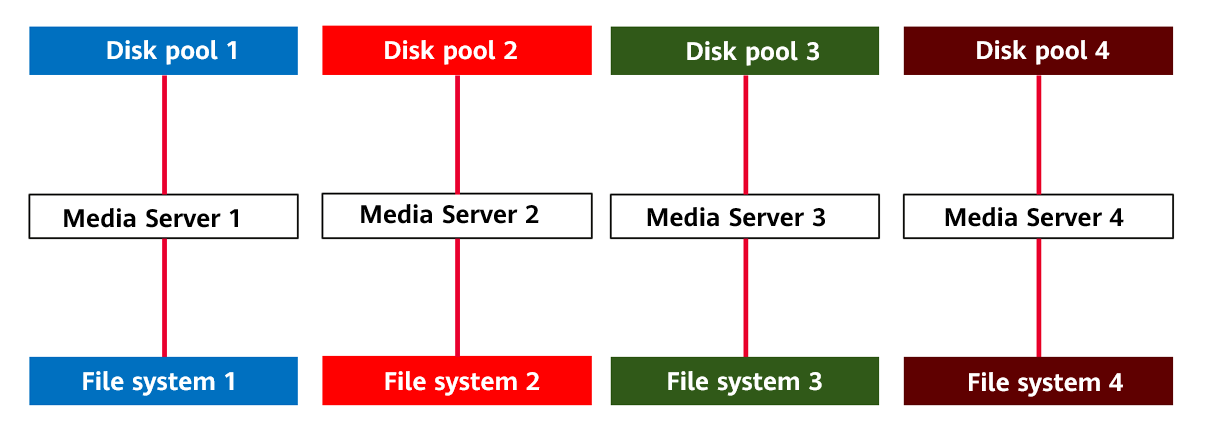
- You can also restrict specific Media Servers to access designated file systems. For details, see step 2 in section « Creating a Storage Unit » of the HyperProtect Backup Storage OST Plug-in User Guide.
- OST matching OceanProtect V200R00C10 or later allows only one file system in the storage. The file system must work in the directory balancing mode (Reduction_Global_Mode or Performance_Global_Mode). The corresponding disk pools and storage units are configured in NetBackup to ensure they are accessible to all Media Servers.
Planning NetBackup Policies
NetBackup policy planning: To ensure that the data is evenly backed up to the two controllers of OceanProtect X8000, you are advised to configure multiple policies to evenly back up all VMs to the storage unit.

To achieve a good deduplication effect, you are advised to disable the deduplication and compression functions of backup software and disable the compression and encryption functions of applications to be backed up. For example, disable compression and encryption of Oracle RMAN.
4.6 Planning Example
This section simulates project requirements and provides planning examples based on the requirements.
Project Requirements
- A customer needs to back up VMs on multiple VMware hosts. The total data volume is about 300 TB, the dataset reduction ratio is about 3:1, about 1.5% of the data is modified daily, and the dataset grows by approximately 10% annually.
The backup policy is to perform a full backup and six incremental backups every week. Some backups need to be accelerated. The backup time window is 8 hours, and all backup copies are retained for one month.
- The customer’s production hosts connect to the production storage devices over a Fibre Channel network. There is no requirement on backup networks. Multiple physical hosts can be provided for backup. The hardware configuration is as follows: CPU: Platinum 8378A; memory: 8 × 32 GB.
- In addition, the customer has a secondary site where an independent NetBackup domain is deployed. After the backup at the primary site is complete, the backup data is replicated to the storage devices at the secondary site. The replication must be complete before the next backup starts.
Planning the Backup Capacity
The backup capacity is calculated based on the total data volume and the maximum number of copies retained in the storage devices. Both the changed and incremental data needs to be considered during the calculation. The physical capacity is estimated based on the original reduction ratio of the dataset. You are advised to use the eDesigner tool for calculation.
In this example, all backup copies need to be retained for one month. That is, copies of a maximum of five backup cycles (five weeks, involving five full backup copies and 30 incremental copies) can be retained in the storage devices. Therefore, the total capacity required before deduplication is about 2,200 TB.

Capacity planning is generally completed in the pre-sales phase to determine the model of devices and number of disks to be delivered. In the delivery phase, you only need to consider the number of storage pools to be used and calculate the file system capacity based on the total capacity required before deduplication.
Planning the Backup Performance
With an initial full backup size of 300 TB and an annual data growth rate of approximately 10%, the total data volume is expected to reach 400 TB after three years. Based on an 8-hour backup window, the required backup performance is calculated to be around 50 TB/h. However, the backup performance is planned to be 70 TB/h because the backup jobs may be delayed and the overall job duration is long.
Transmission Protocols and Plug-ins
- The backup performance of 70 TB/h can be achieved only if a source deduplication network is used. Therefore, DataTurbo is used as the transmission protocol.
- The project requires NetBackup to accelerate backup and replication. Therefore, the HyperProtect OST plug-in is used.

If a project does not require all features provided by the OST plug-in, you can use the storage units of the Basic Disk type for integration in NetBackup to simplify the configuration process.
URL for the HyperProtect compatibility: https://files.opengood.cc/#
Planning Backup Media Servers
Due to the high backup performance of 70 TB/h (20 GB/s), the SAN mode with better performance is used as the VMware backup transmission mode. For details about this mode and other transmission modes, see Planning Backup Networks.
According to the preliminary test, the backup processing performance of a backup media server that can be used in the project is about 4 GB/s to 5 GB/s in SAN transmission mode. Therefore, six servers with this configuration are used on a backup network.
The front-end network of each server connects to the production storage devices through four 16 Gbit/s Fibre Channel links, which ensures that no bottleneck occurs in the data read operations during backup. The back-end network connects to the OceanProtect storage devices through two 10GE (TCP) links.
Planning File Systems
If the number of backup media servers is greater than that of OceanProtect storage controllers, you are advised to create file systems with the same number of backup media servers. Each server uses one file system.
In this example, six file systems are used, and DataTurbo shares are created for access by the servers. The total capacity of 2,200 TB is divided by the number of file systems and the result is rounded up to obtain the capacity of each file system, which is 400 TB.
The Reduction_Prioritized_Mode_enhanced application type is recommended for the NetBackup software.
The security style is configured based on the operating system of the host that uses the file system.

Determine the capacity of a file system based on actual services. The capacity of a file system is the logical capacity. The total capacity of file systems can exceed the capacity of the storage pool and can be changed.
Use at least as many file systems as controllers to ensure that all controllers can be used.
Planning Backup Networks
Six backup media servers have been determined to be used in the preceding text. The front-end network of each server connects to the production storage devices through four 16 Gbit/s Fibre Channel links, which ensures that no bottleneck occurs in the data read operations during backup. The back-end network connects to the OceanProtect storage devices through two 10GE (TCP) links.
The OceanProtect storage devices must use the physical network ports corresponding to the backup media servers, that is, 6 × 2 × 10GE network ports. Twelve logical ports complying with the DataTurbo protocol must be created to connect to the ports of all backup media servers in one-to-one mode.
The file system using the Reduction_Prioritized_Mode_enhanced application type is assigned to a default controller. Therefore, the physical ports of the same controller are preferentially used to avoid traffic forwarding between controllers. For example, if backup media server A uses file system a which belongs to controller 0A, the physical network ports on this controller will be used when the two logical ports to be connected to server A are created.
The following figure shows the network connection.
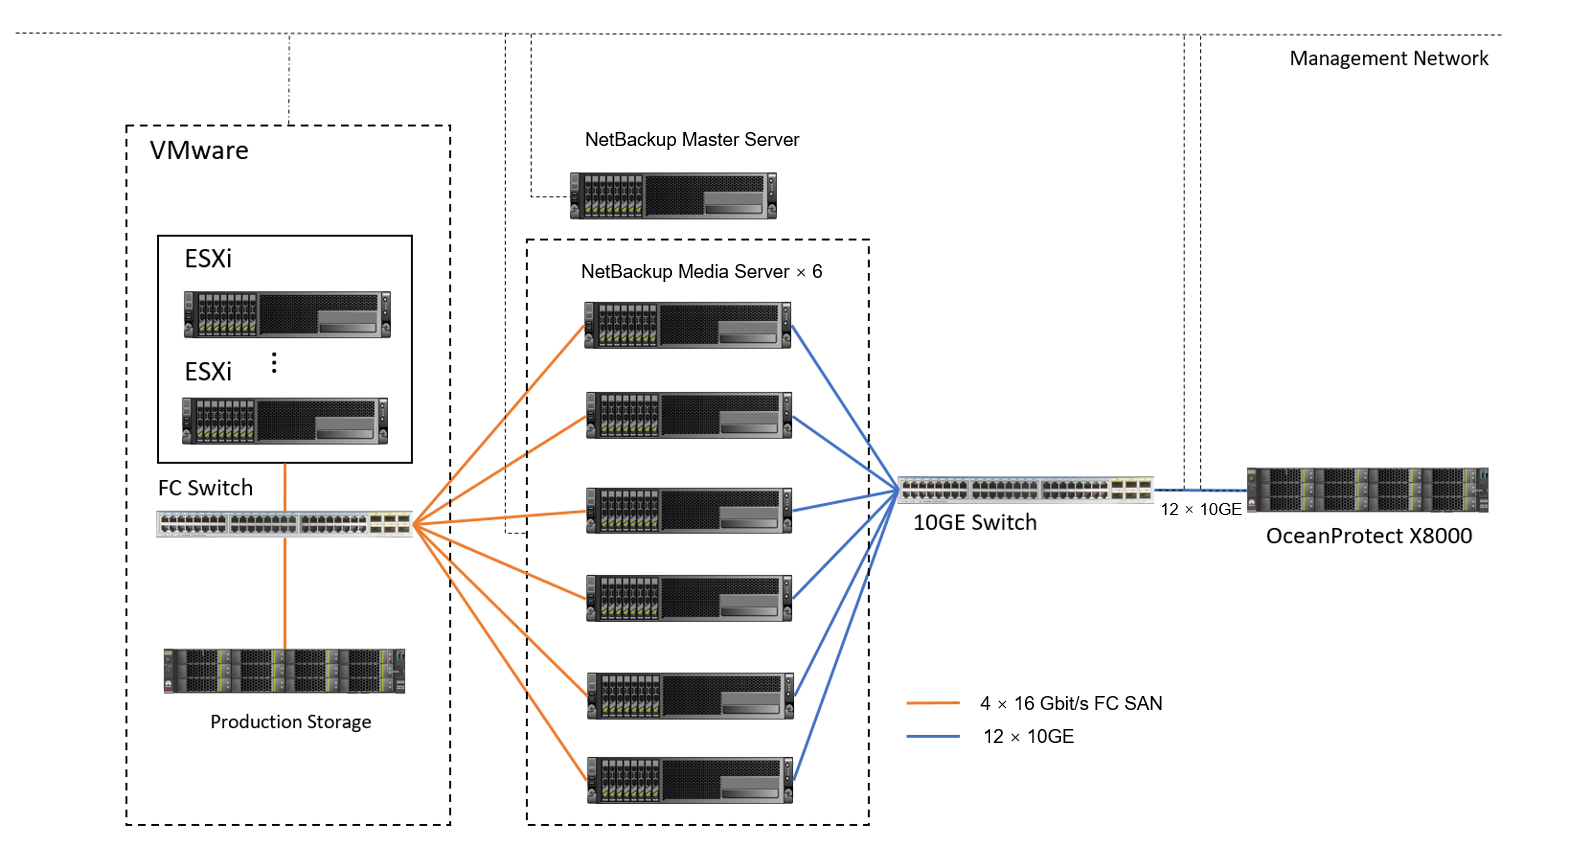

The network planning in this section is based on the network connections between storage devices and servers through switches. The port failover feature of the OceanProtect can ensure the reliability in cases of controller and network port failures. However, if the servers are directly connected to storage devices, exercise caution when planning networks.
Planning Replication Networks
In this example, replication must be completed before the next backup. That is, the replication time window is 16 hours (24 hours per day minus the backup time window of 8 hours). The required replication bandwidth is about 20 TB/h. At least six 10GE replication links are required to meet the bandwidth requirement.
In this example, an independent NetBackup domain is deployed at the remote site, which indicates inter-domain replication. A replication network only needs to connect replication links between OceanProtect storage devices at the two sites. The backup network at the remote site is independently deployed. If intra-domain replication is used, local backup media servers need to connect to the storage devices at the remote site. For details about how to plan the connection, see Planning Replication Networks.
The following figure shows the networking diagram (omitting the backup network at the remote site) based on the backup network.
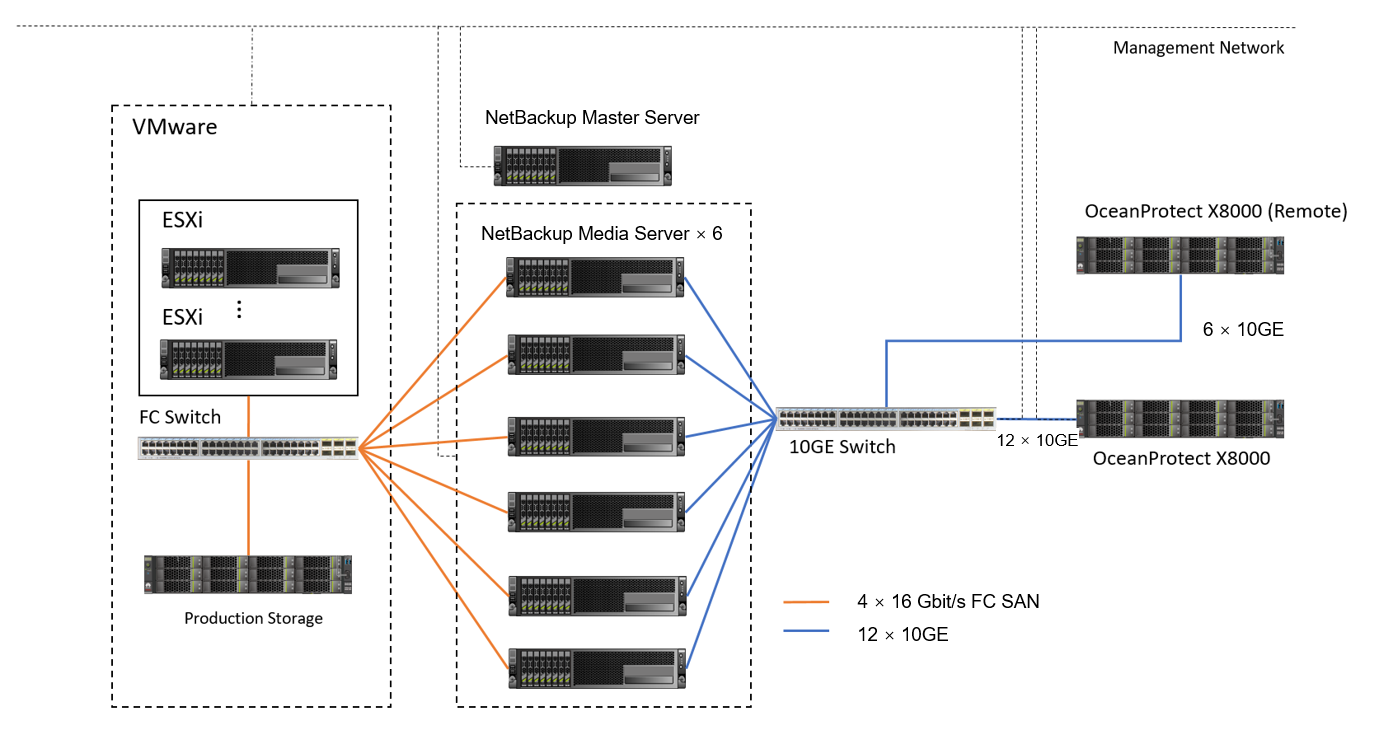

If the backup and replication time windows do not overlap, the replication and backup ports can share a physical port.
OST optimized replication uses the storage file-level replication function (replicating files at the storage layer). In the current version, the replication rate is limited to 100 MB/s by default. You can modify the replication rate as required by referring to « Adjusting the Intra- or Inter-Domain Replication Duration » in section « Common Problems and Solutions » of the HyperProtect Backup Storage OST Plug-in User Guide.
Planning Internal Configurations of NetBackup
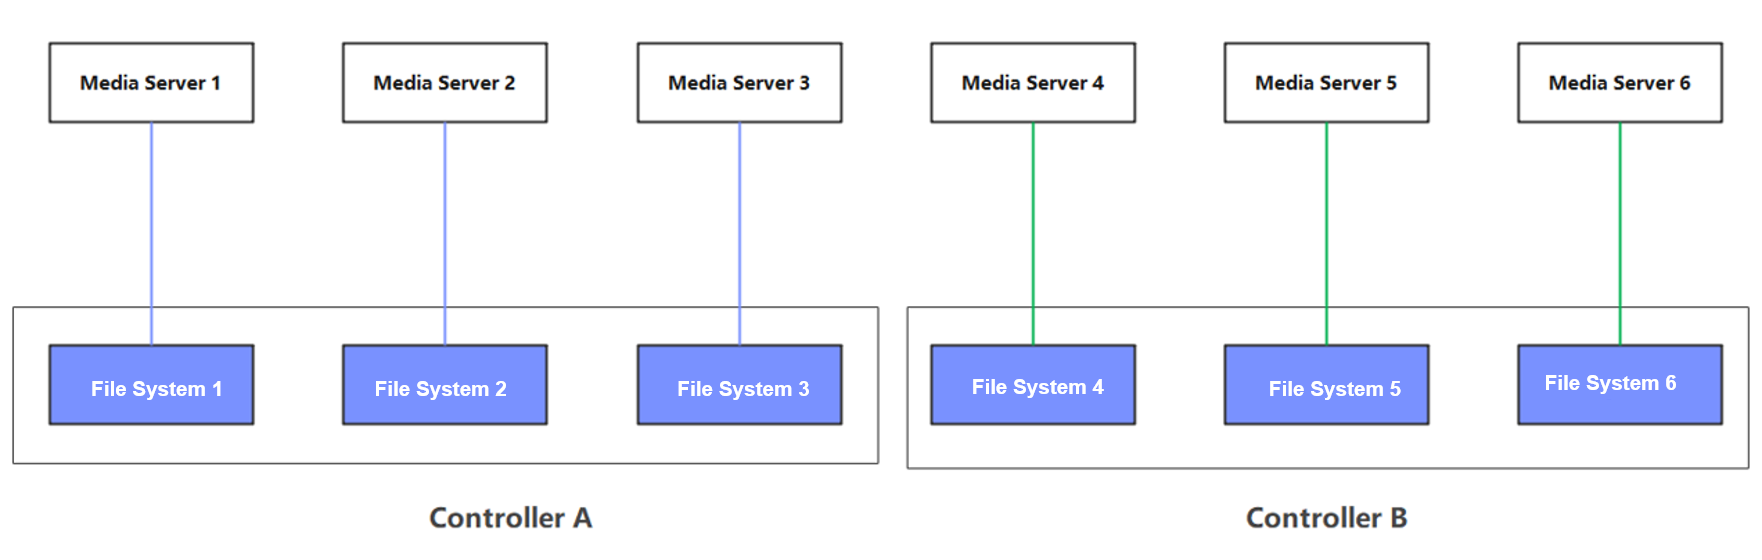
In this example, the OST plug-in, six hosts, and six file systems are used. The following figure shows the mapping between storage units in the NetBackup software and file systems in the storage devices. For details, see Planning NetBackup Storage.
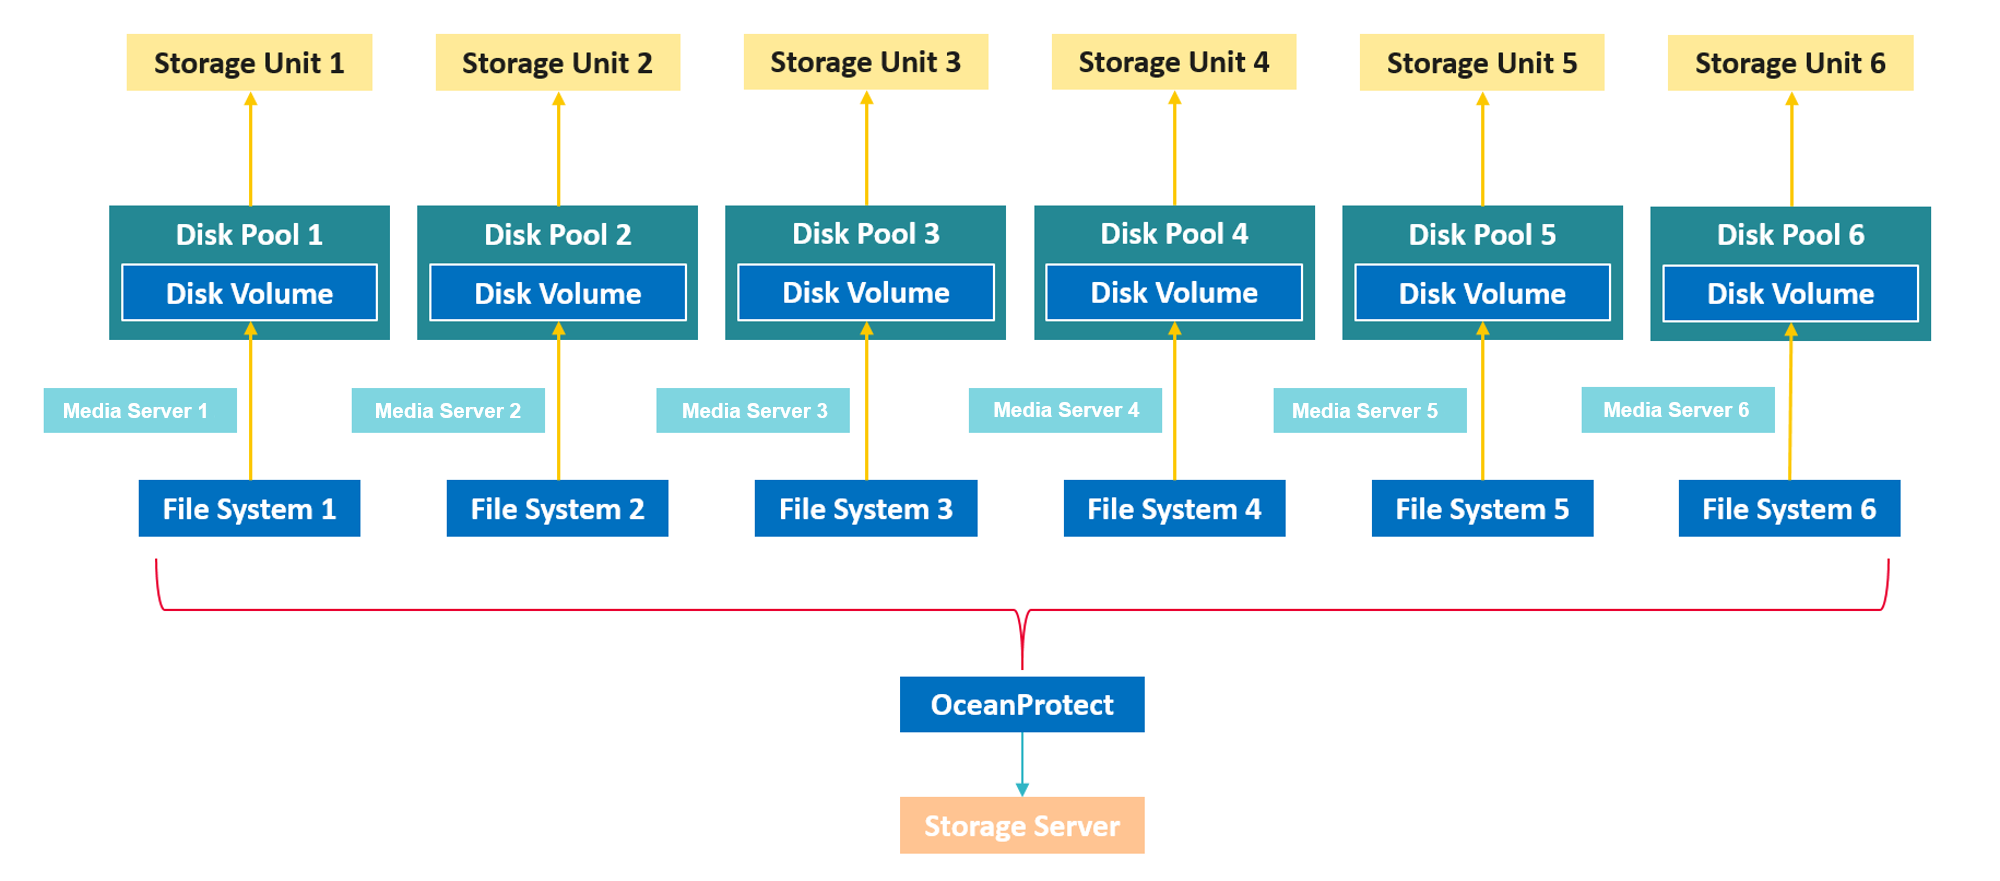
The remote site complies with the same mapping because of the replication solution. In addition, you need to create a NetBackup storage lifecycle policy (SLP) for each storage unit.
When creating a backup policy, you are advised to evenly use all storage units.
5.Configuration Example
This chapter provides a configuration example to describe how to back up VMware VMs using OceanProtect X8000 with the DataTurbo plug-in and NetBackup 10.3.

This chapter is intended to present the configuration operations. Adjust all parameter settings based on the actual plan. For details about the planning principles, see 4 Planning and Configuration. For details about the planning example, see 4.6 Planning Example.
5.2 Hardware and Software Configuration
5.3 Configuration Planning for NetBackup Integration
5.4 VMware Backup and Restore Configuration
5.5 Configuration of A.I.R. File-level Replication
5.7 Configuring WORM for a File System
5.1 Networking Diagram
Figure 5-1 shows an example of TCP networking in this practice guide.
Figure 5-1 TCP networking for backing up VMware VMs using OceanProtect X8000 and NetBackup (VMware transport mode: SAN)
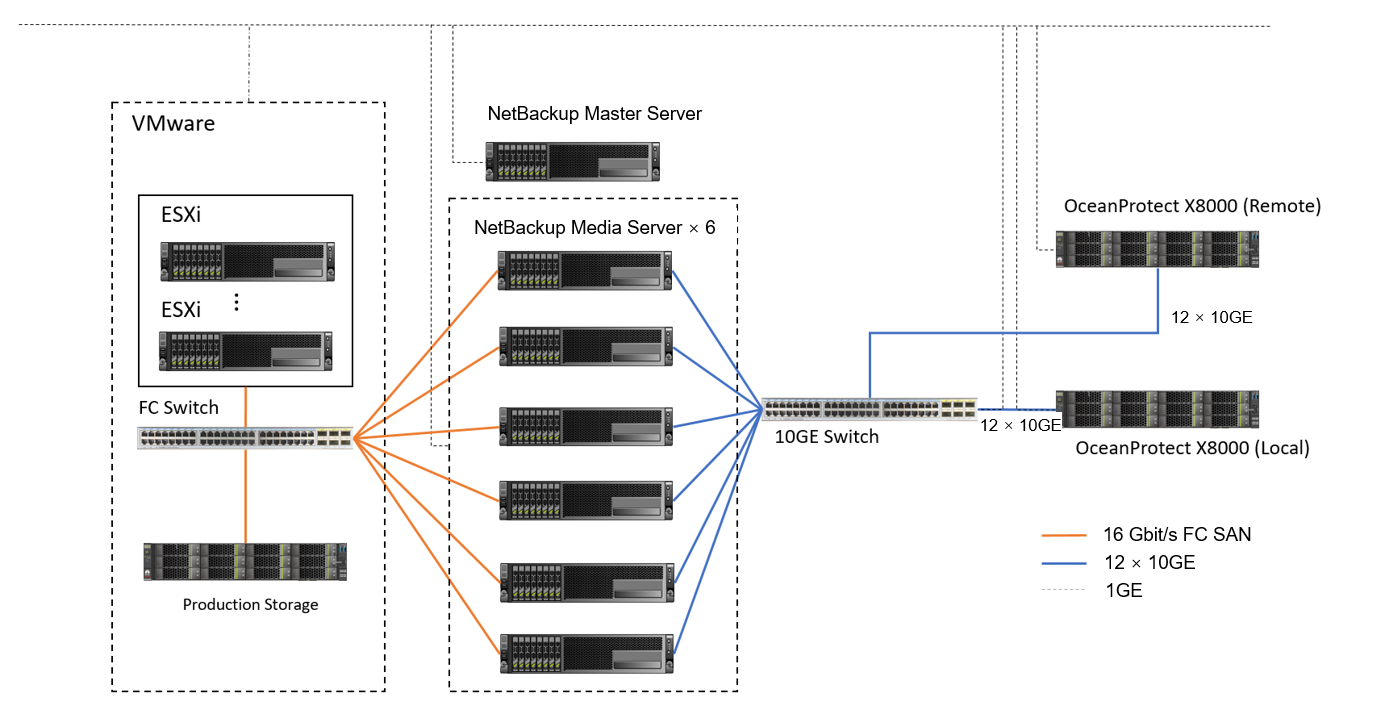

The networking diagram shown in Figure 5-1 is for reference only. For details about the cable connections between the OceanProtect X8000 controller enclosures and application servers, disk enclosures, or other controller enclosures, see « Installation Planning and Preparation > Cabinet Layout and Connection Planning » in the OceanProtect X6000, X8000 Backup Storage 1.x & V200R001 Hardware Installation Guide
TCP networking description:
- VMware: Six ESXi hosts are deployed, and 16 VMs are deployed on each ESXi host. Therefore, 96 VMs are deployed in total.
- Each host uses four 3.84 TB SSDs as the production storage and VM datastores. Four VMs are planned for each datastore. Therefore, a total of 16 VMs are deployed on each host. Each VM contains one system disk and five data disks. About 500 GB data is preset in the data disks.
- vCenter: One VM is deployed as vCenter to manage VMware VMs.
- Each ESXi host is connected to the Fibre Channel switch through four 16 Gbit/s optical fibres.
- NetBackup Media Server: Six NetBackup Media Servers are deployed.
- Front-end network: four 16 Gbit/s optical fibres are used to connect to the Fibre Channel switch.
- Back-end network: Two 10GE optical fibres are used to connect to the 10GE switch. The switch is connected to OceanProtect X8000.
- Local OceanProtect X8000: It is connected to the 10GE service switch through 12 x 10GE optical fibres. Each controller is connected with 6 x 10GE optical fibres. The 12 physical ports are used as backup links to connect to backup servers and also as replication links to connect to remote devices.
- Remote OceanProtect X8000: Controllers A and B are respectively connected to the 10GE service switch through 6 x 10GE optical fibres to form a remote replication network with the local end.
5.2 Hardware and Software Configuration
<5.2.1 Hardware Configuration
Table 5-1 Hardware configuration
Name | Description | Quantity | Function |
|---|---|---|---|
ESXi server |
| 6 | The ESXi host is used to create VMs. |
Backup Media Server |
| 6 | NetBackup Media Servers are used to process backup and restoration jobs. |
TCP service switch | Huawei CE6850 | 1 | 10GE network switch on the TCP service plane. |
Fibre Channel service switch | FC_SNS2224 | 1 | 16 Gbit/s network switch on the Fibre Channel service plane. |
5.2.2 OceanProtect X8000 (All-Flash) Configuration
Table 5-2 OceanProtect X8000 (all-flash) configuration
Name | Description | Quantity |
|---|---|---|
OceanProtect engine | Huawei OceanProtect X8000 with two controllers | 2 |
10GE front-end ETH interface module | 4-port 10GE ETH I/O module | 4 |
16 Gbit/s front-end Fibre Channel interface module | 4-port 16 Gbit/s Fibre Channel I/O module | 2 |
SAS SSD | Huawei 3.84 TB SAS SSDs | 50 |
5.2.3 Test Software and Tools
able 5-3 Software description
Software Name | Description |
|---|---|
OceanProtect V200R001C10 | Backup storage software. |
OceanStor DataTurbo 1.6.0 | The SourceDedupe client software, which is deployed on the backup server to perform source deduplication and compression on backup data, reducing the amount of physical data transmitted from the backup server to the storage and improving the overall bandwidth capability of backup services. |
NetBackup 10.3 | NetBackup 10.3 backup software. |
HyperProtect_2.1.0_OSTPlugin_LinuxRD | OST plug-in software. |
ESXi 7.02 | Enterprise-level hypervisor developed by VMware, which is used to provide hardware virtualization services. |
RHEL 8.3 | Red Hat Enterprise Linux operating system. |
smartbench-2.5.9 | Third-party tool for generating file backup test data. |
SSH client software | SSH terminal connection tool. |
5.3 Configuration Planning for NetBackup Integration
5.3.1 DataTurbo over TCP Configuration Planning
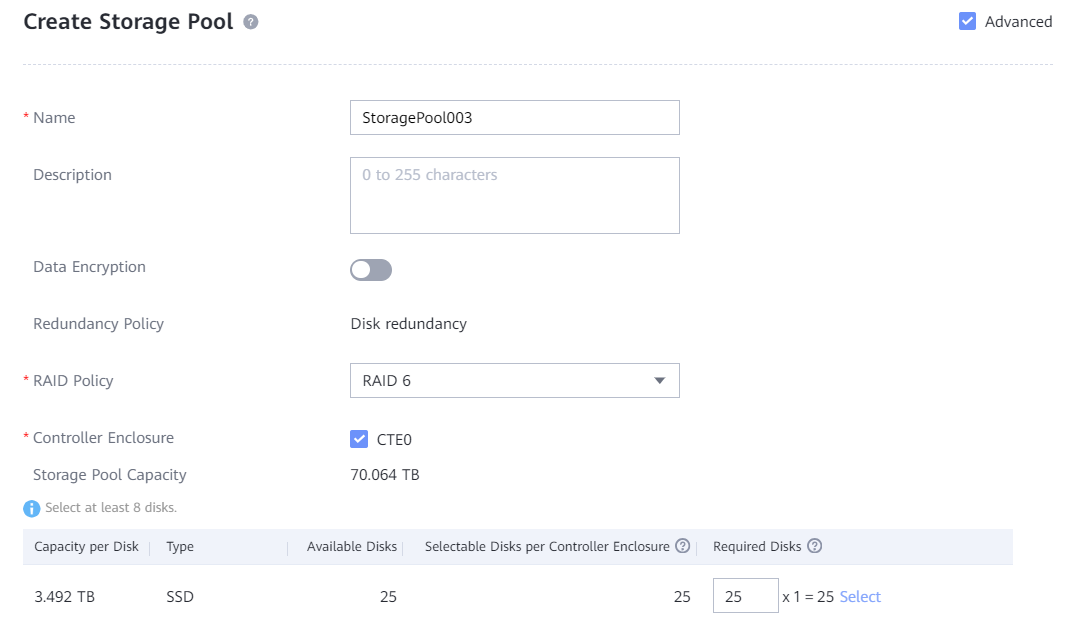
- Storage pools on OceanProtect X8000: Create a storage pool, configure 25 SAS SSDs (3.84 TB for each SSD), and set the RAID policy to RAID 6.
- File systems on OceanProtect X8000: To ensure backup performance and deduplication and compression effects, plan six file systems (400 TB for each file system, and three file systems for each controller). In addition, if the same data is backed up for multiple times, ensure that it is backed up to the same file system each time. In this way, data deduplication and compression can be ensured.
- Logical ports on OceanProtect X8000: OceanProtect X8000 is connected to the six NetBackup Media Servers through 12 × 10GE physical links. Each physical port is configured with one logical port.
- Setting up connections using DataTurbo: This solution uses the SourceDedupe feature. The file systems created on OceanProtect X8000 need to use the DataTurbo protocol to connect to the front-end hosts. After being installed with the DataTurbo software, the NetBackup Media Server needs to be first connected to OceanProtect X8000. It is recommended that 2 × 10GE optical fibres (one connected to controller A and the other connected to controller B of OceanProtect X8000) be configured for each NetBackup Media Server. And then set up DataTurbo connections.
- Storage Unit (STU): Create six file systems on OceanProtect X8000. Using the OST plug-in, each file system is created as an independent STU.
Figure 5-2 shows the STUs that are generated after the file systems are mounted.
Figure 5-2 Mounted file systems
- NetBackup policy: Configure six policies. Each Media Server backs up VMs on an ESXi host.

Networking principles:
- Scenarios where NetBackup uses only STUs: It is recommended that the same type of applications should correspond to one STU; one STU should correspond to one file system; one STU should correspond to one backup Media Server.
- To maximize the performance, all controllers need to carry services. That is, the number of file systems to be created must be at least the same as that of controllers. Ensure that the number of file systems under each controller is balanced.
5.4 VMware Backup and Restore Configuration
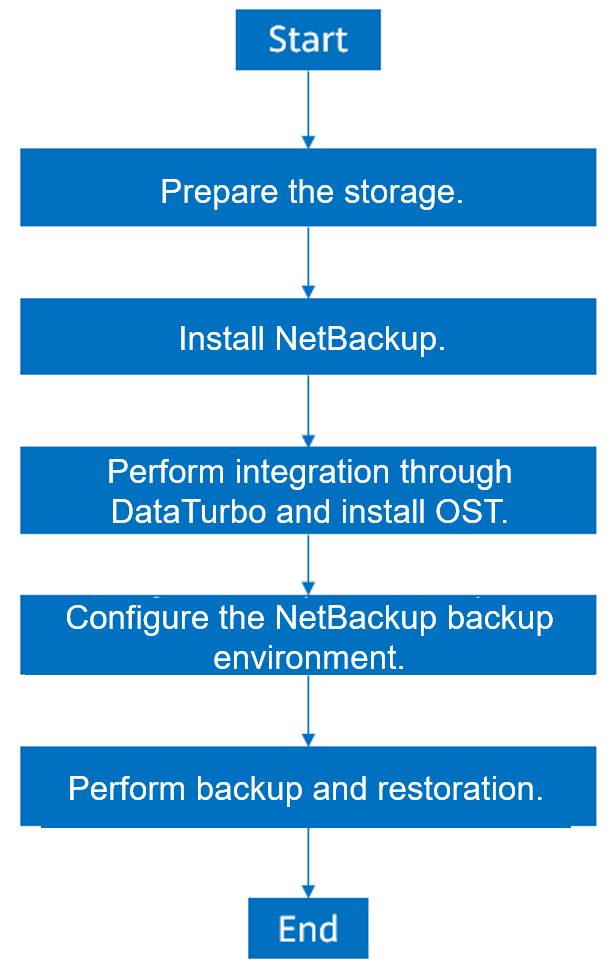
5.4.1 Configuration Process
Figure 5-3 Configuration process
5.4.2 Preparing the Storage
According to the solution, six file systems and DataTurbo shares are created on OceanProtect X8000. The configuration procedure is as follows:
- Create a storage pool.
- Create logical ports.
- Create file systems, and DataTurbo users and shares.
5.4.2.1 Creating a Storage Pool on OceanProtect X8000
Step 1 Follow the deployment guide or choose System > Storage Pools on DeviceManager to create a storage pool. Select all disks and set RAID Policy to RAID 6. Set other parameters as required.
Step 2 Click Advanced and set the compression mode based on the solution plan.
—-End
5.4.2.2 Creating OceanProtect X8000 Logical Ports (DataTurbo over TCP)
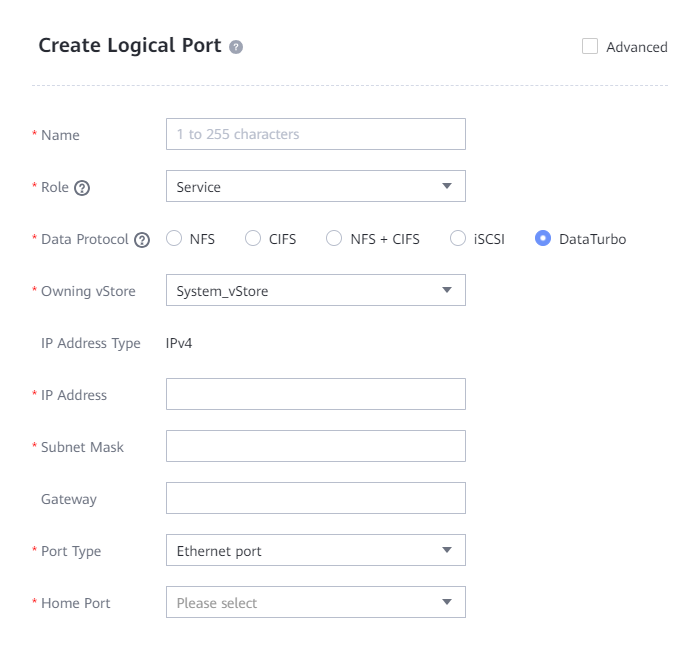
DataTurbo over TCP networking requires configuration of logical ports. In this practice, the OceanProtect X8000 has a total of 12 physical ports. Each physical port is configured with one logical port, creating 12 logical ports in total. Set Role to Service and Data Protocol to DataTurbo, and configure the other parameters as needed.
The following figure shows a logical port configuration example.
5.4.2.3 Creating File Systems and Shares
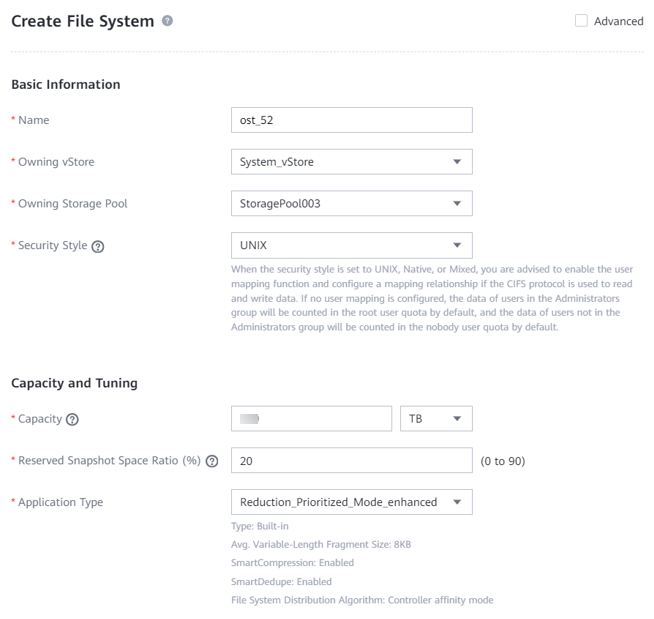
Step 1 Create six file systems whose names must contain ost (case-insensitive). Select a created storage pool and configure the security style, capacity, and application type as planned.

Application Type cannot be changed once being configured. You are advised to set the value based on the service I/O model.
Step 2 Choose Services > vStore Service > vStores and select the vStore in use.
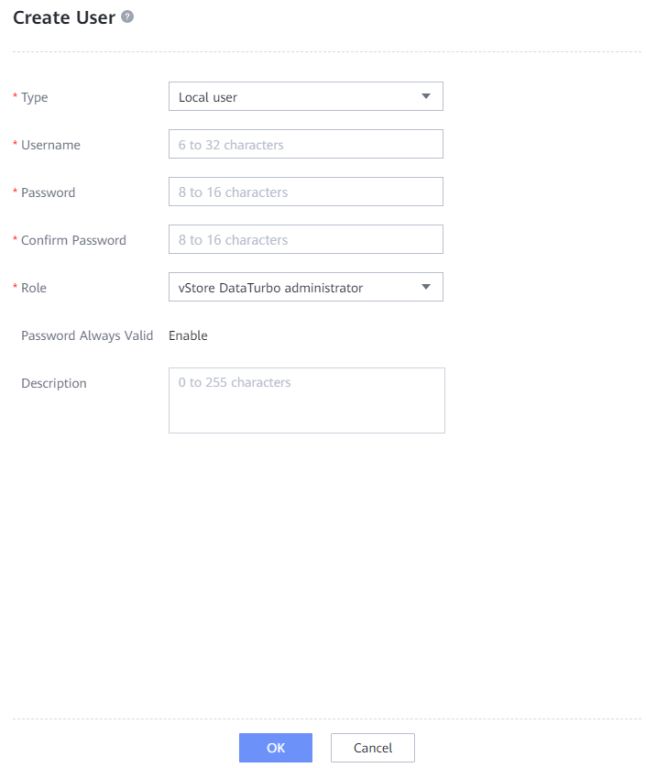
Step 3 Choose User Management and click Create to go to the Create User page.
Step 4 On the Create User page, set Type to Local user, enter the name and password, and set Role to vStore DataTurbo administrator. The following figure shows a configuration example.

After Password Always Valid is enabled, the newly created user does not need to change the password upon the first login.
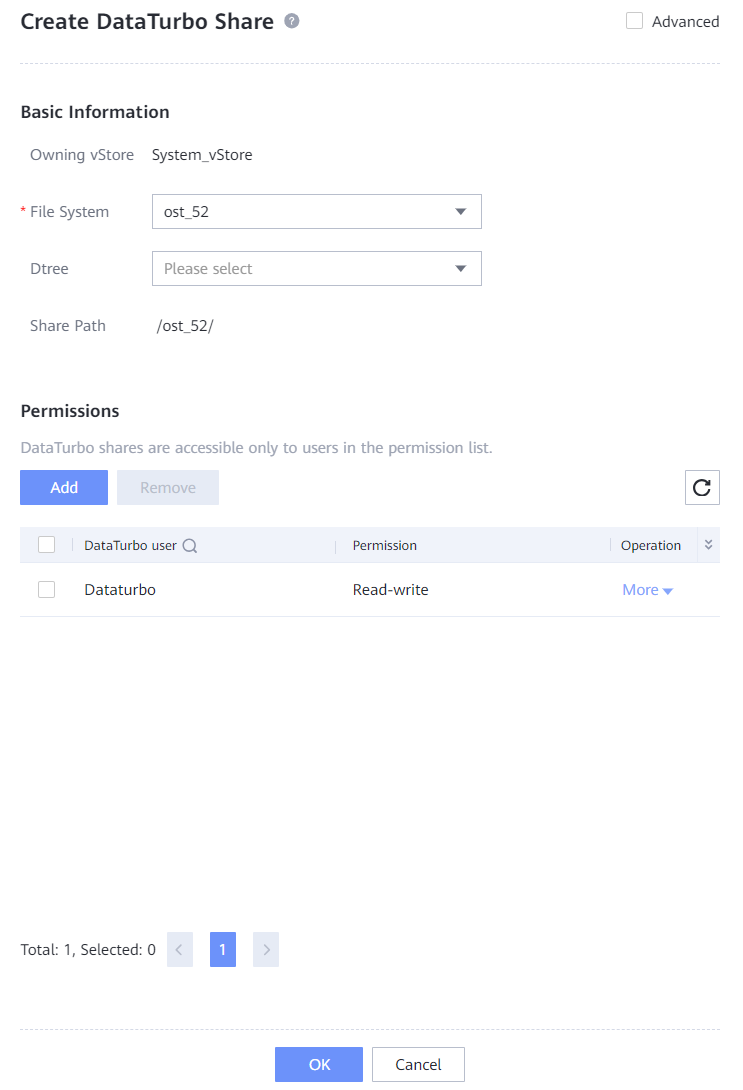
Step 5 Choose Services > Shares > DataTurbo Shares, and click Create. Select the file system for which you want to create a share, click Add, and select the vStore DataTurbo administrator created in Step 4.

If the selected file system is the secondary end in a remote replication pair, data in the file system is probably being modified when it is accessed. Before performing this operation, confirm that the application allows possible data inconsistency.
—-End
5.4.2.4 Creating a Data Protection Administrator
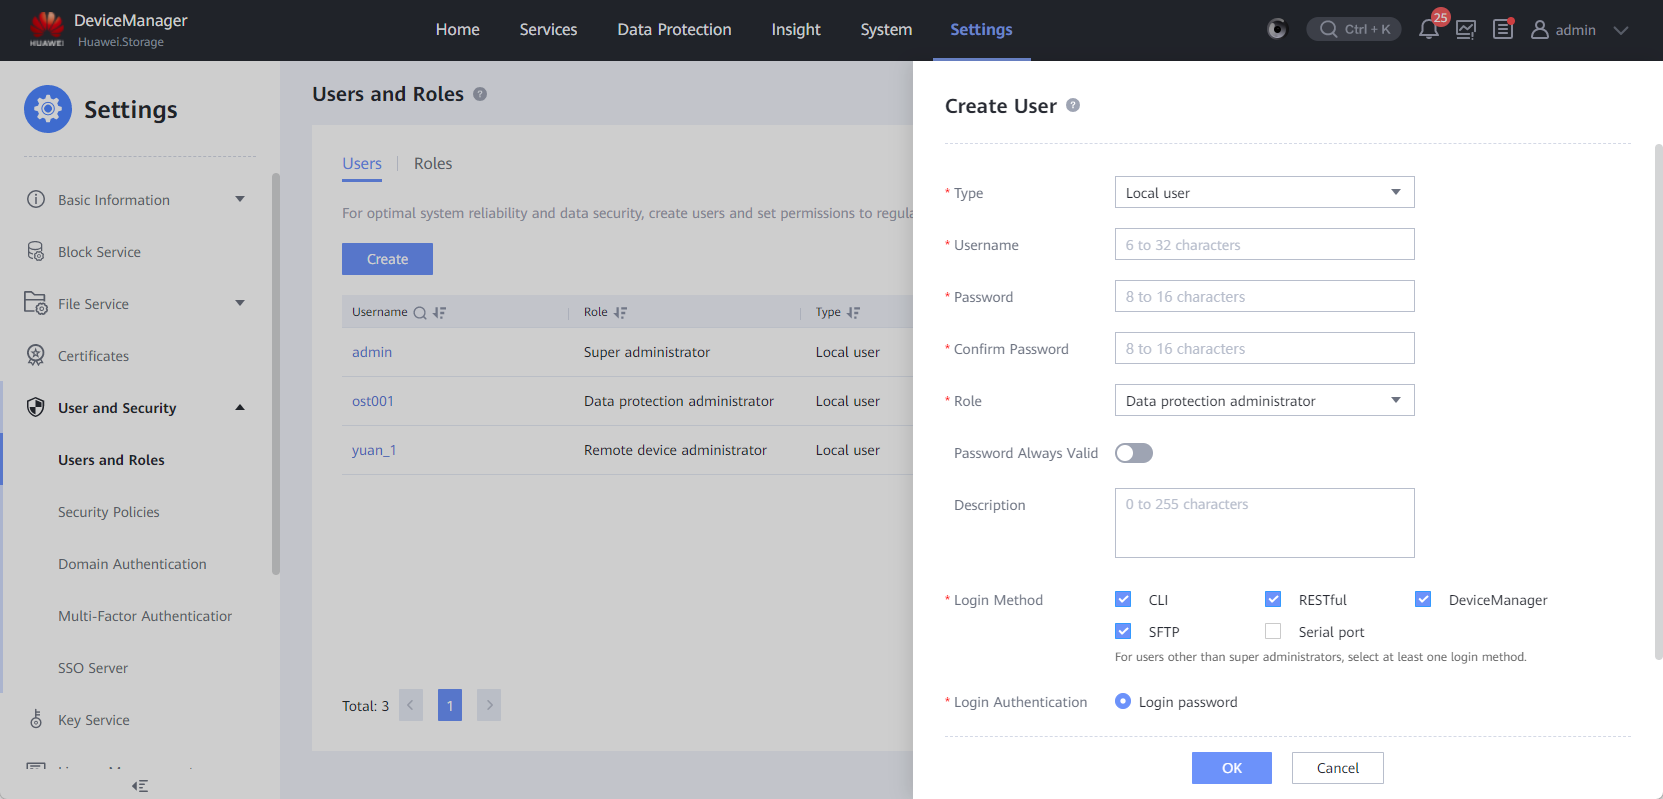
Step 1 Choose Settings > User and Security > Users and Roles > Users. On the Users tab page, click Create. The Create User page is displayed.
Step 2 Customize the username and password. Set Role to Data protection administrator, and enable Password Always Valid based on security requirements. Retain the default values for other parameters.
—-End
5.4.3 Installing NetBackup and OST Plug-in
The NetBackup 10.3 software is used in this best practice. The NetBackup software must be installed on the NetBackup Media Servers and NetBackup Master Server. For details about how to install the NetBackup software, see the NetBackup official documentation.
The OST plug-in must be installed on all Media Servers. For details, see HyperProtect Backup Storage OST Plug-in User Guide.
5.4.4 Performing Integration Through DataTurbo
This solution uses the SourceDedupe feature, which requires the DataTurbo protocol for connection with Media Servers. DataTurbo shares are created on OceanProtect X8000. To mount the corresponding file systems to the backup hosts using the DataTurbo protocol, you need to install the DataTurbo software and configure related parameters on Media Servers.
5.4.4.1 Installation and Deployment
DataTurbo must be installed on all Media Servers. For details, see « Installing, Upgrading, and Uninstalling the DataTurbo Client » in the OceanProtect Backup Storage 1.6.0-1.7.0 & V200R001 SourceDedupe User Guide. During the installation, select the high level.
5.4.4.2 Parameter Configuration
DataTurbo configuration consists of two parts: establishing links and mounting file systems.
- Establishing links: Connect the two ports of each Media Server to controllers A and B of OceanProtect X8000 respectively through physical links. That is, connect each Media Server to the back-end storage through two links. The links can be TCP or Fibre Channel links, with no impact on other configurations. Establish links based on the site networking.
- Mounting file systems: This operation is automatically completed by the OST plug-in.
Table 5-4 DataTurbo parameter adjustment
Parameter | Recommendation | Description |
|---|---|---|
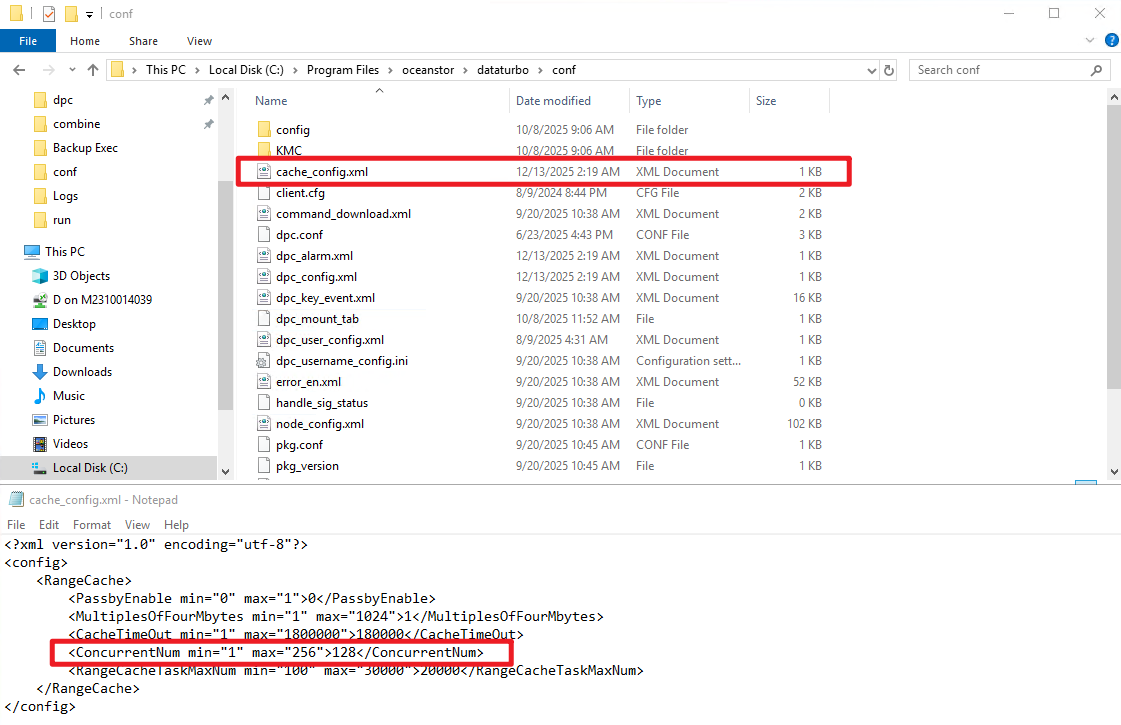
DataTurbo levels | If resources on the Media Server are sufficient, set the highest level to 3 to fully utilize the DataTurbo performance, as shown in Figure 5-4. | The higher the level, the more the total number of threads requested by the front and back ends, and the higher the deduplication and compression performance. |
Concurrent FileClone queues | If resources on the Media Server are sufficient, set the maximum number of concurrent FileClone queues to 128, as shown in Figure 5-5. | NetBackup accelerated backup is implemented through FileClone. Therefore, higher concurrency enables DataTurbo to fully leverage its performance in handling small I/Os with FileClone, improving the performance of NetBackup accelerated backup. |
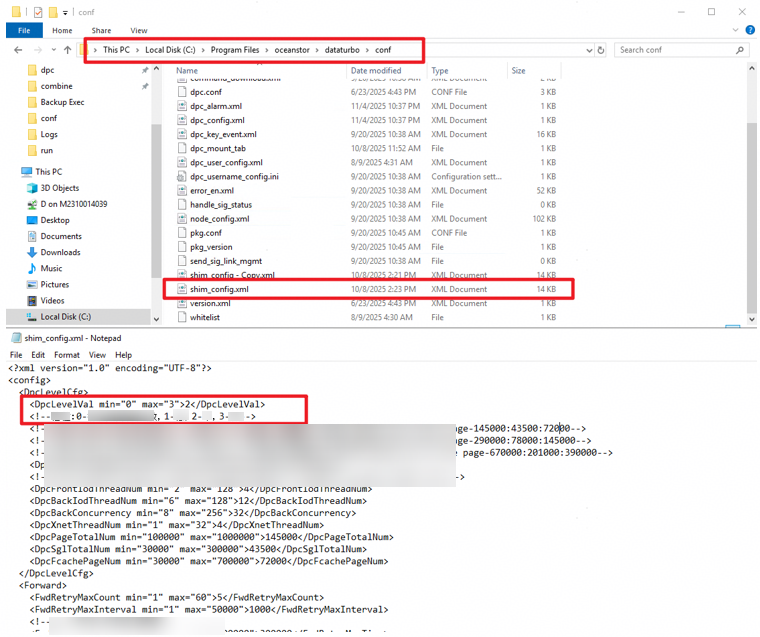
Figure 5-5 Concurrent FileClone queues
Establishing a TCP Link
Step 1 Run the dataturbo create storage_object storage_name=Name ip_list=IP address command (Name indicates the management IP address or domain name of OceanProtect X8000 and IP address indicates the IP address of the logical port created on OceanProtect X8000. Use commas (,) to separate multiple logical port IP addresses.) to establish connection between DataTurbo and OceanProtect X8000. Enter the username and password of the created DataTurbo user as prompted.

- To create multiple links, set ip_list in the command to multiple different logical port IP addresses, which are separated by commas (,), for example, ip_list=10.10.10.10,10.10.10.11.
- In V200R001C10 and later versions, when multiple links need to be created, the logical port IP addresses in ip_list must belong to the same vStore. If they belong to different vStores, links can be created based on logical port IP addresses which belong only to one of the vStores.
In the following example, the storage management IP address is a.a.a.a and the logical port IP address is x.x.x.x.
[root@ma52 ~]# dataturbo create storage_object storage_name=a.a.a.a ip_list=x.x.x.x
Please input username:
Dataturbo
Please input password:
**********
Create storage object successfully.
Step 2 Run the dataturbo show storage_object command to check whether the connection is established successfully.
If the following information is displayed and Status is Normal, the connection is established successfully.
[root@ma52 ~]# dataturbo show storage_object
Storage Name: a.a.a.a
User : Dataturbo
Ips : x.x.x.x
IpPair :
ID Local Address Remote Address Status
—————————————————————
1 x.x.x.x x.x.x.x Normal
Step 3 After the connection is established, log in to DeviceManager and choose Services > File Service > DataTurbo Clients to view the backup server information.


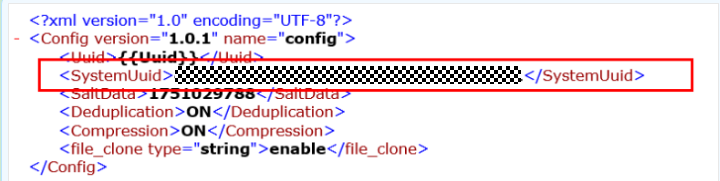
- To query the UUID of a Linux client, run the cat /opt/oceanstor/dataturbo/conf/dpc_config.xml | grep SystemUuid command and check the value of the SystemUuid field. In the following example, XXXXXXXX-XXXX-XXXX-XXXX-XXXXXXXXXXXX is the UUID of the client.
[root@host192 mnt]# cat /opt/oceanstor/dataturbo/conf/dpc_config.xml |grep SystemUuid
<SystemUuid>XXXXXXXX-XXXX-XXXX-XXXX-XXXXXXXXXXXX</SystemUuid>
- To query the UUID of a Windows client, open the dpc_config.xml file (default path: C:\Program Files\oceanstor\dataturbo\conf) and check the value of the SystemUuid field. The following shows an example:
—-End
Establishing a Fibre Channel Link

Only the DataTurbo Windows client of V200R001C10 or later supports Fibre Channel networks.
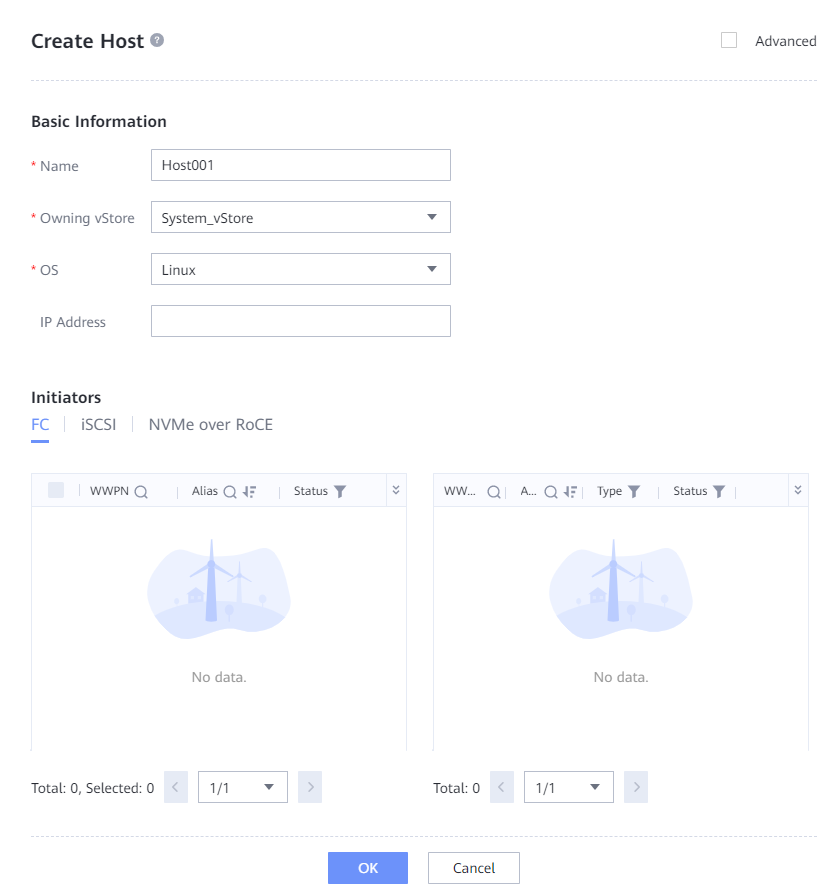
Step 1 Create a host.
Create a virtual host for a storage device.
- Choose Services > Block Service > Host Groups > Hosts.
- Select the desired vStore from the vStore drop-down list in the upper left corner.
- On the Hosts tab page, choose Create > Create Host.
Step 2 Create a channel LUN.
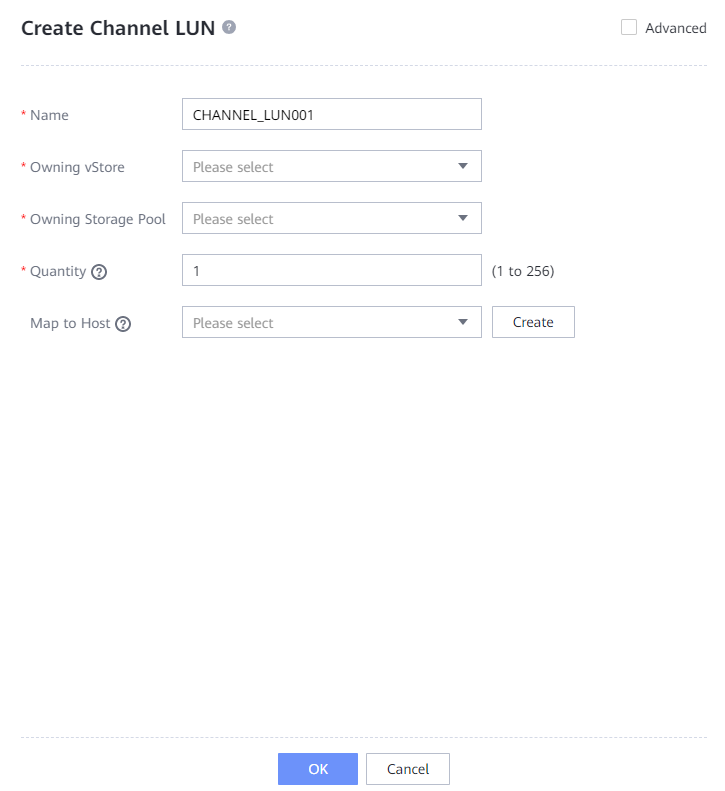
Channel LUNs are used to configure DataTurbo shares on the Fibre Channel network and they are mapped to the host through Fibre Channel links. SCSI devices are generated on the host. DataTurbo clients communicate with the storage system through the SCSI devices.
- Choose Services > Block Service > Channel LUNs.
- Select the desired vStore from the vStore drop-down list in the upper left corner.
- Click Create.
Step 3 Create a mapping.
To enable a DataTurbo client on the host to communicate with the storage system, you need to establish a mapping between the host and the channel LUN.
- Choose Services > Block Service > Channel LUNs.
The channel LUN management page is displayed.
2. Select one or more channel LUNs and click Map.
On the displayed page, set the mapping parameters and click OK.
Step 4 Update the SCSI device in the corresponding mode based on the operating system (OS).
- For Linux, run the dataturbo_rescan command to detect channel LUN mapping changes. In the following example, delete sg xxxx indicates that a channel LUN mapping is removed, and scan hostx indicates that a channel LUN mapping is added.
[root@localhost ~]# dataturbo_rescan
delete sg device sg2 sucess.
delete sg device sg3 sucess.
scan host1 scan host2
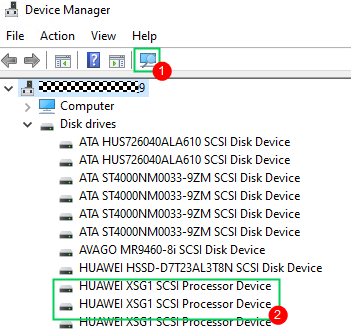
- For Windows, open Device Manager and click (Scan for hardware changes) to update the device. HUAWEI XSG1 SCSI Processor Device displayed under Disk drives is an available device.

Step 5 Run the dataturbo create storage_object storage_name=name link_type=FC command (name indicates the user-defined storage name) to establish a connection between the DataTurbo client and backup storage system.
In the following example, enter the username and password of the DataTurbo user created in Step 4 as prompted. If Create storage object successfully is displayed, the storage object is successfully created.
[root@localhost ~]# dataturbo create storage_object storage_name=test123 link_type=FC
Please input username:
test_001
Please input password:
**********
Create storage object successfully.

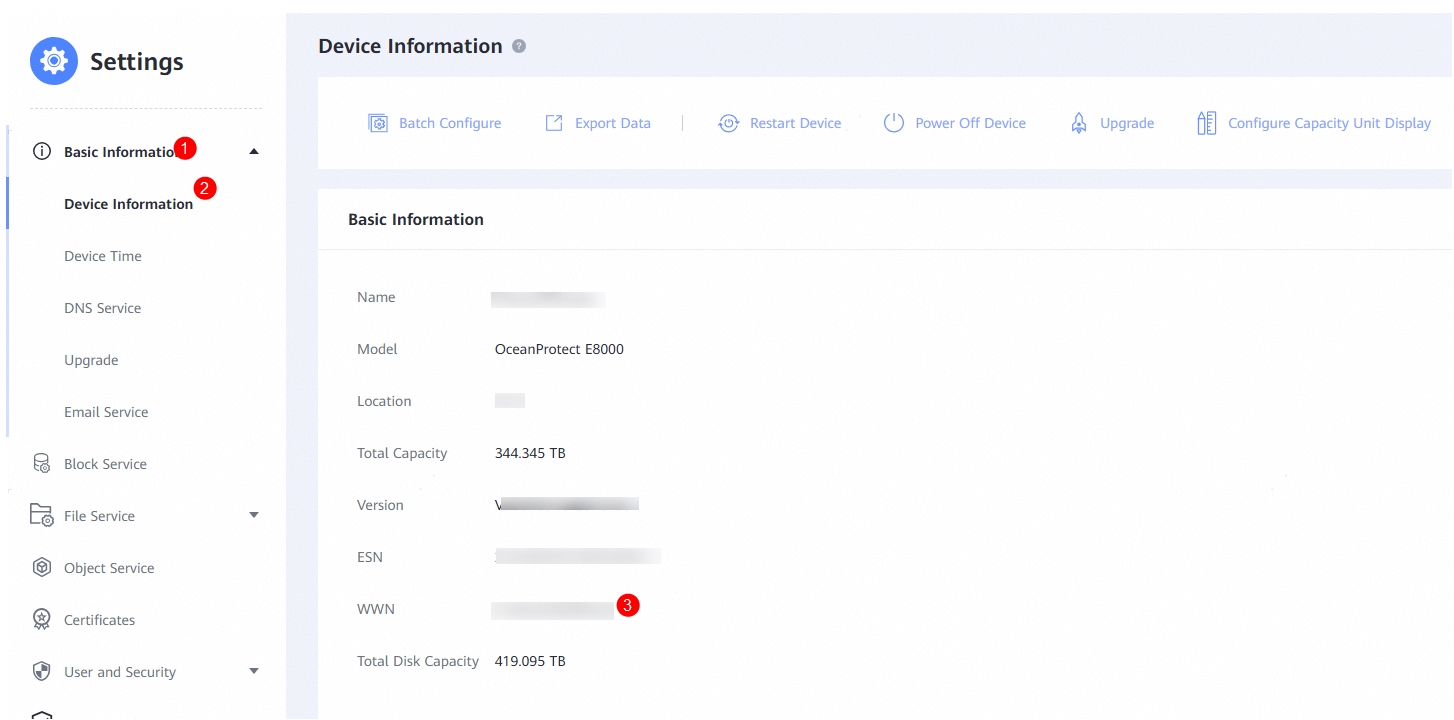
- If you map channel LUNs from two or more backup storage devices to the current backup server, you need to set wwn in the storage object creation command to specify which backup storage device needs to connect to the current backup server.
[root@localhost ~]# dataturbo create storage_object storage_name=test123 link_type=FC wwn=2100c8********8a
Please input username:
test_001
Please input password:
**********
Create storage object successfully.
If the wwn parameter is not specified, the command output lists backup storage devices whose channel LUNs have been mapped to the current backup server. Determine the backup storage device to connect to based on the information.
Cause:Multiple sets of storage({2100c8********8a;21005c********6e}) channel LUN devices were found on the host.
Suggestion:Specify wwn in the storage object creation command.
You can query the value of wwn on the DeviceManager as follows:
- The storage object names for creating links with multiple backup storage devices must be unique.
Step 6 Run the dataturbo show storage_object command to check whether the connection is established successfully.
In the following example, four Fibre Channel links are created on the backup storage. If Status is Normal, the connections are successful and the links are normal.
[root@localhost ~]# dataturbo show storage_object
Storage Name: test123
User : test_001
ID Initiator WWN Target WWN Status
—————————————————————
1 210000********c4 2800**********58 Normal
2 210000********c4 2801**********58 Normal
3 210000********c4 28b0**********3d Normal
4 210000********c4 28e0**********58 Normal
—-End
Mounting File Systems
When a backup job is running, the OST plug-in automatically invokes DataTurbo to mount the corresponding file system and you do not need to manually mount the file system.
After the backup job is started, run the df -h command to check whether the mounting is successful.
Filesystem Size Used Avail Use% Mounted on
/dev/mapper/centos-root 45G 24G 21G 55% /
devtmpfs 4.8G 0 4.8G 0% /dev
tmpfs 4.9G 8.0K 4.9G 1% /dev/shm
tmpfs 4.9G 9.3M 4.8G 1% /run
tmpfs 4.9G 0 4.9G 0% /sys/fs/cgroup
/dev/sda1 1014M 179M 836M 18% /boot
tmpfs 984M 0 984M 0% /run/user/0
/ost_52 820G 65M 820G 1% /HyperProtect/x.x.x.x/ost_52/dataturbo
5.4.5 Configuring the NetBackup Backup Environment
5.4.5.1 Starting NetBackup Administrator Console
Step 1 Log in to the NetBackup Master Server and import environment variables. The IP address in the following command belongs to the local host.
export DISPLAY=IP:0.0
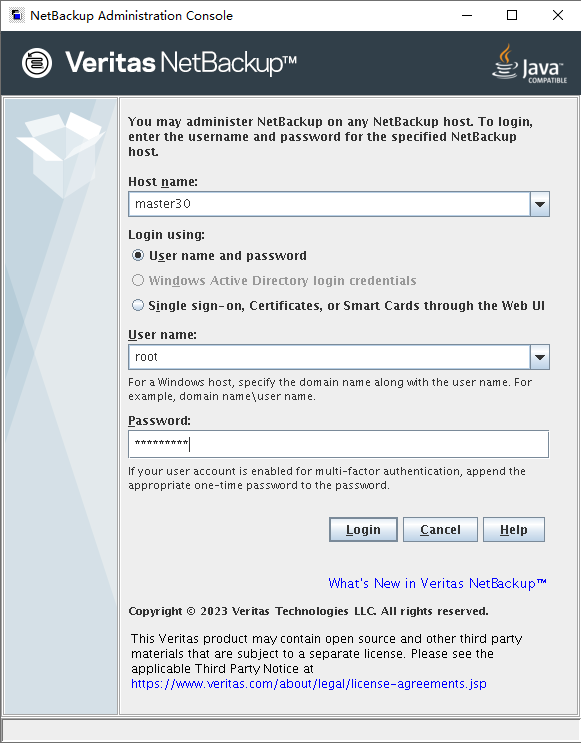
Step 2 Run the following script in the bin directory where NetBackup is installed to switch to the login GUI:
./jnbSA
Step 3 On the Java page that is displayed, enter the password of user root of the NetBackup Master Server and click Login. The NetBackup configuration management page is displayed.
—-End
5.4.5.2 Configuring an OpenStorage Server
Step 1 In the navigation tree, choose Media and Device Management > Credentials > Storage Servers and click New Storage Server to create a storage server.
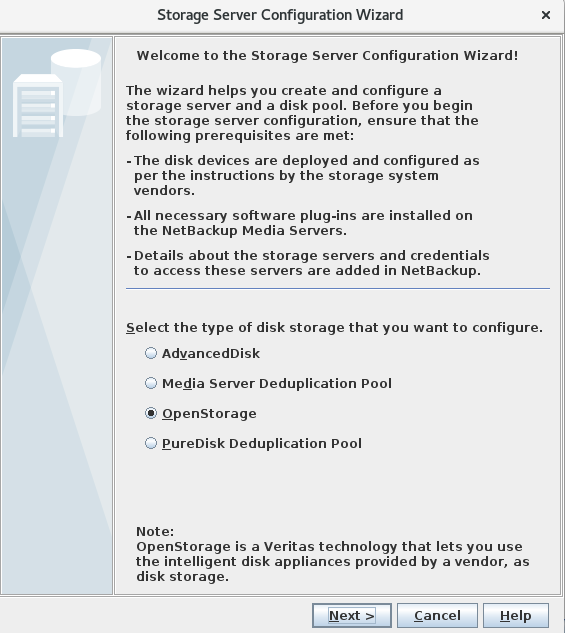
Step 2 Set the disk storage type to OpenStorage and click Next.
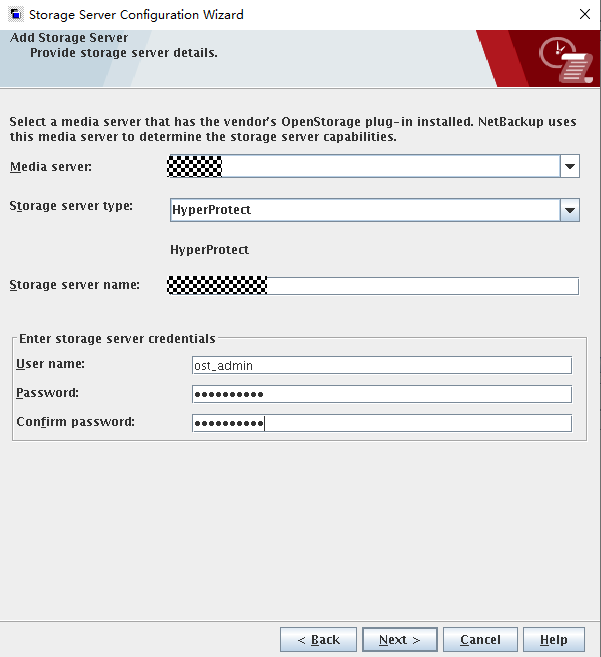
Step 3 Select one Media Server. If there are multiple Media Servers, you can select other Media Servers later.
Set Storage server type to the type of the OST plug-in to be installed. In this document, HyperProtect is used.
Set Storage server name to the IP address or domain name of the OceanProtect storage management network. The value must be the same as the name specified in Step 1.
Set the user information in the Enter storage server credentials area to the information about the data protection administrator in 5.4.2.4 Creating a Data Protection Administrator.
User name and Password are the username and password of the data protection administrator created in 5.4.2.4 Creating a Data Protection Administrator.
If you have created a storage server using the username and password of a non-data protection administrator, delete the /opt/HyperProtect/kmc/token.ini file and create another storage server.
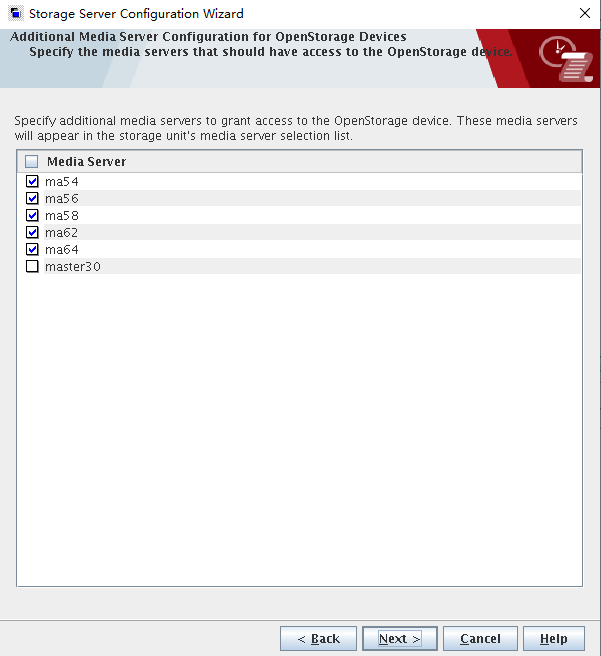
Select other Media Servers that need to use the OST.
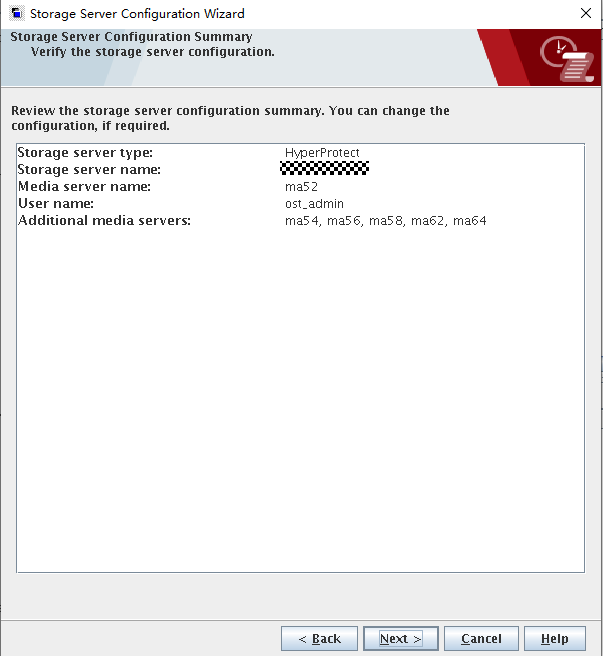
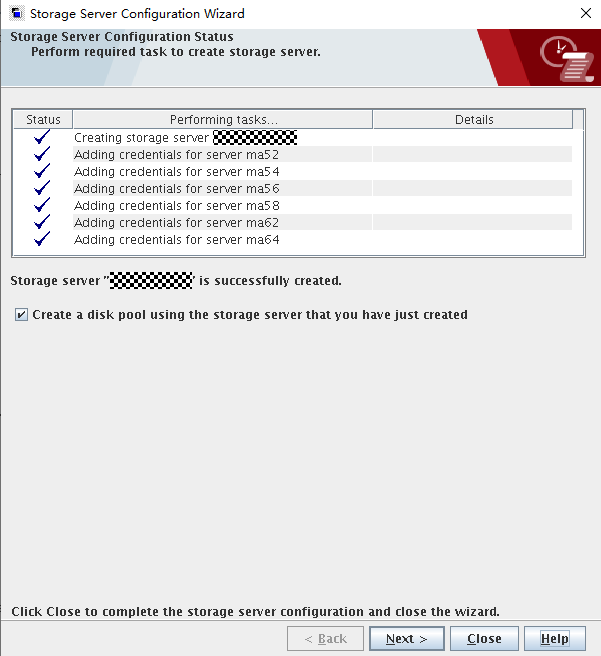
Step 4 Check whether the information is correct.
—-End
5.4.5.3 Creating a Disk Pool
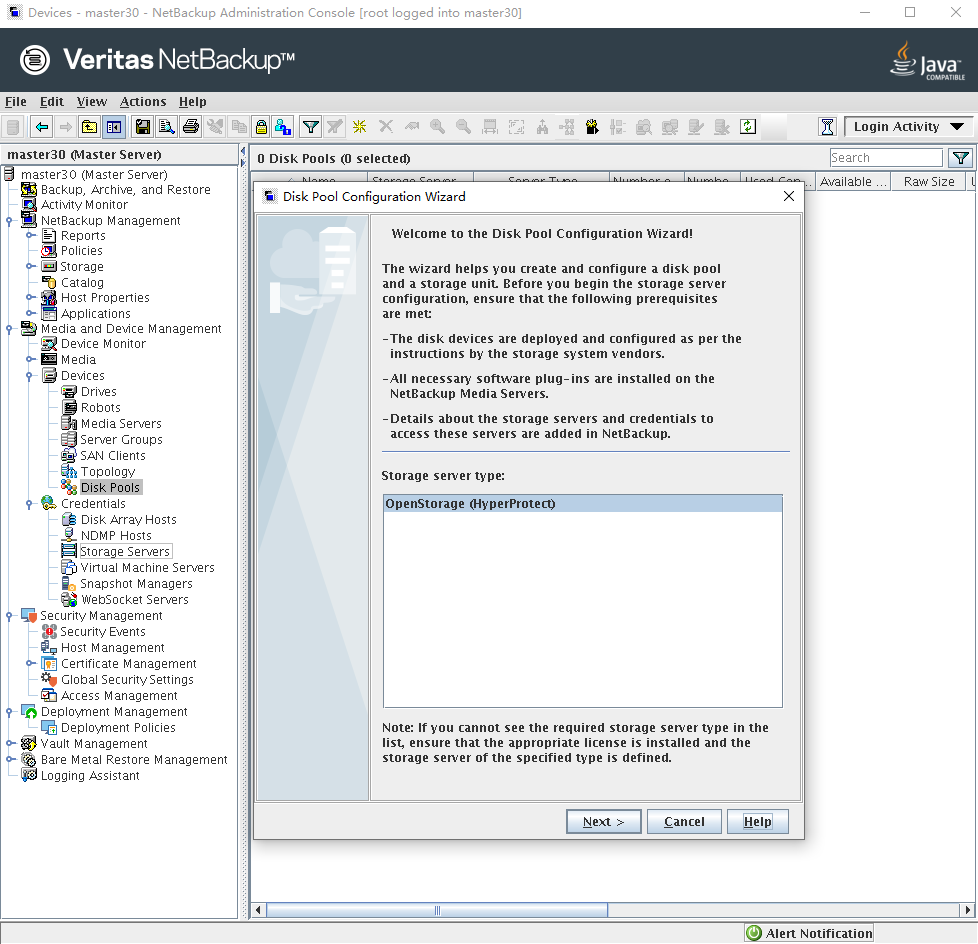
Step 1 In the navigation tree, choose Media and Device Management > Devices > Disk Pools to create a disk pool.
Step 2 Set Storage server type to OpenStorage (HyperProtect).
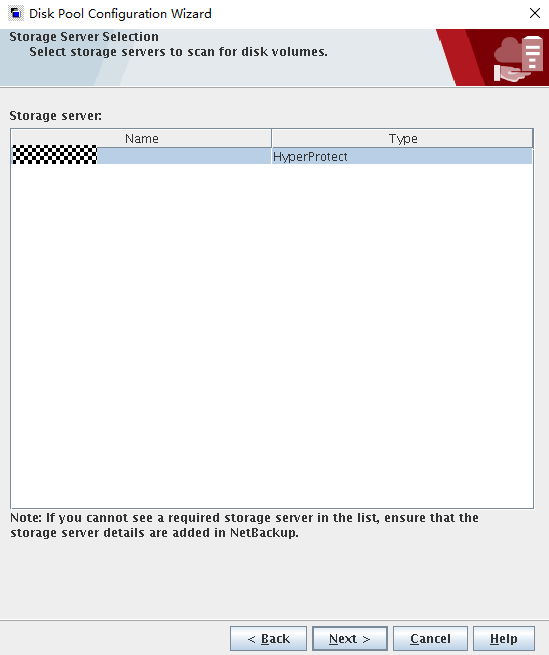
Step 3 Select an OpenStorage server.
Step 4 Select the disk volume (file system created in 5.4.2.3 Creating File Systems and Shares) to create a disk pool.
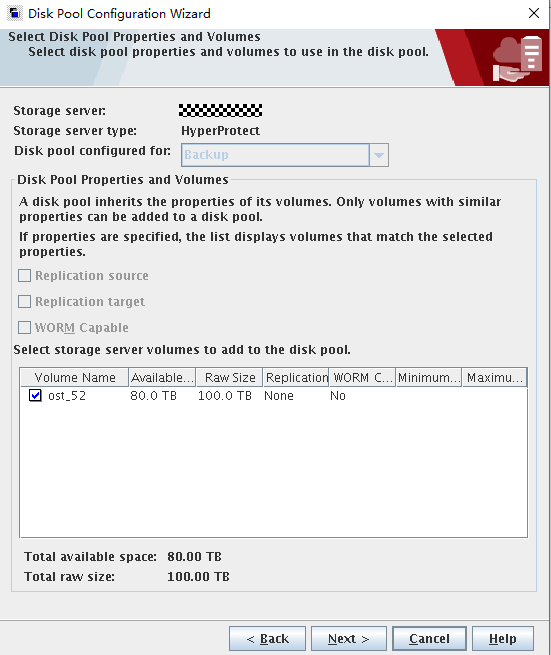

- You are advised to select one disk volume for a disk pool. If you select multiple disk volumes, the following problems may occur:
- During backup using the NetBackup software, one disk volume is randomly selected for data backup. If a disk pool contains multiple disk volumes and the space of one disk volume is insufficient, the backup may fail.
- If a disk pool contains multiple disk volumes and A.I.R. or target A.I.R. is required, ensure that the sizes of file systems are in one-to-one mapping when configuring the copy relationship of file systems. Otherwise, the replication may fail.
- A maximum of 64 file systems can be displayed.
- The value of Replication can be None (no replication pair), Source (source end), or Target (target end).
Step 5 Enter a name for the disk pool.
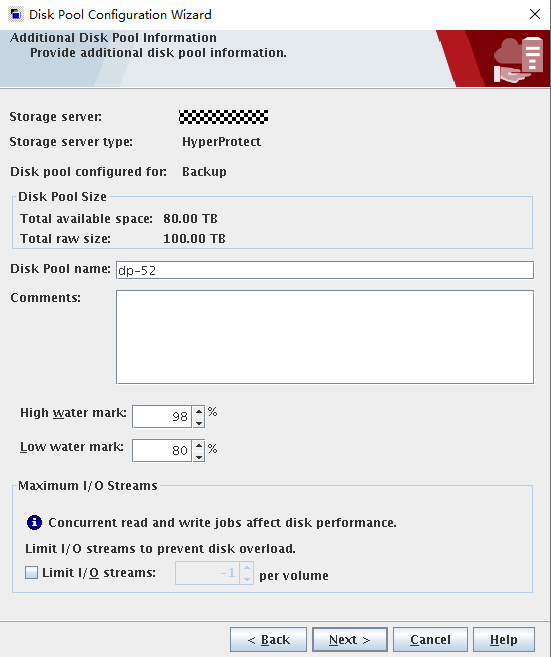
Step 6 Confirm that the information is correct and click Next.
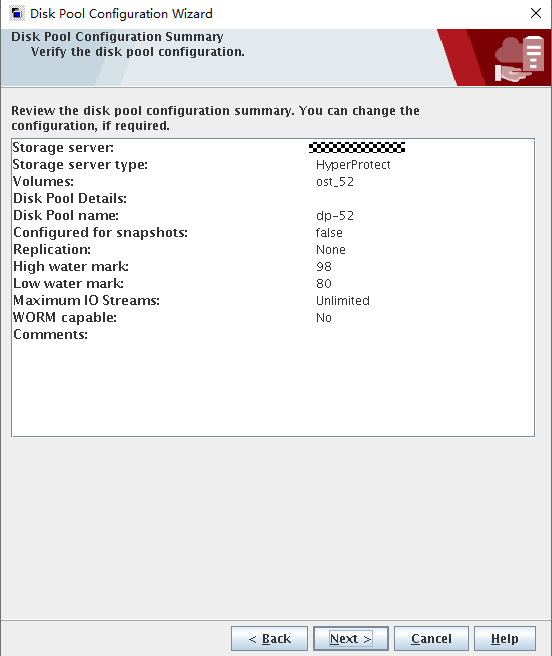
Step 7 After the disk pool is created, determine whether to create an STU immediately as needed.
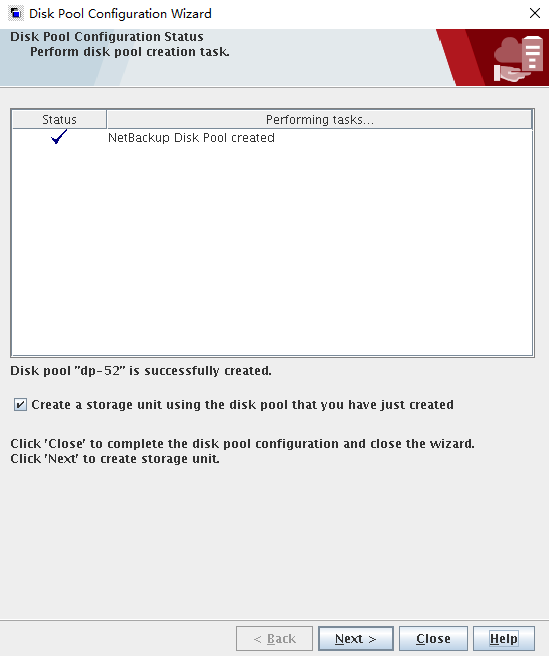
—-End
5.4.5.4 Configuring STUs
Step 1 In the navigation tree, choose NetBackup Management > Storage > Storage Units to create an STU. Set parameter as follows:
- Set Storage unit type to Disk.
- Set Disk type to OpenStorage (OceanProtect). If this option does not exist, check whether the OpenStorage server is successfully created.
- Under Select disk pool, select the disk pool created in 5.4.5.3 Creating a Disk Pool.
- Under Media server, select an option based on site requirements. Ensure that the HyperProtect OST plug-in is correctly installed on Media Servers.
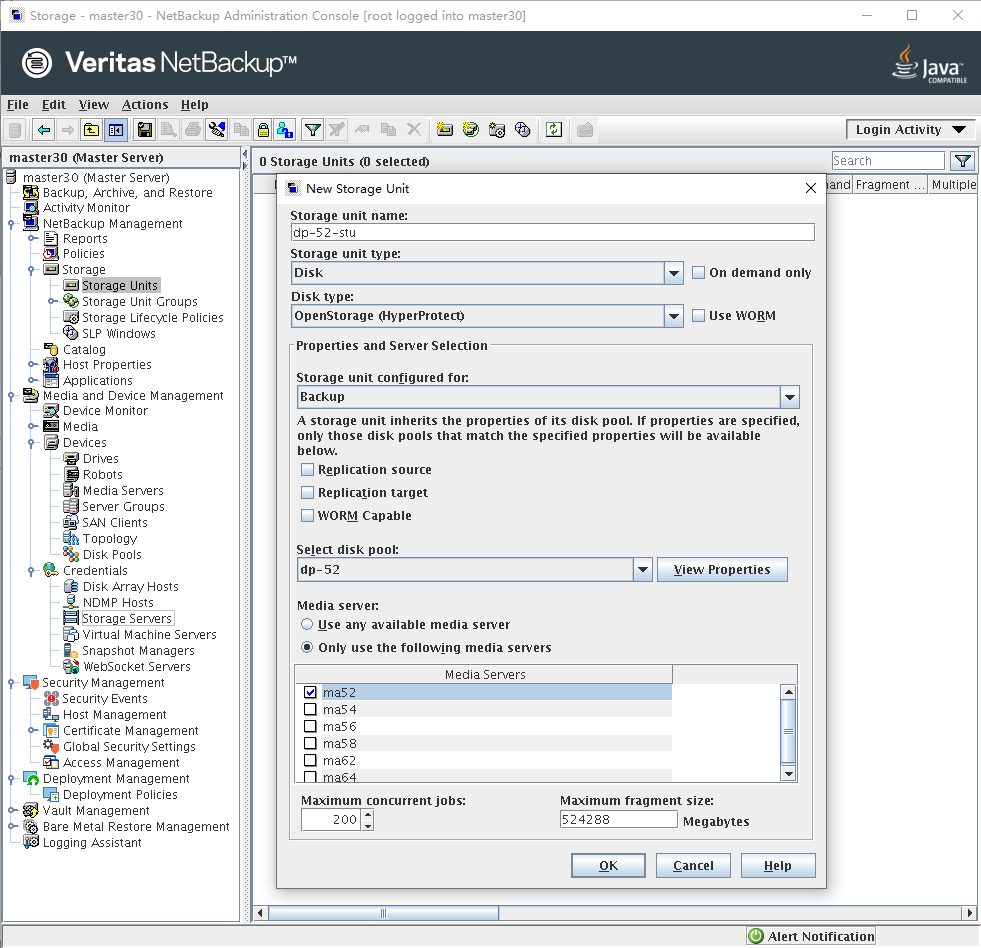
Repeat the preceding operations to create six STUs in sequence.
—-End
5.4.5.5 Integrating the ESXi Host and NetBackup
Choose Media and Device Management > Credentials > Virtual Machine Servers > New Virtual Machine Server. In the dialog box that is displayed, enter the IP address of the vCenter or ESXi host. NetBackup automatically identifies whether it is a vCenter or ESXi host. The following figures show a configuration example.
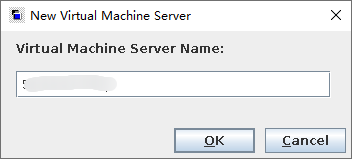


You can also run the following command to add an ESXi host:
tpconfig -add -virtual_machine name -vm_user_id user -vm_type 2 -password password
In this command:
- -add -virtual_machine: IP address or name of the ESXi host to be added
- -vm_user_id: username for logging in to the host
- -vm_type: 2 indicates that the type of the host to be added is ESXi.
- -password: password of the ESXi host
In UNIX, the path for this command is /usr/openv/volmgr/bin/.
In Windows, the path for this command is install_path\Volmgr\bin\.
5.4.5.6 Configuring a NetBackup Policy
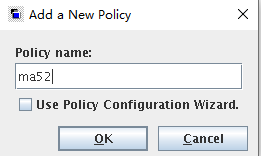
Step 1 Choose Policies on the left, click Add a New Policy, and enter a policy name. The following figure shows a configuration example.
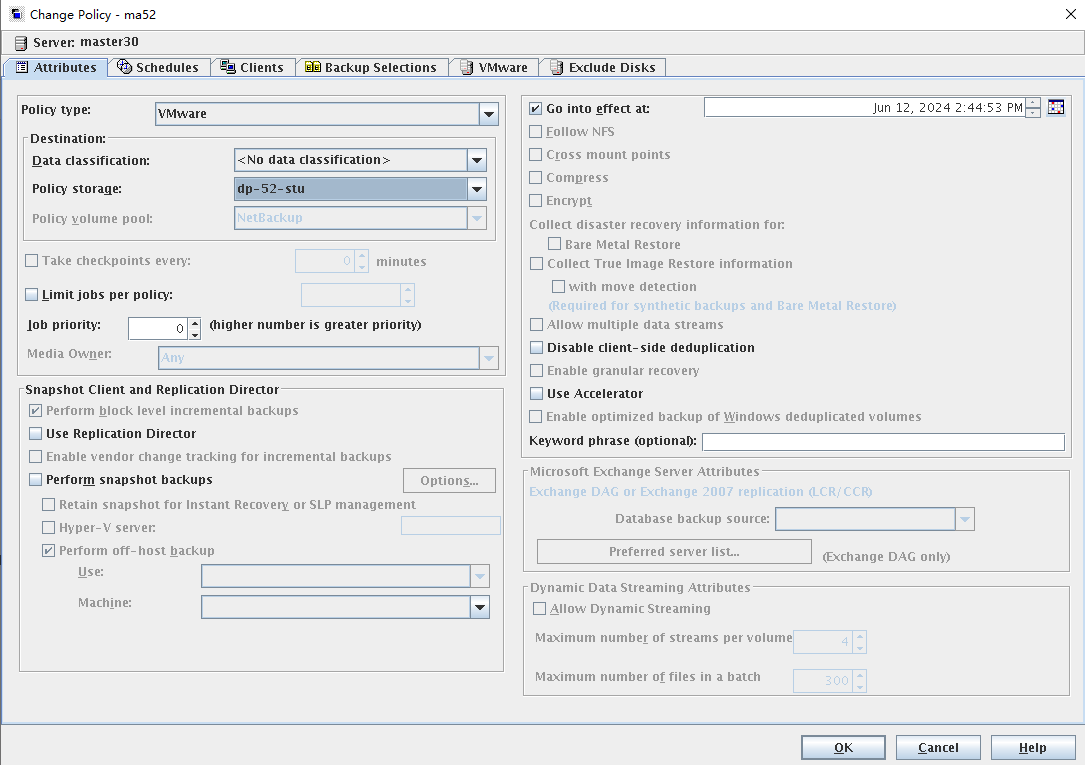
Step 2 On the Attributes tab page, set Policy type to VMware and Policy storage to the created STU.
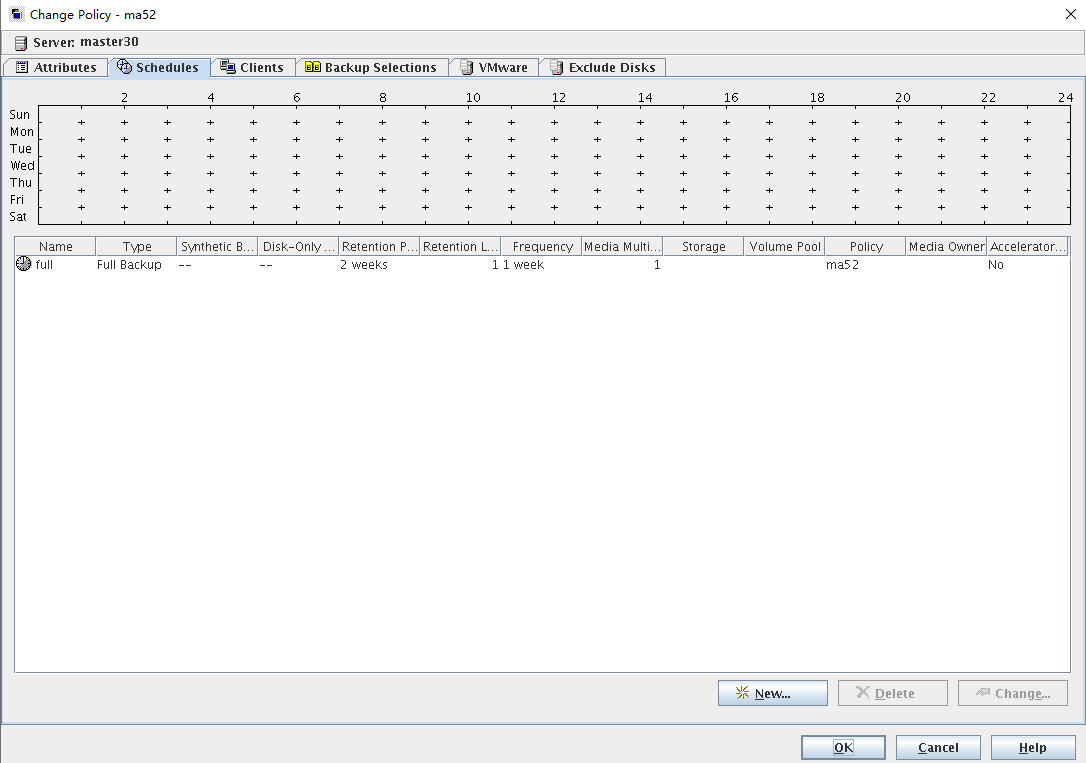
Step 3 On the Schedules tab page, create a full backup policy and set Type to Full Backup.
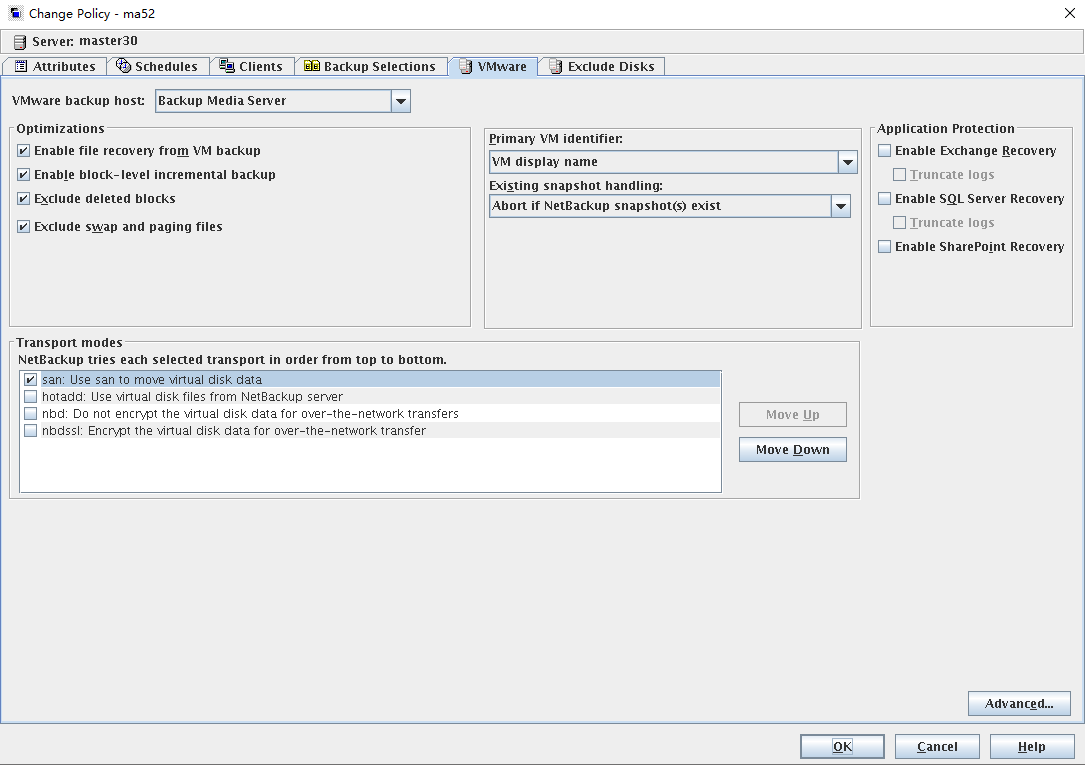
Step 4 On the VMware tab page, set Transport modes to san: Use san to move virtual disk data and Primary VM identifier to VM display name, and retain the default values for other parameters.
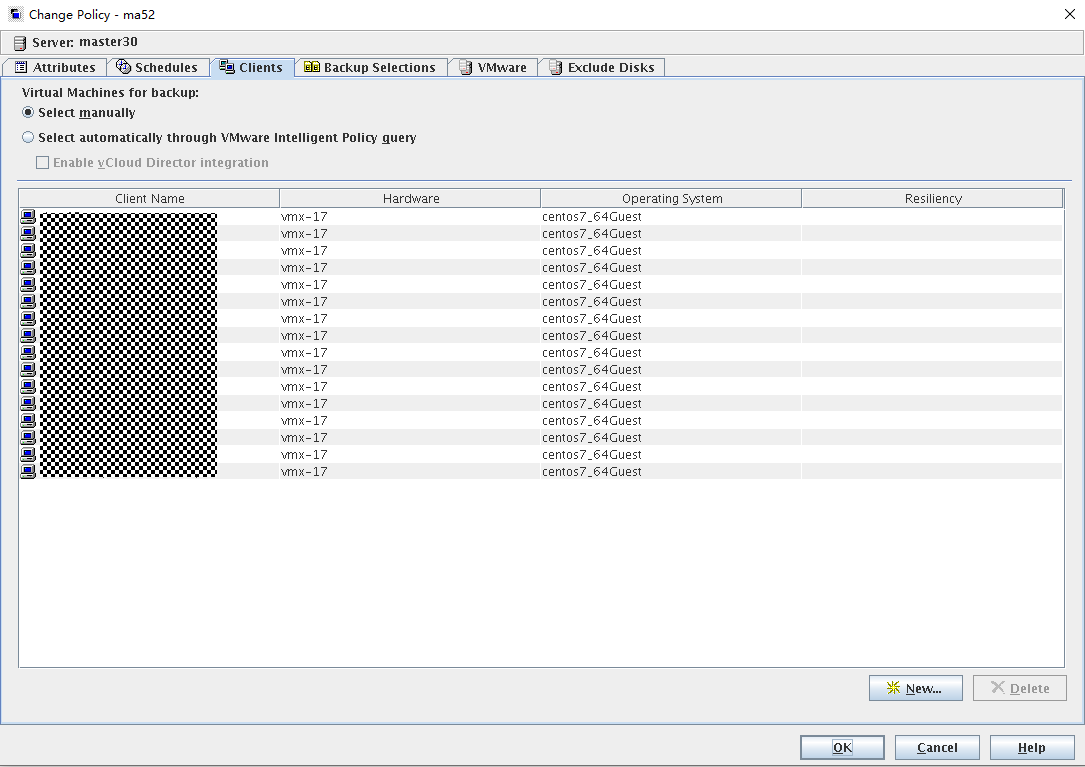
Step 5 On the Clients tab page, click New. In the displayed window for browsing VMs, select the VM to be backed up and add it.
—-End
5.4.6 Performing Backup
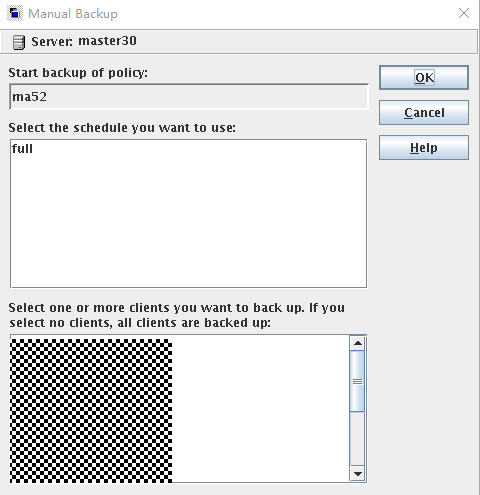
Right-click the created VMware policy and choose Manual Backup from the shortcut menu. In the dialog box that is displayed, click OK. By default, all VMs are backed up. You can also select part of VMs for backup.
5.4.7 Performing Restoration
5.4.7.1 Executing Restoration on NetBackup
Step 1 On the Backup, Archive, and Restore page, click .

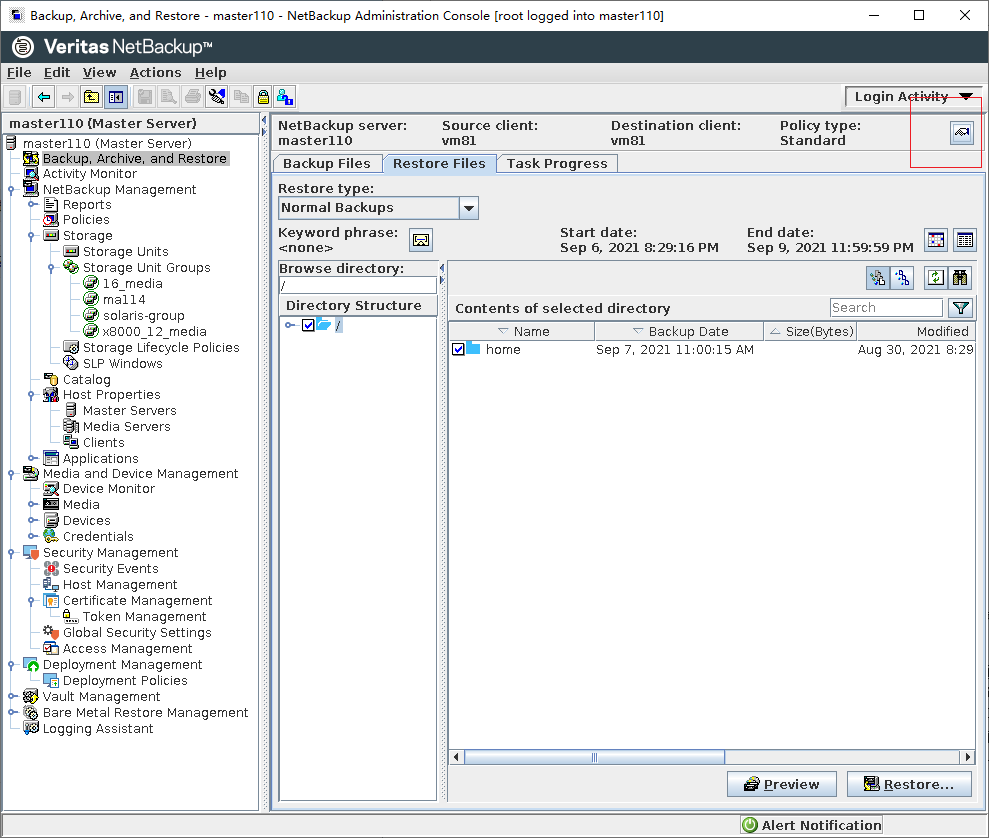
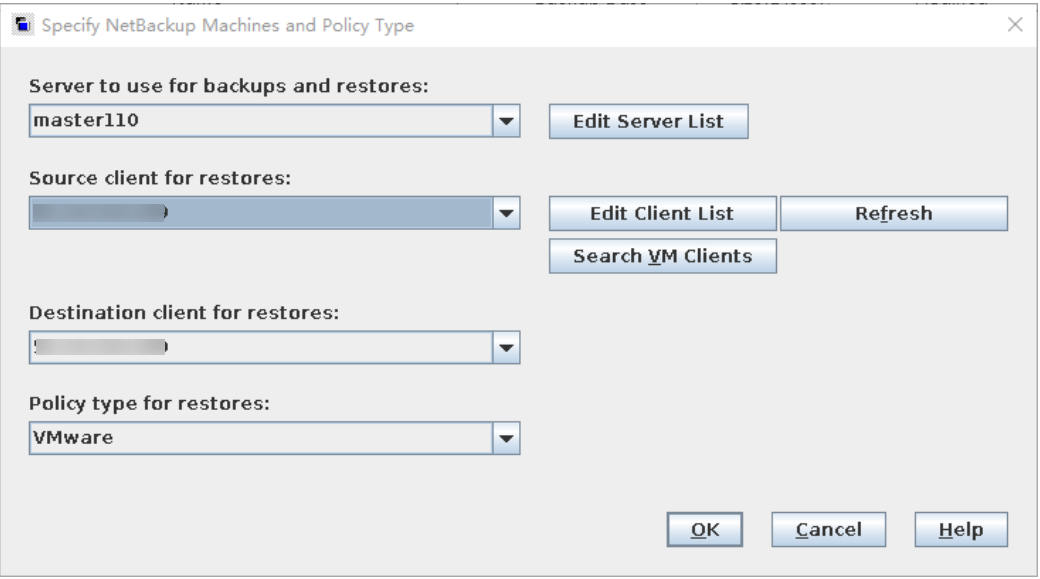
Step 2 Set parameters in the Specify NetBackup Machines and Policy Type window. Then, click OK.
- Set Server to use for backups and restores to NetBackup Master Server.
- Set Source client for restores to the VM to be restored.
- Set Destination client for restores to the VM restoration location.
- Set Policy type for restores to VMware.
Step 3 On the Restore Files tab page, set Restore type to Virtual Machine Backups.
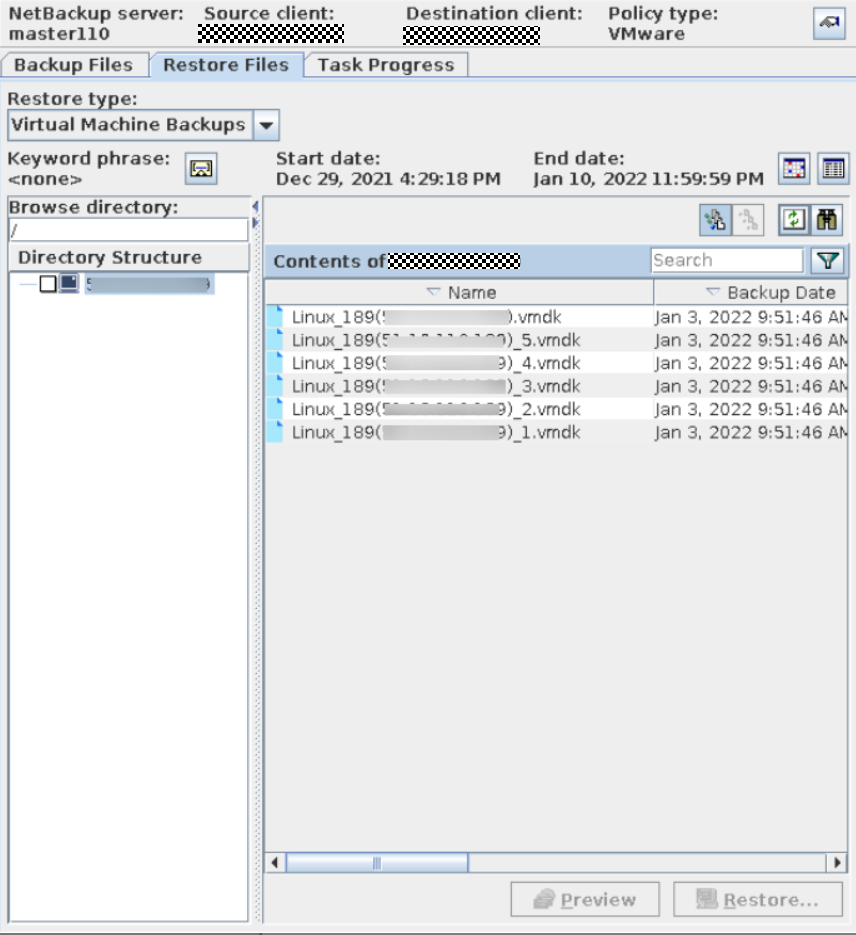
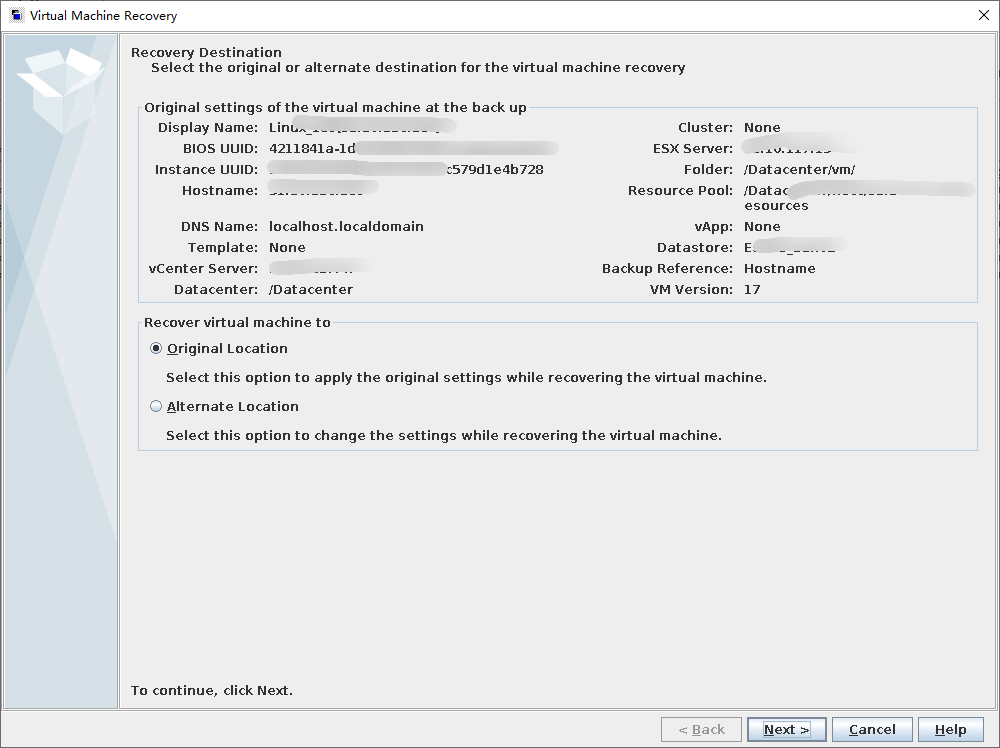
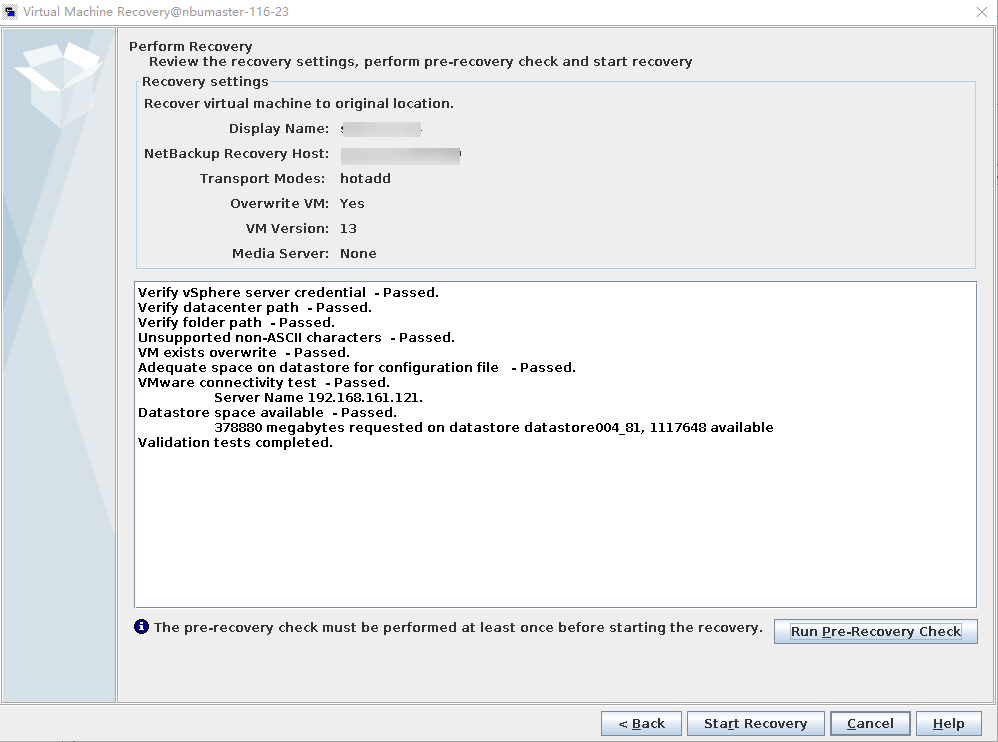
Step 4 In the Virtual Machine Recovery window, select Original Location and click Next.
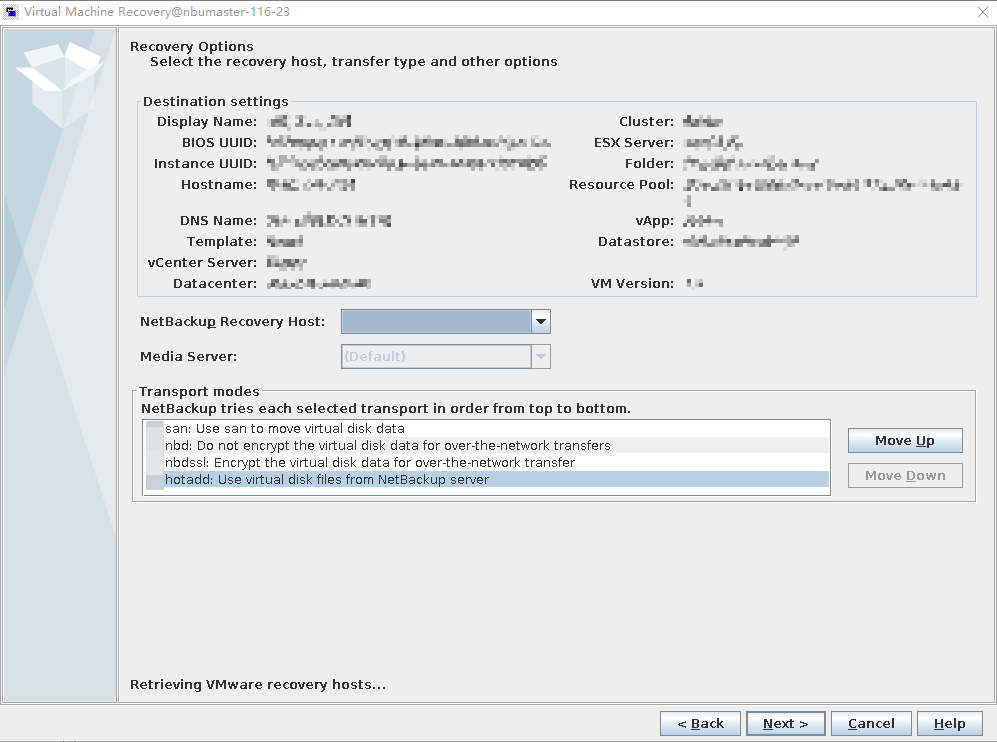
Step 5 Set Transport modes to the modes selected during the backup.
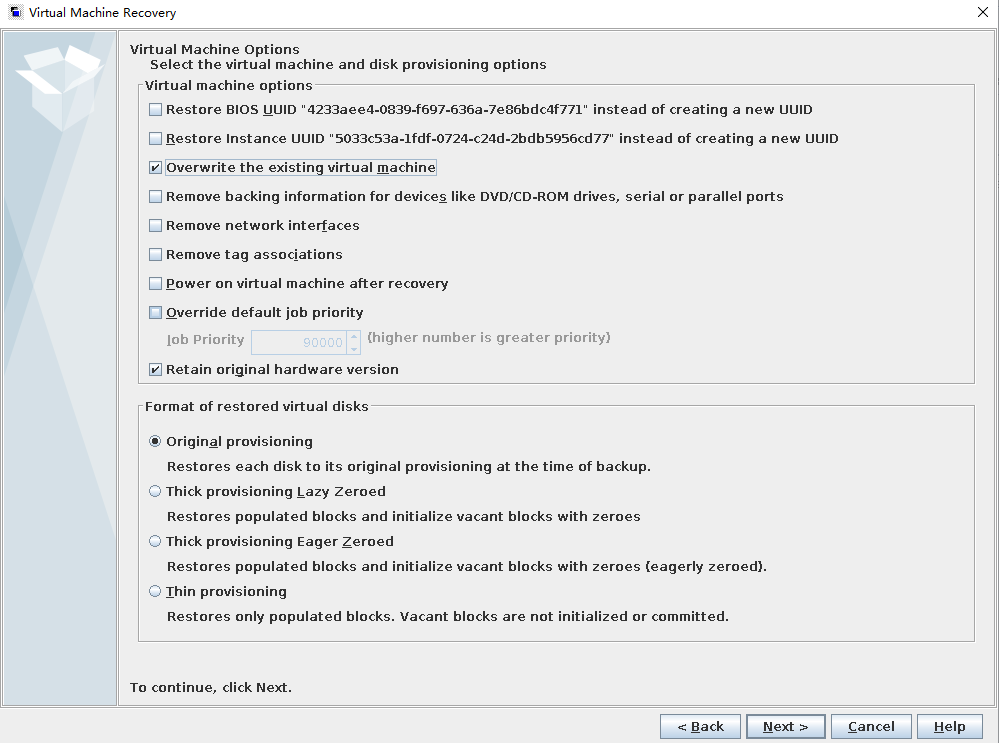
Step 6 Select Overwrite the existing virtual machine.
Step 7 Click Run Pre-Recovery Check to start the health check. After the health check is complete, start the restoration.
—-End
5.4.7.2Executing Restoration Using Commands
Run the following command to open the directory where the nbrestorevm script of NetBackup is located:
cd /usr/openv/netbackup/bin/
Run the following command to restore the VM:
./nbrestorevm -vmw -C vmname -O -vmpo
In this command:
- -vmw: indicates restoring a VMware VM.
- -C: indicates the name of the VM to be restored.
- -O: indicates overwriting the VM and associated resources if they already exist.
- -vmpo: indicates powering on the VM after the restoration is complete.

This section provides only an example of restoring a VM using commands. During the actual test, restore the VM as required. For more command examples, see the NetBackup official documentation.
—-End
5.5 Configuration of A.I.R. File-level Replication
Auto Image Replication (A.I.R.): The backup copies in one NetBackup domain can be replicated to storage in one or more target NetBackup domains. This process is referred to as A.I.R.
Target A.I.R.: A.I.R. replicates data to all configured replication targets, while target A.I.R. can select trusted domains as replication targets for replication to the specified domains.

This section does not apply to the ransomware protection feature. For details about the replication solution supporting ransomware protection, see the Ransomware Protection Solution Best Practice.
5.5.1 Environment Networking
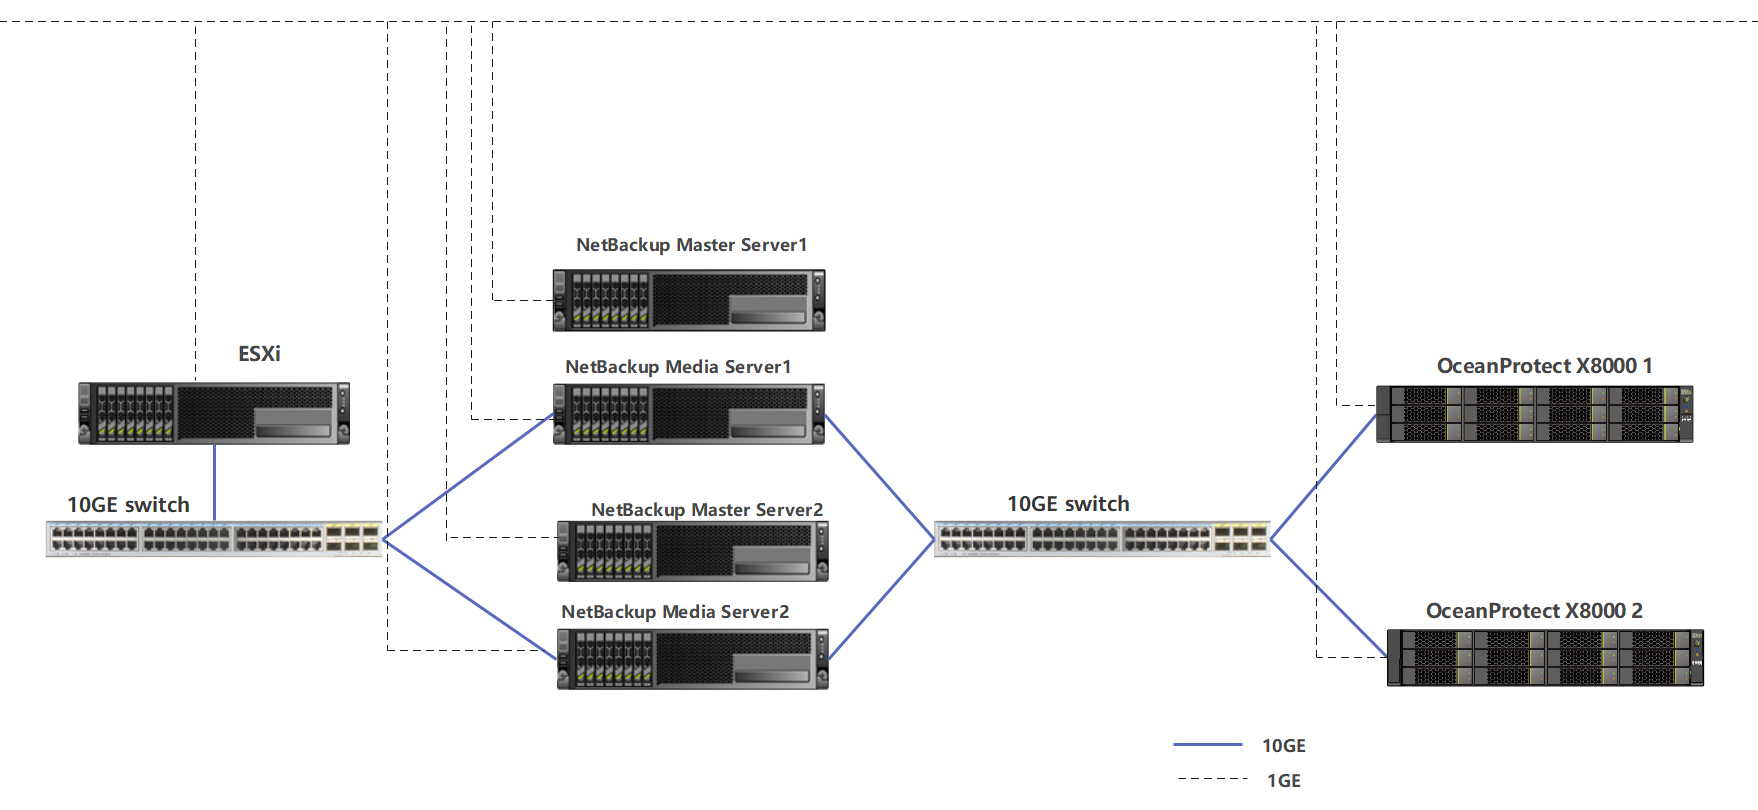
- Two sets of NetBackup systems and two sets of OceanProtect X8000 systems are used. NetBackup Master Server 1 and NetBackup Media Server 1 are primary NetBackup servers, and the Media Server is connected to OceanProtect X8000 1. NetBackup Master Server 2 and NetBackup Media Server 2 are secondary NetBackup servers, and the Media Server is connected to OceanProtect X8000 2. OceanProtect X8000 1 and OceanProtect X8000 2 have 1 × 10GE physical link to form a replication link.
- Storage pools on OceanProtect X8000: Create a storage pool on each of the primary and secondary ends, configure 25 SAS SSDs (3.84 TB for each SSD), and set the RAID policy to RAID 6.
- File systems on OceanProtect X8000: Create a file system on each of the primary and secondary ends, and set the file system type to DataTurbo.
- Logical ports on OceanProtect X8000: Each OceanProtect X8000 is connected to the interconnected NetBackup Media Server through 1 × 10GE physical link. Each physical port is configured with one logical port.
- Setting up connections using DataTurbo: This solution uses the source deduplication feature. The file systems created on OceanProtect X8000 need to connect to the front-end hosts using the DataTurbo protocol. After the DataTurbo software is installed on the NetBackup Media Servers, DataTurbo needs to be first connected to OceanProtect X8000.
Figure 5-6 Target A.I.R. networking
5.5.2 Prerequisites
5.5.2.1 Creating STUs on Master Servers
For details about how to create STUs, perform operations in the 5.4.5.2 Configuring an OpenStorage Server, 5.4.5.3 Creating a Disk Pool, and 5.4.5.4 Configuring STUs in sequence.
5.5.2.2 Configuring the File System Copy Relationship
Step 1 Create a file system copy relationship at the secondary end. Log in to OceanProtect X8000 at the secondary end as user admin in SSH mode and run the create file_copy general copy_type=on-demand local_file_system_name=local_file_system remote_file_system_name=remote_file_system remote_device_id=remote_device_id copy_direct=RemoteToLocal command.
- local_file_system_name: name of the HyperProtect file system at the secondary end
- remote_file_system_name: name of the HyperProtect file system at the primary end
- remote_device_id: ID of the connection established between the secondary end and the primary end, which can be queried by using the show remote_device general command at the background of the secondary storage device.
In the following example, Command executed successfully is displayed, indicating that a file system copy relationship from the primary to the secondary end has been created at the secondary end.
admin:/>create file_copy general copy_type=on-demand local_file_system_name=ost_231 remote_file_system_name=ost_187 remote_device_id=2 copy_direct=RemoteToLocal
Command executed successfully.
Step 2 Log in to OceanProtect X8000 at the primary end as user admin and run the create file_copy general copy_type=on-demand local_file_system_name=local_file_system remote_file_system_name=remote_file_system remote_device_id=remote_device_id copy_direct=LocalToRemote command.
- local_file_system_name: name of the HyperProtect file system at the primary end
- remote_file_system_name: name of the HyperProtect file system at the secondary end
- remote_device_id: ID of the connection established between the primary end and the secondary end, which can be queried by using the show remote_device general command on the primary background.
In the following example, Command executed successfully is displayed, indicating that a file system copy relationship from the primary to the secondary end has been created at the primary end.
admin:/>create file_copy general copy_type=on-demand local_file_system_name=ost_187 remote_file_system_name=ost_231 remote_device_id=2 copy_direct=LocalToRemote
Command executed successfully.
—-End
5.5.2.3 Configuring the LSU A.I.R.
Step 1 Configure the secondary Media Server.
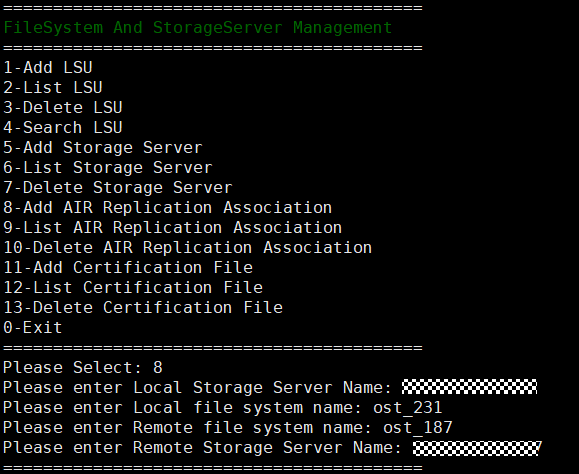
- Go to the CLI of the secondary Media Server and run the /opt/HyperProtect/scripts/config_filesystem_storage.sh command.
- Type 8 and press Enter. Enter the management IP address of the secondary storage system, secondary file system name, primary file system name, and management IP address of the primary storage system in sequence.
Figure 5-7 Configuring LSU A.I.R. at the secondary end
Step 2 Configure the primary Media Server.
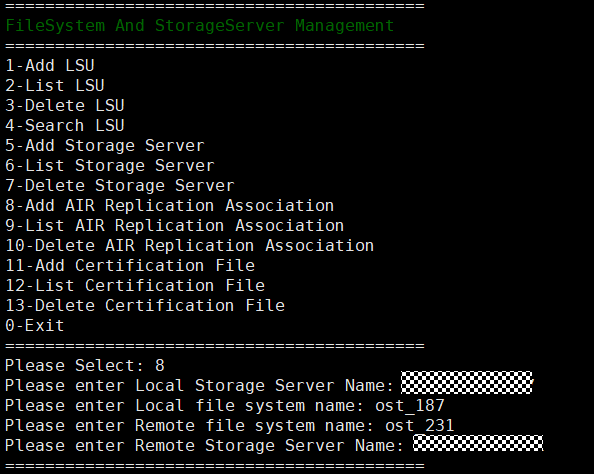
- Go to the CLI of the primary Media Server and run the /opt/HyperProtect/scripts/config_filesystem_storage.sh command.
- Type 8 and press Enter. Enter the management IP address of the primary storage system, primary file system name, secondary file system name, and management IP address of the secondary storage system in sequence.
Figure 5-8 Configuring LSU A.I.R. at the primary end
—-End
5.5.2.4 Refreshing Disk Pools
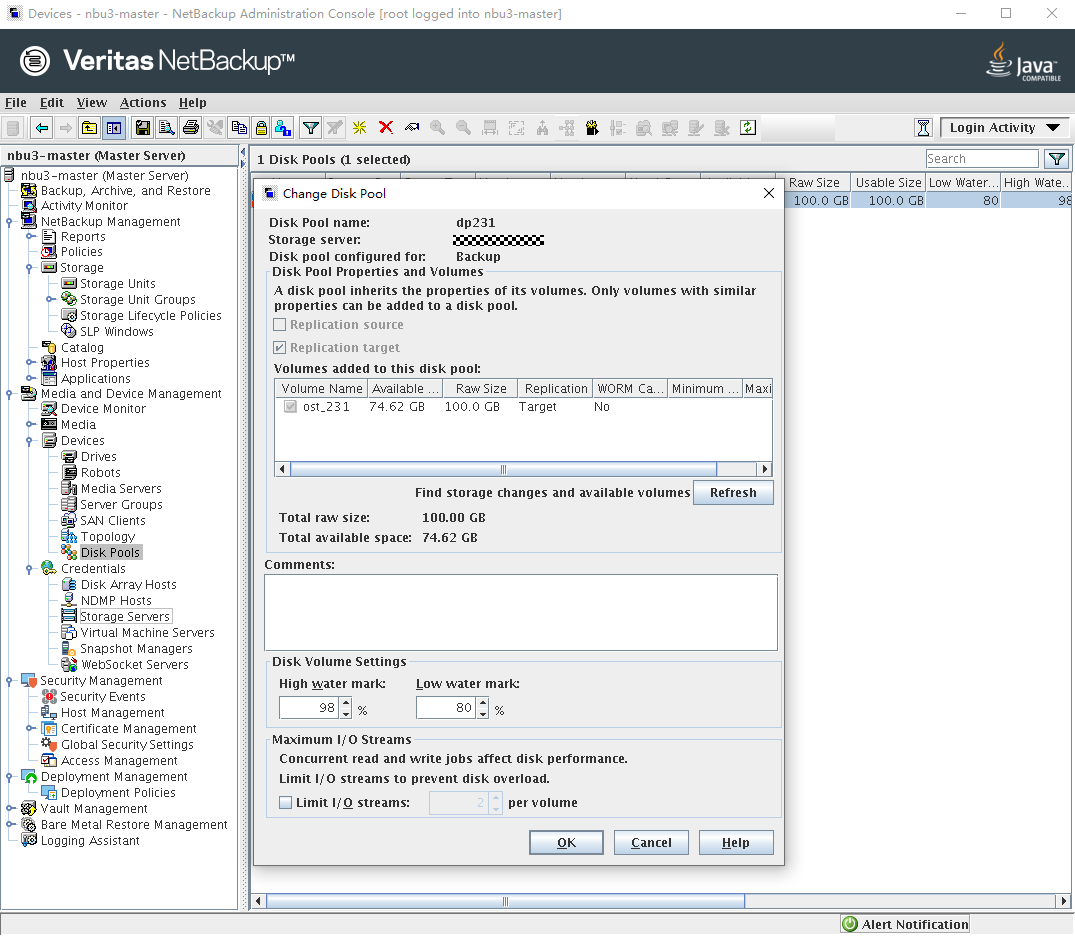
After the disk pools are configured, you need to refresh the disk pool replication settings. Log in to the NetBackup Administrator Console at the primary and secondary ends. In the navigation pane, choose Media and Device Management > Devices > Disk Pools. Double-click the created disk pool. On the page that is displayed, click Refresh. The value of Replication changes to Source for the primary end and Target for the secondary end.
Figure 5-9 Refreshing the disk pool at the primary end
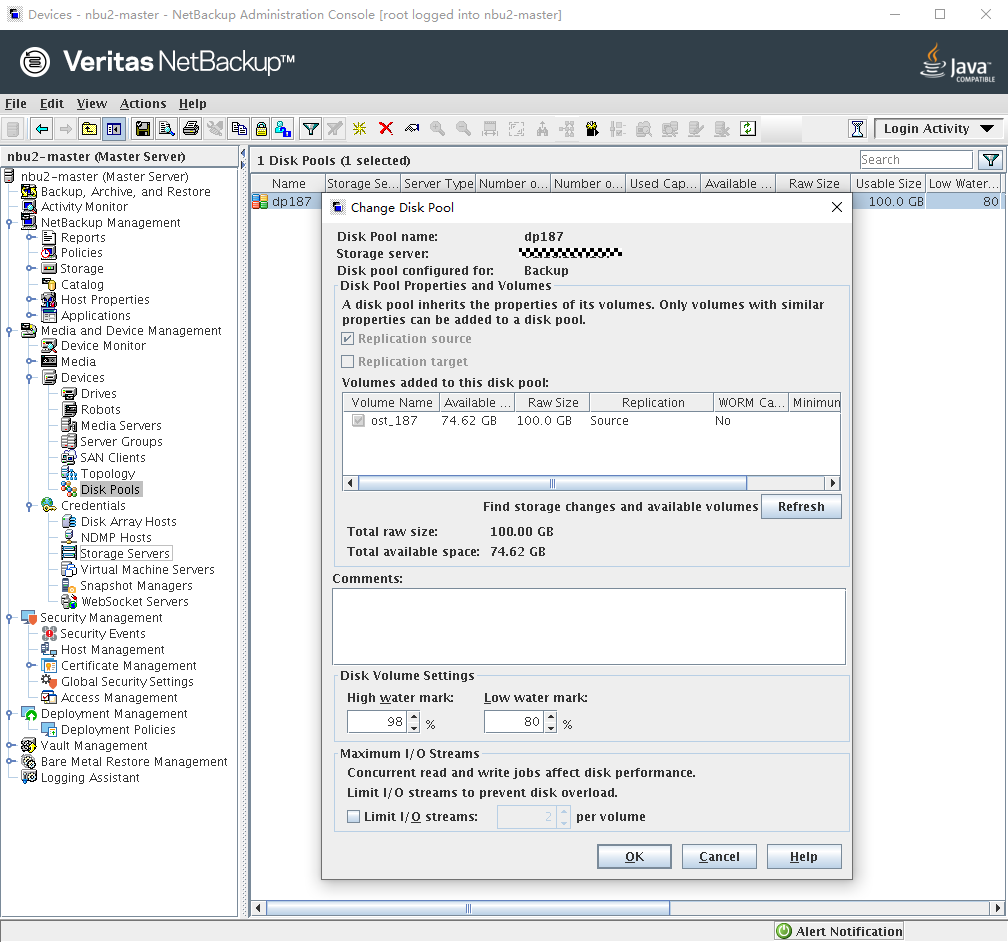
Figure 5-10 Refreshing the disk pool at the secondary end
5.5.2.5 Configuring SLPs
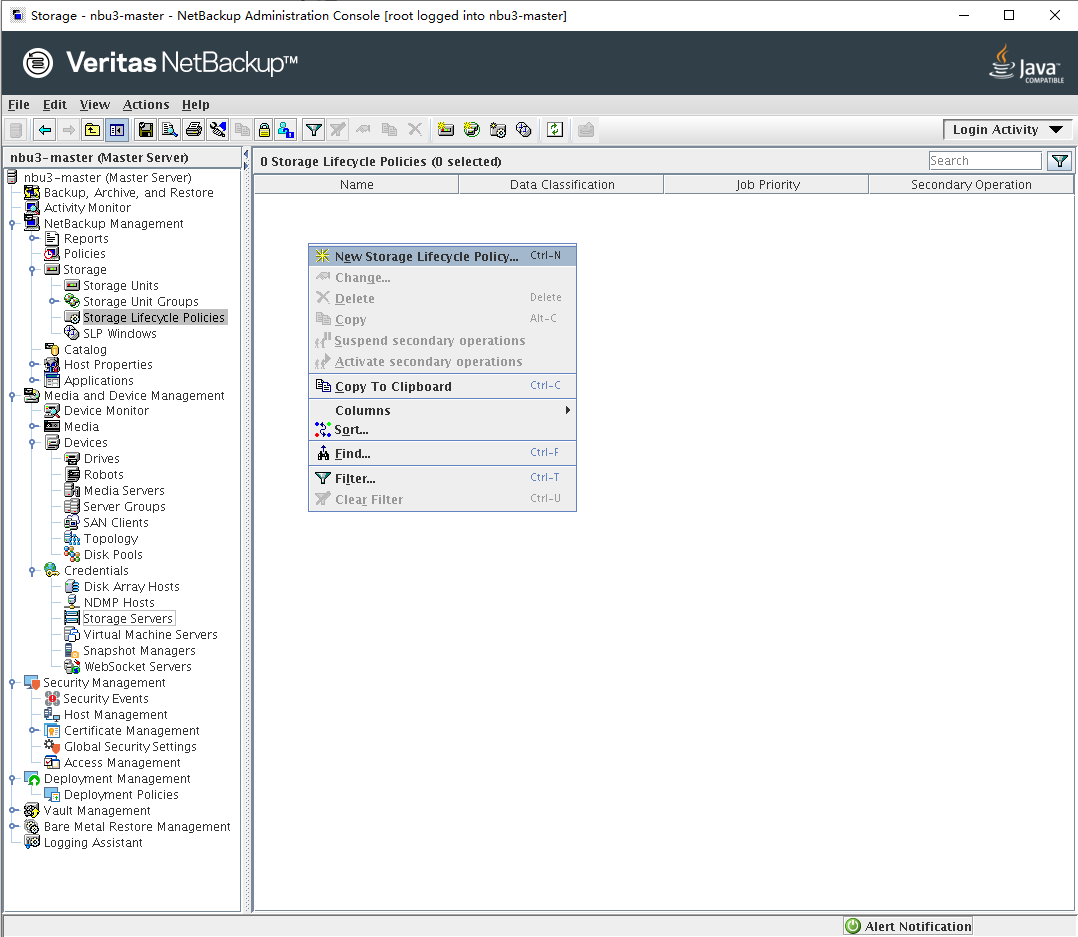
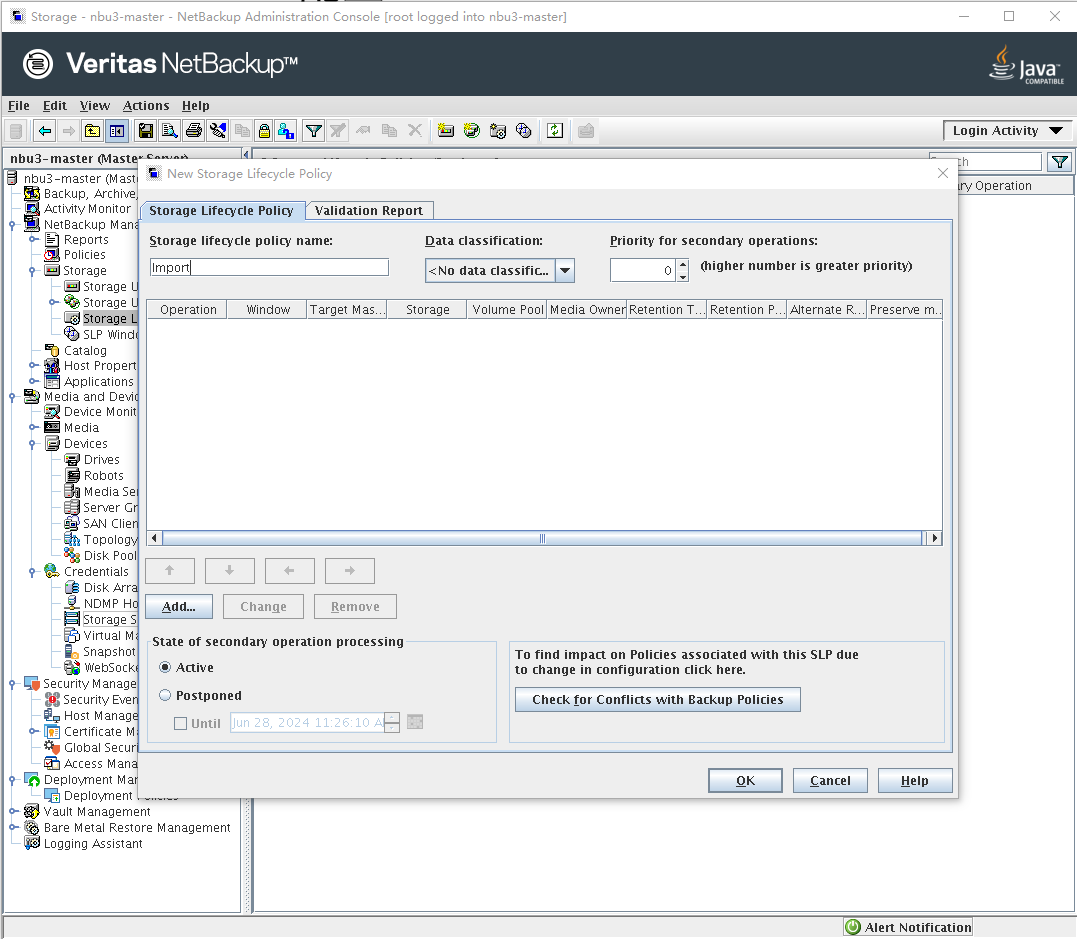
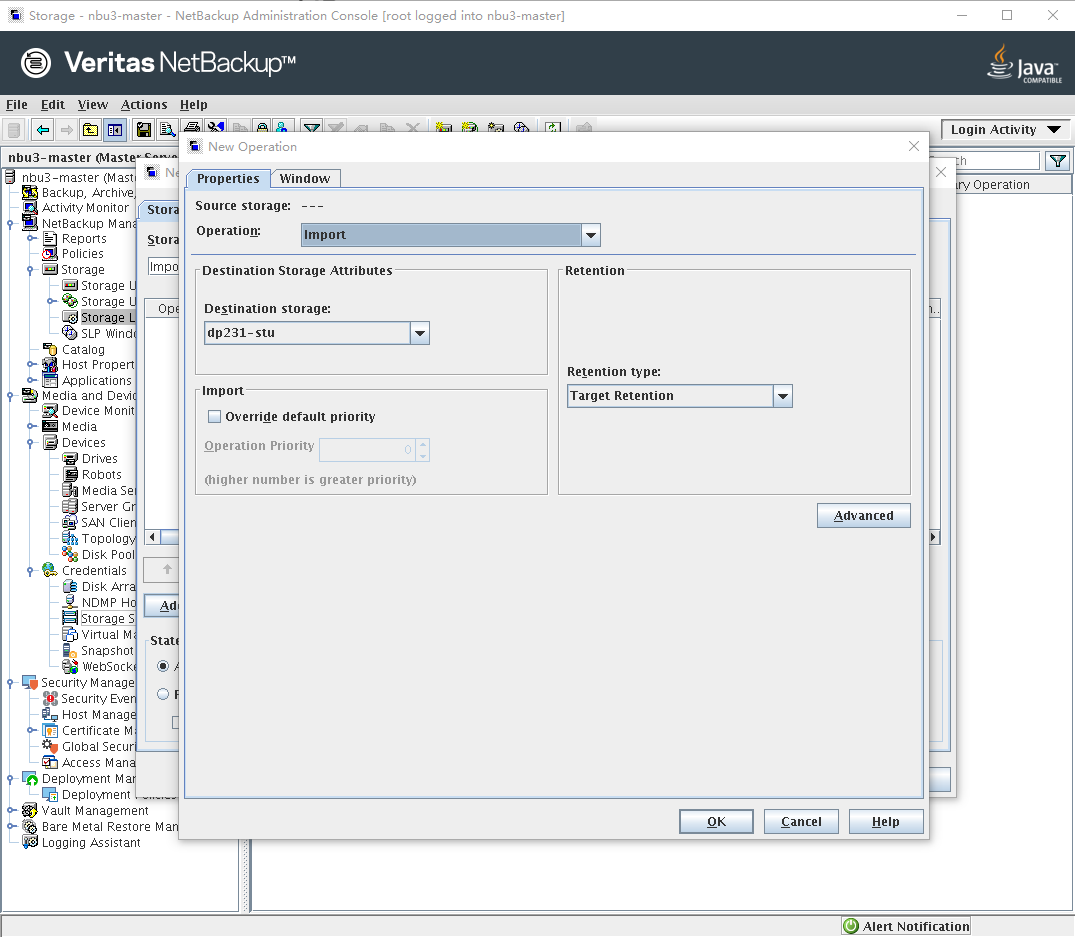
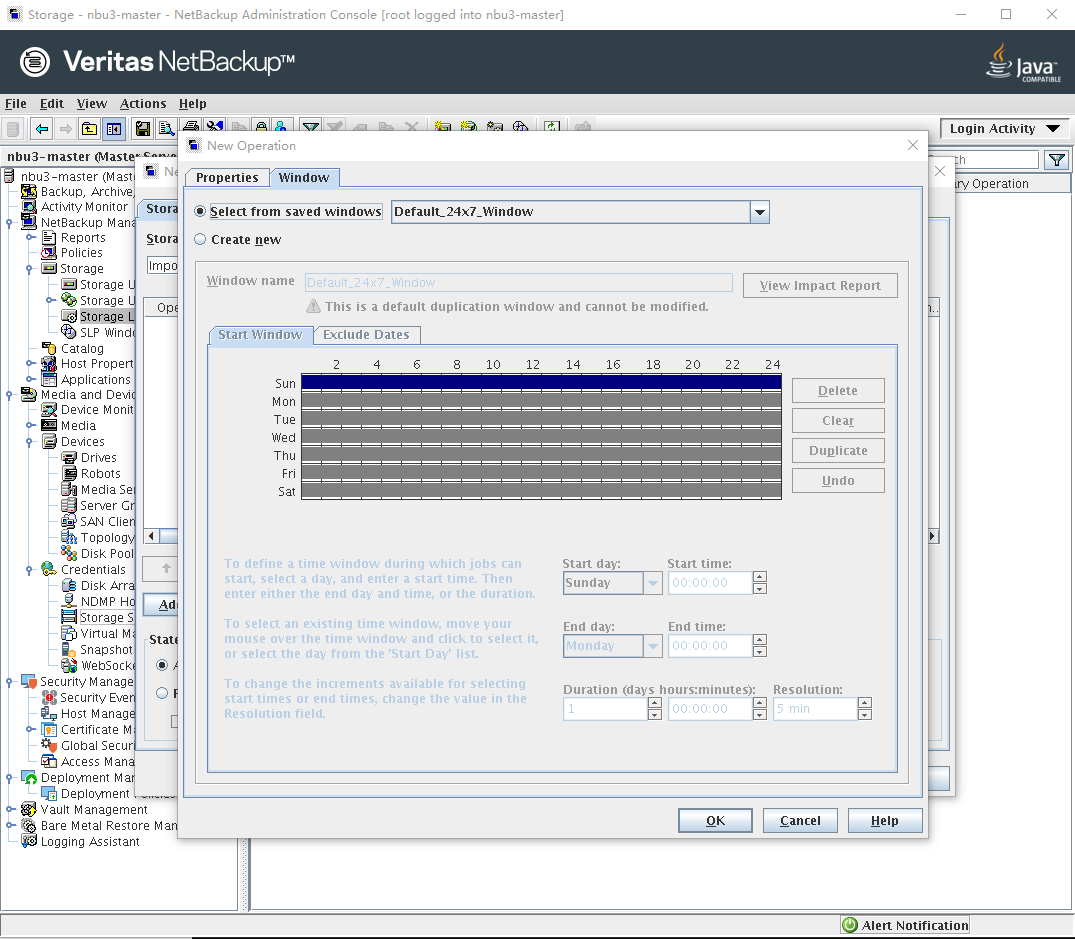
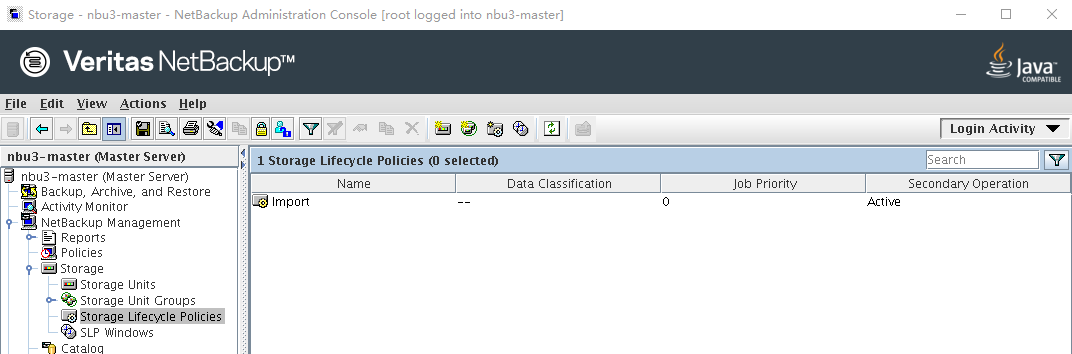
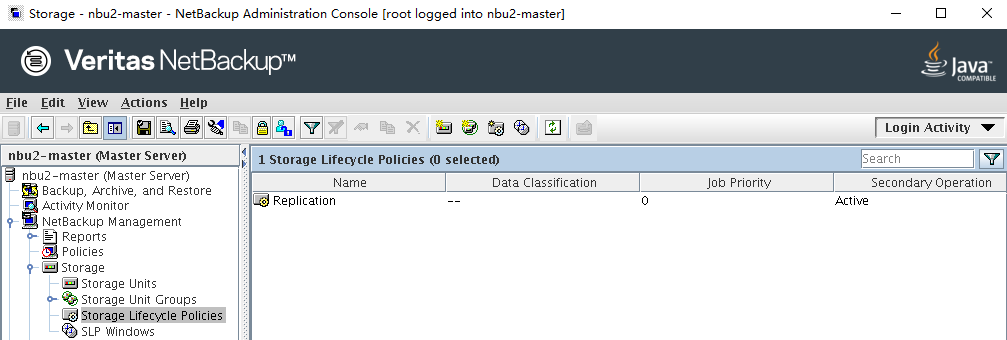
Step 1 Configure a storage lifecycle policy (SLP) at the secondary end. You need to configure Import SLP for the secondary end. Log in to the NetBackup Administrator Console at the secondary end, choose NetBackup Management > Storage > Storage LifeCycle Policies in the navigation tree, and click New Storage LifeCycle Policies to create an SLP.
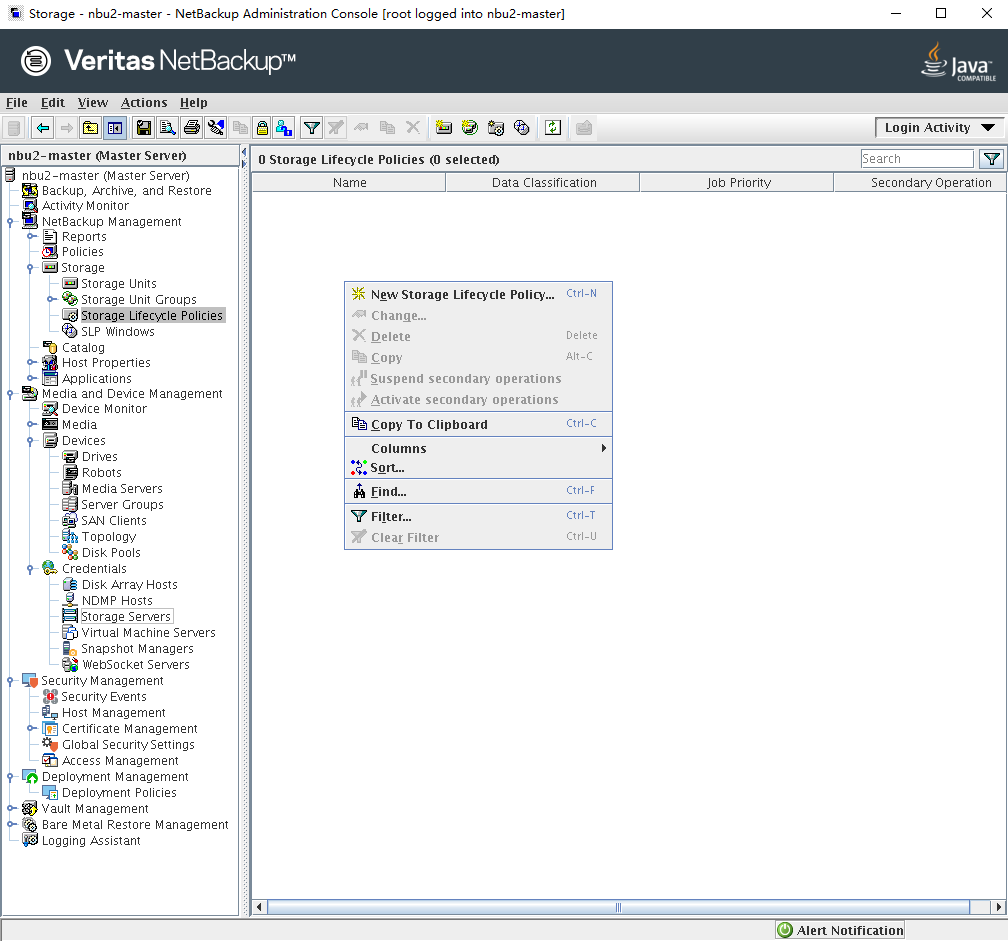
Step 2 Configure an SLP at the primary end. You need to configure Replication SLP for the primary end. Log in to the NetBackup Administrator Console at the primary end, choose NetBackup Management > Storage > Storage LifeCycle Policies in the navigation tree, and click New Storage LifeCycle Policies to create an SLP.
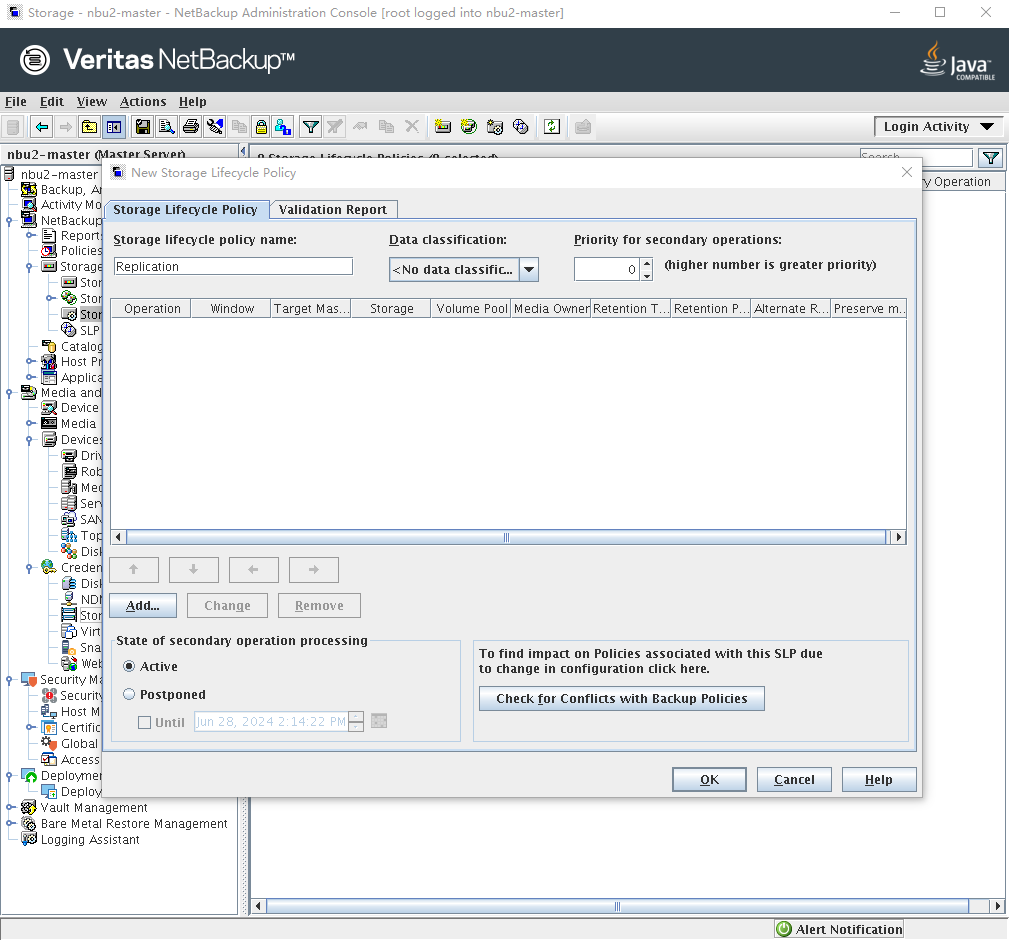
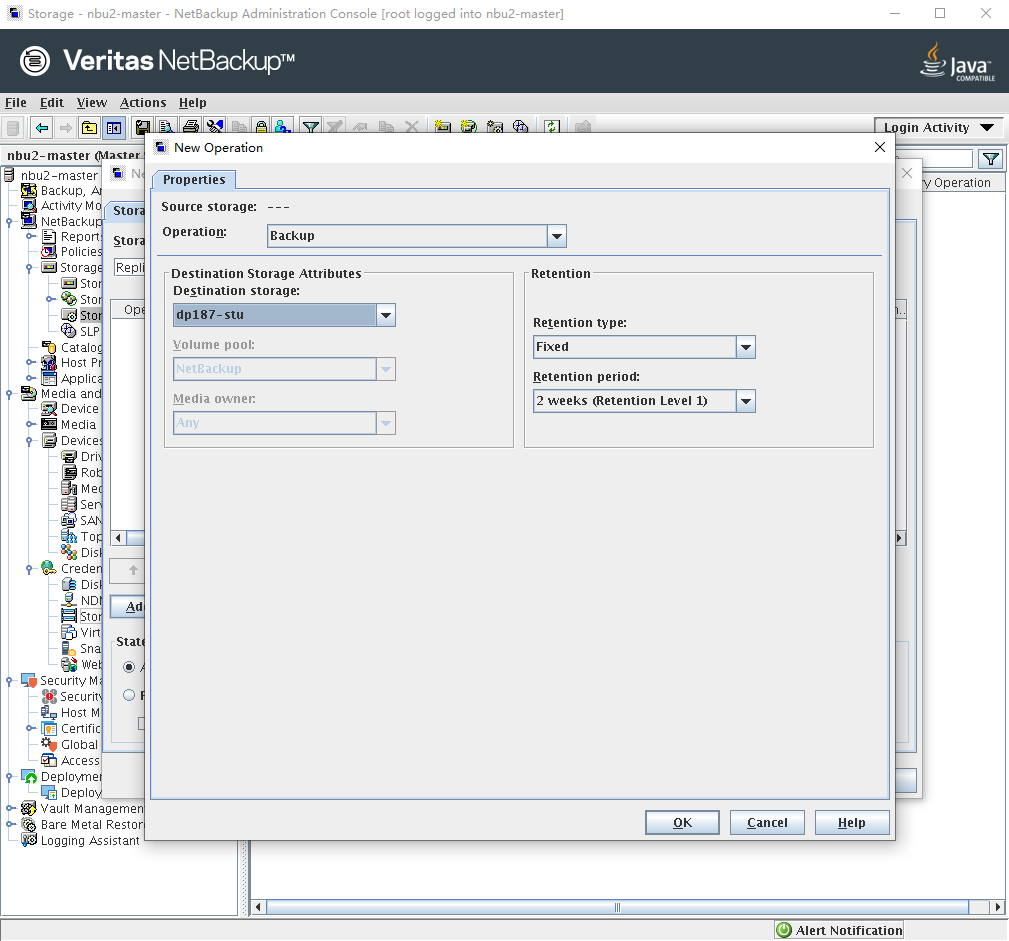
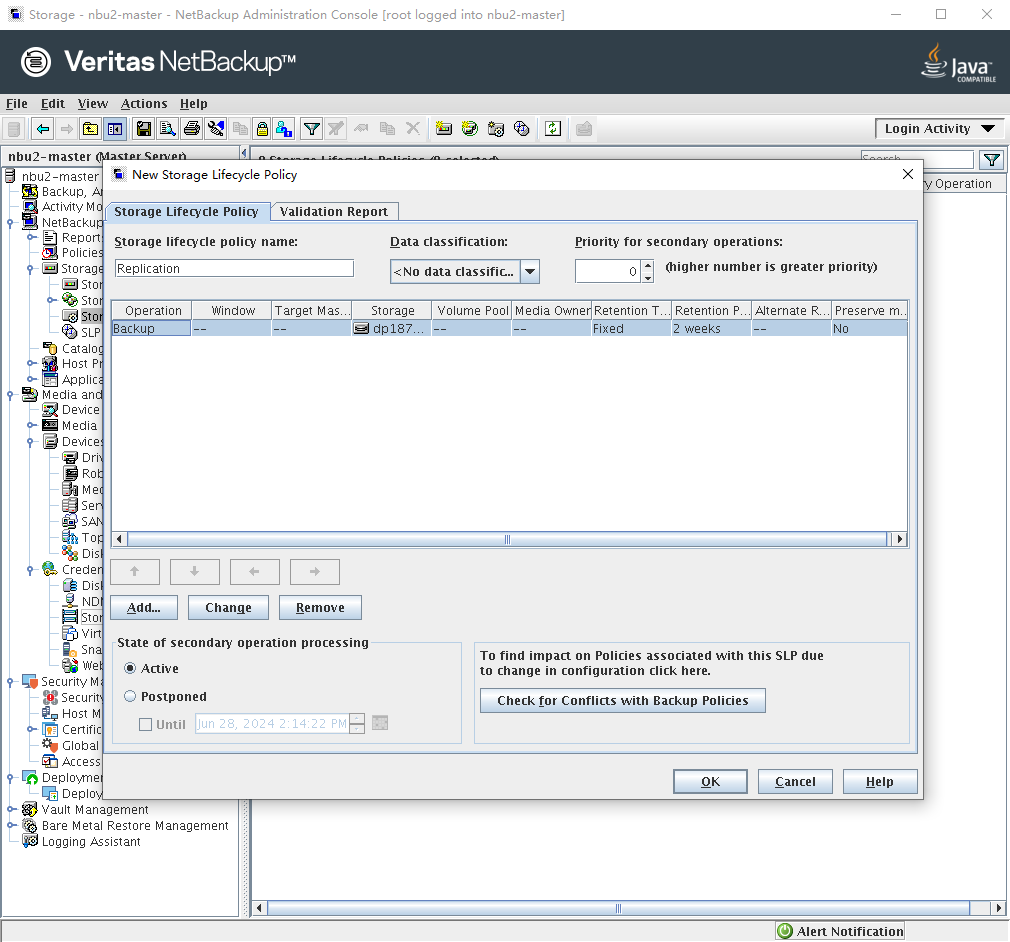
Configure the target NetBackup domain for replication.
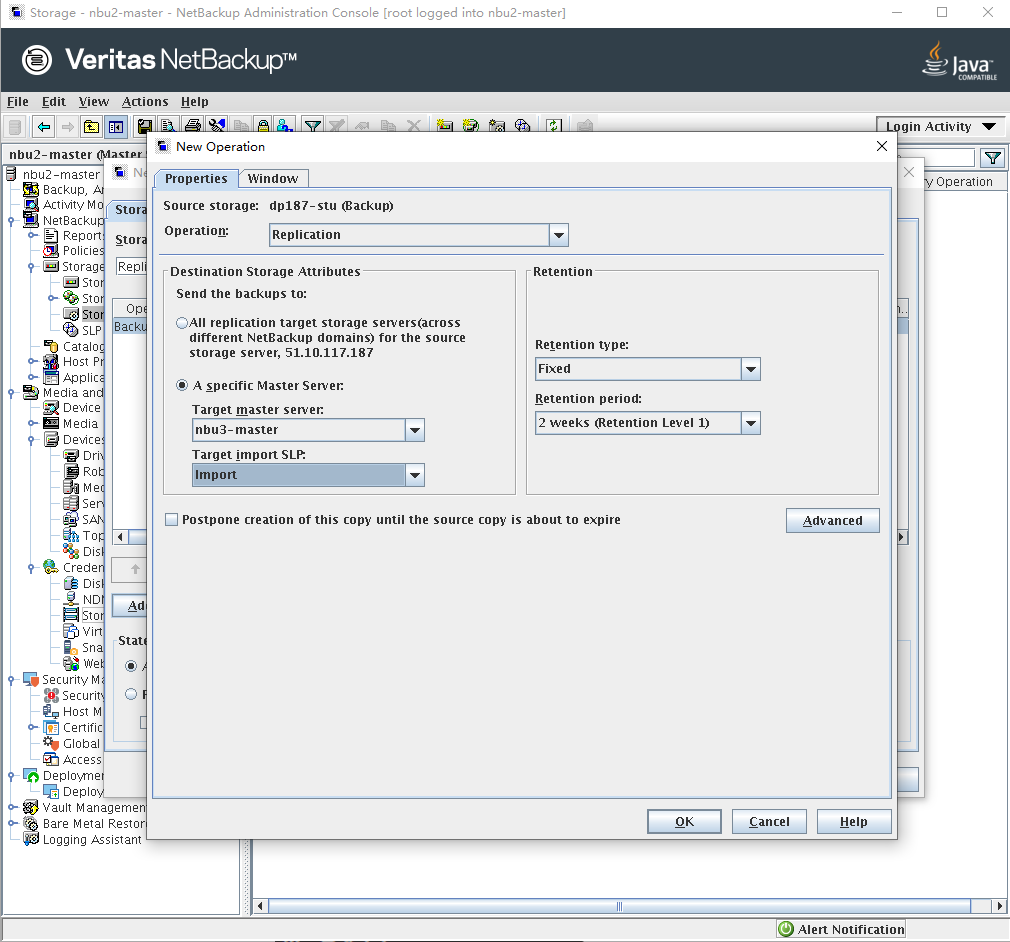

Configuring a specific target domain is referred to as target A.I.R. If there are multiple target domains for replication, you can select All replication target storage servers(across different NetBackup domain) for the source storage server.
Configure the replication time window.
—-End
5.5.3 Backup
At the primary end, use the replication SLP to create a policy for backup.
Step 1 Create a backup policy, select the created SLP as the storage, and configure other parameters based on service requirements.
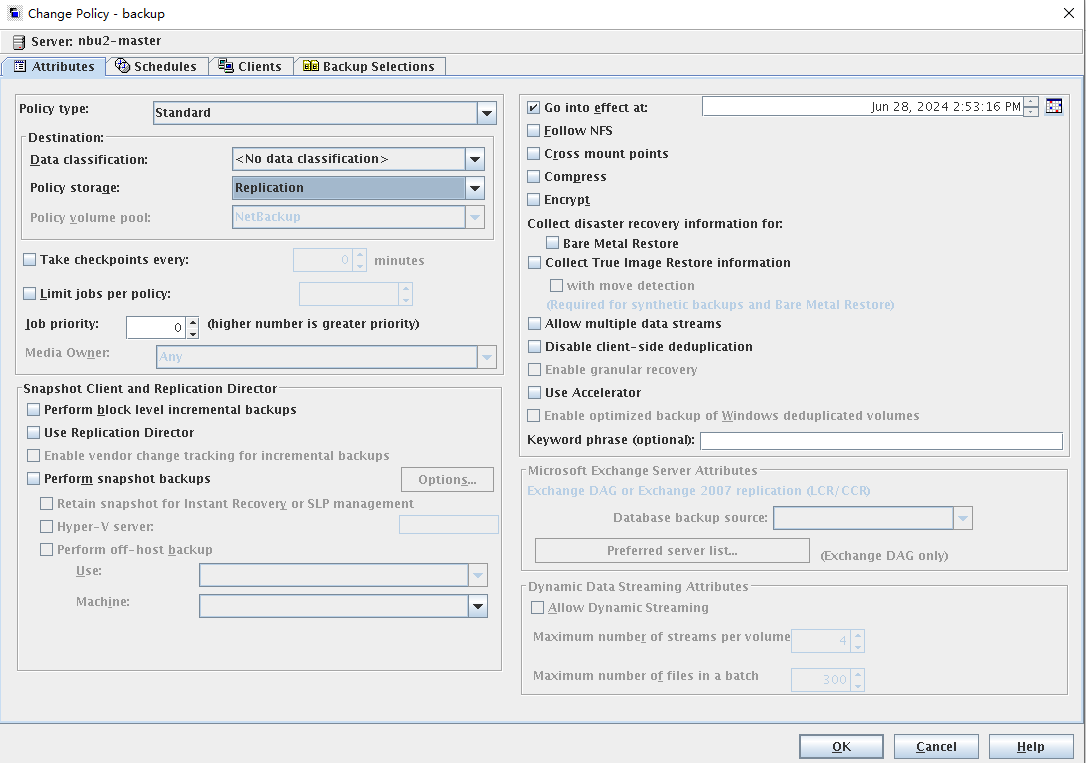
Step 2 Manually initiate a backup. For details, see 5.4.6 Performing Backup.
Step 3 After the backup is complete, view the backup result on the Activity Monitor tab page.
After the backup is successful, a Replication job is created at the primary end.
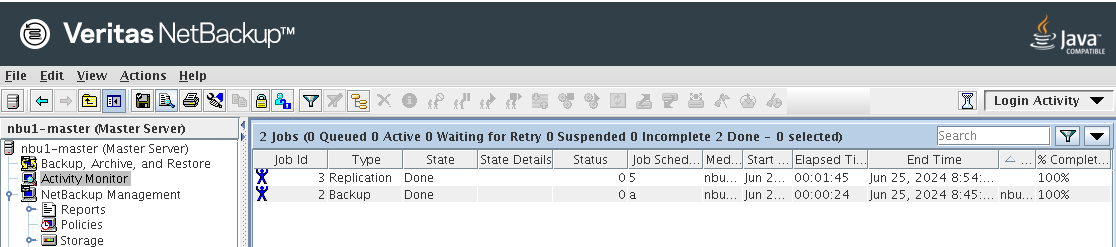
After receiving the Replication job from the primary end, the secondary end has a Replicate Import job.

—-End
5.6 Backup Acceleration
Backup acceleration is a feature of the HyperProtect OST. It can accelerate backup when a copy that has been backed up is backed up again.
5.6.1 Configuring a Policy

- If backup acceleration is used and the storage unit corresponding to the file system in the policy is changed for a backup, you need to perform full backup again for backup acceleration to take effect. (If the media server runs Windows, the DataTurbo version is 1.7.0 or later, and the backup storage version is V200R001C20 or later, backup acceleration can be directly used without full backup.) The possible scenarios are as follows:
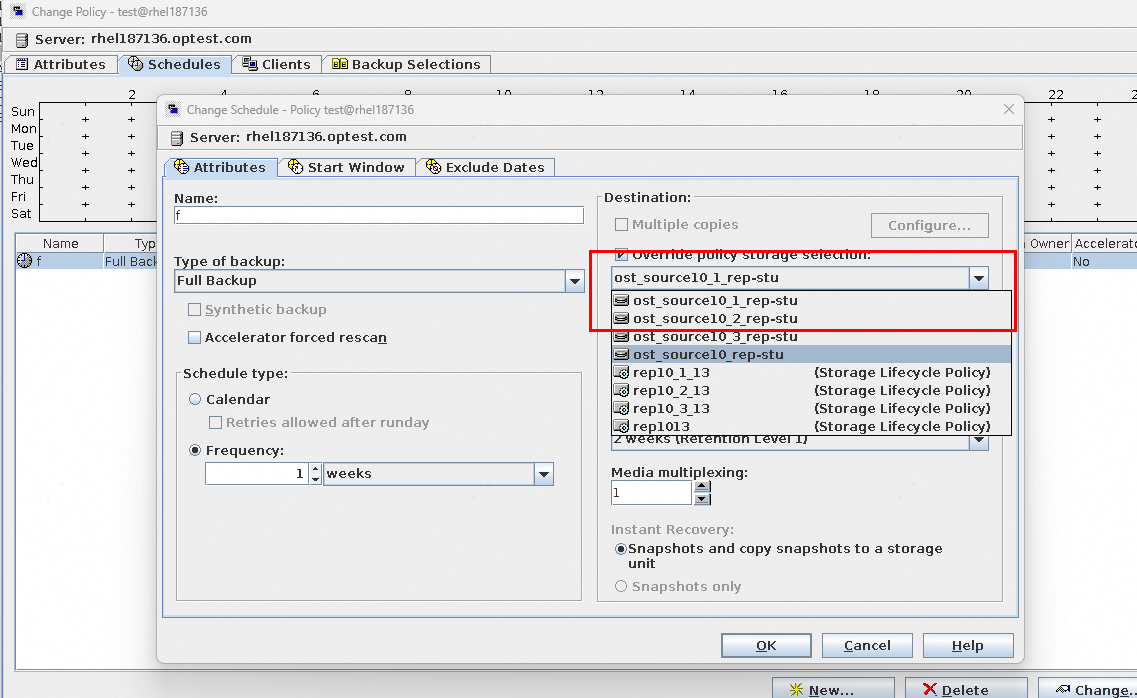
- Scenario 1: A storage unit is selected on the Schedules > Attributes tab page. As shown in the following figure, if you change the storage unit from ost_source10_1_rep-stu to ost_source10_2_rep-stu for jobs using backup acceleration, you need to perform full backup again for backup acceleration to take effect. Otherwise, the subsequent jobs using backup acceleration will fail.
- Scenario 2: If no storage unit is selected in scenario 1, select a storage unit on the Attributes tab page. As shown in the following figure, if you change the storage unit from ost_source10_1_rep-stu to ost_source10_2_rep-stu for jobs using backup acceleration, you need to perform full backup again for backup acceleration to take effect. Otherwise, the subsequent jobs using backup acceleration will fail.
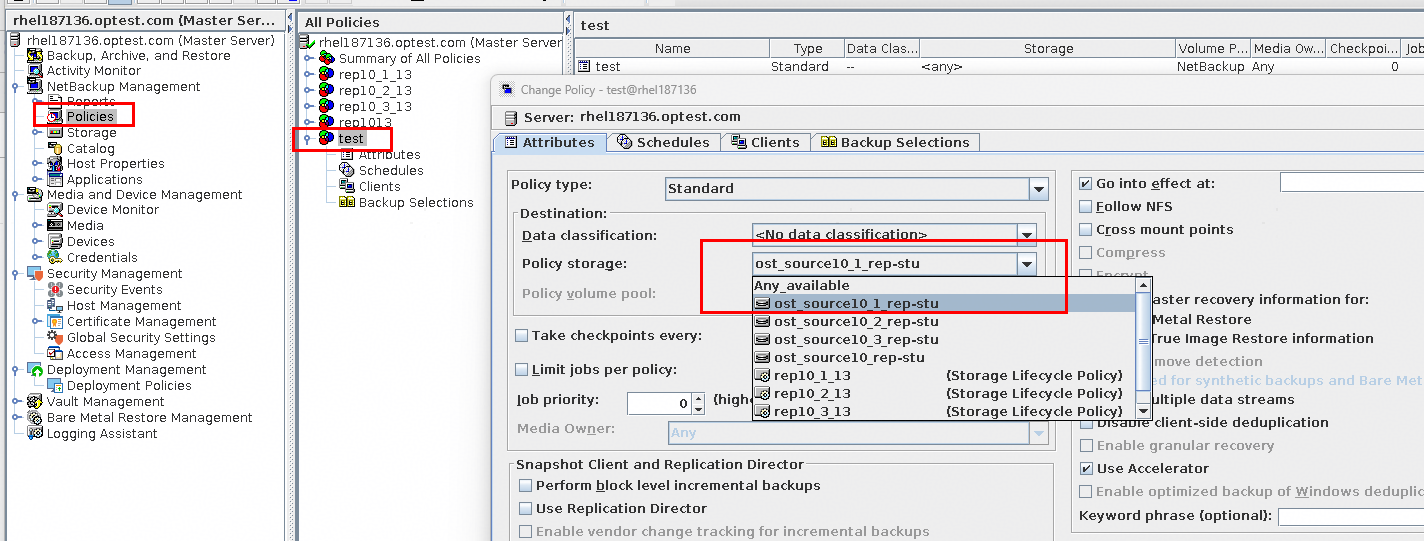
- For the OST plug-in of 2.1.0 and later versions, if an upgrade from 1.6.0 or 1.7.0 is performed, you need to perform a full backup again for backup acceleration to take effect. (If the DataTurbo version is 1.7.0 or later and the backup storage version is V200R001C20 or later after the upgrade, backup acceleration can be directly used without full backup.)
The procedure for performing a full backup again is as follows:
- For VMware backup, you need to select Accelerator forced rescan to forcibly perform a full backup. See the following figure.
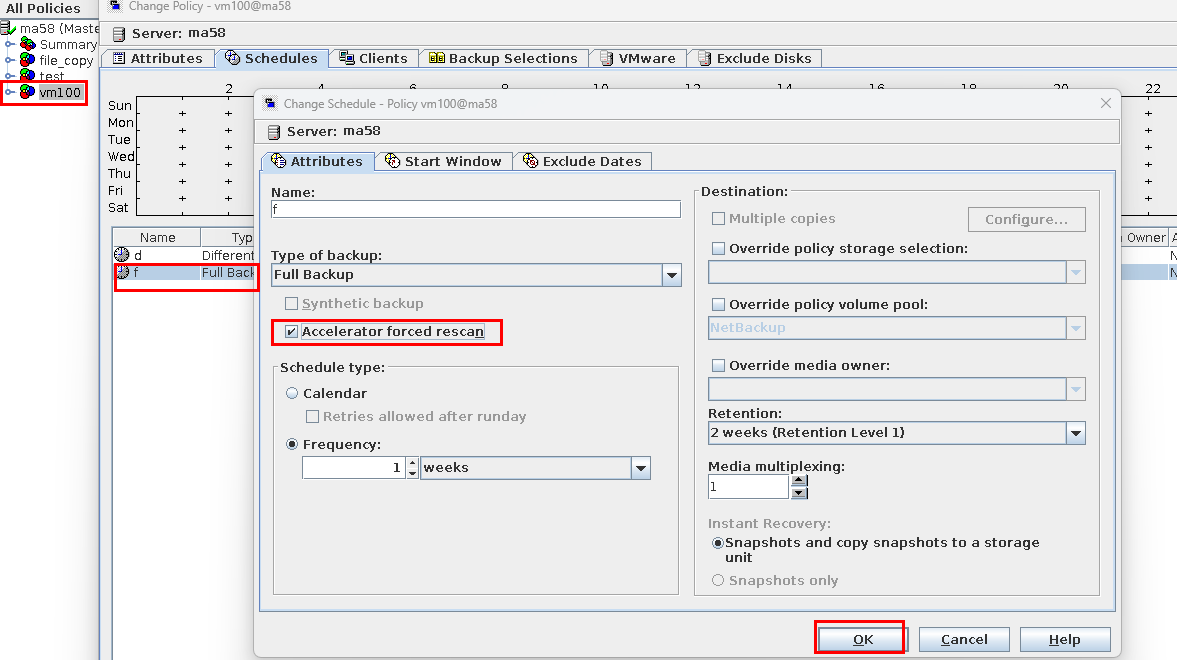
2. For backup of other applications, you need to create a policy for full backup.
After the full backup is complete, deselect Accelerator forced rescan to perform backup acceleration.
Step 1 Log in to the NetBackup Administrator Console, choose NetBackup Management > Policies in the navigation pane, and click New Policy to create a policy.
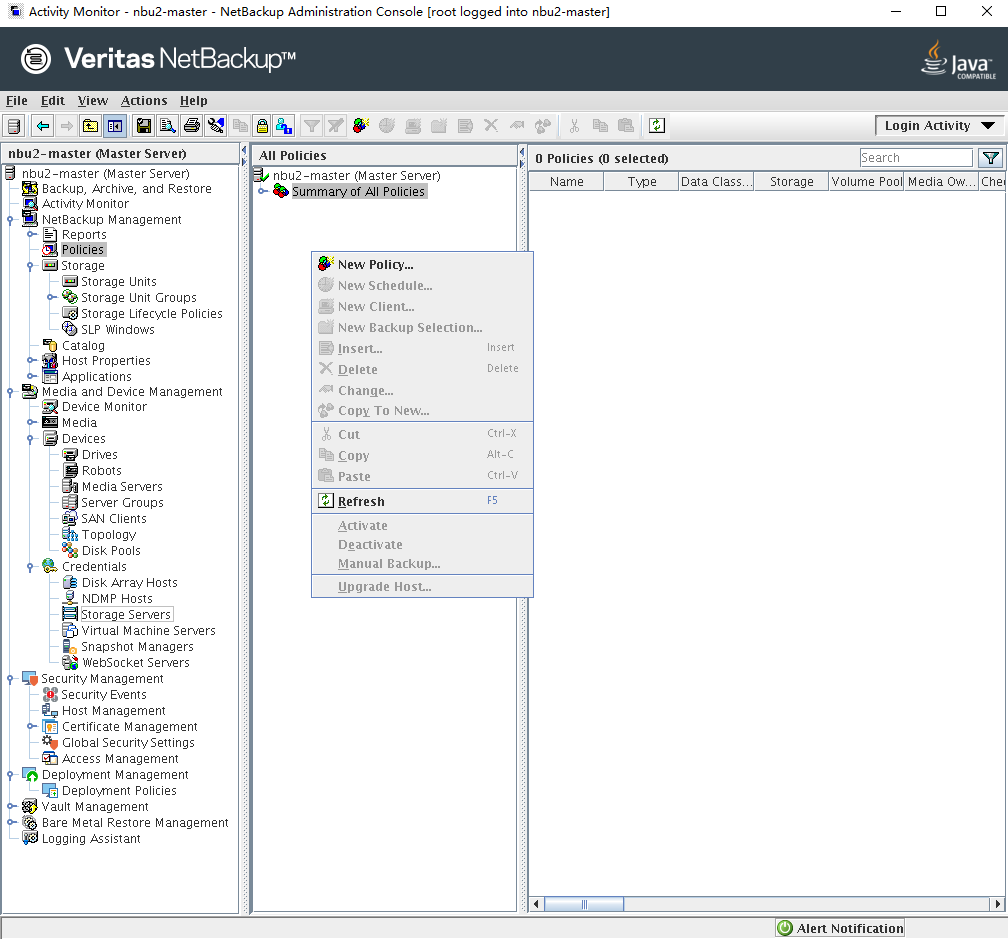
Step 2 On the Change Policy page, click the Attributes tab, set Policy storage to the STU created using OST and select Use Accelerator.
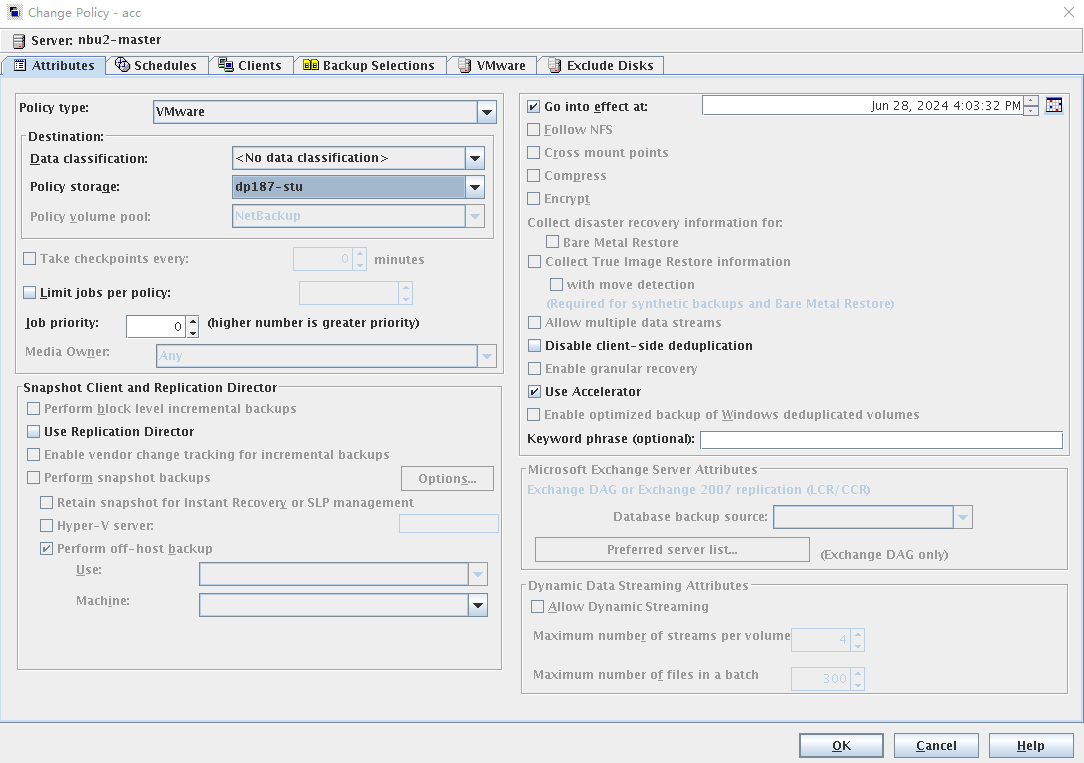
Step 3 On the Change Policy page, click the Schedules tab and create two schedules. Set Type of backup to Full Backup for one schedule and to Differential Incremental Backup for the other schedule.
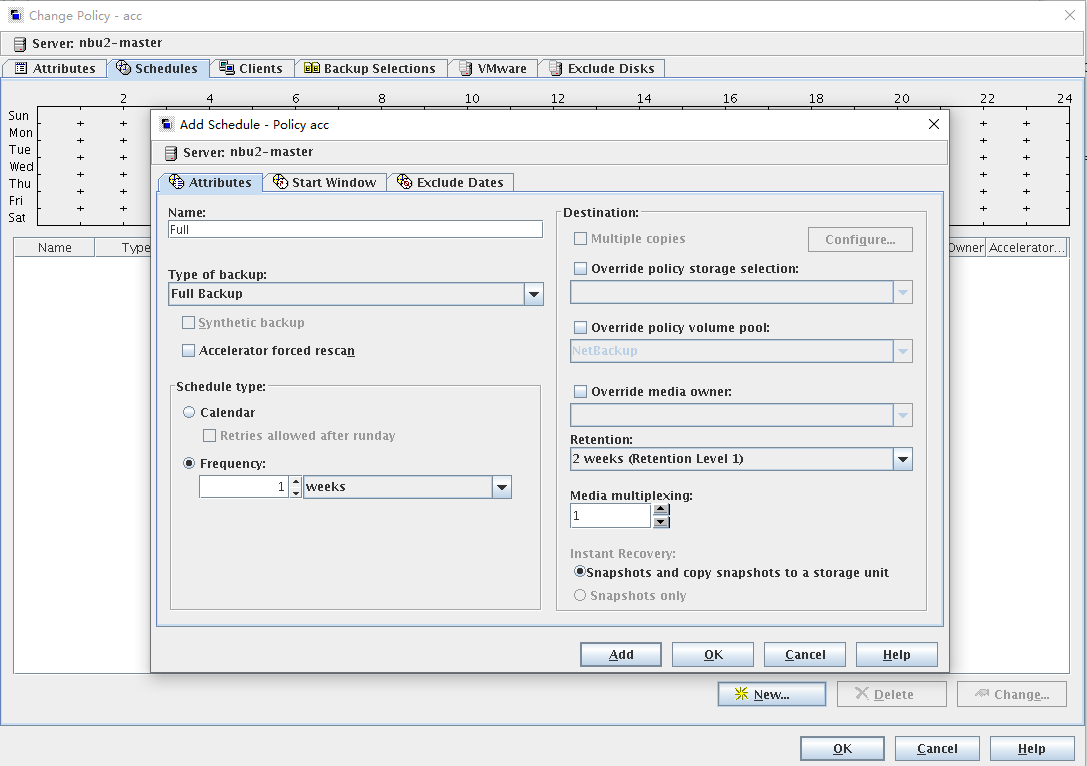
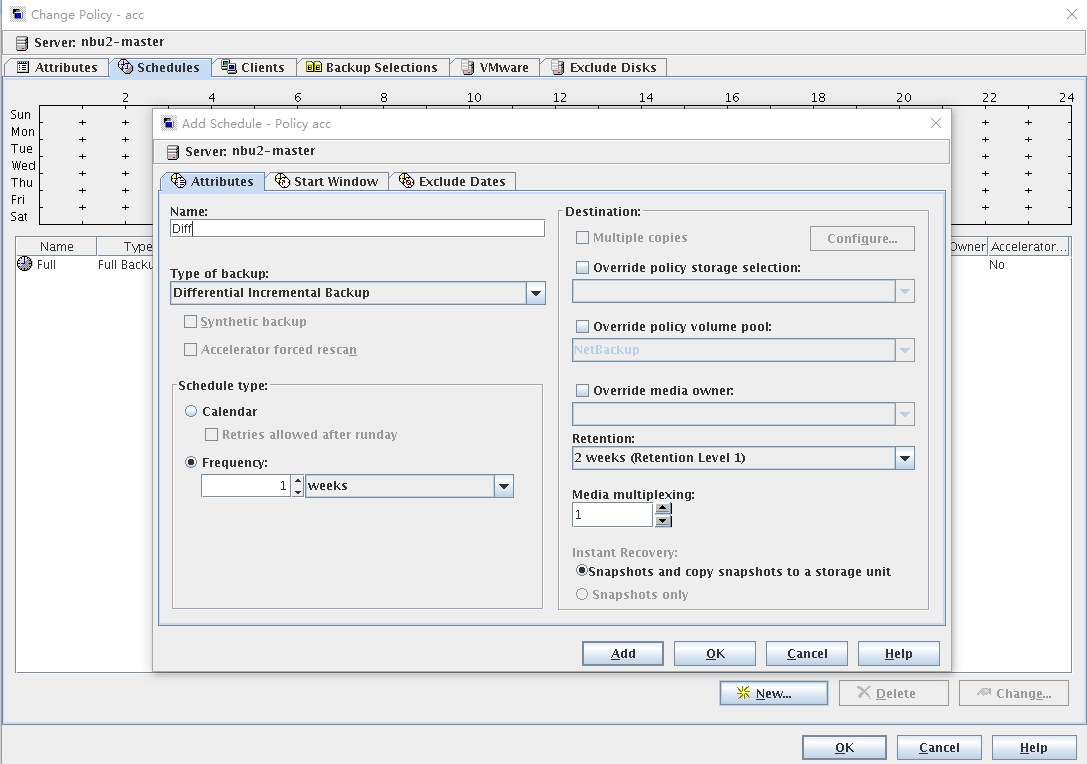
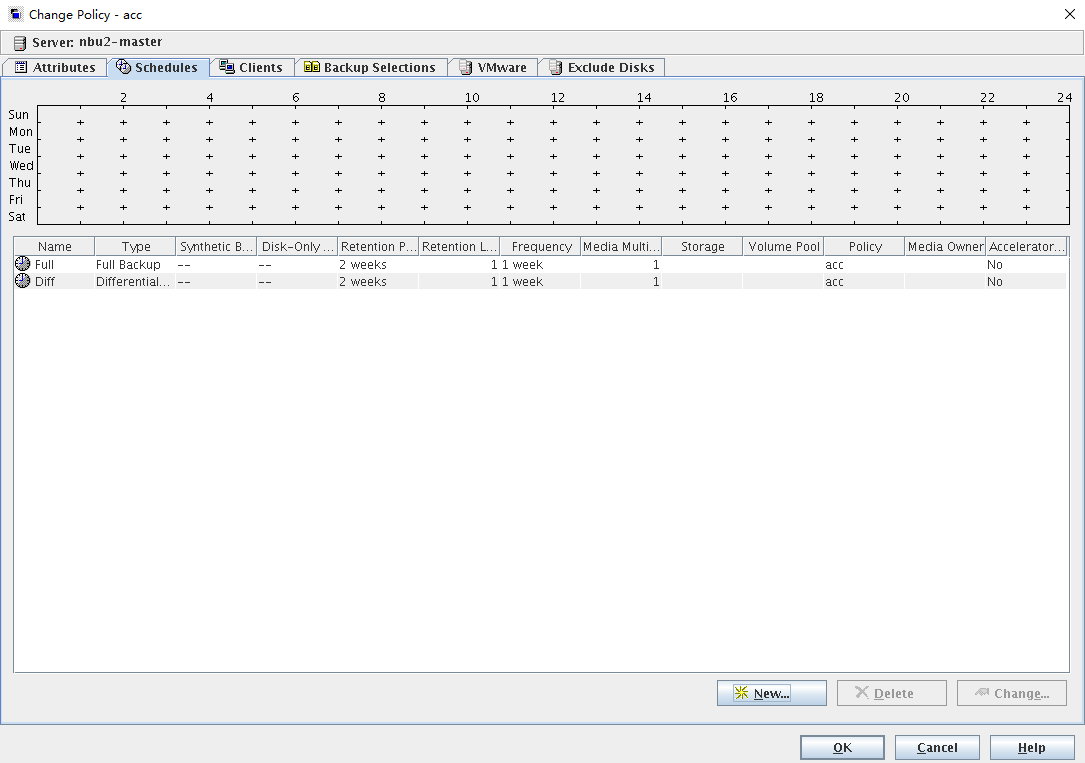
Set other parameters based on the normal configuration of the backup VM.
—-End
5.6.2 Backup Example
To see the accelerated backup effect, perform three backups for the VM: full backup for the first time, incremental backup for the second time, and full backup for the third time. For details about the backup operations, see 5.4.6 Performing Backup.
5.6.2.1 Full Backup for the First Time
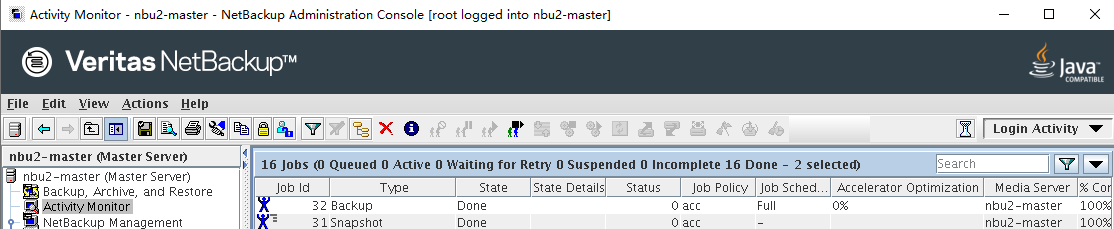
According to the data under the Accelerator Optimization column, 0% data is accelerated.
Figure 5-11 Full backup
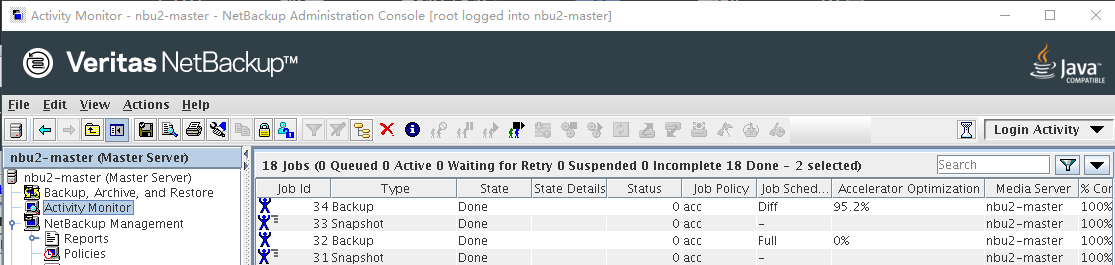
5.6.2.2 Incremental Backup for the Second Time
After 5% of the data is changed, perform incremental backup and check the data under the Accelerator Optimization column. It is found that about 95% of the data is accelerated.
Figure 5-12 Incremental backup
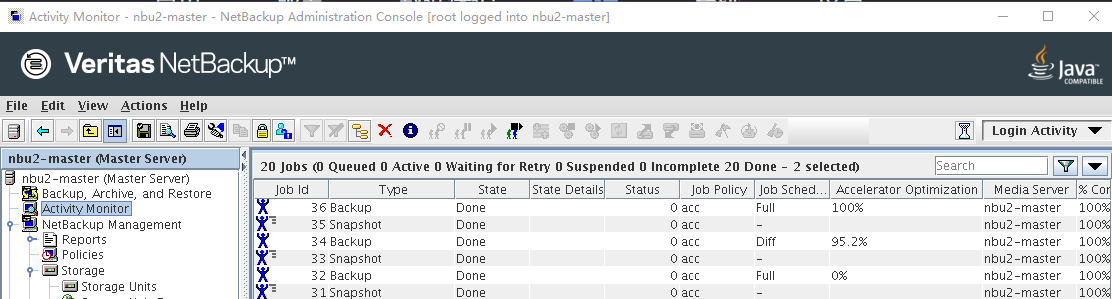
5.6.2.3 Full Backup for the Third Backup
Perform a full backup and check the data under the Accelerator Optimization column. It is found that all data is accelerated.
Figure 5-13 Full backup
5.7 Configuring WORM for a File System

The actual WORM retention period is set by the Retention parameter of NetBackup.
Prerequisites
- NetBackup has been installed.
- The NetBackup OST HyperProtect plug-in has been installed.
- The license file of the WORM feature is valid.
5.7.1 Configuring File Systems and Sharing
Step 1 Create a file system. The name prefix of the created file system must be OST (case insensitive), so that the OST plug-in can identify this file system based on the identifier.
Set parameters such as the name, owning vStore, owning storage pool, security style, file system capacity, application type, and reserved snapshot space ratio as planned.
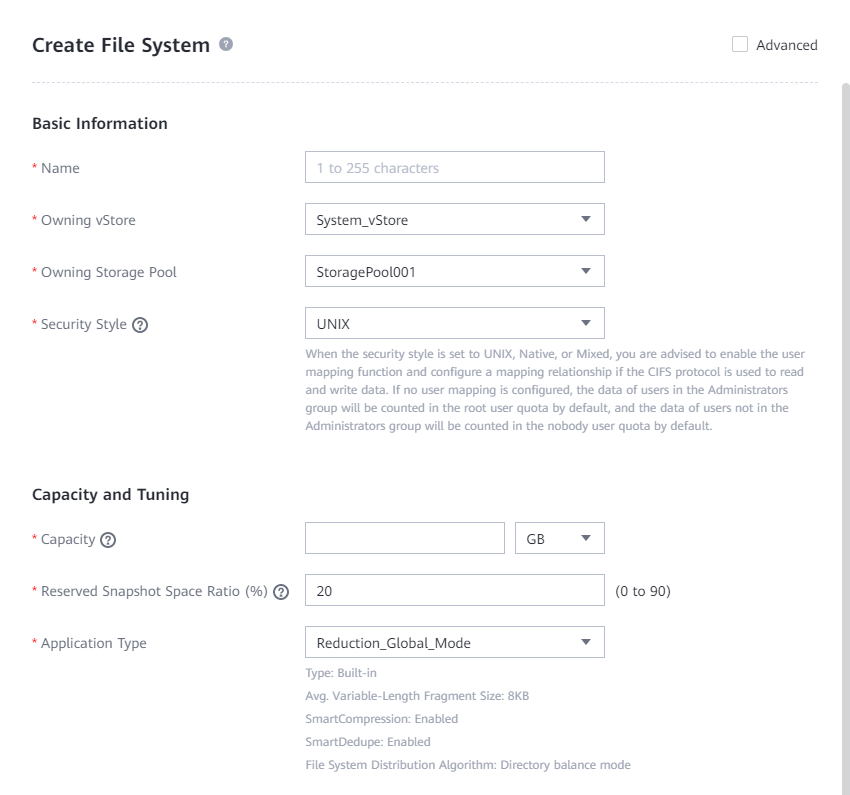
Step 2 Configure sharing as planned and complete subsequent OST interconnection on the host. For details, see « Creating a Share for a File System » in the HyperProtect Backup Storage OST Plug-in User Guide.
—-End
5.7.2 Configuring WORM for a File System
Step 1 On the Create File System page, select Advanced, enable WORM, and set Mode to Compliance.
Step 2 Set Default Protection Period based on the planned expiration time of backup copy files. The value must fall between the minimum and maximum protection periods.
Step 3 Disable Automatic Lockout, Automatic Deletion, and WORM Audit Log File System.
Step 4 If the file system is the first WORM file system in the storage system, select Global WORM Regulatory Clock. You do not need to select this option when creating file systems later.
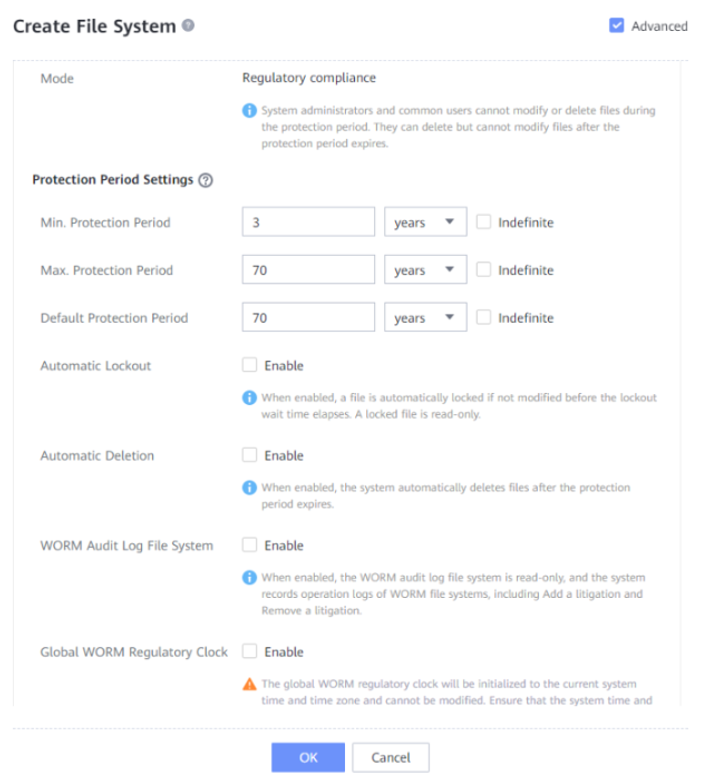

The modes for WORM protection are described as follows:
- Compliance
- Files within the protection period cannot be modified, deleted, or renamed by super administrators, administrators, or common users.
- Files beyond the protection period can be deleted, but cannot be modified or renamed by super administrators, administrators, or common users.
- A file system that contains files within the protection period cannot be deleted by super administrators or administrators.
- A file system, in which the protection period of all files expires, can be deleted by super administrators and administrators.
- Enterprise
- Files within the protection period cannot be modified, deleted, or renamed by common users or administrators, but can be deleted by privileged users.
- Files beyond the protection period can be deleted, but cannot be modified or renamed by super administrators, administrators, or common users.
- A file system that contains files within the protection period cannot be deleted by administrators, but can be deleted by privileged users.
- A file system, in which the protection period of all files expires, can be deleted by super administrators and administrators.
- Advanced
- Files within the protection period cannot be modified, deleted, or renamed by super administrators, administrators, or common users.
- Files beyond the protection period can be deleted, but cannot be modified or renamed by super administrators, administrators, or common users.
- A file system that contains files within the protection period cannot be deleted by super administrators or administrators.
- A file system, in which the protection period of all files expires, can be deleted by super administrators and administrators.
Due to the sensitivity of a WORM file system to data security, the following restrictions apply to configuration operations of file systems:
- Only read-only snapshots can be created for the WORM file system. The snapshot file systems created for the WORM file system also have the WORM feature.
- When configuring the remote replication function:
- If Pair Creation is set to Manual, ensure that the WORM file system modes at both ends are the same. Otherwise, the primary/secondary relationship cannot be established.
- If Pair Creation is set to Automatic, ensure that the global WORM compliance clock has been initialized on the remote end.
- If the primary file system is a WORM audit log file system, primary/secondary switchover and disabling protection for the secondary resource are not supported.
If NetBackup is integrated with backup storage and the WORM feature is required, the Compliance mode is recommended for WORM file systems created in the storage system; however, the other two modes are also applicable.
The units months and years of the WORM file system protection periods refer to calendar months and calendar years.
In the OceanProtect Backup Storage, the protection period of WORM file systems can be set to 0 to 70 years or permanent. However, the NetBackup client supports a maximum protection period of 30 years. To prevent some abnormal scenarios, when a protection period longer than 30 years is set on DeviceManager of the OceanProtect Backup Storage, the OST will perform conversion so that the protection period displayed on NetBackup is only 30 years.
There is another scenario, where if the maximum and minimum protection periods are set to permanent, then the protection period that takes effect for files will be permanent.
—-End
5.7.3 Configuring a WORM STU
Step 1 Create an OpenStorage server by referring to 5.4.5.2 Configuring an OpenStorage Server and integrate the OceanProtect Backup Storage with NetBackup.
Step 2 Create a disk pool by referring to 5.4.5.3 Creating a Disk Pool and configure the WORM file system as a disk pool.
Step 3 Create an STU.
In the navigation pane, choose NetBackup Management > Storage > Storage Units to create an STU.
Set Disk type to OpenStorage (HyperProtect) and enable Use WORM for the STU. Otherwise, the WORM capability is not supported. Select the pool created in Step 2 for Select disk pool.
Select any media server or a fixed media server based on the actual networking. You can adjust the value of Maximum concurrent jobs as required. Retain the default value of Maximum fragment size.
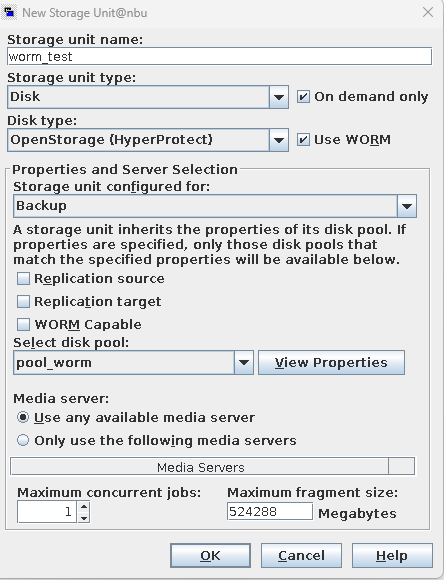
Step 4 Create a policy.
In the navigation pane, choose NetBackup Management > Policies to create a policy.
Configure the backup type and content based on service requirements. For details, see 5.4.5.6 Configuring a NetBackup Policy.
On the Schedules tab page, click New to add a backup schedule. Set Retention to the lock time for backups. The value must fall between the minimum and maximum protection periods. You are advised to set Retention to the default protection period set in 5.7.2 Configuring WORM for a File System. Set other parameters as required and click OK.
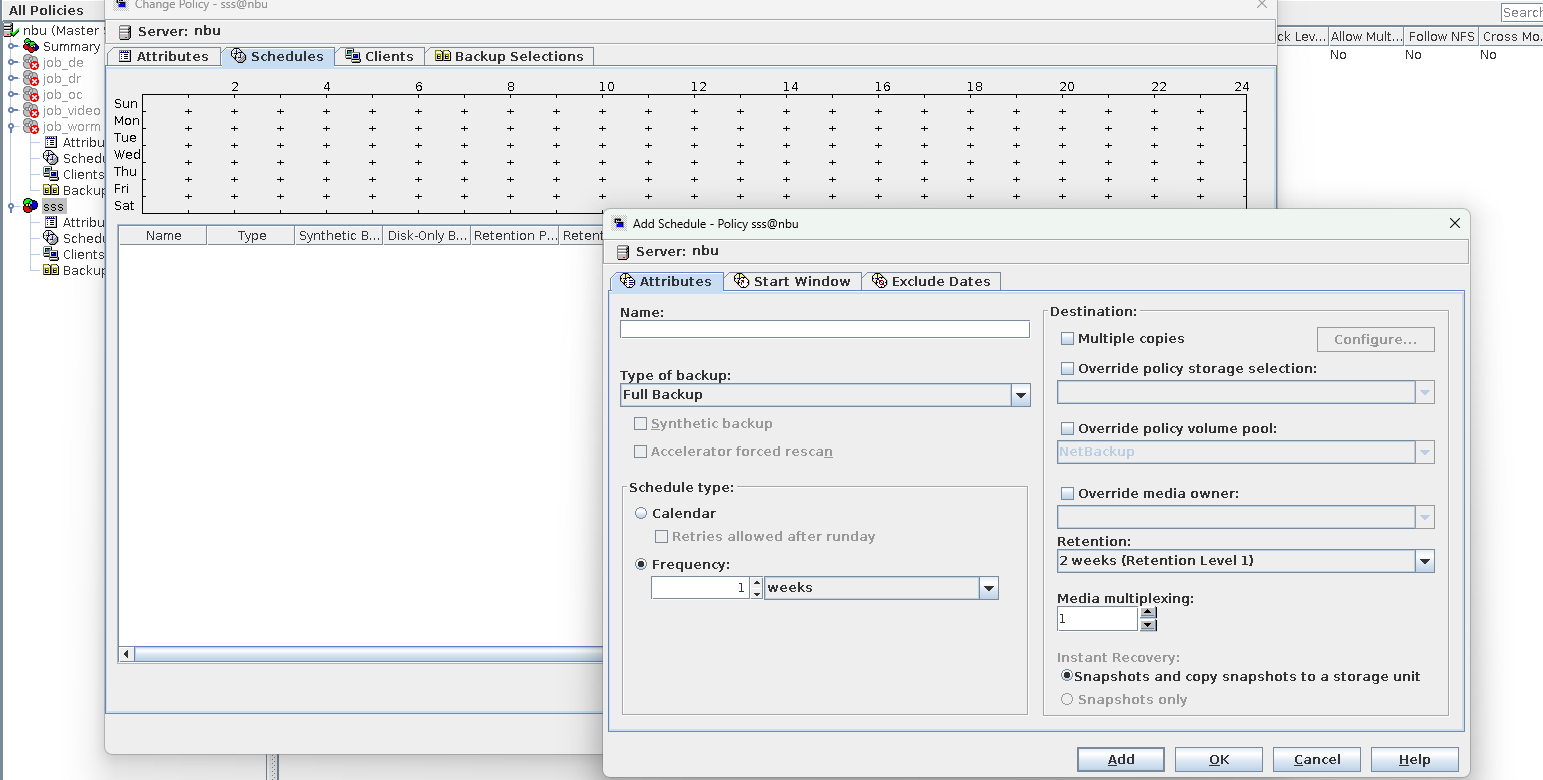
Step 5 After the policy is created, check the retention period.

Step 6 Manually start the backup job. After the backup is complete, you can view the unlock time of the corresponding copy in Catalog.
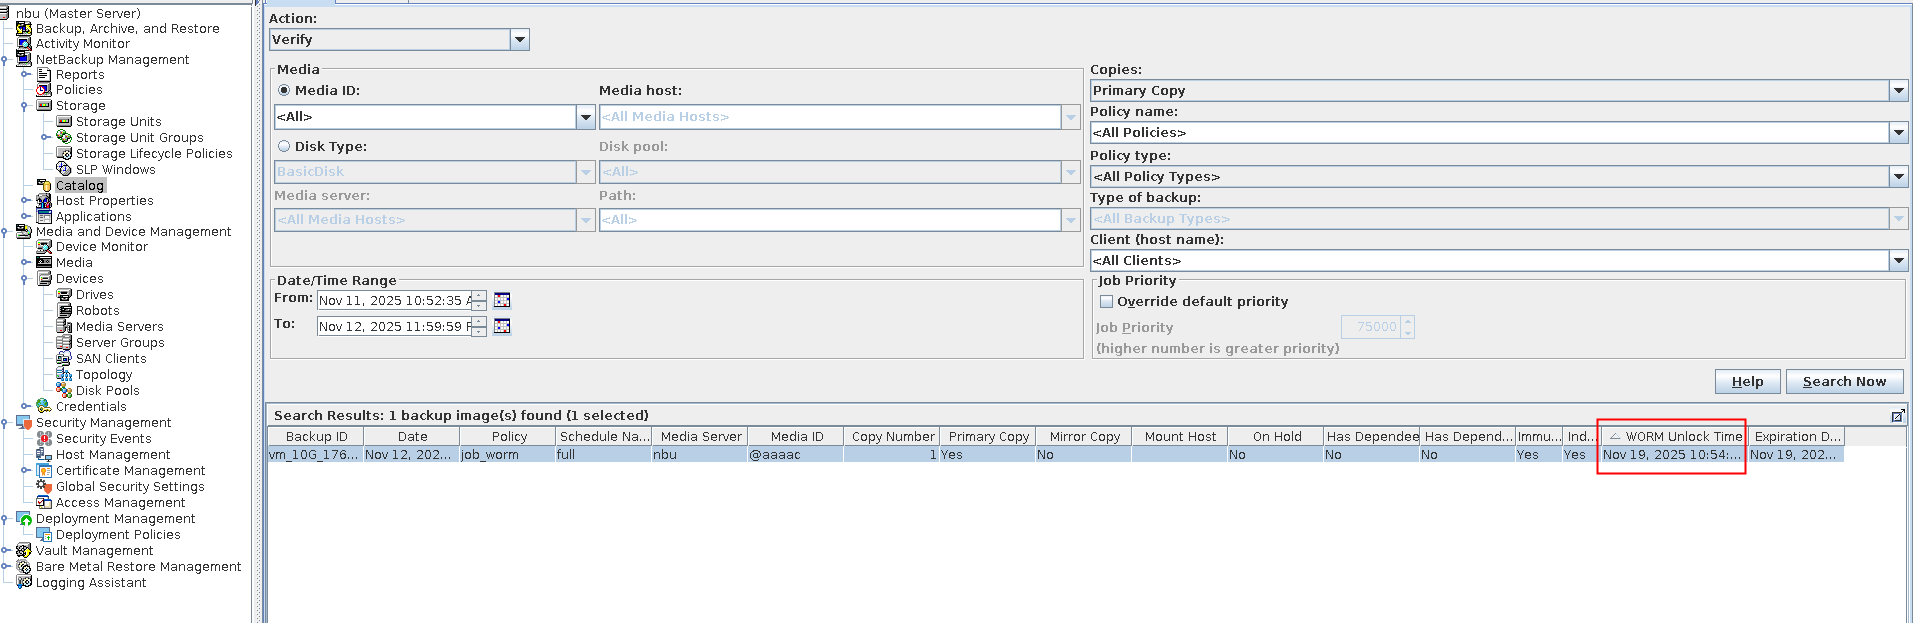
—-End
6. Best Practice Verification Example
6.1 Backup Bandwidth Performance Test Results (TCP Networking)
6.2 Restoration Bandwidth Performance Test Results
6.3 Data Reduction Test Results
6.4 Test Results of Remote Replication Among Storage Devices
6.5 NFS Backup Bandwidth Performance Test Results (TCP Networking)
6.1 Backup Bandwidth Performance Test Results (TCP Networking)
NetBackup 10.3 is used to back up 96 VMware VMs on six ESXi hosts. Each VM is preset with 500 GB data.
The backup policy is used to add backup VMs through the ESXi hosts. If the ESXi hosts are managed by the vCenter, you need to disconnect the ESXi hosts from the vCenter.
File systems are created on all-flash OceanProtect X8000 and mounted through DataTurbo to NetBackup Media Servers as the backup storage. DataTurbo is set to high level. The bandwidth performance is tested during the first, second, and third full backups, with the 5% data change each time. Table 6-1 lists the test results.
Table 6-1 Backup bandwidth test results
Networking | Compression Mode | Backup Type | Backup Peak Value | Backup Data Volume | Backup Duration | Average Backup Bandwidth |
|---|---|---|---|---|---|---|
TCP | High performance | Initial backup | / | 44.830 TB | 72 minutes | 10.626 GB/s |
Second backup | 26.199 GB/s | 44.831 TB | 43 minutes | 17.793 GB/s | ||
Third backup | 26.032 GB/s | 44.832 TB | 32 minutes | 23.91 GB/s | ||
High reduction ratio | Initial backup | / | 44.824 TB | 106 mins | 7.217 GB/s | |
Second backup | 17.795 GB/s | 44.824 TB | 51 minutes | 15 GB/s | ||
Third backup | 17.875 GB/s | 44.824 TB | 52 minutes | 14.711 GB/s |

The high performance mode and the high reduction ratio mode in Table 6-1 are set as follows:
- High performance mode: Set the compression mode of the storage pool to High performance and the file system application type to Performance_Prioritized_Mode_enhanced.
- High reduction ratio mode: Set the compression mode of the storage pool to High reduction ratio and the file system application type to Reduction_Prioritized_Mode_enhanced.
6.2Restoration Bandwidth Performance Test Results
NetBackup 10.3 is used to restore some VMs. Table 6-2 lists the test results.
Table 6-2 Restoration bandwidth test results
Networking | Compression Mode | Number of VMs | Restoration Peak Value | Restored Data Volume | Restoration Duration | Average Restoration Bandwidth |
|---|---|---|---|---|---|---|
TCP | High performance | 48 | 7.517 GB/s | 22.493 TB | 65 minutes | 5.906 GB/s |
High reduction ratio | 48 | 7.464 GB/s | 22.493 TB | 66 minutes | 5.816 GB/s |

The restoration bandwidth depends on the performance of the restoration destination host. The test result does not represent the maximum restoration capability of OceanProtect X8000.
6.3 Data Reduction Test Results
Data reduction tests are performed in the scenario where NetBackup 10.3 is integrated with OceanProtect X8000 to back up 96 VMs. The compression mode of OceanProtect X8000 is set to High reduction ratio. The production data and backup policy are as follows:
- Preset data model: All of the 96 VMs run the Linux OS. Each VM has one 50 GB system disk and five 100 GB data disks. 90 GB data is preset for each data disk.
- Backup policy: Full backup is performed at the first and second backups.
- Backup data difference: Construct 5% data volume change of the VM data disk between two backups.
Table 6-3 lists the end-to-end data reduction test results.
Table 6-3 Data reduction ratio test results
Networking | Compression Mode | Backup Type | Number of VMs | Data Reduction Ratio |
|---|---|---|---|---|
TCP | High performance | Initial backup | 96 | 1.979:1 |
Second backup | 96 | 3.812:1 | ||
High reduction ratio | Initial backup | 96 | 2.002:1 | |
Second backup | 96 | 3.892:1 |

- High reduction ratio mode: Set the compression mode of the storage pool to High reduction ratio and the file system application type to Reduction_Prioritized_Mode_enhanced.
- Data reduction ratio: indicates the ratio of the amount of user data written into the storage pool to the used capacity of the storage pool.
- The actual data reduction ratio is closely related to the data model and the backup policy. The test results are based on the preceding backup policy and data model.
6.4 Test Results of Remote Replication Among Storage Devices
Prepare two OceanProtect X8000 storage devices and connect one of them to a NetBackup Media Server and the other to another NetBackup Media Server to form a remote replication environment with 8 x 10GE remote replication links. Deduplicated replication and link compression are enabled. Perform the initial backup, initial remote replication, second backup, second remote replication, third backup, and third remote replication, and construct 5% data volume change each time.
Table 6-4 lists the data reduction test results of replication links.
Table 6-4 Remote replication test results
Backup Type | Data Volume (TB) | Data Reduction Ratio of Replication Links | Replication Synchronization Duration (min) | Average Replication Bandwidth (GB/s) |
|---|---|---|---|---|
Initial remote replication | 50.538 | 3.114:1 | 140 | 6.095 |
Second remote replication | 50.538 | 65.189:1 | 58 | 14.712 |
Third remote replication | 50.538 | 89.111:1 | 57 | 14.97 |
6.5 NFS Backup Bandwidth Performance Test Results (TCP Networking)
This scenario is a supplementary test. The NFS protocol is used to connect to the file systems.
NetBackup 10.3 is used to back up 48 VMware VMs on six ESXi hosts. Each VM is preset with 500 GB data.
File systems are created on all-flash OceanProtect X8000 and mounted through NFS to NetBackup Media Servers as the backup storage. The bandwidth performance is tested during the first, second, and third full backups, with the 5% data change each time. The following table lists the test results.
Table 6-5 Backup bandwidth test results
Networking | Compression Mode | Backup Type | Backup Peak Value | Backup Data Volume | Backup Duration | Average Backup Bandwidth |
|---|---|---|---|---|---|---|
TCP | High reduction ratio | Initial backup | 7.965 GB/s | 22.493 TB | 91 minutes | 4.218 GB/s |
Second backup | 8.014 GB/s | 22.493 TB | 56 minutes | 6.855 GB/s | ||
Third backup | 8.091 GB/s | 22.493 TB | 58 minutes | 6.619 GB/s |
Table 6-6 Restoration bandwidth test results
Networking | Compression Mode | Number of VMs | Restoration Peak Value | Restored Data Volume | Restoration Duration | Average Restoration Bandwidth |
|---|---|---|---|---|---|---|
TCP | High reduction ratio | 48 | 7.542 GB/s | 22.493 TB | 65 minutes | 5.906 GB/s |
Table 6-7 Data reduction ratio test results
Networking | Compression Mode | Backup Type | Number of VMs | Data Reduction Ratio |
|---|---|---|---|---|
TCP | High reduction ratio | Initial backup | 48 | 2.180:1 |
Second backup | 48 | 4.302:1 | ||
Third backup | 48 | 6.222:1 |
